The holiday season brings magic, sparkle, and the perfect opportunity to transform your look with creative hairstyles that capture the festive spirit.
If you’re searching for ways to stand out at your next holiday gathering, “26 Stunning Christmas Tree Hairstyles to Shine Bright at Any Party” offers an exciting collection of festive hair designs inspired by the beloved Christmas tree.
From elegant updos adorned with ornamental accessories to playful braided styles decorated with twinkling lights and colorful baubles, these hairstyles bring the enchantment of Christmas directly to your hair.
Whether you’re attending an office party, family dinner, or glamorous New Year’s Eve celebration, you’ll discover styles ranging from simple and sophisticated to bold and show-stopping.
This comprehensive guide explores various techniques, accessory options, and styling tips that work for different hair lengths, textures, and skill levels, ensuring everyone can embrace the Christmas tree aesthetic.
Get ready to become the centerpiece of every holiday event as you learn how to create stunning tree-inspired hairstyles that combine traditional holiday colors, shimmering decorations, and innovative styling methods that will leave everyone asking about your festive hair transformation.
1. Classic Christmas Tree Bun

The Classic Christmas Tree Bun serves as the foundation for festive holiday hairstyling, combining the elegance of a structured updo with the whimsical charm of Christmas tree decorations.
This timeless style creates a cone-shaped bun that mimics the silhouette of a traditional evergreen tree, providing the perfect canvas for ornamental embellishments.
Styling Technique:
- Begin by gathering all your hair into a high ponytail at the crown of your head, securing it tightly with a strong elastic band.
- Tease the ponytail thoroughly to create volume and texture throughout the length.
- Twist the teased hair around the base of the ponytail in a circular motion, gradually tapering the bun to form a cone shape that resembles a Christmas tree.
- Secure the bun with bobby pins inserted at various angles to ensure stability throughout your event.
- Apply a strong-hold hairspray to maintain the shape and prevent flyaways from disrupting the clean silhouette.
Decoration Options:
- Attach small ornamental balls using decorative bobby pins, placing them strategically around the bun to mimic tree ornaments.
- Weave thin metallic ribbon in gold or silver through sections of the bun for added shimmer.
- Position a small star hair clip or decorative pin at the very top of the bun to represent the traditional tree topper.
- Consider adding tiny artificial berries, pine sprigs, or holly leaves for a natural, festive touch.
- Battery-operated mini LED lights can be carefully woven through the bun for an illuminated effect during evening events.
2. Spiral Tree Braided Ponytail

The Spiral Tree Braided Ponytail combines intricate braiding techniques with strategic decoration placement to create a dynamic, three-dimensional hairstyle that captures the spiraling branches of a decorated Christmas tree.
This style works exceptionally well for medium to long hair lengths and offers movement and visual interest from every angle.
Construction Method:
- Create a sleek high ponytail, ensuring the hair is smooth and tightly secured at the crown.
- Divide the ponytail into three equal sections to begin a standard three-strand braid.
- As you braid downward, gradually incorporate small decorative elements between each braid section.
- Twist the completed braid around itself in a spiral formation, creating a cone-like structure.
- Secure the spiral with clear elastic bands at intervals to maintain the tree shape.
- Use bobby pins color-matched to your hair to anchor the spiral structure firmly against the base.
Embellishment Strategy:
- Attach small clip-on ornaments between braid sections before creating the spiral for integrated decoration.
- Wrap fine metallic garland or tinsel around the spiraled braid, securing with small pins.
- Place jeweled bobby pins at regular intervals along the spiral to create a twinkling effect.
- Consider using velvet ribbon in traditional Christmas colors woven through the braid before spiraling.
- Add small artificial snowflakes or glitter spray for a winter wonderland effect.
3. Half-Up Christmas Tree Style

The Half-Up Christmas Tree Style offers the perfect compromise for those who want festive flair while keeping their hair partially down, creating an eye-catching focal point at the crown while allowing natural flow and movement in the lower sections.
This versatile option suits various face shapes and hair types, making it accessible for everyday holiday celebrations.
Creating the Foundation:
- Section off the top portion of your hair from temple to temple, gathering hair from the crown area.
- Create a small ponytail or twist at the crown, leaving the remaining hair flowing freely.
- Tease the sectioned hair to add volume and height, forming the triangular tree shape.
- Shape the teased section into a cone using your fingers and strategic pinning.
- Smooth the outer layer gently while maintaining the volumized interior structure.
- Secure the shape with criss-crossed bobby pins for maximum hold.
Decorative Enhancement:
- Position small decorative pins in a triangular pattern across the half-up section to outline the tree shape.
- Attach a decorative hair comb at the base of the tree section for added sparkle.
- Weave thin wire garland through the teased section for a subtle metallic accent.
- Use colored hairspray in green, red, or gold to enhance the festive appearance.
- Add small clip-in extensions in contrasting colors for a multi-dimensional effect.
- Consider placing a small bow or star clip at the peak of the teased section.
4. Braided Christmas Tree Crown

The Braided Christmas Tree Crown creates a regal, all-around hairstyle that transforms your head into a living holiday wreath with Christmas tree-inspired elements, perfect for formal events where you want to make an unforgettable impression.
This sophisticated style showcases braiding expertise while providing numerous opportunities for creative decoration.
Braiding Blueprint:
- Begin by creating a deep side part and sectioning hair from one side of the hairline.
- Start a Dutch braid or French braid along the hairline, working around the head like a crown.
- Gradually increase braid tension to create a raised, prominent effect that stands away from the scalp.
- Continue braiding completely around the head until you reach the starting point.
- Tuck the braid tail underneath and secure with hidden bobby pins.
- Gently pancake the braid by pulling sections outward to create fuller, more dimensional loops.
Festive Ornamentation:
- Insert small floral wire picks with miniature ornaments directly into the braid sections.
- Weave narrow ribbon through the braid pattern in a contrasting color for visual definition.
- Position jeweled hairpins at each braid intersection for consistent sparkle.
- Attach small pine cone accessories or artificial evergreen sprigs for natural texture.
- Consider adding pearl pins for an elegant, sophisticated Christmas aesthetic.
- Use temporary hair color spray in metallic shades along the braid for enhanced festivity.
5. Stacked Buns Christmas Tree

The Stacked Buns Christmas Tree creates a dramatic vertical design by layering multiple buns in descending sizes from top to bottom, mimicking the tiered structure of a classic Christmas tree.
This statement hairstyle demands attention and works best for special occasions where bold styling is celebrated.
Structural Assembly:
- Divide your hair into three or four horizontal sections from crown to nape, securing each with temporary clips.
- Create the smallest bun at the crown using the top section, forming a tight, compact circle.
- Form the second bun directly below using the next section, making it slightly larger in diameter than the first.
- Continue creating progressively larger buns down the back of the head, each one sitting directly beneath the previous.
- Ensure each bun is securely pinned before moving to the next section.
- Adjust positioning so the buns align vertically in a straight line down the center back.
Dimensional Decoration:
- Wrap each bun with different colored ribbon to create a striped effect down the tree structure.
- Place the largest ornamental accessories on the bottom bun, graduating to smaller ones at the top.
- Position a prominent star or angel accessory on the smallest, topmost bun.
- Weave string lights through and around each bun level for an illuminated effect.
- Add artificial snow spray or white glitter for a frosted appearance.
- Consider using green temporary hair color on the buns themselves to enhance the evergreen tree illusion.
6. Fishtail Braid Christmas Tree

The Fishtail Braid Christmas Tree transforms the intricate texture of fishtail braiding into a stunning holiday centerpiece, with the braid’s distinctive pattern providing an ideal structure for ornamental decoration.
This style offers sophistication and complexity while remaining practical for extended wear throughout lengthy holiday events.
Fishtail Formation:
- Gather all hair into a ponytail at your desired height, whether high, mid, or low placement.
- Divide the ponytail into two equal sections for the fishtail braiding technique.
- Take a small strand from the outer edge of the left section and cross it over to join the right section.
- Repeat the process from the right side, taking a small outer strand and crossing to the left.
- Continue this alternating pattern down the entire length, maintaining even tension throughout.
- Secure the end with a clear or decorative elastic band.
- Gently pull apart the braid edges to create a fuller, more voluminous appearance.
Ornamentation Technique:
- Thread fine wire through the braid at regular intervals, attaching small ornaments that hang like decorations on branches.
- Wrap the entire braid with ultra-thin metallic thread in gold or silver for subtle sparkle.
- Clip miniature ornamental bobby pins along the outer edges of the pulled-apart braid sections.
- Weave narrow velvet or satin ribbon throughout the braid pattern.
- Apply hair gems or rhinestones with temporary adhesive along the center spine of the fishtail.
- Consider dusting the braid with glitter spray for an all-over shimmer effect.
7. Side-Swept Tree Cascade

The Side-Swept Tree Cascade creates an asymmetrical, glamorous look by gathering hair to one side and arranging it in a cascading tree formation that drapes elegantly over the shoulder.
This romantic style combines formal elegance with festive creativity, ideal for cocktail parties and upscale holiday gatherings.
Cascading Construction:
- Create a deep side part and gather all hair over one shoulder, securing at the base of the neck on that side.
- Section the gathered hair into multiple smaller sections, each representing a branch tier.
- Begin at the top, creating a small twisted or braided section secured with a clear elastic.
- Create the next section slightly larger, positioning it just below and overlapping the first.
- Continue building downward with progressively larger sections, creating the tapered tree silhouette.
- Pin each section into place against the shoulder area for a cascading effect.
- Ensure the overall shape appears triangular when viewed from the front or back.
Elegant Embellishment:
- Attach delicate jeweled combs between each cascading tier for refined sparkle.
- Weave sheer organza ribbon through the sections in your chosen holiday color palette.
- Position pearl-headed pins throughout for a sophisticated, vintage-inspired aesthetic.
- Add small fresh or silk flowers in white or cream for an elegant natural element.
- Consider incorporating crystal-studded hairpins that catch light with movement.
- Finish with a light mist of shimmer spray for an overall luminous effect.
8. Twisted Rope Christmas Tree
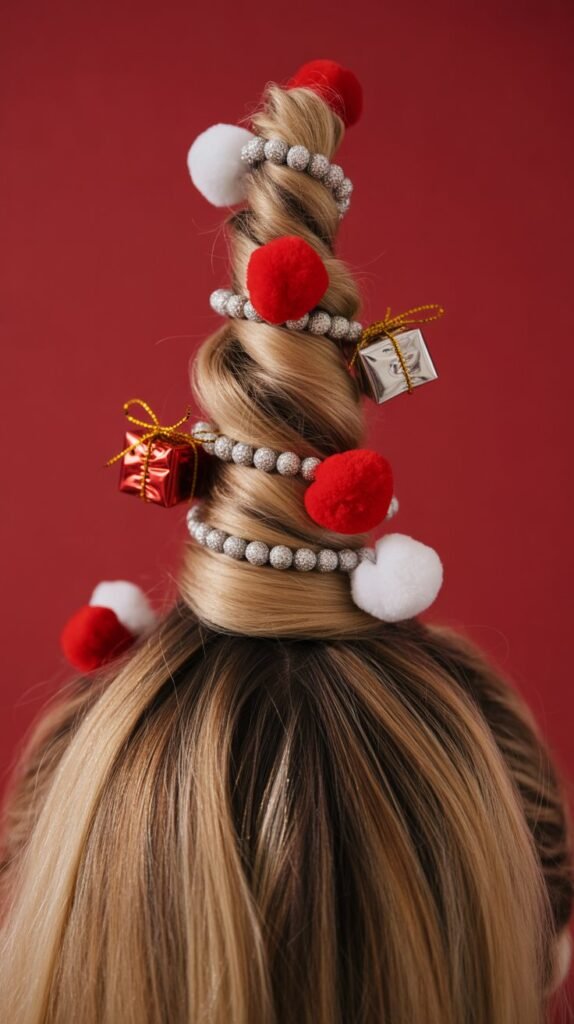
The Twisted Rope Christmas Tree utilizes rope twisting techniques to create textured, dimensional sections that stack and layer to form a unique tree structure with visual depth.
This technique works particularly well for those with thick hair and offers a different aesthetic from traditional braiding methods.
Rope Twist Method:
- Section hair into a high ponytail, ensuring all hair is smooth and free of tangles.
- Divide the ponytail into two equal halves for the rope twist technique.
- Twist the right section clockwise several times until it begins to coil naturally.
- Twist the left section clockwise as well, ensuring both sections are twisted in the same direction.
- Cross the twisted sections over each other counter-clockwise, creating the rope appearance.
- Continue twisting and wrapping down the length of the ponytail.
- Secure with an elastic band and wrap the rope around itself to form the tree cone shape.
- Pin the formation securely against the head, creating the triangular silhouette.
Textured Decoration:
- Wrap textured garland around the rope structure, tucking ends securely into the twist.
- Position decorative pins at the intersection points where the rope sections cross.
- Add small pom-pom accessories in traditional Christmas colors for playful texture.
- Weave ribbon through the rope twist pattern before coiling into the tree shape.
- Attach miniature wrapped gift accessories using small clips for whimsical detail.
- Consider using colored hair extensions twisted into the rope for multi-tonal dimension.
9. Low Chignon Christmas Tree

The Low Chignon Christmas Tree offers understated elegance by creating a sophisticated low bun at the nape of the neck, shaped and decorated to evoke Christmas tree imagery while maintaining professional polish.
This refined option suits workplace holiday parties and formal family gatherings where subtlety is appreciated.
Chignon Construction:
- Gather all hair at the nape of the neck, creating a low ponytail secured with an elastic.
- Twist the ponytail loosely, maintaining some texture and volume throughout.
- Wrap the twisted hair around the base, forming a rounded chignon shape.
- Gradually shape the chignon into a slightly more conical form by strategic pinning.
- Secure with bobby pins inserted from multiple angles for stability.
- Smooth any flyaways with a light pomade or finishing serum.
- Set the style with flexible-hold hairspray to allow natural movement.
Refined Decoration:
- Insert elegant jeweled pins sparingly across the chignon surface in a subtle tree pattern.
- Position a small decorative hair comb at the base for understated elegance.
- Add a single statement piece at the top center, such as a crystal snowflake or small brooch.
- Weave a thin chain of small pearls through sections of the chignon for sophisticated detail.
- Consider placing small velvet bow clips in coordinating colors at strategic points.
- Keep decorations minimal and refined for professional appropriateness while maintaining festive spirit.
10. Ponytail with Tree-Shaped Top Knot

The Ponytail with Tree-Shaped Top Knot combines the casual ease of a ponytail with an elaborate decorative top section, creating a style that’s both practical and festive.
This hybrid approach allows for comfort and movement while showcasing creative holiday styling at the crown.
Hybrid Construction:
- Section hair horizontally from temple to temple, separating the crown area from the remaining hair.
- Secure the lower section into a sleek ponytail at your desired height.
- Tease the top section thoroughly to create significant volume.
- Mold the teased section into a triangular tree shape above the ponytail base.
- Pin the shaped section securely, creating a stable foundation for decoration.
- Smooth the surface layer gently while maintaining the interior volume.
- Ensure the ponytail hangs freely without interference from the top knot structure.
Dual-Section Decoration:
- Decorate the tree-shaped top knot with concentrated ornamental accessories.
- Add a few complementary decorative pins to the ponytail itself for cohesion.
- Wrap ribbon around the ponytail elastic to connect the two sections visually.
- Consider curling the ponytail hair in loose waves for added movement and volume.
- Place the most prominent decorative piece at the peak of the top knot.
- Use temporary color spray on the top knot section only for contrast against the ponytail.
11. Braided Tree with Ribbons

The Braided Tree with Ribbons emphasizes the integration of colorful ribbons directly into braiding patterns, creating a woven effect that combines hair and fabric into a unified festive design.
This technique allows for extensive color customization based on your outfit and personal holiday color preferences.
Ribbon Integration Technique:
- Select ribbons in your chosen colors, cutting them to approximately twice your hair length.
- Attach ribbons securely to a small section of hair at the crown using a small elastic band.
- Divide hair into sections for your chosen braid type, ensuring ribbon strands are distributed among sections.
- Braid the hair and ribbons together as if the ribbons were additional hair strands.
- Maintain even tension on both hair and ribbon throughout the braiding process.
- Secure the completed braid with an elastic band that coordinates with your ribbon colors.
- Shape the ribbon-integrated braid into your desired tree formation, whether vertical or coiled.
Color and Texture Variation:
- Choose traditional Christmas colors like red and green for classic appeal.
- Consider metallic ribbons in gold, silver, or copper for glamorous shimmer.
- Use velvet ribbons for rich texture and luxury appearance.
- Try multiple thin ribbons in different colors for a candy-cane striped effect.
- Select sheer organza ribbons for delicate, ethereal decoration.
- Experiment with patterned ribbons featuring snowflakes, stars, or holiday motifs.
12. Curled Tree Silhouette

The Curled Tree Silhouette uses carefully arranged curls stacked in a triangular formation to create volume and dimension that evokes a full, fluffy Christmas tree shape.
This technique is particularly effective for those with naturally curly hair or those who enjoy working with hot styling tools.
Curl Creation and Arrangement:
- Begin with clean, completely dry hair for best curl retention.
- Section hair into multiple horizontal layers from crown to nape.
- Curl each section using a curling iron or wand, varying curl sizes for natural dimension.
- Allow curls to cool completely before manipulating them.
- Starting at the crown, pin the smallest curls to create the narrow tree top.
- Progress downward, arranging progressively larger and more numerous curls in each tier.
- Shape the overall silhouette into a clear triangular form when viewed from any angle.
- Set the entire style with strong-hold hairspray to maintain curl structure.
Curl Decoration Strategy:
- Pin small decorative elements directly into individual curls for integrated decoration.
- Weave thin ribbon through the curl arrangement, allowing it to peek through naturally.
- Attach clip-in ornamental accessories at curl cluster intersections.
- Apply glitter spray lightly over the curl formation for overall sparkle.
- Position a statement accessory at the crown peak where the smallest curls converge.
- Consider using curl-defining products with shimmer for built-in festive shine.
13. Mohawk-Inspired Christmas Tree

The Mohawk-Inspired Christmas Tree brings edgy, contemporary style to holiday hairstyling by creating a dramatic vertical structure down the center of the head.
This bold statement piece works well for alternative holiday parties and those who embrace non-traditional festive aesthetics.
Mohawk Structure Creation:
- Section hair down the center of the head from forehead to nape in a mohawk pattern.
- Secure the side sections tightly against the head with bobby pins or small elastic bands.
- Tease the center section dramatically to create maximum height and volume.
- Shape the teased section into a vertical triangular form, wider at the top and narrowing toward the nape.
- Apply strong-hold gel or pomade to the sides for sleek contrast against the voluminous center.
- Secure the mohawk structure with strategic pinning throughout to maintain the shape.
- Set with maximum-hold hairspray for long-lasting stability.
Bold Decoration Approach:
- Attach larger, more dramatic ornamental accessories to complement the statement style.
- Consider using LED lights woven through the mohawk for eye-catching illumination.
- Apply temporary color spray in vivid Christmas shades directly to the mohawk section.
- Position spike-like decorative elements to enhance the tree branch appearance.
- Use metallic temporary hair color for an avant-garde holiday look.
- Add unconventional decorations like miniature candy canes or gingerbread cookie clips.
14. Dutch Braid Christmas Tree

The Dutch Braid Christmas Tree utilizes the raised, three-dimensional quality of Dutch braiding to create a prominent structure that stands away from the scalp, providing an ideal foundation for visible decoration.
This technique offers more dimension than traditional French braiding and creates dramatic visual impact.
Dutch Braiding Technique:
- Begin at the crown with a small section of hair divided into three strands.
- Cross the right strand under the center strand, then the left strand under the center.
- Add hair from the sides to each strand as you braid, crossing under rather than over.
- Maintain tight tension to create the characteristic raised appearance of Dutch braiding.
- Continue braiding down the center back or in your desired pattern.
- Secure with an elastic band and gently pancake the braid for enhanced dimension.
- Shape the braided section into a tree silhouette through strategic pinning and arrangement.
Raised Decoration Advantage:
- The elevated braid structure allows decorations to sit prominently and remain visible.
- Clip ornaments directly onto the raised braid sections where they won’t flatten.
- Weave garland through the braid channels for integrated decoration.
- Position decorative pins along the braid edges to accentuate the three-dimensional structure.
- The raised formation creates natural shadows that enhance the tree branch appearance.
- Use the braid’s texture as a foundation for layering multiple decoration types.
15. Twisted Side Bun Tree

The Twisted Side Bun Tree creates an asymmetrical focal point by positioning an elaborately decorated bun to one side of the head, offering both visual interest and practical comfort.
This style works beautifully for events where you’ll be seated or photographed from various angles throughout the evening.
Side Bun Formation:
- Create a deep side part and gather all hair to one side at ear level.
- Twist the gathered hair smoothly while wrapping it around itself to form a bun.
- Position the bun slightly behind the ear rather than directly at the side for better balance.
- Shape the bun into a cone formation by pinning the outer edges inward.
- Ensure the base is secure with multiple bobby pins inserted from different directions.
- Leave a few face-framing tendrils loose for a softer, more romantic appearance.
- Apply finishing serum to tame flyaways and create polish.
Asymmetrical Decoration:
- Concentrate decorations on the visible outer surface of the side bun.
- Position a cluster of ornaments at the base of the bun for visual weight.
- Graduate to smaller decorations toward the top peak of the cone shape.
- Add decorative elements to the face-framing tendrils for cohesive styling.
- Consider positioning a decorative hair comb at the base where hair gathers into the bun.
- Use the asymmetry to create visual interest by varying decoration sizes and placement.
16. Vertical Braided Sections Tree

The Vertical Braided Sections Tree creates multiple parallel braids running vertically down the head, collectively forming a tree shape when decorated and arranged together.
This technique offers textural variety and allows for creative color and decoration patterns across the different braid sections.
Multi-Braid Configuration:
- Section hair into five to seven vertical sections from hairline to nape.
- Create the center section slightly larger than the side sections for dimensional shaping.
- Braid each section individually using your preferred braiding technique.
- Maintain consistent tension across all braids for uniform appearance.
- Secure each braid temporarily at the ends with small clear elastics.
- Fan the braids outward slightly at the bottom to create the tree’s wide base.
- Draw the braids closer together at the top to form the narrow tree peak.
- Secure the collective shape with bobby pins and final elastic band at the bottom.
Multi-Strand Decoration:
- Decorate each braid differently for a varied, interesting appearance.
- Use one color ribbon per braid to create vertical color striping.
- Alternate ornament colors between braids for a patterned effect.
- Position decorations at the same height across all braids for horizontal alignment.
- Create a gradient effect by using lighter decorations at top, darker at bottom.
- Weave lights through specific braids while leaving others plain for contrast.
17. Messy Bun Christmas Tree

The Messy Bun Christmas Tree embraces textured, intentionally undone styling while maintaining the overall tree shape, perfect for those seeking a relaxed yet festive appearance.
This style works exceptionally well for casual holiday gatherings and offers forgiveness for less experienced stylists.
Textured Bun Construction:
- Gather hair into a ponytail without smoothing, allowing natural texture to remain.
- Loosely twist the ponytail, intentionally leaving some sections looser than others.
- Wrap the twisted hair around the base in an imperfect, organic manner.
- Allow some hair ends to stick out rather than tucking everything neatly.
- Pin the bun in place while maintaining the deliberately messy appearance.
- Shape the overall form into a rough triangular silhouette.
- Gently pull a few face-framing pieces loose for a softer look.
- Set lightly with texturizing spray rather than heavy hairspray.
Casual Decoration Approach:
- Use decorations more sparingly to complement the relaxed aesthetic.
- Position ornaments seemingly at random for an organic, natural appearance.
- Choose matte finish decorations over highly polished ones for casual coordination.
- Incorporate natural elements like small dried flowers or wooden beads.
- Allow decorations to nestle into the texture rather than sitting prominently on the surface.
- Consider using bobby pins in decorative finishes rather than separate ornaments.
18. Slicked-Back High Tree

The Slicked-Back High Tree combines sleek, polished styling at the roots with elaborate tree construction at the crown, creating a sophisticated look with dramatic height and modern elegance. This high-fashion approach works beautifully for upscale events and formal holiday celebrations.
Sleek Foundation:
- Apply strong-hold gel or pomade to damp hair, distributing evenly from roots to mid-lengths.
- Use a fine-tooth comb to slick hair straight back from the hairline with no part.
- Gather all hair into a very high ponytail at the crown, securing tightly.
- Apply additional gel to smooth any bumps or flyaways along the slicked sections.
- The slicked base should be completely smooth, glossy, and free of texture.
- Leave the ponytail hair without smoothing product for contrast and volume potential.
High-Fashion Tree Construction:
- Tease the ponytail dramatically to create maximum volume.
- Shape the teased ponytail into a precise conical tree form.
- Use hairspray and smoothing while shaping for a sculpted, architectural appearance.
- Pin the shaped section securely to maintain the sharp silhouette.
- Consider backcombing specific sections for additional height.
- The final tree should appear intentional, structured, and geometric.
Editorial Decoration:
- Choose elegant, high-end decorative elements that complement the sophisticated base.
- Position decorations with precision rather than casual placement.
- Consider monochromatic decoration schemes for refined visual impact.
- Use crystal or glass elements for luxury sparkle that matches the glossy base.
- Keep decoration minimal but impactful, focusing on quality over quantity.
- Add one statement piece at the peak for dramatic focal point.
19. Waterfall Braid Christmas Tree

The Waterfall Braid Christmas Tree incorporates the romantic cascading effect of waterfall braiding while shaping the overall style into a tree silhouette, combining intricate technique with festive decoration.
This advanced style showcases braiding skill while creating beautiful movement and flow.
Waterfall Braiding Method:
- Begin at the front hairline with a small three-strand section.
- Create one standard braid stitch, crossing the right and left strands over the center.
- Drop the front strand and allow it to fall naturally, creating the “waterfall” effect.
- Pick up a new strand from the top to replace the dropped strand.
- Continue this pattern across the head, consistently dropping the front strand and replacing it.
- As you progress, begin angling the braid downward to create the tree taper.
- Secure the braid end and arrange the dropped strands into the tree shape.
Cascading Decoration:
- Attach small decorations to the individual cascading strands for dispersed sparkle.
- Position ornaments at the points where strands drop from the braid.
- Weave thin ribbon through the main braid structure while allowing cascades to flow freely.
- Add decorative pins to the dropped strands where they rest against the remaining hair.
- Create depth by decorating both the braid structure and the cascading pieces.
- Consider curling the waterfall strands for added movement and volume.
20. Low Ponytail Tree Wrap
The Low Ponytail Tree Wrap creates a practical yet festive style by transforming a simple low ponytail into an elaborately wrapped tree structure, ideal for those seeking comfort during extended holiday events.
This approach prioritizes wearability while maintaining visual impact.
Wrapped Structure:
- Create a low ponytail at the nape of the neck, positioning it center or slightly off-center.
- Divide the ponytail into multiple smaller sections, each to be wrapped individually.
- Begin with the top section, wrapping it around the ponytail base to form the tree’s peak.
- Add the next section, wrapping it in a slightly larger diameter below the first.
- Continue adding wrapped sections in descending tiers, each progressively larger than the previous.
- Pin each wrapped section securely before adding the next tier.
- Shape the overall wrapped formation into a clear cone silhouette.
- Secure the final section at the bottom to complete the tree base.
Comfortable Decoration:
- Use lightweight decorations that won’t pull or cause discomfort during extended wear.
- Position ornaments between the wrapped tiers for secure attachment points.
- Weave ribbon around each wrapped section to define the tiered structure.
- Add decorative pins at the overlap points where sections meet for integrated sparkle.
- Keep decorations concentrated on the outer visible surface rather than against the neck.
- Choose smooth, rounded decorative elements that won’t snag on clothing.
21. Double Bun Christmas Tree

The Double Bun Christmas Tree stacks two buns vertically to create instant height and dimension, offering a simplified approach to achieving the tree silhouette without complex braiding or teasing techniques.
This style works particularly well for those with medium-length hair.
Dual Bun Architecture:
- Section hair horizontally across the crown, dividing it into upper and lower portions.
- Create the first bun with the upper section at the crown, making it smaller and tighter.
- Position the first bun to sit high and prominent on the head.
- Form the second bun with the lower section, making it noticeably larger than the first.
- Position the second bun directly below the first, ensuring vertical alignment.
- Secure both buns thoroughly with bobby pins and elastics.
- Adjust spacing between buns to create the tapered tree appearance.
Tiered Decoration Method:
- Decorate the top bun with smaller, more delicate ornaments to represent the tree peak.
- Use larger, more elaborate decorations on the bottom bun for visual balance.
- Wrap different colored ribbons around each bun to distinguish the two tiers.
- Position a star or angel accessory on the top bun as the tree topper.
- Create garland effect by draping thin decorative chains between the two buns.
- Coordinate colors between both buns while varying decoration sizes appropriately.
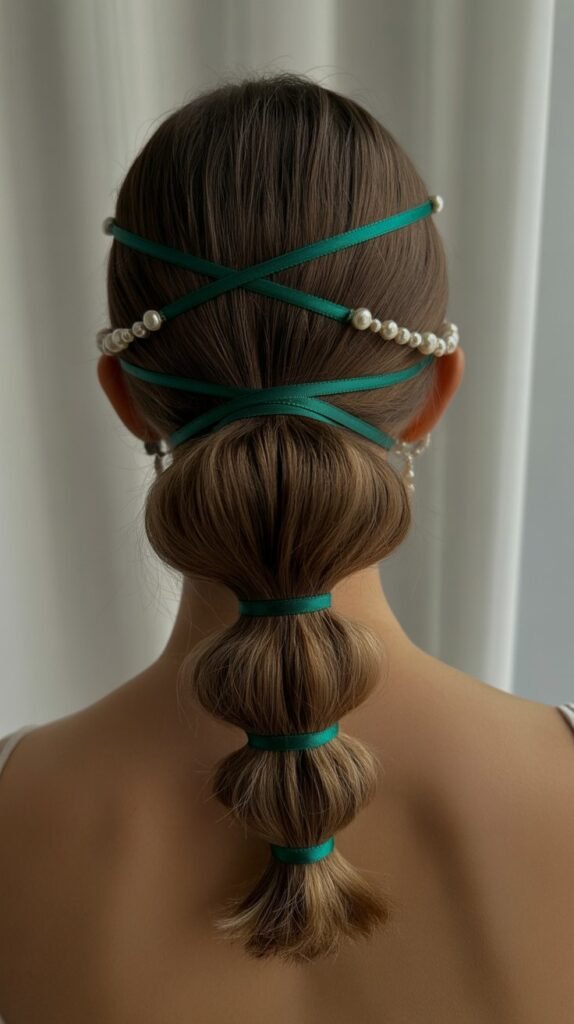
22. Bubble Braid Christmas Tree

The Bubble Braid Christmas Tree uses the trendy bubble ponytail technique arranged into a tree shape, creating separated sections that resemble ornamental clusters on a Christmas tree.
This contemporary style combines current hair trends with festive holiday spirit.
Bubble Formation:
- Create a ponytail at your desired height, securing with a strong elastic.
- Measure approximately two inches down from the ponytail base and add another elastic.
- Gently pull the hair between the two elastics outward to create a rounded bubble effect.
- Continue adding elastics at regular intervals down the length of the ponytail.
- Create each bubble by pulling the contained section outward for volume.
- Make each successive bubble slightly larger than the previous to form the tree taper.
- Adjust bubble sizes and shapes until the overall silhouette appears triangular.
Bubble Decoration:
- Attach decorative elements directly to the elastics for integrated decoration.
- Clip small ornaments onto the surface of each bubble section.
- Wrap thin wire garland around each elastic to conceal them while adding sparkle.
- Position decorative bobby pins within each bubble, using the volume to support them.
- Create patterns by alternating decoration colors or styles between bubbles.
- Add a prominent decoration at the top bubble to represent the tree topper.
23. French Twist Christmas Tree

The French Twist Christmas Tree adapts the classic French twist updo into a holiday masterpiece by shaping it into a conical form and adding festive embellishments.
This timeless style brings vintage elegance to contemporary Christmas celebrations.
French Twist Technique:
- Gather all hair to one side of the head, securing temporarily with bobby pins.
- Begin twisting the gathered hair upward toward the center back.
- Continue twisting until the hair forms a vertical roll against the back of the head.
- Tuck the ends into the twist, creating a closed, polished finish.
- Shape the twist into a slightly tapered form, narrower at top and fuller at bottom.
- Secure the entire twist with bobby pins inserted vertically along the opening.
- Smooth the surface with a finishing pomade for glossy perfection.
Classic Holiday Embellishment:
- Insert decorative combs at strategic points along the French twist.
- Position a vintage-inspired brooch at the twist’s peak for elegant drama.
- Weave pearl strands through visible sections of the twist for timeless sophistication.
- Add small clusters of silk flowers in white or cream for romantic elegance.
- Use decorative hairpins with crystal or jeweled ends for subtle sparkle.
- Keep decoration elegant and refined to complement the classic styling technique.
24. Space Buns Christmas Tree

The Space Buns Christmas Tree playfully transforms the popular space buns hairstyle into festive holiday decoration, creating two symmetrical tree-like formations on either side of the head.
This youthful, fun approach works wonderfully for casual parties and family gatherings.
Dual Formation:
- Part hair down the center from forehead to nape, creating two equal sections.
- Create high pigtails on each side, positioning them symmetrically above the ears.
- Tease each pigtail thoroughly to create maximum volume.
- Wrap each teased pigtail around its base to form rounded buns.
- Shape each bun into a more conical form by strategic pinning and molding.
- Ensure both buns are positioned at identical heights for balanced appearance.
- Secure each formation with multiple bobby pins for stability during activity.
Playful Decoration:
- Decorate both buns identically for symmetrical visual impact.
- Use colorful, whimsical ornaments that reflect a playful holiday spirit.
- Add matching ribbon bows to the base of each bun.
- Position matching star clips at the peak of each cone-shaped bun.
- Consider using temporary glitter spray in different colors on each bun for fun contrast.
- Incorporate novelty decorations like miniature gingerbread men or candy canes.
25. Crown Braid with Tree Center

The Crown Braid with Tree Center combines a braided crown around the perimeter of the head with an elaborate tree structure in the center, creating a framed focal point that draws attention.
This style offers the best of both worlds with intricate braiding and central decoration.
Combination Structure:
- Create a Dutch or French braid beginning at one temple, working around the hairline like a halo.
- Continue the crown braid completely around the head until returning to the starting point.
- Secure the braid tail and tuck it underneath the crown for seamless appearance.
- Gather the remaining center hair that wasn’t included in the crown braid.
- Tease and shape this center section into a conical tree form.
- Pin the tree structure securely within the braided frame.
- Ensure the crown braid maintains even width and tension throughout.
Framed Decoration Approach:
- Decorate the crown braid minimally to frame without competing with the center.
- Concentrate elaborate decorations on the central tree structure.
- Use the crown braid as a natural boundary to define the tree shape.
- Position the most prominent decorative piece at the peak of the center tree.
- Coordinate decoration colors between the crown and center for cohesive appearance.
- Consider weaving ribbon through the crown braid to connect it visually to the center decorations.
26. Accessorized Pixie Christmas Tree

The Accessorized Pixie Christmas Tree proves that even short hair can embrace festive tree styling through creative accessory placement and strategic product use.
This innovative approach ensures those with pixie cuts or short bobs can participate fully in the Christmas tree hair trend.
Short Hair Adaptation:
- Apply strong-hold styling gel to damp hair, distributing evenly throughout.
- Use a blow dryer and round brush to create maximum volume at the crown.
- Direct hair upward and slightly forward to create height and shape.
- Tease the crown section to add additional lift and structure.
- Use your fingers to mold the teased section into a subtle triangular silhouette.
- Set the shaped style with maximum-hold hairspray for extended wear.
- Define individual sections with pomade for textured, piece-y definition.
Accessory-Focused Decoration:
- Rely heavily on clip-in and pin-in accessories rather than woven decorations.
- Position decorative clips throughout the styled crown area in tree formation.
- Use smaller, lighter decorations appropriate for the limited hair length.
- Attach a statement hair accessory at the highest point of the style.
- Consider headband-style accessories with attached ornaments that sit across the crown.
- Add temporary glitter spray or metallic hair color for festive effect without relying on woven decorations.
- Position decorative bobby pins visibly throughout for integrated sparkle.
Conclusion
As you’ve discovered throughout “26 Stunning Christmas Tree Hairstyles to Shine Bright at Any Party,” transforming your hair into a festive masterpiece offers endless creative possibilities for the holiday season.
From the elegance of classic chignons and French twists to the playful charm of space buns and bubble braids, these Christmas tree-inspired hairstyles provide options for every hair length, texture, skill level, and occasion.
Whether you choose intricate braiding techniques, stacked bun formations, or accessory-focused approaches for shorter hair, each style offers a unique way to celebrate the season while expressing your personal style.
The decoration possibilities are equally diverse, ranging from traditional ornaments and ribbons to contemporary LED lights and temporary color treatments, allowing you to customize your look to match your outfit and event atmosphere.
Remember that the key to successful Christmas tree hairstyling lies in secure construction, strategic decoration placement, and choosing a design that complements your comfort level and the event’s formality.
With proper preparation, quality products, and the confidence to embrace festive creativity, you can transform any of these 26 stunning Christmas tree hairstyles into your signature holiday look that will have everyone asking about your beautiful, festive hair throughout the season.