Every mom knows that frantic morning rush when the kids need breakfast, lunches need packing, and you catch a glimpse of yourself in the mirror realizing your hair is a complete mess.
The struggle is real, and finding time for an elaborate hairstyle feels like an impossible luxury when you’re already running five minutes late.
But here’s the good news: you don’t need a professional stylist or an extra hour to look put-together and feel confident.
This comprehensive guide on 27 Quick Updos for Moms When You Have Zero Time will transform your morning routine with hairstyles that take five minutes or less, require minimal tools, and work beautifully whether your hair is freshly washed or in need of some dry shampoo magic.
From messy buns that hide unwashed hair to elegant twists perfect for school meetings, you’ll discover updos for every hair type, length, and occasion that will have you walking out the door feeling like you actually have your life together, even when you absolutely don’t.
1. The Classic 30-Second Messy Bun

The messy bun is the ultimate lifesaver for busy moms because it literally works with any hair texture and looks intentionally stylish rather than rushed.
This timeless updo has become a mom uniform staple because it genuinely takes less than a minute and somehow makes you look effortlessly chic even when you feel anything but put together.
How to Create:
- Flip your head upside down and gather all your hair into a high ponytail without worrying about bumps or perfection.
- Twist the ponytail loosely around itself while holding the base with your other hand.
- Wrap the twisted hair around the elastic in a circular motion, tucking the ends wherever they naturally fall.
- Secure everything with another hair tie or bobby pins if needed.
- Pull out a few face-framing pieces and gently tug on the bun to create volume and that perfectly imperfect texture.
Best For:
- Second or third-day hair when natural oils give your hair better grip and texture.
- Running errands, playground trips, or casual outings where you want to look presentable without trying too hard.
- All hair types, though those with layered cuts might need extra bobby pins to secure shorter pieces.
2. The Sleek Low Bun for Professional Meetings

When you have a parent-teacher conference or work video call in twenty minutes, the sleek low bun delivers that polished, professional appearance that says you’re competent and organized.
This elegant style takes just three minutes but makes you look like you spent twenty getting ready, which is exactly the kind of illusion busy moms need in their styling arsenal.
Step-by-Step Process:
- Apply a small amount of smoothing serum or hair oil to tame flyaways and add shine to your hair.
- Brush your hair straight back using a fine-tooth comb or paddle brush, creating a smooth surface from roots to ends.
- Gather all hair at the nape of your neck and secure with an elastic band into a low ponytail.
- Twist the ponytail tightly and wrap it around the base in a circular motion, keeping everything neat and controlled.
- Pin the bun securely with bobby pins that match your hair color, tucking in any loose ends.
- Finish with a light mist of hairspray to keep everything in place throughout your busy day.
Styling Tips:
- Part your hair in the center or side before brushing back for a more sophisticated finish.
- Use a toothbrush sprayed with hairspray to smooth down baby hairs along your hairline.
- Add a decorative hair pin or small barrette to the bun for an extra touch of elegance when needed.
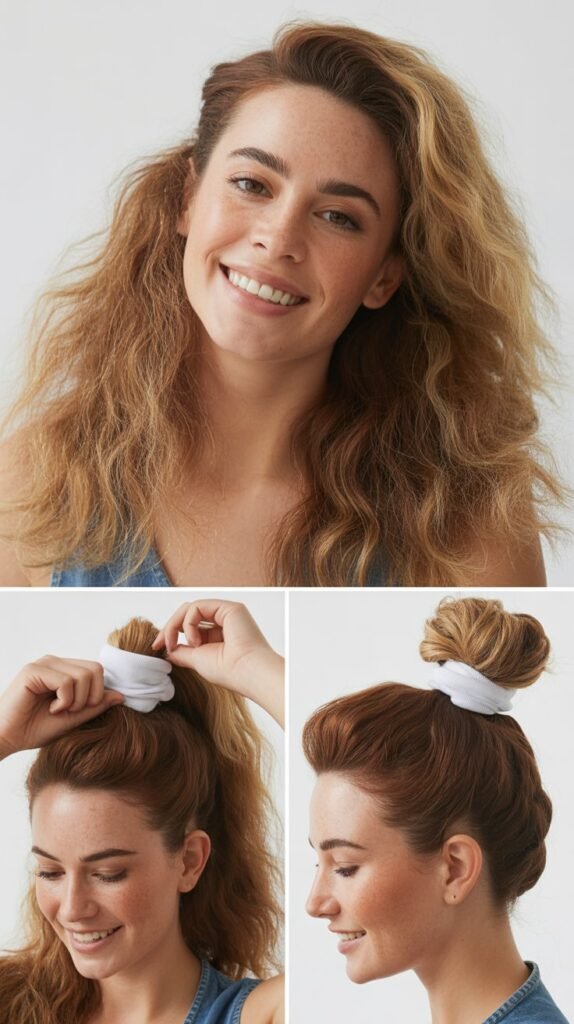
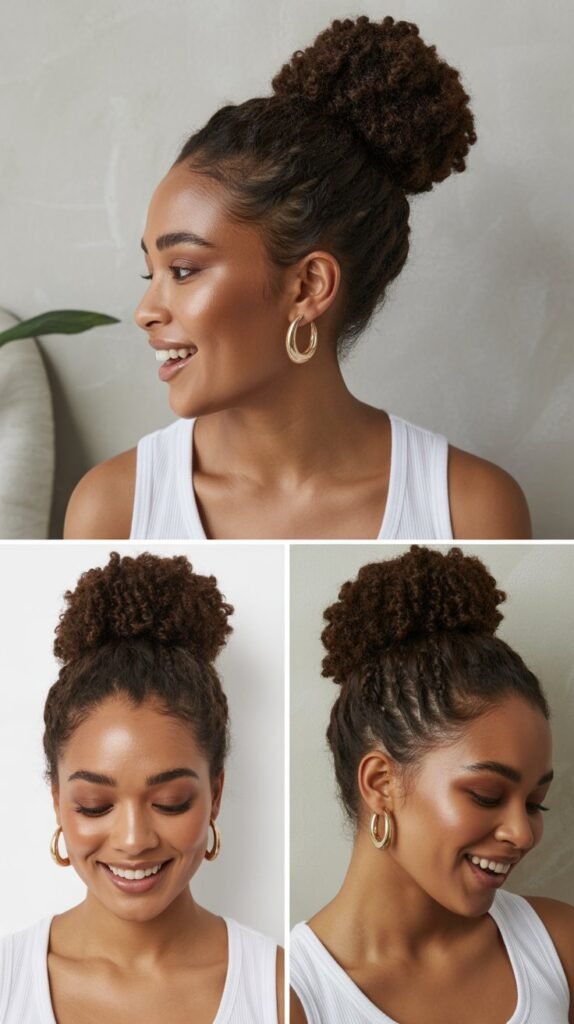
3. The Quick Topknot That Hides Dirty Hair
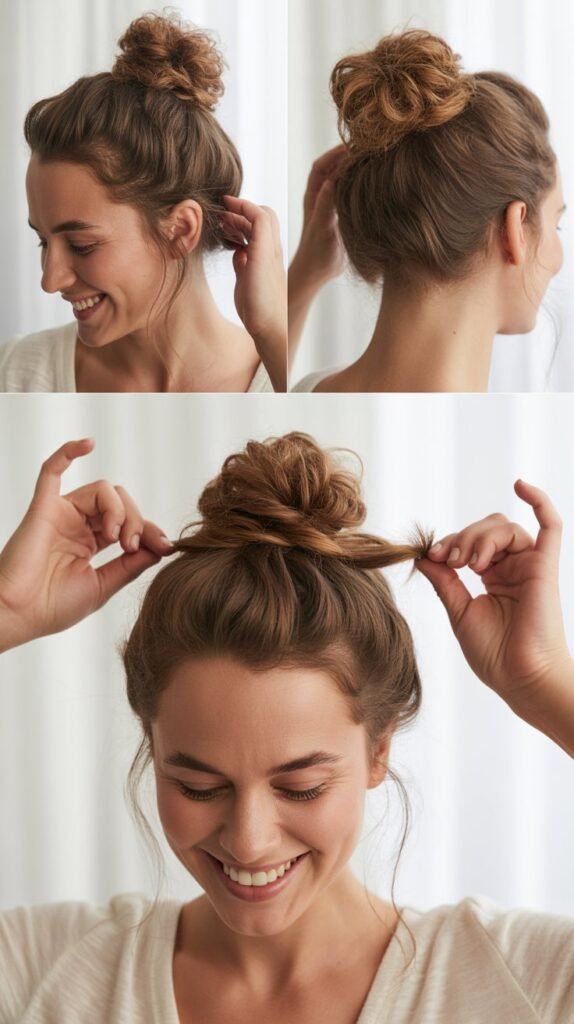
The topknot sits at the crown of your head and magically conceals unwashed roots while giving you an instant facelift effect that makes you look more awake than you feel.
This style is genuinely genius for those mornings when dry shampoo is your best friend and you need maximum volume to disguise the fact that you haven’t washed your hair in three days.
Quick Instructions:
- Flip your head forward and gather all your hair at the very top of your head where you’d place a unicorn horn.
- Secure with a strong elastic, creating a high ponytail that stands straight up from your scalp.
- On the last wrap of the elastic, don’t pull your hair all the way through, creating a looped bun.
- Wrap the remaining tail around the base of the loop and secure with bobby pins or tuck under the elastic.
- Adjust the bun by pulling sections to create more volume and that perfectly messy topknot texture.
Why Moms Love It:
- The height of this updo means greasy roots are hidden at the crown where they’re least visible.
- Works perfectly with athleisure outfits for school drop-off or gym sessions.
- Takes literally two minutes even when you’re half asleep and haven’t had your coffee yet.
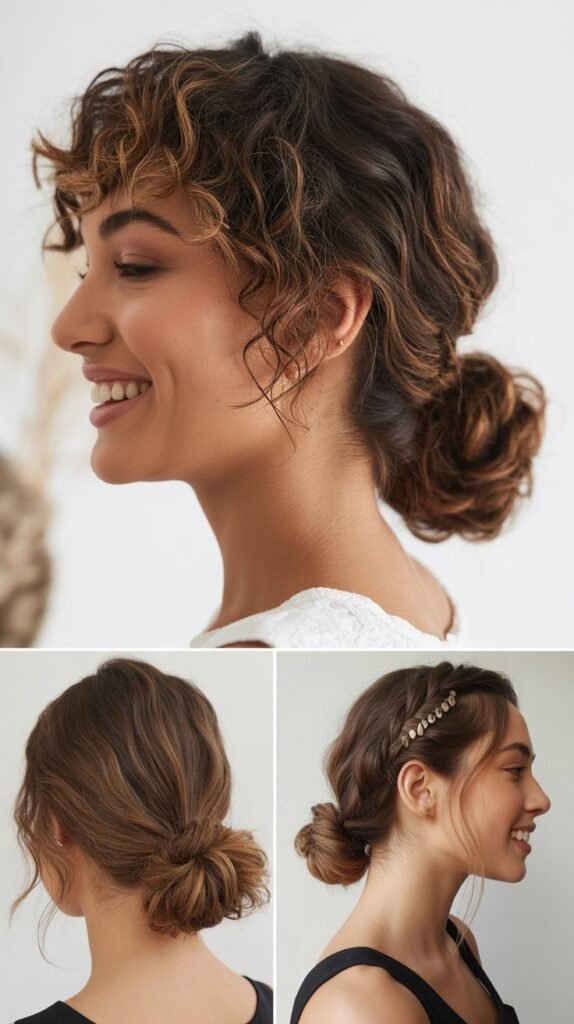
4. The Twisted Low Bun for Medium Hair
This elegant twisted variation adds visual interest to a basic low bun and works beautifully for moms with medium-length hair who struggle with shorter updos.
The twisting technique creates the illusion of intricate styling while actually being simple enough to master on your first attempt, making it perfect for those days when you want to look more put-together than usual.
Creation Method:
- Part your hair down the middle from forehead to nape, dividing it into two equal sections.
- Twist each section individually away from your face, keeping the twists relatively tight and controlled.
- Cross the two twisted sections at the back of your head, creating an X shape at the nape.
- Wrap both twisted sections together around the base, forming a textured low bun.
- Secure with bobby pins, making sure to catch both twisted sections to keep everything in place.
- Gently pull on the twists to loosen them slightly for a softer, more romantic appearance.
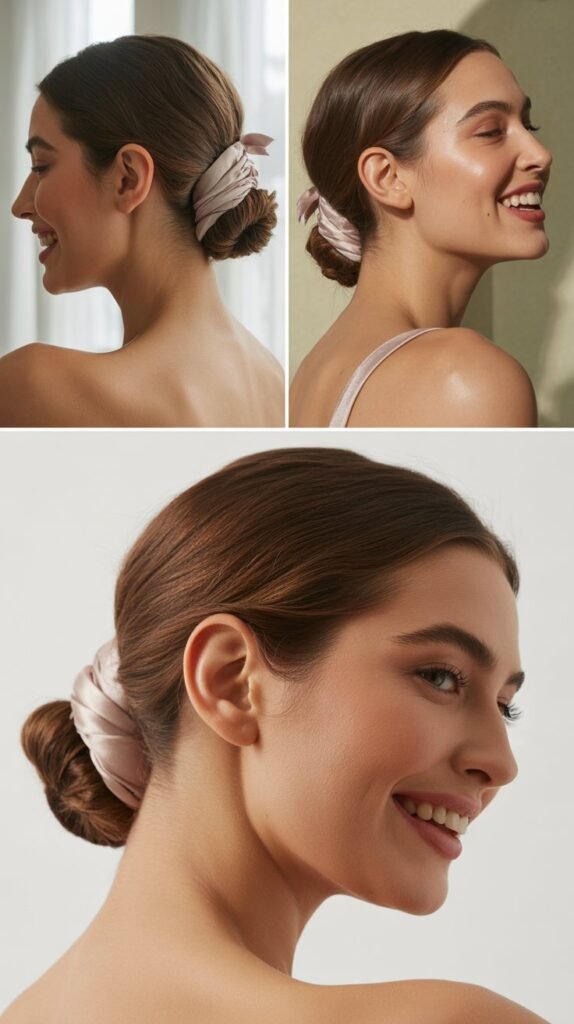
5. The Side-Swept Bun for Elegance

The side-swept bun brings asymmetrical elegance to your busy mom life and looks surprisingly sophisticated for something that takes under five minutes.
This style works wonderfully for date nights, family gatherings, or any occasion where you want to look effortlessly romantic without spending precious time you don’t have on your hair.
How to Achieve:
- Sweep all your hair to one side of your neck, either left or right based on your preference.
- Gather the hair just below and behind your ear, securing with a clear elastic.
- Twist the ponytail and wrap it around the elastic base, creating a bun positioned at the side of your neck.
- Pin securely with bobby pins, making sure the bun feels stable since it’s positioned asymmetrically.
- Pull out a few face-framing pieces on the opposite side for a soft, romantic finishing touch.
Perfect Occasions:
- Evening events or dinner parties where you want elegance without salon-level effort.
- Photos and family gatherings where you’ll be in pictures and want to look polished.
- Days when you’re feeling more feminine and want your hairstyle to reflect that mood.
6. The Double Twist Updo
This creative style uses two simple twists that meet in the middle to create an updo that looks far more complicated than it actually is.
The double twist technique is particularly flattering because it adds height and dimension while being secure enough to survive even the most chaotic mom days filled with picking up toys and chasing toddlers.
Step-by-Step Guide:
- Take a section of hair from each side of your head, starting near your temples and going back about two inches.
- Twist each section backward toward the crown of your head, keeping the twists tight enough to hold but not so tight they pull.
- Pin both twists at the back center of your head with bobby pins, crossing them over each other for security.
- Gather the remaining loose hair at the nape and twist it upward, tucking it into the space where the two twists meet.
- Secure everything with additional bobby pins, making sure all loose ends are hidden and the style feels secure.
Styling Benefits:
- Creates the illusion of a more intricate hairstyle with minimal actual skill required.
- Adds height at the crown which can make your whole face appear more lifted and youthful.
- Works on various hair lengths from medium to long, making it versatile for different hair types.
7. The Quick French Twist

The French twist exudes timeless sophistication and surprisingly takes less time than you’d imagine once you master the basic technique.
This classic updo has been a go-to for elegant women for decades because it transforms ordinary hair into something special in about three minutes, making it perfect for moms who need to transition from daytime chaos to evening elegance quickly.
Creating the Twist:
- Brush all your hair to one side of your head, either left or right depending on which feels more natural.
- Hold all the hair with one hand and begin twisting it vertically along the back of your head.
- As you twist, gently push the hair toward the center back of your head, creating a vertical roll.
- Continue twisting and rolling until you reach the opposite side, then tuck the ends into the twist.
- Secure with bobby pins inserted vertically into the twist, making sure to catch your scalp hair for stability.
- Smooth down any bumps or flyaways with hairspray and a fine-tooth comb for that polished finish.
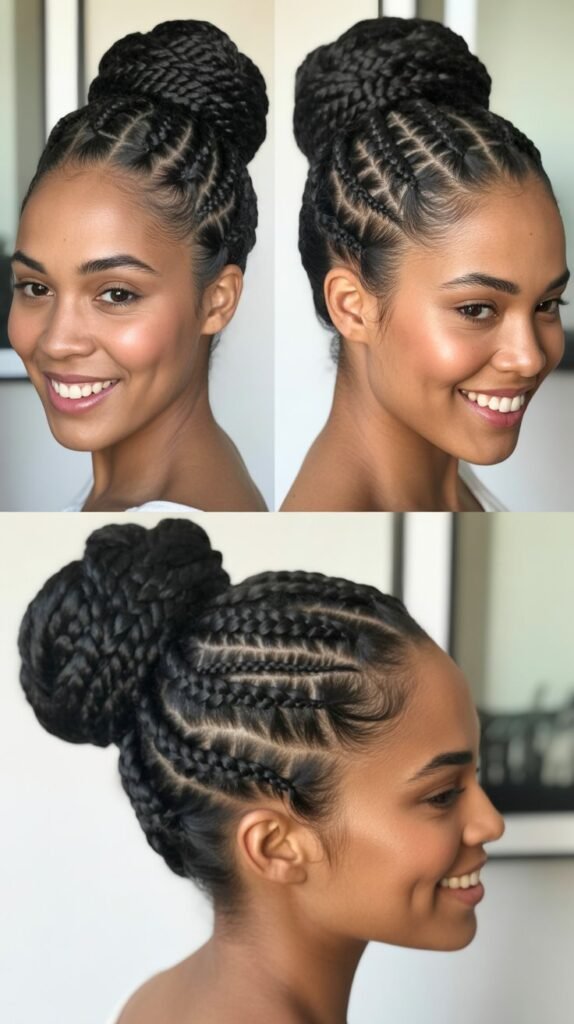
8. The Braided Bun Combo

Combining a braid with a bun gives you textural interest and helps shorter layers stay secured within the updo.
This hybrid style is particularly genius for moms because the braid portion keeps fine or slippery hair under control while the bun portion gives you that classic pulled-together appearance everyone loves.
Instructions for Success:
- Pull your hair into a ponytail at whatever height you prefer, securing tightly with an elastic band.
- Braid the entire length of the ponytail using a simple three-strand braid technique.
- Secure the end of the braid with a small elastic or hair tie to prevent unraveling.
- Wrap the braid around the base of the ponytail in a circular motion, creating a coiled bun shape.
- Tuck the end of the braid under the bun and secure everything with bobby pins placed around the perimeter.
Why This Works:
- The braiding step adds only thirty seconds but significantly increases the security of your updo.
- Creates interesting texture that makes the style look intentional rather than thrown together.
- Particularly effective for fine or slippery hair that tends to fall out of regular buns.
9. The Half-Up Top Knot
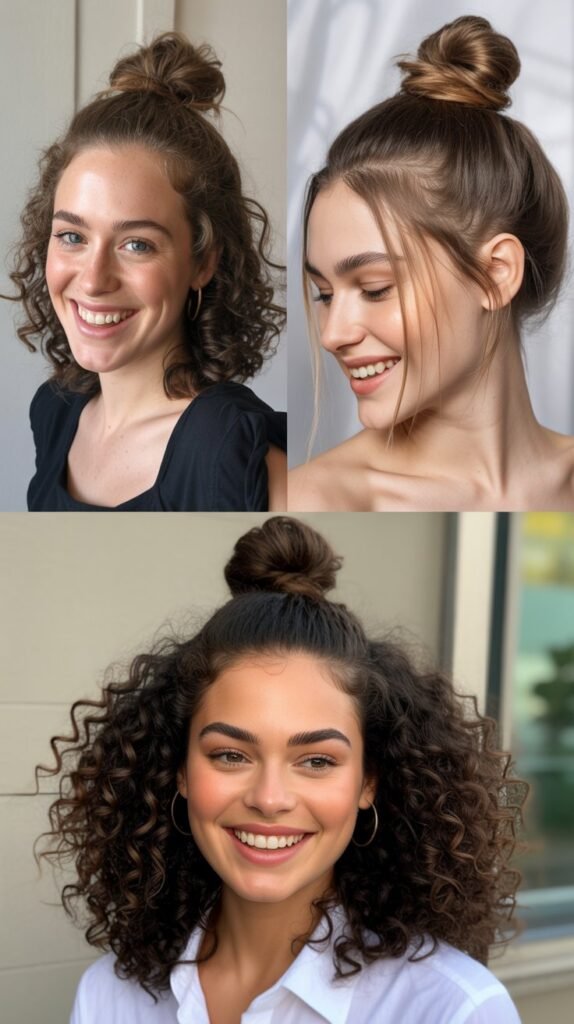
The half-up top knot gives you the best of both worlds by keeping hair out of your face while maintaining some length and movement.
This modern style has become incredibly popular because it’s youthful, trendy, and literally takes ninety seconds while still looking like you put thought into your appearance.
Quick Creation Steps:
- Section off the top half of your hair from ear to ear, leaving the bottom section loose.
- Gather the top section at the crown of your head and secure it with an elastic band.
- Twist the secured section and wrap it around itself to create a small knot at the crown.
- Pin the knot in place with bobby pins or simply secure with another elastic if your hair is thick enough.
- Leave the bottom section flowing naturally or add loose waves if you have an extra minute.
Perfect For:
- Moms who want their hair off their face but aren’t ready to commit to a full updo.
- Transitional styling between casual daytime and slightly dressier evening looks.
- Medium to long hair lengths that have enough volume to create a noticeable top knot.
10. The Sock Bun for Volume
The sock bun technique uses a cut sock or purchased bun form to create a perfectly round, voluminous bun that looks professionally styled.
This method is particularly brilliant for moms with fine or thin hair because it creates the illusion of thickness and fullness that your natural hair alone might not achieve.
How to Create:
- Cut the toe section off a clean sock and roll it into a donut shape, or purchase a proper bun form from any drugstore.
- Pull your hair into a high or low ponytail depending on where you want the bun positioned.
- Thread the ponytail through the center hole of the sock donut, positioning it at the end of your ponytail.
- Spread your hair evenly around the entire sock, covering it completely so none of the sock shows through.
- Roll the sock down toward your head, tucking hair as you roll to create a smooth, round bun.
- Secure with bobby pins around the base and use hairspray to tame any flyaways for a polished appearance.
11. The Twisted Crown Updo

This romantic style creates a crown-like effect around your head using twisted sections that meet in a low bun.
The twisted crown updo looks intricate and special enough for weddings or formal events but actually requires only basic twisting and pinning skills that any mom can master on the first try.
Step-by-Step Process:
- Take a two-inch section of hair from the front of your head on one side, starting near your part.
- Twist this section back along the side of your head, adding small pieces of hair as you twist for a rope-braid effect.
- Pin the twist temporarily when you reach behind your ear, then repeat the entire process on the other side.
- Once both sides are twisted back, remove the temporary pins and gather all remaining hair at the nape.
- Twist or bun the gathered hair at the nape, securing with pins to create the foundation of your updo.
- Wrap the two side twists around or over the low bun, pinning securely to complete the crown effect.
12. The Messy Side Braid into Bun
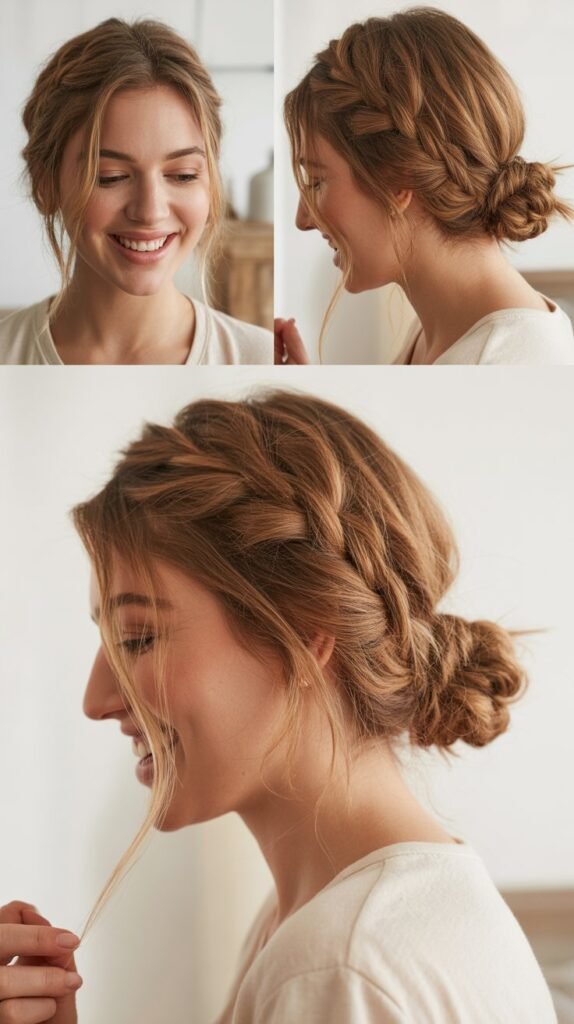
Combining a loose side braid with a relaxed bun creates an effortlessly bohemian look that’s perfect for weekend adventures.
This casual-chic style works wonderfully when you want to look put-together without appearing too formal or rigid, striking that perfect balance between intentional styling and carefree ease.
Creation Instructions:
- Sweep all your hair over one shoulder, gathering it loosely at the side of your neck.
- Create a loose three-strand braid, intentionally keeping it relaxed rather than tight and controlled.
- Gently pull on the edges of the braid to make it wider and more textured, creating that desirable messy appearance.
- Coil the loosened braid into a bun shape at the side of your neck where the braid started.
- Secure with bobby pins and elastic, allowing small pieces to escape for that perfectly imperfect bohemian vibe.
13. The Low Twisted Chignon
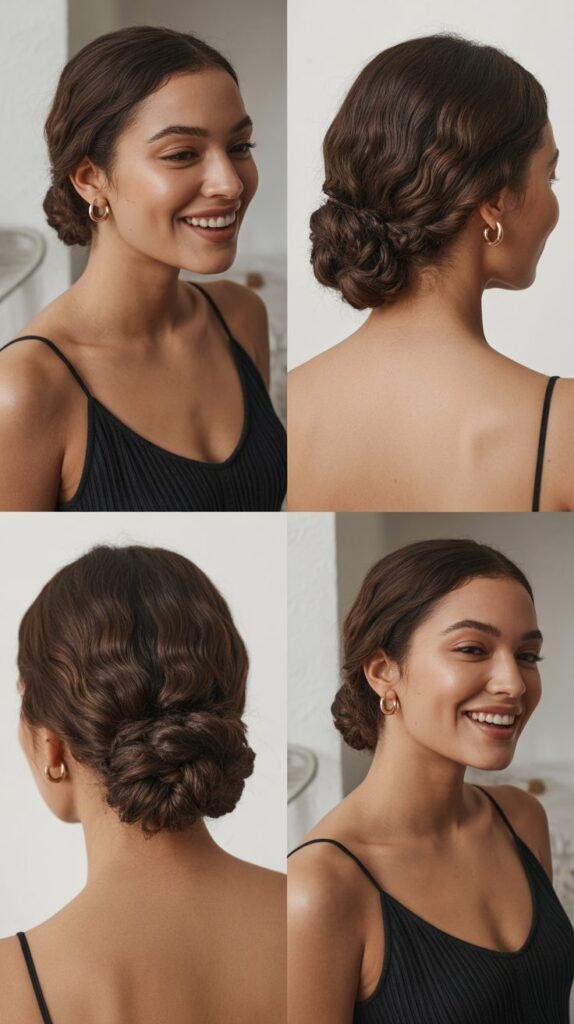
The chignon brings French elegance to your busy American mom life and sits beautifully at the nape of your neck.
This sophisticated style has been beloved for generations because it manages to look expensive and refined while requiring nothing more than twisting and pinning skills you likely already possess.
How to Achieve:
- Gather your hair at the nape of your neck and divide it into two or three equal sections.
- Twist each section individually, keeping the twists moderately tight so they hold their shape.
- Wrap the twisted sections around each other at the nape, creating an interwoven pattern.
- Pin each twist securely with bobby pins, making sure to catch some of your scalp hair for stability.
- Tuck any loose ends into the chignon and smooth with hairspray for that refined French finish.
Best Occasions:
- Professional settings like job interviews or important work meetings where appearance matters.
- Special occasions such as weddings, galas, or formal dinners where elegance is expected.
- Any time you want to channel sophisticated European style without spending an hour on your hair.
14. The Quick Gibson Tuck
The Gibson Tuck is a vintage-inspired updo where you tuck hair into itself to create an elegant rolled effect.
This underrated style deserves more attention in the mom world because it looks incredibly sophisticated yet takes about three minutes once you understand the tucking technique.
Creating the Tuck:
- Create a loose ponytail at the nape of your neck, securing with an elastic but keeping it somewhat relaxed.
- Use your fingers to create a small gap in the hair just above the elastic band.
- Flip the ponytail up and over, tucking it through the gap you created, essentially turning the ponytail inside out.
- Continue tucking the length of hair into the rolled section, creating a tucked effect along the nape.
- Secure everything with bobby pins placed horizontally through the tucked sections to keep them in place.
- Smooth any bumps and adjust the tuck to ensure it looks even and polished from all angles.
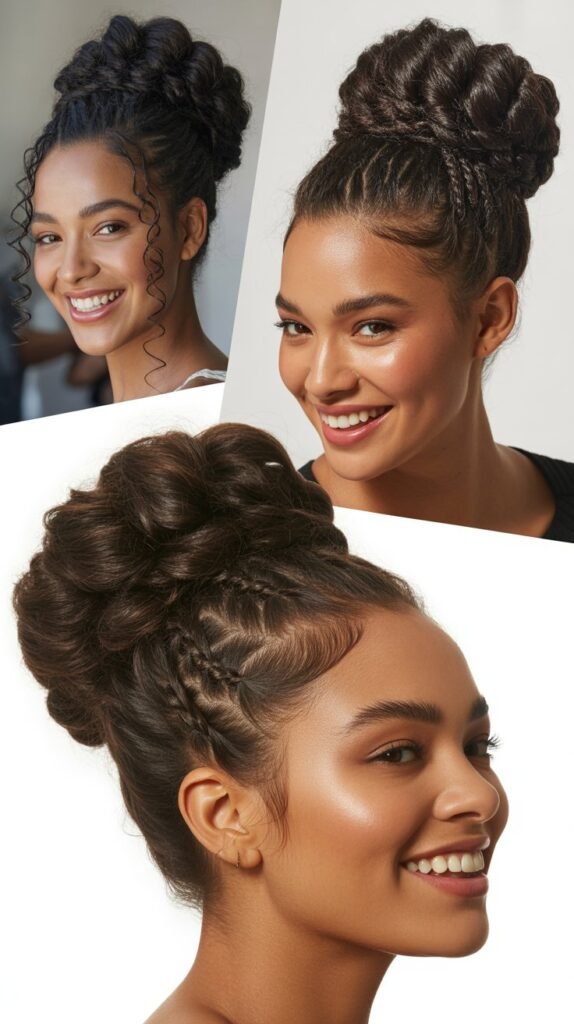
15. The High Ballerina Bun

The high ballerina bun sits at the crown and gives you that graceful, dancer-inspired aesthetic that somehow makes everything you do look more elegant.
This classic style is particularly practical for moms because it keeps absolutely all your hair secured and out of the way while making you look surprisingly sophisticated for minimal effort.
Step-by-Step Guide:
- Flip your head upside down and gather all hair at the very top of your head where a ballerina would place her bun.
- Secure tightly with a strong elastic band, making sure the ponytail stands straight up from your scalp.
- Smooth the ponytail with a brush or your hands, then twist it into a rope-like texture.
- Wrap the twisted ponytail around its base in a circular motion, creating a neat coiled bun.
- Secure with another elastic around the bun or use bobby pins placed in a circular pattern around the base.
- Use hairspray and a toothbrush to smooth any flyaways or baby hairs for that sleek ballerina finish.
16. The Textured Low Pony Updo
This style starts as a low ponytail but gets transformed into an updo through strategic tucking and pinning.
The textured approach makes it forgiving of imperfections while still looking polished and intentional, which is exactly what time-crunched moms need in their styling repertoire.
Creation Method:
- Create a low ponytail at the nape but first tease the crown area slightly for added height and texture.
- Gently backcomb or tease the ponytail itself to create volume and a textured appearance throughout.
- Fold the ponytail up and tuck it under itself, creating a rolled effect against your head.
- Pin the folded ponytail in place with bobby pins, spacing them evenly to distribute the weight.
- Pull on sections of the updo to create more texture and dimension, making it look fuller and more intentional.
- Finish with texturizing spray or light hairspray to maintain the piece-y, dimensional texture you’ve created.
17. The Rope Braid Bun
The rope braid technique uses two sections twisted around each other to create a braid-like effect that’s actually easier than traditional braiding.
This method is fantastic for moms who struggle with coordination or have never quite mastered regular braiding because it produces similar visual interest with much simpler mechanics.
How to Create:
- Pull your hair into a ponytail at any height you prefer, securing tightly with an elastic band.
- Divide the ponytail into two equal sections, holding one in each hand.
- Twist each section individually in the same direction, either both clockwise or both counterclockwise.
- Once both sections are twisted, wrap them around each other in the opposite direction, creating a rope effect.
- Wrap this rope-like braid around the base of your ponytail to form a textured bun.
- Secure the end with bobby pins and adjust the bun to make it look full and evenly shaped.
18. The Crisscross Pin Updo

This modern updo uses strategic crisscross pinning to create a geometric, contemporary look that feels very current.
The crisscross technique might sound complicated but actually just involves crossing small sections and pinning them, making it much easier than it appears while delivering impressive visual results.
Step-by-Step Instructions:
- Section your hair horizontally into three or four layers from top to bottom, securing each with clips temporarily.
- Starting with the bottom section, divide it in half and cross the two halves over each other like an X.
- Pin each crossed section to the opposite side of your head with bobby pins that match your hair color.
- Release the next section up and repeat the crossing and pinning process, building upward on your head.
- Continue with each section until all your hair is crossed and pinned, creating a layered crisscross pattern.
- Tuck any remaining ends into the updo and secure with additional pins for a clean, finished appearance.
19. The Twisted Side Sweep

The twisted side sweep creates an elegant asymmetrical look by twisting sections from one side across to the other.
This romantic style works beautifully for moms who want something different from center-positioned updos and appreciate the face-framing softness that side-swept styles naturally provide.
Creating the Style:
- Part your hair deeply on one side, creating an asymmetrical starting point for the style.
- Take sections from the heavy side and twist them back toward the opposite side of your head.
- Pin each twist across the back of your head, creating a sweeping motion from one side to the other.
- Continue adding and twisting sections until all hair from the heavy side is incorporated and pinned.
- Gather any remaining hair at the opposite side and pin it under the twisted sections for a clean finish.
- Pull gently on the twists to loosen them slightly and create a softer, more romantic appearance.
20. The Double Bun Style

The double bun creates a playful, youthful look with two buns positioned symmetrically on your head.
This fun style might seem more appropriate for teenagers but actually works wonderfully for moms who want something different and don’t take themselves too seriously, plus it’s incredibly practical for keeping hair completely secured.
How to Achieve:
- Part your hair straight down the middle from forehead to nape, dividing it into two equal sections.
- Create two ponytails positioned symmetrically on either side of your head at whatever height you prefer.
- Twist each ponytail individually and wrap it around its base to form a bun on each side.
- Secure each bun with elastic bands and bobby pins, making sure both are roughly the same size.
- Adjust both buns to match in height and fullness for a balanced, intentional appearance.
Style Variations:
- Position the buns high on your head for a more playful, youthful appearance perfect for casual days.
- Place them lower behind your ears for a more subtle, sophisticated take on the double bun trend.
- Try one high and one low for an edgy, asymmetrical variation if you’re feeling adventurous.
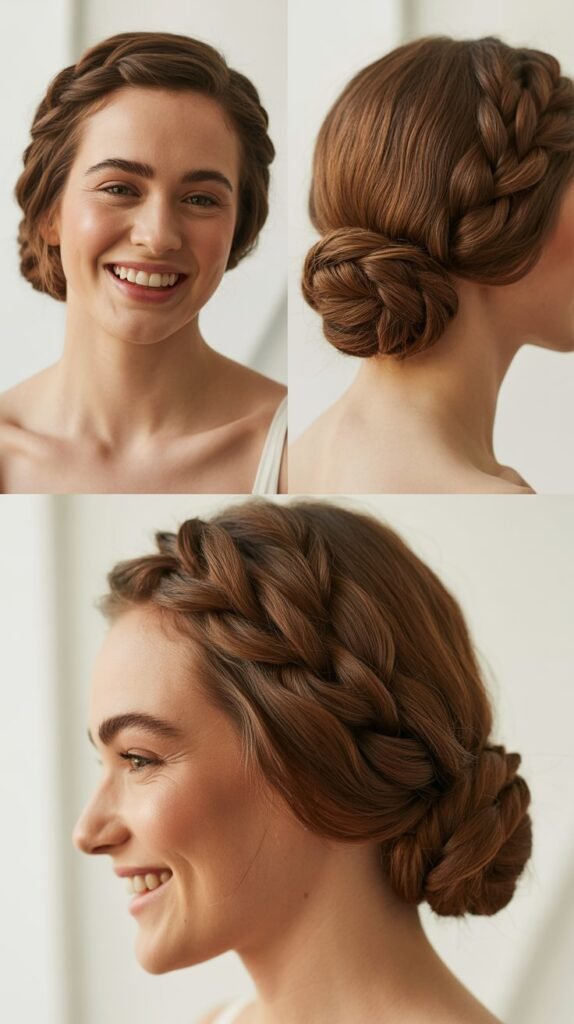
21. The Braided Crown Updo
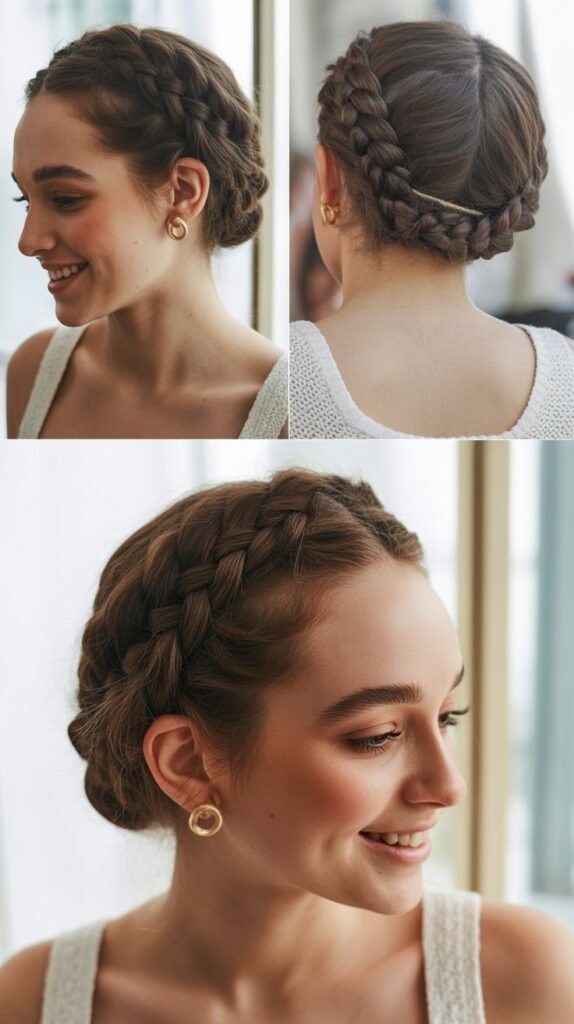
The braided crown wraps around your head like a halo and creates a romantic, bohemian aesthetic that looks complex but isn’t.
This beautiful style is particularly flattering because it draws attention to your face while keeping all your hair elegantly secured away, making it perfect for special occasions when you want to look extra lovely.
Step-by-Step Creation:
- Part your hair on one side and create a Dutch or French braid starting from the heavy side near your ear.
- Braid along your hairline across the top of your head, incorporating hair as you go to create the crown effect.
- When you reach the opposite side, continue braiding the remaining length without adding more hair.
- Wrap the braid end around the back of your head and pin it securely behind your opposite ear.
- If you have enough length, create a second braid from the other side and wrap it around the back to meet the first.
- Tuck all ends underneath the braided crown and secure with bobby pins for a seamless, romantic finish.
22. The Quick Rolled Updo

The rolled updo involves rolling sections of hair upward and pinning them to create a vintage-inspired look.
This technique gained popularity in the 1940s and has made comebacks ever since because it’s genuinely practical and creates beautiful results with relatively simple rolling and pinning motions.
Instructions for Success:
- Section your hair horizontally from ear to ear, creating a bottom section at the nape.
- Take the bottom section, roll it upward toward your head, and pin it securely with bobby pins inserted horizontally.
- Release the next section and roll it upward over the first roll, creating a layered effect.
- Continue rolling and pinning sections upward until all your hair is incorporated into the rolled updo.
- Smooth the top and sides with your hands or a brush, securing any loose pieces with additional pins.
- Finish with hairspray to hold the rolls in place and give your updo that polished vintage appearance.
23. The Knotted Bun
The knotted bun uses an actual knot in your hair to create the foundation of the style rather than twisting.
This unique technique creates interesting texture and holds surprisingly well without requiring lots of bobby pins, making it perfect for moms who want something different that also happens to be practical.
How to Create:
- Pull your hair into a ponytail and divide it into two equal sections, one in each hand.
- Tie these two sections into an actual knot, just like you’d tie shoelaces, pulling it relatively tight.
- If your hair is long enough, tie a second knot below the first for added security and texture.
- Wrap the knotted length around the base of your ponytail to form a bun shape.
- Secure the bun with bobby pins and tuck the ends under or through the knots to hide them.
Why This Works:
- The knot itself creates natural hold without requiring perfect twisting technique or lots of pins.
- Creates unique texture that makes the style look intentional and more interesting than basic buns.
- Particularly effective for thick hair that can be difficult to secure with traditional methods.
24. The Pinned Twist Updo

This elegant style uses multiple twists pinned strategically to create a sophisticated updo with dimension and movement.
The pinned twist method is forgiving of imperfections because the multiple twists naturally create texture and interest that disguises any less-than-perfect technique.
Creation Process:
- Divide your hair into five or six random sections of varying sizes rather than perfectly uniform pieces.
- Twist each section individually, keeping some tighter and others looser for varied texture.
- Pin each twisted section randomly across the back of your head, overlapping and layering them artfully.
- Don’t worry about perfect placement; the random pinning creates an intentionally artistic, organic appearance.
- Tuck any loose ends into the other twists and secure everything with bobby pins placed discreetly.
- Gently pull on some twists to loosen them and create more volume and romantic texture.
25. The Wrapped Low Bun
The wrapped low bun uses a section of hair to wrap around the bun base, hiding the elastic and creating a polished, professional finish.
This refined detail takes only an extra thirty seconds but elevates the entire look from casual to sophisticated, making it perfect for moms who want their updo to look intentional rather than thrown together during the morning chaos.
Step-by-Step Instructions:
- Create a low ponytail but before securing, separate out a thin section of hair from underneath the ponytail.
- Secure the main ponytail with an elastic band, leaving that thin section loose and free.
- Twist the main ponytail and wrap it around the elastic base to form your bun, securing with bobby pins.
- Take the thin section you reserved and wrap it around the base of the bun, covering the elastic completely.
- Pin the wrapped section securely with a bobby pin that matches your hair color, tucking the end under the bun.
- Smooth any flyaways with hairspray and your fingers for that perfectly polished, professional appearance.
Professional Benefits:
- The wrapped detail makes the style look intentional and carefully crafted rather than rushed.
- Hides the elastic band completely, which creates a more expensive and sophisticated appearance.
- Works beautifully for work environments, interviews, or any situation where you need to look professionally polished.
26. The Bubble Ponytail Updo

The bubble ponytail creates segments along a ponytail that get pinned up into an updo with unique dimensional texture.
This trendy style has exploded in popularity recently because it looks incredibly intricate and fashion-forward while actually being achievable by anyone who can tie elastic bands and pin hair.
How to Create:
- Pull your hair into a high ponytail and secure tightly with an elastic band at the base.
- Add additional elastic bands down the length of the ponytail at two or three-inch intervals, creating multiple segments.
- Gently pull on each segment between the elastics to create “bubble” shapes that add volume and texture.
- Starting from the bottom, fold the bubbled ponytail upward toward your head in an accordion fashion.
- Pin each bubble section as you fold it up, securing with bobby pins placed strategically to hold everything.
- Adjust each bubble to ensure they’re evenly sized and the updo looks balanced and intentional.
Why It’s Trending:
- Creates a modern, fashion-forward look that appears current and stylish rather than dated.
- The texture and dimension make fine or thin hair appear much fuller and more voluminous.
- Perfect for moms who want to try trendy styles without complicated braiding or advanced techniques.
27. The Twisted Ponytail Tuck

The twisted ponytail tuck combines multiple simple techniques into one elegant updo that looks sophisticated but requires only basic skills.
This versatile final style brings together elements you’ve learned throughout this guide—twisting, tucking, and pinning—to create something greater than the sum of its parts, making it the perfect culmination of quick updo mastery.
Final Style Instructions:
- Create a low ponytail positioned at the nape of your neck, keeping it relatively loose rather than tight.
- Twist the entire ponytail from base to ends, creating a rope-like texture throughout the length.
- Fold the twisted ponytail upward toward your head, bringing the ends up toward the elastic base.
- Tuck the twisted length under and into itself, creating a rolled, tucked effect against the back of your head.
- Secure with bobby pins placed horizontally through the tucked sections, ensuring everything feels stable.
- Smooth the top and sides, pull out a few face-framing pieces if desired, and finish with light hairspray.
Perfect For All Occasions:
- Professional settings where you need polished elegance without appearing overdone or too formal.
- Special events like weddings or parties where you want sophistication without salon-level styling time.
- Everyday versatility since this style transitions beautifully from casual to dressy depending on your outfit.
Essential Tools Every Mom Needs for Quick Updos
Having the right tools readily accessible makes creating these quick updos even faster and more successful. Here are the essential items every busy mom should keep in her styling arsenal for those rushed mornings when every second counts.
Must-Have Basics:
- Strong elastic bands in colors matching your hair that won’t snap or break under pressure.
- Bobby pins in your exact hair color, with at least twenty available for more complex styles.
- A good quality hairbrush or wide-tooth comb for detangling without causing breakage.
- Dry shampoo for adding texture and volume while absorbing oils on unwashed hair days.
- Light-hold hairspray to tame flyaways and keep your updo in place throughout busy days.
Optional But Helpful:
- Hair donut or sock bun form for creating perfectly round, voluminous buns effortlessly.
- Small claw clips to section hair temporarily while creating more complex updos.
- Texturizing spray or sea salt spray for adding grip and piece-y texture to fine hair.
- Mini hair ties for creating the bubble ponytail or securing smaller sections within styles.
- Travel-sized smoothing serum or hair oil for polishing sleek styles and taming frizz.
Organization Tips:
- Keep all your updo tools in one designated basket or drawer so you’re not searching every morning.
- Place bobby pins in a small magnetic container to prevent them from scattering everywhere.
- Hang elastic bands on a carabiner clip attached to your styling caddy for easy access.
Hair Type Considerations for Updo Success
Different hair types require slight modifications to make these updos work optimally, so understanding your specific hair needs will help you achieve better results with less frustration.
For Fine or Thin Hair:
- Use dry shampoo or texturizing products to add grip and prevent slippery hair from sliding out of styles.
- Consider the sock bun method or teasing techniques to create the illusion of more volume and fullness.
- Avoid pulling hair too tightly, which can make thin hair appear even thinner and show scalp.
- Embrace messier, textured styles that naturally make fine hair appear fuller and more dimensional.
For Thick or Heavy Hair:
- Use multiple bobby pins and strong elastic bands to ensure your updo stays secure throughout the day.
- Section hair into smaller pieces when twisting or rolling to make thick hair more manageable.
- Consider styles with braiding elements that help control and contain heavy hair effectively.
- Don’t be afraid of using more pins than tutorials suggest—thick hair simply requires extra security.
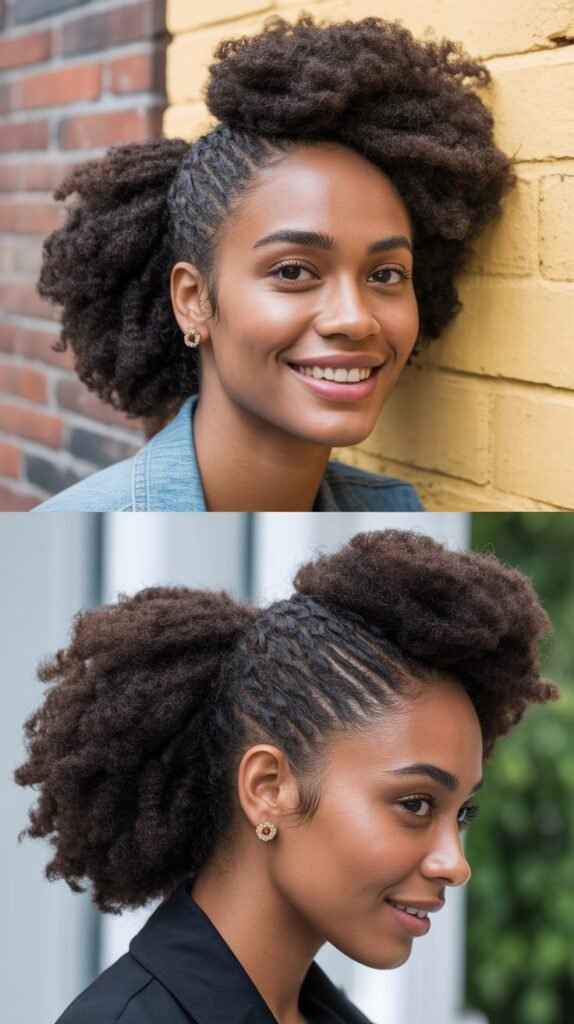
For Curly or Textured Hair:
- Work with your natural texture rather than fighting it by choosing styles that embrace volume and movement.
- Use your fingers instead of brushes when creating updos to preserve curl pattern and prevent frizz.
- Apply leave-in conditioner or curl cream before styling to keep curls defined and moisturized within the updo.
- Embrace the beautiful texture curly hair adds to messy buns and twisted styles naturally.
For Short or Layered Hair:
- Focus on styles like the half-up top knot or twisted sections that work with shorter lengths.
- Keep extra bobby pins handy to secure shorter layers that tend to escape from updos.
- Use small elastic bands to create multiple mini ponytails that collectively form an updo effect.
- Consider pinned twist styles where shorter sections can be individually secured rather than relying on length.
Troubleshooting Common Updo Problems
Even with the quickest styles, moms sometimes encounter frustrating problems that can derail the entire morning routine. Here are solutions to the most common updo challenges that busy moms face regularly.
Problem: Updo Falls Out Within Hours
- Use stronger elastic bands designed specifically for thick or heavy hair types.
- Add more bobby pins than you think necessary, placing them in X-patterns for maximum hold.
- Apply texturizing spray or dry shampoo before styling to give hair more grip and friction.
- Make sure you’re catching scalp hair when pinning rather than just pinning through the updo itself.
Problem: Bumps and Lumps Everywhere
- Use a fine-tooth comb or brush to smooth sections as you work rather than trying to fix everything at the end.
- Apply a small amount of smoothing serum or hair oil to tame stubborn bumpy areas.
- For intentionally messy styles, embrace some texture rather than fighting for perfection that isn’t the goal.
- Practice the style when you’re not rushed so you can perfect the technique before high-pressure mornings.
Problem: Hair Too Slippery to Hold Styles
- This is the number one reason to embrace second or third-day hair for updos rather than freshly washed.
- Apply dry shampoo to clean hair before styling to add the texture and grip that fresh hair lacks.
- Use texturizing spray throughout your hair before attempting any updo for much better hold.
- Avoid using too much conditioner or leave-in products that can make hair overly silky and unmanageable.
Problem: Short Layers Keep Falling Out
- Keep bobby pins handy throughout the day for quick fixes when shorter pieces inevitably escape.
- Use small amounts of hairspray on problem areas before pinning to help short layers stay in place.
- Choose styles specifically designed for shorter hair rather than trying to adapt long-hair styles.
- Strategically place bobby pins specifically targeting those shorter layers before they have a chance to fall.
Making Updos Last Through Busy Mom Days
Creating an updo in five minutes is wonderful, but it’s pointless if the style falls apart by lunchtime when you’re chasing toddlers or running between meetings and errands.
Morning Preparation Strategies:
- Work with day-old or day-two hair whenever possible since natural oils provide better texture and hold than freshly washed hair.
- Apply styling products before creating your updo rather than trying to add them afterward when everything is already pinned.
- Give yourself one extra minute to strategically place bobby pins in high-stress areas that typically come loose first.
- Use hairspray as a final step, focusing on the areas around your hairline and any pins that might slip during the day.
Throughout-the-Day Maintenance:
- Keep a small emergency kit in your car or purse with extra bobby pins and a mini hairspray for quick touchups.
- When you notice sections starting to loosen, address them immediately rather than waiting until everything falls apart.
- If you’re transitioning from day to evening, spend two minutes reinforcing your updo rather than completely redoing it.
- Embrace a slightly messier version by afternoon rather than stressing about maintaining morning perfection through chaos.
Hair Health Considerations:
- Avoid pulling hair into tight updos every single day, which can cause breakage and stress on your hairline over time.
- Alternate between high and low updo positions to distribute tension across different areas of your scalp throughout the week.
- Use bobby pins without rough edges or coating that can snag and damage hair with repeated use.
- Give your hair complete breaks from updos on weekends when possible to allow your scalp and hair follicles to recover.
Adapting Updos for Different Occasions
The same basic updo can be adapted for various occasions simply by adjusting a few elements, which means you can master fewer styles but use them in more situations throughout your busy life.
Casual Everyday Adaptations:
- Keep updos intentionally messy and textured rather than perfectly smooth and polished for relaxed, approachable vibes.
- Pull out more face-framing pieces and allow some flyaways for that effortlessly undone appearance perfect for errands.
- Position buns higher on your head for a more playful, casual aesthetic during weekend family activities.
- Skip time-consuming finishing touches like smoothing every flyaway or using multiple styling products when precision isn’t necessary.
Professional Work Adaptations:
- Smooth hair thoroughly before creating the updo and use hairspray to control all flyaways for polished professionalism.
- Position updos at the nape or lower on your head for a more conservative, business-appropriate appearance.
- Choose sleeker styles like the French twist or wrapped low bun rather than messy bohemian options for important meetings.
- Add minimal, elegant accessories like simple hair pins if desired, avoiding anything overly trendy or distracting.
Special Event Adaptations:
- Incorporate braiding elements or more complex twisting patterns to elevate basic updos for weddings and formal occasions.
- Use decorative pins, small flowers, or elegant accessories to transform simple styles into special-occasion worthy looks.
- Take an extra five minutes to perfect the shape and smooth all sections for that salon-worthy polished finish.
- Consider adding loose curls or waves to any hair left down in half-up styles for extra elegance and romance.
Active/Athletic Adaptations:
- Secure updos extra tightly with multiple elastic bands and extra bobby pins to withstand physical activity without falling apart.
- Choose high positions like the ballerina bun or topknot that keep all hair completely away from your face and neck.
- Skip delicate finishing touches and embrace functional simplicity that prioritizes security over aesthetics during workouts.
- Use sweat-resistant hair products if you’ll be exercising, as regular hairspray can become sticky and uncomfortable with perspiration.
Time-Saving Tips for Faster Morning Styling
Beyond mastering the actual updo techniques themselves, implementing these strategic time-saving approaches will shave even more precious minutes off your morning routine when every second counts before school drop-off.
The Night Before:
- Shower at night instead of morning to eliminate the entire hair-drying step from your morning routine.
- Sleep with your hair in a loose braid or bun to create texture overnight that makes updos easier and more secure.
- Lay out all your hair tools and accessories in one designated spot so you’re not hunting for bobby pins at 7 AM.
- Apply dry shampoo before bed rather than morning so it has time to absorb oils overnight for better results.
Morning Efficiency Strategies:
- Master three to five go-to updos rather than attempting a different style every day, which allows muscle memory to speed up the process.
- Keep a basket of hair supplies in the bathroom where you get ready rather than storing them in multiple locations throughout your home.
- Practice your favorite updos on relaxed weekends so you can perfect technique without the pressure of actual time constraints.
- Take progress photos of styles from multiple angles so you can quickly reference what the back should look like without struggling with mirrors.
Simplification Approaches:
- Accept that updos don’t need to be perfect, and embrace messier, more textured styles that are forgiving of imperfections and rush.
- Invest one weekend learning two quick updos extremely well rather than superficially knowing many styles you can’t execute under pressure.
- Create a simple decision tree: dirty hair equals topknot, professional day equals sleek low bun, everything else equals messy bun.
- Remember that most people won’t notice small imperfections in your hair that seem glaring to you in the mirror during critical self-examination.
Conclusion
The journey through these 27 Quick Updos for Moms When You Have Zero Time proves that looking put-together doesn’t require sacrificing precious sleep or adding stress to already chaotic mornings.
Each style in this comprehensive guide was specifically chosen because it delivers maximum impact with minimal time investment, addressing the real challenges that busy moms face every single day when trying to look presentable while managing a million other responsibilities.
From the classic thirty-second messy bun that hides a multitude of hair sins to the elegant French twist that makes you look sophisticated for important occasions, you now have a complete arsenal of quick styling solutions that work with your life rather than against it.
The beauty of mastering these updos isn’t just about the hairstyles themselves but about the confidence and mental energy you gain from knowing you can walk out the door feeling good about your appearance in just a few minutes.
Whether you’re navigating the school run with toddlers in tow, heading into an important work meeting, or somehow managing to squeeze in a date night with your partner, you now have the tools and knowledge to create appropriate, attractive updos that match every occasion without requiring more time than you realistically have.
Remember that perfect hair isn’t the goal here; functional, flattering hair that makes you feel like yourself is what matters, and with practice, these quick updos will become second nature, transforming your morning routine from stressful to manageable one messy bun at a time.