When it comes to wedding day beauty, bridesmaids deserve hairstyles that are both elegant and memorable.
The perfect updo can transform your entire bridal party look, and when you add the timeless charm of braids, you create something truly magical.
In this comprehensive guide to 27 Romantic Bridesmaid Updo Hairstyles with Braid, you’ll discover a stunning collection of hairstyles that blend sophistication with romance.
Whether you’re planning a rustic barn wedding, a beachside ceremony, or a classic ballroom reception, these braided updo combinations offer versatility for every wedding theme and hair type.
From intricate fishtail crowns to soft twisted buns, each style has been carefully selected to help your bridesmaids look and feel their absolute best.
Get ready to explore professional styling techniques, maintenance tips, and creative variations that will make your bridal party shine with confidence and grace.
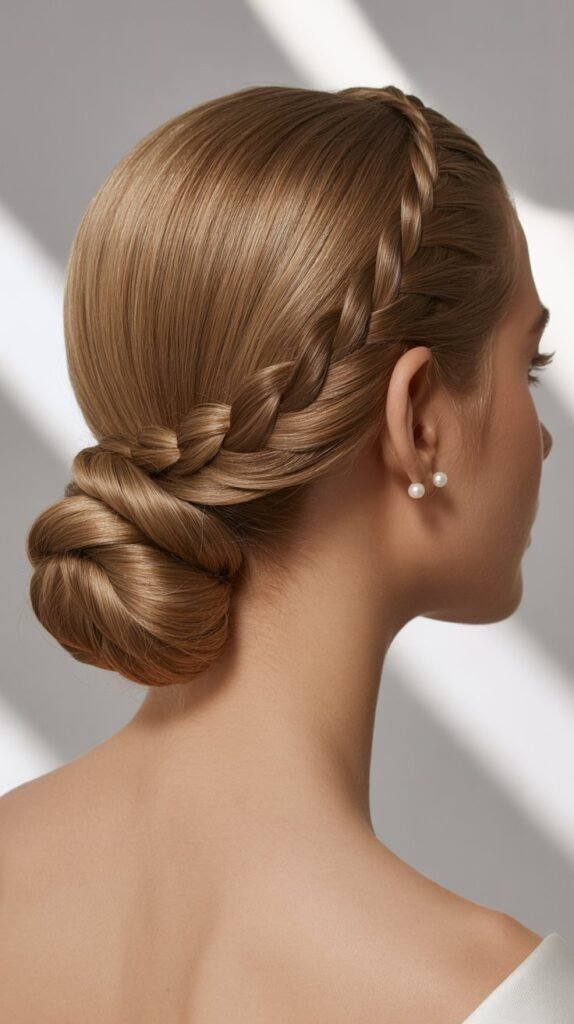
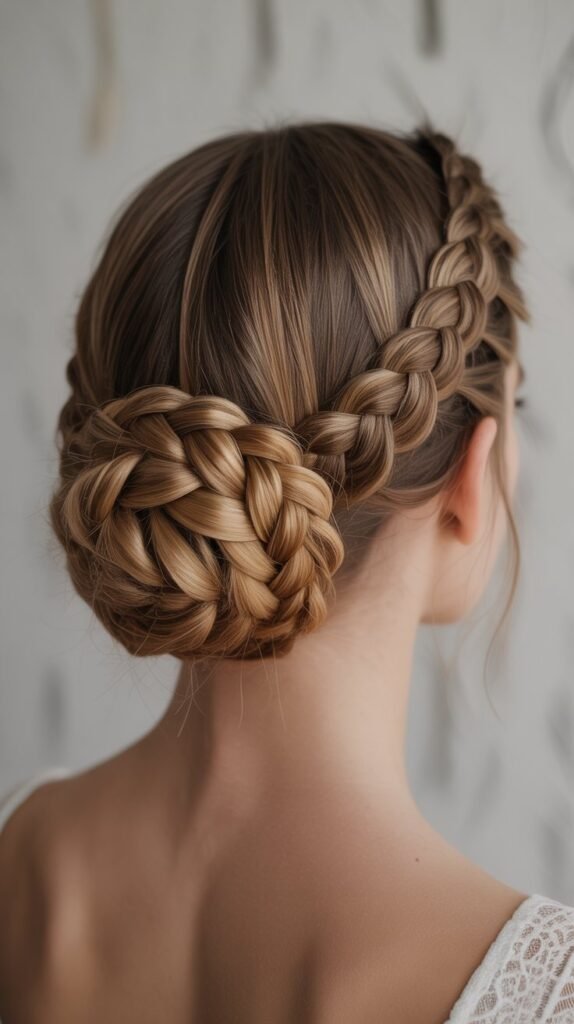
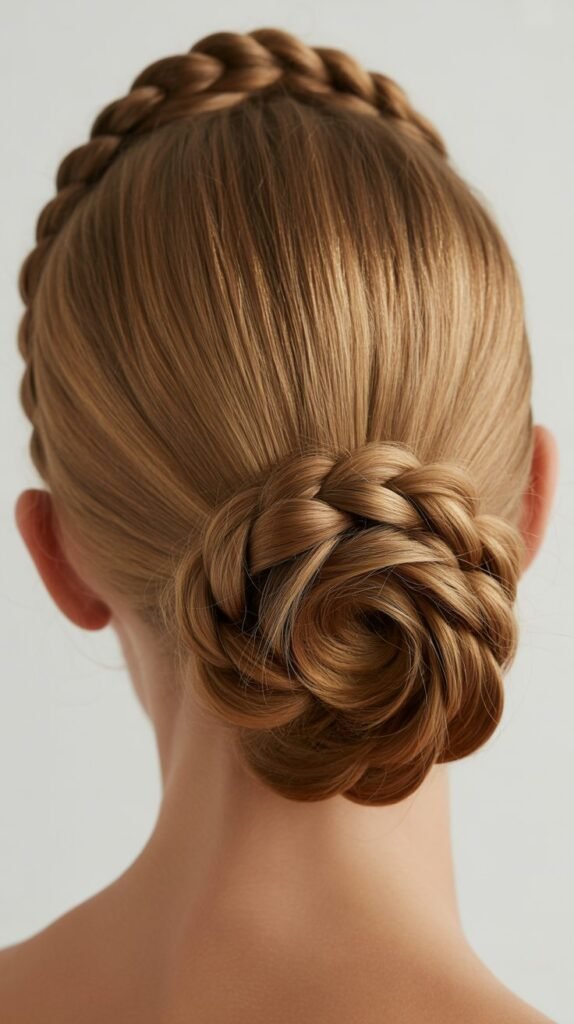
1. Classic Low Braided Bun
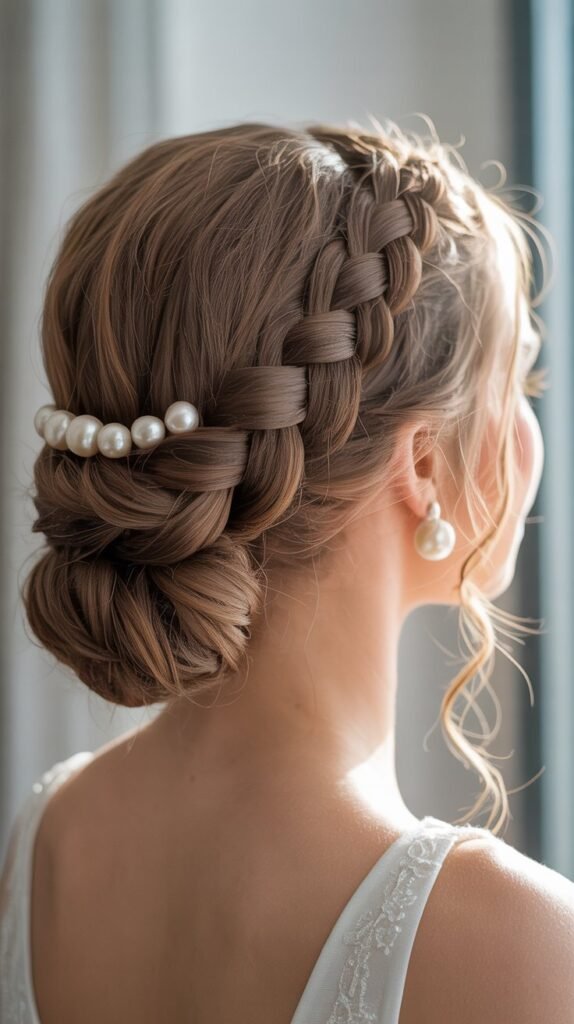
The classic low braided bun represents timeless elegance that never goes out of style.
This sophisticated updo combines the structured beauty of a traditional bun with the romantic texture of braided details.
It works exceptionally well for bridesmaids with medium to long hair and complements virtually any wedding dress neckline.
Key Features:
- The foundation starts with a deep side part or center part, depending on face shape and personal preference.
- A three-strand braid wraps around the base of the bun, creating a beautiful crown effect that adds dimension.
- The bun itself sits at the nape of the neck, providing a graceful silhouette that photographs beautifully from every angle.
- Loose face-framing pieces can be left out to soften the overall look and create a more romantic feel.
- This style stays secure throughout long ceremonies and receptions, making it practical for all-day wear.
Styling Tips:
- Apply texturizing spray to dry hair before beginning to create grip and hold.
- Use a donut bun form for added volume and a perfectly round shape.
- Secure the braid with clear elastic bands that blend seamlessly with the hair color.
- Finish with medium-hold hairspray to maintain the style without creating stiffness.
- Add small pearl pins or delicate flowers along the braid for extra wedding-day glamour.
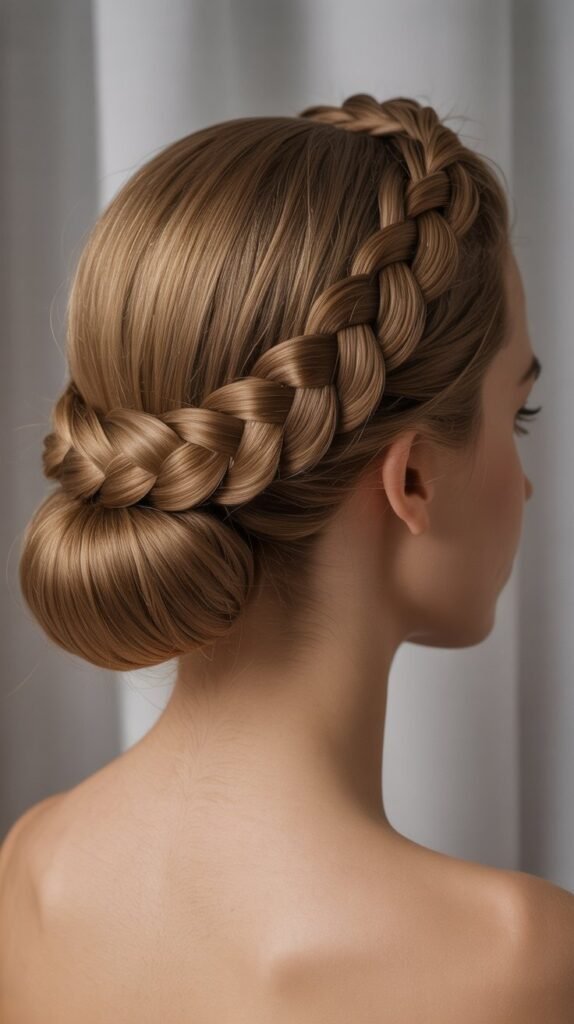
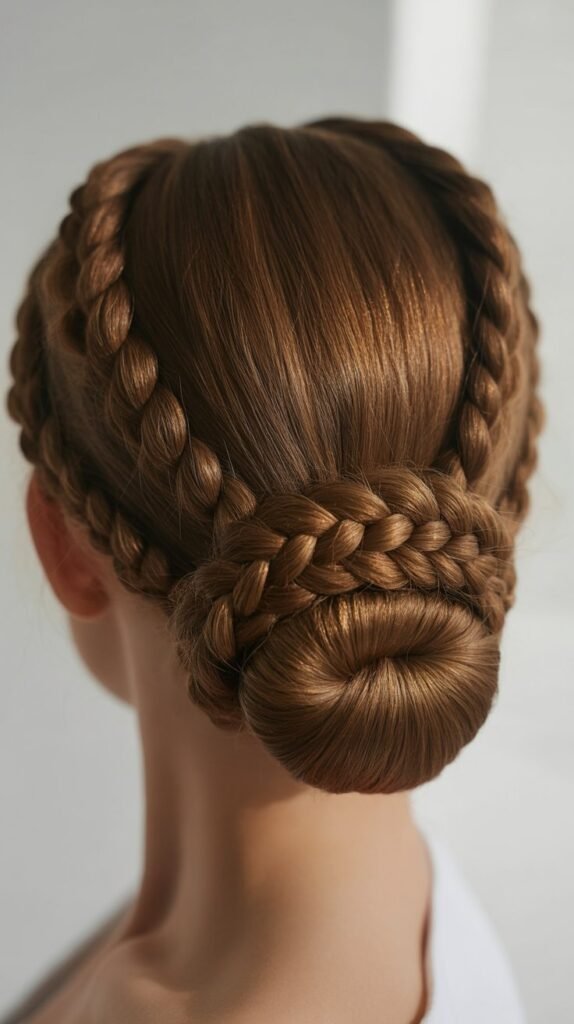
2. Dutch Braid Crown Updo
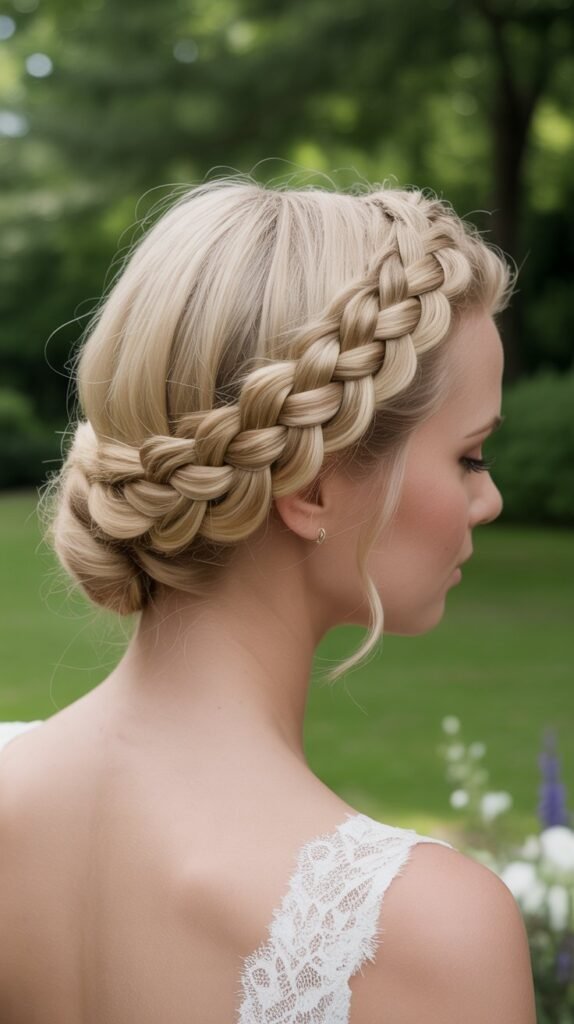
The Dutch braid crown updo creates a regal appearance that makes every bridesmaid feel like royalty.
This eye-catching style features a raised braid that circles the head like a halo, with the remaining hair tucked into an elegant updo.
It’s particularly stunning for outdoor weddings and garden ceremonies.
Construction Method:
- The Dutch braid begins at one temple and travels around the circumference of the head, picking up sections as it progresses.
- Unlike a French braid that sits flat, the Dutch technique creates a raised, three-dimensional effect that stands out beautifully.
- The remaining hair is twisted and pinned into a low chignon or tucked bun beneath the crown.
- Small pieces are strategically pulled from the braid to create a softer, more romantic texture.
- The crown effect frames the face beautifully and draws attention to facial features and makeup.
Best Practices:
- Start with second-day hair or apply dry shampoo for better texture and grip.
- Keep consistent tension throughout the braiding process to ensure an even, symmetrical crown.
- Use bobby pins that match the hair color exactly for invisible hold.
- Spray each section lightly as you work to prevent flyaways and maintain control.
- Consider adding fresh baby’s breath or small roses tucked into the crown for a garden wedding aesthetic.
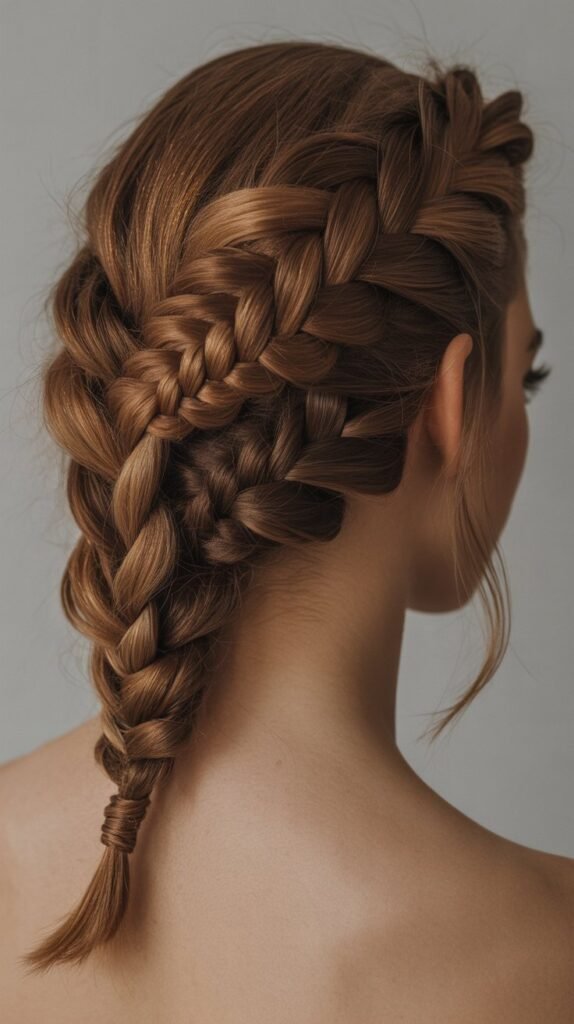
3. Fishtail Braid Side Sweep
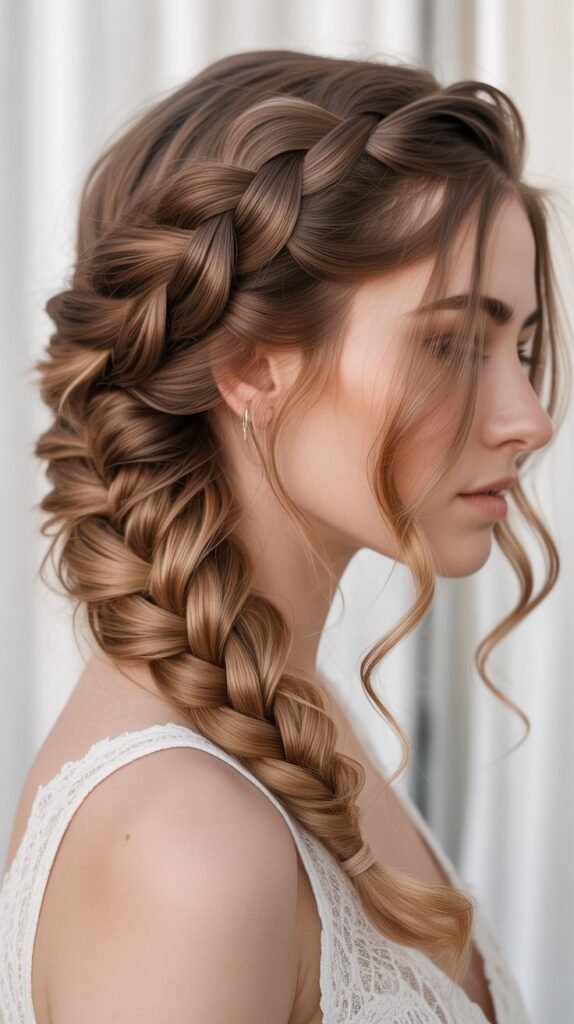
The fishtail braid side sweep brings bohemian romance to bridesmaid hairstyles with its intricate pattern and relaxed elegance.
This style sweeps all the hair to one side, creating an asymmetrical look that’s both modern and timeless.
The fishtail technique produces a detailed, complex appearance that photographs exceptionally well.
Technical Details:
- All hair is gathered to one side, typically over the shoulder opposite the bride for cohesive photos.
- The fishtail braid is created by dividing hair into two sections and crossing small pieces from each side alternately.
- The braid is gently pancaked (pulled apart) to create width and a fuller, more textured appearance.
- The end is secured and twisted into a low side bun or left as a long draped braid depending on hair length.
- Face-framing layers are curled and left loose to balance the swept-over style.
Execution Guidelines:
- Work with slightly textured or day-old hair for the best grip and lasting hold.
- Take smaller sections when creating the fishtail for a more intricate, detailed pattern.
- Use a clear elastic at the end of the braid before forming it into an updo.
- Apply shine serum to finished sections to enhance the dimensional pattern of the fishtail.
- Secure with strategic bobby pin placement in an X-pattern for maximum hold.
4. Twisted Rope Braid Chignon
The twisted rope braid chignon offers a unique alternative to traditional braiding techniques with its elegant spiral pattern.
This sophisticated style combines two-strand rope twists with a classic chignon base, creating visual interest through its distinctive texture.
It works beautifully for both formal and semi-formal wedding settings.
Style Components:
- Hair is divided into multiple sections that are each twisted into rope braids using a two-strand twisting technique.
- The rope braids are wrapped around each other and pinned to create a dimensional chignon.
- The twisting creates a beautiful spiral effect that catches light and adds depth to the hairstyle.
- This technique works particularly well for fine to medium hair textures as it creates the illusion of thickness.
- The finished look is polished yet romantic, bridging the gap between casual and formal styling.
Application Process:
- Begin with smooth, brushed hair that has light hold product applied throughout.
- Create rope braids by dividing sections into two pieces and twisting them around each other continuously.
- Keep the twists tight initially, then gently pull them apart for added volume.
- Pin the twisted sections in a circular pattern at the nape, building up the chignon layer by layer.
- Finish with a light misting of flexible hold spray to maintain movement and natural flow.
5. Waterfall Braid into Low Bun
The waterfall braid into low bun combines flowing romance with structured elegance in one stunning hairstyle.
This enchanting style features a cascading waterfall braid that flows into a gathered low bun, creating the illusion of hair literally falling like water.
It’s perfect for bridesmaids who want something truly special and memorable.
Distinctive Elements:
- The waterfall braid begins at the temple and travels around the back of the head, dropping sections as it goes.
- Each dropped section creates a beautiful cascade effect that resembles a waterfall of hair.
- The dropped sections are later gathered with the remaining hair and formed into a soft low bun.
- Loose curls can be added to the dropped sections for enhanced texture and dimension.
- This style creates movement and interest even in an updo format.
Styling Strategy:
- Start with curled or waved hair to enhance the waterfall effect with added texture.
- Create the waterfall braid by dropping the bottom section and picking up a new section with each stitch.
- Keep the braid relatively loose to maintain a romantic, soft appearance throughout.
- Gather all dropped sections and remaining hair into a low ponytail before forming the bun.
- Use a combination of pins and clear elastics to secure without visible hardware.
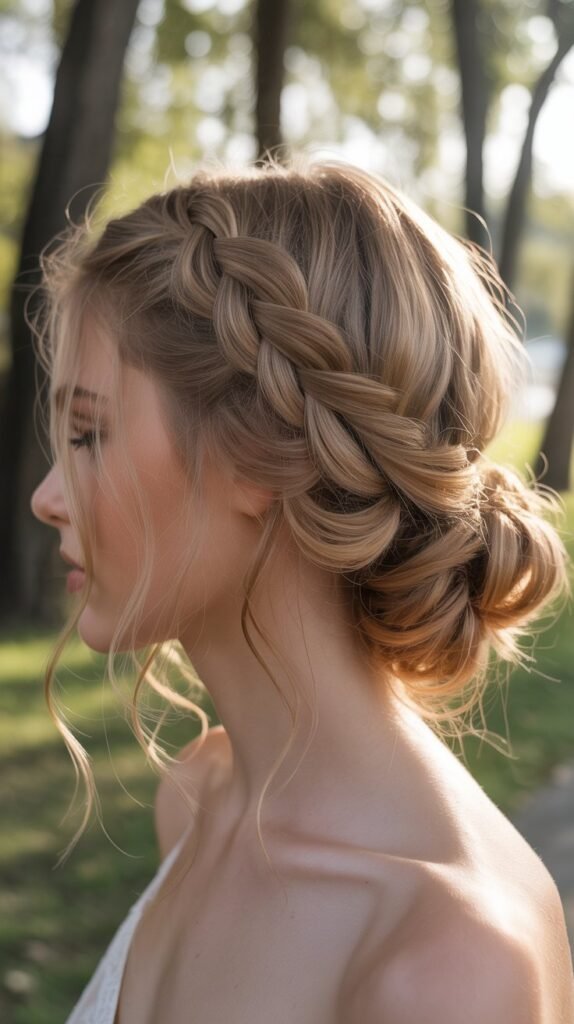
6. Milkmaid Braid Updo
The milkmaid braid updo channels rustic charm with a sophisticated twist, perfect for country weddings and barn receptions.
This pastoral style features two braids wrapped over the crown of the head, creating a headband effect that’s both practical and beautiful.
It evokes a sense of natural, effortless beauty.
Structure Overview:
- Two French or Dutch braids are created on either side of a center part.
- Each braid is wrapped over the top of the head and pinned on the opposite side.
- The braids cross over each other to form a crown or halo effect.
- Any remaining length is tucked and pinned underneath for a clean finish.
- The style sits relatively flat against the head while creating a beautiful frame for the face.
Implementation Details:
- Part hair down the center and divide into two equal sections for symmetry.
- Braid each section all the way to the ends before wrapping over the crown.
- Pin the braids securely underneath on opposite sides using multiple bobby pins.
- Gently pull at the braids to create a fuller, more relaxed appearance.
- Add small flowers or greenery tucked into the braids for a garden wedding touch.
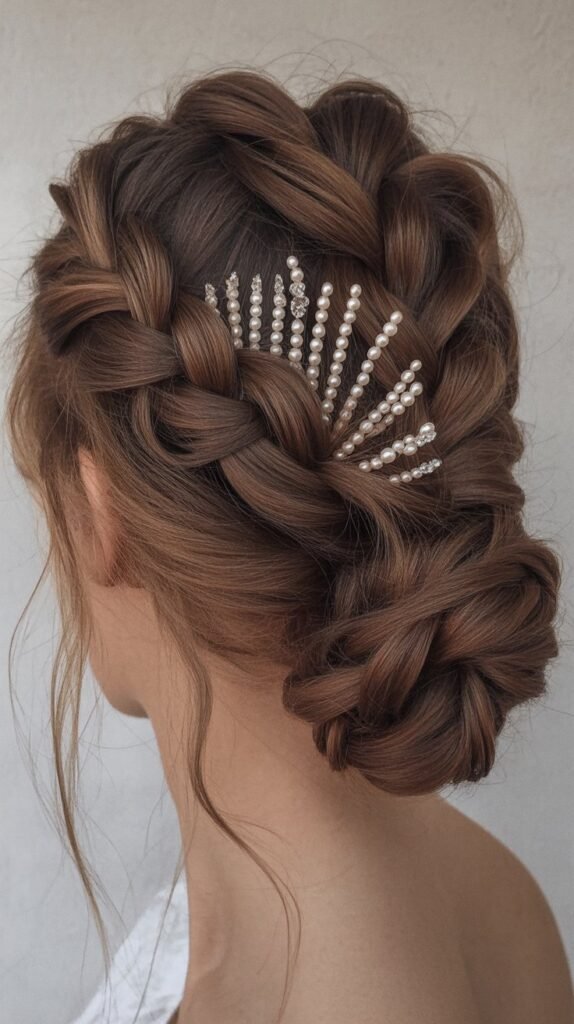
7. French Braid Twisted Updo
The French braid twisted updo combines classic braiding technique with modern twisted elements for a contemporary bridal look.
This versatile style works for various wedding themes and provides a secure, long-lasting option for bridesmaids.
The combination of braiding and twisting creates rich texture and visual complexity.
Design Features:
- One or more French braids start from the hairline and travel toward the back of the head.
- Sections of unbraided hair are twisted and incorporated into the updo for contrast.
- The braided and twisted sections are pinned together to create a textured bun or chignon.
- The interplay between braided and twisted hair adds dimension and interest.
- This style offers flexibility in placement, working well as a low, mid, or high updo.
Creation Process:
- Begin French braiding from the front hairline, picking up sections as you work backward.
- Leave some sections unbraided to twist separately for textural variety.
- As you reach the back, secure the braid with an elastic and begin twisting the remaining sections.
- Pin the braided and twisted pieces together in your desired updo placement.
- Pull gently at both braided and twisted sections to create a fuller, more voluminous appearance.
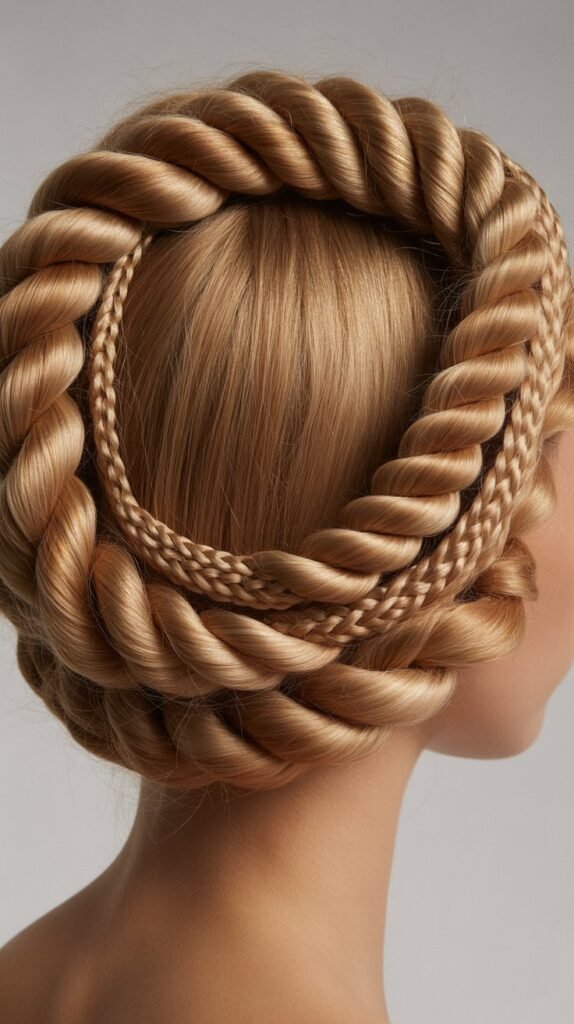
8. Halo Braid with Tucked Ends
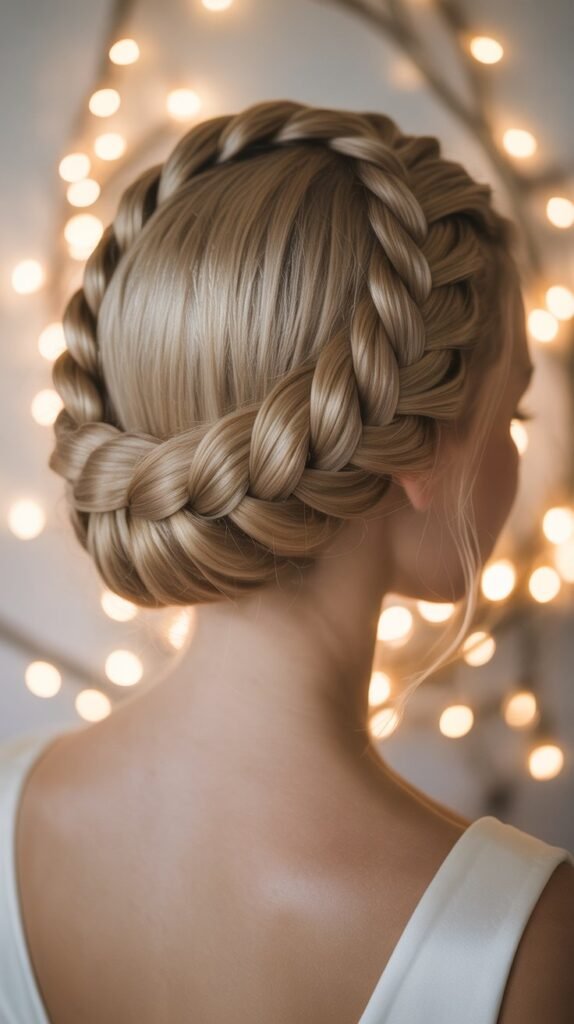
The halo braid with tucked ends creates an angelic appearance that’s perfect for romantic wedding themes.
This celestial style encircles the head with a beautiful braid that has all ends carefully tucked away for a seamless, polished finish.
It’s particularly flattering for round and heart-shaped faces.
Structural Characteristics:
- A single braid travels completely around the circumference of the head like a halo.
- All hair ends are meticulously tucked underneath the braid and pinned invisibly.
- The braid can be positioned higher or lower on the head depending on preference.
- This creates a clean, uninterrupted circular pattern that’s visually striking.
- The style keeps hair completely off the face and neck, ideal for warm weather weddings.
Assembly Instructions:
- Start the braid behind one ear and work around the head in a circular pattern.
- Pick up sections continuously as you braid to incorporate all hair into the halo.
- When you reach the starting point, continue braiding the remaining length without picking up new sections.
- Tuck the braided tail underneath the halo and pin securely from the inside.
- Use small pins placed frequently for a secure hold that lasts all day.
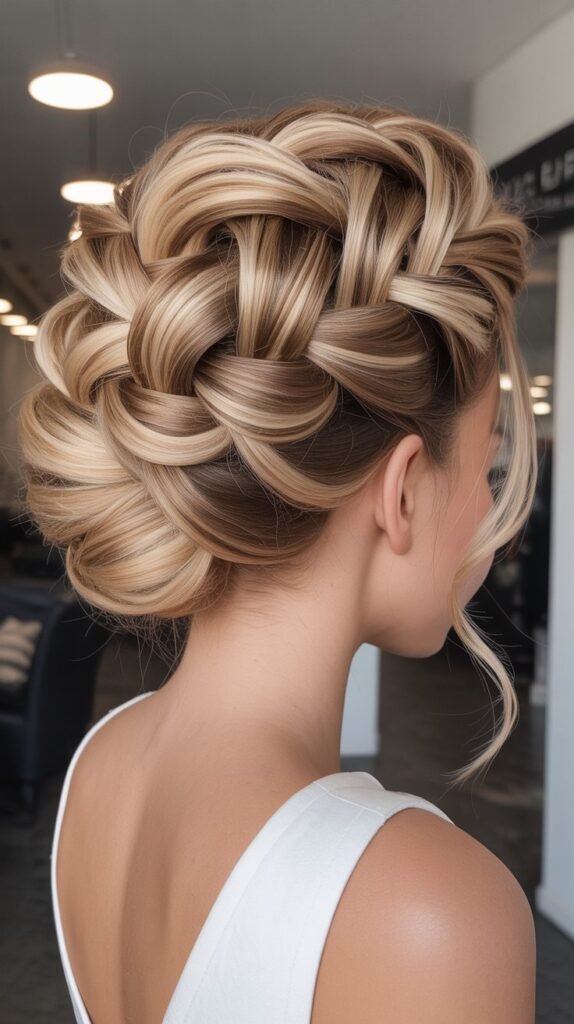
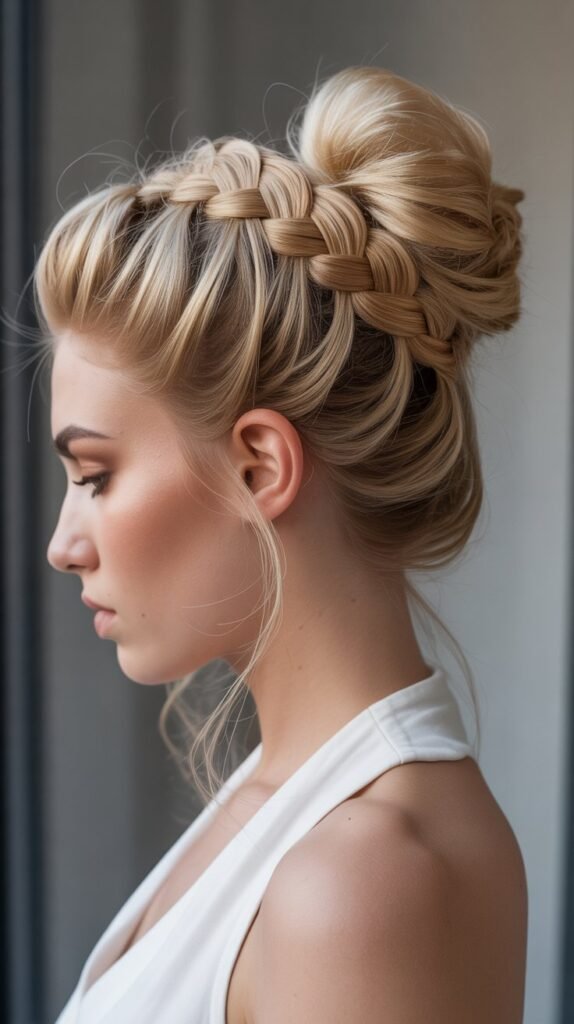
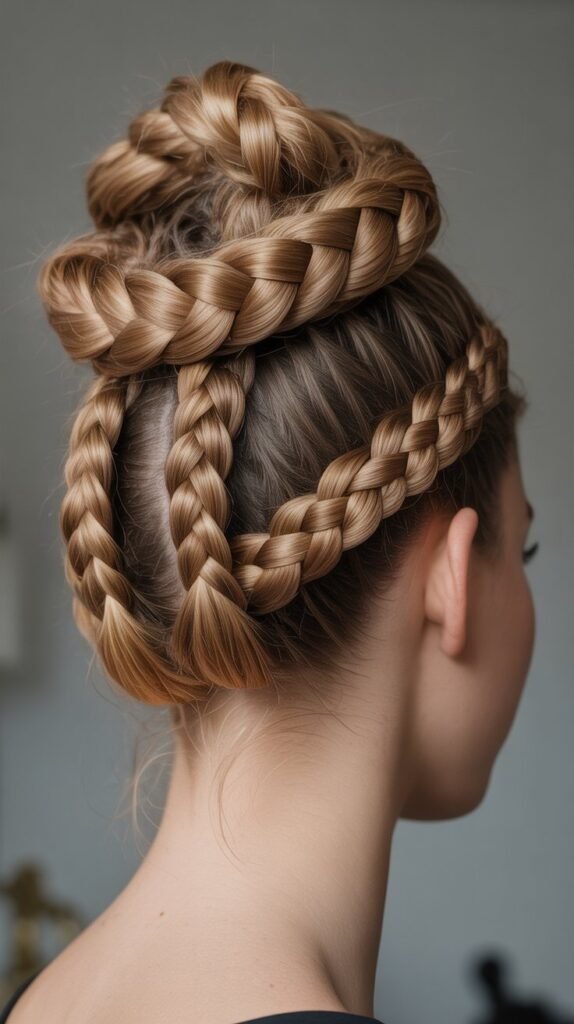
9. Braided Ballerina Bun
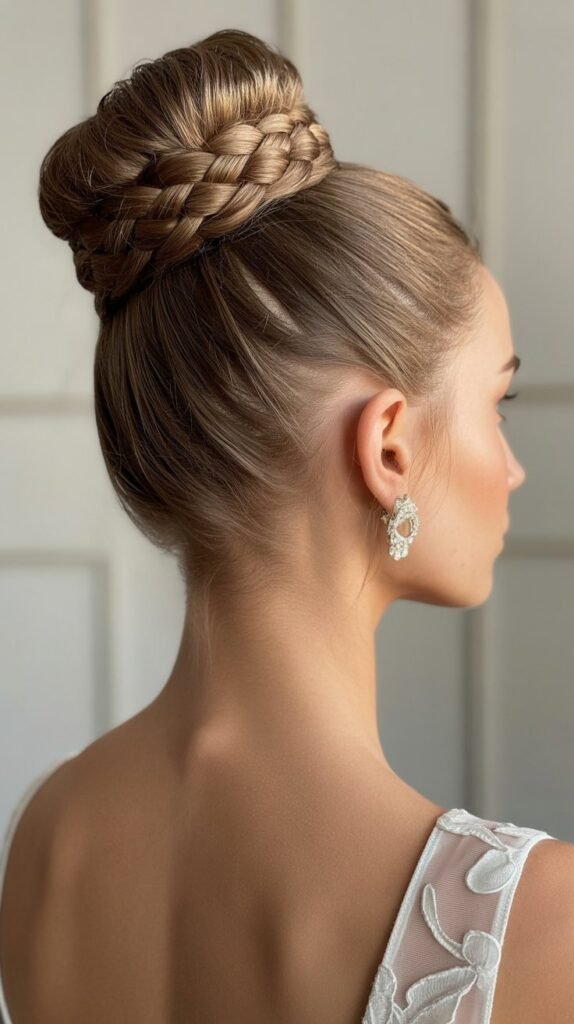
The braided ballerina bun brings dance-inspired elegance to bridesmaid hairstyles with its high placement and refined finish.
This graceful style features a classic ballerina bun elevated with braided details, creating a look that’s both sophisticated and youthful.
It’s ideal for bridesmaids with long necks and strong facial features.
Defining Aspects:
- The bun sits high on the crown of the head, creating a lengthened, elegant silhouette.
- One or more braids wrap around the base of the bun or are incorporated into the bun itself.
- The high placement draws the eye upward and creates a regal, poised appearance.
- This style pairs beautifully with statement earrings and shows off dress necklines.
- The tight, polished finish ensures the style stays perfect throughout long events.
Building Method:
- Gather all hair into a high ponytail at the crown using a strong elastic.
- Braid the ponytail completely before wrapping it around the base to form the bun.
- Alternatively, leave some sections out of the ponytail to braid separately and wrap around the bun.
- Secure with ample bobby pins placed in a spoke pattern radiating from the center.
- Apply strong hold hairspray and smooth any flyaways with a fine-toothed comb.
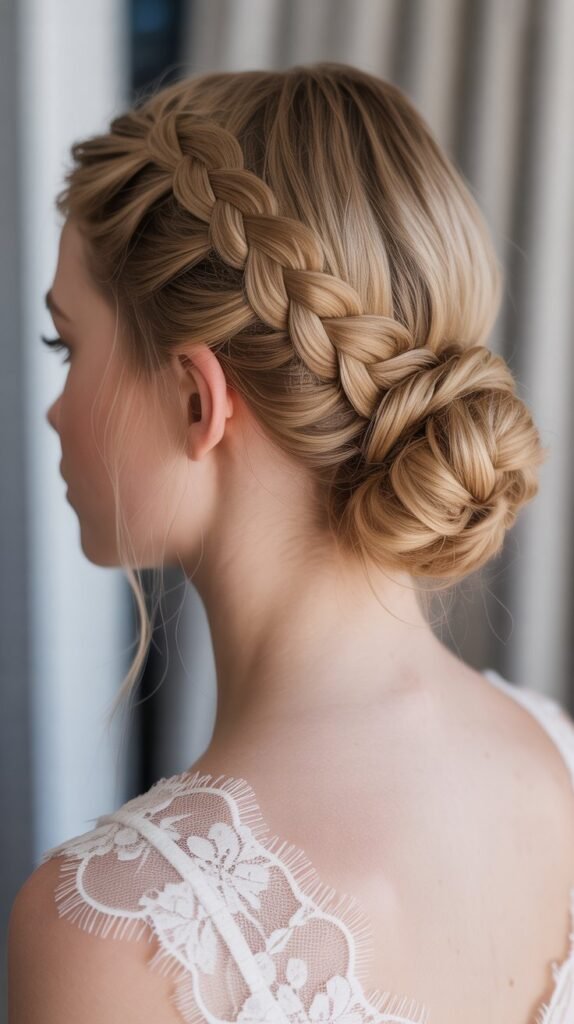
10. Side Braid into Twisted Bun
The side braid into twisted bun offers asymmetrical beauty with balanced proportions.
This contemporary style features a braid that travels along the side of the head before transitioning into an elegantly twisted bun.
It provides visual interest from every angle and photographs beautifully in bridal party portraits.
Style Breakdown:
- A braid begins at the temple or behind the ear on one side of the head.
- The braid travels horizontally or diagonally across the back of the head.
- At the opposite side, the braid transitions into twisted sections that form a bun.
- The asymmetrical placement creates a modern, fashion-forward appearance.
- This style works well for bridesmaids of varying heights as it creates visual balance.
Execution Steps:
- Start the braid on the side with a Dutch or French braid technique for added dimension.
- Continue braiding across the back of the head, keeping consistent tension throughout.
- When you reach the opposite side, secure the braid and begin twisting the remaining hair.
- Form the twisted sections into a bun, pinning securely as you wrap.
- Soften the look by pulling small pieces loose around the face and nape.
11. Infinity Braid Updo

The infinity braid updo showcases intricate pattern work that resembles the mathematical infinity symbol.
This complex and stunning style demonstrates advanced braiding technique with its interwoven figure-eight pattern.
It’s perfect for bridesmaids who want a truly unique and conversation-starting hairstyle.
Pattern Details:
- The infinity braid creates a continuous loop pattern that resembles the ∞ symbol.
- Four strands of hair are woven together in a specific sequence to create the infinity pattern.
- Multiple infinity braids can be incorporated into a single updo for maximum impact.
- The pattern creates beautiful depth and dimension that stands out in photographs.
- This advanced technique requires patience but delivers stunning results.
Creation Technique:
- Divide hair into four equal sections to begin the infinity braiding pattern.
- Cross sections in the specific infinity pattern sequence, keeping track of each strand.
- Continue the pattern until the desired length is achieved, maintaining even tension.
- Gather all infinity braided sections and form them into an artistic updo.
- Pin strategically to showcase the infinity pattern from the most flattering angles.
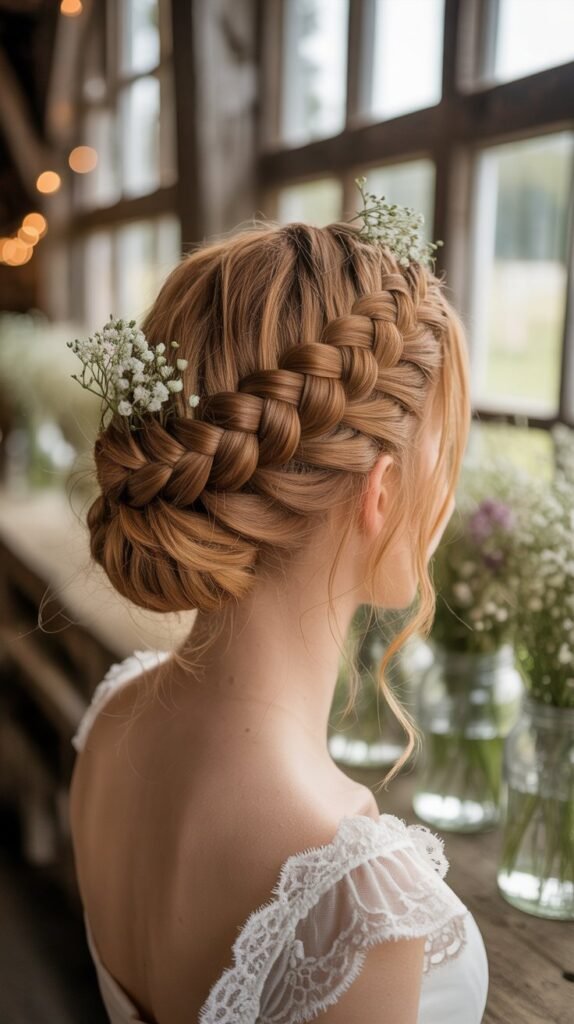
12. Braided Bun with Floral Accent

The braided bun with floral accent combines natural beauty with sophisticated styling for a garden-inspired look.
This romantic style features a braided bun adorned with fresh or silk flowers, creating a connection between the hairstyle and wedding florals.
It’s particularly stunning for spring and summer weddings.
Aesthetic Components:
- A braided bun serves as the foundation, positioned at the nape, side, or crown.
- Fresh flowers, silk flowers, or floral hair accessories are strategically placed throughout the bun.
- The florals should complement or match the wedding bouquets and arrangements.
- The combination of braided texture and organic floral elements creates romantic harmony.
- This style bridges the gap between the hairstyle and overall wedding design.
Assembly Guidelines:
- Create your chosen braided bun style first, ensuring it’s secure and stable.
- Select flowers that have been properly prepared for hair use with appropriate wrapping.
- Insert flowers using bobby pins or floral pins, distributing them naturally throughout the bun.
- Consider flower size proportion to the bun size for balanced, attractive placement.
- Coordinate with the wedding florist to ensure flowers match and are available on the wedding day.
13. Pull-Through Braid Updo
The pull-through braid updo creates the illusion of a complex braid while using a simpler technique.
This voluminous style features stacked sections that are pulled through each other, creating a full, dimensional appearance.
It’s ideal for bridesmaids with fine hair who want to achieve a fuller look.
Technical Explanation:
- Instead of traditional braiding, hair is secured in multiple ponytails stacked vertically.
- Each ponytail is split in half and the next ponytail is pulled through the middle.
- The technique creates a beautiful braid-like appearance with maximum volume.
- This method is easier to execute than complex braiding but achieves similar visual impact.
- The result is a textured, full updo that photographs with incredible dimension.
Step-by-Step Process:
- Create a series of small ponytails down the back of the head using clear elastics.
- Split each ponytail in half and bring the next ponytail through the center.
- Secure the new ponytail and repeat the process down the length of the hair.
- Gently pull at each section to create width and fullness throughout.
- Gather the finished pull-through braid into an updo and pin securely.
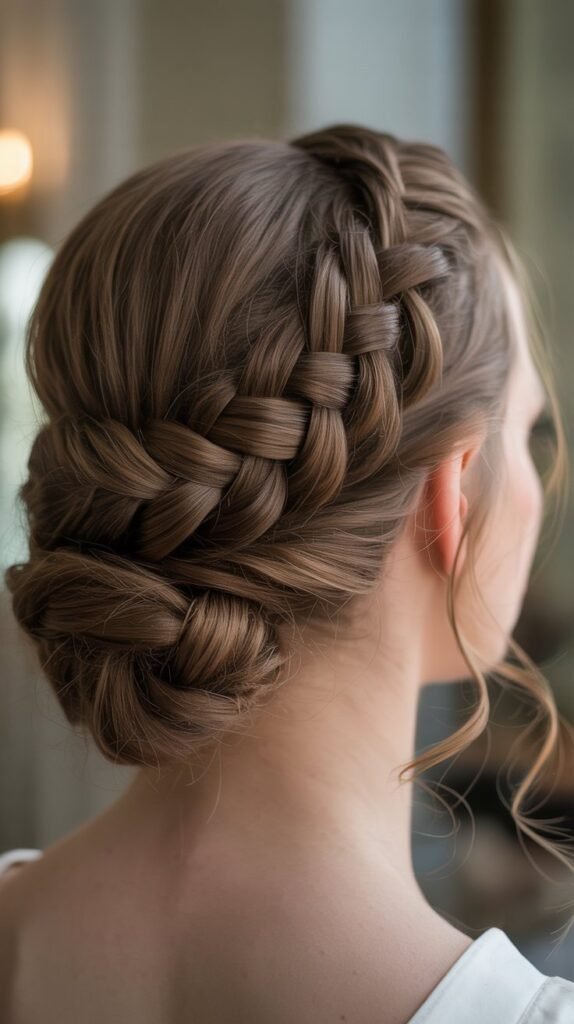
14. Lace Braid Side Chignon
The lace braid side chignon combines delicate lace braid technique with a sophisticated side-placed chignon.
This elegant style features a one-sided braid that resembles delicate lace trim, creating a refined and feminine appearance.
It’s perfect for bridesmaids who appreciate subtle, detailed beauty.
Design Qualities:
- A lace braid travels along one side of the head, picking up sections from only one side.
- The asymmetrical placement creates visual interest and frames the face beautifully.
- The remaining hair is gathered into a low side chignon positioned behind the ear.
- The lace braid technique creates a lighter, more delicate appearance than traditional braiding.
- This style works exceptionally well with formal wedding gowns and classic venues.
Construction Details:
- Begin the lace braid at the temple or front hairline on one side.
- Pick up sections from the top side only, creating the characteristic lace braid appearance.
- Continue the braid along the side and toward the back, maintaining the one-sided pickup pattern.
- Gather all hair including the lace braid into a side chignon position.
- Twist and pin the gathered hair into an elegant chignon, showcasing the lace braid across the top.
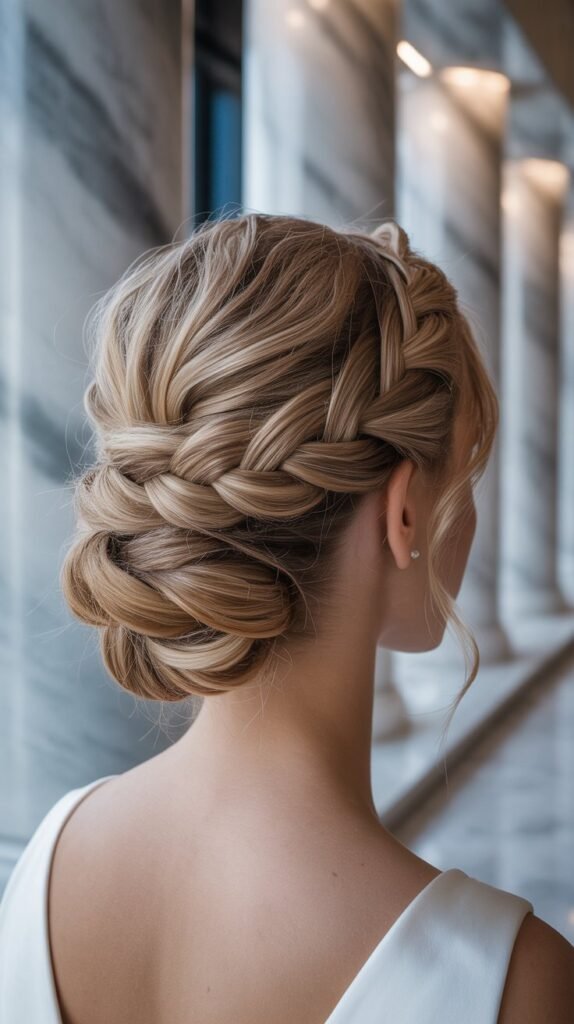
15. Double Braid Wrapped Bun
The double braid wrapped bun features two braids elegantly wrapped around a central bun, creating a layered, textured masterpiece.
This dimensional style offers visual complexity with its multiple braided elements working together in harmony.
It’s sophisticated enough for formal weddings while maintaining romantic softness.
Layered Structure:
- Two separate braids are created from different sections of hair.
- A central bun forms the foundation at the desired height placement.
- The two braids wrap around the bun in opposite directions, creating a criss-cross pattern.
- The wrapped braids add texture, dimension, and visual interest to a simple bun base.
- This technique works well for medium to thick hair textures that provide substantial braid volume.
Building Process:
- Section out hair for two braids, typically one from each side of the head.
- Braid each section completely, securing the ends with small elastics.
- Gather remaining hair into a bun at your chosen placement using a bun form if desired.
- Wrap the first braid around the bun in one direction, pinning as you go.
- Wrap the second braid in the opposite direction, creating a beautiful criss-cross effect.
16. Bohemian Braided Low Bun
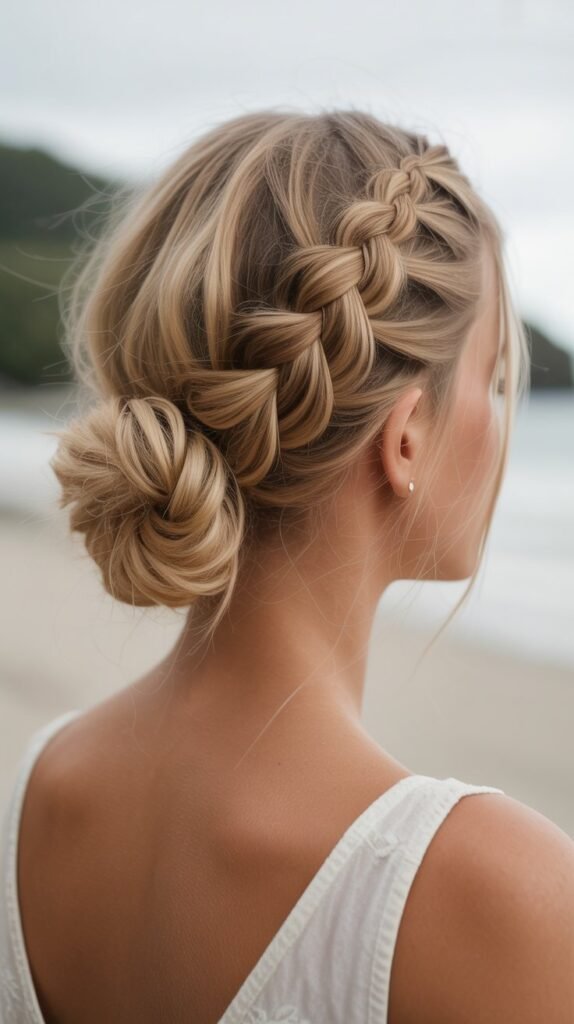
The bohemian braided low bun embraces relaxed elegance with intentionally loose, textured styling.
This free-spirited look features soft braiding incorporated into a loose, low-positioned bun that exudes effortless beauty.
It’s ideal for outdoor weddings, beach ceremonies, and rustic celebration settings.
Bohemian Characteristics:
- The overall aesthetic is intentionally undone and relaxed rather than rigidly polished.
- Multiple loose braids of varying sizes are incorporated throughout the style.
- The low bun sits at the nape with pieces gently pulled out for softness.
- Face-framing pieces are left loose and gently curled for romantic movement.
- The texture is paramount, with matte finish products replacing high-shine sprays.
Styling Approach:
- Work with textured, day-old hair or apply sea salt spray for beachy texture.
- Create several loose braids throughout the hair, mixing different braiding techniques.
- Keep braids relaxed and pull them apart generously for increased volume and softness.
- Gather all hair including braids into a very loose low bun, allowing pieces to escape naturally.
- Finish with texture spray rather than hairspray to maintain the lived-in, bohemian feel.
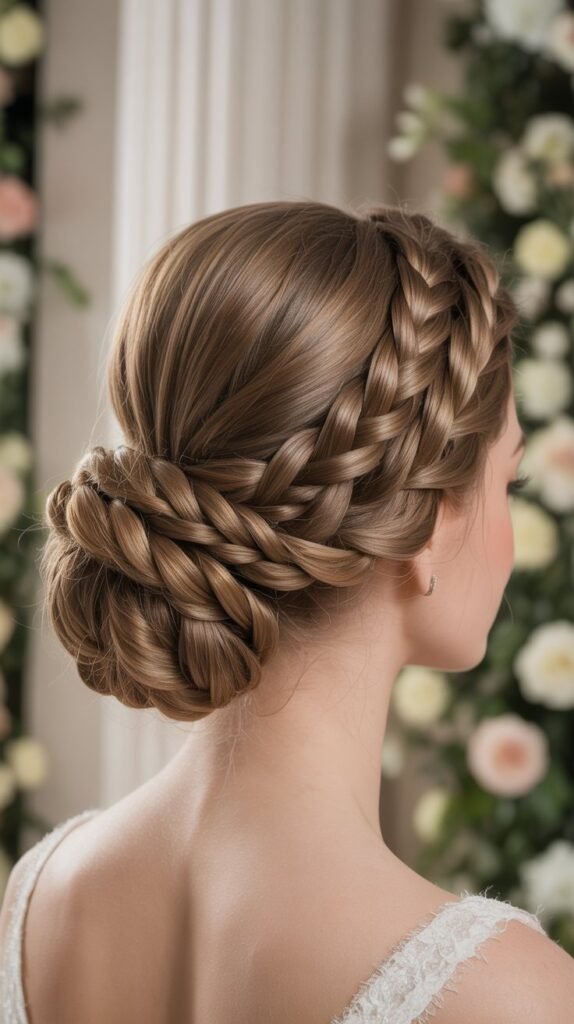
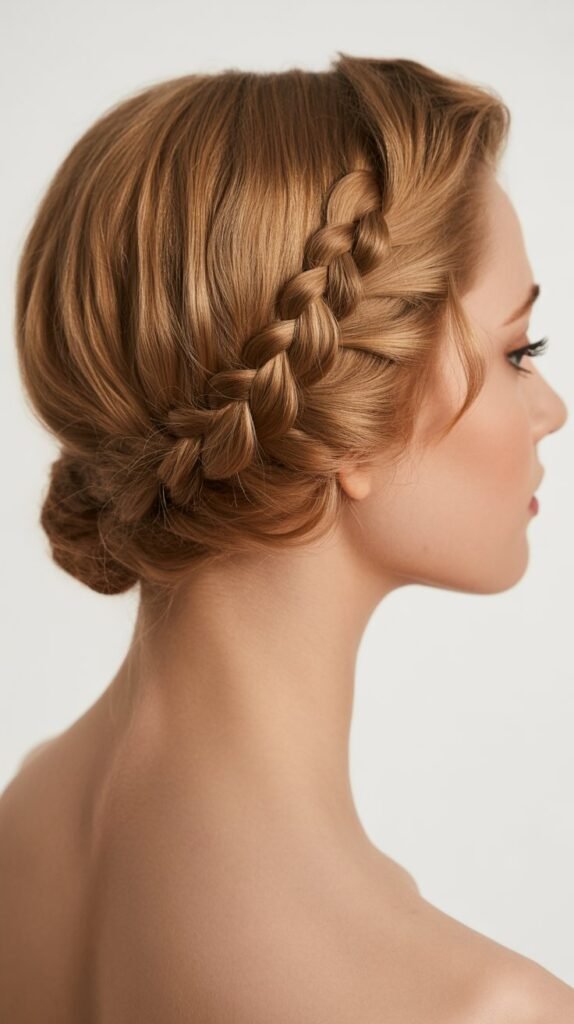
17. Braided Crown with Low Rolled Bun
The braided crown with low rolled bun combines regal crown braiding with classic rolled bun technique.
This timeless style features a braided crown that circles the head while the remaining hair is rolled into an elegant low bun.
It offers a perfect balance between traditional and contemporary styling.
Structural Elements:
- A crown braid encircles the head from temple to temple across the top.
- The crown effect creates a beautiful frame for the face and adds height.
- Remaining hair is smoothly gathered and rolled under to create a classic rolled bun.
- The combination of crown and rolled bun creates visual interest at two focal points.
- This style elongates the neck and creates a graceful, elegant silhouette.
Assembly Method:
- Create a crown braid starting at one temple, working across the top of the head to the other temple.
- Secure the crown braid with pins, ensuring it sits at the desired height and fullness.
- Gather the remaining hair at the nape into a smooth ponytail.
- Roll the ponytail upward and under, creating the classic rolled bun shape.
- Pin the rolled bun securely and ensure both crown and bun are stable for all-day wear.
18. Fishtail Braided Updo with Curled Wisps
The fishtail braided updo with curled wisps combines intricate braiding with soft, romantic face-framing elements.
This style showcases the detailed pattern of fishtail braiding while maintaining softness through strategically placed curled pieces.
It’s versatile enough for various wedding themes from casual to formal.
Style Features:
- One or more fishtail braids are incorporated into an updo structure.
- Delicate curled wisps frame the face, softening the overall appearance.
- The fishtail technique creates intricate, detailed texture that photographs beautifully.
- Strategic placement of curled pieces prevents the style from appearing too severe.
- The combination creates balance between structure and softness.
Creation Strategy:
- Start with curled hair to establish the foundation for face-framing wisps.
- Pull out small sections around the face before beginning the fishtail braiding.
- Create fishtail braids with the remaining hair, pancaking them for fullness.
- Form the fishtail braids into an updo structure using strategic pinning.
- Curl the pulled-out face-framing pieces with a small barrel curling iron for softness.
19. Twisted Halo with Braided Detail
The twisted halo with braided detail presents a modern take on the classic halo style by combining rope twists with braided accents.
This contemporary style creates a beautiful crown effect using multiple techniques, resulting in rich texture and dimensional interest.
It’s ideal for bridesmaids seeking something current and fashion-forward.
Design Components:
- Rope twists form the main halo structure circling the head.
- Smaller braids are interwoven with the twists for contrasting texture.
- The combination of techniques creates a more complex, interesting halo than single-technique styles.
- The twisted sections catch light differently than braided sections, adding dimension.
- This style works well for various hair lengths and can be adapted for different textures.
Building Technique:
- Section hair and create rope twists along one side, working toward the back.
- Simultaneously create small three-strand braids in alternating sections.
- Bring the twisted and braided sections together to form the halo crown.
- Pin the halo securely around the circumference of the head.
- Tuck any remaining ends underneath the halo or incorporate them into the crown.
20. Messy Braided Bun with Accessories
The messy braided bun with accessories embraces intentional imperfection enhanced by beautiful hair jewelry.
This relaxed style features deliberately loosened braids gathered into an artfully messy bun, then elevated with decorative pins, combs, or clips.
It’s perfect for bridesmaids who want an effortlessly chic appearance.
Aesthetic Approach:
- The overall look celebrates natural texture and intentionally imperfect placement.
- Multiple loose braids of varying sizes create organic, flowing texture.
- The bun is purposefully messy with pieces escaping in an artful manner.
- Hair accessories like jeweled pins, pearl combs, or decorative clips add glamour.
- The contrast between relaxed styling and elegant accessories creates modern sophistication.
Styling Process:
- Create several braids throughout the hair without worrying about perfection or symmetry.
- Loosen and pull apart the braids significantly to create fuller, messier texture.
- Gather braids loosely at the back of the head, allowing pieces to escape naturally.
- Form a deliberately loose bun, securing minimally to maintain the messy aesthetic.
- Add hair accessories strategically to elevate the relaxed style with glamorous touches.
21. Side Swept Dutch Braid Bun
The side swept Dutch braid bun combines the raised texture of Dutch braiding with dramatic side-swept styling.
This statement style features a bold Dutch braid that sweeps across the head before culminating in an elegant side bun.
It’s perfect for bridesmaids who want to make an impact while maintaining sophistication.
Defining Features:
- A Dutch braid begins at the front hairline and travels dramatically to one side.
- The raised nature of Dutch braiding creates a three-dimensional, prominent appearance.
- The braid transitions into a side-positioned bun that sits behind the ear or at the nape.
- The sweeping motion creates beautiful lines that photograph dynamically.
- This asymmetrical style balances boldness with elegance perfectly.
Construction Method:
- Start the Dutch braid at the front hairline, slightly off-center.
- Pick up sections as you braid, traveling diagonally across and toward one side.
- Maintain consistent tension to keep the raised braid prominent and defined.
- When you reach the side, secure the braid and form the remaining hair into a bun.
- Pin the bun securely and pancake the Dutch braid for added volume and presence.
22. Braided Gibson Tuck
The braided Gibson tuck modernizes a vintage classic by incorporating braided elements into the iconic rolled updo.
This timeless style features hair tucked and rolled under at the nape with braided accents adding contemporary interest.
It’s ideal for vintage-themed weddings and bridesmaids who appreciate classic Hollywood glamour.
Vintage Elements:
- The Gibson tuck creates a rolled under effect at the nape that’s been popular since the Edwardian era.
- Braided sections are added to update the traditional style for modern weddings.
- The low placement creates an elegant, elongated neck line.
- This style pairs beautifully with vintage-inspired wedding gowns and accessories.
- The tucked ends create a clean, polished finish without visible hair elastics.
Creation Steps:
- Create one or more braids along the sides or crown of the head.
- Gather all hair including braids into a low ponytail at the nape.
- Roll the ponytail upward and tuck the ends underneath, creating the Gibson tuck.
- Secure with pins placed horizontally through the roll for maximum hold.
- Ensure braided sections are prominently featured in the front or sides of the finished style.
23. Braided Ponytail Updo
The braided ponytail updo transforms a simple ponytail into an elegant updo through strategic braiding and wrapping.
This versatile style features a high or mid-level ponytail that’s braided and then wrapped into an updo structure.
It offers the youthful energy of a ponytail with the sophistication of an updo.
Style Characteristics:
- A ponytail serves as the base, positioned at the desired height on the head.
- The ponytail is braided using any preferred braiding technique.
- The braided ponytail is then wrapped, twisted, or tucked to create an updo.
- This style maintains the ponytail’s sleek front while providing the security of an updo.
- The wrapped braid creates interesting texture and dimension.
Building Process:
- Gather hair into a secure ponytail at your chosen height using a strong elastic.
- Braid the entire length of the ponytail, incorporating all hair into the braid.
- Wrap the braided ponytail around the base of the ponytail in a circular pattern.
- Pin securely as you wrap, creating a spiral bun effect.
- Tuck the end underneath the wrapped braid and pin invisibly for a polished finish.
24. Rope Braid Wraparound Bun
The rope braid wraparound bun showcases the elegant simplicity of rope braiding technique wrapped around a classic bun.
This streamlined style features one or more rope braids that encircle a bun base, creating clean lines and sophisticated texture.
It’s perfect for modern, minimalist wedding aesthetics and contemporary venues.
Structural Details:
- Rope braids are created using the two-strand twisting technique for a spiral effect.
- A classic bun forms the central foundation at any desired height.
- The rope braids wrap around the bun circumference, framing it beautifully.
- The clean, linear quality of rope braids creates a modern, refined appearance.
- This style works exceptionally well for sleek, polished wedding looks.
Assembly Instructions:
- Section out hair to create one or more rope braids while reserving hair for the central bun.
- Create rope braids by twisting two sections around each other continuously.
- Form the remaining hair into a bun at your desired placement using a bun form if needed.
- Wrap the rope braids around the bun base in a circular pattern.
- Secure with pins and apply shine serum to enhance the rope braid’s spiral texture.
25. Braided Bun with Ribbon Accent
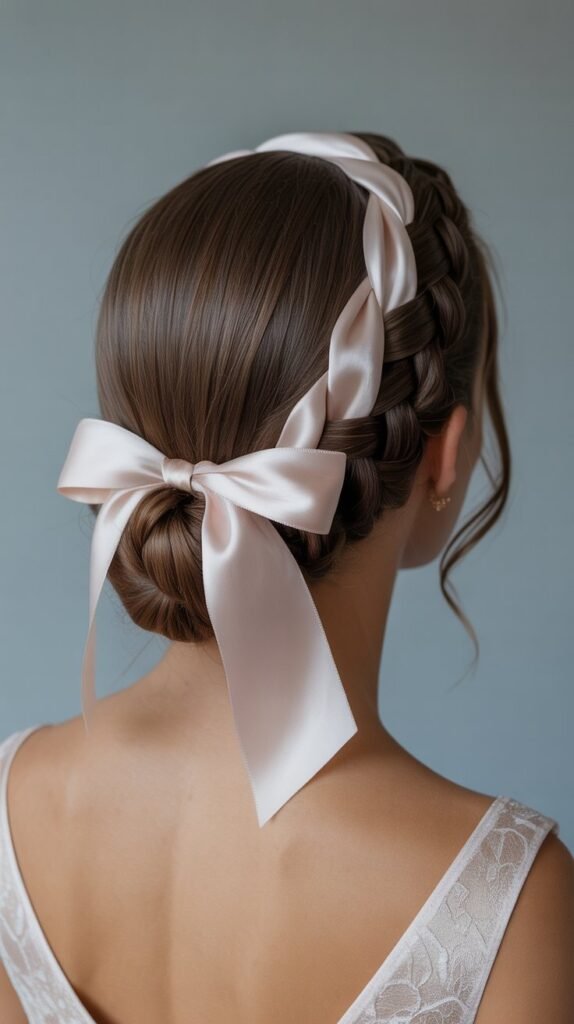
The braided bun with ribbon accent incorporates fabric elements into braided hairstyling for a romantic, customizable look.
This charming style features a braided bun enhanced with ribbon woven through the braid or tied around the bun.
It’s ideal for bridesmaids who want to incorporate wedding colors directly into their hairstyles.
Decorative Aspects:
- Ribbon in wedding colors or complementary shades is woven into the braided hair.
- The ribbon can be incorporated during braiding or wrapped around the finished bun.
- Silk, satin, or velvet ribbons work best for an elegant, luxurious appearance.
- The ribbon adds a pop of color and creates a cohesive look with wedding décor.
- This customizable element allows each bridesmaid to have a personalized touch.
Integration Method:
- Select ribbon that’s approximately half-inch to one-inch wide for best results.
- If weaving into the braid, treat the ribbon as one strand of a three-strand braid.
- Alternatively, braid the hair first and then wrap the ribbon around the completed bun.
- Tie the ribbon in a small bow or knot, allowing ends to trail gracefully if desired.
- Secure the ribbon with small pins to prevent slipping throughout the event.
26. Asymmetrical Braided Updo
The asymmetrical braided updo embraces modern design principles with intentionally off-center placement and uneven distribution.
This contemporary style features braids positioned asymmetrically with the updo placed to one side for dramatic effect.
It’s perfect for fashion-forward bridesmaids and modern wedding celebrations.
Contemporary Design:
- Braids are positioned asymmetrically rather than centered or evenly distributed.
- The updo placement is off-center, creating visual tension and modern interest.
- Multiple braiding techniques can be combined in asymmetrical patterns.
- The intentional imbalance creates a fashion editorial quality.
- This style makes a statement while remaining elegant and appropriate for weddings.
Construction Approach:
- Plan the asymmetrical design before beginning, considering face shape and proportions.
- Create braids on one side of the head more prominently than the other.
- Position the updo to one side rather than centered at the back.
- Balance the asymmetry by leaving strategic face-framing pieces on the opposite side.
- Ensure the asymmetrical design is intentional and polished, not accidental or messy.
27. Braided Knot Bun
The braided knot bun creates sculptural beauty through knotted braiding technique combined with bun structure.
This artistic style features braids tied into actual knots before being formed into an updo, creating three-dimensional texture and visual intrigue.
It’s ideal for bridesmaids who appreciate unique, conversation-starting hairstyles.
Artistic Elements:
- Braided sections are literally tied into knots rather than simply twisted or wrapped.
- The knotting creates bumps and dimensional texture throughout the style.
- Multiple knotted braids can be combined to create a complex, sculptural bun.
- The technique produces a truly unique appearance that stands out in photos.
- This style showcases advanced technique and creates an artistic statement.
Creation Technique:
- Create multiple braids from different sections of hair throughout the head.
- Tie each braid into one or more knots along its length.
- Gather all knotted braids together at the desired updo placement.
- Arrange the knotted sections artistically to showcase the three-dimensional texture.
- Pin securely to maintain the sculptural shape and ensure the knots remain prominent.
Hair Care and Preparation Tips
Proper preparation ensures your chosen braided updo looks its best and lasts throughout the wedding day. Understanding hair care fundamentals makes a significant difference in the final result. These professional tips help bridesmaids achieve salon-quality results.
Pre-Wedding Hair Preparation:
- Begin deep conditioning treatments two weeks before the wedding for optimal hair health.
- Avoid significant haircuts or color changes within one week of the wedding day.
- Wash hair the day before styling for best texture and grip.
- Apply a leave-in conditioner to prevent breakage during extensive styling.
- Get adequate sleep the night before to ensure hair looks healthy and vibrant.
Day-of Styling Tips:
- Start with slightly textured hair by applying dry shampoo or texturizing spray to clean hair.
- Use heat protectant before any curling or straightening to prevent damage.
- Work in sections when creating braids to ensure even tension and consistent results.
- Keep bobby pins and clear elastics within easy reach during the styling process.
- Have a small mirror available to check all angles of the hairstyle.
Maintenance Throughout the Day:
- Bring bobby pins and a small hairspray for touch-ups during the reception.
- Avoid touching or adjusting the hairstyle unnecessarily to maintain its integrity.
- If outdoors, consider weather conditions and use appropriate holding products.
- Take photos early in the day when the hairstyle is freshest for best results.
- Have a bridesmaid buddy system where you check each other’s hairstyles periodically.
Choosing the Right Style for Your Wedding Theme
Matching bridesmaid hairstyles to the overall wedding aesthetic creates cohesive, beautiful wedding photos. Different wedding themes call for different styling approaches and levels of formality. Understanding these connections helps bridesmaids select the most appropriate braided updo.
Coordination Considerations:
- Discuss hairstyle choices with the bride to ensure they complement her vision.
- Consider whether all bridesmaids will wear the same style or variations on a theme.
- Account for different hair lengths and textures within the bridal party.
- Ensure chosen styles work with the bridesmaid dress necklines and silhouettes.
- Factor in the formality level of the venue when selecting styling approaches.
Seasonal Appropriateness:
- Spring weddings pair beautifully with floral-accented styles and softer, romantic updos.
- Summer ceremonies call for secure updos that withstand heat and humidity.
- Fall celebrations complement richer, more textured braiding techniques.
- Winter weddings allow for more dramatic, polished, and structured updo styles.
- Consider weather conditions and choose styles with appropriate hold and security.
Professional Styling vs. DIY Considerations
Deciding between professional styling and DIY approaches requires honest assessment of skill levels and available resources. Both options can produce beautiful results when properly executed. Understanding the benefits and challenges of each approach helps bridesmaids make informed decisions.
Professional Stylist Benefits:
- Experienced stylists execute complex techniques with precision and speed.
- Professional tools and products create longer-lasting, more polished results.
- Stylists can adapt techniques to work with individual hair types and textures.
- Having hair professionally done reduces stress on the wedding day morning.
- Multiple bridesmaids can be styled efficiently in a coordinated timeframe.
DIY Approach Advantages:
- Significant cost savings, especially for larger bridal parties.
- Greater flexibility in timing and location of styling.
- Opportunity to practice and perfect the style before the wedding day.
- Personal satisfaction from creating your own beautiful hairstyle.
- Ability to make adjustments throughout the day if needed.
Hybrid Approach:
- Consider having complex foundational elements done professionally while adding DIY finishing touches.
- Schedule a trial session with a stylist to learn techniques for DIY recreation.
- Have one skilled friend style all bridesmaids’ hair for consistency and cost savings.
- Use professional styling for the bride and mothers while bridesmaids style each other.
- Hire a stylist for hair prep and structure, then add your own accessories and finishing touches.
Practice Recommendations:
- Schedule at least two full practice runs before the wedding day.
- Take detailed photos of successful practice attempts from all angles.
- Time yourself to ensure the style can be completed within available wedding morning time.
- Practice with the exact products and tools you’ll use on the wedding day.
- Have someone else photograph your practice styles to see how they appear in photos.
Accessories and Embellishments for Braided Updos
The right accessories transform a beautiful braided updo into something truly extraordinary. From delicate pins to statement pieces, embellishments add personality and glamour to bridesmaid hairstyles. Selecting appropriate accessories ensures they enhance rather than overwhelm the overall look.
Popular Accessory Options:
- Pearl Pins: Classic and elegant, pearl pins add subtle glamour scattered throughout braids.
- Crystal Combs: Sparkly combs positioned near the updo create focal points that catch light.
- Fresh Flowers: Natural blooms connect the hairstyle to wedding florals for cohesive beauty.
- Silk Ribbons: Woven through braids or tied around buns, ribbons add color and softness.
- Metallic Bobby Pins: Gold, silver, or rose gold pins worn visibly create modern edge.
- Jeweled Barrettes: Statement barrettes positioned strategically add vintage or contemporary flair.
Placement Guidelines:
- Position accessories where braids naturally intersect or at the base of updos for maximum impact.
- Distribute smaller accessories like pearl pins evenly throughout for balanced sparkle.
- Use larger statement pieces as single focal points rather than multiple competing elements.
- Consider the dress neckline and ensure accessories don’t clash with dress embellishments.
- Place accessories to be visible in both front-facing and profile photographs.
Coordinating with Wedding Style:
- Match metal tones in hair accessories to jewelry and dress details for cohesion.
- Select flowers that appear in the wedding bouquets and arrangements.
- Choose ribbon colors that coordinate with bridesmaid dress colors or wedding palette.
- Consider the formality level—understated accessories for casual, bolder for formal weddings.
- Ensure all bridesmaids’ accessories complement each other for unified bridal party photos.
Application Tips:
- Secure accessories after the hairstyle is completely finished and sprayed.
- Use additional bobby pins behind decorative pieces for extra security.
- Test accessories during practice runs to ensure they stay secure throughout the day.
- Bring extra accessories to the wedding for emergency replacements if needed.
- Apply accessories last to avoid interfering with the styling process.
Conclusion
The journey through these 27 Romantic Bridesmaid Updo Hairstyles with Braid reveals the incredible versatility and timeless beauty of braided updos for wedding celebrations.
From the classic elegance of low braided buns to the contemporary sophistication of asymmetrical designs, each style offers unique charm that enhances the bridal party’s overall appearance.
Whether you choose the bohemian romance of loose, textured braids or the polished refinement of intricate crown braids, these hairstyles ensure every bridesmaid feels confident and beautiful on the special day.
The combination of braiding techniques with updo structures creates hairstyles that are both practical for all-day wear and stunning for photographs that will be treasured for years to come.
By considering factors like wedding theme, personal style preferences, hair texture, and maintenance requirements, bridesmaids can select the perfect braided updo that complements the bride’s vision while expressing their individual beauty.
With proper preparation, quality products, and attention to detail, these romantic braided updos transform ordinary bridal party looks into extraordinary memories captured forever in wedding albums.