Short hair on your wedding day isn’t a limitation—it’s your ultimate advantage. While long-haired brides struggle with heavy updos and constant touch-ups, you’ll glide through your celebration with effortless elegance and modern sophistication.
This article unveils 27 stunning short hair wedding looks that’ll steal the show, proving that pixie cuts, bobs, and lobs can be just as breathtaking as cascading curls.
From vintage-inspired finger waves to contemporary textured styles, you’ll discover how to transform your short hair into a show-stopping bridal statement that photographs beautifully and stays flawless from ceremony to last dance.
1. Classic Sleek Bob with Side Part

The sleek bob represents timeless elegance that never goes out of style for wedding ceremonies.
This polished look works exceptionally well for modern minimalist weddings and creates a sophisticated canvas for statement earrings.
A deep side part adds drama while keeping the overall aesthetic clean and refined.
Styling Tips:
- Start with freshly washed hair and apply a heat protectant serum to prevent damage from styling tools.
- Blow-dry your hair using a paddle brush, pulling sections taut for maximum smoothness and shine.
- Run a flat iron through small sections at 350-400°F to eliminate any remaining texture or frizz.
- Apply a lightweight shine serum to the mid-lengths and ends, avoiding the roots to prevent greasiness.
- Set the style with a light-hold hairspray that won’t leave your hair feeling stiff or crunchy.
Best For:
- Straight to slightly wavy hair textures that naturally lie flat without excessive effort.
- Modern, minimalist, or contemporary wedding themes where clean lines are prioritized.
- Brides who want to showcase bold jewelry pieces like chandelier earrings or statement necklaces.
2. Romantic Textured Pixie Cut

The textured pixie brings an edgy yet feminine energy to bridal styling that challenges traditional expectations.
This cut showcases your facial features beautifully and requires minimal maintenance throughout your wedding day.
Strategic texturing adds movement and dimension that photographs exceptionally well from every angle.
Styling Essentials:
- Apply a volumizing mousse to damp hair, focusing on the roots for lift and body.
- Use a diffuser attachment on your blow dryer to enhance natural texture without creating frizz.
- Work a small amount of texturizing paste through the lengths, separating pieces for definition.
- Create strategic height at the crown by backcombing gently and smoothing the surface layer.
- Finish with a flexible-hold spray that maintains movement while keeping the style in place.
Accessory Pairing:
- Delicate floral crowns that sit like a halo around the head create a romantic garden-party vibe.
- Single statement hairpins positioned near the temple add sparkle without overwhelming the cut.
- Pearl or crystal ear cuffs complement the edgy-meets-elegant aesthetic perfectly.
3. Finger Waves for Vintage Glamour

Finger waves transport you straight to the golden age of Hollywood with their sculptural elegance and old-world charm.
This technique creates S-shaped curves that lie flat against the head, offering a red-carpet worthy look.
The style pairs beautifully with art deco wedding themes and vintage-inspired gowns with beading or fringe details.
Creating the Look:
- Begin with clean, damp hair and apply a strong-hold setting lotion throughout all sections.
- Create a deep side part and use a fine-tooth comb to sculpt S-shaped curves along the scalp.
- Secure each wave with metal clips while the hair dries completely, either naturally or under a hooded dryer.
- Once fully dry, remove clips carefully and gently brush the surface with a soft-bristle brush for shine.
- Lock the waves in place with a firm-hold hairspray, misting from at least 10 inches away.
Era-Appropriate Accessories:
- Art deco headbands with geometric designs and crystals enhance the vintage authenticity.
- Jeweled brooches pinned at the deepest part of the wave create focal points.
- Birdcage veils positioned over one eye complete the 1920s-1940s aesthetic flawlessly.
4. Tousled Lob with Soft Curls

The lob (long bob) offers versatility that bridges the gap between short and medium-length styling options.
Soft curls add romance and movement without appearing too formal or structured for relaxed wedding settings.
This effortlessly chic style works beautifully for beach weddings, garden ceremonies, and bohemian celebrations.
Curl Creation Process:
- Prep with a sea salt spray on damp hair to enhance natural texture and create grip.
- Wrap random sections around a 1-inch curling iron, alternating directions for an organic, undone look.
- Allow curls to cool completely in your palm before releasing them to ensure lasting hold.
- Break up the curls with your fingers, gently pulling them apart for a softer, more relaxed appearance.
- Scrunch in a light texturizing spray to add piece-y definition and beachy movement.
Flower Placement Ideas:
- Tuck small blooms like baby’s breath or wax flowers randomly throughout for a whimsical garden feel.
- Position a small cluster of flowers behind one ear as a focal point that draws the eye.
- Weave a delicate floral vine through the curls for a fairytale-inspired romantic touch.
5. Asymmetrical Bob with Bold Side Sweep

The asymmetrical bob makes a confident statement with its dramatic angle and modern edge that commands attention.
One side remains longer, creating visual interest and allowing for creative styling that’s both contemporary and elegant.
This cut photographs beautifully in profile shots and highlights strong facial features with architectural precision.
Styling Techniques:
- Use a flat iron to create pin-straight texture that emphasizes the sharp angles of the cut.
- Sweep the longer side dramatically across the face, securing behind the ear with hidden bobby pins.
- Apply a pomade or styling wax to the shorter side for a slicked-back finish with high shine.
- Keep the back section smooth and polished, ensuring all lines remain crisp and defined throughout the day.
- Use a strong-hold hairspray to lock the swept section in place, preventing it from falling forward.
Complementary Makeup:
- Bold lips in classic red or deep berry shades balance the dramatic hair and create cohesion.
- Strong brows frame the face and prevent the overall look from appearing too one-dimensional.
- Winged eyeliner adds vintage glamour while maintaining the modern edge of the hairstyle.
6. Crown Braid for Short Hair

Crown braids prove that short hair can absolutely handle intricate braided styles with proper technique and patience.
This ethereal style wraps around the head like a halo, creating a romantic princess-worthy look.
While it requires hair at least 4-5 inches long, the result is worth every minute of styling time.
Braiding Strategy:
- Start by creating texture with a curling iron or hot rollers to give the hair more grip and fullness.
- Section the hair into a horseshoe shape from ear to ear across the crown area.
- Begin a Dutch braid (reverse French braid) on one side, incorporating small sections as you work around.
- Secure the end of the braid with a clear elastic and tuck it underneath the starting point.
- Pull gently on the braid sections to create width and fullness, making it appear more substantial.
Working with Short Layers:
- Use small clear elastics to secure wayward pieces that want to escape from the braid structure.
- Apply a light-hold gel to short layers before braiding to help them stay incorporated longer.
- Leave face-framing pieces out intentionally for a softer, more romantic finished appearance.
- Add decorative hairpins to both secure loose sections and contribute to the overall aesthetic.
7. Half-Up Twisted Style

The half-up twisted style offers the best of both worlds by keeping hair away from the face while showcasing length.
This versatile option works for various hair lengths in the bob to lob range and adds height without requiring extensions.
The twisted sections create visual interest and photograph beautifully from behind during ceremony moments.
Step-by-Step Instructions:
- Divide the hair horizontally from temple to temple, isolating the top section from the bottom.
- Take a small section near the temple and begin twisting it tightly back toward the crown area.
- Repeat on the opposite side, creating a mirror image twist that meets the first at center back.
- Secure both twists together with bobby pins, crossing them for maximum hold and stability.
- Curl or wave the remaining loose hair to add body and create a romantic contrast with the sleek twists.
Embellishment Options:
- Pearl-studded hairpins scattered throughout the twisted sections add subtle sparkle and dimension.
- A small decorative comb positioned where the twists meet creates an elegant focal point.
- Delicate crystal pins placed sporadically catch light beautifully in wedding photography.
8. Slicked-Back Wet Look

The slicked-back wet look channels supermodel energy with its high-fashion edge and confident attitude.
This daring style works exceptionally well for evening weddings and fashion-forward brides who want to make a bold statement.
The high-shine finish creates a striking contrast against traditional wedding elements like veils and gowns.
Achieving the Look:
- Apply generous amounts of strong-hold gel to soaking wet hair, distributing it evenly throughout.
- Use a fine-tooth comb to slick hair back tightly from the hairline to the nape of the neck.
- Continue combing until the hair lies completely flat with no bumps or texture visible from any angle.
- Allow the gel to dry naturally for the most authentic wet-look finish, or use a diffuser on cool setting.
- Seal with a high-shine finishing spray specifically formulated for slicked-back styles.
When to Choose This Style:
- Modern, minimalist weddings with clean lines and contemporary design elements throughout.
- Evening ceremonies where dramatic lighting will enhance the reflective quality of the style.
- Brides who want to showcase sculptural earrings or dramatic necklines without hair interference.
- Fashion-forward celebrations that embrace runway trends and editorial aesthetics.
9. Voluminous Curly Pixie
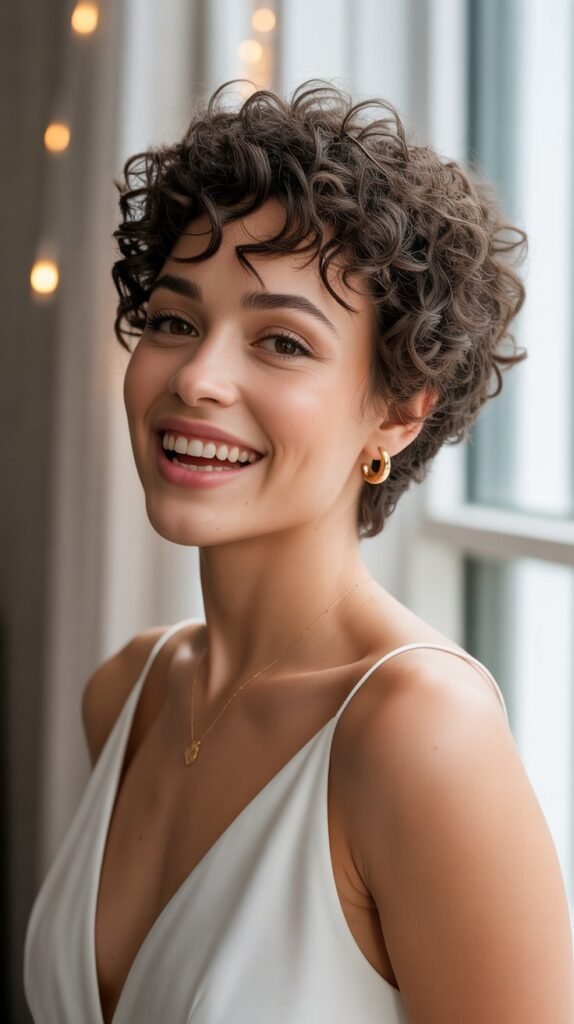
Curly pixie cuts bring natural texture to the forefront, celebrating the beauty of coils and curls.
This style embraces volume and dimension rather than fighting against natural hair patterns for authentic beauty.
The key is enhancing what’s already there while maintaining definition that lasts through lengthy celebrations.
Curl Definition Methods:
- Start with a curl-enhancing cream applied to soaking wet hair, raking it through with fingers.
- Scrunch sections upward toward the scalp to encourage curl formation and maximize volume at the roots.
- Diffuse on low heat with a bowl diffuser attachment, cupping curls gently without disturbing their pattern.
- Once 80% dry, apply a light gel by scrunching it in for hold without crunchiness.
- Finish by gently separating larger curl clumps for a fuller, more voluminous finished appearance.
Maintaining Definition All Day:
- Use a satin or silk scarf when changing into your dress to protect the style from friction.
- Keep a small bottle of water mixed with leave-in conditioner for touch-ups throughout the day.
- Avoid touching or running fingers through curls excessively, which disrupts the curl pattern.
- If curls lose definition, spritz lightly with water and scrunch to reactivate styling products.
10. Deep Side Part with Dramatic Wave

The deep side part creates instant drama and old-Hollywood glamour with minimal effort required.
A single dramatic wave on the longer side draws the eye and photographs beautifully in profile shots.
This style works particularly well for asymmetrical haircuts but can be adapted for even-length bobs too.
Creating the Wave:
- Part hair deeply on one side, about an inch from the natural part line for maximum impact.
- Apply setting lotion to the longer side and create a large S-curve using your fingers and a comb.
- Clip the wave in place with large metal clips and allow to set completely while you do makeup.
- Remove clips carefully and brush through gently with a soft brush to smooth without eliminating the wave.
- Tuck the hair behind the ear on the shorter side to emphasize the asymmetry of the style.
Pairing with Face Shapes:
- Oval faces can carry this style with any size wave, from subtle to dramatic.
- Round faces benefit from the deep part creating vertical lines that elongate the appearance.
- Heart-shaped faces look beautiful with the wave positioned to balance a wider forehead.
- Square faces soften when the wave creates curves that contrast with angular jawlines.
11. Braided Headband Effect

The braided headband effect creates a delicate crown-like detail that’s both practical and beautiful for short hair.
This style keeps hair off the face while adding intricate detail that elevates the overall look significantly.
Even if your hair isn’t quite long enough for a full crown braid, this partial version delivers similar impact.
Technique Breakdown:
- Section hair from temple to temple across the top of the head, leaving the back sections down.
- Create a simple three-strand or Dutch braid along this section, working from one side to the other.
- Secure the end of the braid with a small clear elastic positioned behind the opposite ear.
- Gently pull on the braid sections to create width and a more substantial, fuller appearance.
- Leave the remaining hair loose and styled in waves or curls for a romantic contrast.
Enhancement Ideas:
- Weave tiny fresh flowers or greenery through the braid for an organic garden-inspired touch.
- Add small pearl or crystal pins along the length of the braid for subtle sparkle.
- Use metallic thread or thin ribbon braided into the sections for a unique bohemian element.
12. Pompadour with Volume

The pompadour brings rock-and-roll edge to bridal styling while maintaining elegance through proper execution.
This style creates dramatic height at the front that elongates the face and adds confidence to your overall presence.
Modern pompadours work beautifully for alternative brides who want to honor their personal style on their wedding day.
Building the Structure:
- Backcomb the front section at the roots aggressively to create a foundation of volume and support.
- Smooth the surface layer over the backcombed section with a soft brush to hide the teasing technique.
- Roll the front section back and secure with bobby pins positioned at the base of the volume.
- Apply firm-hold hairspray liberally to lock the structure in place for all-day wear.
- Slick the sides down flat to create contrast with the volume up top for maximum impact.
Style Variations:
- Classic pompadour with extreme height creates vintage rockabilly vibes perfect for retro themes.
- Soft pompadour with gentle volume offers a more subdued, romantic interpretation of the style.
- Textured pompadour leaves the surface piece-y rather than smooth for modern edge.
13. Accessorized Pixie with Jeweled Headpiece

A pixie cut becomes a stunning canvas for elaborate headpieces that might overwhelm longer hairstyles.
The short length allows decorative pieces to take center stage without competing with hair volume or length.
This approach transforms simplicity into statement-making bridal beauty that’s utterly unforgettable.
Headpiece Selection:
- Choose pieces that wrap around the head rather than those designed to tuck into long hair.
- Consider the weight of the headpiece, ensuring it’s not too heavy for comfortable all-day wear.
- Match metals in the headpiece to your jewelry and dress details for cohesive overall styling.
- Test the headpiece during your hair trial to ensure it stays secure on short hair without slipping.
Securing Techniques:
- Use fashion tape or toupee tape on the inside of headbands to prevent sliding on smooth hair.
- Bobby pins can anchor decorative pieces at multiple points for extra security throughout the celebration.
- Apply a light texturizing spray before putting on headpieces to create grip on slippery, freshly styled hair.
14. Faux Hawk with Romantic Twist

The faux hawk brings unexpected edge to bridal beauty while maintaining femininity through soft execution and romantic elements.
This style creates height through the center of the head without the commitment of an actual mohawk cut.
When paired with flowers or delicate accessories, it transforms into something uniquely bridal yet personally authentic.
Creating the Faux Hawk:
- Apply volumizing mousse throughout damp hair, concentrating on the center section for maximum lift.
- Blow dry the center section while lifting it straight up with a round brush to create height.
- Use bobby pins to secure the sides flat against the head, creating the illusion of an undercut.
- Backcomb the center section at the roots for additional height and structure that lasts.
- Apply a strong-hold hairspray and gently smooth the surface without eliminating all the volume created.
Softening the Look:
- Tuck small flowers along the raised center section for romantic contrast with the edgy structure.
- Leave a few soft pieces around the face to prevent the style from appearing too severe or harsh.
- Choose neutral or pastel makeup colors to balance the boldness of the hairstyle itself.
15. Classic Chignon for Bob Length

The low chignon adapts beautifully for bob-length hair when proper technique and strategic pinning create the illusion of more length.
This timeless updo exudes sophistication and elegance while keeping hair completely off the neck and shoulders.
It works particularly well for formal weddings and traditional celebrations where classic beauty reigns supreme.
Adaptation for Shorter Lengths:
- Curl all the hair first to create extra volume and length that makes the updo appear fuller.
- Gather hair at the nape and loosely twist, allowing the curls to create a rounded, fuller shape.
- Pin sections randomly rather than creating a tight bun, which would reveal the limited length.
- Leave a few pieces out strategically to frame the face and disguise any areas where length is lacking.
- Use a texturizing spray before styling to create grip that helps bobby pins hold more securely.
Veil Attachment:
- Position the veil comb directly above the chignon for proper weight distribution and security.
- Use extra bobby pins to anchor both the veil and the hairstyle simultaneously for double duty.
- Choose a veil style that drapes over the chignon to help camouflage the updo’s construction.
16. Retro Pin Curls

Pin curls deliver authentic vintage charm with their sculptural quality and timeless appeal that never feels dated.
This technique creates uniform, bouncy curls that sit close to the head in organized patterns for polished perfection.
The style works beautifully for themed weddings, particularly those inspired by the 1940s and 1950s eras.
Pin Curl Process:
- Start with clean, damp hair and apply a generous amount of setting lotion throughout all sections.
- Take small sections and wrap them around your finger, creating flat circular curls against the scalp.
- Secure each curl with a metal clip or bobby pin, maintaining the circular shape perfectly flat.
- Allow to dry completely under a hooded dryer or overnight for maximum set and lasting hold.
- Remove pins carefully, brush through gently with a soft brush, and set with firm-hold hairspray.
Curl Pattern Options:
- Forward-rolling curls create volume and lift away from the face for a glamorous appearance.
- Backward-rolling curls provide a more subtle, elegant look that lies closer to the head.
- Alternating directions create a brick-pattern effect with maximum volume and dimension throughout.
17. Side-Swept Waves with Floral Accent

Side-swept waves combine romance and elegance in one effortlessly beautiful style that flatters all face shapes.
The asymmetrical placement creates visual interest while soft waves add movement and dimension to shorter lengths.
A strategically placed floral accent becomes the focal point that ties the entire bridal look together harmoniously.
Wave Creation:
- Create a deep side part and curl all hair in the same direction toward the face for cohesive flow.
- Brush through the curls gently with a paddle brush to transform them into soft, connected waves.
- Apply a light-hold hairspray while brushing to set the waves without making them stiff or crunchy.
- Sweep everything to one side and secure behind the ear with bobby pins arranged in an X-pattern.
- Leave a few face-framing pieces loose on the opposite side to prevent the look from appearing too severe.
Floral Selection:
- Choose a single large bloom like a garden rose or peony for dramatic statement impact.
- Cluster several smaller flowers together for a more whimsical, garden-party aesthetic.
- Match flowers to your bouquet for cohesive styling throughout all wedding elements.
- Secure flowers with floral wire wrapped around bobby pins for maximum hold throughout the day.
18. Textured Crop with Natural Movement

The textured crop celebrates natural hair texture and embraces an undone, effortless aesthetic that’s thoroughly modern.
This low-maintenance style requires minimal styling while still looking intentionally polished and wedding-ready.
It’s perfect for brides who want to look like themselves rather than wearing a costume on their special day.
Enhancing Natural Texture:
- Apply a lightweight styling cream to damp hair, distributing it evenly with fingers for natural definition.
- Scrunch sections while blow-drying with a diffuser to enhance any existing natural wave or curl pattern.
- Use a small amount of pomade to separate pieces and create definition without weighing hair down.
- Avoid over-styling or using too much product, which defeats the naturally effortless aesthetic goal.
- Finish with a light mist of flexible-hold hairspray to maintain movement throughout the day.
Minimal Accessory Options:
- A single delicate hairpin positioned near the temple adds sparkle without overwhelming the simplicity.
- Small stud earrings or ear cuffs complement the understated hair without creating visual competition.
- Skip hair accessories entirely and let statement jewelry or your dress become the focal points instead.
19. Twisted Low Bun

The twisted low bun offers sophistication and elegance while being surprisingly achievable on shorter hair lengths.
Multiple twisted sections create the illusion of a fuller bun than would be possible with the actual hair length.
This style works beautifully for both formal and casual wedding settings depending on how tightly it’s styled.
Construction Method:
- Divide hair into 3-4 sections depending on thickness and create loose twists with each section individually.
- Wrap each twist around a central point at the nape, pinning them in a circular, rose-like formation.
- Pull gently on the edges of each twist to create width and fullness that disguises the actual length.
- Secure everything with multiple bobby pins, ensuring they cross over each other for maximum stability.
- Mist with strong-hold hairspray and allow it to dry before adding any veil or hair accessories.
Finishing Touches:
- Pull out a few face-framing pieces before creating the bun for a softer, more romantic appearance.
- Add pearl or crystal pins throughout the bun to catch light and add dimension to the style.
- Position a small decorative comb at the base of the bun for an elegant finishing touch.
20. Curly Bob with Defined Ringlets

The curly bob showcases natural curl patterns in their full glory with proper product and technique enhancing definition.
Defined ringlets create dimension and movement that photographs beautifully from every angle throughout the day.
This style celebrates natural texture while looking polished and intentionally styled for the special occasion.
Curl Care and Styling:
- Start with a curl-specific shampoo and conditioner, followed by a leave-in conditioning treatment for moisture.
- Apply curl-enhancing cream to soaking wet hair, distributing with a wide-tooth comb for even coverage.
- Use the “squish to condish” method, scrunching water and product upward to encourage curl formation.
- Diffuse on low heat with a bowl diffuser, cupping curls gently without touching them excessively to prevent frizz.
- Once completely dry, scrunch out any product crunch with a small amount of oil for soft, touchable curls.
Avoiding Common Mistakes:
- Never brush or comb dry curly hair, which destroys curl definition and creates unmanageable frizz immediately.
- Don’t skip the diffuser and air-dry, which often results in inconsistent curl patterns and excessive frizz.
- Avoid touching curls while they dry, even though it’s tempting, as this disrupts formation and causes frizz.
- Don’t use products containing sulfates, silicones, or drying alcohols that strip natural oils from curly hair.
21. Vintage Bouffant

The bouffant brings dramatic volume and retro elegance that commands attention in the most glamorous way possible.
This 1960s-inspired style creates height at the crown while maintaining smoothness at the sides for a balanced silhouette.
It works exceptionally well for vintage-themed weddings or brides who love bold, statement-making styles.
Building the Bouffant:
- Section the crown area from temple to temple and backcomb aggressively to create substantial height foundation.
- Smooth the top layer over the teased section with a soft bristle brush, leaving the volume underneath intact.
- Pin the smoothed section at the back of the crown, securing the volume in place with crossed bobby pins.
- Apply generous amounts of firm-hold hairspray, allowing it to dry completely before touching the style.
- Smooth the sides down flat against the head to create contrast with the dramatic crown volume.
Modern Adaptations:
- Create a softer, more romantic version with less extreme height for a contemporary take on the classic.
- Add texture to the bouffant surface rather than keeping it smooth for a more current, undone aesthetic.
- Incorporate braids into the sides leading to the bouffant for a fusion of vintage and modern elements.
22. Braided Crown with Loose Ends

The braided crown with loose ends combines the best elements of updos and down styles for versatile beauty.
The crown keeps hair off the face while the loose ends provide movement and softness that photographs beautifully.
This style works particularly well for outdoor weddings where some wind is expected throughout the celebration.
Braiding Technique:
- Create texture first with a curling iron or texturizing spray to give the hair grip for easier braiding.
- Part hair down the middle and create two Dutch braids starting at the temples and working back.
- Bring both braids across the crown area, pinning them to create a crown or halo effect across the top.
- Leave the ends of the braids loose rather than tucking them in, allowing them to blend with loose hair.
- Gently pull on the braid sections to create fullness and width that makes them more prominent and substantial.
Styling the Loose Sections:
- Curl or wave all loose hair to create cohesive texture that blends seamlessly with the braided crown.
- Apply a texturizing spray throughout to add piece-y definition and prevent the style from looking too perfect.
- Consider leaving some face-framing pieces completely out of the braids for extra softness around the face.
23. Hollywood Waves

Hollywood waves deliver red-carpet glamour with their perfectly sculpted S-curves and high-shine finish.
This technique creates uniform waves that lie in organized patterns for polished, elegant sophistication.
The style requires precision and patience but delivers truly stunning results that photograph like editorial perfection.
Creating Perfect Waves:
- Start with completely dry hair that’s been blow-dried smooth as a clean canvas for wave creation.
- Use a 1.5-inch curling iron to create uniform curls throughout, all wrapped in the same direction for consistency.
- Allow curls to cool completely, then brush through with a paddle brush to transform them into connected waves.
- Use large clips to set the wave pattern, positioning them at the peak and valley of each S-curve.
- Once set (about 15-20 minutes), remove clips and apply shine spray for that signature glossy Hollywood finish.
Maintaining the Style:
- Avoid touching or running fingers through waves, which disrupts the carefully created pattern immediately.
- Keep a small soft-bristle brush handy for gentle touch-ups if any sections lose definition during the day.
- Apply shine spray at intervals throughout the celebration to maintain that essential glossy, polished appearance.
24. Messy Updo with Loose Pieces

The messy updo brings effortless romance to short hair styling with its intentionally undone aesthetic.
Strategic chaos creates a soft, approachable look that still reads as special-occasion ready and wedding-appropriate.
This style works beautifully for rustic, bohemian, or garden wedding themes where perfection isn’t the goal.
Creating Artful Messiness:
- Start by curling all hair to create texture that will translate into fullness within the updo structure.
- Loosely gather sections at random heights rather than all at one central point for organic asymmetry.
- Pin sections haphazardly with bobby pins, allowing pieces to stick out and create intentional imperfection throughout.
- Pull out face-framing pieces and some sections from the updo to create that lived-in, effortless appearance.
- Finish with a flexible-hold hairspray that maintains the structure without making anything stiff or perfect-looking.
Strategic Placement:
- Position the updo slightly off-center or at varying heights for a more organic, less structured appearance.
- Allow some pieces to hang lower than others rather than trying to create uniform height throughout.
- Embrace pieces that won’t stay pinned rather than fighting them into submission with excessive product.
25. Smooth Pixie with Statement Earrings

The smooth pixie showcases clean lines and polished simplicity that becomes the perfect backdrop for dramatic jewelry.
When hair is kept sleek and minimal, attention naturally shifts to your face and accessories for maximum impact.
This approach celebrates the confidence of short hair while allowing bold earrings to become the star of your bridal look.
Achieving Smoothness:
- Begin with a smoothing shampoo and conditioner to tame any frizz or flyaways from the start.
- Apply a heat protectant and blow-dry using a paddle brush to pull hair smooth in all directions.
- Run a small flat iron through sections to eliminate any remaining texture or wave for glass-like smoothness.
- Finish with a smoothing serum or pomade, focusing on the surface layer for maximum shine and sleekness.
- Set with a light mist of anti-humidity hairspray to protect against environmental factors throughout the day.
Earring Selection Guidelines:
- Choose chandelier or drop earrings that create vertical lines and draw the eye down elegantly.
- Consider the weight of earrings carefully, as you’ll be wearing them for many hours of celebration.
- Match metals to your dress details, wedding rings, and other jewelry for cohesive overall styling.
- Test earrings during your hair trial to ensure they don’t overwhelm your frame or cause discomfort.
26. Beachy Waves with Sea Salt Texture

Beachy waves bring relaxed coastal vibes to wedding styling with effortless, windswept texture.
This undone look embraces natural movement and piece-y definition that feels fresh and modern rather than overly formal.
It’s the perfect choice for beach weddings, tropical destinations, or any celebration with a laid-back, bohemian atmosphere.
Creating Beach Texture:
- Apply sea salt spray generously to damp hair, scrunching it upward to encourage natural wave formation.
- Twist random sections while blow-drying with a diffuser to create irregular, organic-looking waves throughout.
- Use a curling wand on a few select pieces to add dimension, wrapping hair loosely around the barrel.
- Run fingers through the waves to separate and create that piece-y, lived-in texture characteristic of beach hair.
- Finish with a texturizing spray rather than traditional hairspray to maintain movement and touchable softness.
Maintaining the Aesthetic:
- Embrace the wind and elements rather than fighting them, as they enhance the beachy vibe naturally.
- Keep styling products minimal to maintain that soft, natural texture without stiffness or crunchiness.
- Touch up by spritzing with sea salt spray and scrunching if waves lose definition during the celebration.
Perfect Pairings:
- Flower crowns made with tropical blooms like orchids or hibiscus complement the relaxed island aesthetic.
- Loose, flowing dress silhouettes echo the effortless nature of the hairstyle for cohesive overall styling.
- Minimal makeup with bronzed, glowing skin enhances the sun-kissed, natural beach bride appearance.
27. Elegant Low Side Bun

The elegant low side bun combines sophistication with romance through asymmetrical placement and soft execution.
Positioning the bun off to one side creates visual interest while maintaining the elegance of a classic updo.
This style works beautifully for formal weddings while still feeling fresh and modern rather than stuffy or dated.
Construction Process:
- Create a deep side part and gather all hair to one side at the nape, just behind the ear.
- Twist the hair loosely into a coil, wrapping it around itself to create a rounded bun shape.
- Pin the bun securely with bobby pins arranged in a starburst pattern for maximum hold and stability.
- Pull gently on sections of the bun to create fullness and texture rather than a tight, severe appearance.
- Leave a few face-framing pieces loose on the opposite side to balance the asymmetrical placement.
Styling Considerations:
- This style works best with bob-length or longer short hair that has enough length to create a substantial bun.
- Adding decorative pins throughout the bun increases both security and visual interest simultaneously.
- Position your veil above the bun rather than within it to avoid disrupting the hairstyle’s structure.
- Consider the side you choose based on which profile you prefer or which shoulder you want to showcase.
Conclusion
Your wedding day hairstyle should celebrate who you are rather than conform to outdated expectations about bridal beauty.
These 27 Stunning Short Hair Wedding Looks That’ll Steal the Show prove that pixies, bobs, and lobs can be every bit as breathtaking as long, flowing locks when styled with intention and confidence.
From vintage-inspired finger waves to modern textured crops, from romantic braided crowns to edgy faux hawks, short hair offers endless possibilities that photograph beautifully and stay flawless through every moment.
The true secret to a stunning bridal look isn’t length—it’s choosing a style that makes you feel authentically beautiful, confident, and completely yourself as you walk down the aisle and into your new chapter.