Being a mom means mastering the art of doing everything in record time, and your morning hair routine shouldn’t be the exception.
The struggle of looking put-together while juggling breakfast, school lunches, and getting everyone out the door is real, but it doesn’t mean you have to sacrifice your appearance.
This comprehensive guide to 30 Easy Hairstyles for Moms That Look Good Even on Busy Mornings will transform your hectic mornings into manageable moments where you can look fabulous without spending hours in front of the mirror.
From classic buns to trendy braids, quick ponytails to effortless waves, we’ve gathered the most practical and stylish hairstyles that take five minutes or less to create.
Whether you have long, medium, or short hair, straight or curly textures, there’s a perfect solution waiting for you.
These hairstyles are specifically designed for real moms with real schedules, requiring minimal tools, basic skills, and maximum impact.
Get ready to discover your new go-to looks that will have everyone asking how you manage to look so polished while handling a busy household.
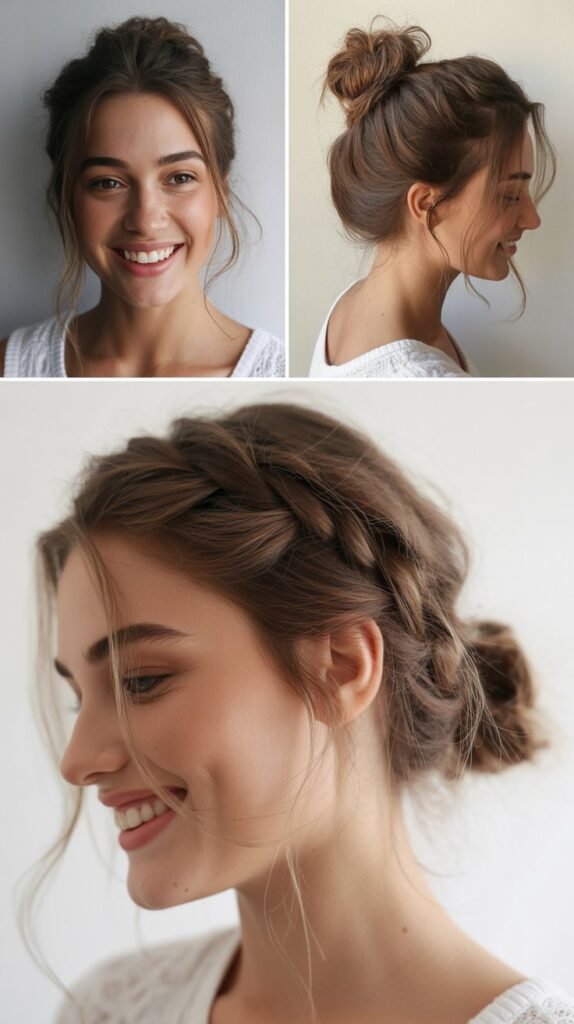
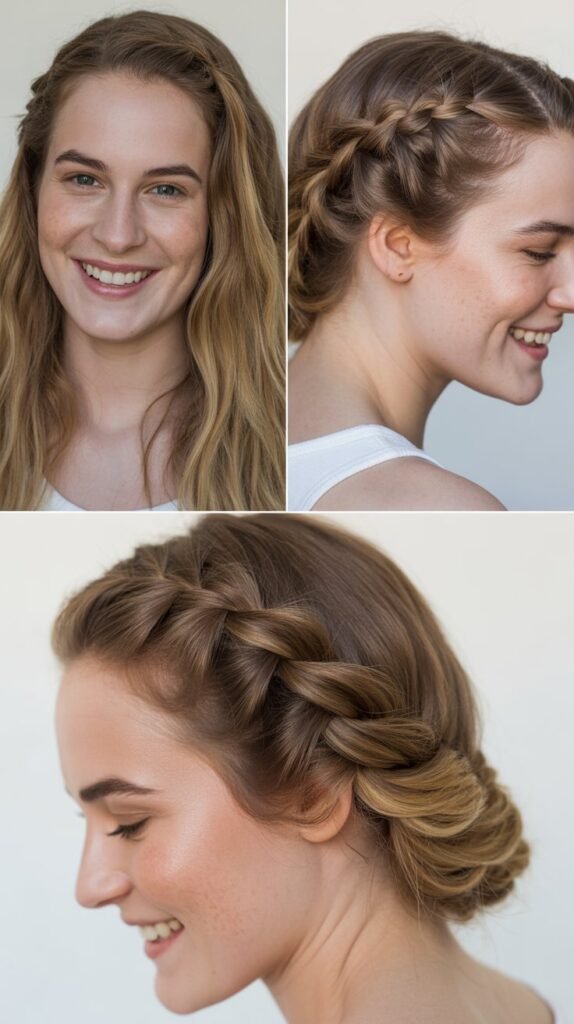
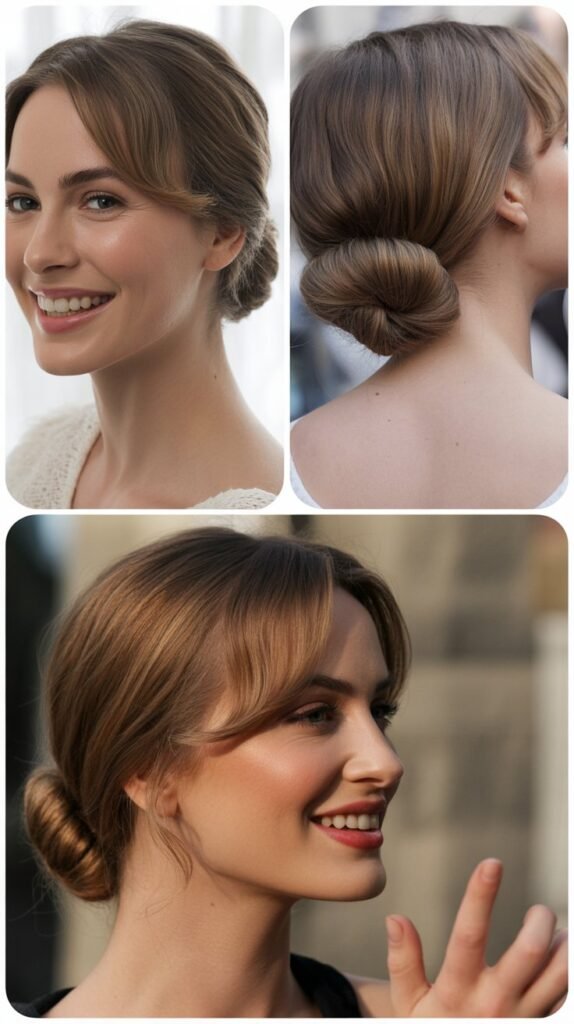
1. The Classic Low Bun
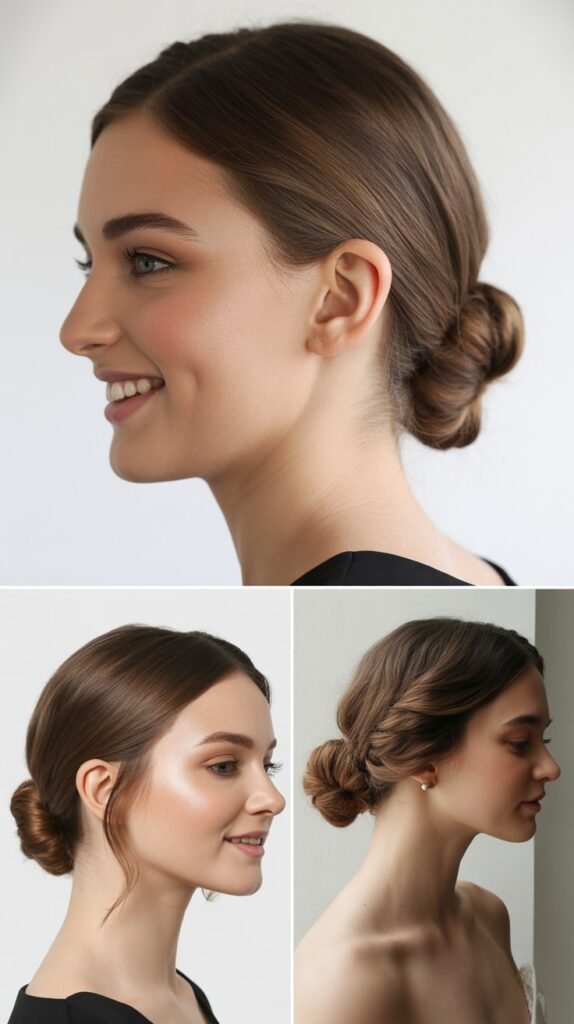
The classic low bun remains one of the most elegant and effortless hairstyles that works for virtually any occasion, from school drop-offs to professional meetings.
This timeless style takes less than two minutes to create and instantly makes you look polished and put-together, even if you’re running on minimal sleep.
How to Create:
- Brush your hair back smoothly to remove any tangles or knots
- Gather all your hair at the nape of your neck using one hand
- Twist the hair gently in one direction until it starts to coil naturally
- Wrap the twisted hair around itself to form a bun shape
- Secure with a hair elastic and add bobby pins if needed for extra hold
- Pull out a few face-framing pieces for a softer, more relaxed look
Best For:
- Medium to long hair lengths
- All hair textures, though slightly textured or day-old hair holds better
- Professional settings, casual outings, and formal events
- Moms who prefer a sophisticated, minimalist appearance
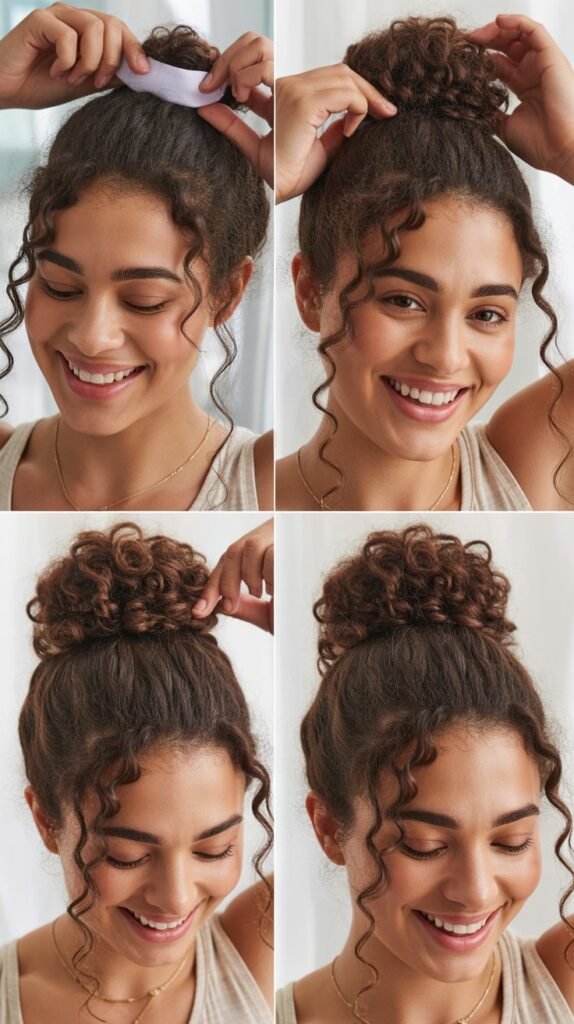
2. The Messy Top Knot
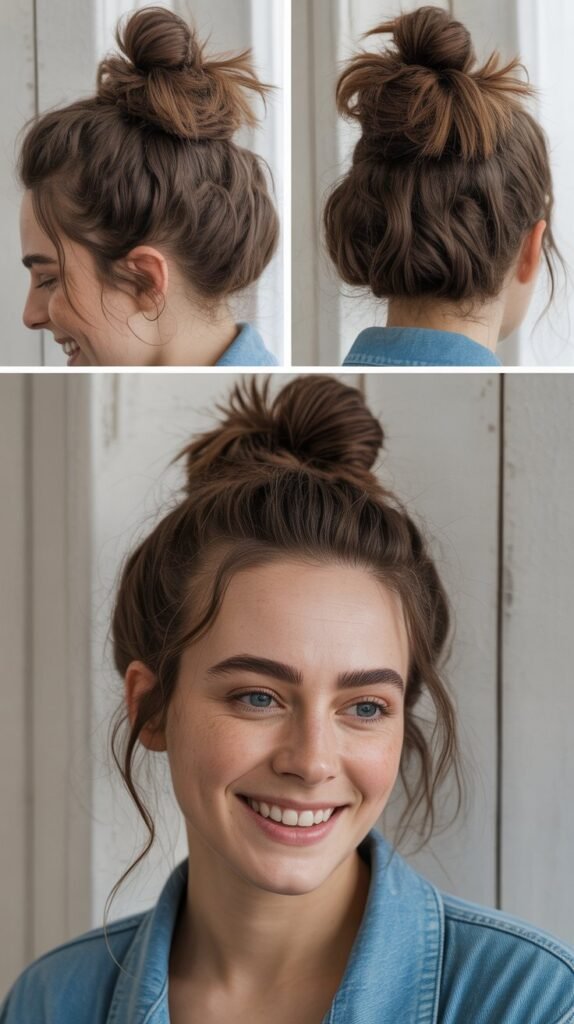
The messy top knot is the ultimate lazy-day hairstyle that somehow manages to look intentionally stylish rather than rushed.
This carefree style embraces texture and volume, making it perfect for those mornings when washing your hair simply isn’t happening.
Quick Steps:
- Flip your head upside down and gather hair at the crown of your head
- Create a high ponytail but don’t pull the hair all the way through on the last wrap
- Leave the ends sticking out to create that perfectly imperfect look
- Wrap any loose ends around the base of the knot
- Secure with another elastic or bobby pins as needed
- Gently pull and loosen sections for added volume and texture
- Let a few strands fall naturally around your face
Perfect Timing:
- Takes only 60-90 seconds from start to finish
- Ideal for second or third-day hair
- Works great after a workout or during busy mornings
3. The Sleek High Ponytail
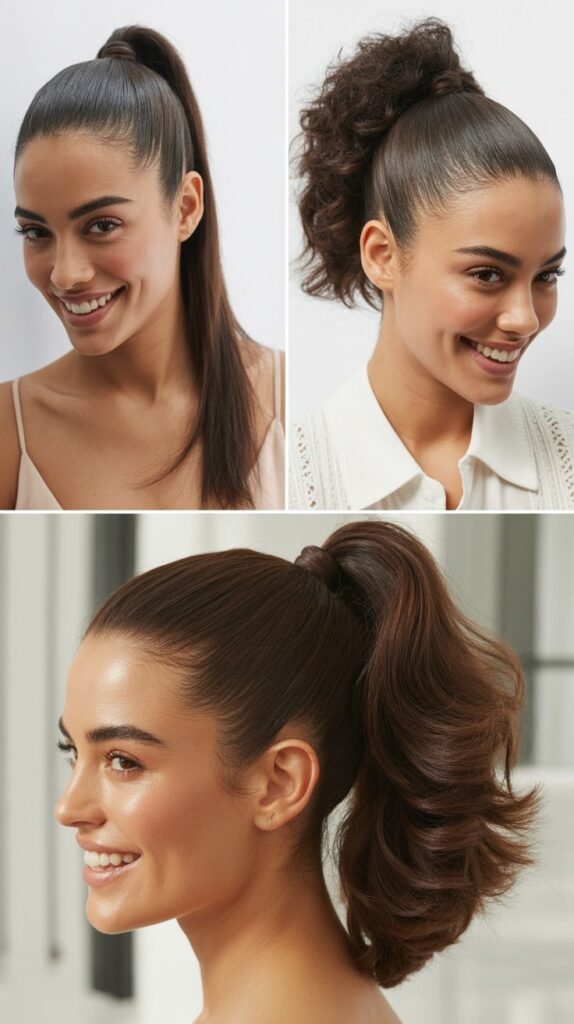
A sleek high ponytail delivers instant glamour and keeps hair completely off your face, making it ideal for active moms who need function without sacrificing style.
This classic look has been favored by celebrities and everyday moms alike for its versatility and sophisticated appeal.
Creation Process:
- Start with either freshly washed hair or apply dry shampoo at the roots
- Brush hair straight up toward the crown using a paddle brush or comb
- Gather all hair tightly at the desired height on your head
- Secure with a strong elastic band that won’t slip throughout the day
- Take a small section of hair from the ponytail and wrap it around the elastic
- Pin the wrapped section underneath the ponytail base with a bobby pin
- Apply a small amount of hair gel or spray for extra sleekness if desired
Styling Tips:
- Use a boar bristle brush for maximum smoothness
- Apply edge control gel on flyaways along your hairline
- Consider adding a volumizing powder at the crown before gathering hair
4. The Half-Up Half-Down Style
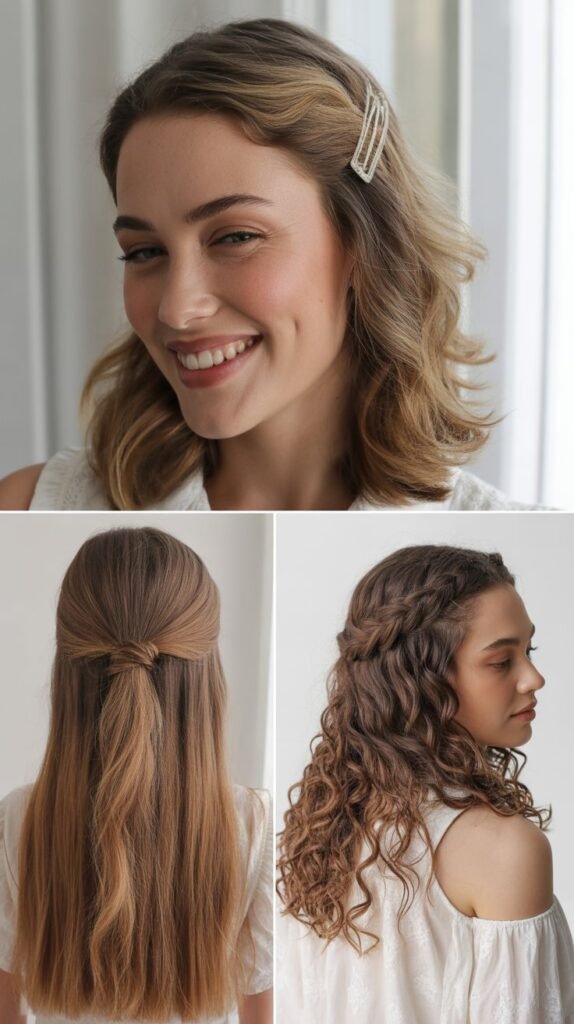
The half-up half-down hairstyle strikes the perfect balance between keeping hair off your face while still showing off your length and volume.
This versatile style works beautifully for both casual and dressy occasions, making it a reliable choice for unpredictable mom schedules.
Easy Instructions:
- Part your hair down the middle or on your preferred side
- Section off the top half of your hair from temple to temple
- Gather this top section at the back of your head
- Secure with a hair elastic, clip, or decorative barrette
- Leave the bottom section flowing freely down your back
- Gently tease the crown area before securing for added volume
- Pull a few face-framing pieces loose for a softer appearance
Variations to Try:
- Twist the top section before securing for added texture
- Braid the top portion for a bohemian touch
- Use a claw clip for an instant 90s-inspired look
5. The Simple Side Braid
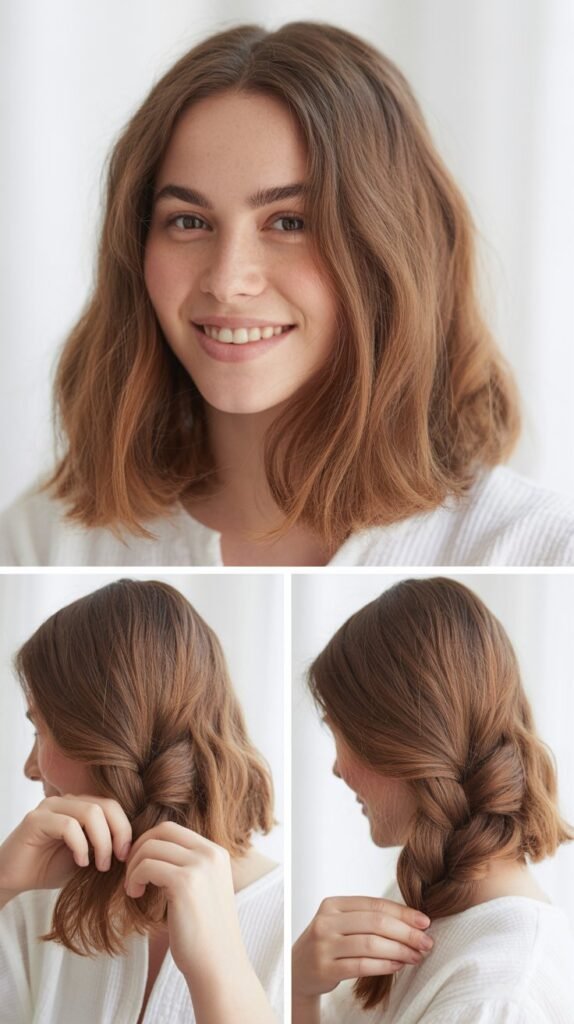
A simple side braid offers effortless charm with minimal effort, perfect for moms who want to look put-together without spending precious morning minutes on complicated styling.
This playful yet practical style works for running errands, playground visits, or casual coffee dates.
Braiding Steps:
- Brush all your hair over to one shoulder of your choice
- Divide the hair into three equal sections at the nape of your neck
- Cross the right section over the middle section
- Then cross the left section over the new middle section
- Continue this pattern all the way down to the ends
- Secure with an elastic band at the bottom
- Gently pull apart the braid sections slightly for a fuller, more relaxed appearance
Enhancement Options:
- Add a ribbon or decorative hair tie for extra personality
- Incorporate a few face-framing pieces left out intentionally
- Pancake the braid by pulling gently on the outer edges
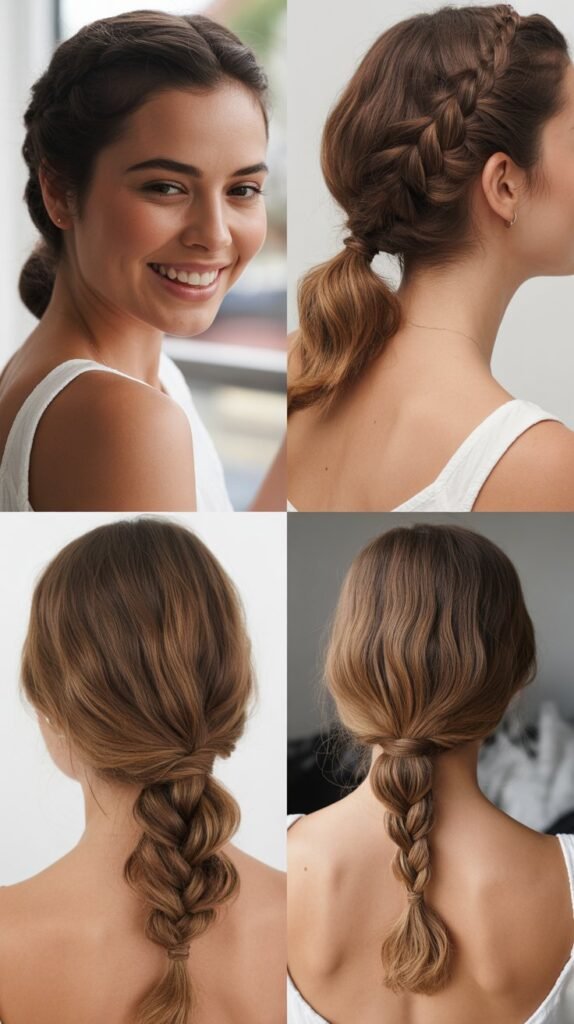
6. The Low Twisted Ponytail
The low twisted ponytail adds an elegant twist (literally) to the standard ponytail, elevating a basic style into something more refined and intentional.
This sophisticated option takes just minutes but looks like you put in much more effort.
Creation Method:
- Create a low ponytail at the nape of your neck with an elastic
- Divide the ponytail into two equal sections
- Twist each section individually in the same direction (clockwise or counterclockwise)
- Wrap the two twisted sections around each other in the opposite direction
- The twists will naturally spiral together creating a rope-like effect
- Secure the end with another elastic band
- Gently pull on the twisted sections to add width and dimension
Ideal Occasions:
- Professional work environments
- Date nights or dinner outings
- School events or parent-teacher meetings
7. The Quick French Twist
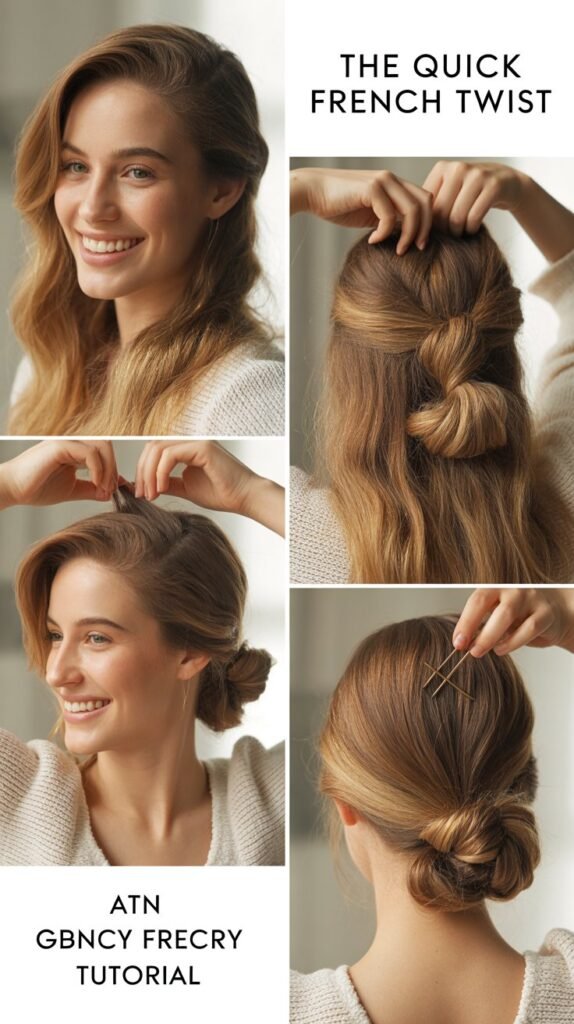
The French twist exudes timeless elegance and sophistication, making it perfect for those mornings when you need to look extra polished.
While it appears complex, this classic updo can be mastered quickly with practice and becomes second nature after a few attempts.
Step-by-Step Guide:
- Brush your hair smooth and gather it to one side at the back
- Hold the hair with one hand and begin twisting it upward
- As you twist, roll the hair toward the center of your head
- Continue rolling until all hair is tucked into the twist
- Secure the twist vertically with bobby pins along the seam
- Tuck any loose ends into the twist and pin them down
- Finish with hairspray for all-day hold
Pro Tips:
- Use bobby pins that match your hair color for seamless blending
- Slightly textured or day-old hair holds this style better than freshly washed hair
- Create a looser version by not twisting as tightly
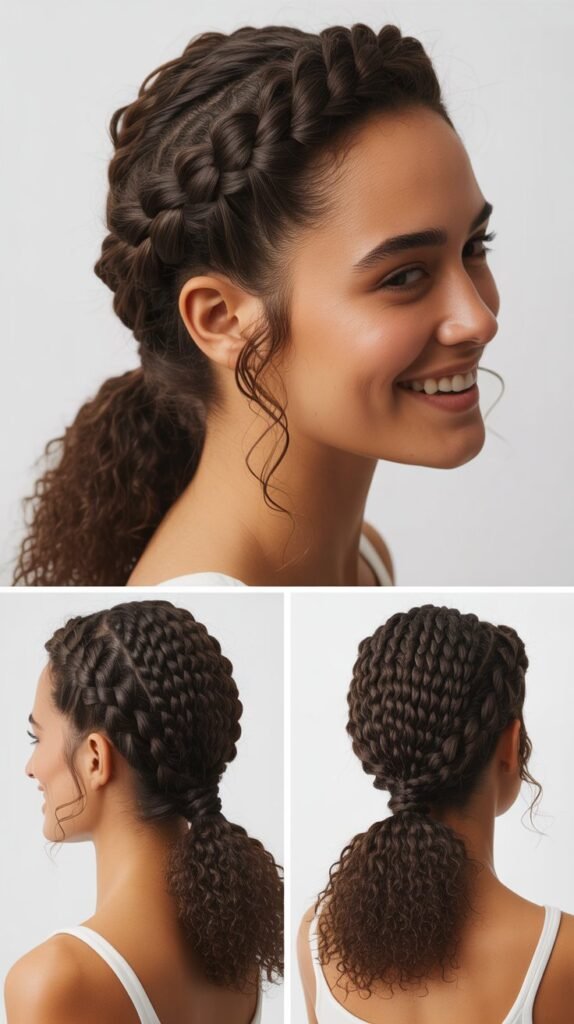
8. The Braided Crown

The braided crown creates a romantic, bohemian look that’s surprisingly simple to achieve and perfect for moms who want something special without the time commitment.
This ethereal style works beautifully for everything from farmers market trips to backyard gatherings.
How to Create:
- Part your hair down the middle from forehead to nape
- Create a regular three-strand braid on one side starting near your ear
- Repeat the same braiding process on the other side
- Take one braid and wrap it across the top of your head like a headband
- Pin it securely on the opposite side with bobby pins
- Take the second braid and wrap it behind the first braid
- Secure with more bobby pins and tuck any visible ends
- Gently pull on the braids to make them appear fuller and softer
Styling Variations:
- Try Dutch braids instead of regular braids for more dimension
- Leave some face-framing pieces out for a romantic touch
- Add small flowers or decorative pins for special occasions
9. The Bubble Ponytail
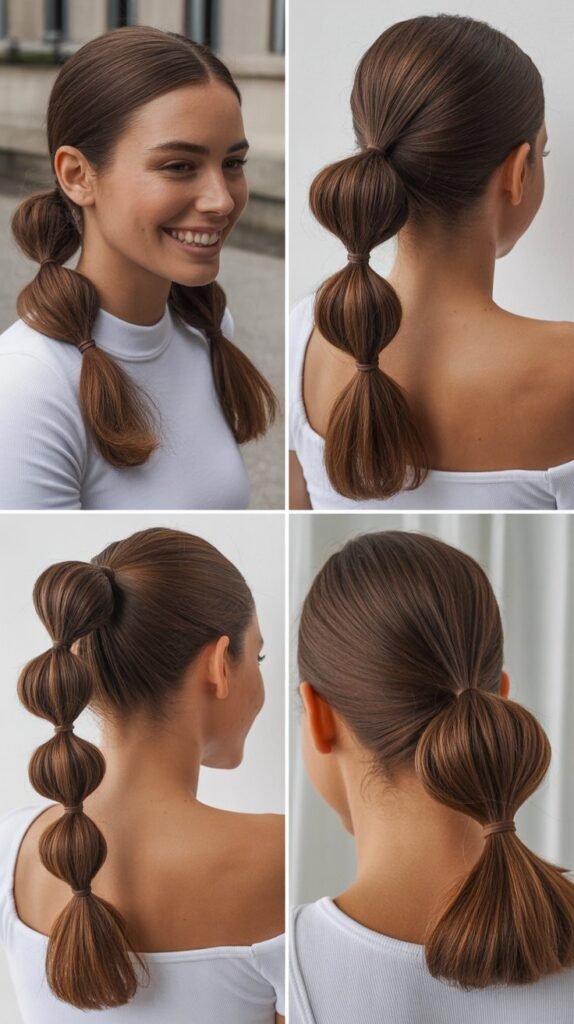
The bubble ponytail brings a playful, trendy vibe to your morning routine while being incredibly easy to execute. This Instagram-worthy style looks intricate but requires only elastics and a few minutes of your time.
Quick Instructions:
- Create a high or low ponytail depending on your preference
- Tie the first elastic at the base where you want the ponytail to start
- Measure about two to three inches down and add another elastic
- Gently pull and loosen the hair between the two elastics to create a bubble effect
- Continue adding elastics down the length of the ponytail
- Create bubbles between each set of elastics by pulling hair outward
- Repeat until you reach the end of your ponytail
Customization Ideas:
- Use clear elastics for a seamless look or colorful ones for fun
- Make larger or smaller bubbles depending on your hair length
- Add this technique to a side ponytail for variation
10. The Textured Beach Waves
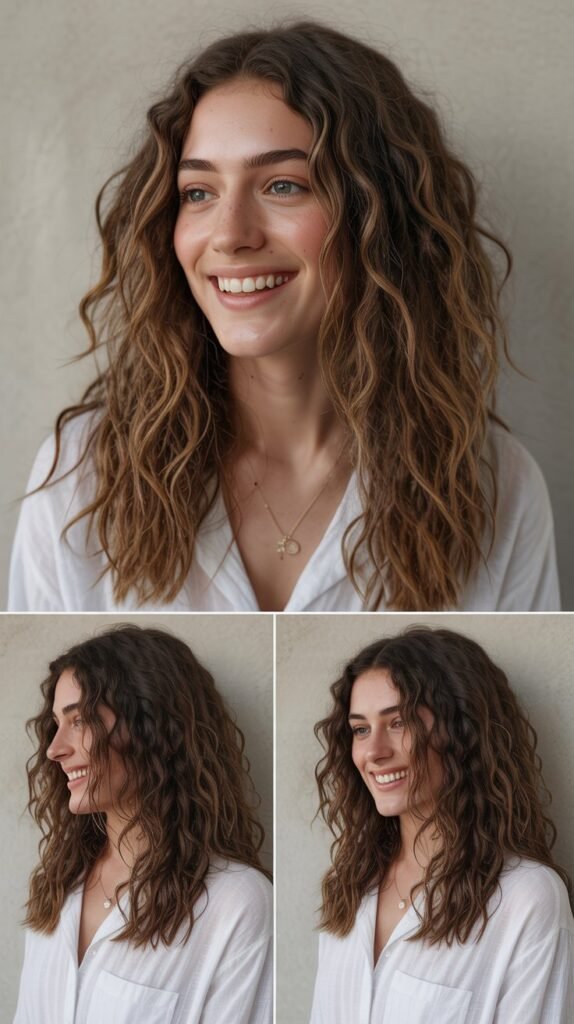
Textured beach waves give you that effortlessly tousled look that appears natural and carefree, perfect for moms who want to embrace their hair’s natural movement.
This style works whether you’re actually heading to the beach or just want that relaxed, vacation-inspired vibe.
Creating Beach Waves:
- Start with damp or dry hair depending on your method
- Apply a sea salt spray or texturizing product throughout your hair
- Scrunch your hair in sections from ends to roots with your hands
- If using heat, twist small sections of hair and run a flat iron down them
- Alternatively, braid damp hair before bed and release in the morning
- Once waves form, scrunch again with a small amount of styling cream
- Use your fingers to separate and define the waves
- Finish with a light-hold hairspray to maintain the texture
Time-Saving Options:
- Sleep in braids to wake up with natural waves
- Use a wave spray on dry hair and scrunch for instant texture
- Embrace your natural wave pattern with the right products
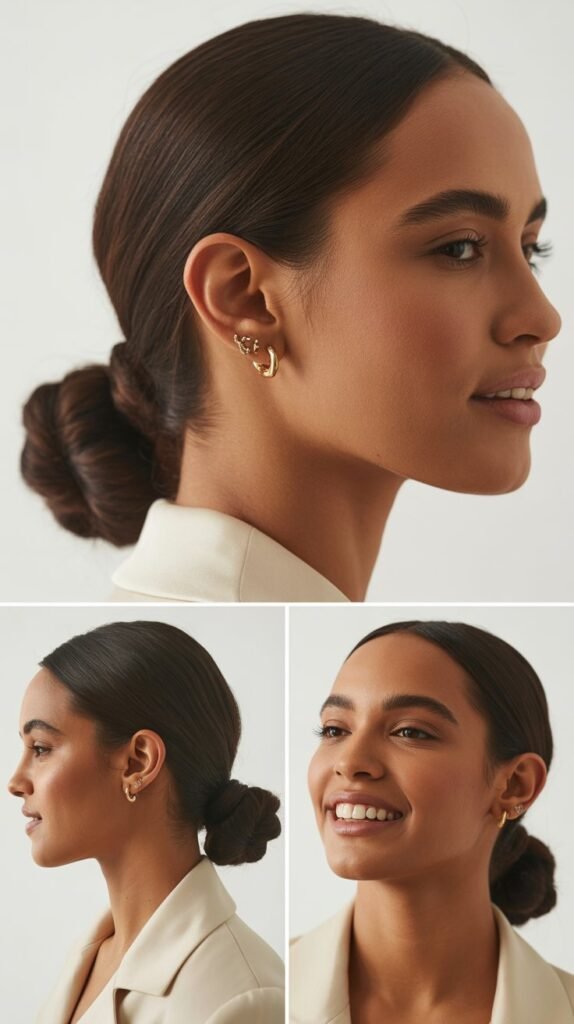
11. The Twisted Low Chignon
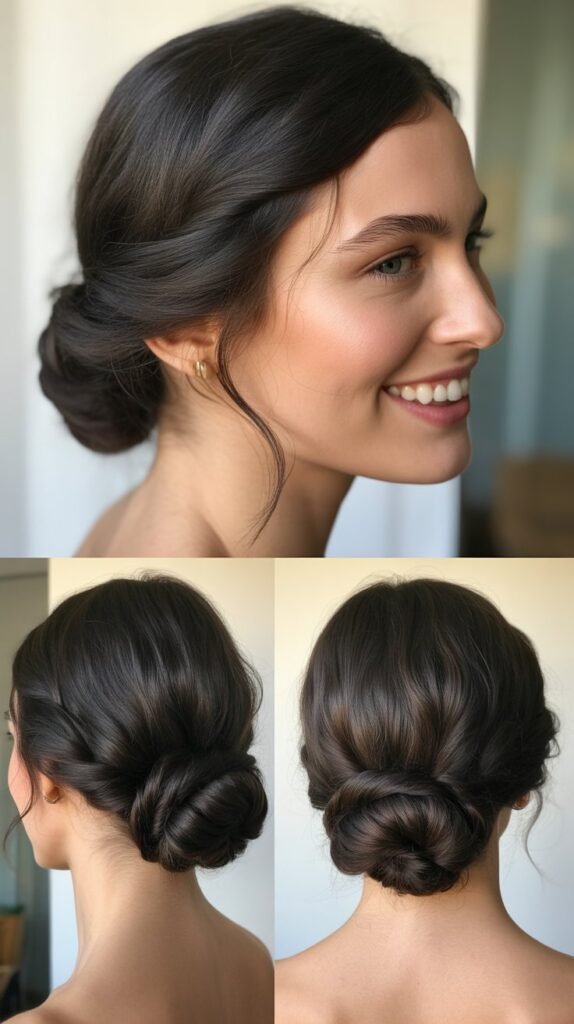
The twisted low chignon combines elegance with simplicity, creating a sophisticated updo that looks complex but comes together in minutes.
This refined style is ideal for moms who need to transition from morning drop-off to professional meetings seamlessly.
Assembly Instructions:
- Create a low ponytail at the nape of your neck
- Twist the ponytail loosely but not too tightly
- Wrap the twisted ponytail around the base of the elastic
- Form a circular or oval shape depending on your preference
- Tuck the ends under the chignon
- Secure all around with bobby pins in an X pattern for maximum hold
- Pull out a few face-framing wisps for a softer appearance
- Mist with hairspray to ensure it stays in place all day
Professional Polish:
- Smooth flyaways with a toothbrush sprayed with hairspray
- Add a decorative pin or clip for extra elegance
- Keep the chignon slightly loose for a modern rather than severe look
12. The Side-Swept Curls
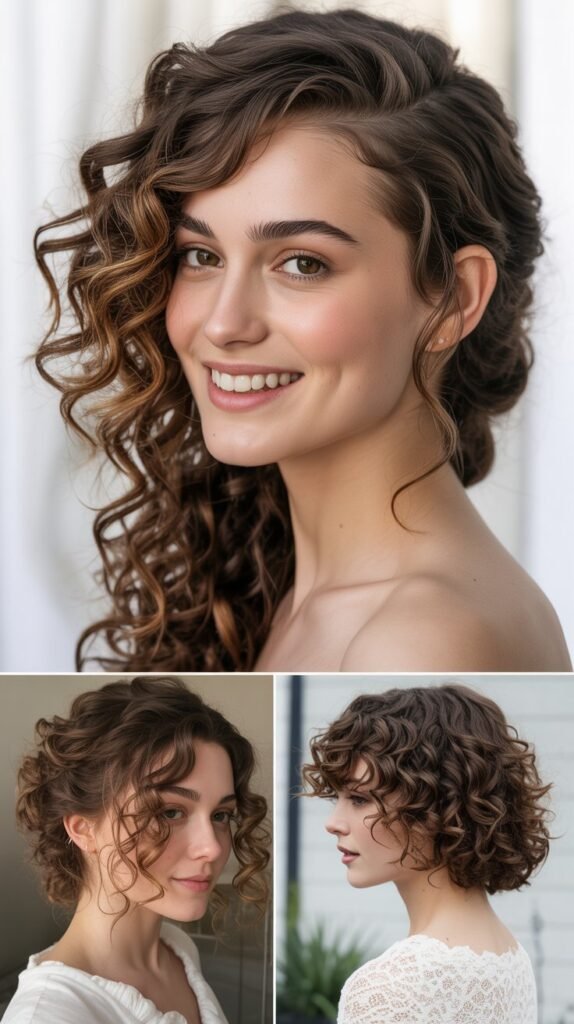
Side-swept curls deliver Hollywood glamour with minimal effort, making you feel polished and feminine even on the most chaotic mornings. This romantic style works beautifully for date nights but is simple enough for everyday wear.
Styling Process:
- If your hair isn’t naturally curly, create loose curls with a curling iron or wand
- Alternatively, release hair from overnight foam rollers or braids
- Brush through the curls gently with your fingers or a wide-tooth comb
- Create a deep side part on your preferred side
- Sweep all or most of your hair over one shoulder
- Pin the hair behind your ear on the opposite side with decorative bobby pins
- Use hairspray to set the style and maintain volume
- Apply shine serum or oil to the ends for added gloss
Quick Curl Methods:
- Use large velcro rollers while getting ready for no-heat curls
- Twist damp hair sections and clip until dry
- Embrace your natural curl pattern with curl-enhancing products
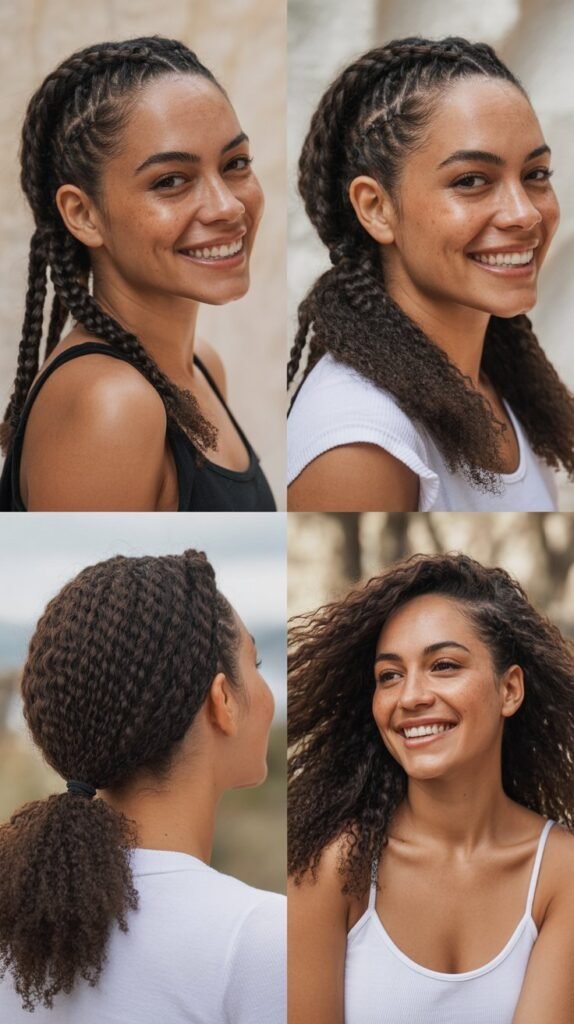
13. The Double Dutch Braids
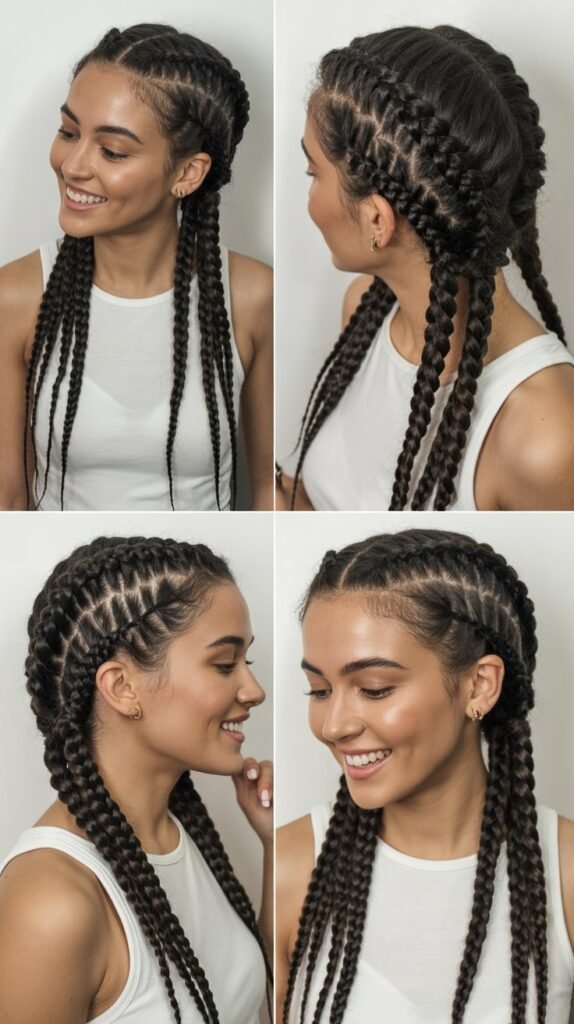
Double Dutch braids create a sporty, youthful look that keeps hair completely secure and out of your face all day long. These inverted braids sit on top of your head rather than lying flat, creating beautiful dimension and texture.
Braiding Technique:
- Part your hair straight down the middle from forehead to nape
- Begin on one side by taking a section of hair near your forehead
- Divide this section into three equal strands
- Cross the side strands under the middle strand rather than over
- Add small sections of hair to each strand as you work your way down
- Continue the under-braiding pattern until you reach the nape of your neck
- Braid the remaining length regularly and secure with an elastic
- Repeat the entire process on the other side of your head
- Gently pull on the edges of both braids to make them fuller
Style Benefits:
- Perfect for workouts, active days with kids, or outdoor activities
- Lasts all day without needing adjustments
- Works for all hair types and lengths past shoulder-length
14. The Easy Sock Bun
The sock bun creates a perfectly round, voluminous bun using a simple hair tool (or an actual sock with the toe cut off), making it an ideal solution for moms who want a polished updo without teasing and pinning endlessly.
Creation Steps:
- Pull your hair into a high ponytail at your desired bun placement
- Slide a sock bun donut (or homemade sock ring) onto the ponytail
- Position the donut at the end of your ponytail
- Spread your hair evenly around the donut to cover it completely
- Tuck the ends of your hair under the donut on all sides
- Slowly roll the donut down toward the base of your ponytail
- Keep the hair smooth and even as you roll downward
- Secure with bobby pins if needed and tuck any stray pieces
- Spray with hairspray for lasting hold
Donut Sizes:
- Use small donuts for subtle, elegant buns
- Medium donuts work for everyday balanced buns
- Large donuts create dramatic, statement-making buns
15. The Messy Side Bun
The messy side bun combines casual chicness with effortless style, perfect for those days when you want to look intentionally undone rather than accidentally disheveled. This asymmetrical style adds interest and works with any hair texture.
Quick Assembly:
- Brush your hair over to one side just above or behind your ear
- Gather the hair loosely without making it too tight or smooth
- Twist the hair gently while allowing pieces to fall naturally
- Wrap the twisted hair around itself to form an irregular bun shape
- Don’t worry about making it perfect—embrace the imperfections
- Secure with bobby pins strategically placed throughout the bun
- Pull out a few face-framing pieces and allow some texture to show
- Leave the ends slightly visible for that perfectly undone appearance
Texture Enhancement:
- Apply texturizing spray before creating the bun
- Use dry shampoo for extra grip and volume
- Don’t brush hair too smoothly—slight tangles help the style hold
16. The Fishtail Braid
The fishtail braid looks intricate and time-consuming but is actually quite simple once you learn the technique. This beautiful braid adds visual interest and sophistication to your morning look without requiring advanced braiding skills.
Braiding Instructions:
- Brush your hair smooth and divide it into two equal sections
- Take a small piece of hair from the outer edge of the left section
- Cross this small piece over to join the right section
- Take a small piece from the outer edge of the right section
- Cross it over to join the left section
- Continue this alternating pattern all the way down your hair
- The smaller the sections you cross, the more intricate the braid appears
- Secure at the bottom with an elastic band
- Gently pull the braid apart slightly for a fuller, more relaxed look
Styling Positions:
- Create a side fishtail braid for bohemian style
- Try a fishtail braid down the back for classic elegance
- Make two fishtail braids for a playful, youthful appearance
17. The Quick Twist and Pin

The twist and pin technique offers countless variations and creates elegant updos in minutes using only bobby pins. This versatile method allows you to customize your look based on your mood, occasion, and available time.
Simple Method:
- Take a section of hair from one side of your head near your temple
- Twist this section loosely as you bring it toward the back
- Secure it at the back of your head with bobby pins in an X formation
- Take another section from the opposite side and repeat the process
- Cross this twisted section over the first one and pin it down
- Continue taking sections from alternating sides if desired
- Twist and pin each one at the back creating layers
- Leave the ends loose for a half-up style or tuck them all in for a full updo
- Allow a few face-framing pieces to fall naturally
Customization Options:
- Create just one or two twists for a simple half-up look
- Add multiple twists for an elaborate updo
- Incorporate small braids instead of twists for variety
18. The Low Braided Ponytail
The low braided ponytail combines the ease of a ponytail with the visual interest of a braid, creating a polished look that stays neat throughout your busiest days. This style works beautifully for both casual and professional settings.
Creation Process:
- Brush your hair back smoothly to remove all tangles
- Create a low ponytail at the nape of your neck with a hair elastic
- Divide the ponytail into three equal sections
- Create a regular three-strand braid down the entire length
- Braid all the way to the ends and secure with another elastic
- Gently pull on the braid edges to make it appear fuller
- Wrap a small section of hair around the base elastic to conceal it
- Secure this wrapped section with a bobby pin underneath
Braid Variations:
- Try a fishtail braid instead of a regular braid
- Create a Dutch braid within the ponytail for raised texture
- Add a ribbon or decorative band woven through the braid
19. The Headband Tuck
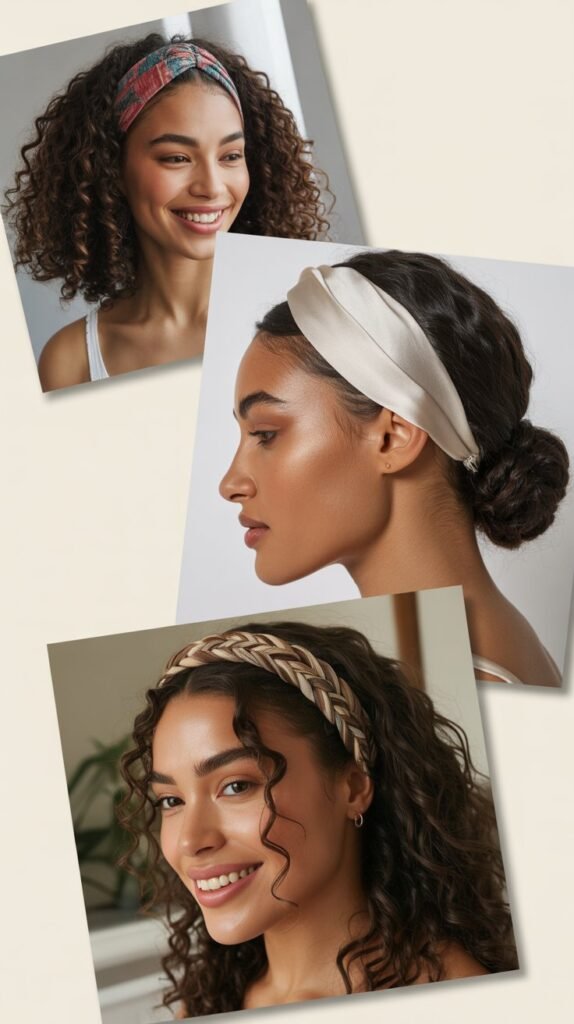
The headband tuck offers a quick and elegant solution that hides less-than-perfect hair while creating a vintage-inspired look. This clever technique uses a simple headband to create what appears to be an intricate updo.
Easy Steps:
- Place a stretchy or elastic headband over your head like a crown
- Position it about an inch back from your hairline
- Take a section of hair near your face and tuck it up and over the headband
- Roll this section under the headband to secure it
- Continue taking sections of hair all around your head
- Tuck each section up and over the headband in the same manner
- Work your way around until all hair is tucked and secured
- Adjust the headband and tucked hair as needed for evenness
- Pull gently on the tucked sections for added volume
Headband Selection:
- Use elastic headbands that grip well for better hold
- Try decorative headbands for special occasions
- Match the headband color to your hair for a seamless look
20. The Sleek Low Side Ponytail
The sleek low side ponytail brings asymmetrical interest to a classic style while maintaining elegance and sophistication. This polished look works equally well for professional environments and casual outings.
Styling Instructions:
- Brush all your hair over to one side of your head
- Decide whether you want the ponytail behind your ear or lower at the nape
- Smooth the hair carefully to eliminate bumps and flyaways
- Use a fine-tooth comb to perfect the smoothness if desired
- Secure with a hair elastic at your chosen position
- Wrap a small section of hair from the ponytail around the elastic
- Pin this wrapped section underneath to hide the elastic completely
- Apply smoothing serum or light oil to add shine
- Use edge control or gel on any flyaways along your hairline
Finishing Touches:
- Add a decorative hair cuff over the elastic for elegance
- Consider curling the ponytail ends for added glamour
- Keep it stick-straight for modern minimalist style
21. The Twisted Half-Up Bun
The twisted half-up bun combines the best features of a top knot and half-up style, creating dimension and visual interest while keeping hair partially down.
This trendy style looks intentional and stylish without requiring much time or skill.
Assembly Method:
- Section off the top half of your hair from temple to temple
- Gather this top section at the crown of your head
- Twist the gathered hair loosely to add texture
- Wrap the twisted hair around itself to form a small bun
- Don’t make the bun too tight—keep it relaxed and textured
- Secure with a hair elastic at the base of the bun
- Use bobby pins around the bun if needed for extra security
- Leave the bottom half of your hair flowing naturally
- Pull a few face-framing pieces loose for a softer look
Style Adjustments:
- Create a tighter bun for a neater appearance
- Make a larger, looser bun for bohemian vibes
- Position the bun higher or lower based on preference
22. The Rope Braid Ponytail
The rope braid ponytail elevates a standard ponytail with a unique twisted texture that looks complex but requires no traditional braiding skills.
This distinctive style holds well throughout active days and adds visual appeal to a simple look.
Creation Technique:
- Pull your hair into a ponytail at your desired height
- Divide the ponytail into two equal sections
- Twist the right section clockwise (or your chosen direction) multiple times
- Keep holding that twist and twist the left section the same direction
- Now wrap these two twisted sections around each other counterclockwise
- The sections will naturally spiral together creating a rope effect
- Continue twisting and wrapping until you reach the ends
- Secure with an elastic band at the bottom
- Gently pull on the rope braid to add width and texture
Rope Braid Tips:
- Twist both sections in the same direction initially
- Wrap them around each other in the opposite direction
- The tighter you twist, the more defined the rope pattern
23. The Pulled-Through Braid
The pulled-through braid creates an elaborate braided appearance without any actual braiding, making it perfect for moms who struggle with traditional braiding techniques.
This optical illusion style looks incredibly intricate while being surprisingly simple.
Step-by-Step Guide:
- Create a small ponytail at the crown of your head with a clear elastic
- Create another ponytail just below the first one
- Split the first ponytail in half vertically
- Bring these two halves around the second ponytail
- Combine the split halves with a small section of loose hair below
- Secure this new combination as a third ponytail
- Continue this pattern of splitting, wrapping, and creating new ponytails
- Work your way down the head until you run out of hair
- Gently pull on each ponytail section to create volume and width
- The result looks like an elaborate braid but uses only ponytails
Visual Enhancement:
- Pancake each section significantly for maximum volume
- Use clear elastics so they’re less visible
- Try this technique on the side for a different look
24. The Crisscross Ponytail
The crisscross ponytail adds architectural interest to a basic ponytail through strategic elastic placement that creates a striking geometric pattern.
This modern style is trending on social media for good reason—it’s eye-catching yet achievable.
Creation Instructions:
- Create a high or low ponytail depending on your preference
- Secure with your first elastic at the base
- Place another elastic about two inches down the ponytail
- Take a small section from the top of this segment and pull it through to create a gap
- Place another elastic two inches further down
- Repeat the process of pulling sections through to create openings
- Continue down the length of your ponytail
- The pulled sections create a crisscross woven appearance
- Adjust and shape each section for uniformity
- Secure the end with a final elastic
Pattern Variations:
- Space elastics closer together for more frequent crisscrosses
- Pull larger or smaller sections through for different effects
- Use colored elastics for a bolder statement
25. The Easy Scarf Updo
The scarf updo incorporates a silk or cotton scarf into your hairstyle, adding color, pattern, and functionality while hiding hair that might not be camera-ready.
This vintage-inspired technique offers endless styling possibilities.
Styling Method:
- Fold a square scarf into a long band about two to three inches wide
- Place the center of the scarf at your nape or desired bun location
- Pull your hair into a low ponytail or bun at this point
- Bring the two ends of the scarf up and around your ponytail or bun
- Wrap them around the base of the hairstyle
- Tie the scarf ends in a knot or bow on top or to the side
- Tuck any loose hair ends into the wrapped scarf
- Adjust the scarf for even coverage and visual appeal
- Let the scarf be the focal point of your hairstyle
Scarf Styling Options:
- Use silk scarves for elegant, sophisticated looks
- Try printed or patterned scarves for playful vibes
- Match your scarf to your outfit for coordinated style
26. The Voluminous Half-Up

The voluminous half-up style creates the illusion of thicker, fuller hair through strategic teasing and positioning.
This classic look works beautifully for moms who want to add oomph to fine or flat hair without elaborate styling.
Volume Creation:
- Section off hair from your temples across the crown
- Take the hair at your crown and gently backcomb or tease it
- Don’t tease all the way to the scalp—focus on the mid-lengths
- Smooth the very top layer over the teased section gently
- Gather this top section and bring it to the back of your head
- Secure with an elastic or clip at the desired position
- Don’t pull too tightly or you’ll lose the volume you created
- Leave the bottom section of hair flowing naturally
- Spray the teased area lightly with hairspray to maintain volume
Volume Boosting Tips:
- Use volumizing powder at the roots before teasing
- Tease in small sections rather than large chunks
- A natural bristle brush works better than plastic for smoothing
27. The Knotted Ponytail
The knotted ponytail replaces the traditional elastic with an actual knot created from your own hair, resulting in a sophisticated and seamless appearance.
This elegant technique eliminates the need for hair ties while creating a polished focal point.
Knotting Technique:
- Gather your hair at your desired ponytail position but don’t use an elastic yet
- Divide the gathered hair into two equal sections
- Tie these two sections together in a simple overhand knot
- Pull the knot tight enough to hold but not so tight it damages hair
- The loose ends will hang down creating your ponytail
- You can add a clear elastic below the knot for extra security if needed
- Wrap a small section of hair around any elastic to hide it
- Tuck any short pieces that stick out from the knot
- Apply smoothing cream to tame flyaways around the knot
Styling Considerations:
- Works best on hair that’s at least shoulder-length
- May need practice to tie the knot smoothly
- Consider a low position for easier knotting
28. The Side-Swept Low Bun
The side-swept low bun combines asymmetrical interest with classic elegance, creating a romantic look that’s perfect for everything from casual brunches to formal events. This off-center style adds dimension and visual appeal.
Assembly Steps:
- Brush all your hair over to one side at the nape of your neck
- Position the gathering point just behind and below your ear
- Twist the hair loosely to add texture and make it easier to work with
- Wrap the twisted hair around itself to form a bun shape
- Keep the bun low and to the side rather than centered
- Secure with bobby pins in an X pattern all around the bun
- Leave a few pieces loose around your face for softness
- Pull gently on the bun to add dimension and fullness
- Finish with hairspray to ensure it lasts all day
Perfect Occasions:
- Wedding guest looks
- Romantic date nights
- Professional presentations with a softer touch
29. The Quick Pin Curls
Quick pin curls offer a heat-free way to create waves and curls overnight, allowing you to wake up with styled hair that requires minimal morning effort.
This vintage technique has been revived for its convenience and beautiful results.
Overnight Method:
- Start with damp (not soaking wet) hair before bedtime
- Apply a curl-enhancing mousse or setting lotion throughout
- Take small sections of hair starting from the front
- Wrap each section around two fingers to form a flat curl against your head
- Secure each curl flat against your scalp with two crossed bobby pins
- Continue creating pin curls all over your head in a systematic pattern
- Cover with a silk scarf or bonnet to protect while sleeping
- In the morning, carefully remove all bobby pins
- Gently separate the curls with your fingers—don’t brush
- Set with hairspray and style as desired
Curl Variations:
- Make smaller pin curls for tighter waves
- Create larger pin curls for looser, softer waves
- Curl different sections in different directions for natural movement
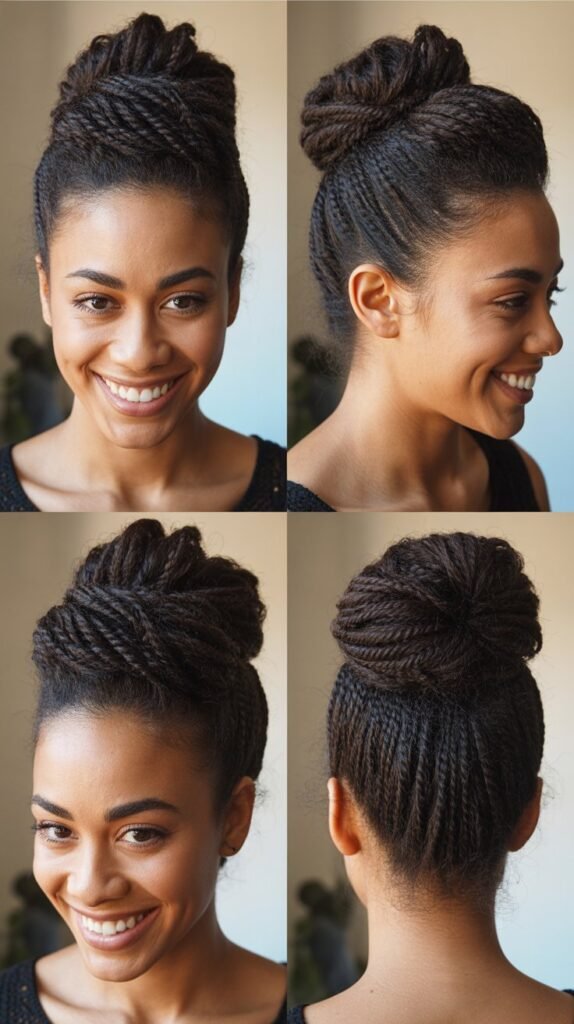
30. The Double Twisted Bun
The double twisted bun creates an intricate-looking updo by combining two separate twisted sections into one elegant bun.
This sophisticated style appears complex but comes together quickly once you understand the simple technique.
Creation Process:
- Part your hair down the middle from forehead to crown
- Take the right section and twist it loosely as you bring it toward the back
- Secure this twisted section temporarily with a clip
- Repeat with the left section, twisting it toward the back
- Combine both twisted sections at the back of your head
- Twist them together or wrap them around each other
- Form a bun with the combined twisted hair
- Tuck the ends under and secure with multiple bobby pins
- Ensure the pins go through both twisted sections for stability
- Adjust the twists and bun for balance and visual appeal
Style Enhancements:
- Pull gently on the twists before combining for added width
- Position the bun higher or lower based on preference
- Leave face-framing pieces out for a romantic touch
Quick Reference Guide: Choosing Your Perfect Morning Hairstyle
| Hairstyle | Time Required | Best Hair Length | Skill Level | Best For |
|---|---|---|---|---|
| Classic Low Bun | 2 minutes | Medium to Long | Beginner | Professional settings, elegant occasions |
| Messy Top Knot | 1-2 minutes | Medium to Long | Beginner | Casual days, workouts, busy mornings |
| Sleek High Ponytail | 3 minutes | Medium to Long | Beginner | Active days, polished casual looks |
| Half-Up Half-Down | 2 minutes | All lengths | Beginner | Versatile for any occasion |
| Simple Side Braid | 3 minutes | Medium to Long | Beginner | Casual outings, playful looks |
| Low Twisted Ponytail | 4 minutes | Medium to Long | Beginner | Professional environments, elegant casual |
| Quick French Twist | 5 minutes | Medium to Long | Intermediate | Formal events, sophisticated occasions |
| Braided Crown | 6-7 minutes | Medium to Long | Intermediate | Bohemian looks, special occasions |
| Bubble Ponytail | 4 minutes | Long | Beginner | Trendy casual, social media worthy |
| Textured Beach Waves | 5-10 minutes | All lengths | Beginner | Relaxed casual, vacation vibes |
| Twisted Low Chignon | 4 minutes | Medium to Long | Intermediate | Professional meetings, refined looks |
| Side-Swept Curls | 10-15 minutes | Medium to Long | Intermediate | Date nights, elegant occasions |
| Double Dutch Braids | 8-10 minutes | Medium to Long | Intermediate | Active days, sporty looks |
| Easy Sock Bun | 3 minutes | Medium to Long | Beginner | Polished updos, ballet-inspired |
| Messy Side Bun | 2 minutes | Medium to Long | Beginner | Casual chic, effortless style |
| Fishtail Braid | 5-6 minutes | Medium to Long | Intermediate | Bohemian, intricate-looking style |
| Quick Twist and Pin | 4-5 minutes | Medium to Long | Beginner | Elegant half-up, customizable |
| Low Braided Ponytail | 4 minutes | Medium to Long | Beginner | Neat all-day style, versatile |
| Headband Tuck | 5 minutes | Medium to Long | Beginner | Vintage-inspired, quick updo |
| Sleek Low Side Ponytail | 3 minutes | Medium to Long | Beginner | Asymmetrical elegance, modern |
| Twisted Half-Up Bun | 3 minutes | Medium to Long | Beginner | Trendy, dimensional style |
| Rope Braid Ponytail | 4 minutes | Medium to Long | Beginner | Unique texture, interesting detail |
| Pulled-Through Braid | 6-7 minutes | Long | Beginner | Faux braid, voluminous look |
| Crisscross Ponytail | 5 minutes | Medium to Long | Beginner | Modern geometric, social media ready |
| Easy Scarf Updo | 3 minutes | Medium to Long | Beginner | Vintage-inspired, colorful accent |
| Voluminous Half-Up | 4 minutes | All lengths | Beginner | Added volume, classic beauty |
| Knotted Ponytail | 3 minutes | Medium to Long | Intermediate | Seamless elegant, no elastic visible |
| Side-Swept Low Bun | 4 minutes | Medium to Long | Beginner | Romantic asymmetrical, soft elegance |
| Quick Pin Curls | Overnight | All lengths | Beginner | Heat-free curls, vintage waves |
| Double Twisted Bun | 5 minutes | Medium to Long | Intermediate | Sophisticated updo, woven texture |
Essential Tools and Products Every Mom Needs
Must-Have Tools:
- Quality hair elastics in various sizes (preferably no-snag varieties)
- Bobby pins in colors matching your hair
- A good paddle brush for smoothing
- Wide-tooth comb for detangling
- Small hair clips for sectioning
- Sock bun donut in your hair color
- Decorative headbands and scarves
- Hair ties with metal-free construction
Recommended Products:
- Dry shampoo for second-day styling and volume
- Texturizing spray for added grip and beachy texture
- Light-hold hairspray that doesn’t make hair crunchy
- Smoothing serum or oil for shine and frizz control
- Edge control gel for flyaways along the hairline
- Volumizing powder for root lift
- Leave-in conditioner for easier detangling
- Heat protectant spray if using hot tools
Time-Saving Tips for Morning Hair Routines
The Night Before:
- Wash hair in the evening so it’s dry by morning
- Apply products before bed for overnight styling
- Sleep with hair in braids or pin curls for wake-up texture
- Use a silk pillowcase to reduce frizz and tangles
- Prep your styling station with all needed tools
Morning Shortcuts:
- Embrace second or third-day hair with dry shampoo
- Keep a go-to style that you can create in under three minutes
- Use multi-purpose products that style and protect
- Perfect one or two techniques rather than attempting many
- Accept that “perfect” isn’t necessary—polished is enough
Strategic Planning:
- Choose hairstyles based on your schedule for the day
- Reserve complex styles for days when you have extra time
- Have backup styles ready when your first choice doesn’t work
- Consider your hair’s current condition when selecting a style
- Don’t wash hair every day—work with your natural texture
Adapting Styles for Different Hair Types
Fine Hair:
- Focus on styles that create the illusion of volume like bubble ponytails and voluminous half-ups
- Use texturizing products to add grip and fullness
- Avoid heavy products that weigh hair down
- Tease strategically at roots for lift
- Try messy styles that embrace texture rather than fighting it
Thick Hair:
- Choose secured styles like buns and braids that manage volume
- Use smoothing products to control frizz
- Consider styles that work with thickness rather than against it
- Divide hair into manageable sections when styling
- Embrace low buns and chignons that showcase your hair’s abundance
Curly Hair:
- Work with natural texture rather than straightening first
- Use curl-enhancing products before styling
- Try styles like messy buns and beach waves that embrace curls
- Avoid over-brushing which can create frizz
- Consider protective styles that maintain curl pattern
Straight Hair:
- Add texture with products before styling for better hold
- Choose sleek styles that showcase straight hair’s shine
- Use dry shampoo at roots for added grip
- Experiment with heat-free waves for variation
- Embrace styles like high ponytails and French twists
Troubleshooting Common Morning Hair Problems
Problem: Hair won’t hold style Solution: Use more product at the beginning and add texture with dry shampoo or texturizing spray before styling
Problem: Flyaways and frizz Solution: Apply edge control gel or smoothing serum and use an old toothbrush sprayed with hairspray to tame strays
Problem: Ponytails slide down Solution: Tease hair slightly before gathering or use elastics with better grip and add bobby pins at the base for security
Problem: Buns fall apart Solution: Use more bobby pins in X patterns and secure through multiple layers of hair rather than just the surface
Problem: Braids look too tight or severe Solution: Gently pull on braid sections after completing them to create a fuller more relaxed appearance
Problem: Not enough volume Solution: Backcomb at roots flip head upside down while styling and use volumizing powder at the base
Problem: Hair too slippery to style Solution: Work with day-old hair or apply dry shampoo and texturizing spray to create grip
Conclusion
Mastering these 30 Easy Hairstyles for Moms That Look Good Even on Busy Mornings will revolutionize your daily routine and boost your confidence as you tackle everything motherhood throws your way.
The beauty of these styles lies not in their complexity but in their simplicity and adaptability to real life. You don’t need salon skills or hours of free time to look polished and put-together.
With practice, these quick hairstyles will become second nature, allowing you to transition seamlessly from morning chaos to daytime activities while feeling like the best version of yourself.
Remember that the goal isn’t perfection but rather finding styles that work with your unique hair type, lifestyle, and personal aesthetic.
Some mornings you’ll have time for a braided crown while other days will call for a messy top knot, and both are equally valid choices.
The key is having a repertoire of go-to looks that you can execute confidently without stress. As you experiment with these styles, you’ll discover which ones work best for your hair texture, face shape, and daily activities.
Don’t be discouraged if a style doesn’t work perfectly the first time—like any skill, hairstyling improves with practice. Keep your styling tools organized and ready, maintain a collection of reliable products, and embrace the learning process.
Your morning hair routine should empower you rather than stress you out, giving you one less thing to worry about as you navigate the beautiful chaos of motherhood.
With these versatile options at your fingertips, you’ll never again feel like you have to choose between looking good and having enough time in your busy mornings.