Side-part braided hairstyles have become one of the most versatile and elegant hair trends that seamlessly blend sophistication with effortless style.
Whether you’re preparing for a casual day out, a formal event, or simply want to elevate your everyday look, 30+ Stunning Side-Part Braided Hairstyles to Try Right Now offers endless possibilities that flatter every face shape and hair texture.
This comprehensive guide explores over thirty creative variations of side-parted braids, from classic Dutch braids swept to one side to intricate fishtail patterns that cascade over your shoulder.
You’ll discover styling techniques for different hair lengths, maintenance tips to keep your braids looking fresh, and accessory ideas that add personality to each style.
Each hairstyle comes with detailed descriptions and practical advice to help you recreate these stunning looks at home or communicate your vision clearly to your hairstylist.
1. Classic Side Dutch Braid
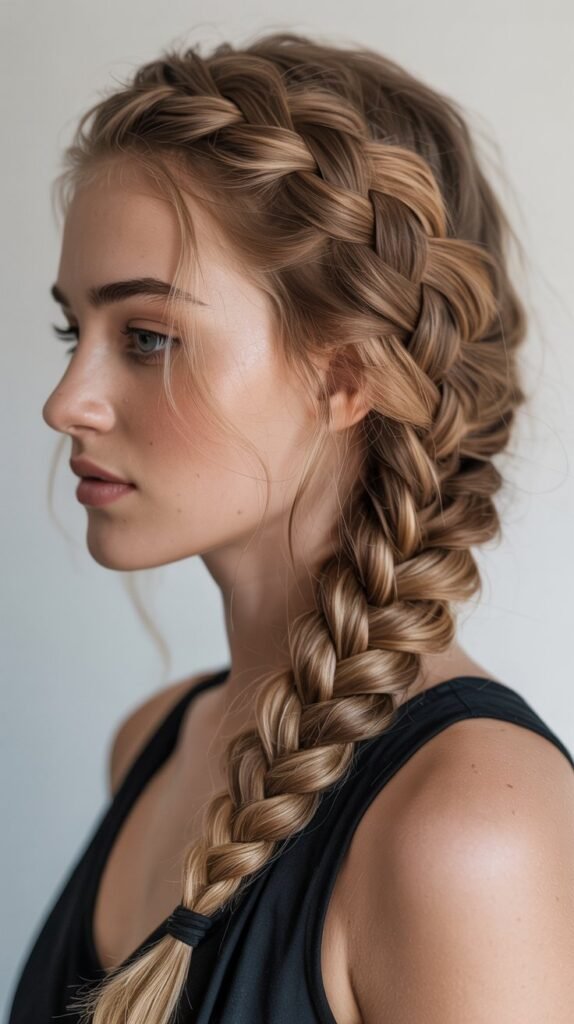
The side Dutch braid stands as a timeless favorite that works beautifully for both casual and formal occasions.
This inverted braiding technique creates a raised, three-dimensional effect that adds volume and texture to your hair.
The side placement draws attention to your facial features while keeping hair elegantly secured.
Styling Steps
- Begin by creating a deep side part on freshly washed and dried hair
- Take a three-inch section near the hairline on the heavier side of the part
- Divide this section into three equal strands to start the braiding process
- Cross the outer strands under the middle strand instead of over for the Dutch technique
- Add small sections of hair from each side as you continue braiding down
- Keep consistent tension throughout to maintain the raised appearance
- Secure the end with a clear elastic band once you reach the nape area
- Gently pancake the braid by pulling on the edges to create fuller volume
Best Hair Types
- Works exceptionally well on medium to thick hair textures
- Ideal for hair lengths that reach past the shoulders
- Straight to wavy hair showcases the braid pattern most clearly
- Fine hair benefits from texturizing spray applied before braiding
2. Bohemian Side Fishtail Braid

The bohemian fishtail braid offers a relaxed, romantic aesthetic perfect for festival season or beach weddings.
This intricate-looking style actually involves a simple two-strand technique that creates a herringbone pattern.
The deliberately messy, loosened appearance gives it that coveted effortless vibe.
Creating the Look
- Part hair deeply to one side and brush through to remove tangles
- Gather all hair over the opposite shoulder from your part
- Divide the ponytail into two equal sections instead of three
- Take a thin strand from the outer edge of the left section
- Cross this thin strand over to join the right section
- Repeat by taking a thin strand from the outer right edge
- Continue alternating sides while maintaining loose tension for the bohemian effect
- Secure at the bottom and pull apart sections generously for volume
Styling Enhancement
- Spritz with sea salt spray before braiding for enhanced texture
- Weave in small flowers or delicate pins for special occasions
- Leave face-framing pieces loose at the front for softness
- Apply a light texturizing paste to finished braid for hold
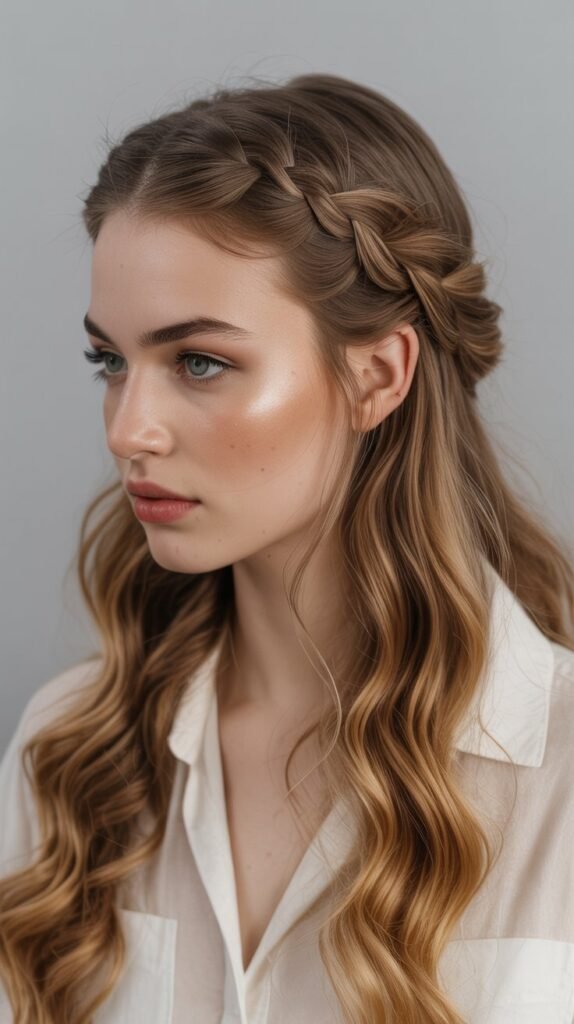
3. Side-Swept French Braid Crown

This elegant variation combines the classic French braid with a crown-like placement that wraps around the head from a side part.
The style creates a halo effect while keeping hair completely off the face and neck.
This sophisticated option works wonderfully for weddings, proms, or professional settings.
Construction Method
- Create a side part and section off the front portion from ear to ear
- Begin French braiding at the heavier side of the part near the temple
- Braid along the hairline incorporating small sections as you move around
- Continue the braid around the back of the head toward the opposite ear
- Maintain consistent braid size by keeping added sections uniform
- Secure the braid end with bobby pins behind the opposite ear
- Style remaining loose hair in waves or leave straight based on preference
- Set with medium-hold hairspray to ensure all-day wear
4. Double Side Braids with Middle Section

This trendy style features two small braids on the heavier side of a part while leaving the middle section flowing freely.
The combination creates visual interest and dimension that flatters oval and heart-shaped faces particularly well.
The style balances structure with movement beautifully.
Execution Process
- Part hair deeply to your preferred side using a fine-tooth comb
- Section off two narrow strips of hair along the heavier side
- Create a small three-strand braid with the first section closest to the part
- Secure this first braid temporarily with a small clip
- Braid the second section parallel to the first about an inch away
- Both braids should extend down to ear level before securing
- Use clear micro elastics that blend with your hair color
- Leave the remaining hair down and style with loose curls or straight
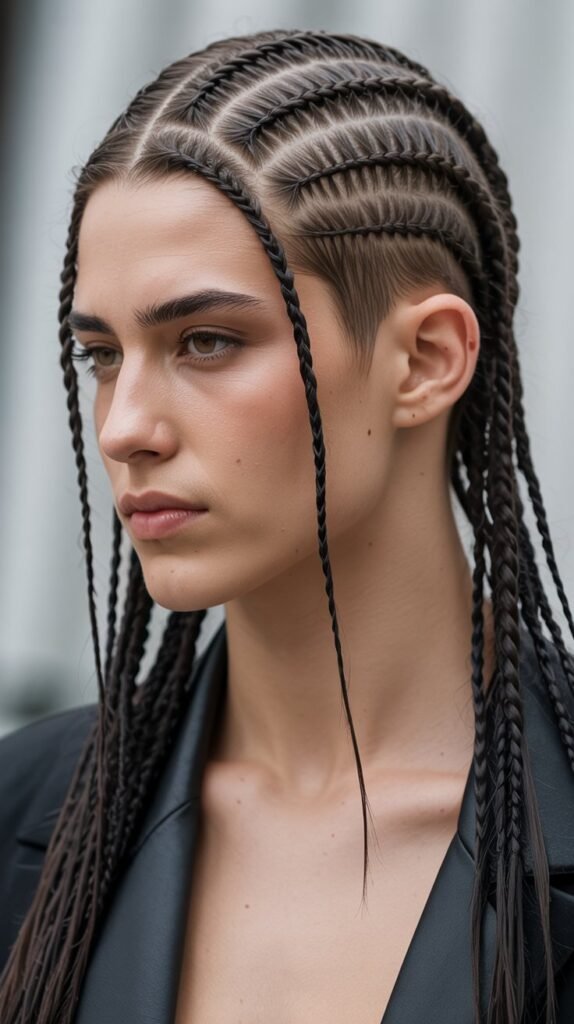
5. Side Cornrow into Ponytail

Side cornrows transitioning into a sleek ponytail deliver an athletic yet stylish appearance ideal for active lifestyles.
This protective style keeps hair secure during workouts while maintaining a polished, put-together look.
The tight braiding pattern provides excellent hold that lasts for days.
Braiding Technique
- Section the heavier side of your part into three to five equal horizontal strips
- Apply edge control gel to smooth down flyaways and baby hairs
- Begin cornrowing each section tightly against the scalp starting at the part
- Continue each cornrow until reaching the point where you want the ponytail
- Gather all remaining loose hair including cornrow ends into one section
- Secure with a strong elastic band at your desired ponytail height
- Wrap a small section of hair around the elastic to conceal it
- Apply light oil sheen spray to add shine to the cornrows
6. Romantic Side Braid with Ribbon
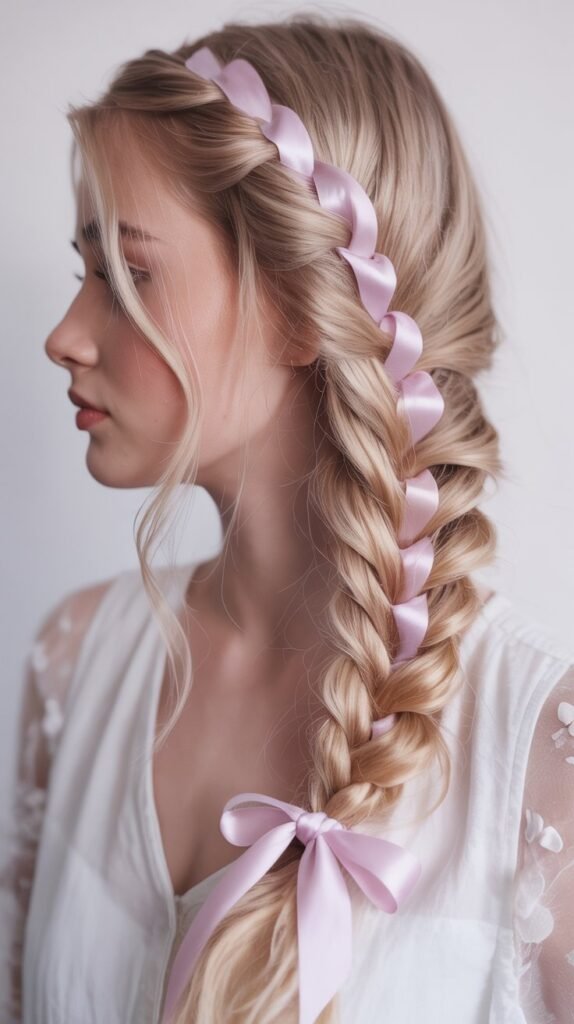
Adding ribbon to a side braid transforms a simple style into something truly special and personalized.
This decorative technique works beautifully for celebrations, date nights, or when you simply want to feel extra feminine.
The ribbon adds color, texture, and a custom touch to your hairstyle.
Ribbon Integration
- Choose a ribbon that complements your outfit or matches your hair color
- Cut the ribbon to approximately twice the length of your hair
- Create your side part and gather hair over one shoulder
- Position the ribbon at the base where you’ll start braiding
- Incorporate the ribbon as a fourth strand or weave it between existing strands
- Alternate the ribbon through the braid pattern as you work downward
- Secure the end by tying the ribbon into a bow around the elastic
- Adjust the tightness of the ribbon integration based on your desired look
7. Side Braid into Low Bun

This sophisticated combination offers the best of both worlds by featuring a visible braid that transitions seamlessly into an elegant low bun.
The style provides a polished appearance suitable for office environments, formal dinners, or any occasion requiring refined elegance.
The low placement keeps the style comfortable for all-day wear.
Assembly Instructions
- Part hair to your preferred side and brush thoroughly
- Begin a three-strand braid at the front hairline on the heavier side
- Continue braiding while gradually incorporating all hair from both sides
- Once the braid reaches the nape of your neck, stop adding new sections
- Finish braiding the remaining length down to the ends
- Coil the completed braid into a circular bun shape at the nape
- Secure the bun with bobby pins inserted in multiple directions
- Spray with strong-hold hairspray to prevent loosening throughout the day
8. Side Waterfall Braid

The waterfall braid creates a cascading effect where strands appear to flow through the braid like water over a cliff. This intricate-looking style works wonderfully for special occasions and photographs beautifully.
The combination of braided and flowing sections adds dimensional interest to any hair color.
Waterfall Technique
- Create a deep side part and section off hair along the front hairline
- Begin a standard three-strand braid near the part on the heavier side
- After the first stitch, drop the bottom strand completely
- Pick up a new section from the top to replace the dropped strand
- Continue this drop-and-replace pattern as you braid along the hairline
- The dropped strands create the waterfall effect flowing down
- Braid horizontally around toward the back of the head
- Secure with bobby pins when you reach behind the ear
Styling Tips
- Curl the dropped strands with a curling iron for enhanced effect
- This technique works best on hair with some natural texture
- Apply smoothing serum to the braided sections for contrast
- Leave face-framing layers loose at the front for softness
9. Side Viking Braid

Inspired by historical Nordic styles, the side Viking braid features multiple small braids woven into one larger statement braid.
This bold, warrior-inspired look has surged in popularity thanks to television shows and offers a strong, confident aesthetic.
The complexity of the style makes it perfect for standing out at festivals or themed events.
Construction Details
- Section the hair on the heavier side of your part into three vertical strips
- Create tight three-strand braids with each individual section
- Leave these small braids hanging while you section the remaining hair
- Gather all hair including the small braids over one shoulder
- Incorporate the small braids as you create one large Dutch or French braid
- The small braids add texture and visual complexity to the main braid
- Continue down the full length and secure with a sturdy elastic
- Gently pull on the outer edges to create a fuller Viking appearance
10. Side Rope Braid

The rope braid offers a simple yet striking alternative to traditional three-strand braiding that creates a twisted, cord-like appearance.
This two-strand technique works up quickly and provides a sleek, uniform look that’s perfect for both casual and dressy occasions.
The simplicity makes it ideal for those still developing their braiding skills.
Twisting Method
- Part hair deeply and gather everything over one shoulder
- Divide the gathered hair into two equal sections
- Twist each section individually in a clockwise direction
- Once both sections are twisted, cross them over each other counterclockwise
- The opposite twisting directions create the rope effect and prevent unraveling
- Continue twisting and crossing down the entire length
- Secure tightly with an elastic band at the bottom
- Apply a small amount of hair oil to smooth any frizz
11. Side Braided Mohawk
This edgy style combines the boldness of a mohawk silhouette with the femininity of braids. Multiple cornrows or Dutch braids run along each side of the head, leaving a central strip of hair that can be styled up or braided itself.
The look works exceptionally well for concerts, parties, or whenever you want to make a statement.
Creating the Structure
- Part hair down the center creating a three-inch wide strip from front to back
- Clip this central section away temporarily while working on sides
- Create three to four tight cornrows or Dutch braids on each side
- These side braids should run parallel from hairline to nape
- Once side braids are complete, release the center section
- Style the center strip into a high braid, twist, or leave it spiked
- Secure side braids at the nape if creating a unified base
- Add edge control to keep the parting lines sharp and clean
12. Side Ladder Braid

The ladder braid showcases an architectural quality with horizontal bars running through a vertical braid structure.
This advanced technique requires patience but delivers an absolutely stunning visual effect that photographs beautifully.
The geometric pattern works particularly well on solid hair colors where the structure stands out clearly.
Complex Assembly
- Create two small rope twists on either side of your side part
- Keep these twists parallel running down toward your shoulder
- Take horizontal sections between the two rope twists
- Weave these horizontal sections over and under the vertical twists
- Each horizontal section creates one “rung” of the ladder
- Continue this pattern down the length adding horizontal strands
- The technique requires securing each rung as you progress
- Finish by securing all ends together and concealing with wrapped hair
13. Side Accent Braid with Down Hair

This subtle approach features one small decorative braid on the heavier side of a part while leaving most hair flowing freely.
The minimalist style adds just enough detail to elevate a basic down hairstyle without requiring extensive time or skill.
Perfect for everyday wear or when you want effortless elegance.
Simple Application
- Create your side part with a comb for precision
- Take a one-inch section of hair right along the heavier side
- Braid this small section using a standard three-strand technique
- Extend the braid down to approximately ear or shoulder length
- Secure with a small clear elastic that blends with hair
- Leave all remaining hair down and style as desired
- The accent braid can be placed right at the hairline or slightly behind
- Works beautifully with straight hair, waves, or curls
14. Side Pull-Through Braid

The pull-through braid creates the illusion of an extremely thick, voluminous braid without requiring traditional braiding skills.
This technique uses stacked ponytails that are split and pulled through each other.
The final result looks impressively complex while being quite simple to execute.
Step-by-Step Process
- Create a side part and gather hair over one shoulder
- Secure a ponytail at the top with a clear elastic
- Create a second ponytail directly below the first one
- Split the top ponytail in half vertically
- Bring these two halves around and behind the second ponytail
- Temporarily clip them out of the way above the second ponytail
- Create a third ponytail below the second one
- Combine the split sections from the first ponytail with this third ponytail
- Continue this split-and-combine pattern down the length
- Gently pull each ponytail section apart to create volume
15. Side Four-Strand Braid

The four-strand braid offers additional intricacy and dimension compared to standard three-strand braiding.
This technique creates a flatter, more woven appearance that showcases highlights and color dimension beautifully.
While it requires practice to master, the stunning result makes the learning curve worthwhile.
Braiding Pattern
- Part hair to the side and divide into four equal sections
- Number the sections mentally from left to right as one through four
- Cross section one over section two
- Cross section four under section three
- Cross the new section two over the new section three
- Repeat this over-under-over pattern consistently
- Keep even tension on all four strands throughout
- The technique becomes intuitive with practice and repetition
16. Side Braided Headband with Loose Hair

This charming style uses a braid created from the lighter side of your part that sweeps across the head like a headband.
The braid frames the face beautifully while keeping hair out of your eyes.
The remaining hair flows freely, creating a balanced look between structured and loose elements.
Headband Creation
- Part hair deeply to one side using a tail comb
- Take a section from the thinner side along the hairline
- Begin braiding this section using your preferred technique
- Braid along the hairline moving toward the heavier side
- Continue the braid across the front of the head like a headband
- Secure the braid end behind the ear with bobby pins
- Leave all remaining hair down and style with waves or straight
- The braid can be tight for definition or loosened for softness
17. Side Bubble Braid

The bubble braid creates a fun, playful appearance using elastic bands spaced evenly down a ponytail.
Sections between elastics are gently pulled apart to create rounded bubble shapes.
This youthful, trendy style works wonderfully for festivals, parties, or casual outings.
Bubble Formation
- Create a side ponytail at your desired height
- Secure with a strong elastic band at the base
- Measure down approximately three to four inches
- Add another elastic band at this point
- Gently pull the hair between elastics apart to create volume
- Continue adding elastics at regular intervals down the ponytail
- Create bubbles between each set of elastics
- Finish the last section with a final elastic at the bottom
Enhancement Options
- Use colorful elastics for a bold, playful statement
- Add ribbons tied around each elastic for decoration
- This style works beautifully with textured or wavy hair
- Apply light hairspray to maintain bubble shape throughout the day
18. Side Braided Updo

This elegant updo incorporates side braiding elements into a sophisticated pinned style.
Multiple braids created from different sections are woven together and pinned into an artistic arrangement at the back of the head.
Perfect for weddings, galas, or any black-tie event requiring glamorous hair.
Updo Construction
- Create a deep side part and section hair into multiple pieces
- Braid several sections on the heavier side using various techniques
- Create two to three braids on the lighter side as well
- Begin pinning braids across the back of the head
- Weave braids over and under each other for dimension
- Create a structured bun or loose chignon as the base
- Wrap braids around this base pinning as you go
- Leave a few delicate pieces loose at the front for softness
19. Side Infinity Braid

The infinity braid creates a beautiful figure-eight pattern that weaves through the hair.
This advanced technique requires dexterity and practice but produces a stunning, unique result unlike any other braid style.
The continuous loop pattern catches light beautifully and works wonderfully for special occasions.
Figure-Eight Technique
- Section hair deeply to one side and divide into two main sections
- Take a small piece from the outer edge of the left section
- Weave it in a figure-eight pattern through the two main sections
- The strand goes over the left section, under the right, then back
- Continue taking new small pieces alternately from each side
- Maintain the figure-eight weaving pattern consistently
- This creates a complex interlocking appearance
- Secure at the bottom and avoid pulling apart to maintain definition
20. Side Braid with Undercut Design

For those with shaved undercut sections, a side braid beautifully showcases the contrast between the shaved design and longer braided hair.
The juxtaposition creates an edgy, fashion-forward look that’s gained popularity in alternative style communities.
The braid can be positioned to perfectly display your undercut art.
Styling Approach
- Part hair to the opposite side of your undercut design
- This naturally sweeps hair over to expose the shaved section
- Create your chosen braid style on the long side
- Position the braid to rest over your shoulder on the undercut side
- The length of the braid contrasts dramatically with the shaved section
- Keep the undercut freshly trimmed for maximum impact
- Consider temporary hair color on the braid for additional contrast
- This style requires regular maintenance of the shaved section
21. Side Braided Pigtails

This youthful, playful style features two braids that hang on either side of a side part rather than a center part.
The asymmetrical placement gives traditional pigtails a modern, updated appearance.
This fun style works well for casual settings, theme parties, or anyone embracing a more playful aesthetic.
Pigtail Placement
- Create a side part instead of the traditional center part
- Divide hair into two sections using the part as the division point
- One side will naturally have more hair than the other
- Braid each section using your preferred braiding technique
- The uneven sections create an interesting asymmetric appearance
- Secure each braid with elastics that match your outfit
- The braids can be positioned over shoulders or behind ears
- This style works with braids of different sizes for added interest
22. Side Braid with Hair Jewelry

Incorporating hair jewelry elevates a simple side braid into something truly special and personalized.
From delicate chains to statement hair cuffs, accessories transform braids into wearable art.
his decorative approach works beautifully for festivals, weddings, or whenever you want your hair to sparkle.
Jewelry Integration
- Select hair jewelry that complements your personal style
- Hair cuffs can be slid onto completed braid sections
- Chains can be woven through braids during the braiding process
- Decorative pins can be inserted at strategic points along the braid
- Consider the weight of jewelry to ensure comfortable wear
- Gold tones complement warm hair colors beautifully
- Silver and crystal pieces work well with cool-toned hair
- Distribute jewelry evenly throughout the braid for balance
23. Side Braided Faux Hawk

This bold style combines multiple tight braids that create the appearance of a mohawk without requiring shaved sides.
The braids run from the hairline back toward the crown, where remaining hair can be styled up.
Perfect for those wanting an edgy look without permanent commitment.
Faux Hawk Assembly
- Create three to five sections running from front to back
- Leave a central strip of hair free from ear to ear
- Braid each side section tightly using Dutch or cornrow technique
- Direct all braids toward the center back of the head
- Secure braids together at the crown area
- Tease or style the loose center section upward
- Create height at the crown for the mohawk effect
- Use strong-hold products to maintain vertical styling
24. Side Braid with Extensions

Adding extensions to a side braid instantly increases length, volume, and styling possibilities.
Clip-in or tape-in extensions blend seamlessly when braided, making them undetectable in the finished style.
This technique allows anyone to achieve long, flowing braids regardless of natural hair length.
Extension Application
- Choose extensions that match your natural hair color and texture
- Clip in extensions before beginning the braiding process
- Focus extension placement on the side where you’ll create the braid
- Blend extension pieces throughout natural hair for uniform appearance
- Begin braiding once extensions are securely attached
- The added length and volume create a dramatically fuller braid
- Secure the extended length with a strong elastic band
- Gently tug braid sections for even distribution of natural and extension hair
25. Side French Braid Ponytail
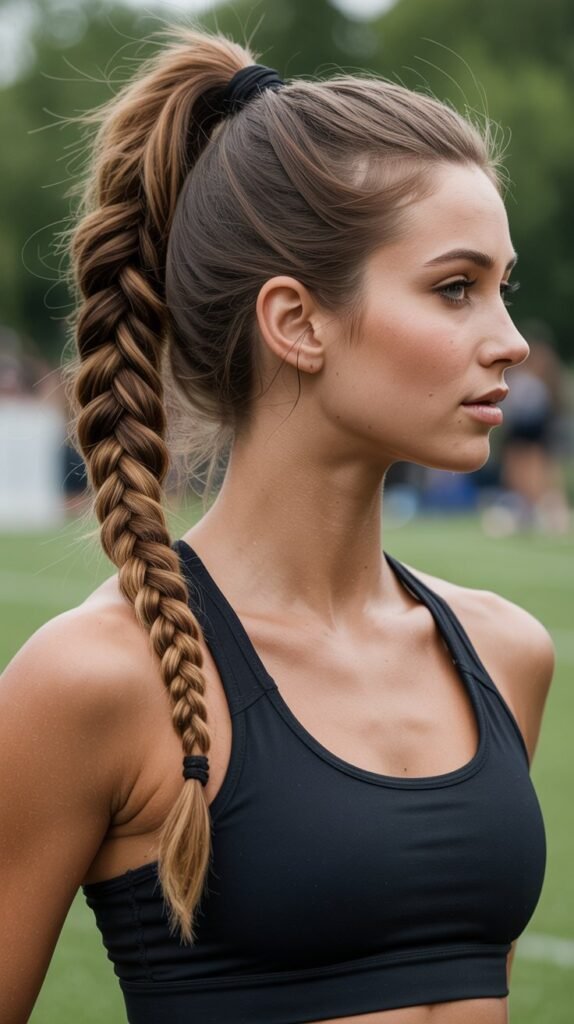
This athletic yet polished style features a French braid that runs along the side of the head before incorporating into a ponytail.
The combination keeps hair completely secure during physical activity while maintaining a feminine, put-together appearance.
Ideal for athletes, gym enthusiasts, or active lifestyles.
Athletic Assembly
- Part hair to your preferred side starting at the front hairline
- Begin French braiding along the heavier side of the part
- Incorporate sections from the hairline as you braid toward the back
- Continue the French braid until reaching your desired ponytail placement
- Gather remaining loose hair along with the braid end
- Secure everything together in one unified ponytail
- Wrap a section of hair around the elastic to polish the look
- The style stays secure even during intense physical activity
26. Side Mermaid Braid

The mermaid braid creates a whimsical, fantasy-inspired look with an intentionally messy, voluminous appearance.
This ultra-loosened style features pulled-apart sections that create a dramatic, wide braid reminiscent of fairytale illustrations.
Perfect for beach weddings, photoshoots, or anyone embracing a romantic aesthetic.
Mermaid Effect Creation
- Apply texturizing spray throughout hair before starting
- Create a loose three-strand or fishtail braid over one shoulder
- Keep tension very light to allow for maximum pulling apart
- Once the braid is complete and secured, begin pancaking aggressively
- Pull each section apart much more than you would for normal pancaking
- Create a very wide, voluminous appearance
- Some sections should appear almost entirely pulled apart
- Finish with texture spray and avoid smoothing products
27. Side Braided Space Buns

This trendy style combines side-parted sections with space buns that sit asymmetrically on the head.
Small braids lead into the buns, adding detail and structure to the playful style.
Popular in alternative fashion and festival settings, this look makes a bold statement.
Space Bun Construction
- Create a deep side part dividing hair into two unequal sections
- Take the larger section and divide it into two horizontal layers
- Create a small braid leading from the part toward where the bun will sit
- Secure this first bun high on the head incorporating the braid
- Repeat the process on the lighter side of the part
- This second bun will naturally be smaller and positioned differently
- The asymmetric placement creates visual interest
- Leave small pieces loose at the front for face-framing
28. Side Celtic Braid

Inspired by traditional Celtic knotwork, this intricate braid features woven patterns that create the appearance of interlocking loops.
The complex technique requires advanced braiding skills but produces museum-worthy results.
Perfect for Renaissance fairs, Celtic celebrations, or whenever you want to showcase true braiding artistry.
Knotwork Technique
- This advanced style combines multiple small braids woven together
- Create several thin braids from different sections on the heavier side
- Begin weaving these braids over and under each other
- Create intentional loop patterns that reference Celtic knotwork designs
- Some strands should appear to go over, under, and through others
- Secure intersections with small clear elastics or pins temporarily
- The final result resembles historical Celtic art patterns
- This technique requires patience and multiple practice attempts to master
29. Side Braided Top Knot

This contemporary style features braids that run from a side part up to a high top knot positioned at the crown.
The combination of sleek braided sides with a textured top knot creates interesting contrast.
Perfect for both casual wear and dressed-up occasions depending on accessorizing.
Top Knot Assembly
- Create a side part and section off strips along the heavier side
- Braid these sections using cornrows or Dutch braids angled upward
- Direct all braids toward a central point at the crown
- Gather remaining loose hair at this crown point
- Combine braid ends with loose hair into one section
- Create a top knot by twisting and wrapping this combined section
- Secure with bobby pins inserted in multiple directions
- Pull a few pieces from the top knot to create texture
30. Side Braid with Beads

Adding beads to braids creates cultural significance, personal expression, and rhythmic movement.
This decorative technique has deep roots in various cultures and allows for endless customization through bead color, size, and placement.
The clicking sound of beads adds an auditory element to the visual beauty.
Bead Application
- Choose beads with holes large enough to fit your braid
- Thread beads onto the braid as you work or add them after completion
- Secure each bead by adding a small elastic below it
- Distribute beads evenly throughout the length or cluster them
- Wooden beads offer natural aesthetic while metal beads add shine
- Consider the weight of beads for comfortable all-day wear
- Beads work particularly well on smaller, tighter braids
- This technique celebrates cultural hair traditions beautifully
31. Side Braided Half-Up Style
This versatile style braids the top section of hair on one side while leaving the bottom half flowing freely.
The technique offers the best of both worlds by keeping hair off the face while showcasing length and movement.
Works beautifully for all occasions from casual to formal.
Half-Up Construction
- Create a side part and section off the top half of hair
- Take sections from the heavier side of the part
- Braid these top sections using your preferred technique
- Leave all hair below the occipital bone loose and unstyled initially
- Secure the braid at the back with pins or elastics
- Style the loose bottom section with curls, waves, or leave straight
- The braid should connect seamlessly with the loose section
- This style works with any braid type from simple to complex
32. Side Zipper Braid

The zipper braid creates a clean, linear appearance where the center of the braid resembles a closed zipper.
This technique involves precise movements that pull strands directly through the center rather than to the sides.
The structured appearance works beautifully for modern, minimalist aesthetics.
Zipper Technique
- Part hair to the side and divide into three initial sections
- Begin braiding but pull strands through the center very tightly
- Each new section should be pulled directly down through middle
- This creates a vertical line down the center of the braid
- Keep consistent tension to maintain the zipper appearance
- The technique requires practice to achieve the clean zipper effect
- Secure at the bottom without pulling apart any sections
- Apply smoothing serum for maximum definition of the zipper line
Conclusion
From classic elegance to bold contemporary statements, 30+ Stunning Side-Part Braided Hairstyles to Try Right Now provides comprehensive inspiration for every skill level, hair type, and personal style preference.
Whether you’re drawn to the romantic softness of a bohemian fishtail, the athletic functionality of cornrow ponytails, or the intricate artistry of Celtic knotwork, these diverse styling options ensure you’ll never run out of creative ways to wear your hair.
The beauty of side-part braids lies in their versatility—they transition seamlessly from casual daily wear to formal special occasions with simple adjustments to technique and accessories.
By experimenting with these various approaches, you’ll discover which styles complement your face shape, lifestyle needs, and personal aesthetic while developing valuable braiding skills.