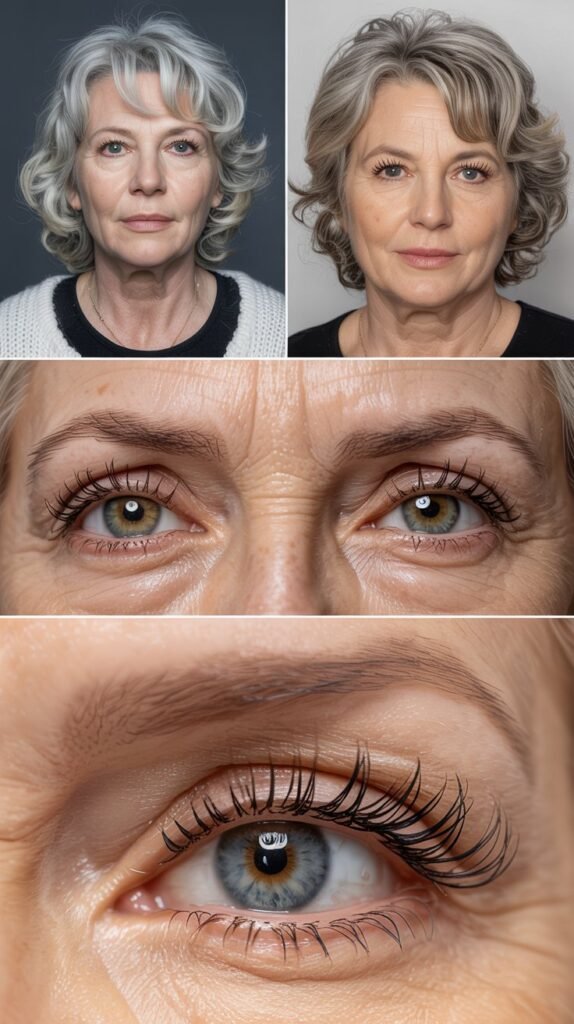
As we embrace our 50s and beyond, our eyes remain one of our most captivating features, capable of expressing wisdom, joy, and timeless beauty.
The right makeup techniques can transform your eyes, making them appear more awake, youthful, and radiant than ever before.
This comprehensive guide on 32 Best Makeup Tips for Women Over 50 to Brighten the Eyes will walk you through expert-approved methods, from choosing the perfect eyeshadow shades to mastering eyeliner application for mature skin.
Whether you’re dealing with hooded lids, fine lines, or simply want to enhance your natural beauty, you’ll discover practical solutions that celebrate your age while bringing out your eyes’ natural sparkle.
These tips focus on brightening techniques, proper product selection, and application methods specifically designed for mature skin, ensuring you look and feel absolutely stunning every single day.
1. Prime Your Eyelids for Long-Lasting Brightness
Eye primer creates the perfect canvas for your eye makeup and prevents creasing throughout the day. As skin matures, eyelids can become more textured and prone to oiliness or dryness, making primer an essential first step.
A quality primer fills in fine lines, evens out discoloration, and helps eyeshadow colors appear more vibrant and true to pan.
- Choose a primer specifically formulated for mature skin that contains hydrating ingredients like hyaluronic acid.
- Apply a small amount to each eyelid and blend gently from lash line to brow bone using your ring finger.
- Wait 30-60 seconds before applying eyeshadow to allow the primer to set properly.
- Consider using a color-correcting primer in peach or yellow tones to neutralize dark circles and veins.
- Look for primers with a slightly tacky finish that helps eyeshadow adhere better than silicone-based formulas.
- Apply primer to your lower lash line as well to prevent under-eye makeup from smudging or fading.
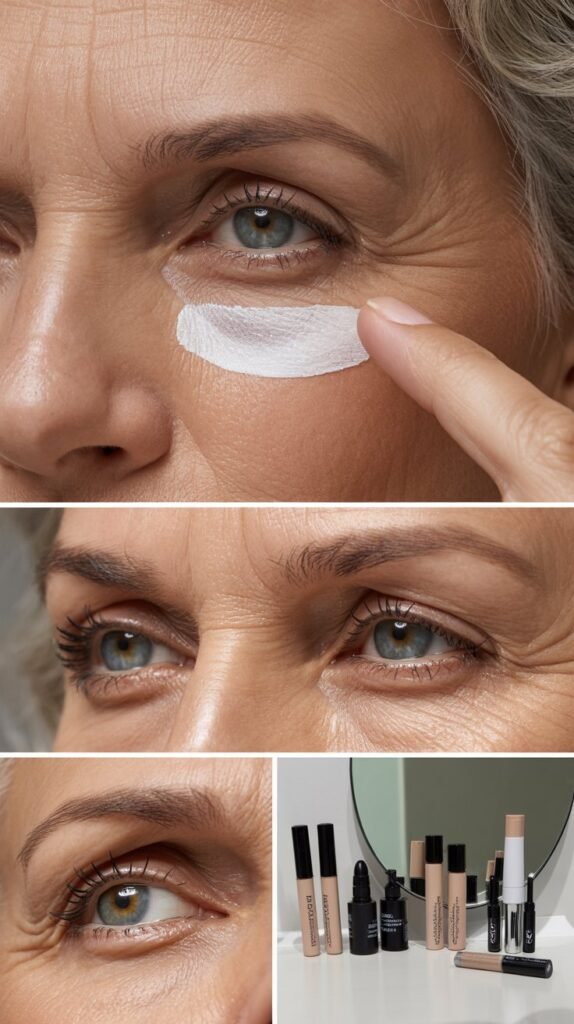
2. Master the Art of Concealing Dark Circles
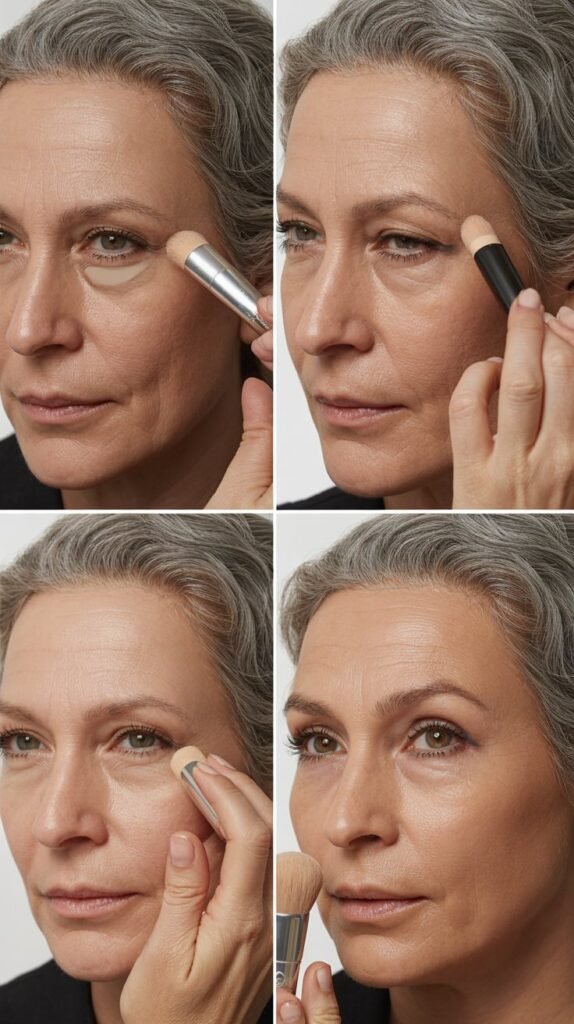
Dark circles can make eyes appear tired and sunken, but the right concealer application technique creates a lifted, brightened effect. Mature skin requires a different approach than younger skin, focusing on hydration and light-reflecting properties rather than heavy coverage.
The goal is to neutralize darkness while maintaining a natural, skin-like finish that doesn’t settle into fine lines.
- Choose a concealer one to two shades lighter than your foundation for maximum brightening effect.
- Apply concealer in an inverted triangle shape under the eye, extending down toward the cheek.
- Use a damp beauty sponge to blend the edges seamlessly into your skin without removing the product.
- Set with a finely milled translucent powder using a light hand to prevent creasing.
- Layer concealer gradually if you need more coverage rather than applying one thick layer.
- Consider using a peachy or salmon-toned color corrector underneath your concealer to neutralize blue or purple tones.
- Avoid concealer formulas with excessive shimmer that can emphasize texture and wrinkles.
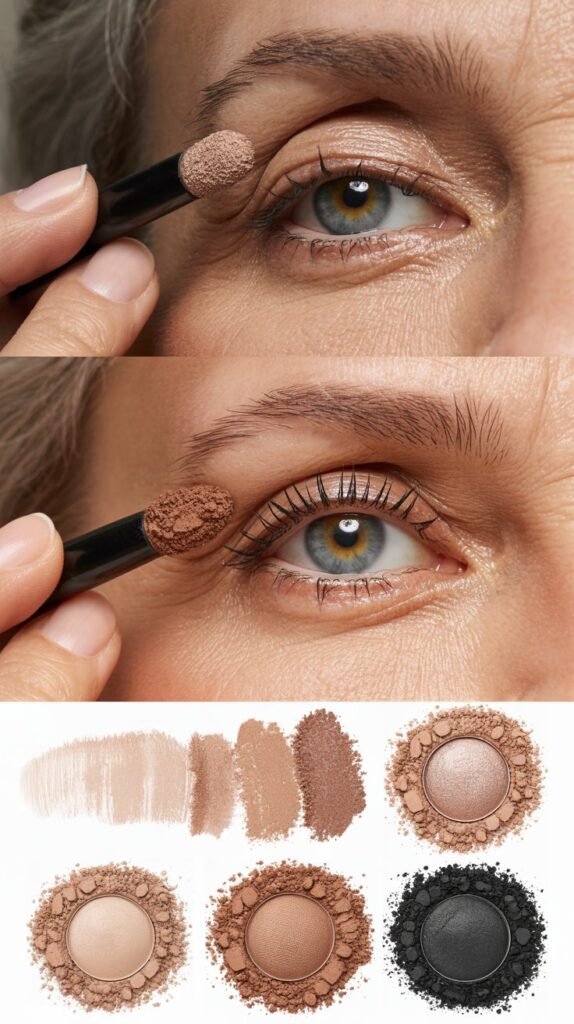
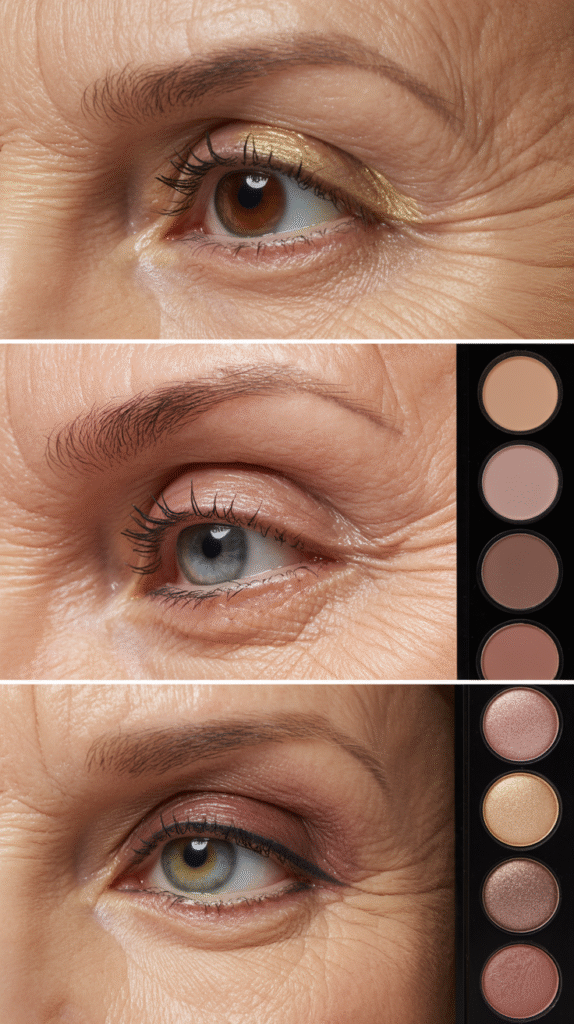
3. Choose Light-Reflecting Eyeshadow Formulas
The right eyeshadow texture can make a significant difference in how youthful and bright your eyes appear. Cream and satin-finish eyeshadows with light-reflecting particles create dimension and luminosity without emphasizing texture.
These formulas blend seamlessly on mature lids and provide a more forgiving application than powder shadows.
- Opt for cream-to-powder or satin-finish eyeshadows rather than matte or glittery formulas.
- Look for products containing light-reflecting pigments like mica or pearl that create a soft-focus effect.
- Apply lighter shades to the inner corner and center of the lid to catch light.
- Avoid chunky glitters that settle into creases and emphasize fine lines.
- Choose eyeshadows with buildable coverage that allow you to control intensity gradually.
- Test eyeshadow formulas on your hand first to ensure they don’t appear chalky or dry on mature skin.
4. Brighten Inner Corners with Champagne Shades
The inner corner highlight is one of the most effective tricks for instantly opening up and brightening the eyes. A champagne or soft gold shade applied to the inner corners creates the illusion of wider-set, more awake eyes.
This technique works particularly well for mature eyes as it draws attention to the brightest part of the eye area.
- Use a small, precise brush to apply champagne or soft gold shadow to the inner corners of your eyes.
- Extend the highlight slightly onto the bridge of your nose for a more dimensional effect.
- Choose shades with a subtle sheen rather than intense glitter for a sophisticated look.
- Layer the highlight over your base eyeshadow rather than applying it directly to primer.
- Consider using a cream highlighter stick for a more intense, long-lasting effect.
- Blend the edges softly to avoid harsh lines that can look unnatural.
- Reapply throughout the day for an instant refresh if your eyes start to look tired.
5. Define Your Brows to Frame Your Eyes
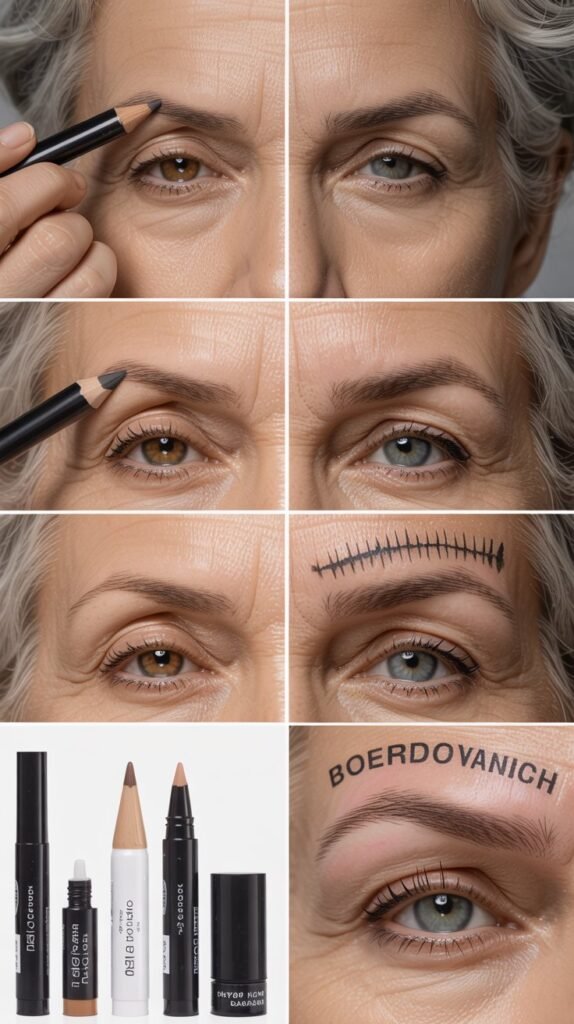
Well-groomed, defined eyebrows frame the eyes and create a lifted appearance that makes eyes look brighter and more youthful. As we age, brows can become sparse or lose their natural arch, making brow definition crucial for overall eye brightness.
The right brow shape and color can take years off your appearance.
- Choose a brow pencil or powder one shade lighter than your natural brow color for a softer look.
- Use light, feathery strokes to fill in sparse areas rather than drawing solid lines.
- Focus on creating a subtle arch that lifts the outer corner of your eye.
- Brush brows upward and outward with a spoolie to create a lifted effect.
- Set brows with a clear or tinted brow gel to keep them in place all day.
- Avoid brow products that are too dark or warm-toned as they can look harsh against mature skin.
- Highlight beneath the arch of your brow with a light concealer or highlighter to enhance the lift.
6. Use Nude or White Eyeliner on the Waterline
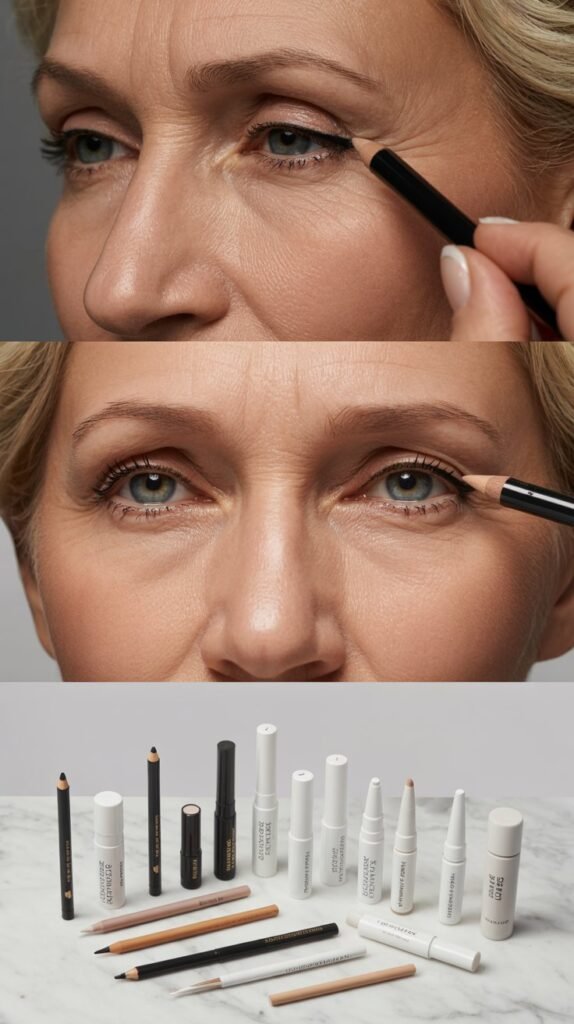
Applying nude or white eyeliner to your lower waterline is a game-changing technique that instantly makes eyes appear larger and brighter.
This method counteracts redness and creates the illusion of more white showing in the eye. It’s particularly effective for mature eyes that may have become smaller or more hooded over time.
- Choose a creamy, long-wearing nude or white eyeliner pencil specifically designed for the waterline.
- Gently pull down your lower lid and apply the liner along the entire waterline.
- Select a shade that matches the whites of your eyes for the most natural brightening effect.
- Avoid stark white liners that can look artificial; opt for champagne or soft pink tones instead.
- Reapply throughout the day as waterline liner tends to fade with natural tear production.
- Pair waterline liner with a darker shade along the lower lash line for added definition without closing off the eye.
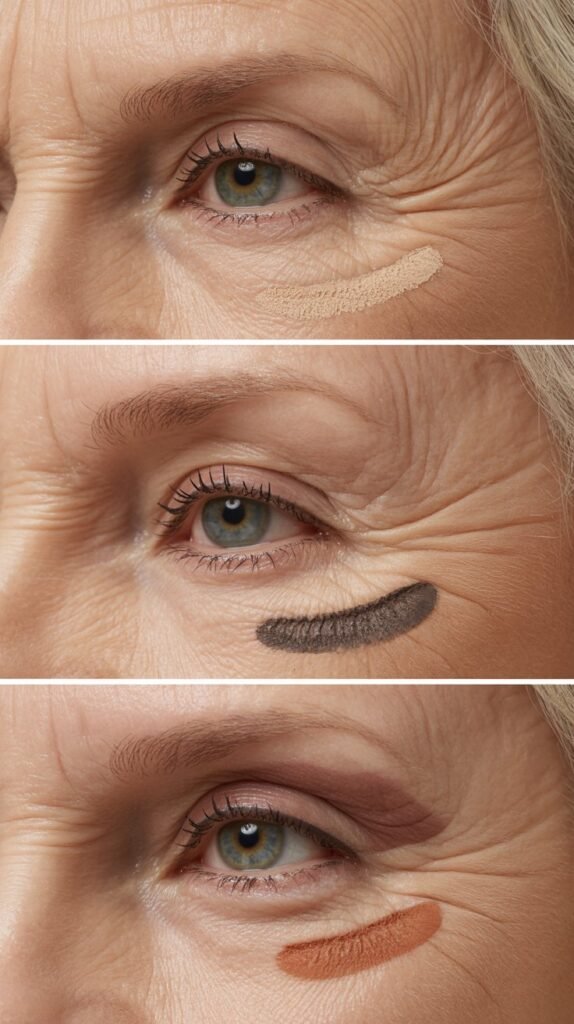
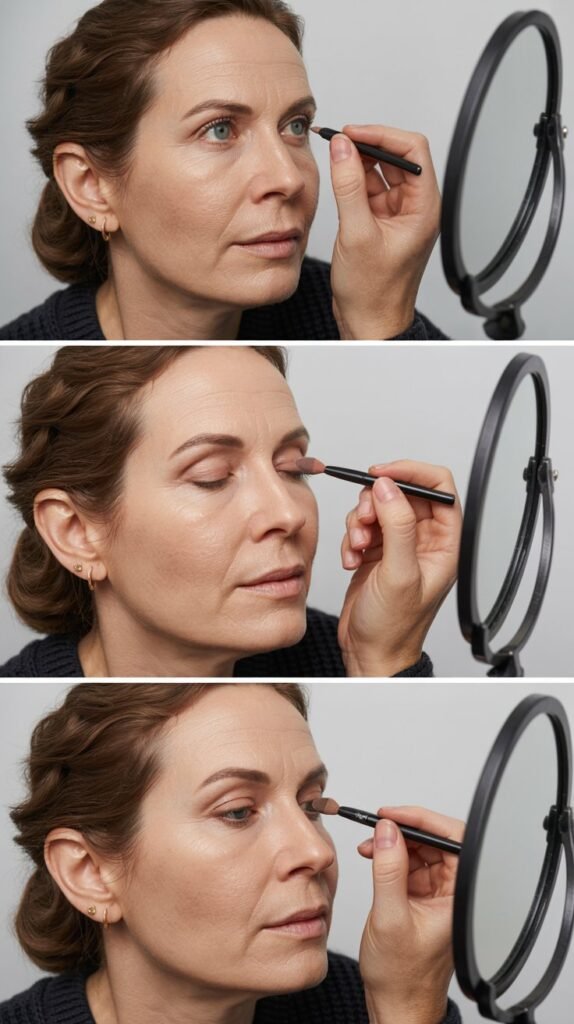
7. Apply Eyeshadow with Strategic Placement
Proper eyeshadow placement can dramatically change how large and bright your eyes appear. The traditional method of applying darker shades in the crease doesn’t always work for hooded or mature eyes.
Instead, strategic placement that considers your unique eye shape creates more lift and brightness.
- Apply your lightest shade across the entire lid as a base to brighten the eye area.
- Place medium tones slightly above your natural crease where it’s visible when eyes are open.
- Use the darkest shade only in the outer corner and blend upward and outward.
- Avoid bringing dark colors too far into the center of the lid which can make eyes look smaller.
- Keep darker shades diffused and soft rather than creating harsh lines.
- Apply a light, shimmery shade to the center of your mobile lid to create dimension.
- Blend all edges thoroughly to create seamless transitions between colors.
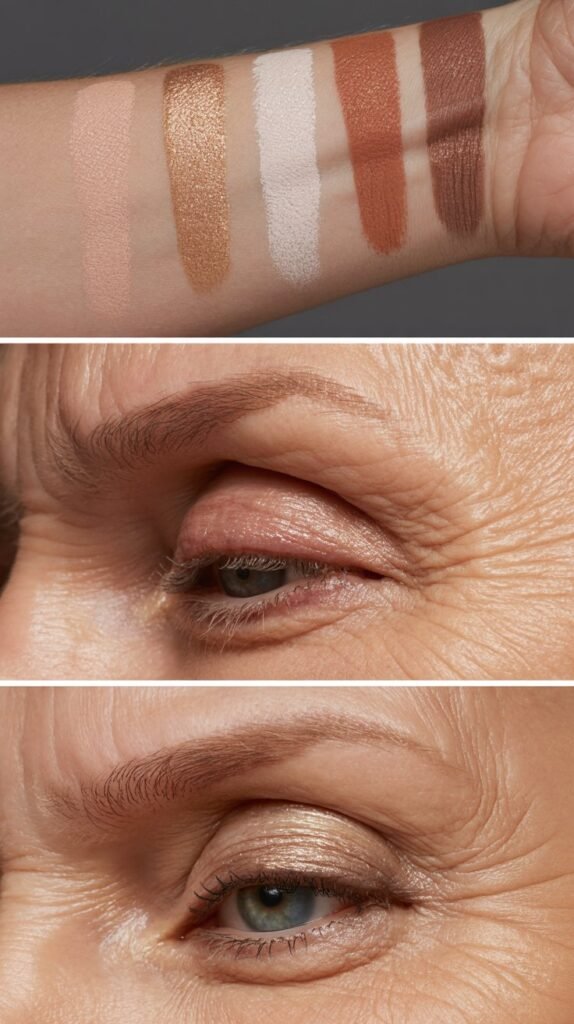
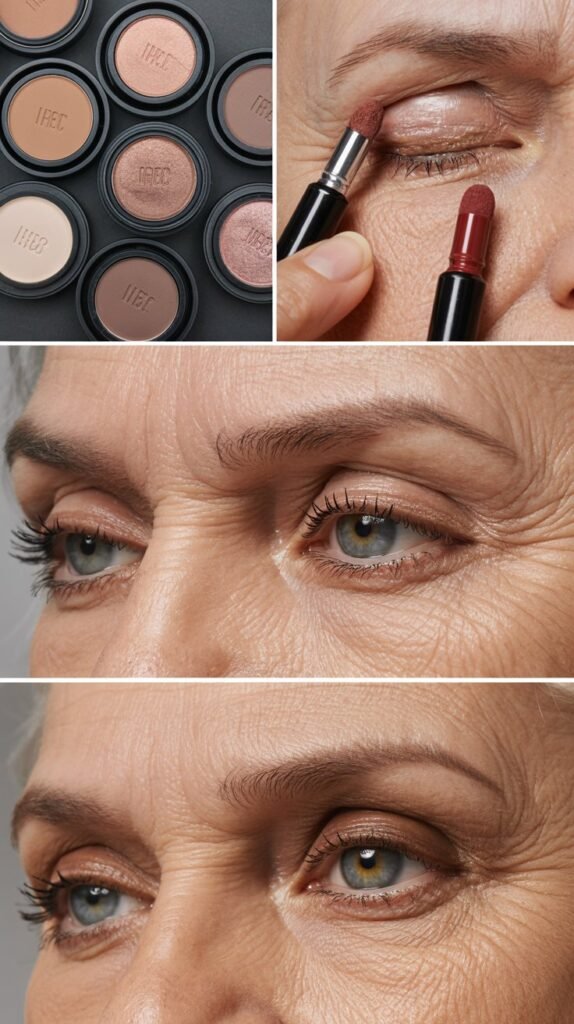
8. Choose Cool-Toned Eyeshadow Shades

Cool-toned eyeshadows in shades of taupe, soft gray, and cool brown complement mature skin better than warm oranges or coppers.
These colors create a brightening effect and make the whites of your eyes appear whiter. Cool tones also work harmoniously with the natural changes in skin tone that occur with aging.
- Select eyeshadow palettes that feature soft taupes, cool grays, and muted purples.
- Avoid warm oranges, rusty browns, and yellow-based golds that can make eyes look tired.
- Consider soft lavender or dusty rose shades that naturally counteract yellow undertones in mature skin.
- Test eyeshadow colors on your eyelid rather than your hand as undertones appear differently on different areas.
- Look for cool-toned neutrals with subtle shimmer rather than matte finishes for added brightness.
- Pair cool eyeshadows with warmer lip colors to create balance in your overall makeup look.
9. Master the Halo Eye Technique
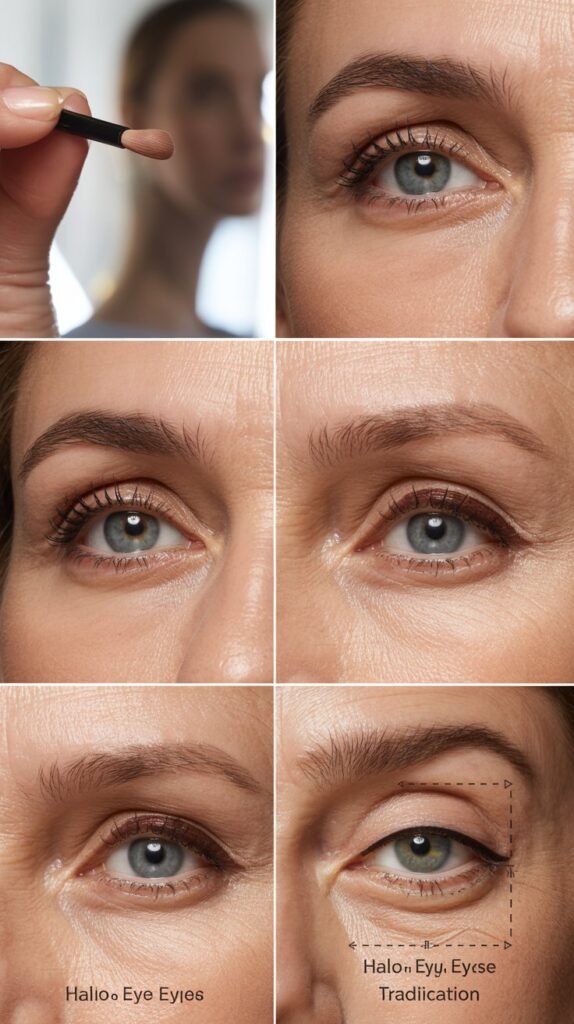
The halo eye technique places lighter shades in the center of the lid with darker shades on the inner and outer corners, creating a lifted, dimensional effect.
This method is particularly flattering for mature eyes as it draws attention to the center of the lid while adding depth without making eyes look smaller.
- Apply a medium shade to the inner and outer thirds of your eyelid.
- Place your lightest, most shimmery shade in the center of your mobile lid.
- Blend the edges where the light and dark shades meet to create a seamless gradient.
- Use a slightly darker shade in the crease to add definition and depth.
- Keep the halo effect subtle rather than dramatic for a more wearable, sophisticated look.
- This technique works particularly well with metallic or satin-finish eyeshadows that catch light.
10. Curl Your Lashes for an Instant Eye Lift
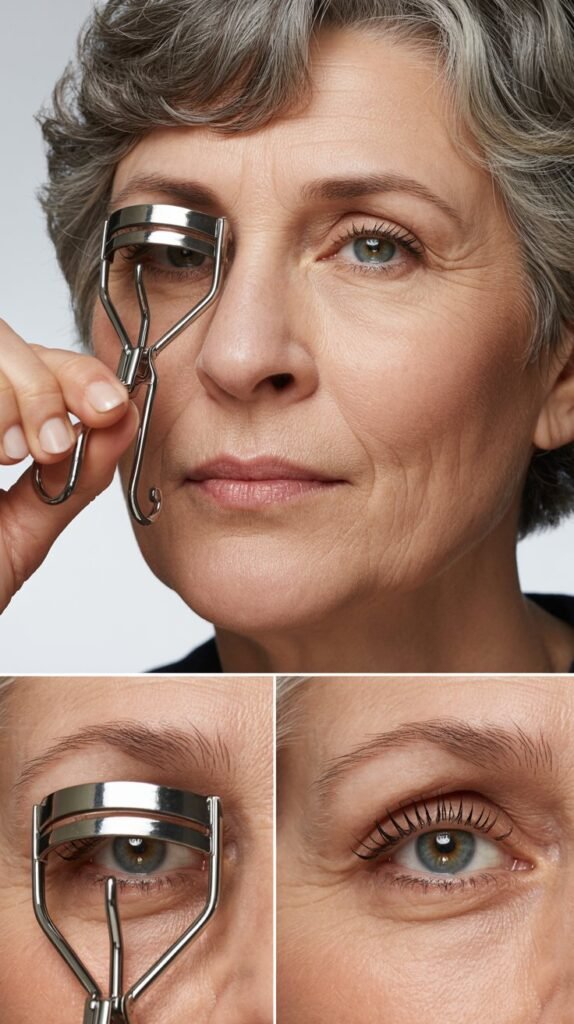
Curling your lashes opens up the eye area and creates the appearance of longer, more youthful lashes. This simple step makes a dramatic difference in how awake and bright your eyes look.
Properly curled lashes also prevent them from casting shadows on your eyelids.
- Use a high-quality eyelash curler with a cushioned pad that fits your eye shape.
- Position the curler as close to your lash line as possible without pinching skin.
- Gently squeeze for 10-15 seconds, then move the curler halfway up the lash and squeeze again.
- Always curl lashes before applying mascara to prevent breakage.
- Consider heating your eyelash curler slightly with a hair dryer for a longer-lasting curl.
- Replace your eyelash curler pad every 3-6 months to maintain effectiveness.
- Use an eyelash comb to separate lashes after curling but before mascara application.
11. Apply Mascara to Both Upper and Lower Lashes
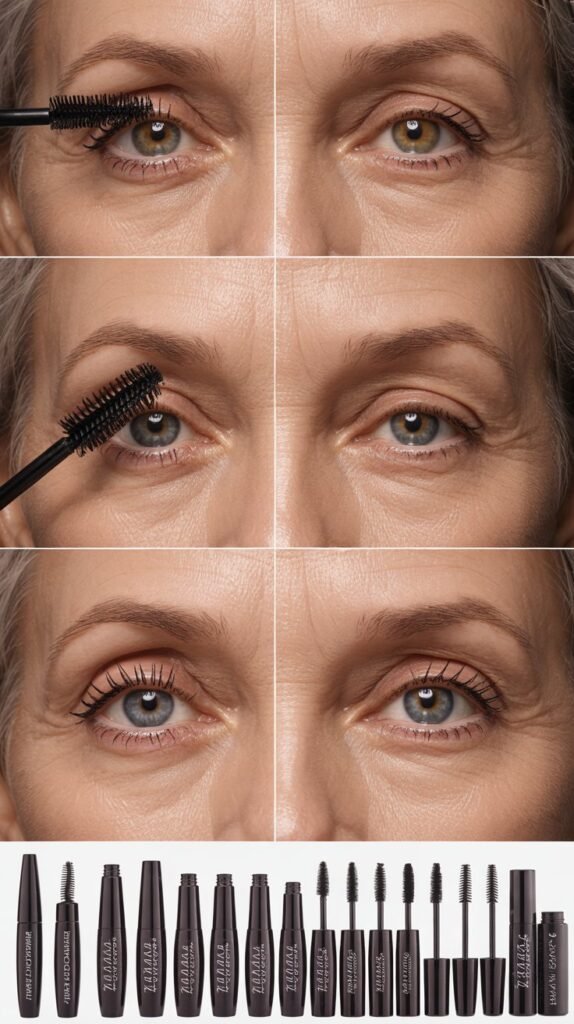
Mascara on both upper and lower lashes creates definition and frames the eyes beautifully. However, the application technique matters significantly for mature eyes to avoid clumping or smudging.
The right mascara formula and application method can make your eyes appear larger and more defined.
- Choose a lengthening or curling mascara rather than volumizing formulas that can look heavy.
- Wiggle the wand at the base of your lashes and sweep upward in a zigzag motion.
- Use a lighter hand on lower lashes to avoid a heavy, dated appearance.
- Apply one to two coats maximum to prevent clumping and spider lashes.
- Wipe excess product off the wand before application to control the amount applied.
- Consider using brown or brown-black mascara for a softer, more natural look than stark black.
- Remove any mistakes immediately with a cotton swab dipped in makeup remover.
12. Try Tightlining for Subtle Definition
Tightlining involves applying eyeliner to the upper waterline between your lashes, creating the illusion of fuller lashes and more defined eyes.
This technique adds definition without the harsh look of traditional eyeliner, making it perfect for mature eyes. It’s particularly effective for creating the appearance of thicker lashes.
- Use a waterproof gel liner or pencil that won’t smudge throughout the day.
- Gently lift your upper lid and apply liner between your lashes along the entire lash line.
- Choose dark brown or charcoal rather than black for a softer appearance.
- Use small, short strokes rather than trying to create one continuous line.
- This technique works best when paired with curled lashes and mascara.
- Avoid pulling or tugging on your eyelid which can cause premature wrinkles.
13. Skip Harsh Black Eyeliner
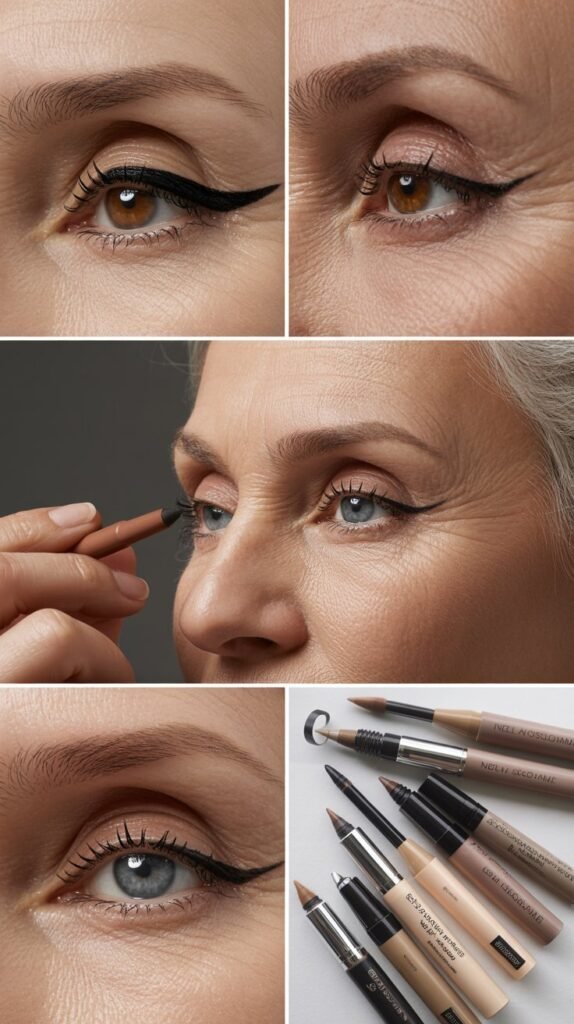
While black eyeliner can be dramatic and striking on younger eyes, it often looks too harsh on mature eyes and can actually make them appear smaller. Softer shades of brown, charcoal, and navy provide definition without the severity of black.
These gentler colors complement mature skin tones better and create a more sophisticated look.
- Choose brown, charcoal, or deep plum eyeliner instead of jet black for everyday wear.
- Select softer shades that still provide definition without creating stark contrast.
- Consider navy blue eyeliner which brightens the whites of your eyes and looks surprisingly natural.
- Use softer colors on the lower lash line where black can look particularly harsh.
- Save black eyeliner for evening looks when more drama is appropriate.
- Smudge or blend any liner slightly rather than leaving sharp, defined lines.
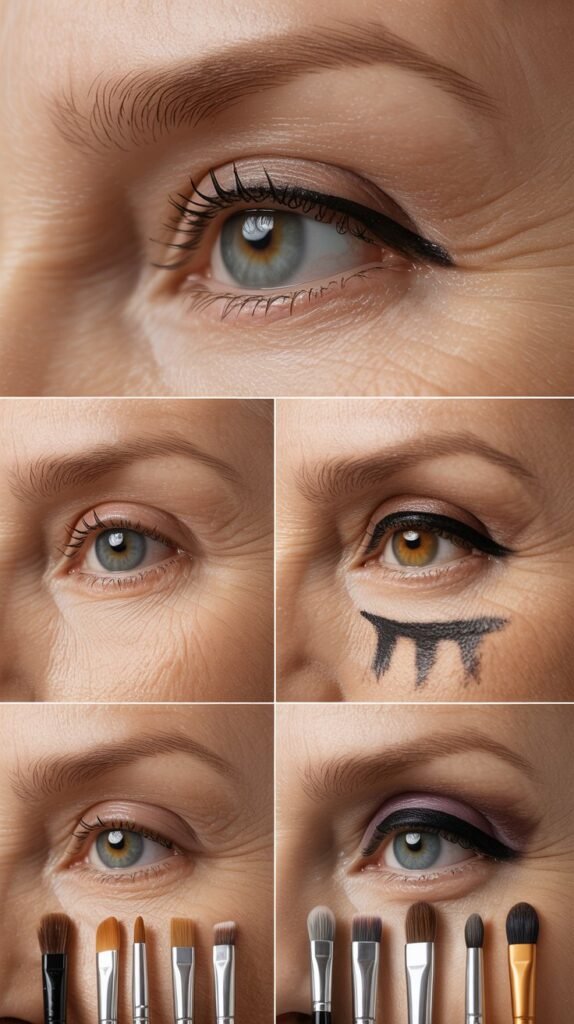
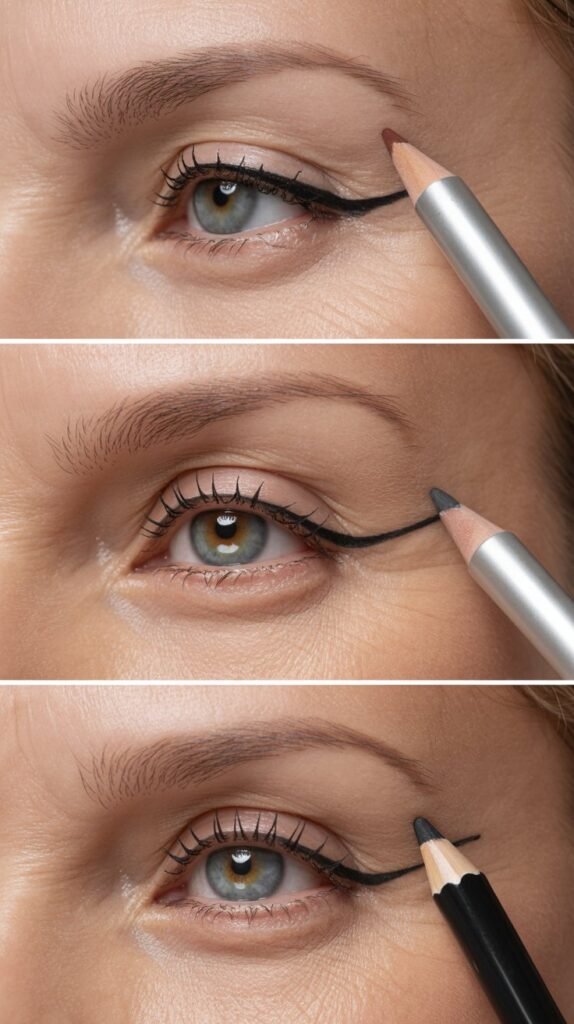
14. Create a Soft Wing for Lifted Eyes
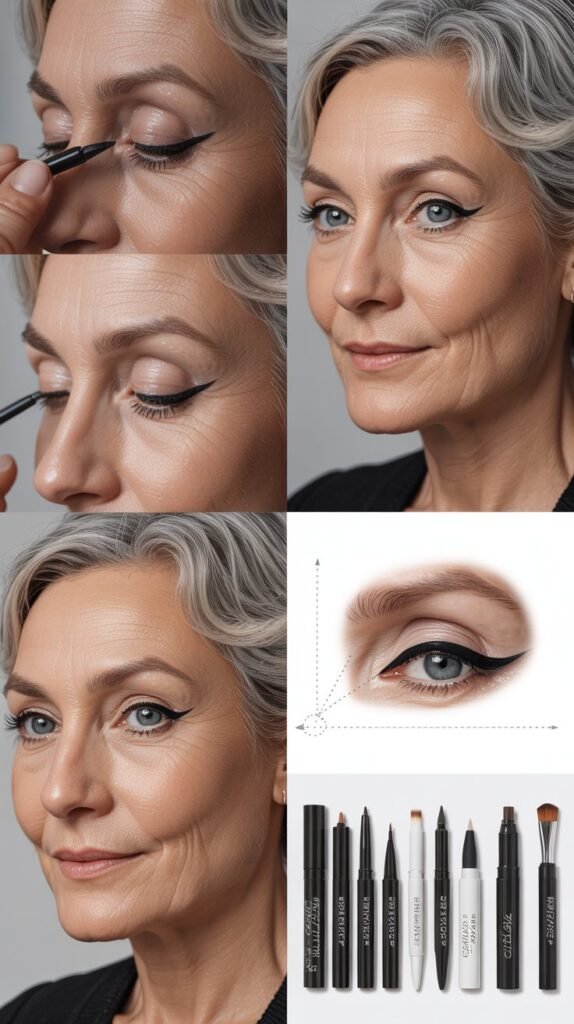
A subtle winged liner creates the illusion of lifted, more youthful eyes without looking overdone. The key for mature eyes is keeping the wing soft and subtle rather than sharp and dramatic.
This technique draws the eye outward and upward, counteracting any downward pull from aging.
- Use a pencil or gel liner rather than liquid liner for more control and a softer appearance.
- Keep your wing short and angled upward, following the natural lift of your lower lash line.
- Apply liner close to your lash line and keep it thin along the lid.
- Smudge the liner slightly with a small brush for a softer, more forgiving look.
- Avoid extending the wing too far or making it too thick which can drag eyes down.
- Practice the angle by using tape or a card as a guide until you master the technique.
15. Highlight Below the Brow Bone

Highlighting the area just beneath your brow bone creates lift and makes eyes appear more open and awake. This technique catches light and draws attention upward, counteracting any heaviness in the upper eye area.
A subtle highlight in this area is one of the most effective brightening tricks.
- Use a matte or satin-finish light shadow or highlighter just below the highest point of your brow.
- Apply the highlight from the arch to the outer end of your brow for maximum lift.
- Choose a shade just one or two tones lighter than your skin tone for a natural effect.
- Blend the edges thoroughly to avoid a visible stripe of lighter color.
- Avoid shimmery highlighters in this area if you have textured skin or visible pores.
- This technique works best when your brows are properly shaped and defined.
16. Use Makeup Setting Spray to Prevent Creasing
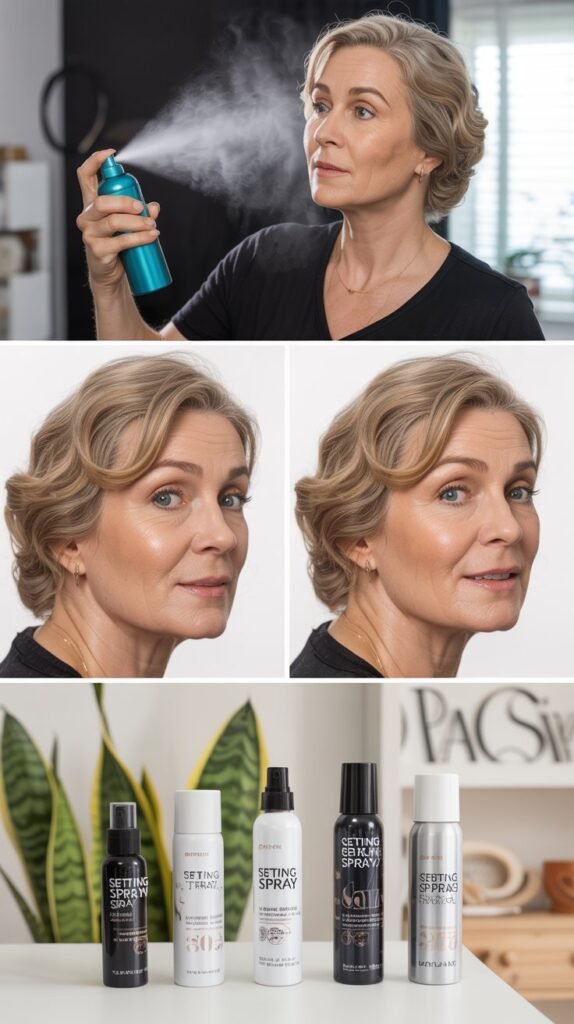
Setting spray locks your eye makeup in place and prevents creasing, fading, and smudging throughout the day. As mature eyelids can be more prone to oiliness or movement, setting spray becomes essential.
The right setting spray also adds a natural, skin-like finish that doesn’t look powdery or dry.
- Choose a hydrating setting spray rather than matte formulas that can emphasize dryness.
- Hold the bottle 8-10 inches from your face and mist in an X and T pattern.
- Apply setting spray as the final step after all eye and face makeup is complete.
- Look for formulas containing skin-beneficial ingredients like hyaluronic acid or glycerin.
- Allow the setting spray to dry completely before touching your face or applying glasses.
- Reapply setting spray midday if you need to refresh your makeup.
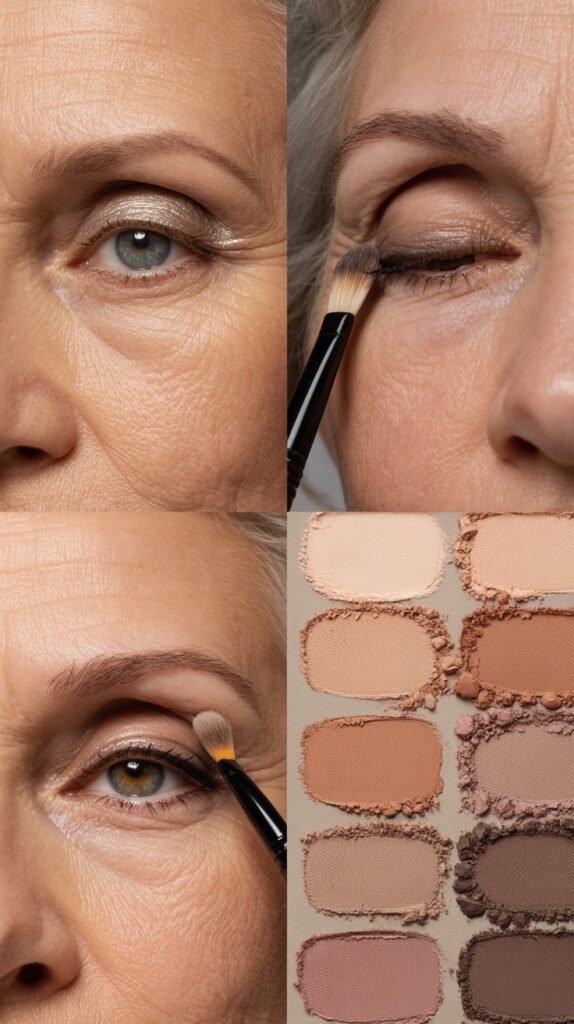
17. Blend, Blend, and Blend Some More
Proper blending is the difference between amateur and professional-looking eye makeup, especially on mature eyes.
Harsh lines and unblended edges emphasize texture and wrinkles, while seamlessly blended eyeshadow creates a soft-focus effect. Taking the time to blend thoroughly is crucial for a youthful, polished appearance.
- Use clean, fluffy blending brushes to diffuse all edges between eyeshadow colors.
- Blend in small circular or windshield-wiper motions with a light hand.
- Always blend with a clean brush after applying each new color to avoid muddying shades.
- Take your time and build up color gradually rather than applying too much at once.
- Invest in quality blending brushes with soft, natural bristles for the smoothest results.
- Step back from the mirror frequently to check your blending from a normal viewing distance.
18. Avoid Shimmer on the Lower Lash Line
While shimmer on the lid can be beautiful and brightening, shimmer along the lower lash line can emphasize fine lines, under-eye bags, and texture.
Matte or satin-finish shadows create definition under the eyes without drawing attention to imperfections. This simple adjustment can make a significant difference in how polished your eye makeup appears.
- Choose matte or satin-finish eyeshadows for the lower lash line area.
- Use soft browns, taupes, or grays to define without looking harsh.
- Apply shadow along the lower lash line with a small, precise brush.
- Keep the color close to the lashes rather than extending it down toward the cheek.
- Smudge eyeliner along the lower lash line with a small brush for soft definition.
- If you want brightness, use a matte champagne shade on the inner third of the lower lash line only.
19. Consider Lash Extensions or Lifts
Semi-permanent lash enhancements like extensions or lash lifts can eliminate the need for daily mascara while keeping eyes looking bright and lifted.
These treatments are particularly beneficial for mature women whose natural lashes may have become thinner or shorter. Professional lash treatments provide consistent, long-lasting results.
- Research experienced lash technicians who specialize in natural-looking results for mature clients.
- Consider a lash lift and tint instead of extensions if you prefer a more natural maintenance routine.
- Choose classic lash extensions rather than dramatic volume styles for a more age-appropriate look.
- Maintain lash extensions with regular fills every 2-3 weeks to keep them looking fresh.
- Use oil-free makeup remover and avoid rubbing your eyes to extend the life of lash treatments.
- Lash lifts last 6-8 weeks and require minimal maintenance compared to extensions.
20. Use Color-Correcting Techniques
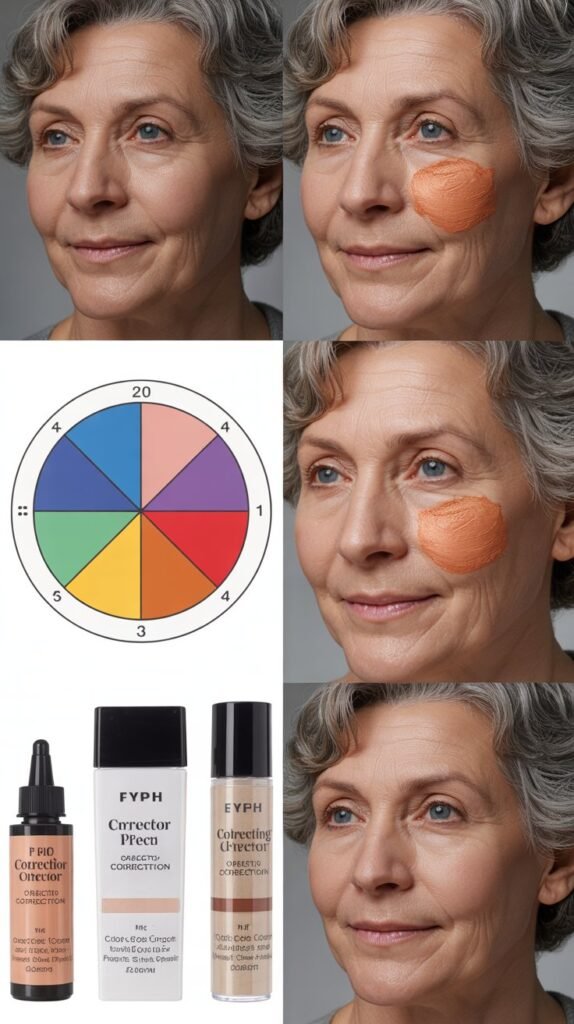
Color theory can be your best friend when brightening mature eyes. Understanding which colors neutralize darkness and redness helps you create a brighter, more even canvas.
Strategic color correction addresses specific concerns before you even apply your regular makeup.
- Use peach or salmon-toned correctors under the eyes to neutralize blue and purple darkness.
- Apply green color corrector to any visible redness around the eyes before concealer.
- Choose yellow-toned correctors for mild darkness or sallowness in the eye area.
- Apply color corrector sparingly with a small brush or your fingertip before foundation.
- Set color corrector with a thin layer of your regular concealer for a seamless finish.
- Look for creamy, blendable color corrector formulas that won’t emphasize texture.
21. Keep Under-Eye Makeup Minimal
Less is more when it comes to makeup under the eyes, especially on mature skin. Heavy or cakey under-eye makeup settles into fine lines and draws attention to texture.
A strategic, light-handed approach creates brightness without emphasizing aging concerns.
- Use only the amount of concealer necessary to neutralize darkness rather than full coverage.
- Apply concealer strategically only where needed rather than in a large area.
- Set under-eye concealer with minimal powder using a damp sponge for a pressed finish.
- Avoid layering multiple products under the eyes which increases the chance of creasing.
- Choose thin, lightweight concealer formulas specifically designed for mature skin.
- Skip powder entirely under the eyes if your skin is very dry or crepey.
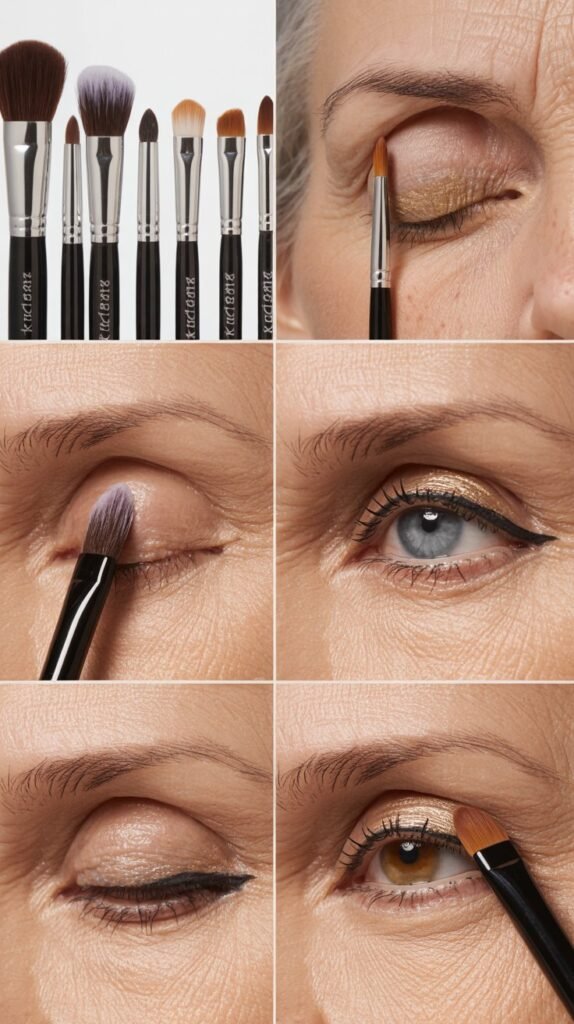
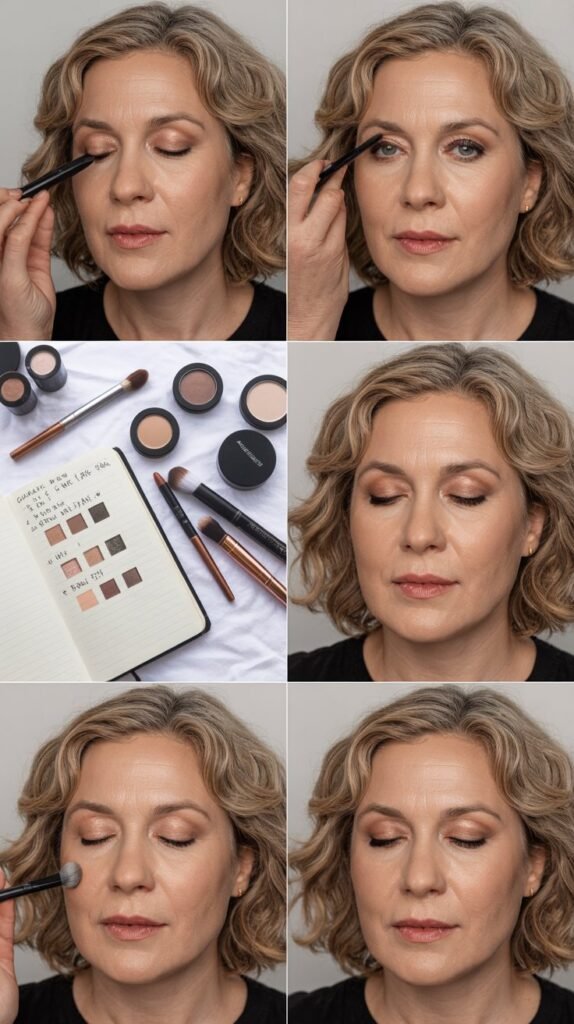
22. Invest in Quality Brushes
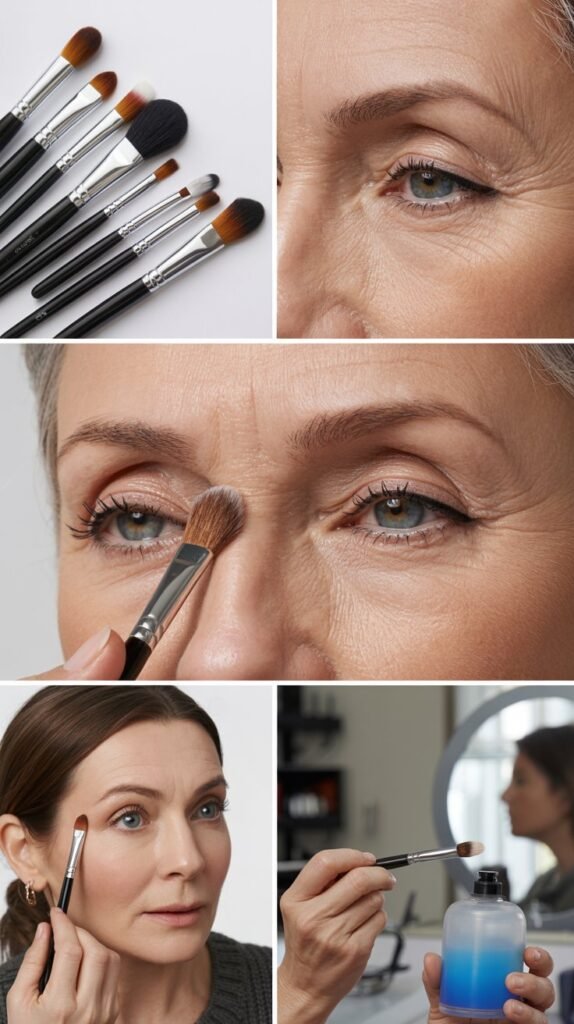
The right tools make a significant difference in how your eye makeup looks and how easily you can apply it. Quality brushes pick up product better, blend more seamlessly, and last for years with proper care.
For mature eyes where precision and blending are crucial, investing in good brushes is essential.
- Purchase natural or high-quality synthetic brushes with soft, dense bristles.
- Invest in at least three essential brushes: a fluffy blending brush, a flat shader brush, and a small detail brush.
- Choose brushes with appropriate size and shape for your eye size and shape.
- Clean brushes weekly with gentle soap or brush cleanser to maintain performance.
- Replace brushes when bristles become sparse, misshapen, or rough.
- Store brushes properly in a holder or case to maintain their shape.
23. Apply Eyeshadow with Your Eyes Open
Applying and checking your eyeshadow placement with your eyes open ensures the color is visible where you want it.
This is especially important for hooded or mature eyes where the natural crease may not be visible when eyes are closed. This technique prevents disappointment when you finish your makeup and realize the placement is off.
- Apply your crease color while looking straight ahead into the mirror with eyes open.
- Place darker shades slightly above where your lid naturally creases when eyes are relaxed.
- Check your progress frequently throughout application rather than waiting until the end.
- Use a hand mirror or magnifying mirror for precise placement and detail work.
- Adjust placement based on what’s visible with your eyes in a natural, relaxed position.
- Take photos of your makeup to see how it looks from different angles and distances.
24. Embrace Cream Eyeshadows
Cream eyeshadows offer several advantages for mature eyes including easier blending, a more natural finish, and less settling into fine lines compared to powder shadows.
These formulas provide long-lasting color with a luminous finish that looks like skin rather than makeup. Modern cream eyeshadows have come a long way in terms of staying power.
- Apply cream eyeshadows with your fingertips for the warmest, most seamless blend.
- Layer cream shadows under powder shadows for increased longevity and intensity.
- Choose long-wearing cream shadow formulas that set to a powder finish.
- Work quickly with cream shadows as they set faster than powder formulas.
- Use cream shadows as a base to intensify powder shadow colors.
- Store cream eyeshadows properly with lids tightly closed to prevent drying out.
25. Hydrate the Eye Area Before Makeup
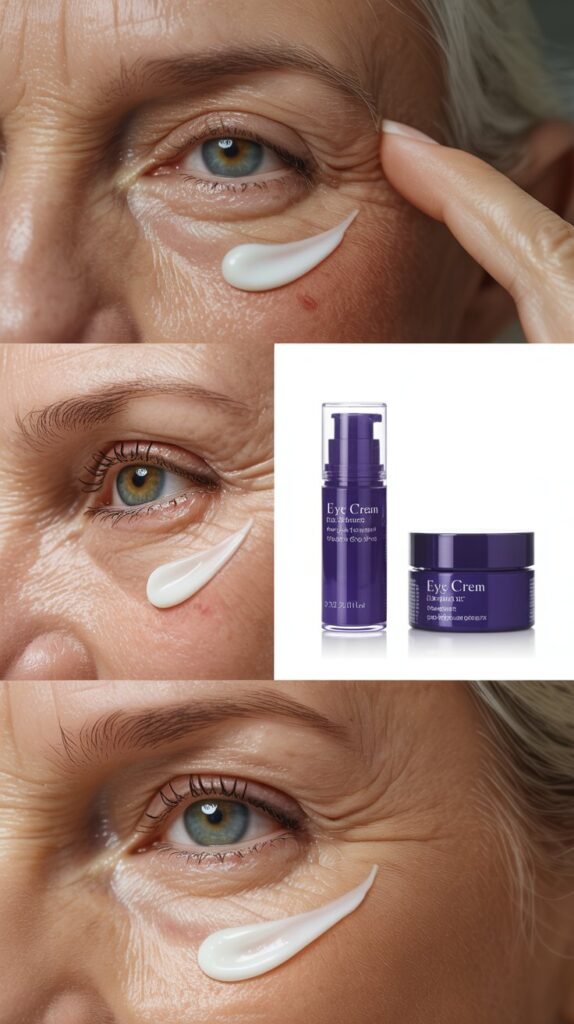
Proper hydration is the foundation of beautiful eye makeup on mature skin. Well-moisturized skin allows makeup to glide on smoothly and prevents it from looking dry or cakey.
Eye cream also plumps fine lines temporarily, creating a smoother canvas for makeup application.
- Apply eye cream at least 10-15 minutes before makeup to allow full absorption.
- Use a hydrating eye cream with ingredients like hyaluronic acid, peptides, or ceramides.
- Pat eye cream gently with your ring finger rather than rubbing or pulling skin.
- Extend eye cream up to the brow bone and on the eyelid, not just under the eye.
- Blot excess oil or cream before applying primer if your eye cream is very rich.
- Choose an eye cream that works well under makeup without causing products to slide.
26. Use Tape as a Guide for Clean Lines
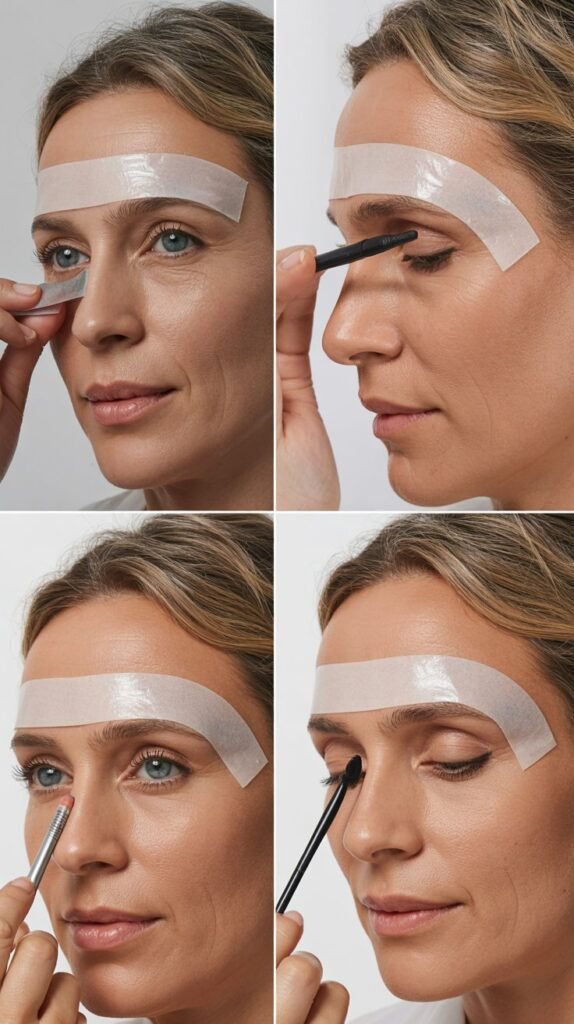
Using tape as a guide helps create sharp, symmetrical eye makeup looks without requiring professional-level skills. This technique is particularly helpful when creating winged liner or cut-crease looks.
The tape method ensures both eyes match and provides a straight edge for a polished appearance.
- Use low-tack tape like painter’s tape or special makeup tape to avoid skin irritation.
- Place tape at an angle from the outer corner of your eye toward your temple.
- Press the tape gently on your hand first to remove some of the adhesive.
- Apply your eyeshadow or liner, then carefully remove the tape while makeup is still slightly wet.
- Use tape to create sharp cut creases by placing it in your crease and applying shadow above.
- Clean up any imperfections with concealer on a small brush after removing the tape.
27. Try Monochromatic Eye Looks
Monochromatic eye makeup using varying shades of one color family creates a sophisticated, cohesive look that’s easy to achieve.
This approach is particularly flattering for mature eyes as it simplifies the blending process and creates dimension without harsh color contrasts. Monochromatic looks appear polished and intentional.
- Choose three shades from the same color family: light, medium, and dark.
- Apply the lightest shade all over the lid as a base.
- Use the medium shade in the crease and outer corner for definition.
- Apply the darkest shade only in the outer V and along the lash line.
- Blend thoroughly between shades to create seamless gradation.
- Coordinate your eye makeup color with your outfit for a cohesive, put-together appearance.
28. Don’t Forget to Groom Your Lashes
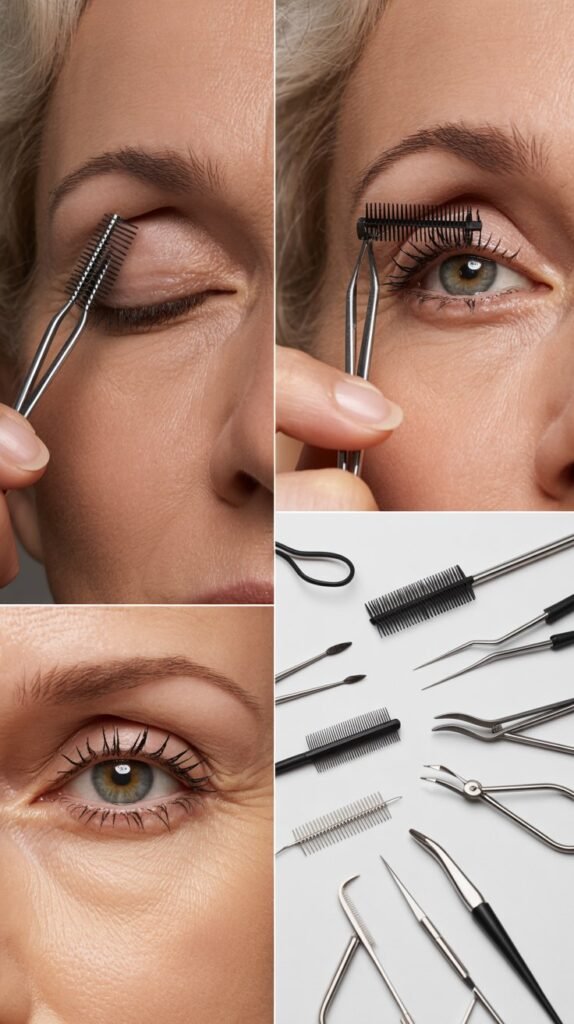
Well-groomed lashes appear fuller, longer, and more defined even before mascara application. Regular lash grooming prevents clumping and ensures each lash is separated and visible.
This simple step makes a significant difference in the final appearance of your eye makeup.
- Use a clean lash comb or spoolie to separate lashes before applying mascara.
- Comb through lashes immediately after mascara application while still wet.
- Gently wiggle the comb from roots to tips to separate and define each lash.
- Keep a clean spoolie in your makeup bag for quick lash grooming throughout the day.
- Consider using a heated eyelash comb for extra curl and separation.
- Remove any clumps or spider lashes with a clean spoolie or lash comb.
29. Master the Cut Crease for Hooded Eyes
The cut crease technique creates the illusion of a defined crease on hooded or mature eyes where the natural crease may have disappeared.
This advanced technique requires practice but delivers dramatic results that make eyes appear larger and more lifted. When executed properly, a cut crease can be incredibly flattering for mature eyes.
- Map out where you want to create your new crease with eyes open and looking forward.
- Apply a darker shade above your natural crease where it will be visible.
- Use concealer or a light shadow to “cut” below the darker shade, creating a sharp line.
- Blend the edges of the dark shade upward while keeping the cut line sharp.
- Apply shimmer or metallic shadow on the lid below the cut for maximum impact.
- Keep the cut crease placement consistent on both eyes for symmetry.
30. Consider Permanent Makeup Options
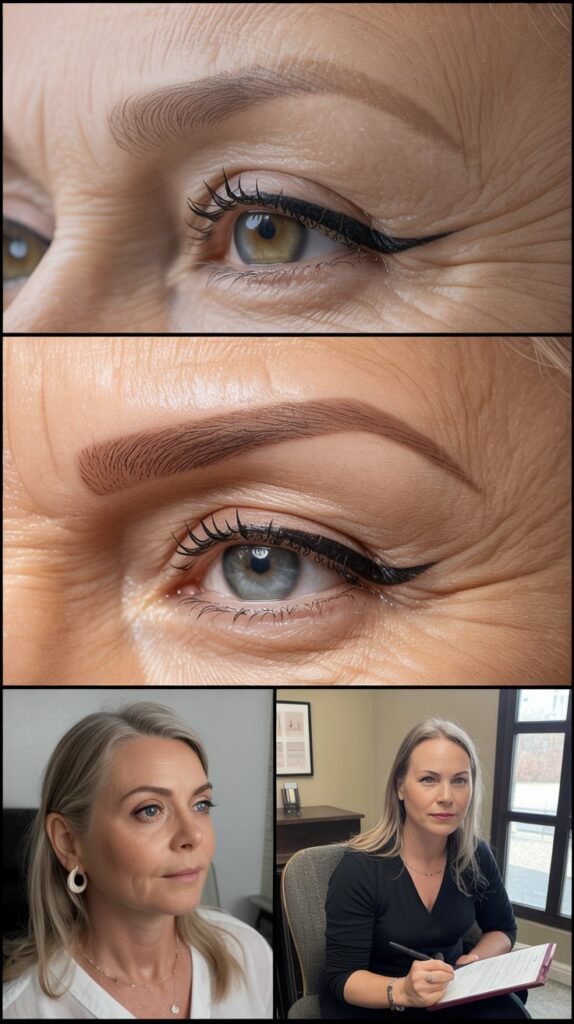
Permanent makeup like microblading for brows, eyeliner tattooing, or lash enhancement can provide long-lasting definition that brightens eyes daily. T
hese semi-permanent solutions reduce daily makeup time while ensuring you always look polished. Professional permanent makeup can look remarkably natural when done correctly.
- Research experienced permanent makeup artists who specialize in natural-looking results for mature clients.
- Schedule a thorough consultation to discuss your desired look and realistic expectations.
- Consider subtle permanent eyeliner along the lash line rather than dramatic wings.
- Start with conservative choices as permanent makeup is difficult to remove or adjust.
- Follow all aftercare instructions carefully to ensure optimal healing and results.
- Touch-ups are typically needed every 1-3 years depending on the procedure and your skin.
31. Use Strategic Highlighting Throughout the Day

Touching up your eye makeup throughout the day maintains that fresh, bright appearance. Strategic refreshing focuses on the areas that make the biggest impact rather than completely redoing your makeup.
Quick touch-ups keep you looking polished from morning through evening.
- Keep a small makeup bag with essential touch-up products in your purse.
- Reapply inner corner highlight when eyes start to look tired or dull.
- Add a touch of nude liner to your waterline for an instant brightness boost.
- Blot any excess oil on eyelids with blotting paper before touching up eyeshadow.
- Refresh mascara on just the tips of your lashes rather than at the roots.
- Use a clean spoolie to groom brows and lashes back into place.
32. Practice and Experiment Regularly
Mastering eye makeup for mature eyes requires practice and willingness to experiment with different techniques and products.
What works for one person may not work for another due to individual eye shape, skin type, and personal preferences.
Regular practice builds confidence and helps you discover what looks best on you.
- Dedicate time weekly to practice new techniques without the pressure of going anywhere.
- Take photos of your eye makeup in different lighting to see what works best.
- Keep a makeup journal noting which products and techniques you prefer.
- Watch tutorials specifically created for mature eyes and adapt techniques to suit your needs.
- Don’t be afraid to make mistakes—they’re part of the learning process.
- Join online communities or local groups focused on makeup for mature women.
- Remember that makeup should be fun and expressive, not stressful or intimidating.
Conclusion
Embracing these 32 Best Makeup Tips for Women Over 50 to Brighten the Eyes empowers you to enhance your natural beauty with confidence and skill.
Each technique we’ve explored—from mastering the perfect primer application to strategic highlighting and color selection—works together to create eyes that sparkle with life and vitality.
Remember that makeup is an art form without rigid rules, and the most important aspect is finding what makes you feel beautiful and confident.
Your eyes have witnessed decades of memories, laughter, and wisdom, and they deserve to be celebrated and showcased with techniques that honor their unique beauty.
By incorporating even a few of these tips into your daily routine, you’ll discover that age is truly just a number when it comes to having bright, captivating eyes.
Take your time experimenting with different approaches, be patient with yourself as you learn new skills, and most importantly, enjoy the transformative journey of discovering makeup techniques that make you feel absolutely radiant every single day.