Being a mom means juggling countless responsibilities throughout the day, and your hairstyle should be the least of your worries.
Finding hairstyles that look polished from morning drop-off to evening pickup can feel impossible when you’re constantly on the move.
Braided hairstyles offer the perfect solution for busy moms who need their hair to stay neat, secure, and beautiful no matter what the day throws at them.
This comprehensive guide to 32 Easy Braided Hairstyles for Moms That Stay Neat All Day will transform your morning routine and give you confidence that lasts from sunrise to bedtime.
Whether you have five minutes or fifteen, long hair or medium length, thick strands or fine texture, you’ll discover practical braiding techniques that work with your lifestyle.
These styles aren’t just functional—they’re fashionable enough for work meetings, school events, date nights, and everything in between.
Get ready to master braids that actually hold up during playground adventures, grocery runs, and all the bending, lifting, and moving that motherhood demands.
1. Classic Three-Strand Side Braid
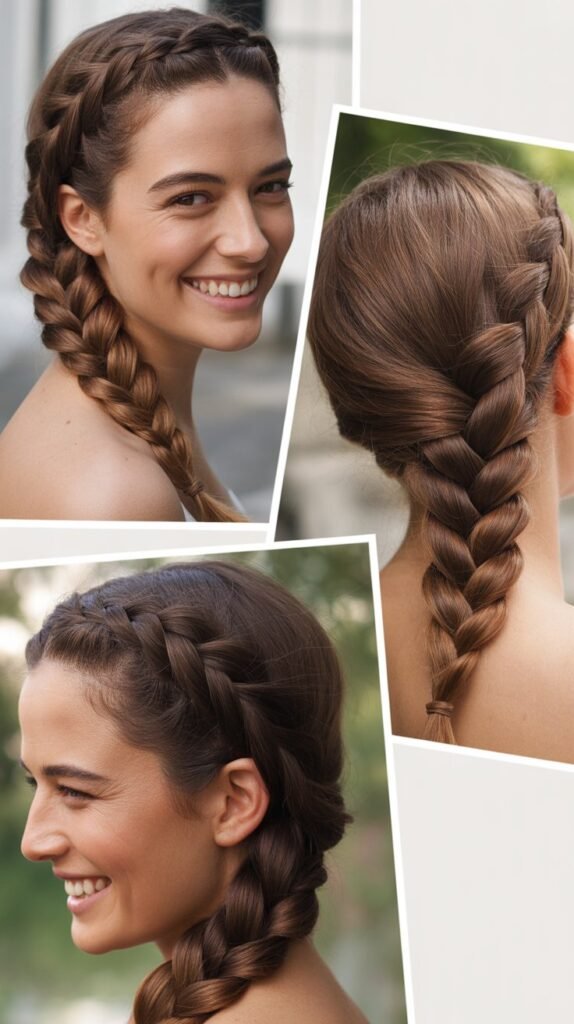
The classic three-strand side braid remains a timeless choice for moms seeking simplicity without sacrificing style.
This versatile braid works beautifully for any hair type and can be dressed up or down depending on your day’s activities.
You can complete this style in under three minutes, making it perfect for hectic mornings when every second counts.
How to Create:
- Brush all your hair to one side of your head, choosing whichever side feels most comfortable.
- Divide the hair into three equal sections at the base of your neck.
- Cross the right section over the middle section, then cross the left section over the new middle section.
- Continue this alternating pattern all the way down to the ends.
- Secure with a hair elastic and gently tug on the braid to add volume.
Why It Stays Neat:
- The tight weaving pattern keeps hair strands locked in place throughout active movements.
- Positioning the braid to the side prevents it from getting caught in car seats or backpacks.
- The simple structure means fewer loose pieces that can escape during the day.
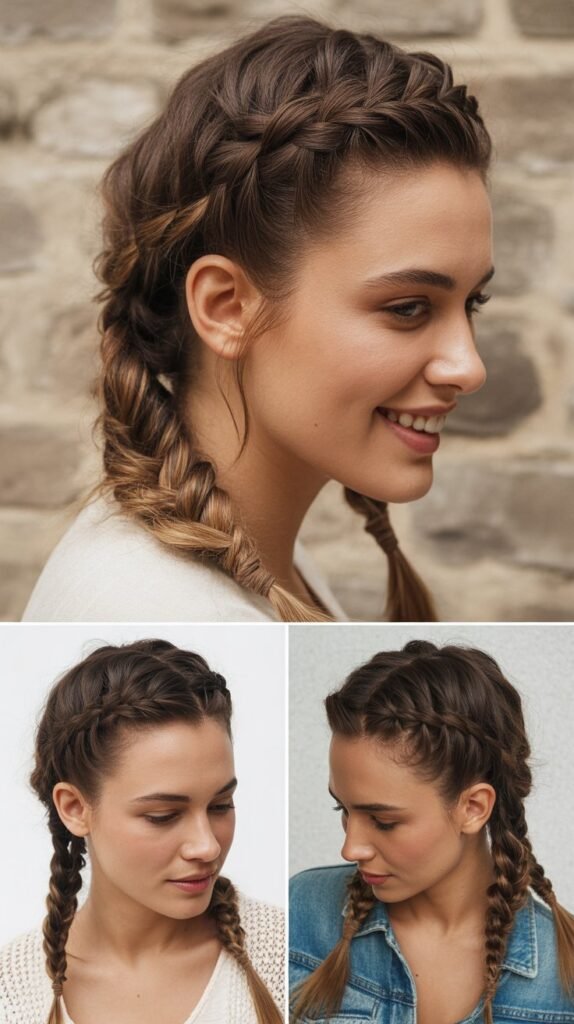
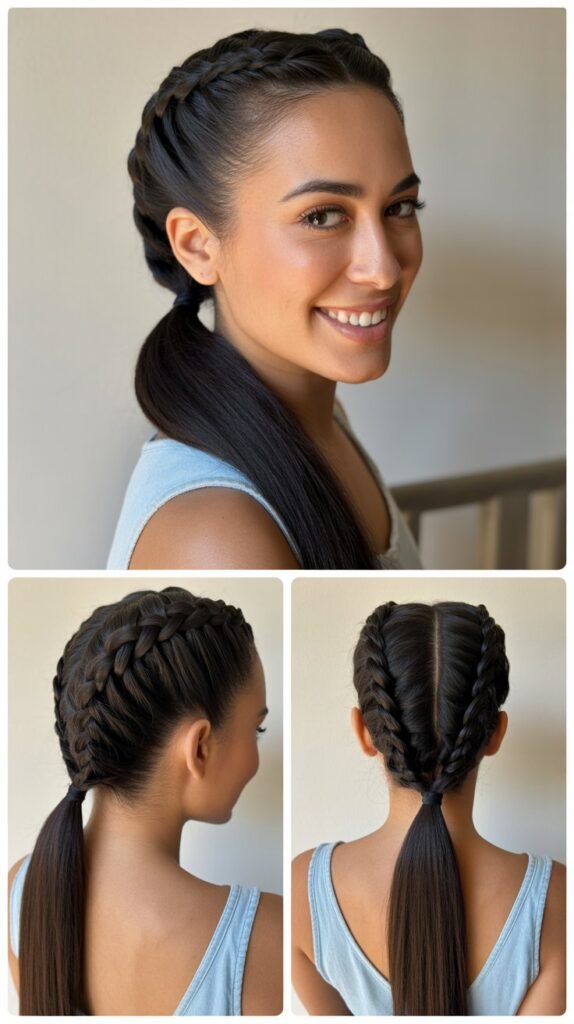
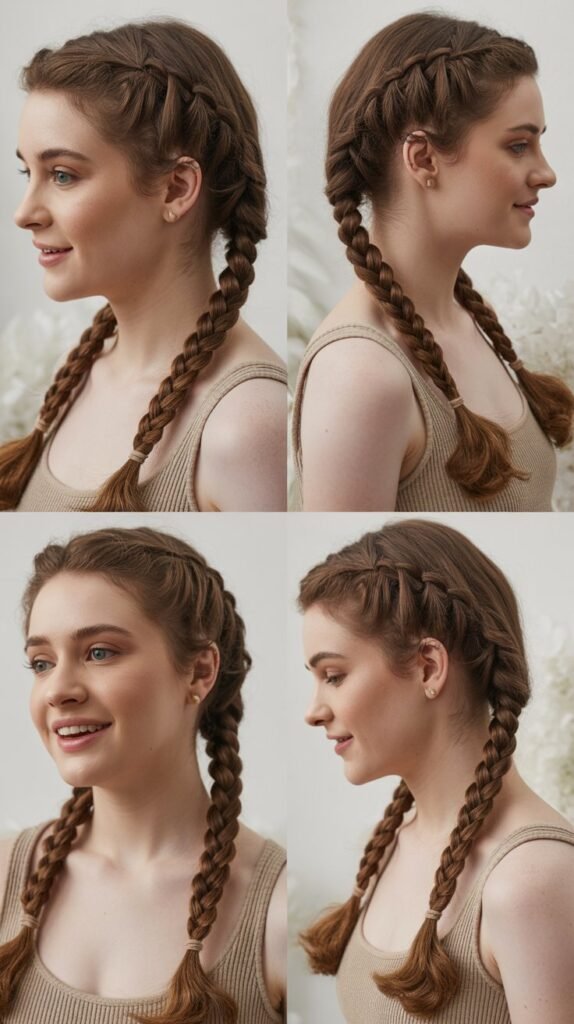
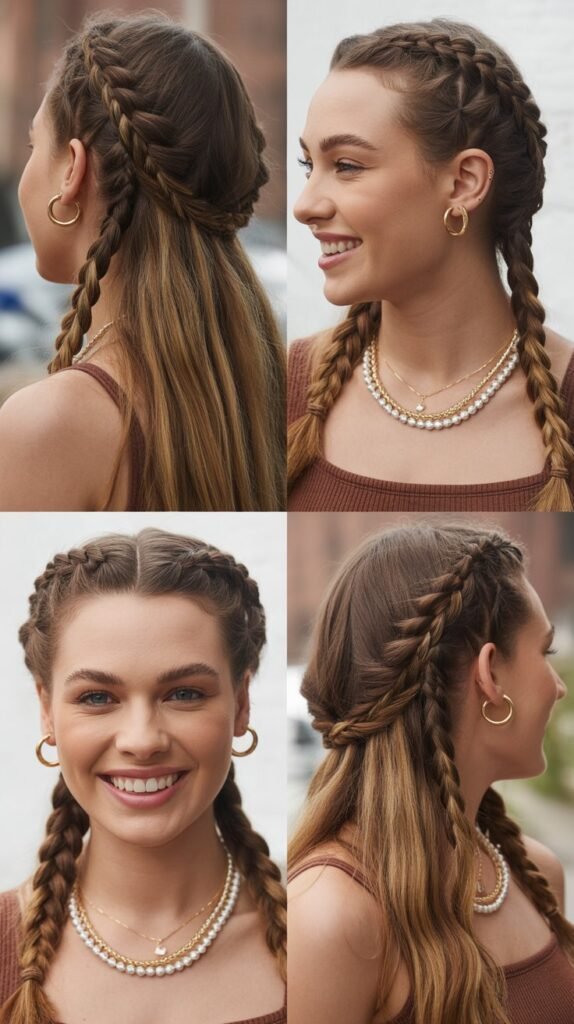
2. Double Dutch Braids

Double Dutch braids create a sporty, athletic look that’s incredibly secure for moms with active lifestyles.
These inside-out braids sit flat against your head and distribute hair weight evenly, reducing tension headaches. The symmetrical style looks intentional and polished even after hours of wear.
Step-by-Step Instructions:
- Part your hair straight down the middle from forehead to nape.
- Clip one side away while working on the other side first.
- Take a section at your hairline and divide it into three pieces.
- Cross the outer sections under the middle section instead of over (this creates the Dutch effect).
- Add small sections of hair to each outer piece before crossing under.
- Continue braiding down past your ear and finish with a regular braid.
- Repeat the exact process on the other side.
Durability Benefits:
- The underhand braiding technique creates a raised effect that grips hair more securely.
- Having two separate braids means if one loosens slightly, the other maintains structure.
- The close-to-scalp design prevents hair from interfering with vision or getting tangled.
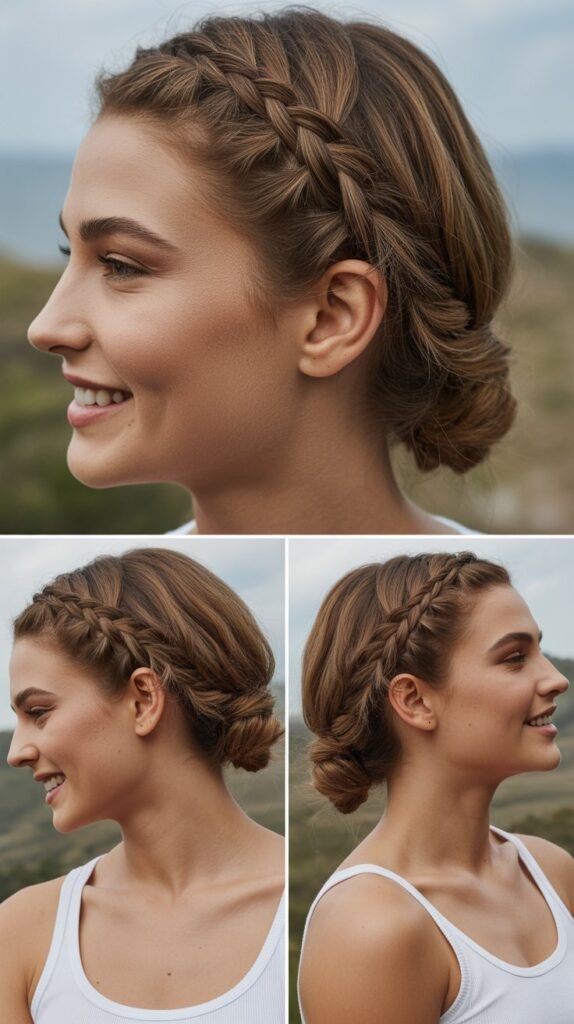
3. French Braid Crown
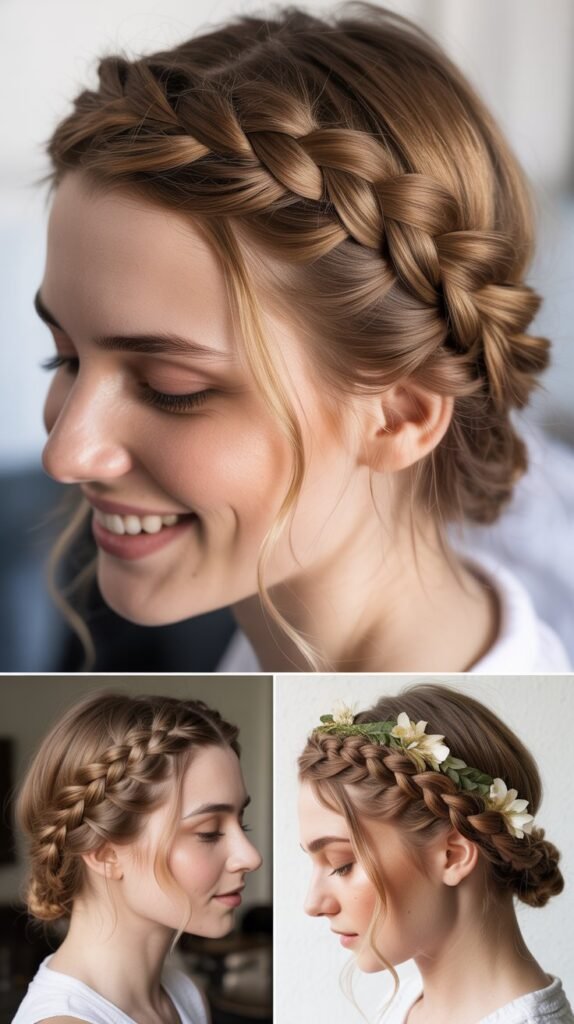
A French braid crown wraps elegantly around your head, creating a halo effect that’s both practical and feminine. This style keeps every strand off your face and neck, making it ideal for hot days or when you need complete visibility.
The circular braid distributes tension evenly, preventing the pulling sensation that single braids can cause.
Creating the Crown:
- Start with a deep side part and begin French braiding from the heavier side.
- Work the braid along your hairline, curving around your head like a headband.
- Continue adding hair sections as you braid around the crown area.
- When you reach the starting point, continue with a regular three-strand braid.
- Tuck the tail under the crown and secure with bobby pins.
- Use hairspray to tame any flyaways along the crown.
All-Day Hold Features:
- The circular pattern has no single stress point that could cause the style to fall.
- Bobby pins placed strategically at the back provide invisible reinforcement.
- The wraparound design naturally keeps shorter layers incorporated into the style.
4. Fishtail Braid Ponytail

Combining a ponytail with a fishtail braid gives you the security of gathered hair with the visual interest of intricate braiding.
This hybrid style prevents the ponytail from looking too casual while ensuring your hair stays completely controlled. The fishtail pattern creates a textured, dimensional look that appears more complex than it actually is.
Construction Method:
- Gather all your hair into a high ponytail and secure with a strong elastic.
- Divide the ponytail into two equal sections.
- Take a small piece from the outer edge of the left section and cross it over to join the right section.
- Take a small piece from the outer edge of the right section and cross it over to join the left section.
- Continue this alternating pattern down the length of the ponytail.
- Secure the end and gently pull the braid to widen it for more volume.
Staying Power:
- The ponytail base keeps all hair gathered before the braid even begins.
- Fishtail braids naturally tighten as they’re worn throughout the day.
- The small sections used in fishtail braiding lock together more securely than larger sections.
5. Messy Side Braid with Texture
A deliberately messy side braid embraces imperfection while maintaining structure throughout your busy day. This relaxed style works exceptionally well for moms with naturally wavy or textured hair.
The intentional looseness means you don’t need perfect technique, and the style actually looks better as it settles.
Easy Creation:
- Apply texturizing spray or dry shampoo to add grip to your hair.
- Loosely gather hair to one side without worrying about smoothness.
- Create a regular three-strand braid but keep the sections somewhat loose.
- Don’t pull the braid tight—allow some natural volume and texture.
- Secure the end and gently pull on sections of the braid to loosen it further.
- Pull out a few face-framing pieces for a softer look.
Why It Lasts:
- The texturizing products create friction that helps hair grip itself.
- Loose braiding actually prevents the strain that causes tight braids to loosen.
- The intentionally undone look means slight loosening throughout the day enhances rather than detracts.
6. Dutch Braid into Low Bun

This sophisticated combination secures hair in two stages for maximum hold throughout long days. The Dutch braid provides structure from crown to nape while the bun keeps the remaining length contained.
This two-part approach means the weight of your hair is distributed rather than pulling from a single point.
How to Achieve:
- Create a Dutch braid starting at the crown and working straight down the back.
- Stop braiding at the nape of your neck and secure with a small elastic.
- Gather the remaining loose hair including the braid tail.
- Twist this gathered hair and wrap it into a low bun.
- Secure the bun with bobby pins, crisscrossing them for strength.
- Spray the braid portion with light-hold hairspray.
Durability Advantages:
- The braid prevents the top section from developing that saggy, flat appearance.
- The bun keeps the length from getting in your way or becoming tangled.
- Two separate securing points mean the style has backup hold if one section loosens.
7. Four-Strand Waterfall Braid
The four-strand waterfall braid creates a cascading effect that looks intricate but stays remarkably secure.
This decorative braid works as a headband alternative, keeping front hair controlled while leaving length flowing. The four-strand technique adds dimension and visual complexity that elevates any outfit.
Braiding Process:
- Take a section of hair near your temple and divide it into four equal pieces.
- Cross the rightmost strand under the two middle strands, then over one.
- Cross the leftmost strand under the two middle strands, then over one.
- Drop the strand now on the far right and replace it with a new section picked up just above.
- Continue this pattern across your head, dropping strands and picking up new ones.
- Secure at the opposite side with a small elastic or bobby pins.
Hold Factors:
- The four-strand structure creates more interlocking points than traditional three-strand braids.
- The waterfall technique continuously incorporates new hair, anchoring the braid along your head.
- Dropping and adding sections distributes tension across your entire scalp rather than pulling one area.
8. Rope Twist Braid

The rope twist braid offers a unique texture through a simple twisting motion rather than traditional weaving. This style works wonderfully for moms who find regular braiding challenging or time-consuming.
The continuous twisting creates a spiral effect that’s visually interesting and structurally sound.
Creating the Twist:
- Gather hair into a ponytail at your desired location (side, back, or low).
- Divide the ponytail into two equal sections.
- Twist each section tightly in the same direction (both clockwise or both counterclockwise).
- Wrap the two twisted sections around each other in the opposite direction.
- The sections will naturally spiral together as you wrap them.
- Secure the end tightly with an elastic band.
Staying Neat:
- The opposing twist directions create tension that locks the braid in place.
- Rope braids actually tighten throughout the day rather than loosening.
- The simple two-section design means there’s less opportunity for strands to escape.
9. Pull-Through Braid Ponytail
The pull-through braid creates the illusion of a complex braid without any actual braiding technique.
This style uses strategic ponytails pulled through each other to create a stacked, voluminous effect. It’s perfect for moms who struggle with traditional braiding but want the polished look.
Assembly Instructions:
- Create a ponytail at the crown and secure it with an elastic.
- Create a second ponytail directly below the first using the remaining loose hair.
- Split the first ponytail in half and bring each half to the sides.
- Clip these halves out of the way temporarily.
- Create a third ponytail below the second using loose hair.
- Release the split sections from the first ponytail and combine them with loose hair to create a fourth ponytail.
- Continue this pattern down the length of your hair.
- Gently pull on each stacked section to add volume and width.
Longevity Features:
- Multiple elastic bands mean the style has several security points instead of one.
- The pull-through technique creates natural volume that doesn’t flatten with time.
- Each section supports the one above it, creating a self-reinforcing structure.
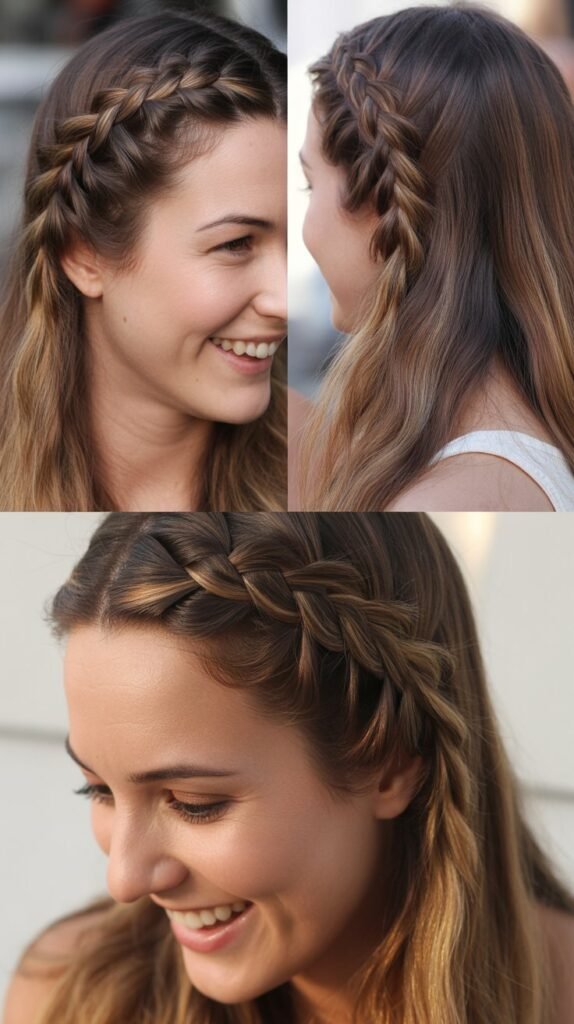
10. Braided Headband with Loose Hair

Creating a braided headband from your own hair keeps the front controlled while leaving length free and flowing.
This style solves the common problem of front pieces falling into your face during activities. The braid acts as a natural accessory that never slips or requires adjustment.
How to Form:
- Part your hair on one side creating a deep side part.
- Take a two-inch section from the front on the heavier side.
- Create a regular three-strand braid with this section working backward toward your ear.
- Continue the braid past your ear along your hairline to the back.
- Secure the braid end with a small clear elastic.
- Use bobby pins to attach the braid behind your opposite ear.
- Leave all remaining hair loose and flowing naturally.
Holding Qualities:
- The braid is pinned in multiple locations providing redundant security.
- Using your own hair means the “headband” is permanently attached and can’t slip.
- The weight of loose hair in back helps anchor the braided section.
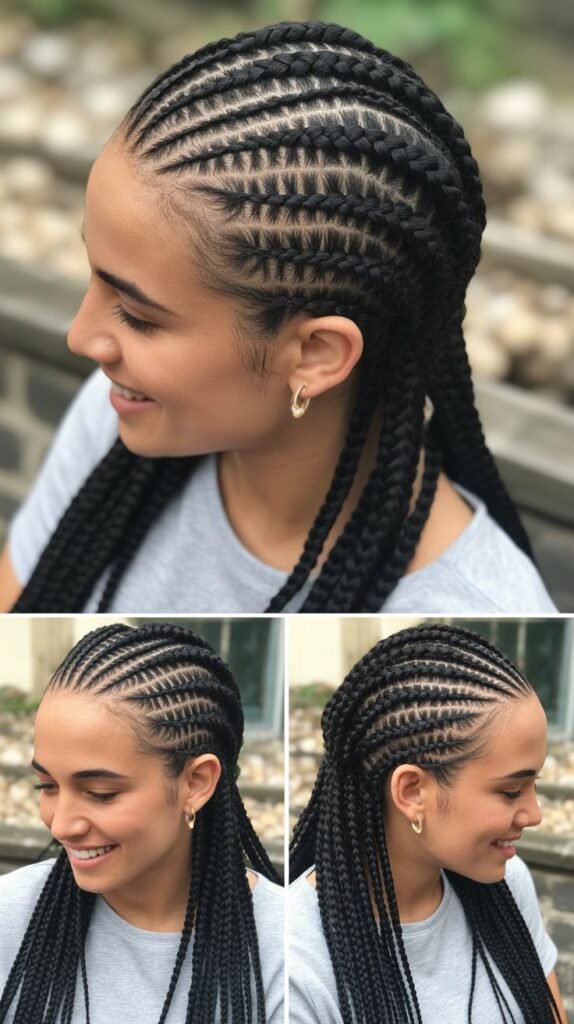
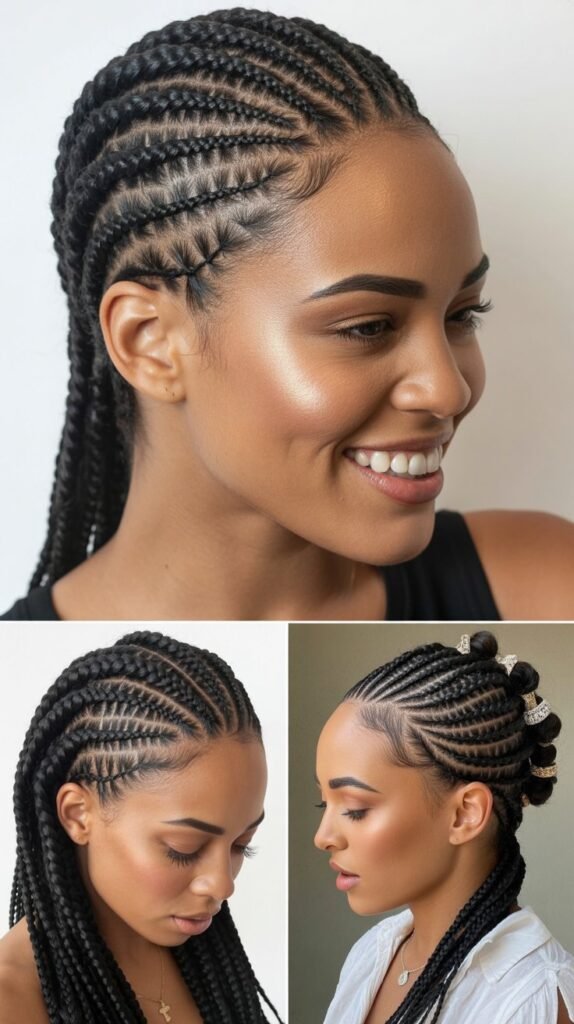
11. Boxer Braids (Tight Dutch Braids)
Boxer braids are ultra-tight Dutch braids that sit flush against your scalp for maximum security. These sporty braids are named for their popularity among athletes who need hairstyles that truly withstand intense activity.
The extra-tight technique makes them perfect for moms facing physically demanding days.
Tight Braiding Method:
- Section hair down the middle creating two equal parts.
- Work with very small sections as you braid for maximum tightness.
- Keep consistent tension throughout the braiding process, pulling firmly but not uncomfortably.
- Braid all the way to the ends rather than stopping mid-length.
- Apply gel or mousse to hair before braiding for extra grip.
- Secure ends with small elastics and consider wrapping them with thread for extra hold.
Superior Hold:
- The tight tension eliminates slack that allows hair to escape.
- The close-to-scalp positioning means gravity works with the style rather than against it.
- Using smaller sections creates more interlocking points that resist loosening.
12. Twisted Crown Braid

A twisted crown braid wraps around your head using twisting rather than traditional braiding technique. This romantic style keeps hair completely off your face and neck while creating an elegant, put-together appearance.
The twist technique is often easier than braiding for moms who find the over-under motion challenging.
Twisting Technique:
- Start at one temple and take a section of hair about two inches wide.
- Divide this section into two pieces and twist them around each other.
- After each twist, add a small amount of new hair from below to the bottom section.
- Continue twisting and adding hair as you work around your head like a crown.
- When you reach the opposite temple, continue twisting without adding new hair.
- Tuck the twisted tail under the crown and pin securely.
Endurance Characteristics:
- Twisting creates a rope-like structure that’s inherently stable and resistant to unraveling.
- The continuous addition of new hair anchors the crown to your head at multiple points.
- The tucked and pinned end has no loose elastic band that could work its way out.
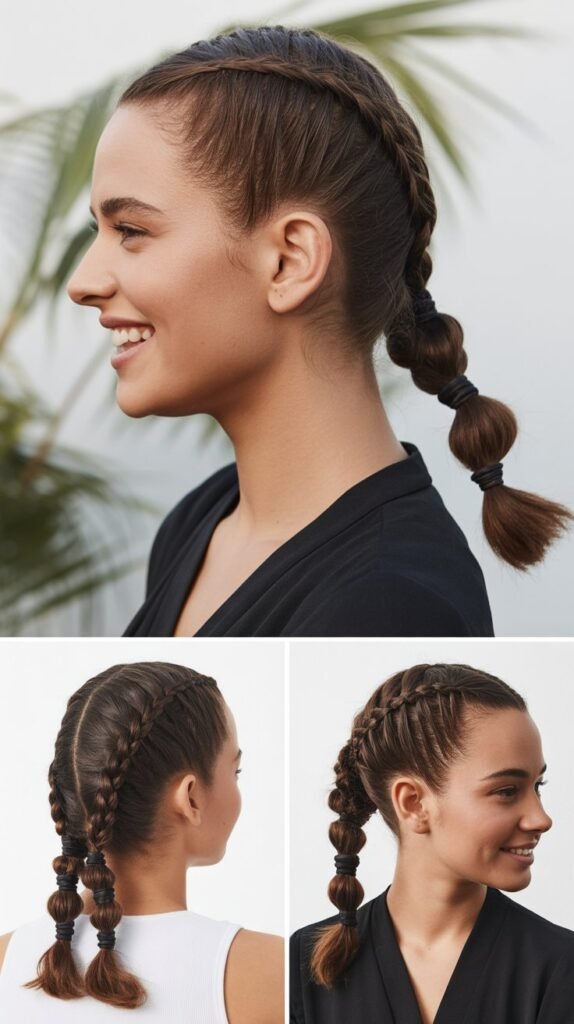
13. Bubble Braid Ponytail
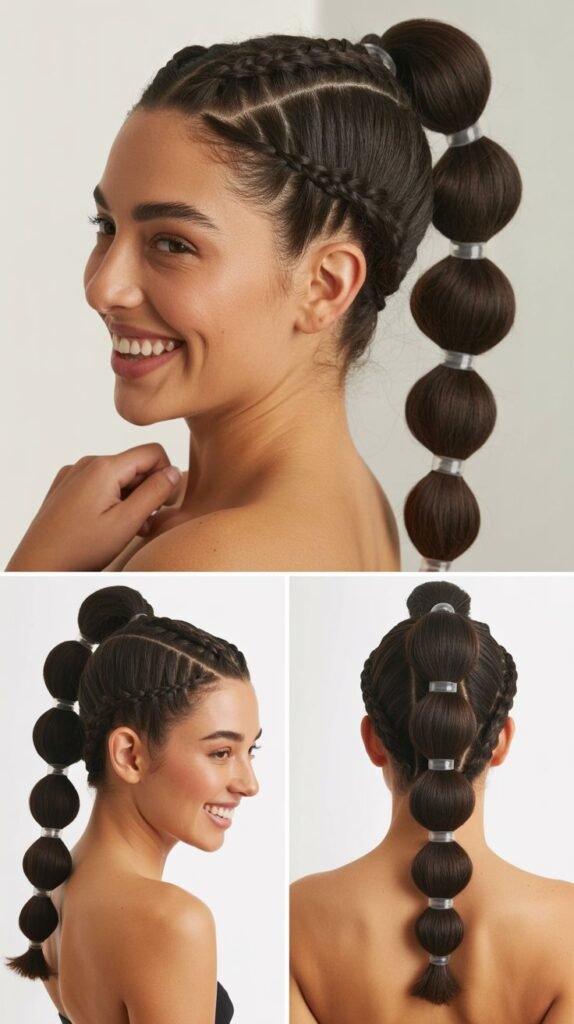
The bubble braid creates distinct segmented sections along a ponytail using multiple elastics. This playful style adds dimension and volume while keeping hair completely contained.
The multiple securing points make this one of the most secure options for extremely active days.
Bubble Creation:
- Gather all hair into a high ponytail and secure with a strong elastic.
- Measure about three inches down the ponytail and add another elastic.
- Gently pull on the hair between the two elastics to create a bubble shape.
- Add another elastic three inches below and create another bubble.
- Continue this pattern down the length of the ponytail.
- Adjust each bubble to be the same size and fullness.
Maximum Security:
- Each elastic acts as an independent securing point throughout the length.
- The bubble pulling technique actually tightens the elastic bands further.
- If one elastic loosens, the others maintain the overall structure.
14. French Braid into Fishtail

Combining two braid types creates visual interest while maximizing hold through different techniques.
Starting with a French braid secures the crown area while transitioning to a fishtail adds texture to the length. This hybrid approach gives you the benefits of both braiding styles in one hairstyle.
Combination Method:
- Begin with a French braid at the crown, incorporating hair from both sides.
- Continue French braiding down to approximately ear level.
- Stop adding new hair and divide your current braid into two sections.
- Begin fishtail braiding by taking small pieces from outer edges and crossing over.
- Continue the fishtail pattern down the remaining length.
- Secure at the end and gently pull both braid sections for added volume.
Dual-Action Hold:
- The French braid portion prevents crown hair from loosening or falling forward.
- The fishtail section creates intricate interlocking that tightens with movement.
- The transition point provides a focal area that disguises any slight loosening.
15. Side Dutch Braid into Ponytail

This asymmetrical style sweeps hair dramatically to one side before gathering into a ponytail. The Dutch braid creates texture and security along the side while the ponytail provides a convenient gathering point.
This combination works beautifully for both casual and slightly dressier occasions.
Creation Steps:
- Create a deep side part on your preferred side.
- Begin a Dutch braid at the part on the heavier side.
- Braid along your hairline toward your opposite ear, curving around your head.
- When you reach behind your ear, stop braiding and hold the braid.
- Gather all loose hair including the braid together at one side.
- Secure everything into a side ponytail with a strong elastic.
Staying Power:
- The Dutch braid keeps the front and crown sections completely controlled.
- The side positioning prevents the ponytail from getting caught against chairs or car seats.
- The braid feeds into the ponytail, creating a seamless connection that won’t separate.
16. Ladder Braid

The ladder braid creates a unique braided design that resembles ladder rungs across a base of hair. This decorative technique keeps side sections controlled while creating an eye-catching pattern.
The ladder effect comes from strategically dropping and weaving sections as you braid.
Ladder Technique:
- Create a regular three-strand braid along one side of your head.
- After a few stitches, separate a thin strand from the outer edge and leave it hanging.
- Continue braiding and dropping these outer strands every few stitches.
- Once the main braid is complete and secured, work on the dropped strands.
- Weave these dropped strands through the main braid creating horizontal “rungs.”
- Secure any loose ends with bobby pins tucked beneath the braid.
Hold Benefits:
- The main braid provides the primary structure that keeps hair in place.
- The woven rungs add extra security points along the length.
- The intricate pattern distributes any loosening across multiple points making it less noticeable.
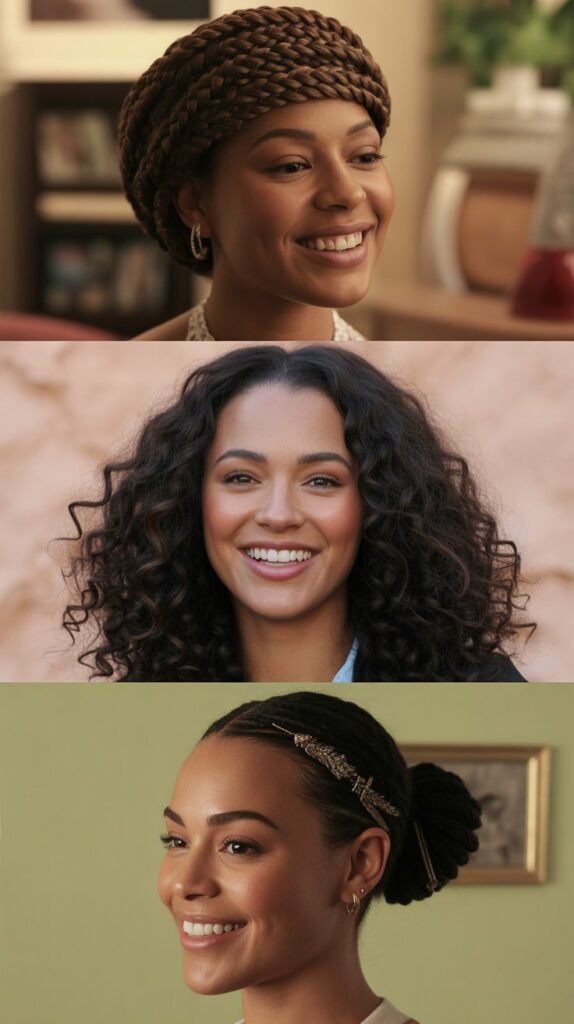
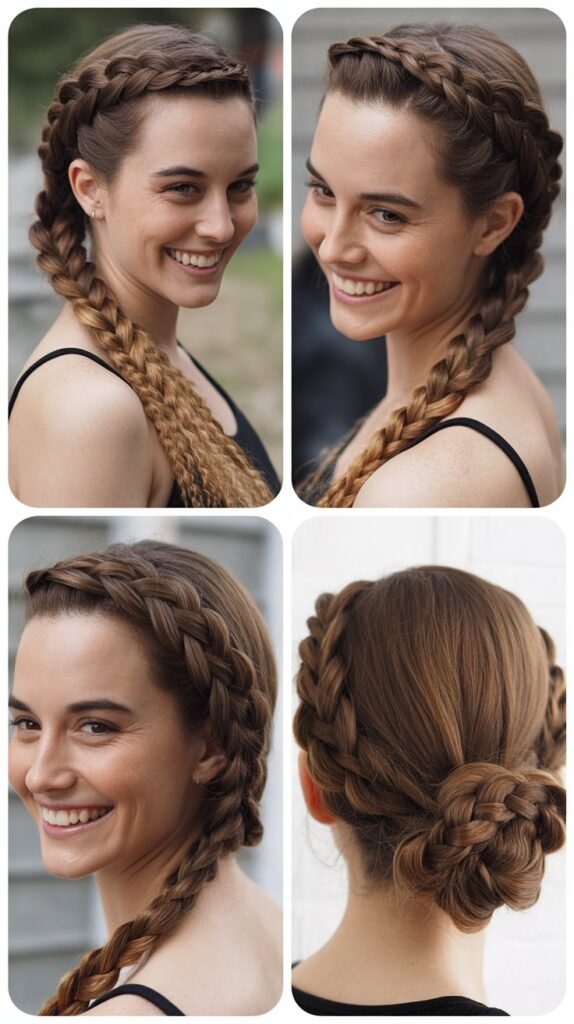
17. Milkmaid Braid

The milkmaid braid wraps two braids over the crown in an X or halo pattern for a vintage-inspired look. This romantic style keeps absolutely all hair secured and off your neck.
The crossed-over design creates built-in volume and works beautifully for medium to long hair lengths.
Milkmaid Assembly:
- Part hair down the center creating two equal sections.
- Create a regular three-strand braid on each side, braiding all the way to the ends.
- Take the right braid and bring it over the top of your head toward the left side.
- Pin the braid securely behind your left ear and along its path.
- Take the left braid and bring it over the top toward the right side.
- This braid will cross over the first braid, creating an X pattern.
- Pin securely and tuck the ends under the braids.
All-Day Security:
- Using multiple bobby pins creates redundant security along the entire crown.
- The crossed pattern means each braid helps hold the other in place.
- The tucked ends eliminate the need for visible elastics that can slip or break.
18. Infinity Braid Ponytail
The infinity braid creates a figure-eight pattern that’s both visually striking and structurally secure.
This advanced-looking technique is surprisingly simple once you understand the pattern. The continuous loop motion creates a braid that’s less likely to loosen than traditional styles.
Infinity Pattern:
- Gather hair into a ponytail at your desired location and secure with elastic.
- Divide the ponytail into two sections.
- Take a small piece from the outer edge of the left section.
- Bring it over the left section, under the right section, and merge it with the left section.
- Take a small piece from the outer edge of the right section.
- Bring it over the right section, under the left section, and merge it with the right section.
- Continue this figure-eight pattern down the length.
Durability Features:
- The over-under-over pattern creates multiple locking points with each stitch.
- The continuous weaving means there’s no clear point where the braid could come undone.
- The figure-eight pattern actually tightens as hair settles throughout the day.
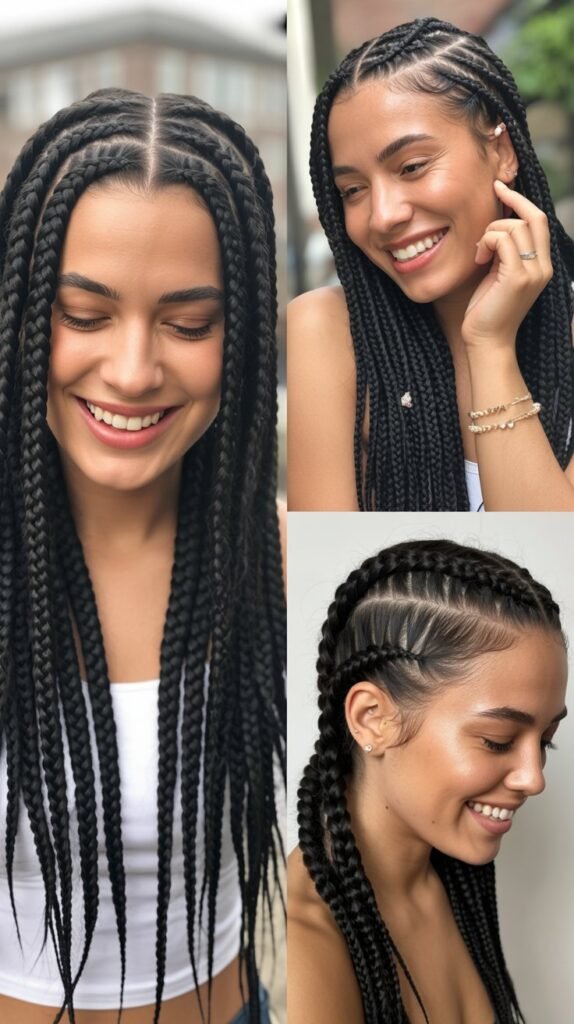
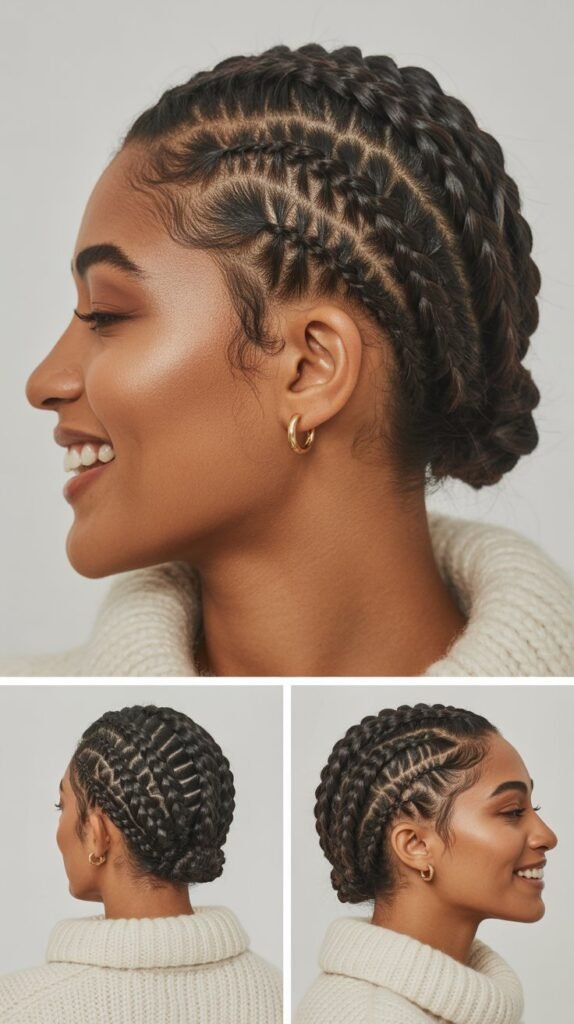
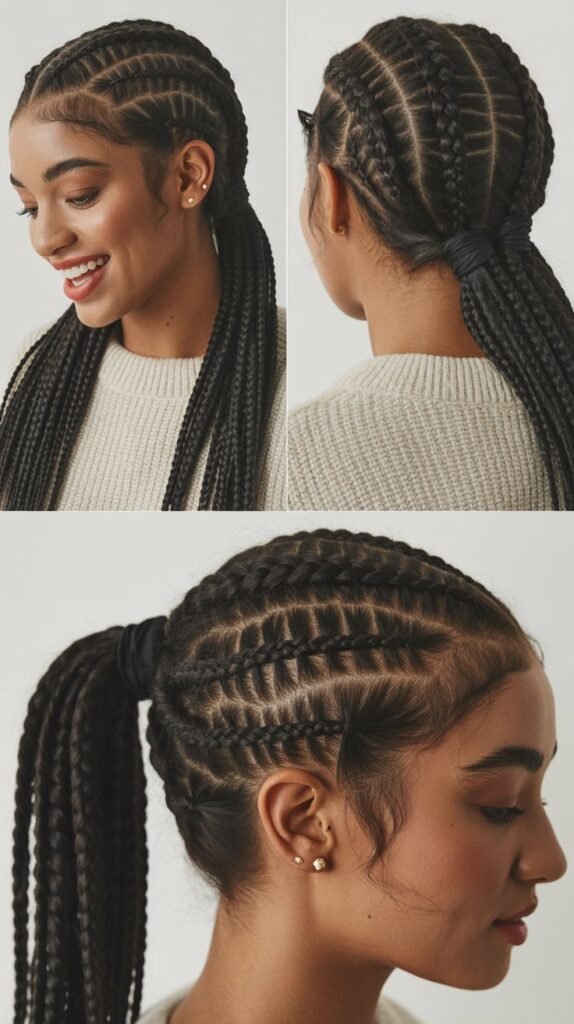
19. Cornrow Base with Bun
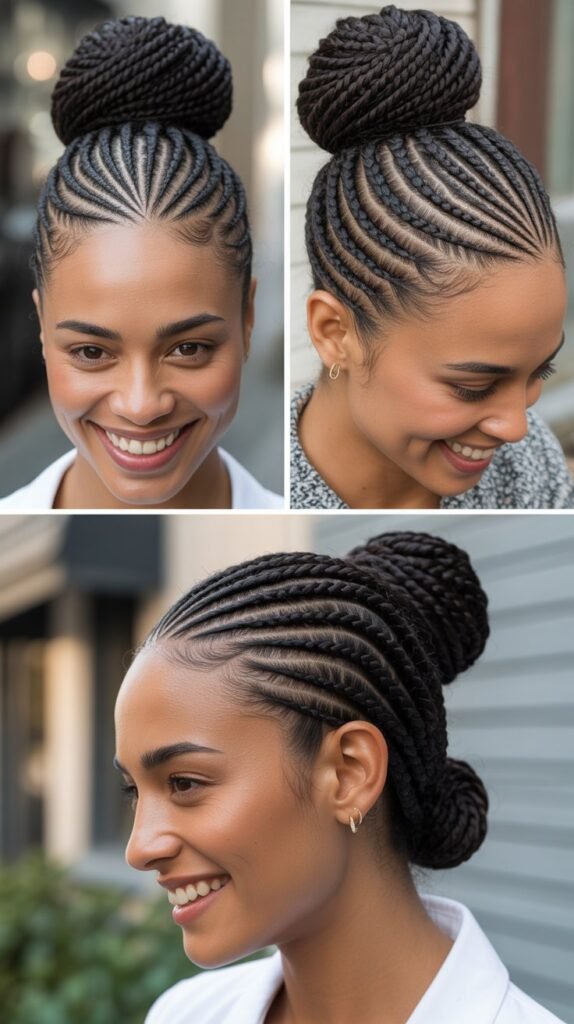
Creating cornrow braids at the base secures hair at the scalp level before gathering the length into a bun. This style combines the sleek look of cornrows with the convenience of a bun.
The double-layer approach provides exceptional hold for active moms who need their hair truly locked down.
Building the Style:
- Section the front portion of your hair from temple to temple.
- Create 2-4 small cornrow braids starting at your hairline working toward your crown.
- Leave the back section of your hair loose for now.
- Gather all loose hair including the cornrow ends into a high or low ponytail.
- Twist the ponytail and wrap it around the base creating a bun shape.
- Secure the bun with bobby pins, making sure to catch the cornrow ends in the bun.
Superior Staying Power:
- Cornrows grip the scalp extremely firmly, eliminating front hair slippage.
- The bun contains the bulk of your hair weight in a compact, controlled form.
- The braided base prevents the stretched-out look that simple ponytails develop.
20. Zigzag Part Dutch Braids
Creating a zigzag part between two Dutch braids adds visual interest while maintaining the security of traditional boxer braids.
The unconventional parting makes the style more playful and modern. This variation works especially well for moms with young children who appreciate fun hairstyle details.
Zigzag Creation:
- Use the pointed end of a rattail comb to create a zigzag part down the center of your head.
- Move the comb point back and forth as you work from hairline to nape.
- Make the zigzags about one inch wide for visibility.
- Clip one side away and create a Dutch braid on the first side.
- Repeat the Dutch braiding process on the second side.
- Secure both braids with elastics and apply light hairspray.
Endurance Qualities:
- The Dutch braiding technique provides the same security as regular boxer braids.
- The zigzag part prevents hair from settling into a straight line and looking messy.
- The playful part draws attention away from any slight loosening throughout the day.
21. Knotted Half-Up Braid
This style creates decorative knots in the upper section of hair before transitioning into a braid. The knotting technique adds texture and detail while keeping the top portion extra secure.
The combination of knots and braiding creates a unique look that’s more secure than it appears.
Knotting and Braiding:
- Take two sections from each side of your head at temple level.
- Tie these sections together in a simple overhand knot at the back of your head.
- Take two more sections just below the first and tie them in another knot below the first knot.
- Gather all knotted hair plus some additional hair from below the knots.
- Begin braiding this gathered section using any braid style you prefer.
- Secure the braid at the bottom and gently pull on the knots to loosen them slightly for texture.
Holding Mechanisms:
- Each knot creates a firm connection point that resists loosening.
- The braid at the bottom secures all the knotted sections together.
- The half-up positioning keeps the heaviest hair weight off the knotted sections.
22. Five-Strand Braid

The five-strand braid creates a wide, intricate pattern that looks incredibly complex but provides exceptional hold.
This advanced technique uses five sections instead of the traditional three, creating more interlocking points. While it requires practice, the stunning result is worth the learning curve for moms seeking standout styles.
Five-Strand Method:
- Divide your hair into five equal sections numbered 1-2-3-4-5 from left to right.
- Bring section 5 over 4 and under 3.
- Bring section 1 over 2 and under 3.
- Repeat this pattern: outside right over one and under one, then outside left over one and under one.
- Keep consistent tension and section size throughout.
- Secure at the bottom and gently pull the braid to widen it.
Exceptional Security:
- Five sections create significantly more interlocking points than traditional three-strand braids.
- The over-and-under pattern creates a basket-weave effect that’s extremely stable.
- The wide braid distributes hair more evenly, reducing strain on any single section.
23. Braided Low Ponytail with Wrap

This elegant style features a braid that wraps around the base of a low ponytail, hiding the elastic. The braid adds decorative detail while the ponytail keeps length contained.
The wrapped base creates a polished finish that elevates a simple ponytail.
Wrapping Technique:
- Gather most of your hair into a low ponytail but leave out a section from underneath.
- Secure the main ponytail with an elastic.
- Take the section you left out and create a three-strand braid.
- Wrap this braid around the elastic base of the ponytail.
- Tuck the end of the braid under the wrap and secure with a bobby pin.
- Apply hairspray to smooth any flyaways around the wrap.
Lasting Elements:
- The ponytail elastic provides the primary hold for all the hair.
- The wrapped braid adds a secondary securing layer around the base.
- The bobby pin securing the wrap is hidden, so it won’t catch on clothing or accessories.
24. Diagonal Lace Braid
A lace braid works diagonally across your head, incorporating hair from only one side as you braid. This asymmetrical style creates a dramatic sweep that keeps face-framing hair controlled.
The lace technique is lighter and more delicate-looking than traditional French braids while remaining secure.
Lace Braiding Process:
- Start at one temple with a three-inch section of hair.
- Begin a regular three-strand braid for one or two stitches.
- Add small sections of hair only from the top side of the braid as you work diagonally across.
- Do not add hair from the bottom side—this creates the lace effect.
- Continue diagonally across your head toward the opposite side behind your ear.
- Finish with a regular braid once you’ve incorporated all the top hair.
- Secure with an elastic and pin the braid behind your ear.
Security Features:
- Adding hair from one side continuously anchors the braid to your head.
- The diagonal angle follows the natural fall of hair, reducing stress on the braid.
- The lighter appearance doesn’t mean less security—the continuous incorporation keeps it firm.
25. Stacked Braids into Ponytail
Creating multiple horizontal braids that stack on top of each other adds texture before gathering into a ponytail.
This style combines the visual interest of multiple braids with the functionality of a ponytail. The stacked effect creates dimension that makes thin hair appear fuller.
Stacking Method:
- Create a horizontal section across the top of your head from temple to temple.
- Braid this section in a regular three-strand braid and secure with a small elastic.
- Create another horizontal section just below the first.
- Braid this section and secure it.
- Continue creating and braiding horizontal sections down the back of your head.
- Gather all the braids plus any remaining loose hair into a ponytail.
- Remove the small elastics from each individual braid once they’re secured in the ponytail.
Multi-Level Hold:
- Each horizontal braid controls that section of hair independently.
- The final ponytail acts as a master securing point for all sections.
- The stacked layers prevent the flattening that occurs with simple ponytails.
26. Twisted Side Braid with Ribbon

Incorporating a ribbon into a twisted side braid adds color and extra security while creating a decorative element.
The ribbon weaves through the braid, helping to hold sections together while adding a feminine touch. This works beautifully for moms who want to add personality to their practical hairstyles.
Ribbon Integration:
- Choose a ribbon that’s about 1/4 to 1/2 inch wide and at least twice the length of your hair.
- Gather hair to one side and divide into two sections.
- Fold the ribbon in half and loop it around one section near the top.
- Twist the two hair sections around each other, including the ribbon with one section.
- The ribbon will spiral around the twist as you work down.
- At the bottom, tie the ribbon in a bow around the elastic for a finished look.
- Trim any excess ribbon length if desired.
Enhanced Durability:
- The ribbon adds friction between hair sections, preventing slippage.
- The woven ribbon acts like an additional strand, reinforcing the twist structure.
- The decorative bow hides the elastic while providing extra securing pressure.
27. Braided Faux Hawk
Creating tight braids on each side that meet in the center produces a faux hawk effect that’s edgy yet professional.
This style keeps side hair completely controlled while creating height and volume down the center. The symmetrical design works well for moms with thick hair that needs maximum containment.
Faux Hawk Construction:
- Part your hair into three vertical sections: left side, center strip, and right side.
- Create a tight Dutch braid along the left section, braiding toward the center.
- Create a matching Dutch braid along the right section, also braiding toward the center.
- Leave the center section loose initially or clip it up.
- Secure both side braids where they meet at the center back.
- Tease or gently backcomb the center section to create height.
- Smooth the top layer of the center section and spray to hold the volume.
All-Day Structure:
- The tight side braids eliminate any possibility of side hair falling forward.
- The center volume is supported by the frame created by the side braids.
- The meeting point at the back distributes all hair weight to a single secure location.
28. Carousel Braid
The carousel braid creates a spiral effect by continuously rotating sections around a central axis. This dimensional technique produces a unique cylindrical shape that’s surprisingly secure.
The continuous rotation prevents the loosening that occurs with traditional over-under braiding patterns.
Carousel Technique:
- Divide hair into four equal sections arranged in a square pattern.
- Hold all four sections and begin rotating them clockwise (or counterclockwise).
- Always move the rightmost section over the section to its left.
- Continue rotating in the same direction, always moving the next section over its neighbor.
- Maintain even tension and consistent section size as you rotate.
- Secure at the bottom and gently pull on the braid to reveal the spiral pattern more clearly.
Staying Power:
- The continuous rotation creates a rope-like structure that’s very stable.
- The four-section design provides more interlocking than traditional three-strand braids.
- The cylindrical shape distributes tension evenly around the entire braid circumference.
29. Accent Braid with Half-Up Style
A small accent braid on one side adds detail to a half-up hairstyle while keeping front sections controlled. This subtle approach works perfectly for moms who want hair management without fully committed styles.
The single braid provides just enough security for face-framing pieces while leaving most hair down.
Accent Creation:
- Take a thin section of hair from just above your temple on one side.
- Create a small three-strand braid with this section, keeping it tight and thin.
- Pull the braid back toward the crown area.
- Gather hair from both sides at crown level including your accent braid.
- Secure this half-up section with an elastic or decorative clip.
- Leave the bottom half of your hair flowing loose.
- Create a matching accent braid on the other side for symmetry if desired.
Functional Benefits:
- The accent braid keeps the front side section from falling into your face.
- The half-up gathering point secures the braid permanently.
- The minimal braiding means you can achieve this style in under two minutes.
30. Pretzel Braid
The pretzel braid creates a twisted, interwoven pattern that resembles a pretzel shape when viewed from the side.
This artistic technique combines braiding with strategic folding and pinning. The complex appearance makes it perfect for special occasions while the multiple securing points keep it intact all day.
Pretzel Formation:
- Create two regular three-strand braids, one on each side of your head.
- Bring both braids to the back center of your head.
- Cross the right braid over the left braid.
- Loop the right braid back toward the right and pin it.
- Loop the left braid back toward the left and pin it.
- The crossed and looped braids create a pretzel-like shape.
- Tuck any remaining tail ends under the pretzel shape and secure with pins.
Hold Advantages:
- Multiple bobby pins create redundant security throughout the pretzel.
- The crossed and looped structure means braids hold each other in place.
- The compact design keeps all hair weight centralized and balanced.
31. Snake Braid
The snake braid creates an S-shaped curved effect by alternating the direction of your braiding path. This serpentine style adds visual movement while keeping hair completely controlled.
The curved pattern sits beautifully against your head and works well for medium to long hair lengths.
Snake Pattern:
- Start a Dutch braid on one side of your head near the temple.
- Braid straight back for about three inches.
- Gradually curve the braid toward the opposite side as you continue adding hair.
- Once the braid reaches the opposite side, curve it back toward the original side.
- Continue this S-pattern down your head, creating gentle curves.
- Finish with a regular braid once all hair is incorporated.
- Secure with an elastic and apply hairspray along the curves.
Secure Structure:
- The Dutch braiding technique keeps the curved sections flat against your head.
- The S-curve distributes tension differently than straight braids, preventing stress on any single area.
- The winding path creates natural anchoring points at each curve direction change.
32. Triple Twist Low Ponytail

Creating three separate twisted sections that combine into a low ponytail adds texture and dimension while ensuring maximum hold.
This style uses the security of twisting combined with the convenience of a ponytail. The triple twist provides visual interest that makes a simple ponytail look intentional and styled.
Triple Twist Method:
- Divide all your hair into three equal vertical sections.
- Take the left section and twist it tightly clockwise all the way down.
- Temporarily secure this twist with a clip.
- Take the middle section and twist it tightly clockwise as well.
- Secure this twist with a clip.
- Take the right section and twist it tightly clockwise.
- Remove all clips and gather the three twists together at the nape.
- Secure all three twists together into a low ponytail with a strong elastic.
- The twists will naturally spiral together within the ponytail.
Maximum Hold:
- Three separate twists mean each section is independently secured before final gathering.
- Twisting in the same direction creates natural tension that resists unraveling.
- The ponytail elastic creates a master securing point that locks all three twists together.
Tips for Making Braids Last All Day
Ensuring your braided hairstyles maintain their structure from morning until night requires proper preparation and strategic techniques. These practical tips will help any braid style stay neat and secure regardless of your activity level.
Preparation Tips:
- Start with second-day hair or hair that has texturizing spray applied—clean hair is often too slippery for braids to grip properly.
- Apply a small amount of styling mousse or gel before braiding to add friction between strands.
- Brush hair thoroughly to remove all tangles, as knots within braids will cause sections to pull apart.
- Consider your hair’s natural texture and work with it rather than against it—wavy hair holds braids differently than straight hair.
During Braiding:
- Maintain consistent tension throughout the entire braiding process without pulling too tight at the scalp.
- Keep sections equal in size as uneven sections will create weak spots in the braid structure.
- Braid slightly tighter than you think necessary—braids naturally loosen throughout the day.
- Use clear elastic bands for securing as they grip better than fabric-covered elastics.
Finishing Touches:
- Apply light-hold hairspray after completing the braid, focusing on the hairline and any shorter layers.
- Use bobby pins that match your hair color for invisible reinforcement at strategic points.
- Avoid touching or adjusting your braid throughout the day as this gradually loosens the structure.
- Sleep on a silk or satin pillowcase if you want braids to last multiple days without friction damage.
Best Hair Products for Long-Lasting Braids
The right products make a significant difference in how well braids hold throughout busy days. Understanding which products to use at each stage will maximize your braid’s longevity.
Pre-Styling Products:
- Dry shampoo or texturizing spray adds grip to clean hair and refreshes second-day hair before braiding.
- Styling mousse provides light hold without making hair stiff or crunchy during the braiding process.
- Leave-in conditioner smooths hair and reduces frizz while maintaining enough texture for braids to grip.
During Styling:
- Hair gel (light to medium hold) tames flyaways along the hairline without creating buildup.
- Smoothing serum controls frizz on humid days but should be used sparingly to avoid slippery hair.
After Styling:
- Flexible-hold hairspray sets the finished braid without making it stiff or brittle.
- Edge control products smooth baby hairs and shorter pieces around the hairline.
- Bobby pins in various sizes provide reinforcement wherever your braid needs extra support.
For Multi-Day Braids:
- Silk or satin scarf protects braids overnight and prevents frizz from pillow friction.
- Braid spray or refresh spray revives braids on the second or third day without completely redoing them.
Conclusion
Managing your hair shouldn’t add stress to an already busy schedule, and these 32 Easy Braided Hairstyles for Moms That Stay Neat All Day prove that practical and beautiful can coexist perfectly.
From quick three-minute solutions to more elaborate weekend styles, you now have a comprehensive toolkit of braiding techniques that fit every schedule, hair type, and activity level.
The key to success lies in choosing styles that match your skill level and time availability while using proper preparation techniques and quality products.
Whether you’re chasing toddlers at the playground, leading business meetings, or doing everything in between, these braids will keep your hair exactly where you want it.
Remember that practice makes perfect—the braids that seem challenging today will become second nature with repetition.
Start with the simpler styles that resonate with your needs and gradually experiment with more complex techniques as your confidence grows.
Your mornings are about to become smoother, your hair will stay polished throughout even the most chaotic days, and you’ll finally have hairstyles that work as hard as you do.
Embrace these braiding solutions and reclaim the time and peace of mind that comes from knowing your hair looks great all day long.