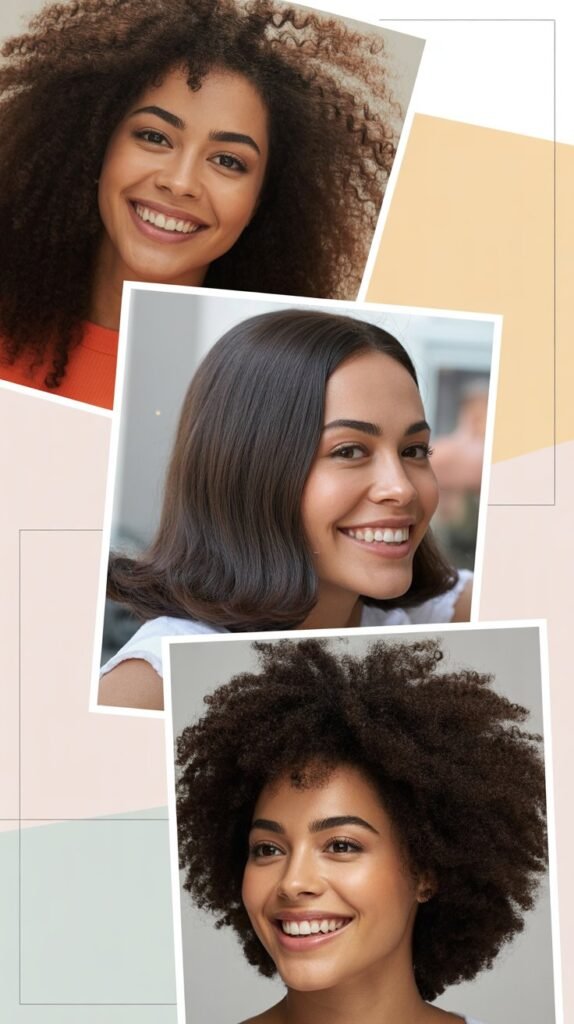
Short curly hair can feel like both a blessing and a challenge for busy moms.
The natural texture brings volume and personality, but managing those curls while juggling motherhood requires quick, practical solutions.
If you’re searching for hairstyles that work with your natural texture rather than against it, you’ve come to the right place.
This comprehensive guide to 33 Easy Hairstyles for Short Curly Hair Moms Love will transform your morning routine from stressful to streamlined.
We’ll explore everything from wash-and-go techniques to elegant updos, protective styles to accessory-enhanced looks, and time-saving tricks that keep your curls healthy and gorgeous.
Whether you have tight coils, loose waves, or anything in between, these styles are designed to complement your busy lifestyle while celebrating your natural beauty.
Get ready to discover hairstyles that take minutes instead of hours, require minimal products, and look fantastic from the playground to parent-teacher conferences.
1. The Classic Wash-and-Go
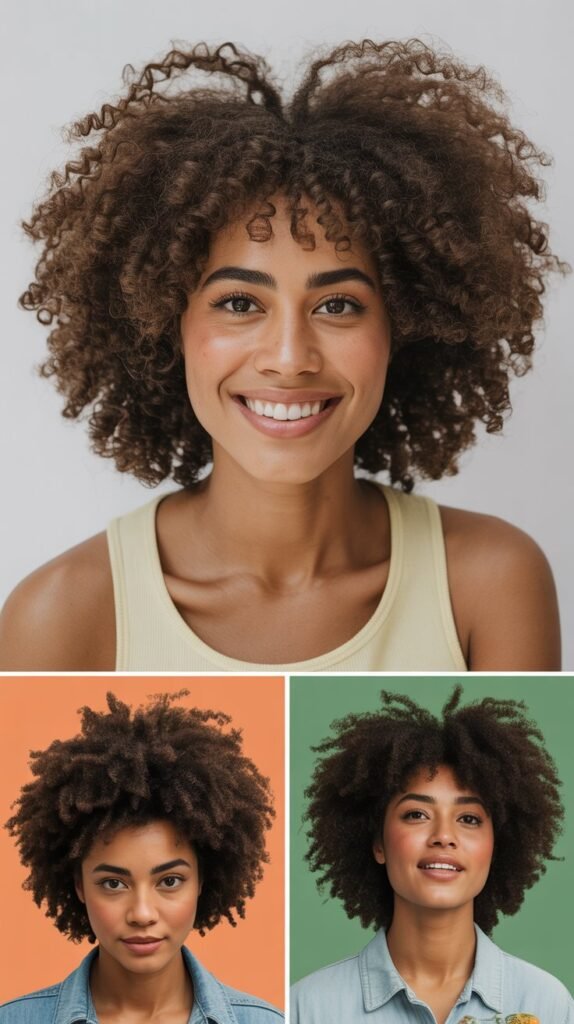
The wash-and-go remains the ultimate time-saver for curly-haired moms who want to embrace their natural texture with minimal effort.
This foundational style works by applying styling products to wet hair and allowing your curls to air-dry or diffuse into their natural pattern.
- Start with freshly washed hair using a sulfate-free shampoo that won’t strip your curls of essential moisture
- Apply a leave-in conditioner while your hair is soaking wet to lock in hydration
- Use the praying hands method or raking technique to distribute curl cream or gel evenly through your hair
- Scrunch your curls upward from the ends to encourage curl formation and remove excess water
- Allow your hair to air-dry completely or use a diffuser on low heat to speed up the process
- Once fully dry, scrunch out any gel cast for soft, touchable curls that last all day
- This style typically takes 10-15 minutes of active styling time plus drying
- Works best with lightweight gels or creams that provide hold without weighing down short curls
2. Side-Swept Curls with Bobby Pins
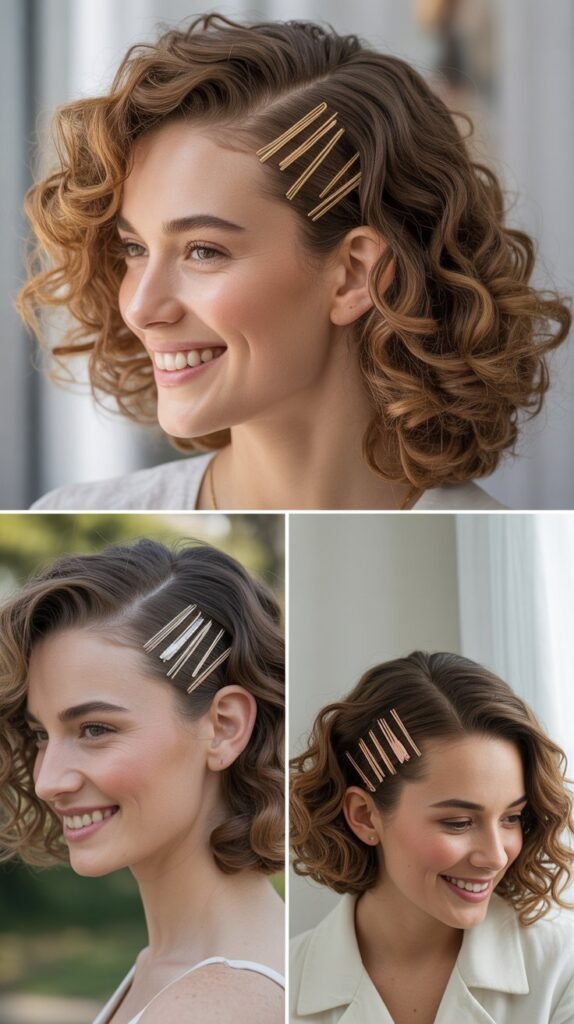
Side-swept styling adds instant elegance to short curly hair while keeping curls away from your face during busy mom moments.
This asymmetrical look creates visual interest and works beautifully for both casual and dressier occasions.
- Part your hair deeply on one side, approximately two inches from your natural part line
- Apply a light curl refresher spray to revive day-old curls or add definition to fresh hair
- Gather curls from the smaller side and sweep them toward the back of your head
- Secure the swept section with two or three bobby pins in an X-pattern for maximum hold
- Choose decorative bobby pins with pearls, metallics, or colors to transform this into an evening look
- Leave the opposite side loose and voluminous to create beautiful asymmetrical balance
- Fluff the loose curls gently with your fingers to add height and dimension
- Use a flexible-hold hairspray to keep pins secure without making your hair stiff
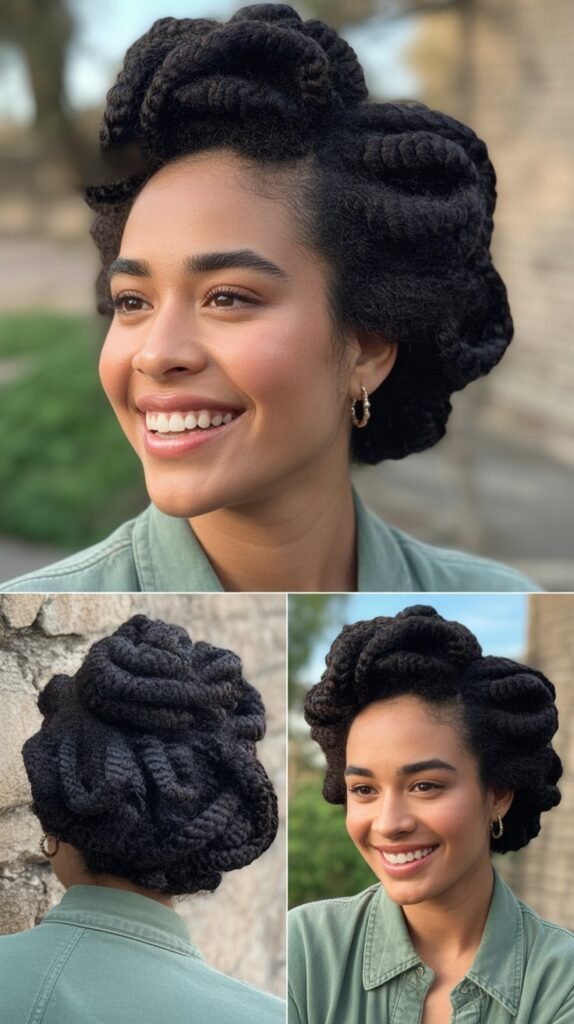
3. Curly Top Knot
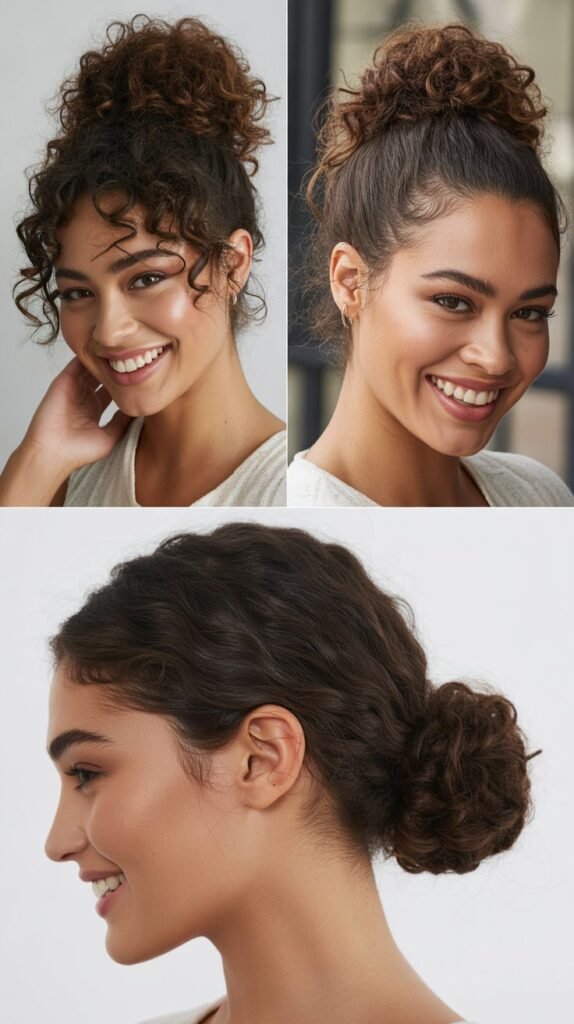
The top knot offers the perfect solution when you need your hair completely off your neck and out of your face. This elevated bun showcases your curls while providing all-day comfort and security.
- Flip your head upside down and gather all your curls at the crown of your head
- Secure with a soft, fabric-covered hair tie to prevent breakage and creasing
- Twist the ponytail loosely and wrap it around the base to create a bun shape
- Pin strategically with bobby pins, allowing some curls to poke through for texture
- Pull out a few face-framing tendrils to soften the look and add romantic appeal
- Spray the bun lightly with water or curl refresher to keep the texture looking intentional
- Adjust the height of your top knot based on your mood and outfit
- This style takes less than three minutes once you master the technique
4. Defined Finger Coils
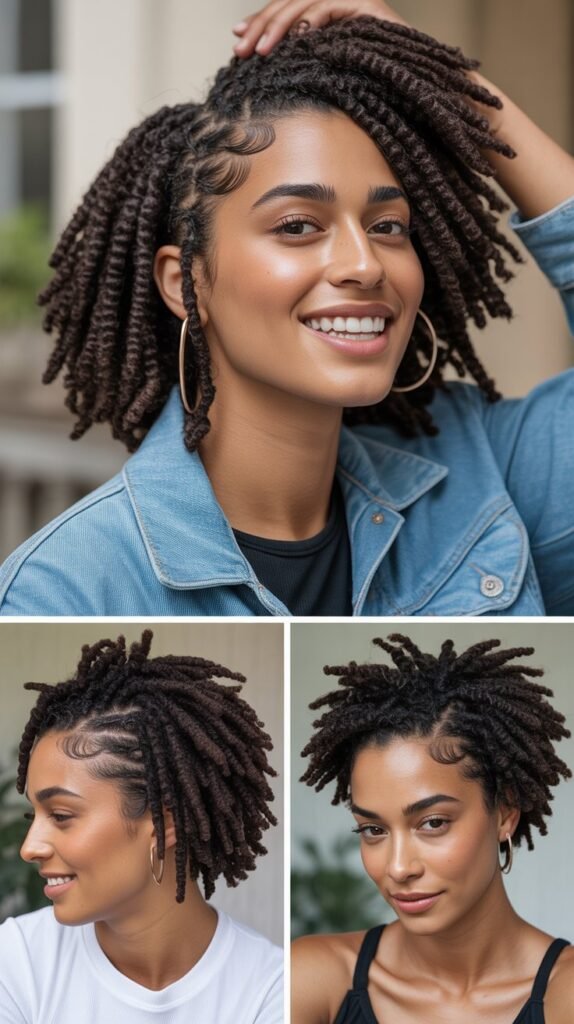
Finger coils create uniform, springy curls that look polished and intentional. This technique works exceptionally well on shorter lengths and provides several days of wear with proper maintenance.
- Work with freshly washed, conditioned hair that’s been detangled thoroughly
- Section your hair into small squares approximately half an inch to one inch wide
- Apply a generous amount of styling gel or curl cream to each section
- Take small sections of hair and wrap them tightly around your index finger from root to tip
- Slide your finger out carefully to maintain the coil shape
- Repeat this process throughout your entire head, working in organized sections
- Allow coils to air-dry completely or sit under a hooded dryer for faster results
- Once dry, separate larger coils gently with your fingers for added volume
- This style can last four to seven days with proper nighttime protection
- Refresh coils daily by spritzing with water and applying light oil to maintain definition
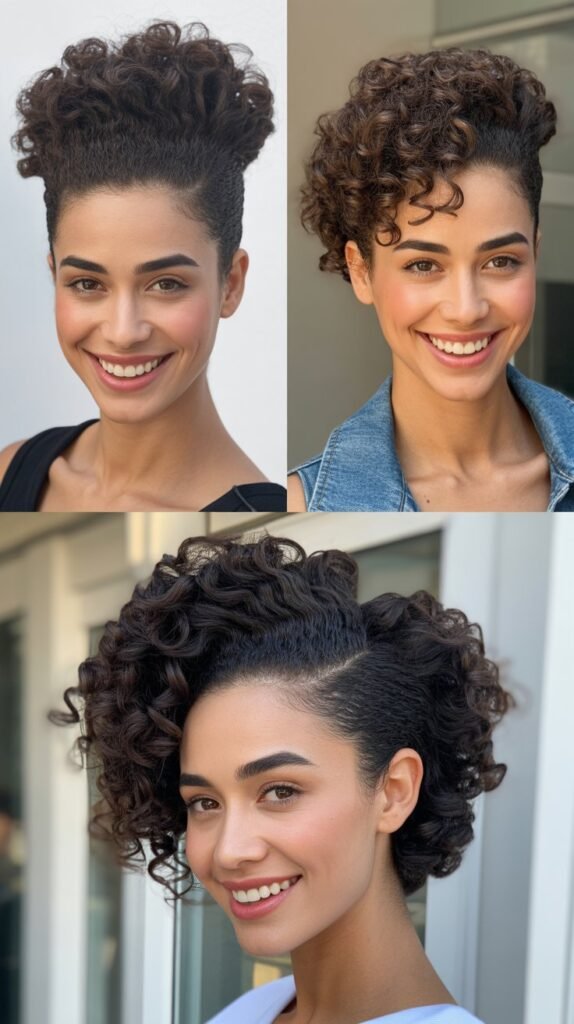
5. Curly Faux Hawk
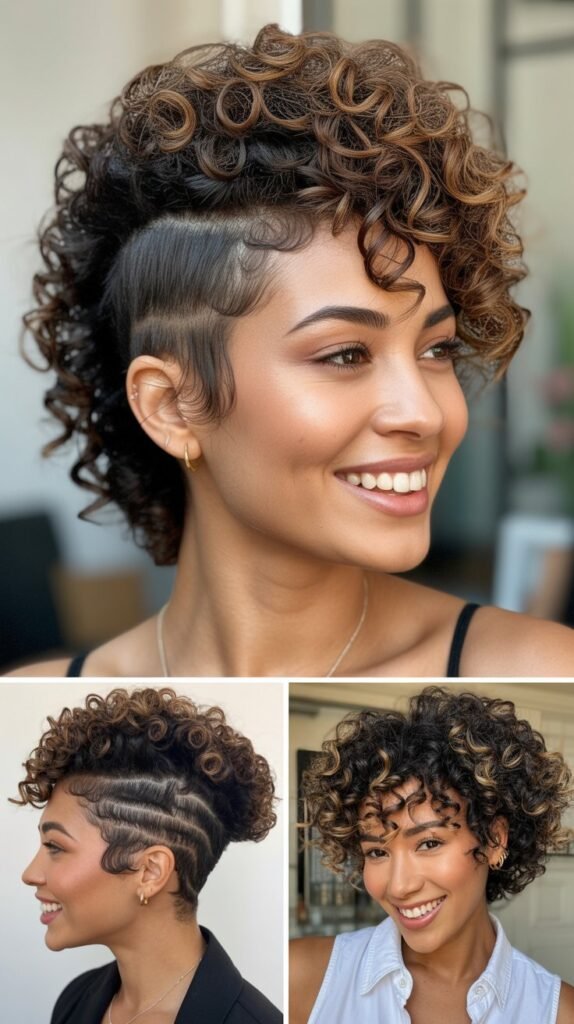
The faux hawk brings edgy style to short curly hair without requiring any hair cutting or commitment. This bold look elevates your natural volume into a statement-making centerpiece.
- Start with day-old curls that have natural volume and texture
- Apply a strong-hold gel or mousse to the sides of your hair only
- Use a fine-tooth comb or brush to smooth the sides down and back toward your ears
- Secure the slicked sides with bobby pins or small hair clips if needed
- Leave the center section from forehead to crown completely free and voluminous
- Use your fingers to lift and separate the center curls for maximum height
- Spray the sides with firm-hold hairspray to keep them sleek all day
- Fluff the center section upward and slightly forward for that signature faux hawk shape
- Add edge control or gel to your hairline for an extra-polished finish
6. Headband Magic

Headbands instantly transform basic curly styles into something special while providing functional benefits like keeping hair off your face. The right headband complements your curls rather than competing with them.
- Choose headbands made from fabric, leather, or flexible materials that won’t slip on curly hair
- Position the headband about one to two inches back from your natural hairline
- Push the headband forward slightly to create volume at the crown before settling it into place
- Allow curls to cascade over and around the headband naturally without flattening them
- Wide headbands work beautifully for bad hair days when you need extra coverage
- Thin, embellished headbands add elegance without overwhelming your natural texture
- Experiment with placement by wearing headbands closer to the crown for different effects
- Secure slippery headbands with small bobby pins hidden beneath your curls
7. Twisted Crown
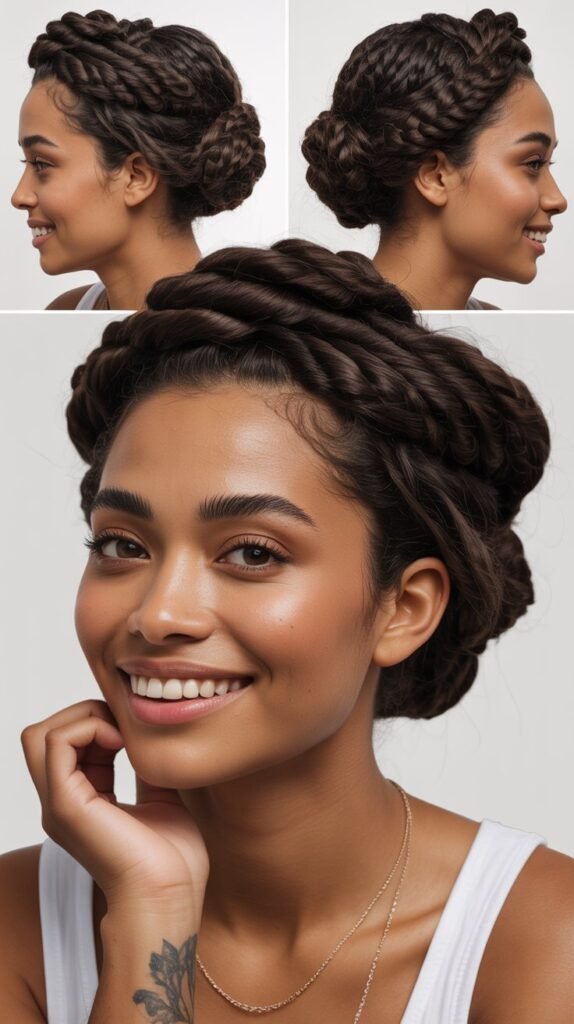
The twisted crown creates a soft, romantic halo effect around your head while keeping your curls beautifully controlled. This style works wonderfully for special occasions or when you want to feel extra feminine.
- Part your hair down the center or slightly off-center depending on your preference
- Take a two-inch section from the front on one side and divide it into two equal parts
- Twist the two sections around each other, adding small amounts of hair as you move toward the back
- Continue the twist along your hairline until you reach the nape of your neck
- Secure the end with a small clear elastic or bobby pins tucked under remaining curls
- Repeat the exact same process on the opposite side to create symmetrical twists
- Allow the remaining curls in the back to fall naturally for a romantic finish
- Pin the two twists together at the back or leave them separate based on your hair density
- Pull gently on the twists to loosen them slightly for a softer, more voluminous appearance
8. Pineapple Updo
The pineapple technique protects your curls overnight and doubles as a cute daytime style. This high, loose ponytail preserves curl pattern while creating an effortlessly chic silhouette.
- Flip your head forward and gather all your curls at the very top center of your head
- Use a silk or satin scrunchie to secure the ponytail loosely without creating tension
- Position the scrunchie so it holds your curls without flattening them against your scalp
- Allow the curls to fountain out from the ponytail in all directions
- Adjust individual curls around your face by pulling them loose from the ponytail
- This style requires no additional products and takes literally 30 seconds to create
- Works best on second or third-day curls that have natural volume
- Transform this into a nighttime protective style by wrapping your pineapple with a silk scarf
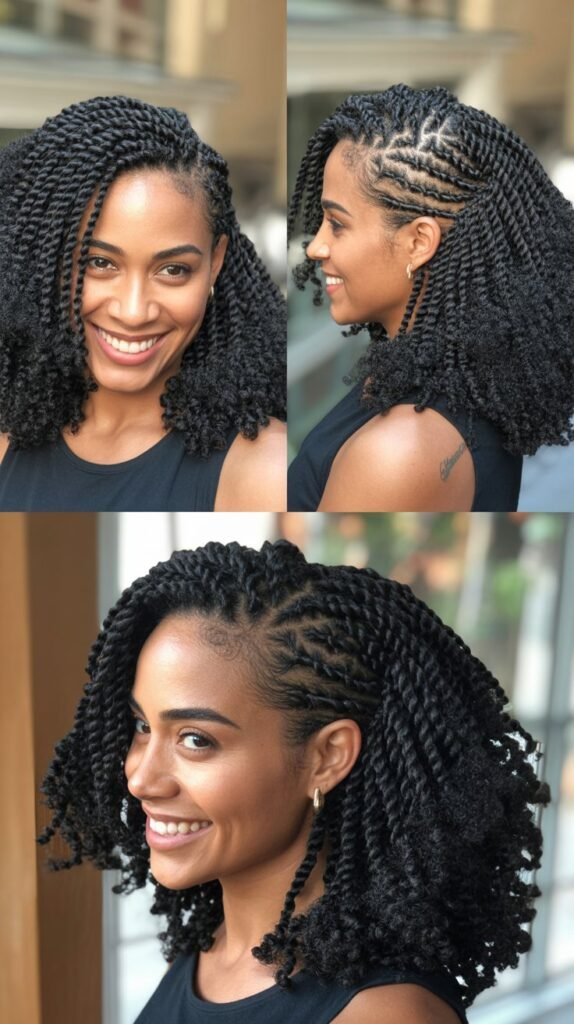
9. Flat Twist Front with Loose Curls

Flat twists along the hairline provide sleek definition that beautifully contrasts with loose, voluminous curls in the back. This combination style offers the best of both worlds.
- Section off the front two to three inches of your hairline from ear to ear
- Divide this front section into two to four equal parts depending on your desired look
- Create flat twists by taking three strands and twisting them flat against your scalp
- Add small sections of hair to the twist as you move backward, similar to cornrowing technique
- Secure each flat twist with a small bobby pin where it meets the loose curl section
- Apply curl cream or gel to the remaining loose curls for definition and shine
- Allow the flat twists to frame your face while the back maintains full volume
- This style typically lasts two to three days with proper nighttime maintenance
- Refresh the loose curls daily with a water-based curl refresher spray
10. Scarf-Enhanced Style

Decorative scarves add personality, color, and vintage charm to short curly hair while serving practical purposes. This accessory transforms simple styles into eye-catching statements.
- Choose lightweight silk or satin scarves that won’t absorb moisture from your curls
- Fold the scarf into a long strip approximately two to three inches wide for headband-style wearing
- Position the scarf at your hairline or further back at the crown depending on your preference
- Tie the scarf ends in a knot or bow at the top, side, or back of your head
- Tuck the scarf ends under for a polished look or let them flow free for bohemian vibes
- Weave thin scarves through your curls like a ribbon for added dimension
- Use scarves to cover regrowth, gray roots, or bad hair days with style
- Experiment with patterns like florals, stripes, or solid colors that complement your wardrobe
11. Curly Pixie Perfection

The curly pixie celebrates short hair at its finest with minimal styling and maximum impact. This cut-and-style combination embraces natural texture while looking effortlessly sophisticated.
- Start with hair cut specifically for curly texture with layers that enhance natural curl pattern
- Apply a dime-sized amount of curl cream to damp hair throughout
- Use your fingers to define individual curls by twisting small sections
- Allow hair to air-dry or use a diffuser on cool setting to prevent frizz
- Once dry, use your fingers to lift curls at the roots for added volume
- Apply a tiny amount of lightweight oil to add shine and reduce any remaining frizz
- Shake your head gently to allow curls to fall into their natural positions
- This style requires redefinition every one to two days for optimal appearance
- Consider getting regular trims every six to eight weeks to maintain the pixie shape
12. Half-Up Puff

The half-up puff combines the security of pulled-back hair with the beauty of loose curls cascading down. This versatile style works for everything from errands to evening events.
- Section your hair horizontally from the top of one ear to the other
- Gather the top section and secure it at the crown with a fabric-covered elastic
- Pull the ponytail upward and forward to create a rounded puff shape
- Use bobby pins around the base of the puff if you want extra security and height
- Fluff the puff with your fingers to maximize volume and remove any flat spots
- Leave the bottom section of curls completely loose and defined
- Pull out a few curls around your hairline to soften the overall look
- Add a decorative clip or pin to the base of the puff for extra flair
- This style takes less than two minutes and works on any curl type
13. Finger Wave Glamour
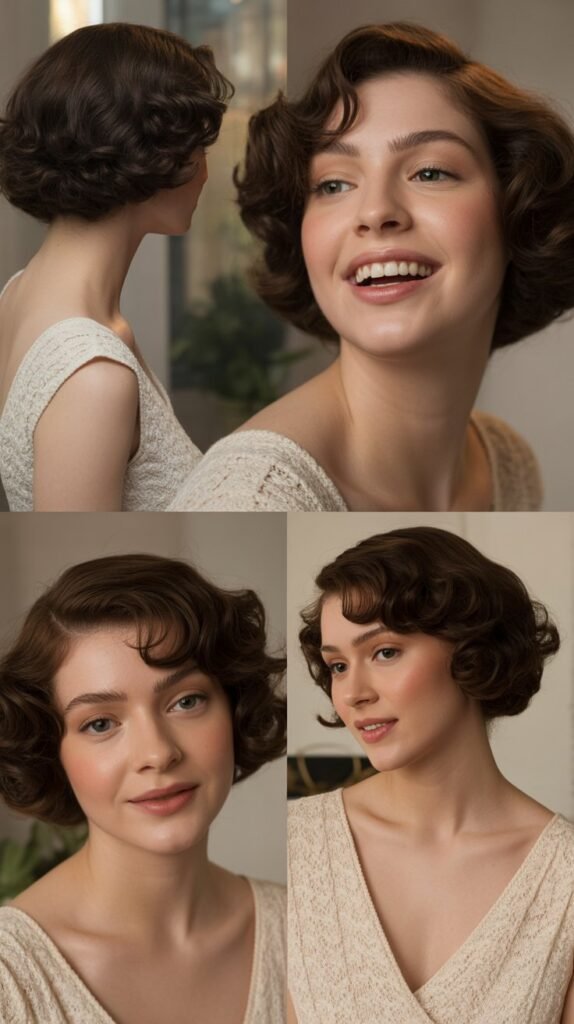
Finger waves bring 1920s Hollywood glamour to modern short curly hair. This technique creates S-shaped waves that look sophisticated and intentional.
- Begin with freshly washed hair that’s wet but not dripping
- Apply a generous amount of strong-hold gel throughout your hair
- Use a fine-tooth comb to create a deep side part
- Place your index and middle fingers flat against your scalp near the part
- Push your fingers forward to create a wave while using the comb to direct hair in the opposite direction
- Continue creating alternating S-shaped waves down the length of your hair
- Secure each wave with a metal wave clip while the hair dries
- Allow hair to dry completely under a hood dryer or naturally over several hours
- Remove clips carefully and avoid disturbing the wave pattern
- Finish with a light mist of firm-hold hairspray to preserve the waves all day
14. Twist-Out Excellence

The twist-out delivers defined, elongated curls that look polished and intentional. This overnight style rewards you with gorgeous texture that lasts for days.
- Work with freshly washed, deeply conditioned hair for the best results
- Section damp hair into manageable squares of about one inch each
- Apply your favorite curl cream or butter to each section generously
- Divide each section into two equal parts and twist them around each other from root to tip
- Secure the end of each twist with a small elastic or by tucking it around itself
- Allow twists to dry completely overnight with a satin bonnet or scarf for protection
- In the morning, apply a light oil to your hands before unraveling each twist
- Gently separate each curl into two or three smaller sections for volume
- Fluff your roots with your fingers to create fullness throughout
- This style typically lasts three to five days with nightly retwisting or pineappling
15. Slicked-Back Elegance

Slicked-back styling showcases your facial features while giving your curls a sophisticated, controlled appearance. This look transitions seamlessly from business meetings to evening outings.
- Apply a generous amount of gel or edge control to the front and sides of damp hair
- Use a boar bristle brush or fine-tooth comb to smooth hair backward from your hairline
- Work in small sections to ensure every strand lies flat against your scalp
- Brush all hair toward the back, creating a smooth surface without any bumps or flyaways
- Secure with bobby pins if needed, though gel often provides sufficient hold
- Allow the curls at the back and crown to remain loose and voluminous
- Tie a silk scarf around your head for 15-20 minutes to set the slicked sections
- Remove the scarf and spray the smooth sections with firm-hold hairspray
- Apply light oil to the loose curls for shine and definition
- This style works beautifully for formal occasions and professional settings
16. Curly Mohawk Fade Styling
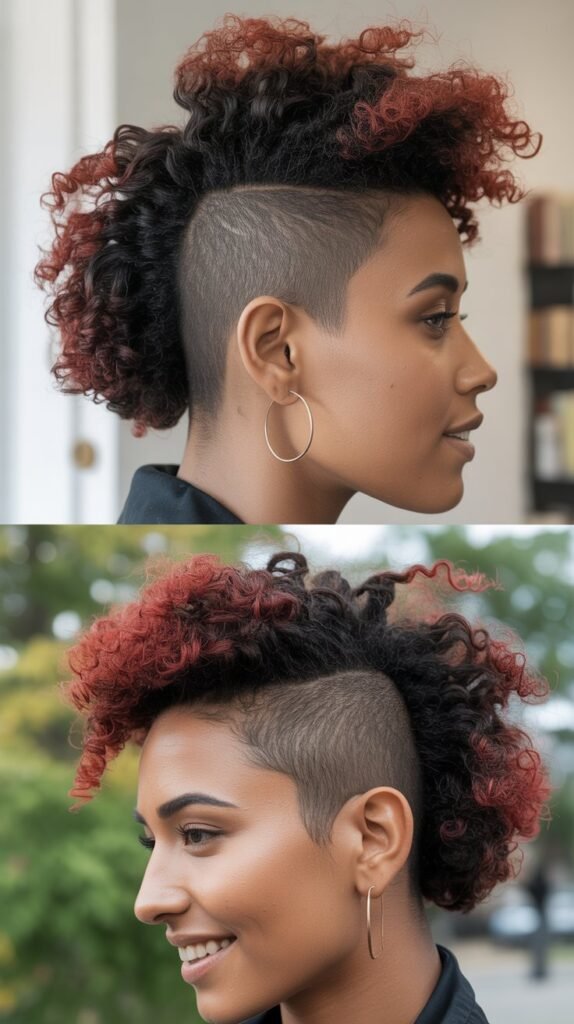
The curly mohawk fade features short or shaved sides with longer curls on top, creating dramatic contrast. Styling the longer section maximizes the impact of this edgy cut.
- This style requires a specific haircut with shorter sides and longer top section
- Apply curl cream or gel to the longer top section while hair is damp
- Use your fingers to lift and separate curls, encouraging them to stand upward
- Consider using a pick or wide-tooth comb to add height at the roots
- Allow curls to air-dry or use a diffuser pointed upward for maximum volume
- The contrast between short sides and voluminous top creates a bold statement
- Maintain the fade with regular barber visits every two to three weeks
- Style the top section daily for best results, though curls can last multiple days
- This cut works exceptionally well for active moms who want minimal daily styling
17. Bandana Brilliance
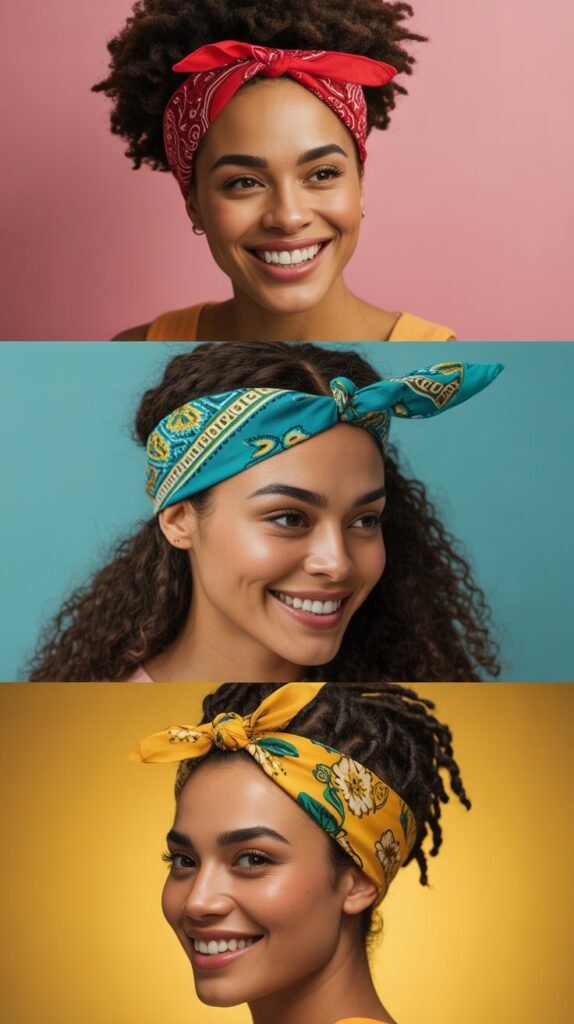
Bandanas offer endless styling possibilities for short curly hair while adding pops of color and pattern. This retro-inspired accessory brings personality to any hairstyle.
- Fold a square bandana into a triangle and then roll it from the point to the long edge
- Position the rolled bandana at your hairline or further back as desired
- Tie the ends at the top of your head in a knot or bow for vintage flair
- Alternatively, tie the bandana at the nape of your neck for a different look
- Choose bandanas in colors that complement your outfit or skin tone
- Cotton bandanas work well for everyday wear while silk versions add elegance
- Use bandanas to hide unwashed roots or protect your hairline from sun exposure
- Layer smaller bandanas with your curls for added texture and visual interest
- This accessory takes seconds to style and completely transforms simple hairstyles
18. Pin Curl Set
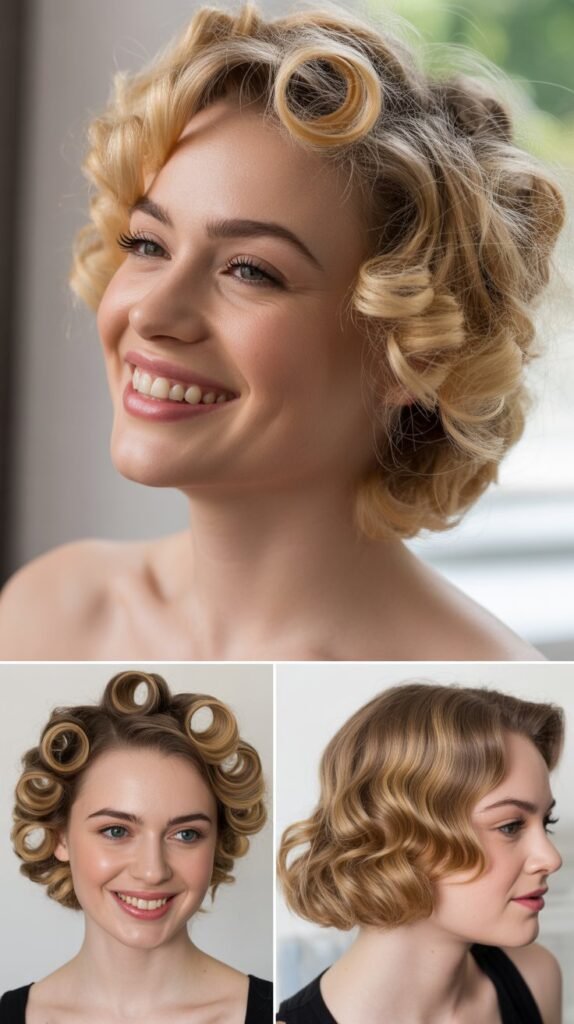
Pin curls create uniform, structured curls that deliver old-Hollywood glamour. This technique works wonderfully for special events when you want controlled, elegant curls.
- Begin with clean, slightly damp hair for easiest manipulation
- Apply setting lotion or mousse throughout your hair for hold
- Take small sections of hair about one inch wide and wrap them around two fingers
- Slide the curl off your fingers and pin it flat against your scalp with a bobby pin
- Continue creating pin curls in organized rows throughout your entire head
- Allow curls to dry completely under a hooded dryer or overnight with a silk scarf
- Remove pins carefully and avoid pulling on the curls as you release them
- Use your fingers or a wide-tooth comb to gently separate and shape the curls
- Finish with hairspray to maintain the sculptured curl pattern throughout your event
- This technique requires advance planning but delivers stunning, long-lasting results
19. Curly Bangs Spotlight

Curly bangs add dimension and frame your face beautifully when styled correctly. Whether you have dedicated bangs or create them by styling your front section differently, they transform your entire look.
- Define your bang section by parting hair from the center of one eyebrow to the other
- Apply extra curl cream or gel to bang section for enhanced definition
- Use a small round brush and blow dryer to direct bangs forward and down
- Twist individual curls around your finger to create uniform ringlets
- Allow bangs to dry slightly separated from the rest of your hair to prevent them from getting lost
- Pull bangs forward and down to ensure they fall properly across your forehead
- Side-swept curly bangs create a softer, more romantic appearance
- Trim curly bangs when dry to avoid cutting them too short
- Style bangs separately from the rest of your hair for best control and definition
20. Accessorized Low Bun
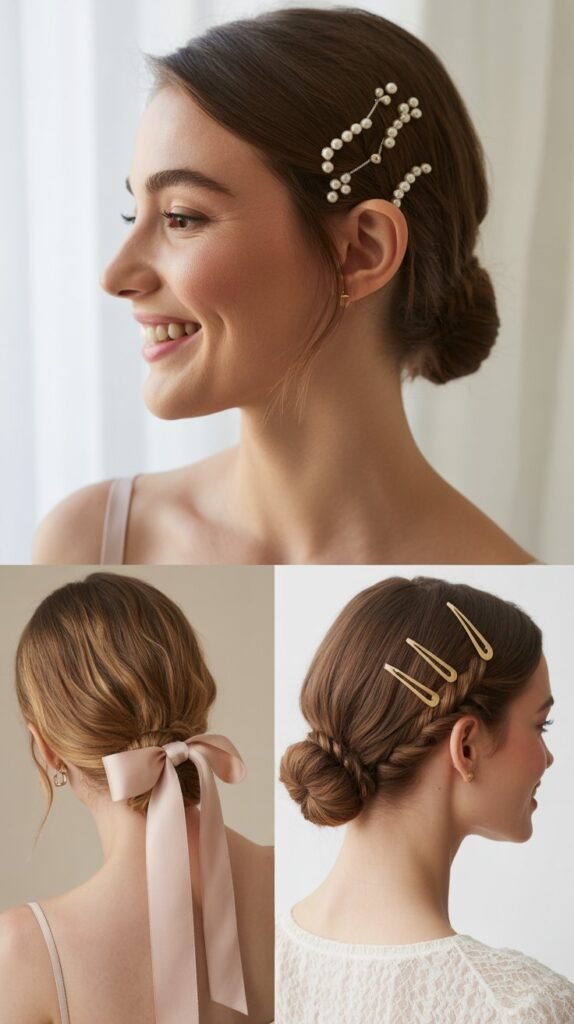
The low bun positions your curls at the nape of your neck, creating an elegant foundation for beautiful accessories. This understated style allows embellishments to shine.
- Gather all your curls at the nape of your neck using a fabric-covered elastic
- Twist the ponytail loosely and wrap it around the base to form a bun shape
- Secure with bobby pins, leaving some curl texture visible rather than smoothing everything down
- Add decorative hair pins with pearls, crystals, or flowers for special occasions
- Insert a decorative comb above or beside the bun for added elegance
- Wrap a thin ribbon around the base of the bun and tie it in a small bow
- Pull out a few face-framing curls to soften the overall appearance
- This style keeps your neck cool while looking polished and put-together
- Works beautifully for weddings, formal dinners, or professional presentations
21. Tapered Cut Styling

The tapered cut features gradually shorter hair from top to bottom and back to front. Styling this cut emphasizes the beautiful shape while celebrating your natural curl pattern.
- This style requires a specific haircut from a stylist experienced with curly hair
- Apply curl cream to damp hair, focusing on the longer top and front sections
- Use your fingers to define curls by twisting small sections
- Allow hair to air-dry or diffuse with a hooded dryer attachment
- Once dry, use a pick to lift curls at the crown for added height
- The gradual taper creates natural shape that requires minimal daily styling
- Maintain the cut every four to six weeks to preserve the shape
- Apply light oil to add shine and smooth any dry ends
- This cut works exceptionally well for moms who want great style with minimal effort
22. Rolled Updo
The rolled updo tucks your curls into an elegant shape that works for formal occasions. This technique keeps curls controlled while maintaining texture and interest.
- Start with stretched or blown-out curls for easier manipulation
- Section your hair horizontally from ear to ear, dividing top and bottom sections
- Roll the bottom section upward toward your crown and secure with bobby pins
- Take the top section and roll it backward, tucking the ends under
- Pin the rolled sections securely, using as many bobby pins as needed for security
- Smooth edges with gel or edge control for a polished finish
- Leave a few curls out strategically to frame your face or soften the style
- This updo works beautifully for formal events, weddings, or professional headshots
- Set the style with firm-hold hairspray to ensure it lasts through your entire event
23. Defined Part Styling

A sharp, defined part adds structure and sophistication to short curly hair. This simple detail transforms a basic style into something polished and intentional.
- Use the end of a rat-tail comb to create a precise part line through damp hair
- Apply gel along the part line to keep it clean and defined as hair dries
- Part placement dramatically changes your look – experiment with different positions
- Center parts create symmetry and work well for balanced facial features
- Deep side parts add volume to one side and create asymmetrical interest
- Zigzag parts add playfulness and visual texture to otherwise simple styles
- Press the part down firmly and allow gel to dry for maximum hold
- Refresh your part daily by applying water or curl refresher along the line
- Well-defined parts make any hairstyle look more polished and intentional
24. Curly Pompadour
The curly pompadour creates dramatic height at the front while keeping sides smoother. This bold style makes a statement and works surprisingly well on short curly hair.
- Apply volumizing mousse to damp hair throughout, especially at the front section
- Use a round brush to blow-dry the front section upward and backward
- Tease the roots at the crown with a fine-tooth comb for extra height
- Smooth the sides backward with gel or pomade to create contrast with the voluminous front
- Pin the pompadour in place if needed, hiding pins under the lifted front section
- Allow the back section to maintain natural curl texture and volume
- Spray the entire style with firm-hold hairspray, focusing on the pompadour
- This dramatic look works beautifully for special occasions or when you want to feel bold
- The height at the front elongates your face and draws attention to your features
25. Messy Curly Bun
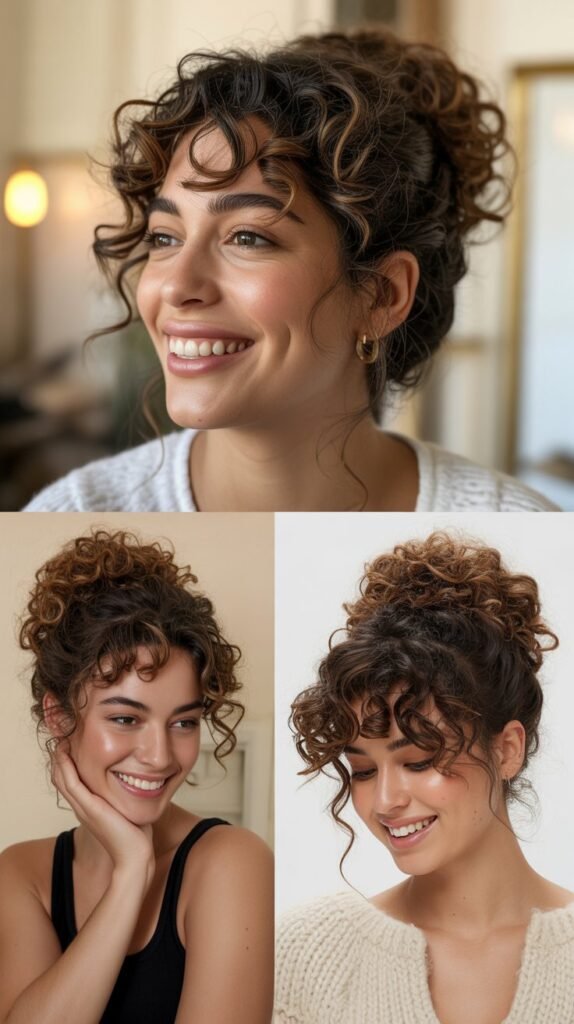
The messy bun embraces imperfection while looking effortlessly chic. This casual style perfect for busy mom days when you need your hair up quickly.
- Gather your curls loosely at any height – high, mid, or low on your head
- Don’t worry about smoothness; embrace the textured, lived-in appearance
- Secure with a scrunchie or fabric-covered elastic in one or two loops
- Pull a few curls loose around your face and nape for a softer effect
- Allow curl ends to stick out from the bun rather than tucking everything in
- Use fingers to gently pull sections of the bun to create intentional messiness
- This style takes literally 30 seconds and looks adorable every time
- Perfect for workouts, errands, cleaning days, or casual weekend activities
- The imperfection is the point – don’t overthink or overstyle this one
26. Claw Clip Creativity

Claw clips provide instant style with zero effort for short curly hair. These functional accessories hold your curls while creating various looks depending on placement and clip size.
- Choose claw clips appropriately sized for your hair density and length
- Small clips work well for half-up styles on shorter hair
- Medium to large clips can gather all your curls for full updos
- Position clips horizontally for classic looks or vertically for different effects
- Gather hair loosely and clip it in place without pulling too tightly
- Twist hair before clipping for added texture and visual interest
- Layer multiple small clips throughout for an artistic, editorial appearance
- Opt for clear clips for subtle styling or decorative clips to make a statement
- This styling method requires no bobby pins and takes mere seconds
27. Curly Fringed Bob Styling
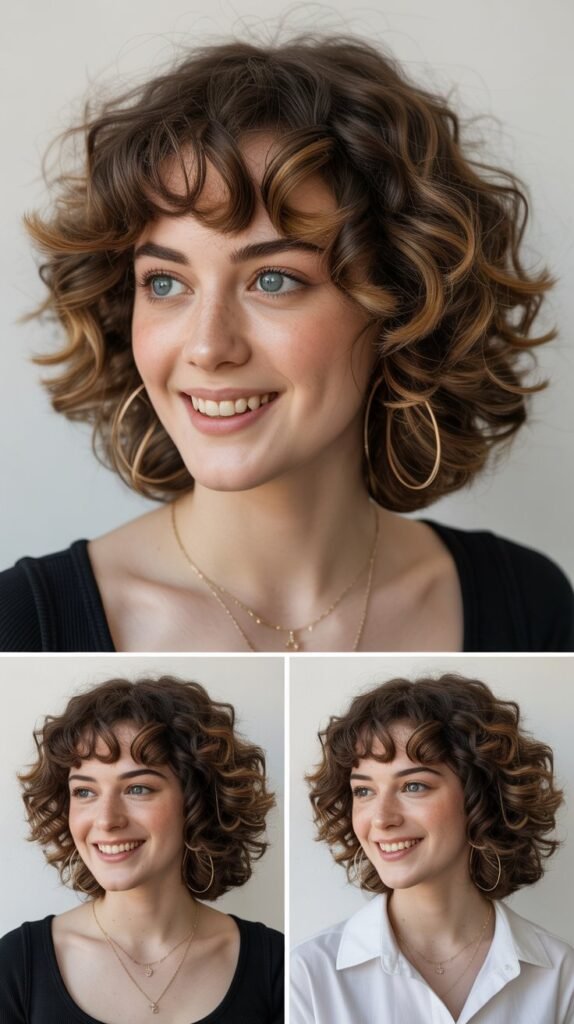
The curly fringed bob features blunt edges and full bangs that create a bold, geometric shape. Styling emphasizes the cut’s structure while celebrating natural curl.
- This style requires a specific blunt cut that works with your curl pattern
- Apply curl cream throughout damp hair, ensuring even distribution
- Define curls by shingling – smoothing product down each curl section individually
- Pay extra attention to bang section, defining each ringlet separately
- Allow hair to air-dry or diffuse carefully to avoid disrupting the curl pattern
- Once dry, shake your head to allow curls to fall into the bob shape
- Use scissors to spot-trim any curls that fall longer than the intended blunt line
- The strong shape requires regular trims every six weeks to maintain
- This statement style works for moms who love bold, fashion-forward looks
28. Victory Roll Curls

Victory rolls bring vintage glamour to short curly hair with dramatic rolled sections at the front. This 1940s-inspired style creates impressive height and retro charm.
- Section the front portion of your hair from your part line to above each temple
- Apply setting lotion or strong-hold mousse to these front sections
- Take one front section and roll it backward toward your crown, creating a tube shape
- Pin the roll securely at the base with multiple bobby pins
- Repeat on the opposite side, creating symmetrical or asymmetrical rolls based on preference
- Leave the remaining curls loose and defined for contrast with the structured rolls
- Spray the victory rolls with firm-hold hairspray to maintain shape all day
- This dramatic style requires practice but delivers stunning results for special occasions
- Watch tutorial videos to master the rolling and pinning technique
29. Halo Braid with Curls

The halo braid creates a crown-like effect around your head while leaving curls loose at the top or bottom. This ethereal style combines structure with natural texture beautifully.
- Create a horizontal part from ear to ear across the back of your head
- Divide the bottom section into two parts, one on each side
- Begin a three-strand braid at one ear, working around the back of your head
- Add small sections of hair to the braid as you move across, similar to a Dutch braid
- Continue braiding until you reach the opposite ear
- Secure the braid end and pin it under the beginning section to create a continuous circle
- Allow the top section of curls to remain loose and voluminous
- Pull gently on the braid sections to create fuller, more romantic loops
- This style works beautifully for special occasions and typically lasts all day with proper pinning
30. Blow-Out Definition
A proper blow-out on curly hair creates stretch and definition without eliminating your natural texture. This technique delivers smooth, elongated curls with beautiful movement.
- Start with freshly washed hair that’s been detangled thoroughly with conditioner
- Apply a heat protectant throughout your hair before any heat styling
- Section hair into manageable parts using clips
- Use a concentrator nozzle attachment on your blow dryer for targeted airflow
- Take small sections and use tension method – holding hair taut while directing heat down the shaft
- Follow up with a diffuser attachment to enhance curl definition while maintaining stretch
- Finish each section with the cool shot button to set the style
- Apply light oil or serum to add shine and reduce any heat-induced frizz
- This method takes 20-30 minutes but delivers salon-quality results at home
31. Sculptured Finger Waves
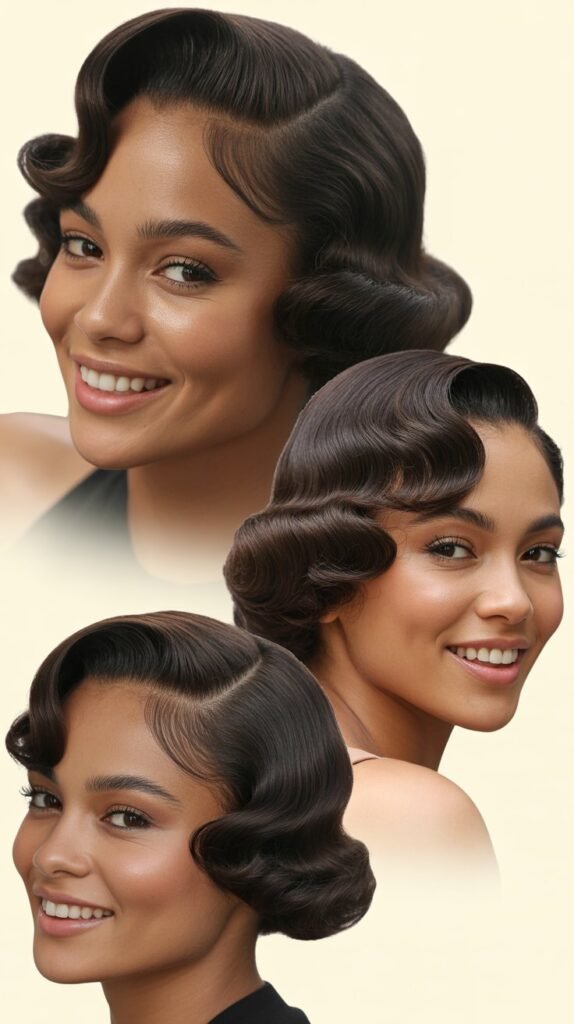
Sculptured finger waves create deep, dramatic S-curves that look artistic and intentional. This advanced technique delivers red-carpet-worthy results for special occasions.
- Work with freshly washed, towel-dried hair as your canvas
- Apply a heavy-duty gel throughout hair, ensuring complete saturation
- Create a deep side part with the end of a rat-tail comb
- Use fingers to hold hair in place while combing in the opposite direction to form waves
- Each wave should be about one inch wide for dramatic effect
- Secure waves with wave clips or duckbill clips as you form them
- Allow hair to dry completely under a hood dryer for several hours
- Remove clips carefully without disturbing the wave pattern
- Avoid touching waves excessively; they should remain sculptured and structured
- This technique requires patience and practice but creates show-stopping results
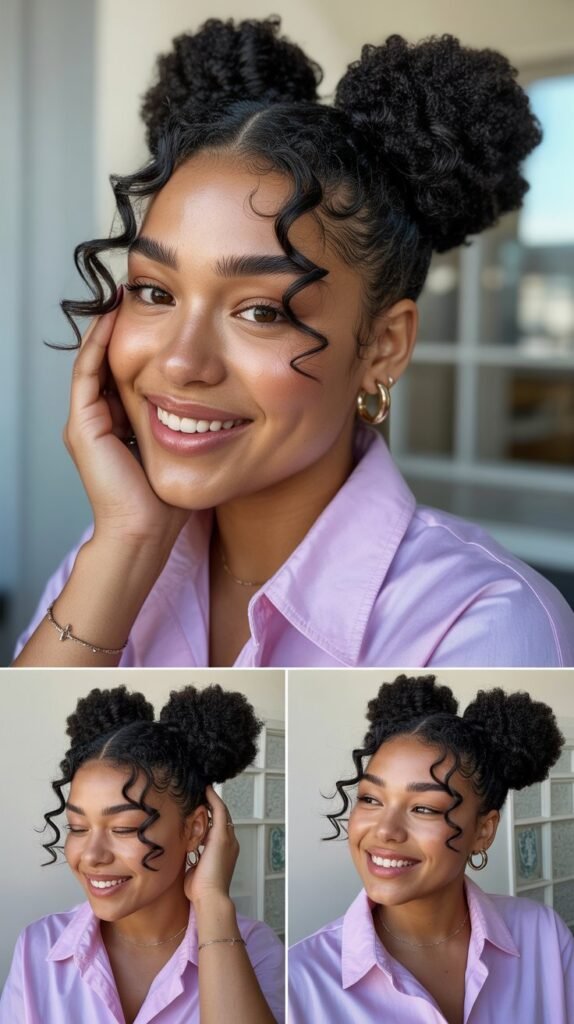
32. Space Buns for Short Curls
Space buns bring playful, youthful energy to short curly hair. These double