When the world fell in love with Bridgerton, it wasn’t just the scandal and romance that captivated audiences—it was the breathtaking hairstyles that transported us to the Regency era.
Those elaborate curls, delicate braids, and ornate accessories created a visual feast that left modern women dreaming of channeling their inner Daphne or Penelope.
Whether you’re preparing for a wedding, a formal event, or simply want to add a touch of romantic elegance to your everyday look, 36 Romantic Curly Bridgerton Hairstyles for Any Occasion brings you the ultimate guide to recreating these timeless styles.
From soft ringlets framing your face to intricate updos adorned with pearls and flowers, these hairstyles prove that curly hair and Regency-inspired elegance are a match made in heaven.
This comprehensive guide walks you through dozens of stunning options suitable for every hair length, texture, and skill level, ensuring you’ll find the perfect style to make you feel like royalty at your next special occasion—or any day you choose to embrace your most romantic self.
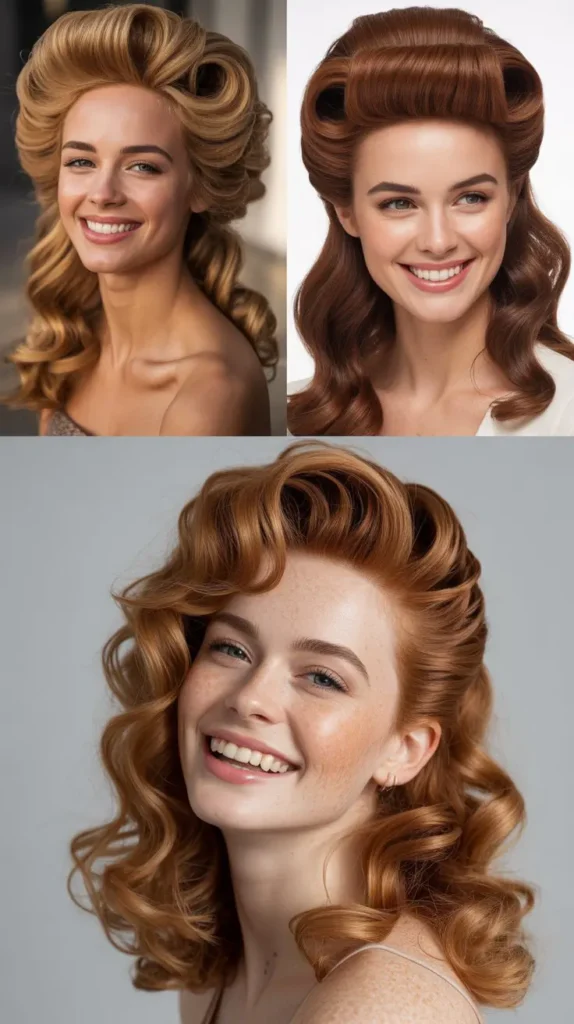
1. Classic Ringlet Curls with Face-Framing Tendrils
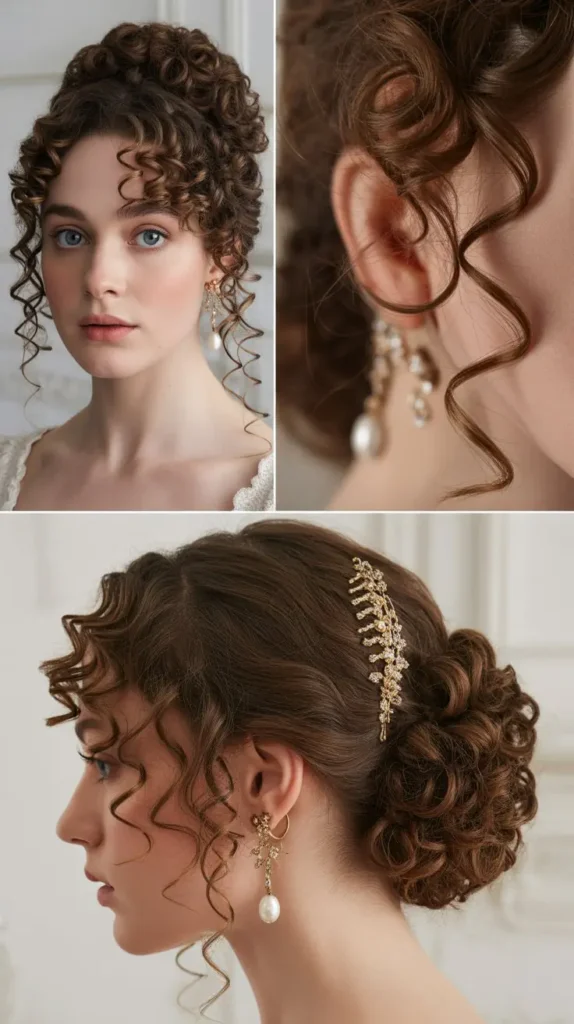
The quintessential Bridgerton look begins with perfectly formed ringlets that cascade gracefully around the face and shoulders.
This style captures the essence of Regency romance while remaining surprisingly wearable for modern occasions.
- Start with freshly washed, conditioned curly hair that’s been treated with a curl-defining cream to enhance natural texture.
- Section the hair into small portions, approximately one inch wide, to create uniform ringlets throughout.
- Use a small-barrel curling iron (3/4 inch to 1 inch) on medium heat to wrap each section, holding for 8-10 seconds.
- Allow curls to cool completely before gently separating them with your fingers for a softer, more romantic appearance.
- Pull out thin tendrils from around the hairline and temples, leaving them slightly looser than the rest for that signature face-framing effect.
- Set the style with a flexible-hold hairspray to maintain bounce and movement throughout the day.
- Add a delicate headband or thin ribbon woven through the crown for an authentic Bridgerton touch.
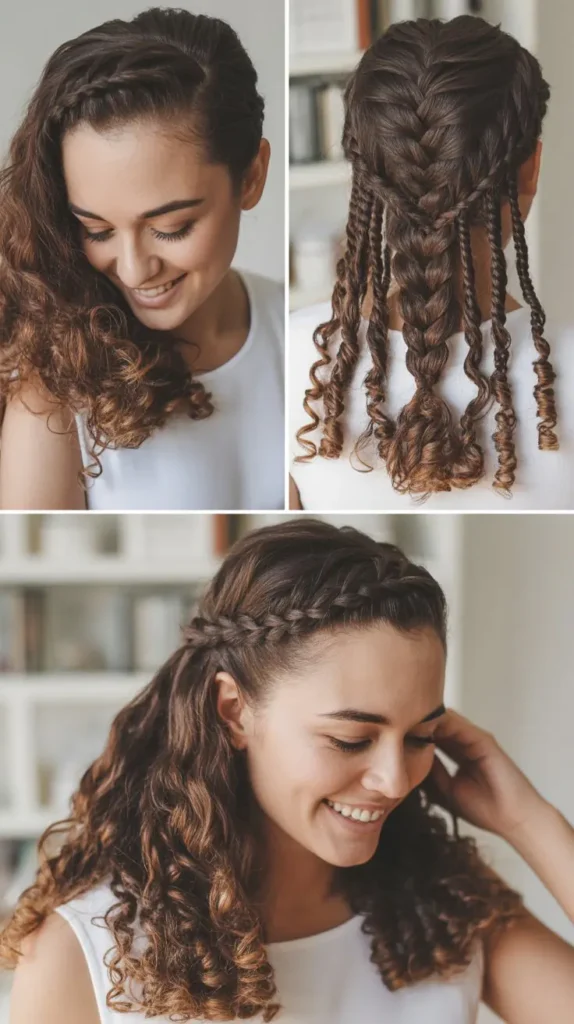
2. Half-Up Twisted Crown with Cascading Curls

This elegant half-up style combines the sophistication of an updo with the romantic appeal of flowing curls, making it perfect for garden parties or afternoon tea.
- Begin by creating a deep side part to add asymmetry and visual interest to the overall style.
- Take a two-inch section from the front of the hairline on the heavier side of the part.
- Twist this section backwards toward the crown, keeping the twist loose and romantic rather than tight.
- Secure the twist at the crown with bobby pins that match your hair color for seamless blending.
- Repeat the twisting process on the opposite side, bringing it to meet the first twist at the center.
- Allow the remaining curls to cascade freely down the back and over the shoulders.
- Gently tease the crown area for added volume that’s characteristic of the Regency silhouette.
- Finish by tucking small flowers or decorative pins along the twisted sections for authentic period detail.
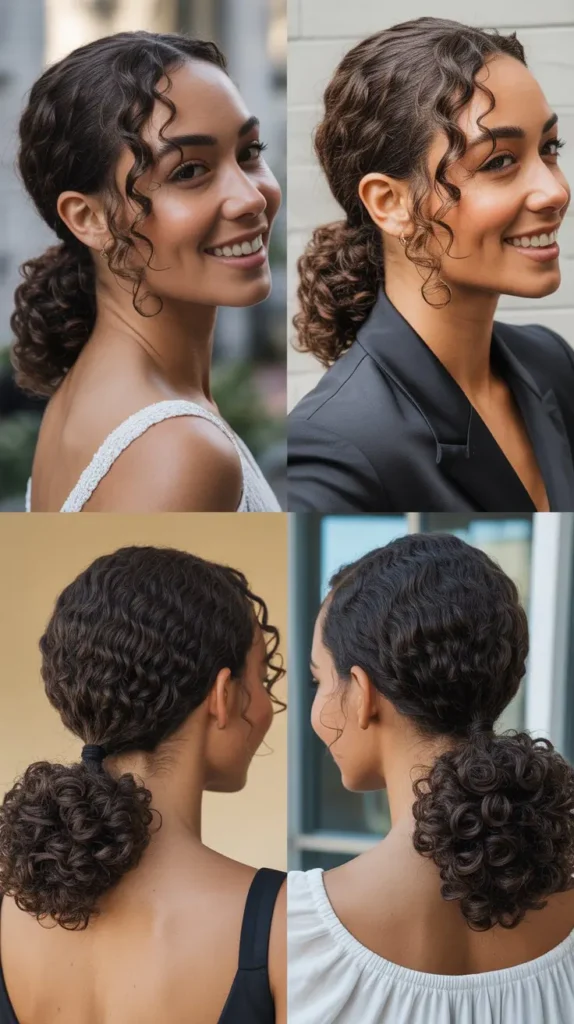
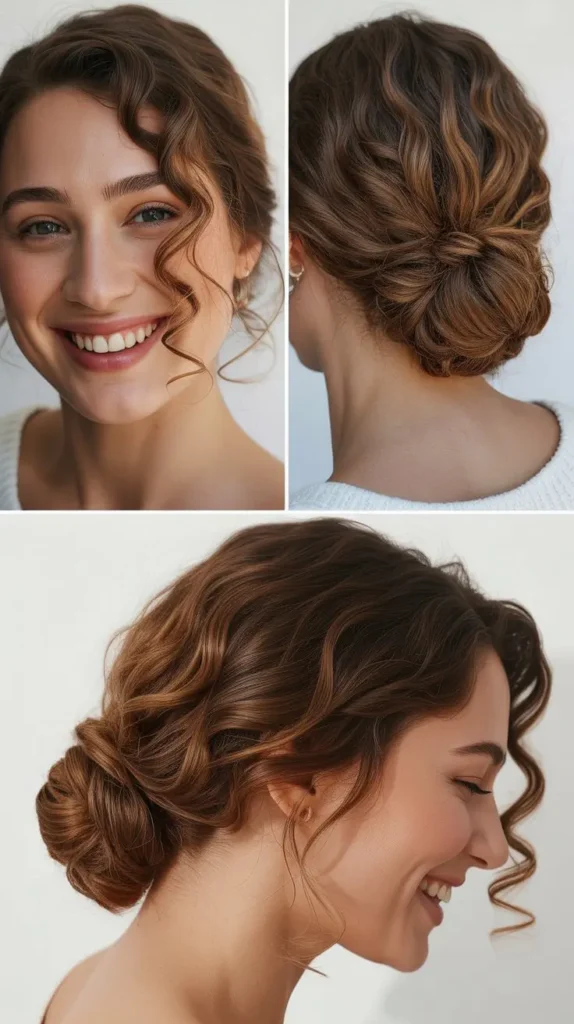
3. Low Chignon with Curly Tendrils
The low chignon represents understated elegance with strategic curly tendrils that soften the overall look and add romantic dimension.
- Gather all hair at the nape of the neck, leaving out face-framing sections on both sides.
- Create a loose ponytail and twist it gently to form a soft, rounded bun shape.
- Secure the chignon with U-shaped pins, distributing them evenly around the base for stability.
- Pull out small sections of curls around the hairline, temples, and nape to create intentional, romantic tendrils.
- Use a small curling iron to enhance these tendrils if needed, ensuring they have defined spiral shape.
- Spray individual tendrils with hairspray while scrunching to maintain their curly texture.
- Pin a decorative comb or cluster of pearls at the base of the chignon for added Regency glamour.
- Gently pull and loosen the chignon slightly to create a softer, more lived-in appearance.
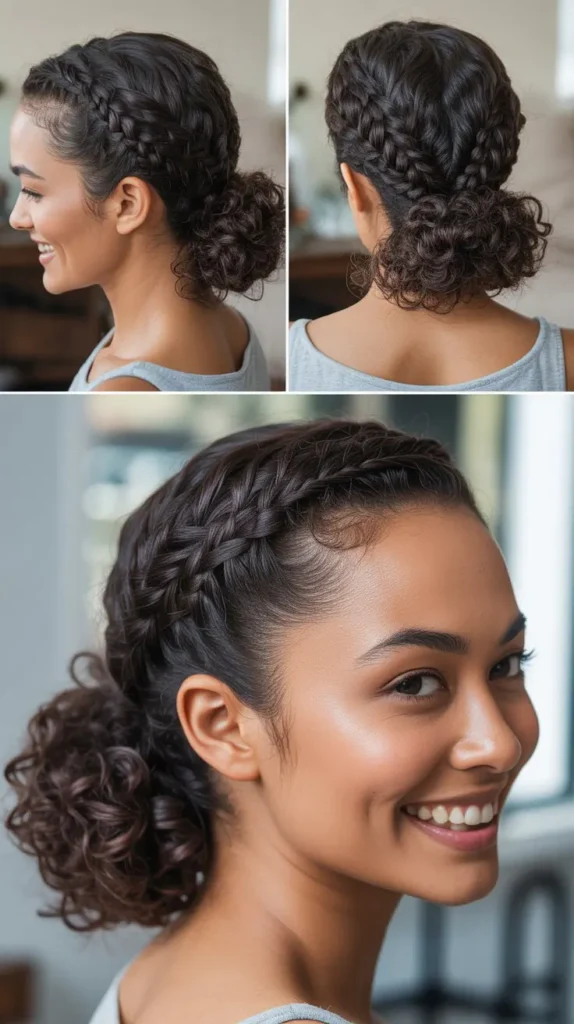
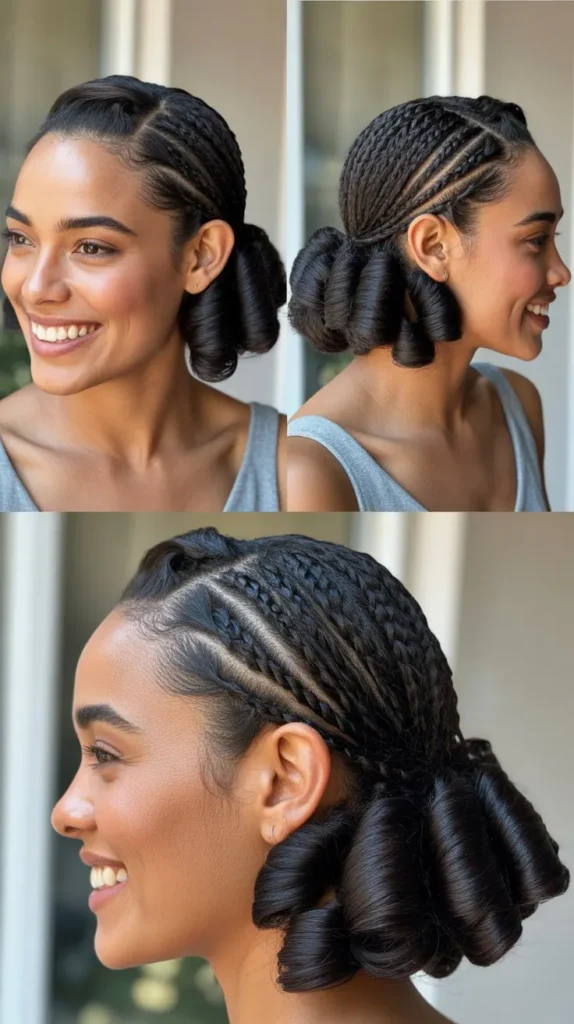
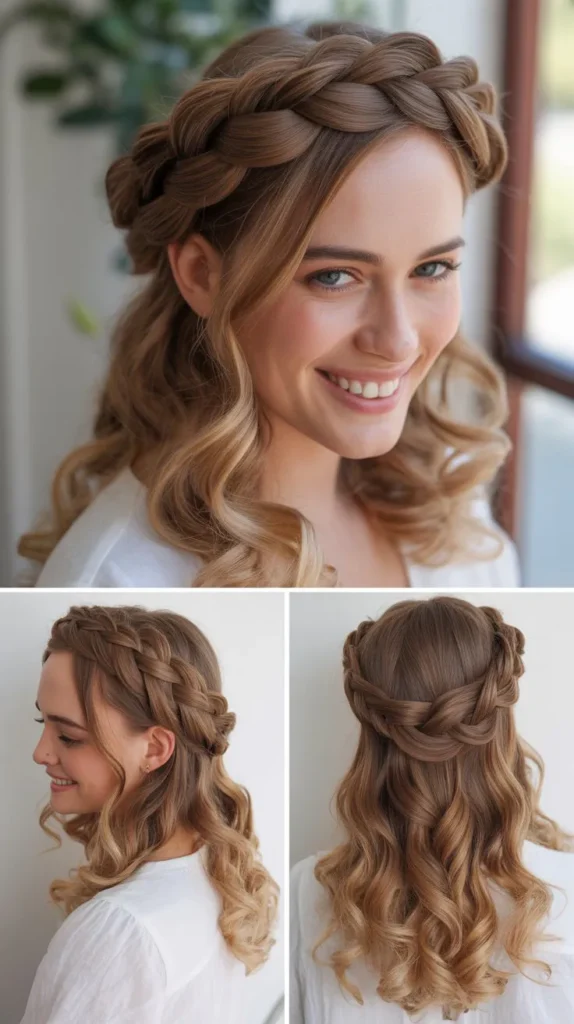
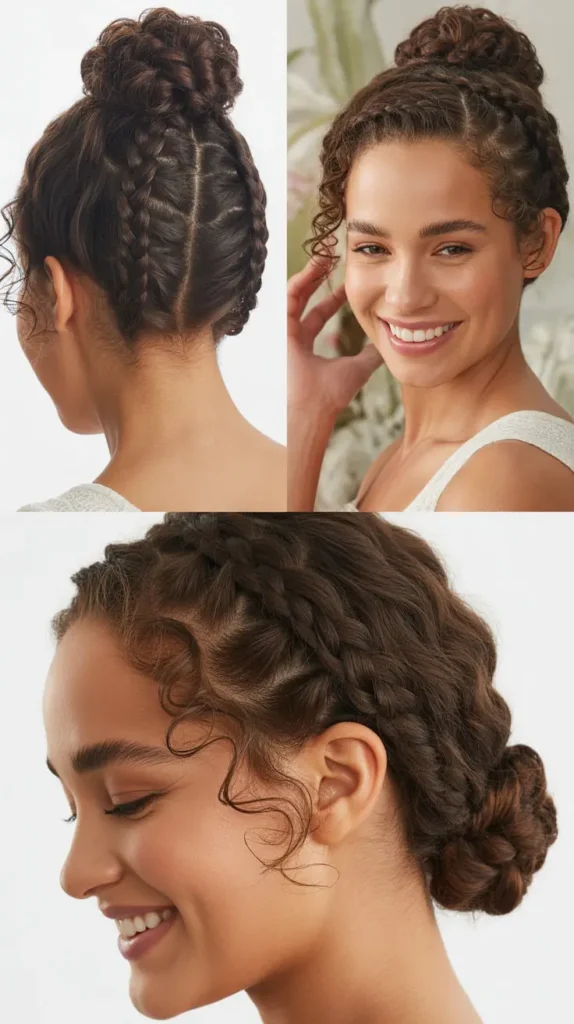
4. Braided Crown with Voluminous Curls

This regal style features a braided crown that circles the head while voluminous curls provide dramatic impact and romantic movement.
- Part hair horizontally from ear to ear, separating the top section from the bottom.
- Clip away the bottom section temporarily to keep it out of the way during braiding.
- Create a Dutch braid along the front hairline, starting from one side and working across to the other.
- Incorporate small sections of hair as you braid to create the crown effect that sits like a headband.
- When the braid reaches the opposite side, secure it with a small elastic and tuck the end underneath.
- Release the bottom section and use a diffuser or curling method to maximize volume and curl definition.
- Gently backcomb the roots of the loose curls to create the voluminous silhouette characteristic of the era.
- Weave small flowers, pearls, or ribbons through the braided crown for authentic Bridgerton styling.
5. Side-Swept Curls with Jeweled Accessories
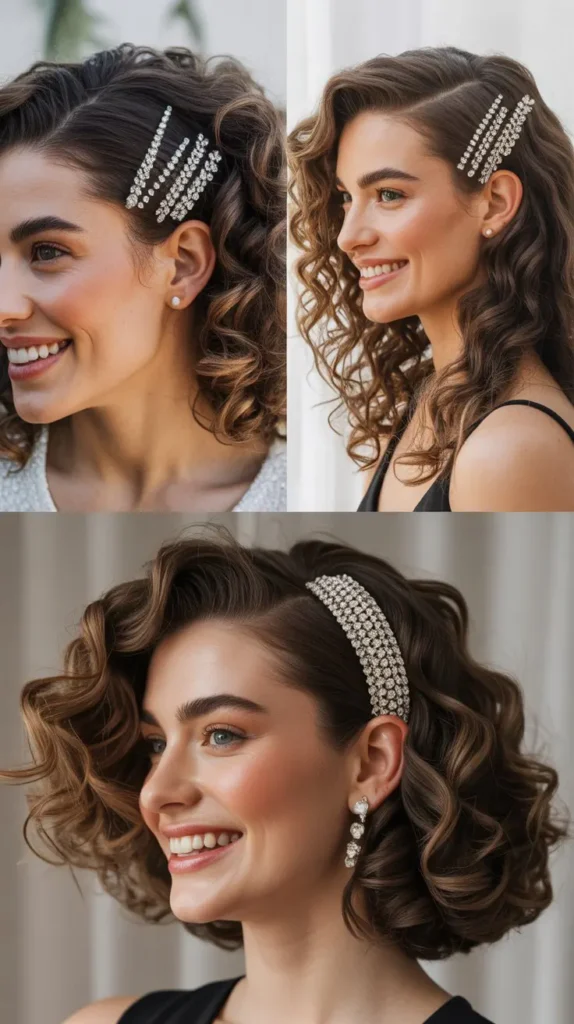
Dramatic side-swept curls adorned with jeweled accessories create an asymmetrical style that’s both modern and timelessly romantic.
- Create a deep side part, positioning it approximately two inches from the center for maximum drama.
- Gather all hair to one side, sweeping it over the shoulder opposite to the part.
- Use bobby pins in an X-formation along the back of the head to secure the swept hair in place.
- Define individual curls with a curl-enhancing cream and finger-coiling technique for uniform spiral shape.
- Layer jeweled clips, combs, or pins along the side with the deeper part to secure and embellish simultaneously.
- Allow some curls to fall forward over the shoulder while pinning others back for dimensional interest.
- Spray the pinned side with medium-hold hairspray to prevent slipping throughout the event.
- Balance the look by ensuring the swept side showcases your most defined, bouncy curls.
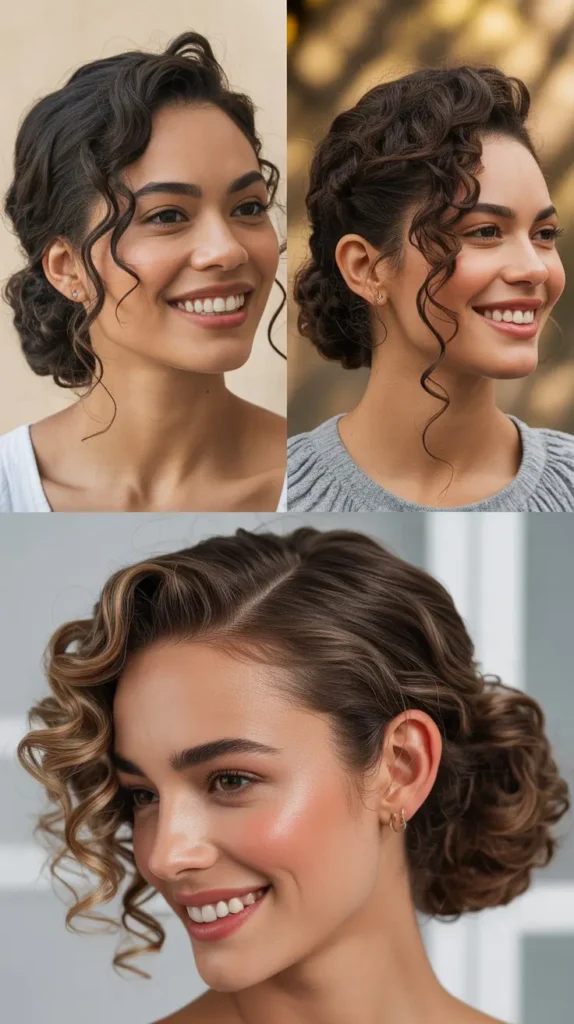
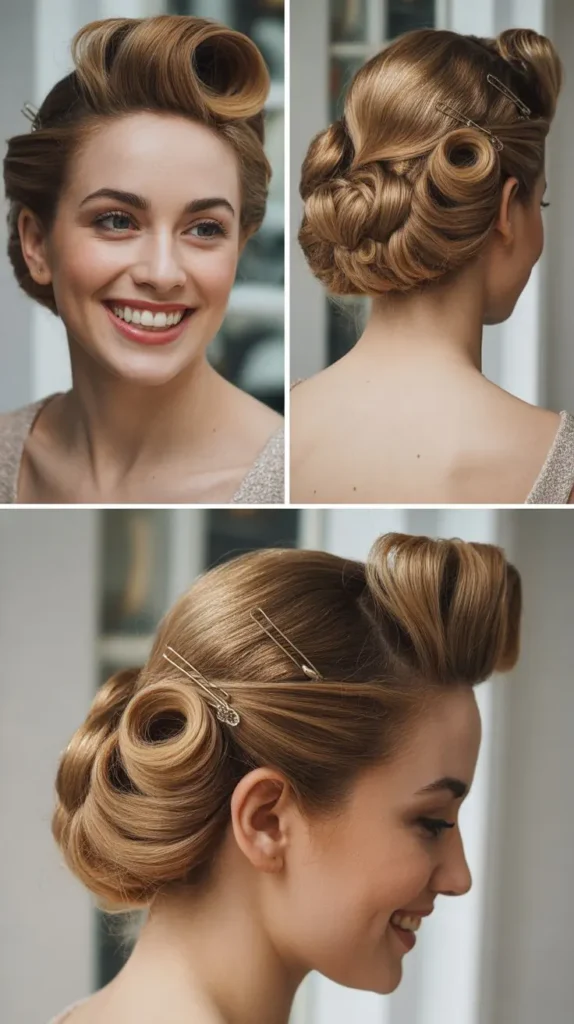
6. Gibson Tuck with Spiral Curls
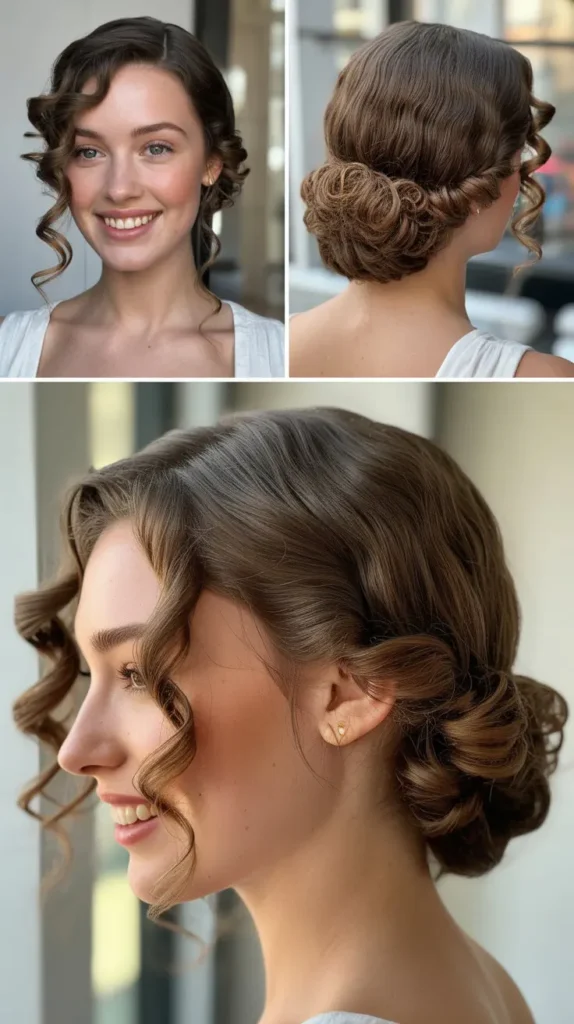
The Gibson tuck offers vintage sophistication with spiral curls that peek out strategically, creating texture and romantic appeal.
- Begin with second-day curls or freshly curled hair that has cooled and been gently separated.
- Create a low ponytail at the nape of the neck, securing it with a fabric-covered elastic.
- Roll the ponytail upward and inward, creating a horizontal roll that tucks against the back of the head.
- Pin the tucked section securely with bobby pins, creating a smooth surface on the roll.
- Pull out strategic curls from the sides and top to frame the face and soften the structured tuck.
- Use your fingers to gently stretch and arrange these escaped curls for natural, effortless placement.
- Add a decorative comb or vintage brooch at the base of the tuck for period-appropriate embellishment.
- Mist the entire style with flexible-hold hairspray to maintain the tuck while allowing curls to move naturally.
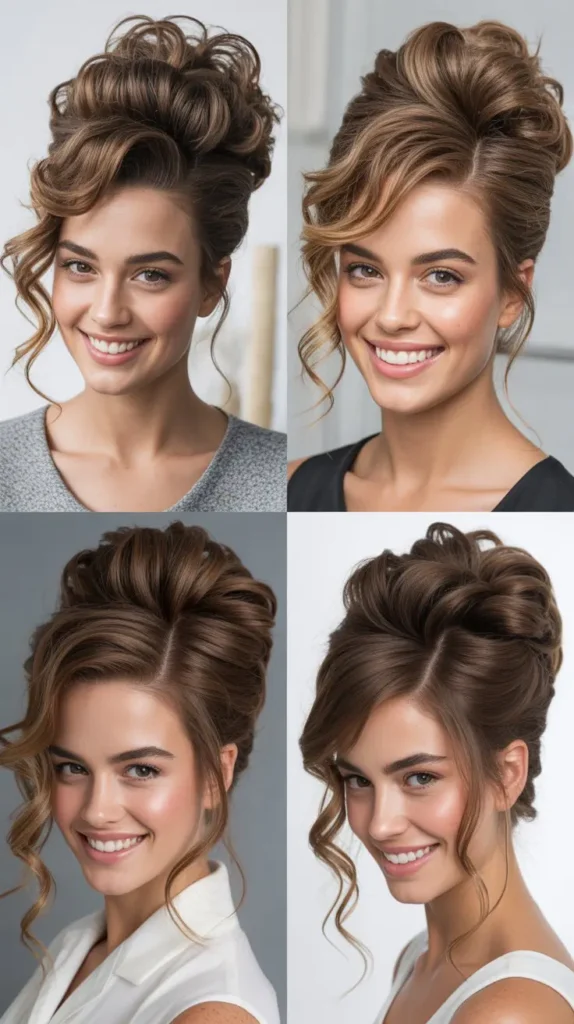
7. High Bun with Cascading Curl Accents
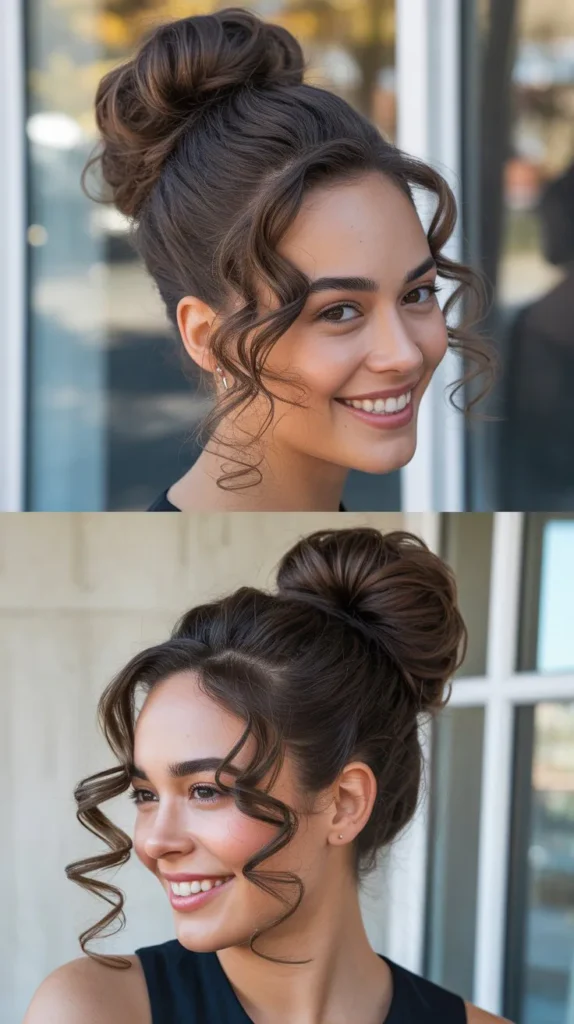
An elevated bun positioned at the crown creates height and drama while cascading curl accents provide softness and romantic movement.
- Flip your head upside down and gather all hair at the crown, creating a high ponytail.
- Twist the ponytail and wrap it around its base to form a rounded, voluminous bun.
- Secure the bun with multiple bobby pins, ensuring it feels stable for all-day wear.
- Before completing the bun, leave out several small sections to create intentional curl accents.
- Allow these sections to cascade down, framing the face and softening the severity of the high bun.
- Use a small curling iron to perfect the shape of these accent curls if they’ve lost definition.
- Tease the base of the bun slightly to create additional volume and that characteristic Regency height.
- Wrap a velvet ribbon around the base of the bun or add decorative pins for authentic styling.
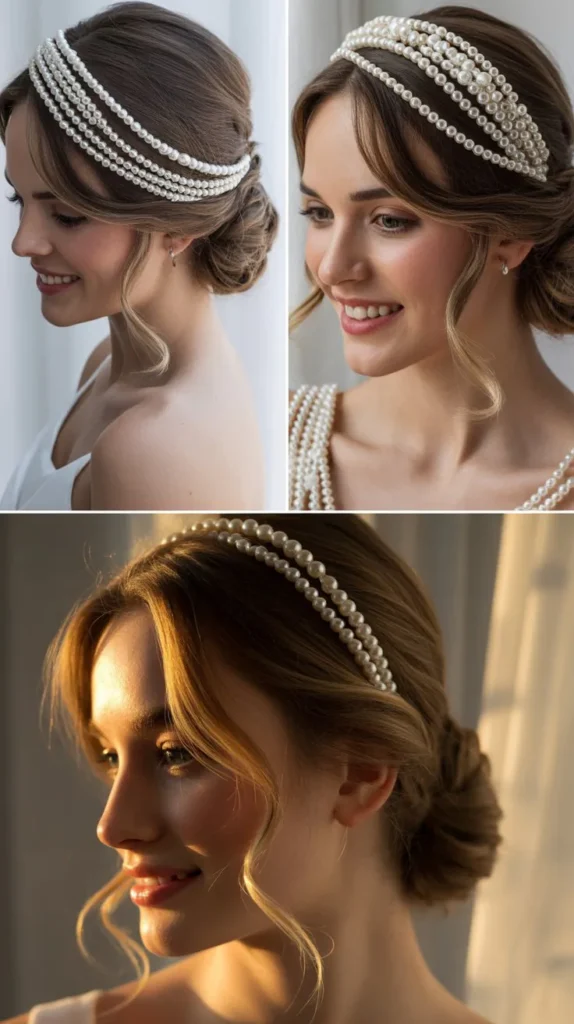
8. Loose Romantic Waves with Pearl Pins
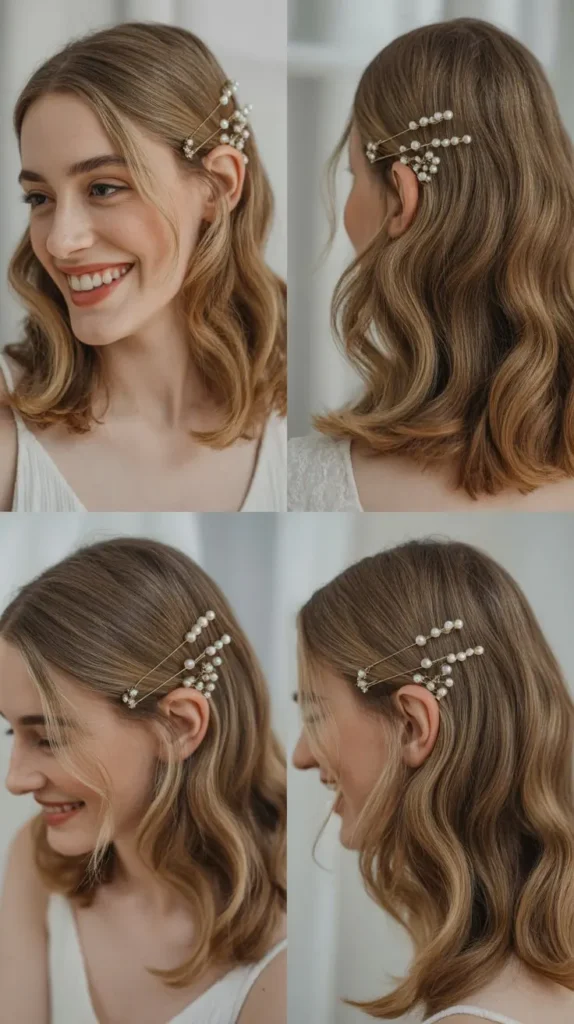
Soft, loose waves create an effortlessly romantic look that’s enhanced by the strategic placement of pearl pins throughout.
- Apply a wave-enhancing mousse to damp hair and allow it to air dry or use a diffuser on low heat.
- Once completely dry, use a large-barrel curling iron (1.5 to 2 inches) to create loose, flowing waves.
- Wrap each section around the barrel in alternating directions to create natural-looking, non-uniform waves.
- Run your fingers through the waves to break them up and create soft, blended texture.
- Take individual pearl pins and scatter them throughout the hair, focusing on one side for asymmetrical interest.
- Pin some pearls at the temples, others near the crown, and a few along the sides for balanced distribution.
- Gently tousle the roots to create volume that prevents the style from looking too flat or modern.
- Finish with a light-hold hairspray that maintains movement while keeping waves intact.
9. Twisted Updo with Floral Crown
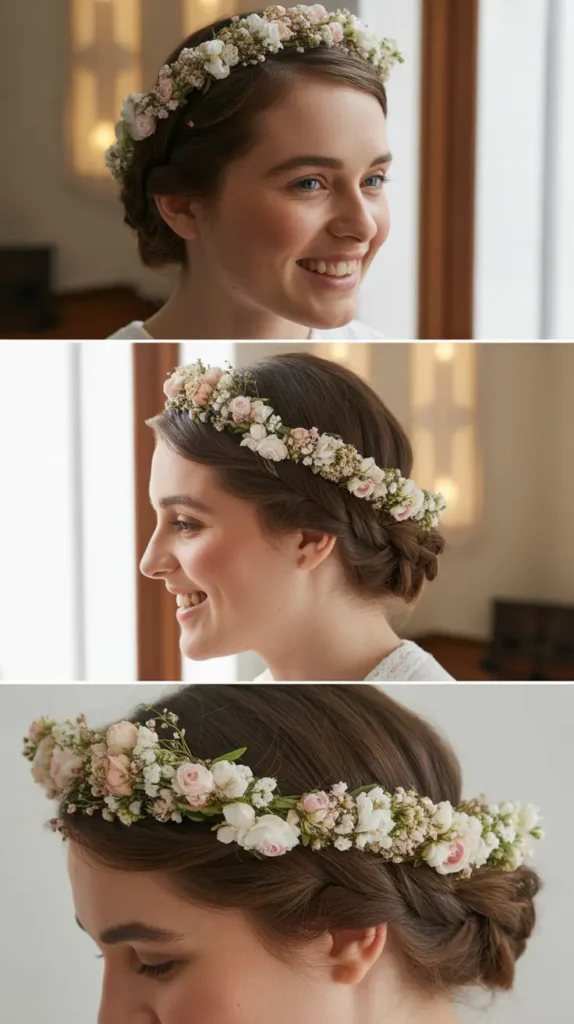
This ethereal style combines twisted sections that create an intricate updo base, crowned with fresh or silk flowers for garden party perfection.
- Section hair into four quadrants: two in front and two in back, securing each with clips.
- Begin with one back section, twisting it loosely and pinning it diagonally across the back of the head.
- Take the opposite back section, twist it similarly, and pin it to overlap the first twist.
- Repeat this process with the front sections, twisting them back and incorporating them into the updo.
- Tuck all ends underneath the twisted sections, creating a seamless, polished appearance.
- Create a floral crown by wiring together small flowers on a flexible base that matches your hair color.
- Position the floral crown around the crown of the head, securing it with bobby pins at multiple points.
- Pull out a few soft tendrils around the face to prevent the look from appearing too severe.
10. Regency-Era Side Bun with Ringlets
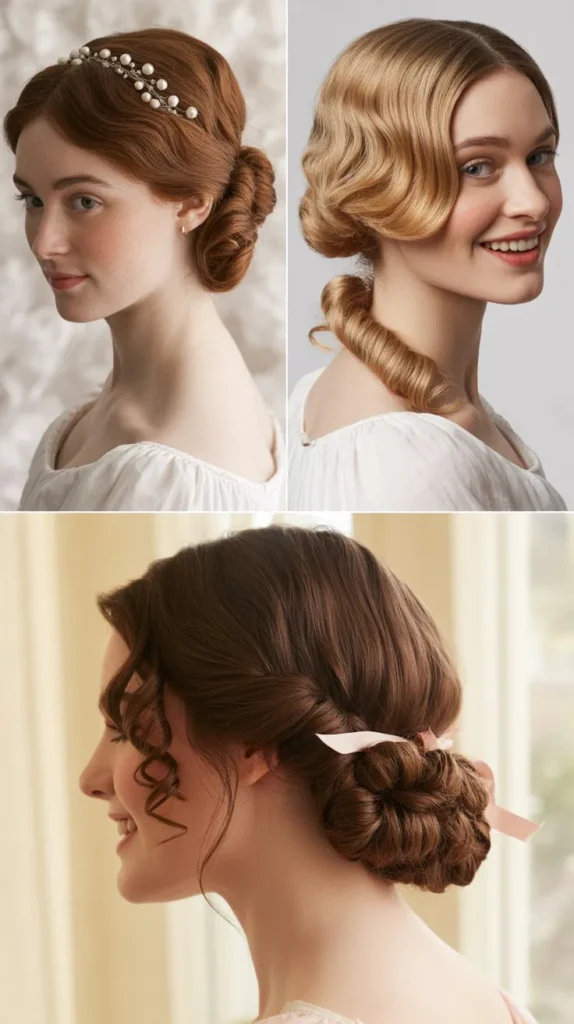
A side-positioned bun creates asymmetry and interest while coordinating ringlets add period-authentic texture and dimension.
- Create a deep side part and gather all hair to one side at ear level.
- Form a ponytail at this side position, leaving out several front sections for face-framing ringlets.
- Divide the ponytail into smaller sections and curl each one tightly with a small-barrel curling iron.
- Pin these curled sections in a clustered arrangement to create a rounded side bun.
- Take the left-out front sections and curl them into tight ringlets that frame the face.
- Arrange these ringlets to cascade artfully, some falling forward and others pinned back slightly.
- Add decorative elements like a jeweled comb or vintage brooch to the side bun for embellishment.
- Ensure the bun has visible texture by not smoothing it too much, allowing individual curls to be distinguished.
11. Waterfall Braid with Bouncing Curls
The waterfall braid technique allows curls to cascade through the braid, creating a stunning waterfall effect that’s both intricate and romantic.
- Start at the temple on one side and divide a small section into three strands for braiding.
- Begin a standard braid, but after the first cross-over, drop the bottom strand and pick up a new section from above.
- Continue this pattern across the head, allowing dropped sections to fall freely as curls through the braid.
- The dropped sections create the “waterfall” effect as they cascade down with the rest of the curls.
- Secure the braid behind the opposite ear with a small elastic or decorative pin.
- Enhance the fallen curls with a curling iron if needed to ensure consistent curl definition throughout.
- Gently pull on the edges of the braid to make it wider and more visible against the curly texture.
- Add small pearl pins along the braid path for extra Bridgerton-inspired embellishment.
12. Pompadour Style with Curly Back
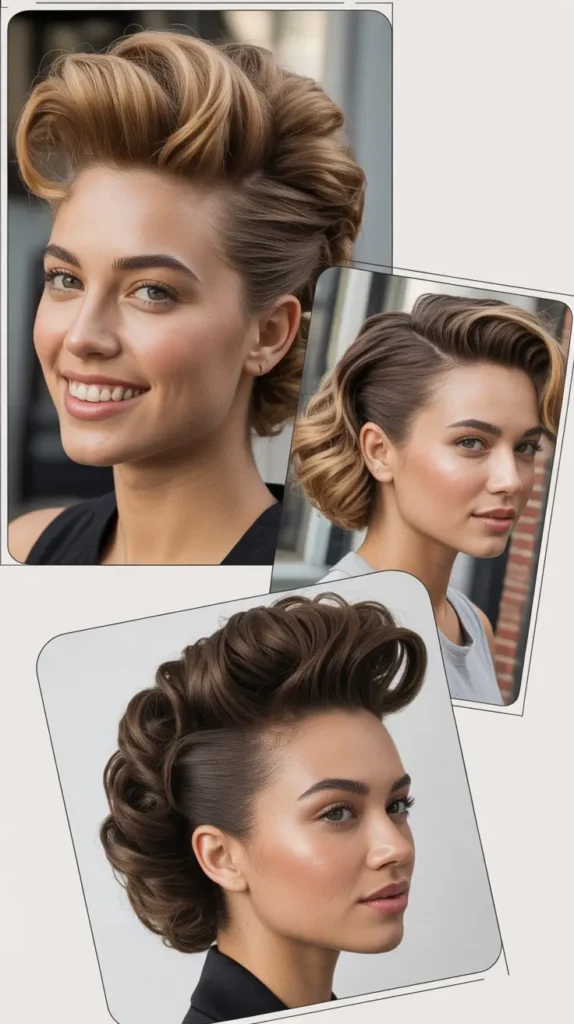
Dramatic height at the front creates the classic Regency pompadour silhouette while curls in the back maintain romantic softness.
- Section off the front portion of hair from temple to temple, approximately 3-4 inches back from the hairline.
- Backcomb this section vigorously at the roots to create substantial volume and height.
- Smooth the top layer of the teased section with a brush while maintaining the volume underneath.
- Roll this section back and pin it at the crown, creating the characteristic pompadour height.
- Style the remaining hair in the back into defined curls using your preferred curling method.
- Allow these back curls to hang freely or gather them loosely to one side for variation.
- Use a strong-hold hairspray on the pompadour section to maintain height throughout the day.
- Insert decorative pins or a small tiara at the base of the pompadour for authentic period styling.
13. Fishtail Braid Updo with Curly Texture
The fishtail braid adds intricate detail to an updo while preserving curly texture throughout the braid for dimensional interest.
- Begin with enhanced curls that have been defined but not brushed to maintain individual curl structure.
- Gather hair into a low side ponytail at the nape of the neck or slightly off-center.
- Divide the ponytail into two equal sections to begin the fishtail braid.
- Take a small piece from the outer edge of the left section and cross it over to the right section.
- Repeat on the opposite side, taking from the outer right edge and crossing to the left section.
- Continue this pattern down the length of the ponytail, keeping the braid loose to showcase curl texture.
- Wrap the completed fishtail braid into a low bun or coil it into an updo shape.
- Secure with pins and gently pull on the braid edges to create width and showcase the intricate pattern.
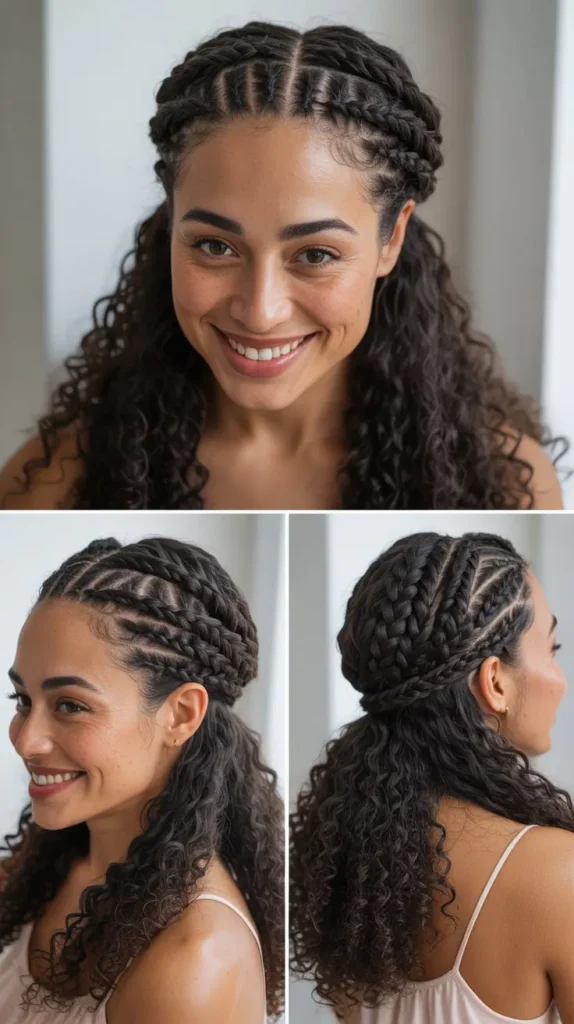
14. Crown Braid Halo with Loose Curls
A braid that encircles the head like a halo creates a romantic crown effect while loose curls beneath provide volume and movement.
- Create a circular part around the crown of the head, separating the top hair from the bottom.
- Clip away the bottom section to work with the crown section independently.
- Begin a Dutch braid at one side near the temple, braiding along the circular part line.
- Continue braiding around the entire head, following the crown line like a halo or headband.
- When the braid completes the circle, tuck the end under the beginning and secure with pins.
- Release the bottom section and enhance the curls with a diffuser or curling iron for maximum volume.
- The contrast between the structured braid halo and loose curls creates beautiful dimensional interest.
- Add small flowers or pearls woven through the braid for enhanced Bridgerton authenticity.
15. Asymmetrical Updo with Pin Curls
Strategic pin curls incorporated into an asymmetrical updo create vintage charm with distinctly defined curl placement.
- Section hair asymmetrically, creating more volume and mass on one side than the other.
- On the fuller side, create several pin curls by wrapping small sections around two fingers.
- Pin each curl flat against the head in a decorative pattern, creating visible curl formations.
- Gather the remaining hair on the opposite side and twist it into a low chignon or bun.
- Leave the pin curls in place as decorative elements rather than brushing them out.
- This creates a beautiful contrast between the structured curl formations and the softer updo section.
- Secure all elements firmly with bobby pins, ensuring the asymmetrical balance remains stable.
- Add vintage-inspired accessories like jeweled pins or small combs on the pin curl side.
16. Voluminous Half-Up with Ribbon Details
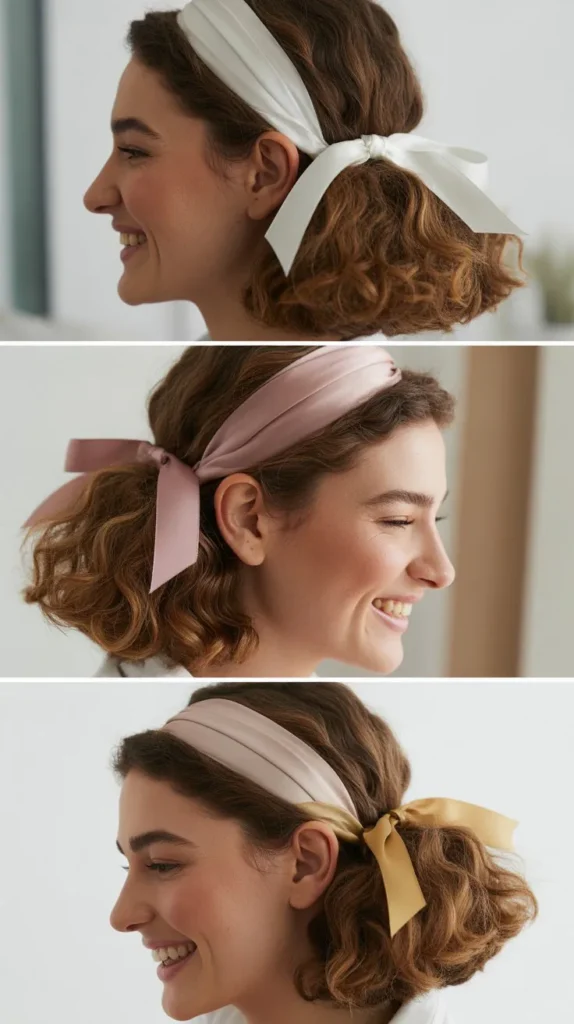
Maximum volume at the crown combined with a half-up style and ribbon accents creates quintessential Regency romance.
- Tease the crown section extensively to create the dramatic height characteristic of the Bridgerton era.
- Smooth the top layer over the teased section while maintaining the volume created underneath.
- Gather hair from temple to temple and secure it at the crown with a covered elastic.
- Thread a velvet or satin ribbon through the secured section, weaving it in and out.
- Tie the ribbon in a bow or leave the ends trailing through the curls for added detail.
- Allow the bottom section of curls to cascade freely, enhancing their definition with product.
- The volume at the crown should be substantial enough to create a visible silhouette from the side.
- Spray the crown section with strong-hold hairspray to maintain height throughout wear.
17. Twisted Side Updo with Curl Clusters
Multiple twisted sections converge into a side updo while curl clusters add texture and romantic dimension throughout.
- Divide hair into six to eight sections radiating from different points around the head.
- Twist each section loosely, maintaining curl definition within the twist rather than smoothing it.
- Bring all twisted sections to one side at approximately ear level.
- Pin each twist in place, creating an overlapping, dimensional effect at the gathering point.
- Allow some curls to escape intentionally from the twists to create softness and texture.
- Form remaining ends into small curl clusters, pinning them decoratively around the main gathering.
- The result should look intricate yet romantic, with visible texture throughout.
- Add decorative pins or a jeweled comb at the gathering point for embellishment.
18. Low Ponytail with Ornate Curl Definition
A sophisticated low ponytail showcases meticulously defined curls with ornate accessories for polished elegance.
- Create perfectly defined curls throughout the hair using the curling method that works best for your texture.
- Gather all hair into a low ponytail at the nape, positioning it slightly off-center for interest.
- Secure with a fabric-covered elastic that won’t damage or snag the curl pattern.
- Wrap a small section of hair around the elastic to conceal it for a polished finish.
- Define each curl in the ponytail individually, using curl cream and finger-coiling if necessary.
- Add an ornate hair cuff, jeweled tie, or decorative ribbon around the base of the ponytail.
- Allow the ponytail to cascade over one shoulder for asymmetrical elegance.
- Ensure no frizz or flyaways at the base by smoothing with a small amount of styling cream.
19. Bouffant Crown with Flowing Curls
Dramatic volume at the crown creates the classic bouffant silhouette while flowing curls maintain movement and romantic appeal.
- Section the crown area from temple to temple, extending approximately four inches back from the hairline.
- Backcomb this section intensively in layers, building substantial height at the crown.
- Smooth the visible top layer over the teasing, creating a rounded bouffant shape.
- Pin the bouffant section at the back crown to secure the height created.
- Style the remaining hair into flowing curls using large-barrel curling iron or velcro rollers.
- These curls should cascade down the back and over the shoulders with maximum volume.
- The bouffant should be proportional to your head size, typically 2-3 inches of added height.
- Set the entire style with medium-hold hairspray that allows movement while maintaining structure.
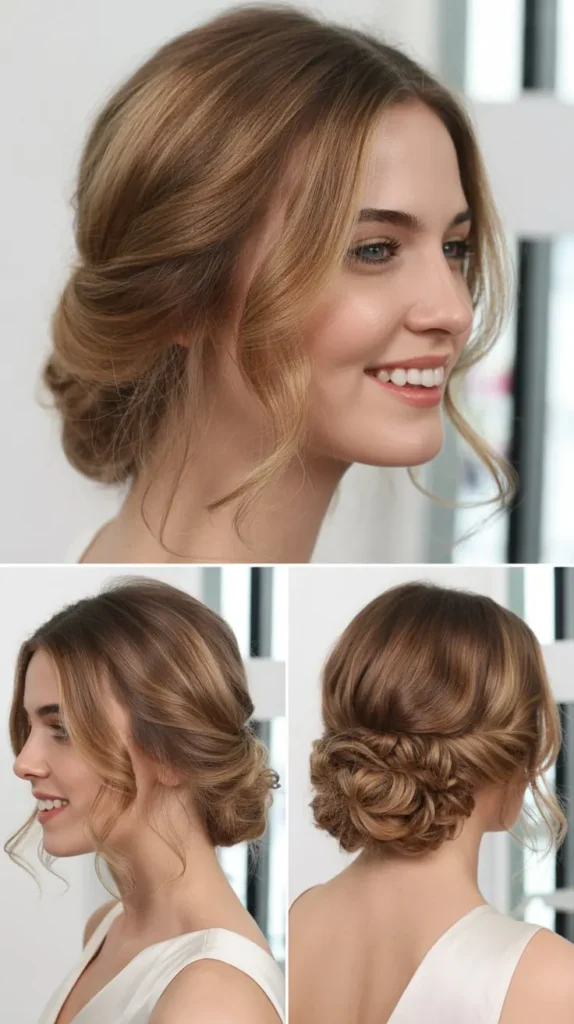
20. Braided Chignon with Escaping Curls
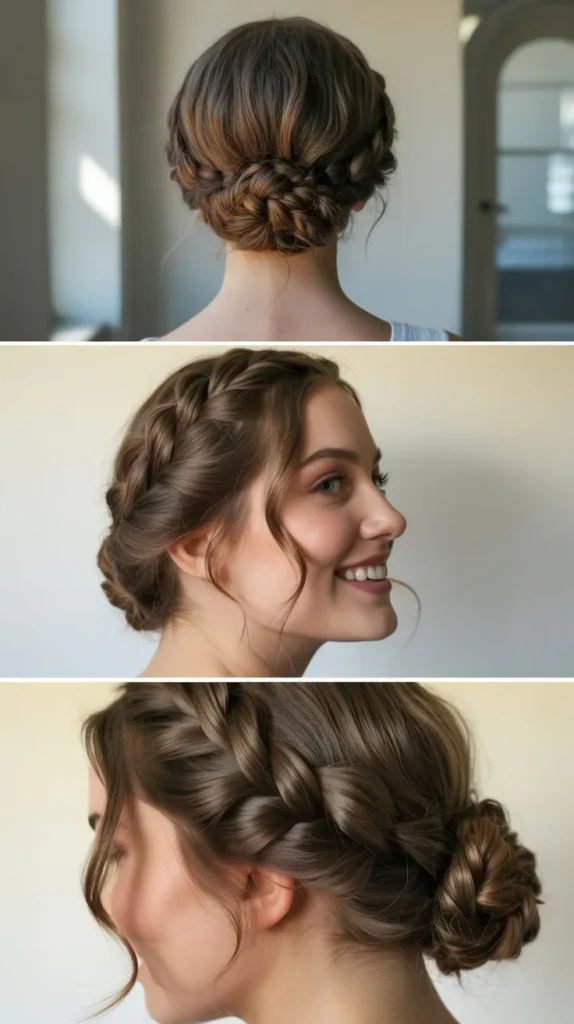
A chignon constructed from braided sections creates textural interest while strategically escaping curls soften the overall look.
- Divide hair into three equal sections at the nape of the neck.
- Create a three-strand braid with each section, securing each braid with a small elastic.
- Take the three braids and twist them together, coiling them into a low chignon at the nape.
- Secure the chignon with U-shaped pins distributed evenly for stability.
- Before completing the style, pull out several small sections to remain free as curls.
- Position these escaping curls at the nape, sides, and near the face for strategic softness.
- The braided texture of the chignon should remain visible for dimensional interest.
- Add pearl pins or small flowers tucked into the braided chignon for Regency detail.
21. Side Part with Cascading Ringlets and Comb
A dramatic side part creates asymmetry while cascading ringlets and a decorative comb add Regency-era sophistication.
- Create an extremely deep side part, positioning it 2-3 inches from the center line.
- On the side with less hair, sweep it smoothly back and secure with bobby pins.
- Position a large decorative comb at this side, both securing the hair and adding embellishment.
- On the side with more hair, create tight ringlets using a small-barrel curling iron.
- Allow these ringlets to cascade over the shoulder and down the back for dramatic effect.
- Ensure each ringlet is individually defined and separated for maximum visual impact.
- The contrast between the smooth pinned side and the ringlet side creates striking asymmetry.
- Finish with a flexible-hold spray that maintains curl definition without stiffness.
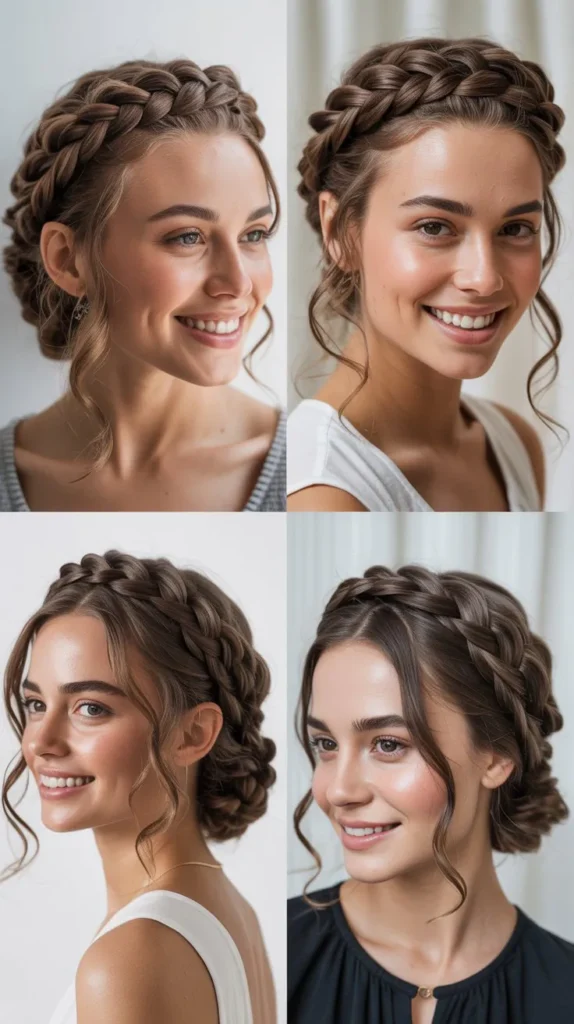
22. Milkmaid Braid Crown with Loose Curls
Two braids wrapped around the head create a milkmaid crown while loose curls beneath add volume and romantic texture.
- Part hair down the center, creating two equal sections from front to back.
- Create a standard three-strand braid on each side, starting at the nape and braiding to the ends.
- Lift the right braid up and over the crown of the head like a headband, pinning it at the left temple.
- Take the left braid and wrap it over the top, crossing over the first braid and pinning at the right temple.
- Tuck the ends of both braids underneath the crossed sections for a seamless appearance.
- Gently pull on the edges of both braids to widen them and create a fuller crown effect.
- Any hair left loose beneath the braids should be curled for volume and texture.
- Weave small flowers or ribbon through the braided crown for enhanced Bridgerton styling.
23. Romantic Side Swept with Pearl Strand
Dramatic side sweeping combined with a strand of pearls woven through curls creates opulent Regency glamour.
- Create defined curls throughout the hair, ensuring consistent curl pattern and bounce.
- Sweep all hair dramatically to one side, securing it at the back of the head with crossed bobby pins.
- Take a long strand of pearls (faux or real) and begin weaving it through the curls.
- Thread the pearl strand in and out of individual curls, creating a winding path through the hair.
- Secure the pearl strand at multiple points with bobby pins to prevent slipping.
- Arrange the swept curls over one shoulder, displaying both the curls and pearl embellishment.
- Some curls should fall forward over the shoulder while others drape down the back.
- The pearl strand should be visible winding through the style but not overwhelming the curls.
24. Double Bun Updo with Curly Accents
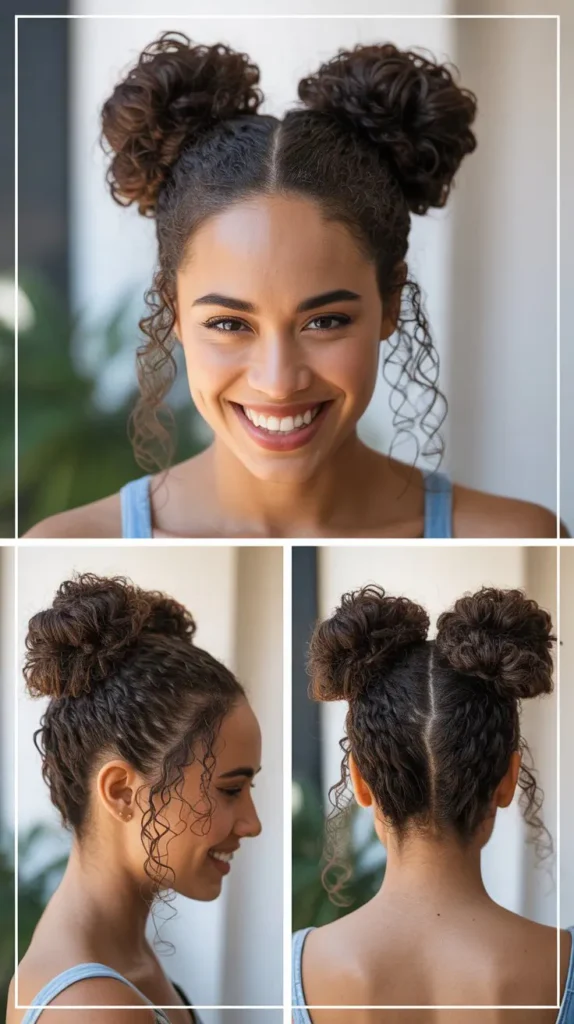
Two stacked or side-by-side buns create architectural interest while curly accents add softness and dimension.
- Section hair horizontally across the back of the head from ear to ear.
- Create a bun with the top section at the crown, twisting and pinning it into place.
- Form a second bun with the bottom section at the nape, slightly offset from the first if desired.
- Leave out several sections before creating the buns to serve as curly accents.
- These accent curls should frame the face and cascade around the buns for softness.
- Ensure both buns have visible texture rather than appearing too smooth or slick.
- Pin decorative elements like flowers or jeweled pins between the two buns.
- The double bun creates a unique silhouette that’s both structured and romantic.
25. Wrapped Ponytail with Spiral Curl Ends
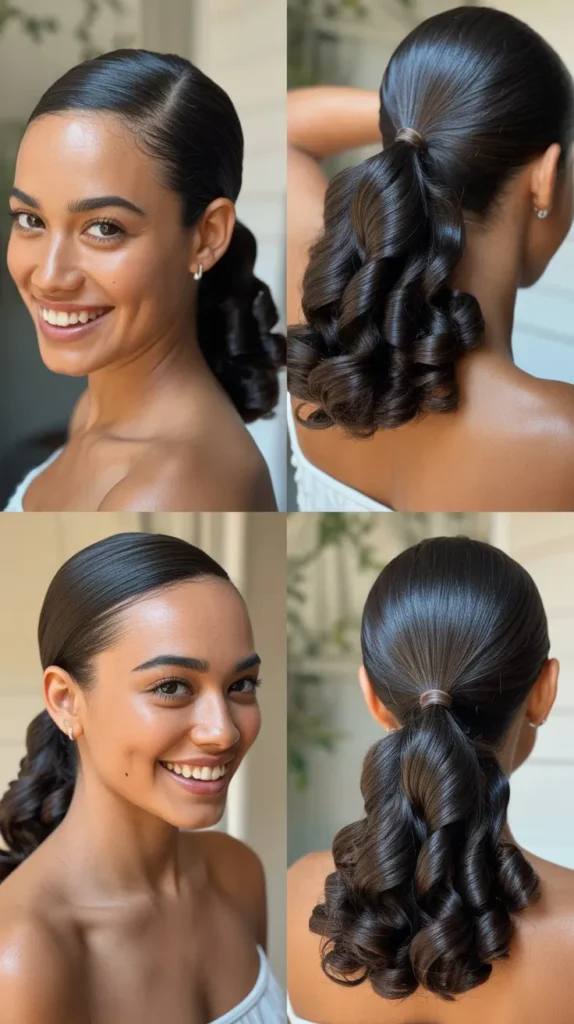
A ponytail with wrapped sections at the base leads to spiral curl ends that showcase curl definition and movement.
- Gather all hair into a mid-height or low ponytail, securing it with a strong elastic.
- Take a small section from the ponytail and wrap it around the elastic base multiple times.
- Secure the wrapped section with bobby pins, completely concealing the elastic underneath.
- Divide the remaining ponytail into small sections and create tight spiral curls with a curling iron.
- Allow these spiral curls to cool completely before gently separating them.
- The ponytail ends should showcase uniform, bouncy spiral curls with defined shape.
- Add a decorative ribbon or jeweled pin at the wrapped base for embellishment.
- This style works beautifully for both formal events and more casual occasions.
26. Vintage Roll with Pinned Curls
A structured roll at the hairline combined with pinned curls creates authentic 1800s styling with modern wearability.
- Section the front portion of hair from temple to temple, about 3 inches back from the hairline.
- Roll this section forward over a hair rat or padded form to create a structured roll.
- Pin the roll securely at both ends and along the length to maintain its shape.
- With the remaining hair, create individual curls and pin them in decorative formations.
- Arrange pinned curls in clusters or rows at the back and sides of the head.
- Each pinned curl should be visible as an individual element in the overall design.
- This style is particularly historically accurate for the Regency and Victorian eras.
- Complete the look with period-appropriate accessories like combs, pins, or small flowers.
27. Asymmetrical Low Bun with Face-Framing Spirals
An off-center low bun creates modern asymmetry while face-framing spirals add romantic softness and curl definition.
- Gather all hair to one side at the nape, creating a low side ponytail position.
- Before securing, leave out several sections at the front and sides for face-framing spirals.
- Twist the gathered hair and wrap it into a bun at the off-center position.
- Pin the bun securely with U-shaped pins, distributing them around the entire bun base.
- Create tight spiral curls with the left-out sections using a small-barrel curling iron.
- Position these spirals strategically to frame the face on both sides.
- The off-center bun creates visual interest while maintaining sophisticated elegance.
- Add a vintage brooch or cluster of pearls at the bun base for Regency authenticity.
28. Layered Curl Updo with Height
Multiple layers of curls stacked to create height result in a dramatic updo with dimensional texture throughout.
- Divide hair into three horizontal sections: bottom, middle, and top.
- Create tight curls throughout all sections using your preferred curling method.
- Pin the bottom section of curls in a cluster at the nape of the neck.
- Take the middle section and pin those curls slightly above the first layer, overlapping.
- Pin the top section curls even higher, creating stacked layers of visible curl formations.
- Each layer should be distinguishable, creating a staircase effect of curls.
- The overall silhouette should show significant height and volume from the side view.
- Secure the entire structure with additional pins and strong-hold hairspray for stability.
29. Partial Updo with Loose Romantic Waves
Half of the hair styled up while the other half flows in loose romantic waves creates versatile elegance.
- Section hair horizontally from temple to temple across the crown of the head.
- Gather the top section and create a loose, textured bun or twisted updo at the crown.
- Secure this updo section with pins, allowing some texture and looseness to show.
- Style the bottom section into loose, flowing waves using a large curling iron or wand.
- These waves should be soft and romantic rather than tight or structured.
- The contrast between the secured top and flowing bottom creates beautiful balance.
- Pull out a few face-framing pieces from the updo section for additional softness.
- This style works wonderfully for both formal events and more relaxed occasions.
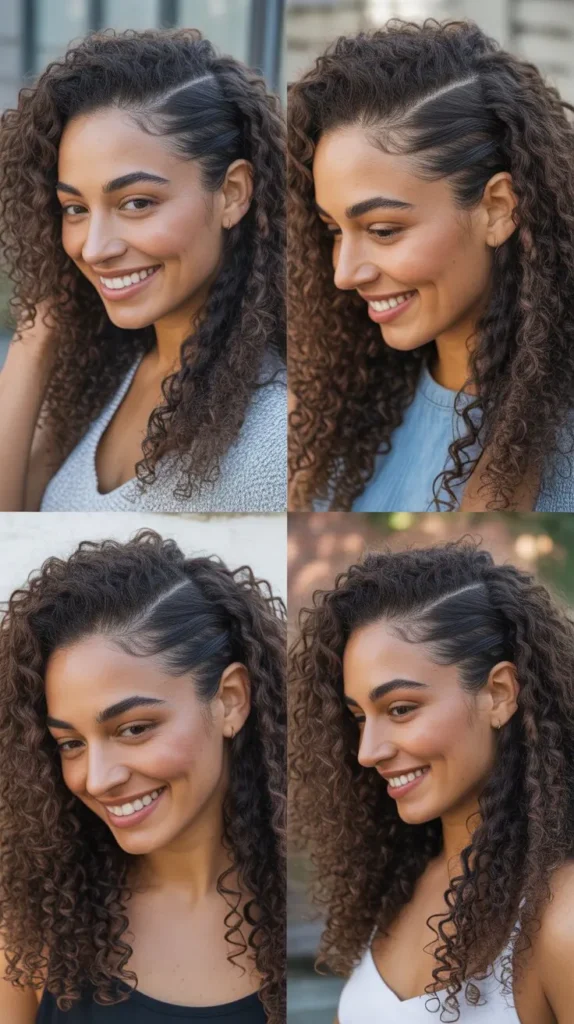
30. Curled Mohawk Updo Style
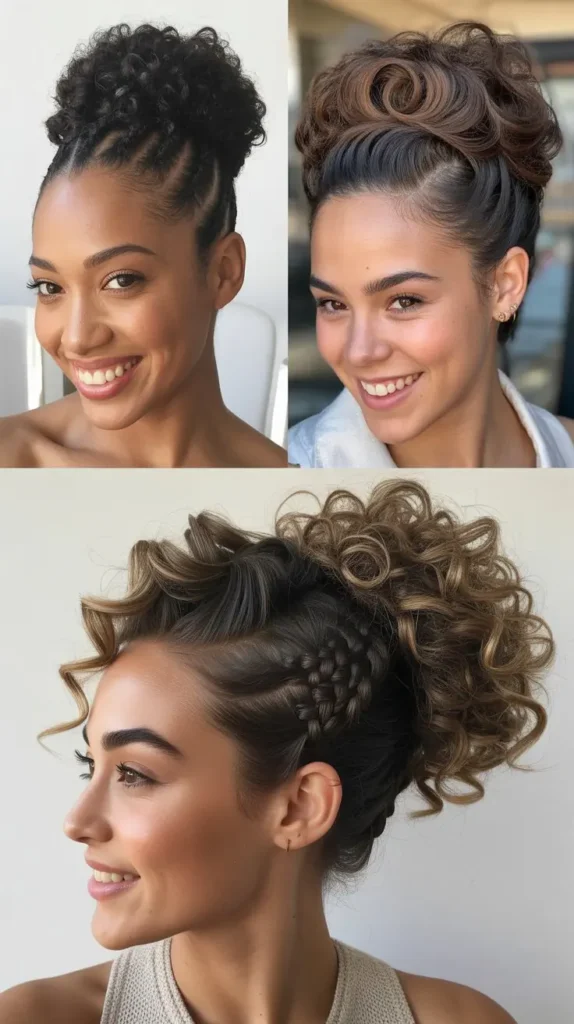
A modern twist on Bridgerton elegance, this style features curls styled upward in a mohawk-inspired formation with side-swept elements.
- Create a center section running from forehead to nape, approximately 3-4 inches wide.
- Pin the side sections smoothly back, sweeping them toward the center section.
- Style the center section curls to stand upward and backward in a mohawk-inspired formation.
- Pin each curl in the center section to create visible, defined curl formations running down the center.
- The sides should be smooth and sleek in contrast to the textured, curled center.
- This creates a dramatic silhouette that’s both modern and reminiscent of Regency height.
- Add small jeweled pins along the smooth side sections for embellishment.
- Use strong-hold products to maintain the upward curl formation throughout wear.
31. Braided Base Bun with Curl Halo
A bun constructed on a braided base provides texture while curls arranged around it create a halo effect.
- Create a Dutch or French braid starting at the nape and braiding upward toward the crown.
- When the braid reaches the crown, secure it and fan out the remaining hair.
- Coil this remaining hair into a bun directly on top of the braided base.
- Secure the bun with pins, ensuring the braided texture beneath remains visible.
- Take any remaining hair and curl it, then arrange these curls around the bun’s perimeter.
- These surrounding curls create a halo or crown effect around the central bun.
- The braided base adds dimensional texture that makes the style more interesting than a simple bun.
- Pin small flowers or pearls into the curl halo for enhanced romantic detail.
32. Side Braid with Cascading Curl Accent
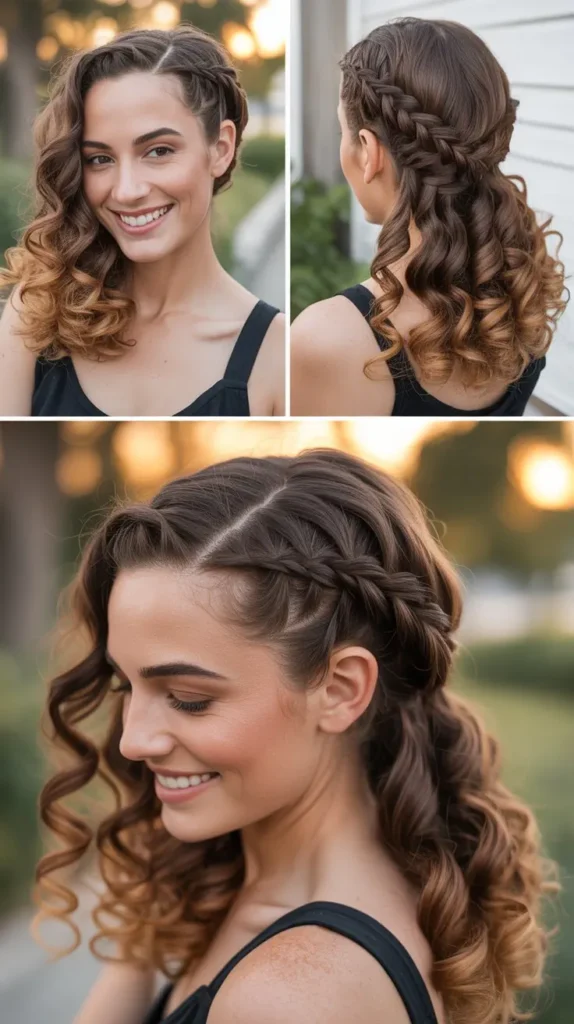
A side braid serves as an anchor point while cascading curls flow freely, creating asymmetrical romantic elegance.
- Create a deep side part and begin a Dutch or French braid at the temple on the heavier side.
- Braid along the side of the head, following the hairline from temple toward the nape.
- Continue braiding down the length, or stop at the nape and allow remaining hair to flow freely.
- On the opposite side from the braid, enhance curls for maximum definition and volume.
- These curls should cascade over the shoulder, creating beautiful asymmetry with the braided side.
- The braid provides structure and interest while the loose curls maintain romantic softness.
- Weave ribbon or small flowers through the braid for added Bridgerton authenticity.
- This style beautifully showcases both braiding skill and natural curl texture.
33. Crossover Braid Crown with Loose Lengths
Two braids that cross over at the crown create dimensional interest while loose lengths maintain movement and volume.
- Part hair down the center from forehead to nape, creating two equal sections.
- Create a Dutch braid on the right side, starting at the front and working back toward the crown.
- Repeat with a Dutch braid on the left side, also working from front to crown.
- At the crown, cross the right braid over to the left side and the left braid over to the right.
- Secure both crossed braids with bobby pins, creating an X-formation at the crown.
- Allow the remaining lengths of both braids plus any unbraided hair to flow freely down the back.
- This creates a beautiful crown detail while maintaining length and volume below.
- Add decorative pins at the crossover point for enhanced visual interest.
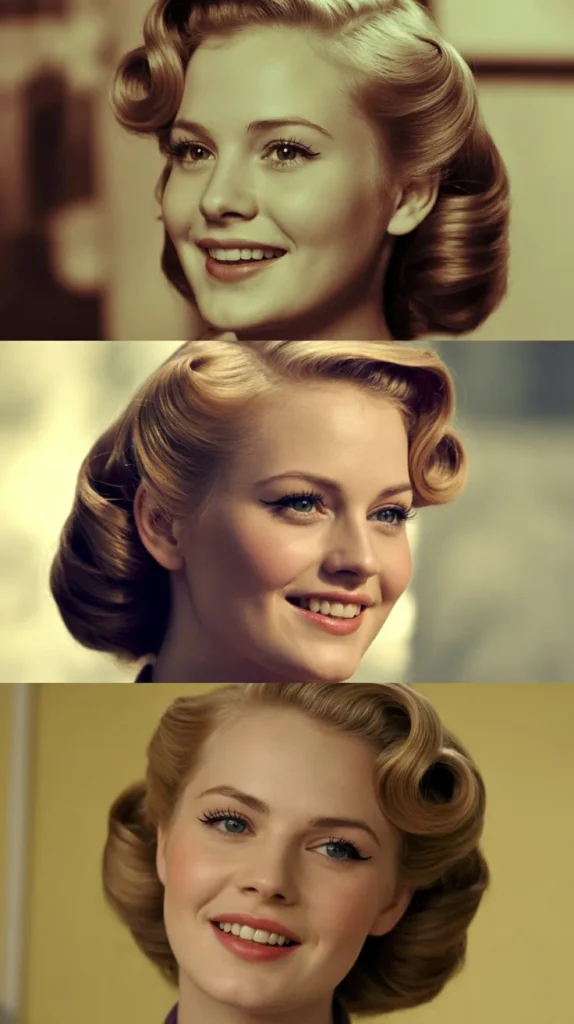
34. Stacked Victory Rolls with Curl Cascade
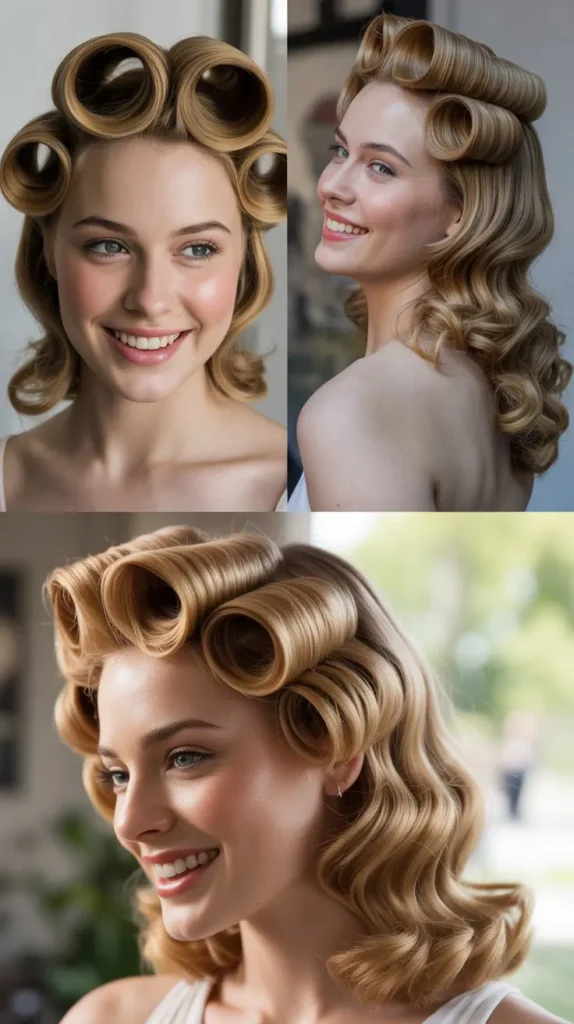
Victory rolls stacked at the crown create dramatic vintage height while cascading curls maintain romantic movement.
- Section the front of the hair from temple to temple, dividing this section in half down the center.
- Create a victory roll with the right front section by rolling it inward and back, pinning it at the crown.
- Create a matching victory roll with the left front section, positioning it next to the first roll.
- The two rolls should sit side by side or slightly overlapping, creating substantial height at the crown.
- Style the remaining hair into defined curls that cascade down the back and over the shoulders.
- The contrast between the structured rolls and flowing curls creates beautiful dimensional variety.
- Victory rolls are characteristic of 1940s styling but work beautifully for Regency-inspired looks.
- Set the rolls with strong-hold hairspray to maintain their shape throughout the event.
35. Wrapped Chignon with Jeweled Pins
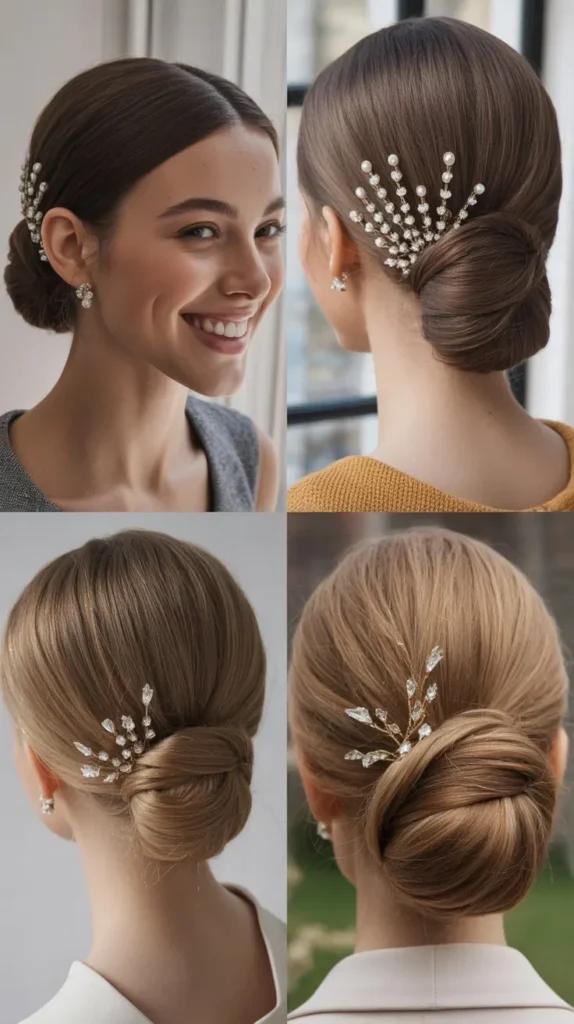
A chignon created with wrapped sections of hair becomes a canvas for jeweled pin placement and elegant embellishment.
- Gather all hair at the nape in a low ponytail, leaving face-framing sections out if desired.
- Divide the ponytail into four to six smaller sections.
- Take each section and wrap it around the base of the ponytail, pinning it to create petal-like formations.
- Continue wrapping and pinning all sections, building a rounded, textured chignon.
- The wrapping technique creates visible texture and dimension within the chignon itself.
- Insert jeweled pins throughout the chignon, spacing them evenly for balanced embellishment.
- These pins serve both decorative and functional purposes, adding security while enhancing beauty.
- The chignon should appear intricate yet cohesive, with the jeweled pins catching light beautifully.
36. Full Volume Curly Updo with Floral Accents
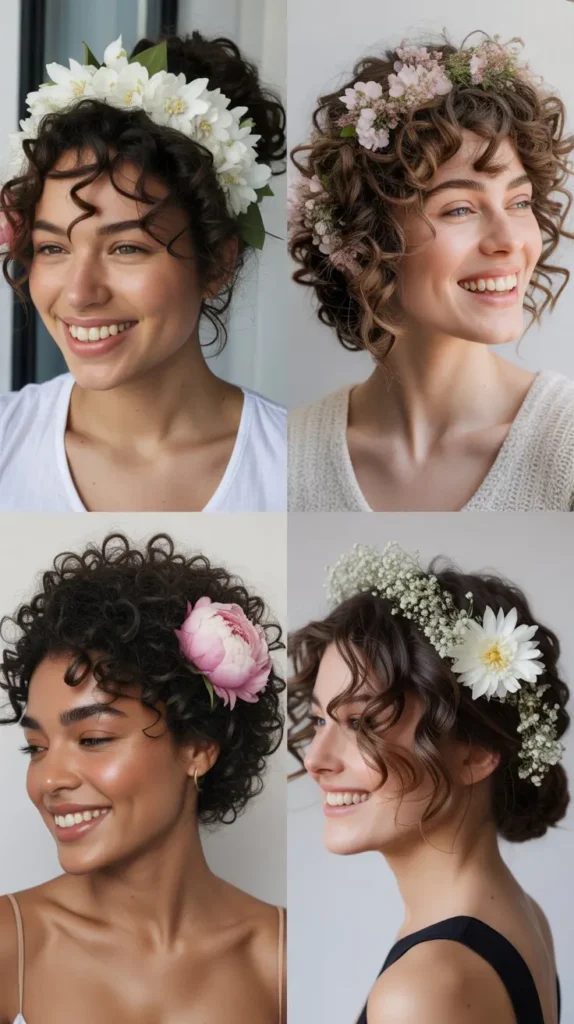
Maximum volume throughout combined with strategic floral placement creates the ultimate romantic Bridgerton updo.
- Begin by creating maximum curl definition throughout all hair using your preferred method.
- Tease the roots extensively throughout all sections to build substantial volume from the base.
- Gather curls in sections, pinning them in various directions and heights to create a voluminous, textured updo.
- The goal is to create a cloud-like mass of curls with visible dimension and texture throughout.
- Strategically place fresh or silk flowers throughout the updo, tucking stems under pinned curl sections.
- Distribute flowers evenly but not uniformly, creating an organic, garden-like appearance.
- The entire updo should have significant height and width, creating a dramatic silhouette.
- This style represents the pinnacle of romantic Bridgerton elegance, perfect for weddings or formal events.
Styling Products and Tools Table
| Product Type | Recommended For | Purpose |
|---|---|---|
| Curl Defining Cream | All curl types | Enhances natural curl pattern and reduces frizz |
| Small Barrel Curling Iron (3/4″-1″) | Tight ringlets | Creates authentic Regency-era spiral curls |
| Large Barrel Curling Iron (1.5″-2″) | Loose waves | Produces romantic, flowing wave patterns |
| U-Shaped Pins | Updos and buns | Provides invisible, secure hold for structured styles |
| Bobby Pins | All styles | Essential for securing sections and tendrils |
| Flexible Hold Hairspray | Curls and waves | Maintains style while allowing natural movement |
| Strong Hold Hairspray | Updos and volume | Secures structured elements like pompadours and rolls |
| Teasing Brush | Volume creation | Builds height at crown for authentic Regency silhouette |
| Diffuser Attachment | Natural curl enhancement | Dries curls while maintaining definition and reducing frizz |
| Velvet or Satin Ribbons | Decorative accents | Adds period-appropriate embellishment to any style |
Conclusion
From elaborate updos adorned with flowers to cascading ringlets that frame the face with timeless elegance, 36 Romantic Curly Bridgerton Hairstyles for Any Occasion offers endless inspiration for bringing Regency romance into your modern life.
These hairstyles prove that curly hair is perfectly suited to the elaborate, romantic styles of the Bridgerton era, with each curl adding texture, dimension, and movement that enhances the overall aesthetic.
Whether you’re preparing for a wedding, attending a formal event, or simply want to feel like royalty on an ordinary day, these styles provide options for every skill level and hair length.
The beauty of these Bridgerton-inspired looks lies not only in their visual impact but also in their versatility—many can be adapted for everyday wear while others create show-stopping moments for life’s most special occasions.
With the right products, tools, and techniques outlined throughout this guide, you have everything you need to transform your curly hair into a masterpiece worthy of the ton.
Embrace your inner Daphne, channel your Penelope confidence, and let these romantic styles transport you to an era where elegance and beauty were celebrated as true art forms.