Managing curly hair as a busy mom can feel overwhelming, especially when frizz takes over and time is limited.
The good news is that beautiful, manageable curls are within reach with the right hairstyles and techniques.
This comprehensive guide to 37 Easy Hairstyles for Moms with Curly Hair That Reduce Frizz will transform your daily routine and help you embrace your natural texture with confidence.
Whether you’re rushing to school drop-off, heading to work, or enjoying a rare moment of self-care, these practical styles are designed to work with your curls, not against them.
From quick five-minute updos to protective styles that last for days, you’ll discover options for every occasion, curl pattern, and skill level. Each hairstyle focuses on minimizing manipulation, sealing in moisture, and protecting your hair from environmental factors that trigger frizz.
You’ll learn why certain styles work better for curly hair, how to prepare your curls for styling success, and which techniques will save you precious time while keeping your hair healthy and gorgeous.
Get ready to say goodbye to frustrating frizz and hello to effortless, beautiful curls that make you feel confident throughout your busy day.
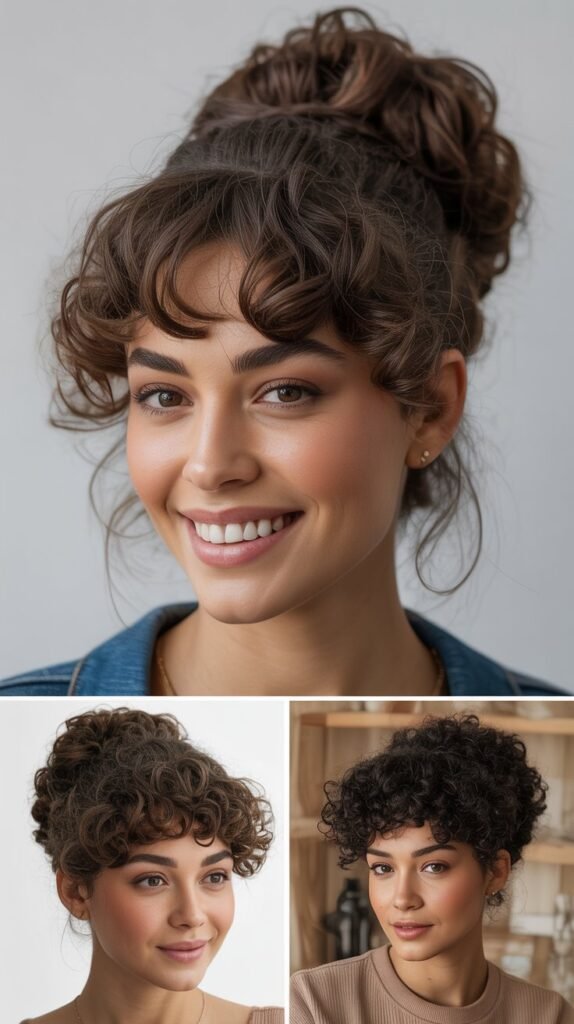
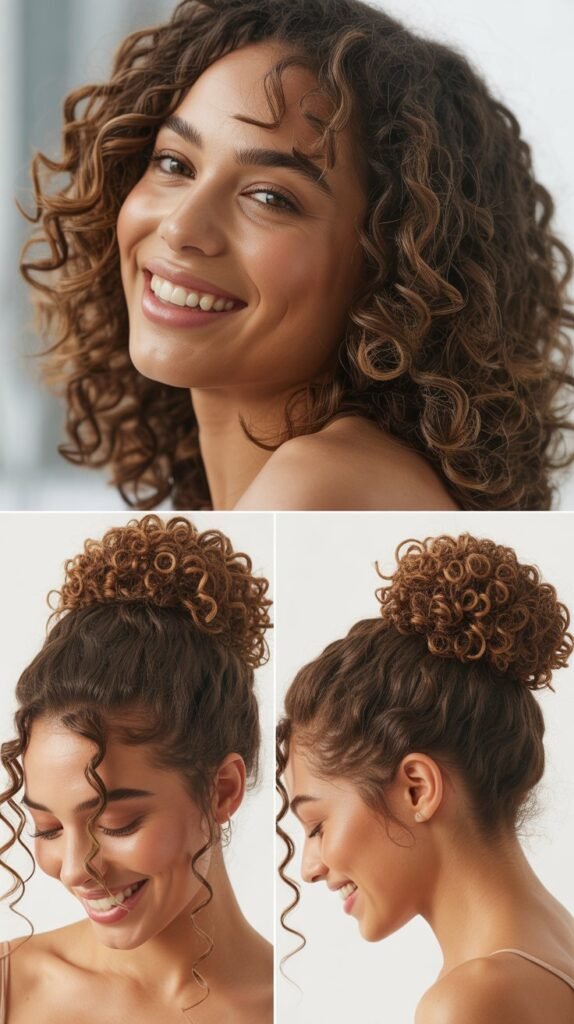
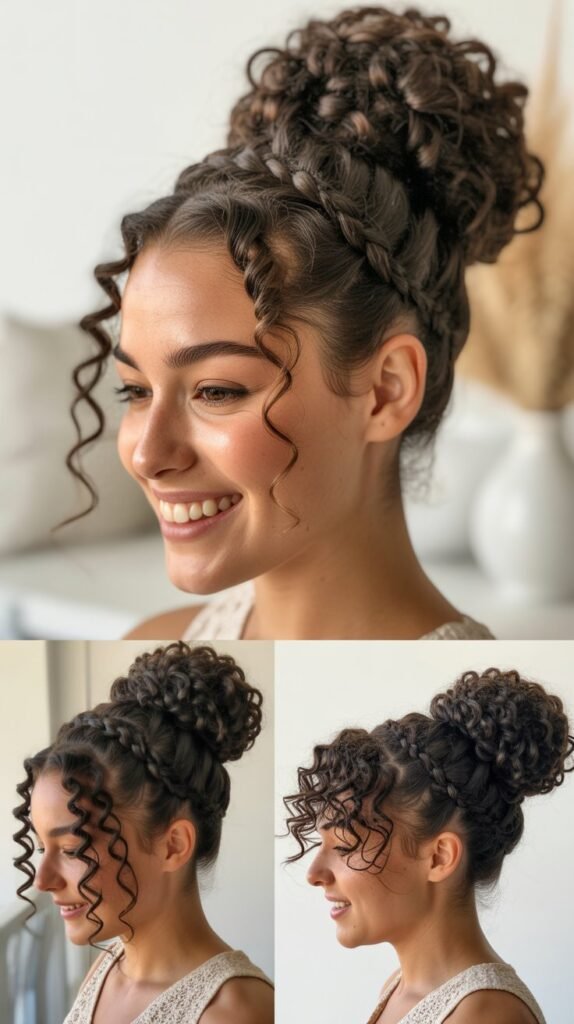
1. The Pineapple Updo

The pineapple updo is a lifesaver for moms who want to preserve their curls overnight and refresh them quickly in the morning.
This style gets its name from the high ponytail positioned at the crown of your head, which fans out like a pineapple top and protects your curl pattern while you sleep.
- Gather all your hair loosely at the highest point of your head using your hands rather than a brush to avoid disturbing curl clumps
- Secure with a silk or satin scrunchie that won’t create dents or breakage in your delicate curls
- Allow the ponytail to fan out naturally around the scrunchie, creating volume at the crown while keeping ends protected
- Sleep on a satin pillowcase or wear a silk bonnet over your pineapple to minimize friction and frizz overnight
- In the morning, release the scrunchie and gently shake your curls loose for instant volume and definition
- Refresh any flattened sections with a water-based curl refresher spray and scrunch gently
- This style works best for shoulder-length to long curly hair and takes less than two minutes to create
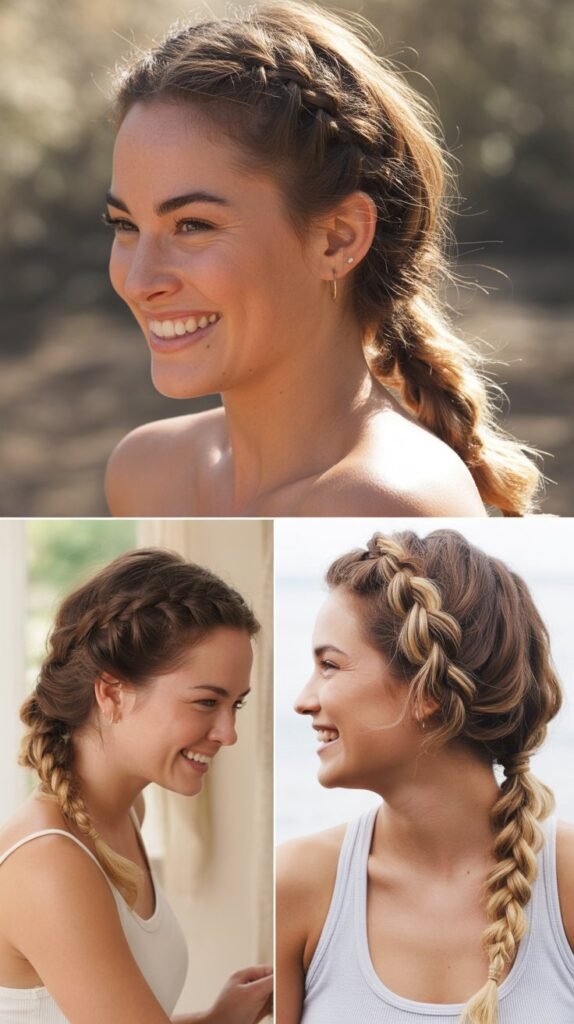
2. Two-Strand Twist Out

The two-strand twist out delivers gorgeous definition and reduced frizz while being surprisingly simple to execute, even for styling beginners.
This technique involves twisting sections of damp hair and allowing them to dry completely before unraveling for soft, elongated curls.
- Start with freshly washed, conditioned hair that’s still damp and apply a curl cream or styling gel evenly throughout
- Divide your hair into manageable sections using clips to keep unworked hair out of the way
- Take a small section of hair, split it into two equal strands, and twist them around each other from root to tip
- Secure the ends by wrapping them around your finger or using small hair ties if needed
- Allow twists to air dry completely or sit under a hooded dryer for faster results without frizz
- Once fully dry, carefully unravel each twist by gently separating the two strands without pulling them apart roughly
- Fluff the roots gently with your fingers and separate larger curl clumps for more volume and a natural appearance
- Seal the style with a light oil on your fingertips to add shine and combat any surface frizz
3. Low Bun with Curly Bangs
The low bun with curly bangs offers an elegant solution for moms who need a polished look while showcasing their natural texture in the front.
This style keeps hair secure and frizz-free while allowing your personality to shine through with beautiful framing curls.
- Section out your bangs or front curls before gathering the rest of your hair, keeping these sections separate
- Apply a small amount of gel or curl cream to your bangs and define them with your fingers or a denman brush
- Gather the remaining hair at the nape of your neck, smoothing gently without brushing to maintain your natural texture
- Twist the gathered hair and wrap it around itself to create a low bun, securing with bobby pins
- Use a toothbrush sprayed with hairspray to smooth any flyaways around your hairline without flattening your curls
- Allow your bangs to air dry or diffuse them gently for maximum definition and minimal frizz
- This versatile style works for professional settings, casual outings, and special occasions alike
4. Messy Top Knot

The messy top knot is the ultimate quick-fix hairstyle for busy moms who need to look put-together in seconds while protecting their curls from damage.
This casual yet chic style embraces your natural texture and keeps hair off your face during hectic days.
- Flip your head upside down and gather all your hair at the crown using your fingers to maintain curl integrity
- Twist the gathered hair loosely and wrap it around the base to create a relaxed, voluminous bun
- Secure with a spiral hair tie or bobby pins, leaving the ends slightly loose for that perfectly imperfect messy look
- Pull out a few face-framing curls to soften the style and add dimension
- Use your fingers to gently loosen and expand the knot for more volume and texture
- Spray with a lightweight holding spray if needed, but avoid products that create crunchiness or stiffness
- This style takes under three minutes and works beautifully for second-day or third-day curls
5. Half-Up Half-Down with Twist

The half-up half-down with twist combines practicality with elegance, keeping hair away from your face while showing off your beautiful curl length and volume. The twisted detail adds visual interest without requiring advanced styling skills.
- Section off the top half of your hair from ear to ear, leaving the bottom section down
- Divide the top section into two equal parts and twist each section away from your face
- Bring both twisted sections together at the back of your head and secure with bobby pins or a decorative clip
- Gently pull and loosen the twists slightly for added volume and a softer, more romantic appearance
- Use a curl refresher spray on the bottom section to revive any flattened curls
- This style protects your hairline and crown from friction while keeping your curl definition intact throughout the day
- Perfect for work meetings, lunch dates, or any occasion where you want to look polished but still showcase your natural hair
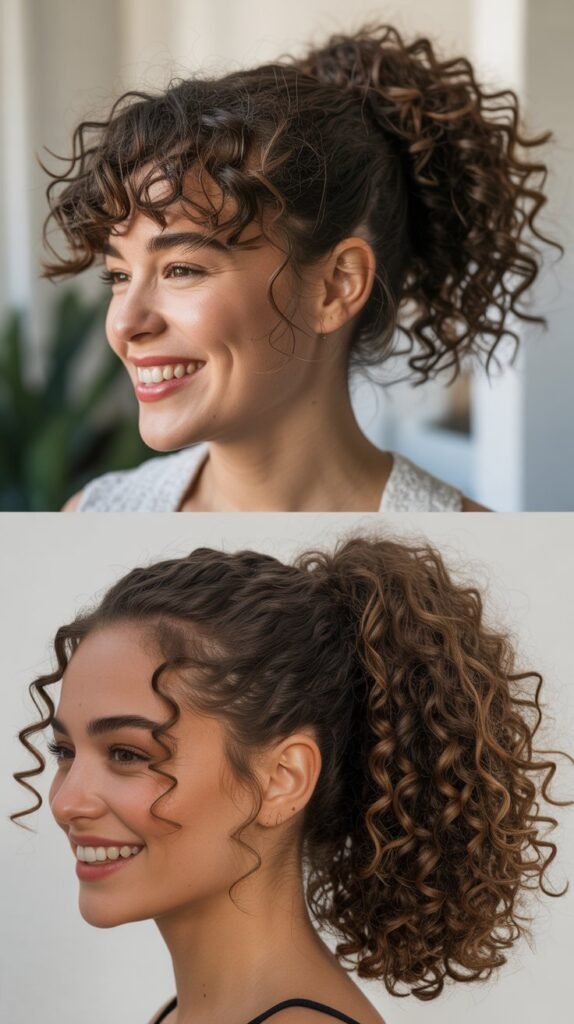
6. Curly Ponytail with Scrunchie
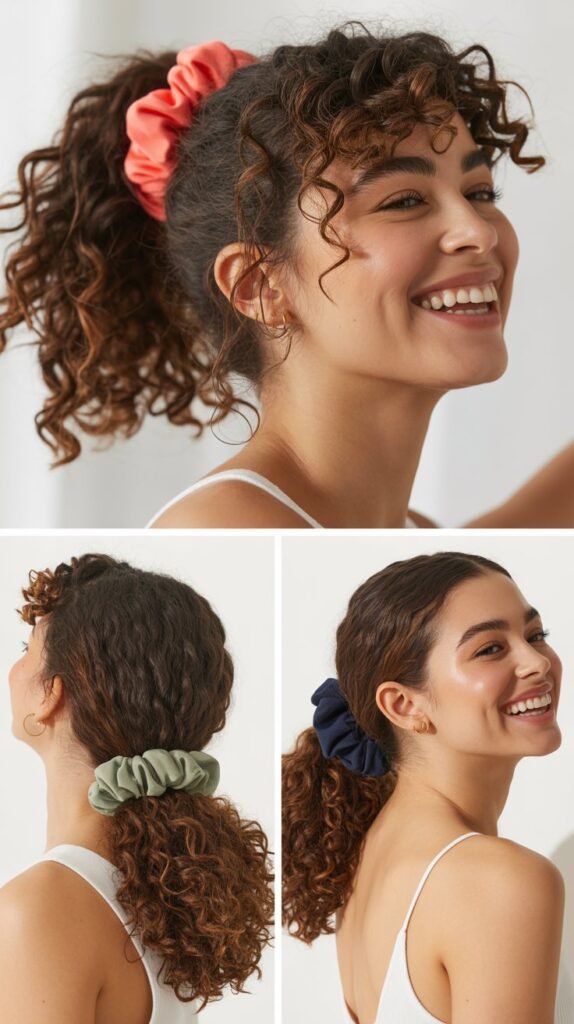
The curly ponytail with scrunchie is a classic go-to that protects your hair while looking effortlessly stylish for any mom on the move. Using a scrunchie instead of regular elastics prevents breakage, creasing, and unnecessary frizz.
- Decide on your ponytail placement based on your face shape and the day’s activities – high for workouts, mid-level for casual wear, or low for sophistication
- Use your fingers or a wide-tooth comb to gather hair smoothly without disturbing individual curl clumps
- Secure with a large fabric or silk scrunchie that distributes tension evenly and prevents hair damage
- Pull the ponytail through the scrunchie one and a half times, leaving it slightly loose on the last wrap for less tension
- Fluff and arrange the curls in the ponytail to maximize volume and showcase your curl pattern
- Take a small section from the ponytail and wrap it around the scrunchie base, pinning underneath for a polished finishing touch
- Apply a small amount of anti-frizz serum to the length of the ponytail for extra shine and smoothness
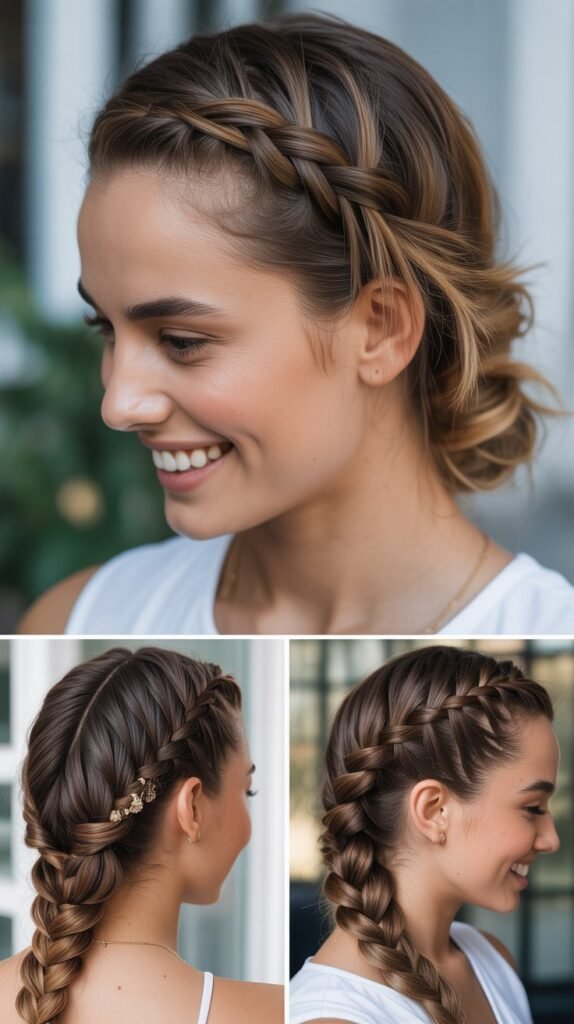
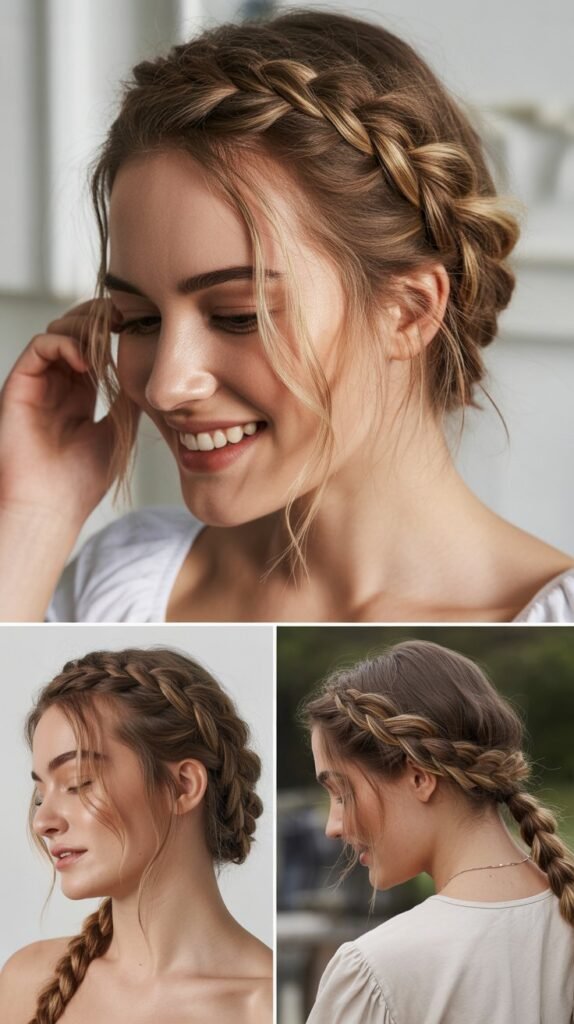
7. Braided Crown
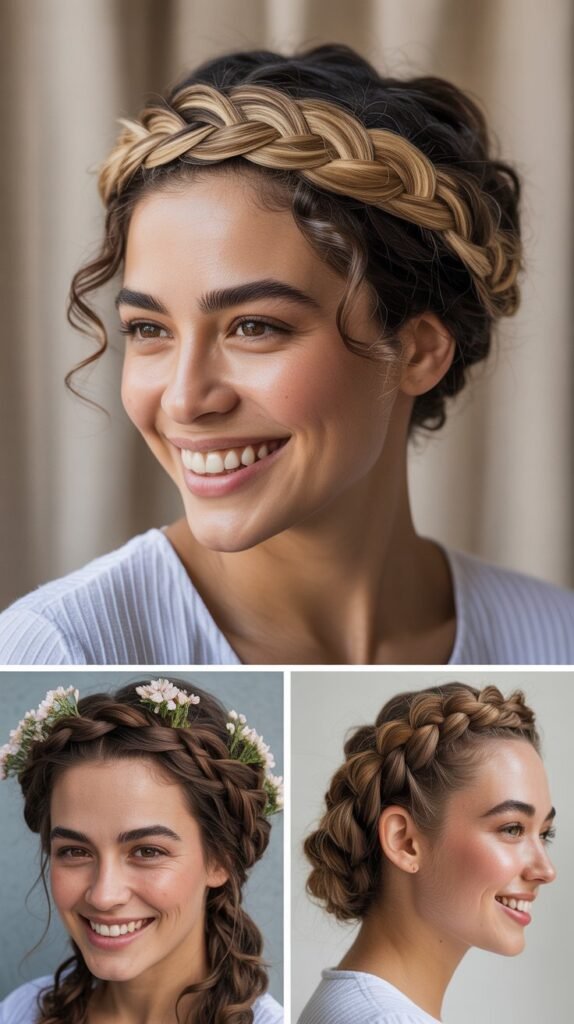
The braided crown creates a stunning halo effect that keeps all your hair secured while reducing frizz through minimal manipulation. This romantic style looks complex but becomes surprisingly easy with a little practice.
- Part your hair down the middle from forehead to nape, creating two equal sections
- Starting behind one ear, create a Dutch braid or French braid that follows your hairline toward the opposite ear
- Secure the end temporarily with a clip and repeat the braiding process on the other side
- Cross the braids over the top of your head, pinning them securely with bobby pins that match your hair color
- Tuck the ends of each braid underneath the opposite braid and secure with additional pins for a seamless finish
- Gently pull and loosen sections of the braids for a fuller, more textured appearance
- This protective style can last for several days and works beautifully for special occasions or everyday wear
8. Side-Swept Curls
Side-swept curls offer Hollywood glamour with minimal effort, creating an asymmetrical style that flatters most face shapes while keeping frizz at bay. This elegant look works for both casual and formal occasions.
- Apply a curl-defining cream or gel to freshly washed or refreshed curls while they’re still damp
- Create a deep side part on whichever side feels most natural and flattering for your face shape
- Sweep the larger section of hair over your shoulder, allowing curls to cascade beautifully to one side
- Pin the hair behind your ear on the opposite side using decorative bobby pins or small clips
- Use a curl-enhancing mousse on individual curl clumps for extra definition and bounce
- Allow hair to air dry or diffuse on low heat to maintain the side-swept position without creating frizz
- Finish with a light-hold hairspray to keep the style in place throughout the day
9. Space Buns
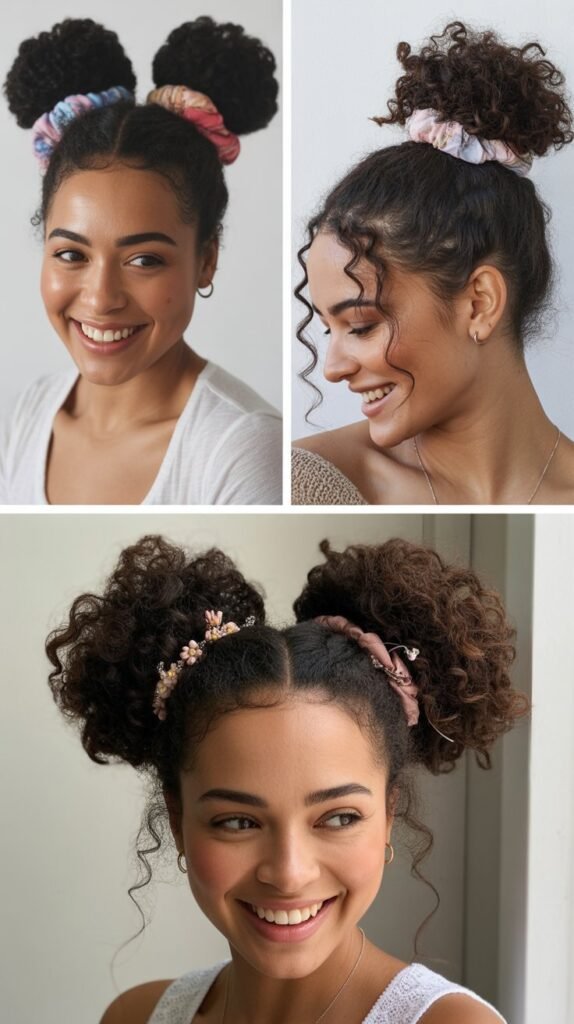
Space buns bring playful energy while being incredibly practical for moms who need their hair completely secured for active days. These high double buns protect your curls and create a fun, youthful aesthetic.
- Part your hair straight down the middle from your forehead to the nape of your neck
- Create two high ponytails on each side, positioning them where you want the buns to sit
- Twist each ponytail and wrap it around its base in a circular motion to form a bun shape
- Secure each bun with bobby pins or another scrunchie, ensuring they feel comfortable and secure
- Pull out a few curls around your face and hairline for a softer, less severe appearance
- Use a styling gel on a toothbrush to smooth any flyaways around the parts and bun bases
- This style works exceptionally well for gym sessions, busy errands, or hot summer days
10. Low Side Braid

The low side braid combines sophistication with practicality, keeping curls protected in a loose, textured braid that drapes beautifully over one shoulder. This style minimizes frizz while showcasing your curl texture throughout the braid.
- Sweep all your hair over one shoulder, choosing the side that feels most comfortable
- Apply a small amount of cream or oil to help curls glide smoothly during the braiding process
- Create a loose three-strand braid starting from behind your ear and working down to the ends
- Secure the end with a clear elastic or fabric hair tie that won’t damage your curls
- Gently pull apart sections of the braid to create a fuller, more voluminous appearance
- Pull out small curls around your face and at the crown for added dimension and softness
- This elegant style works beautifully for date nights, professional settings, or lazy weekend days
11. Curly Faux Hawk

The curly faux hawk makes a bold statement while being surprisingly practical for active moms who want their hair secured but still want to showcase their curl volume. This edgy style combines function with fashion-forward thinking.
- Section your hair into three parts: two sides and one center strip running from forehead to nape
- Apply gel or mousse to the side sections and smooth them down toward your ears and nape
- Secure the side sections flat against your head using bobby pins or small clips in a downward pattern
- Fluff and volumize the center section using your fingers to lift curls at the roots
- Use a pick or your fingertips to create maximum height and width in the center mohawk section
- Spray the sides lightly with holding spray to keep them sleek while leaving the center section soft and touchable
- This style works particularly well for second-day curls that already have great volume
12. Twisted Low Ponytail
The twisted low ponytail elevates a basic style with elegant twists that reduce frizz through smooth, intentional manipulation. This sophisticated look takes minutes but appears much more complex and polished.
- Divide your hair into four to six sections depending on thickness and desired twist size
- Twist each section individually from roots to ends, working in a consistent direction
- Gather all twisted sections at the nape of your neck into one low ponytail
- Secure with a hair tie, then take a small section from the ponytail and wrap it around the base
- Pin the wrapped section underneath to hide the hair tie and create a polished finish
- Leave the twisted sections in the ponytail or gently separate them for a softer appearance
- This style maintains curl definition while keeping everything neat and controlled throughout busy days
13. Bantu Knot Out
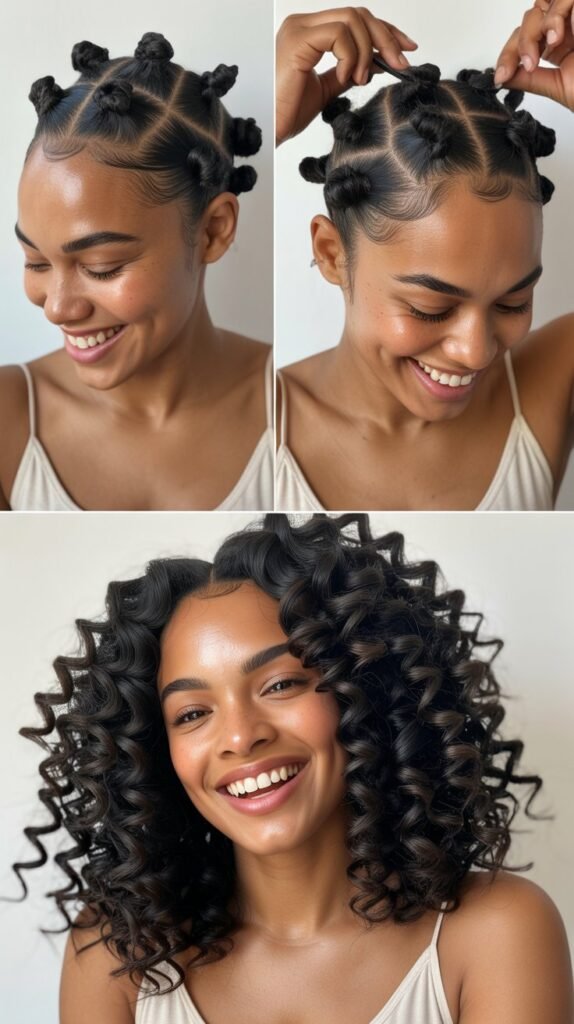
The Bantu knot out delivers stunning curl definition and significantly reduced frizz through a protective styling technique that creates uniform, bouncy curls. This method works beautifully on all curl types and provides long-lasting results.
- Start with freshly washed and conditioned hair while it’s still damp but not soaking wet
- Apply a generous amount of curl cream and holding gel to each section before styling
- Divide hair into small to medium sections and twist each section tightly from root to tip
- Continue twisting until the hair coils around itself naturally, forming a small knot against your scalp
- Secure each knot with a bobby pin or allow it to tuck under itself naturally
- Sleep on the knots using a satin bonnet or allow them to air dry completely for 24 hours
- Carefully unravel each knot by unwinding in the opposite direction, separating gently for volume
- Apply oil to your fingertips and scrunch to enhance shine and eliminate any residual crunchiness
14. Top Knot with Headband

The top knot with headband combines practicality with style, using a fabric headband to keep frizz at bay while adding a fashionable accessory. This quick style keeps all hair secured while protecting your hairline.
- Choose a wide fabric headband that won’t slip and complements your outfit or hair color
- Place the headband about an inch back from your hairline to avoid tension on your edges
- Gather your hair into a high ponytail above the headband and create a messy top knot
- Secure the knot with pins and allow some curls to escape naturally for texture
- Adjust the headband to ensure it’s catching any flyaways or frizz around your hairline
- Pull the headband forward slightly and then push back to create a small puff of volume at the crown
- This versatile style transitions easily from playground dates to evening events
15. Finger Coils
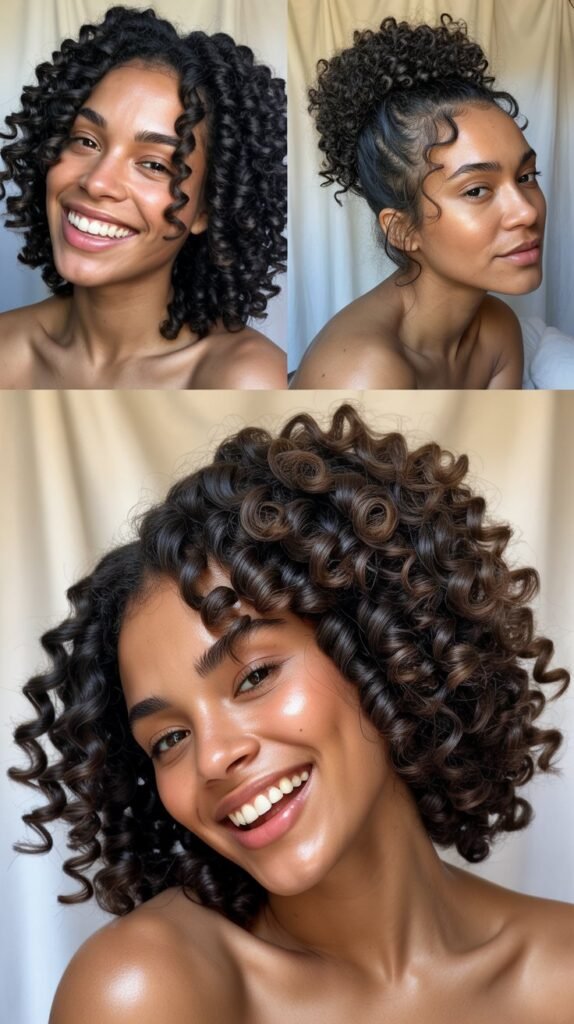
Finger coils create uniform, defined curls by wrapping small sections of hair around your finger, resulting in maximum definition with minimal frizz.
This technique works exceptionally well for tighter curl patterns and provides long-lasting results.
- Work with freshly washed, very damp hair that has been thoroughly saturated with leave-in conditioner
- Apply a curl-defining gel or cream to small sections for maximum hold and definition
- Take a small piece of hair and wrap it tightly around your finger from root to tip
- Slide your finger out carefully while maintaining the coil shape and allowing it to spring back naturally
- Repeat this process throughout your entire head, keeping sections small and consistent for uniform results
- Allow coils to air dry completely without touching them to prevent frizz and maintain definition
- Once dry, you can separate coils gently for more volume or leave them as tight spirals
- This style can last for several days with proper nighttime maintenance using a satin bonnet
16. Curly High Ponytail
The curly high ponytail radiates energy and confidence while keeping hair completely off your face and neck for ultimate comfort. This style showcases your curl volume at its fullest while protecting ends from damage.
- Flip your head upside down and gather all hair at the crown using your fingers only
- Secure tightly with a scrunchie or spiral hair tie that won’t cause breakage or creasing
- Flip your head back up and use a soft bristle brush on your edges only to smooth flyaways
- Apply edge control or gel with a toothbrush to lay down any stubborn baby hairs around your hairline
- Fluff the ponytail curls using a pick or your fingers to create maximum volume and definition
- Wrap a small section of hair from the ponytail around the base to hide the hair tie
- Refresh ponytail curls with a spray bottle of water mixed with leave-in conditioner for extra bounce
17. Rolled Updo

The rolled updo offers vintage elegance with modern practicality, creating smooth rolls that keep curls protected while delivering a sophisticated appearance.
This style works beautifully for special occasions or when you need to look extra polished.
- Section your hair horizontally into three to four layers from bottom to top
- Starting with the bottom section, smooth it with your hands and roll the ends under toward your scalp
- Pin the roll securely with bobby pins, creating a smooth, cylindrical shape against your head
- Continue with each subsequent section, rolling and pinning until all hair is incorporated into the updo
- Use a smoothing serum or cream on each section before rolling to minimize frizz and add shine
- Spray the entire style lightly with hairspray for hold without stiffness or crunchiness
- This elegant style keeps your neck cool and looks stunning from every angle
18. Curly Pigtails
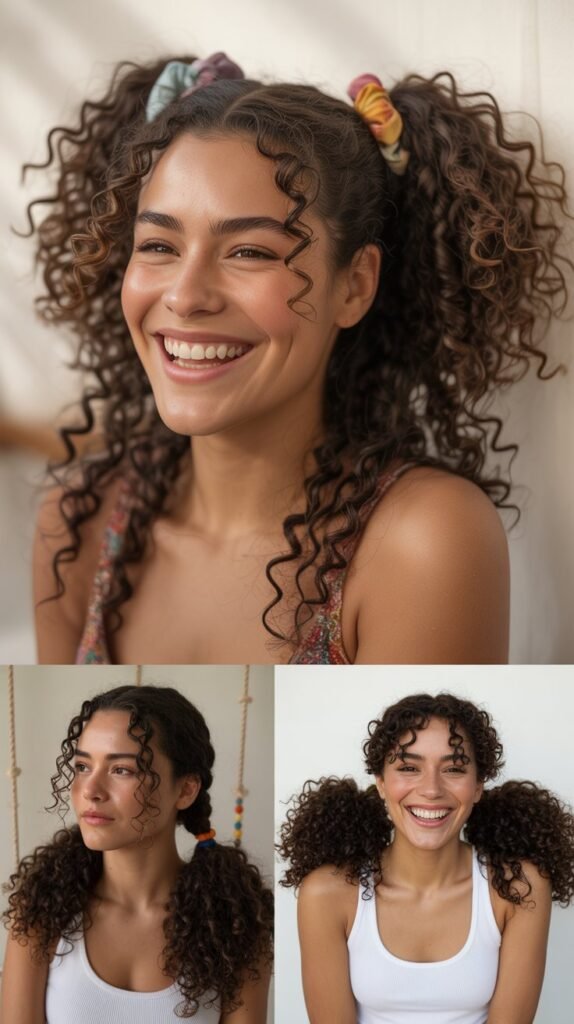
Curly pigtails bring playful charm while being incredibly functional for active moms who need their hair completely secured. This youthful style protects your curls from tangling and reduces frizz through simple sectioning.
- Create a straight part down the center of your head from forehead to nape
- Gather one side into a ponytail at whatever height feels comfortable and flattering
- Secure with a scrunchie or fabric hair tie that won’t damage your delicate curls
- Repeat on the other side, ensuring both pigtails are positioned at the same height
- Fluff each pigtail to showcase your natural curl volume and definition
- Pull out a few face-framing curls for a softer, less severe appearance
- This style works perfectly for gym sessions, outdoor activities, or casual weekend wear
19. Pin Curl Updo

The pin curl updo transforms individual curl sections into decorative swirls that stay frizz-free while creating an artistic, sophisticated hairstyle. This technique celebrates your natural curl pattern while keeping everything beautifully controlled.
- Work with damp hair that has been coated with a strong-hold gel or styling cream
- Take individual curl clumps and wrap them around two fingers to create uniform curl shapes
- Pin each curl flat against your head in an artistic pattern, working from bottom to top
- Continue creating and pinning curls until all hair is secured in the updo design
- Allow the pinned curls to dry completely before removing any pins for maximum hold
- Once dry, you can leave curls pinned for a structured look or release them for softer volume
- This versatile style transitions beautifully from daytime casual to evening formal events
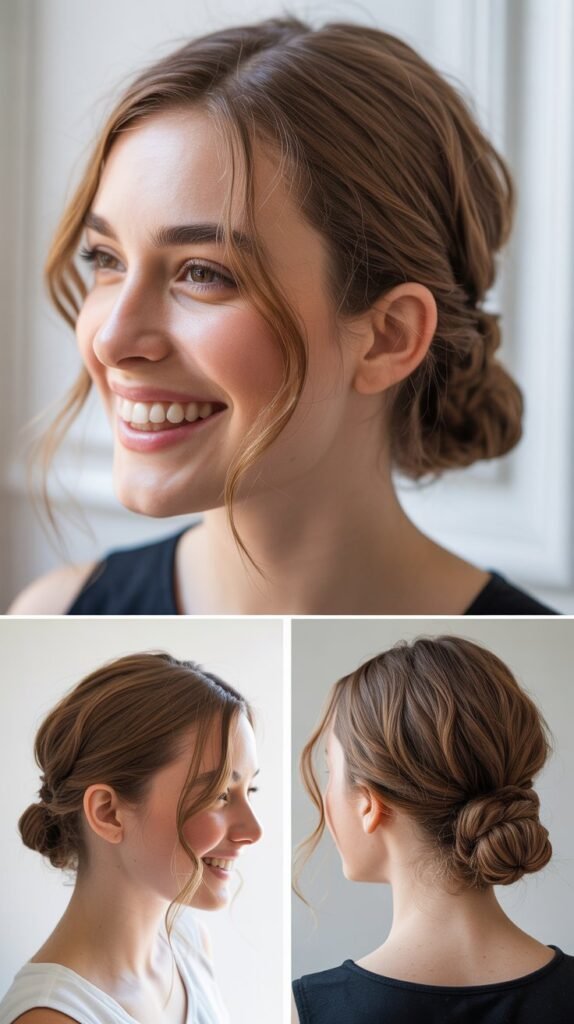
20. Sleek Low Bun
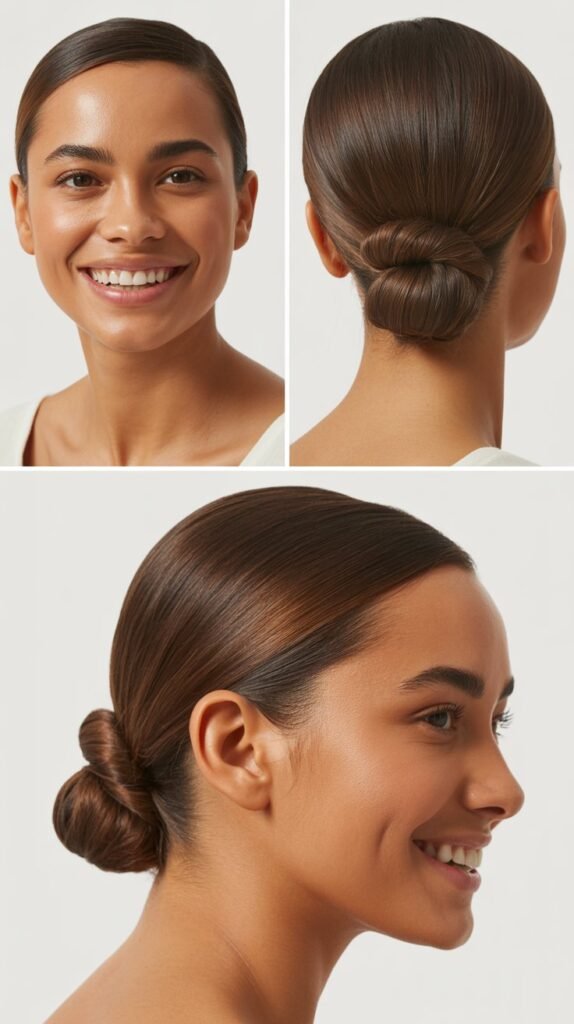
The sleek low bun combines elegance with simplicity, smoothing your curls into a polished bun while maintaining healthy hair practices that minimize frizz. This professional style works for any formal occasion or workplace setting.
- Apply a smoothing cream or gel to damp or dry hair for better control and frizz reduction
- Use a soft bristle brush or your hands to gather all hair smoothly at the nape of your neck
- Create a low ponytail and secure it with a hair tie that matches your hair color
- Twist the ponytail and wrap it around the base in a circular motion to form a neat bun
- Secure the bun with bobby pins inserted in different directions for maximum hold
- Use a toothbrush sprayed with hairspray to smooth any flyaways or frizz around your hairline
- Finish with a shine-enhancing spray for a glossy, professional appearance
21. Waterfall Braid
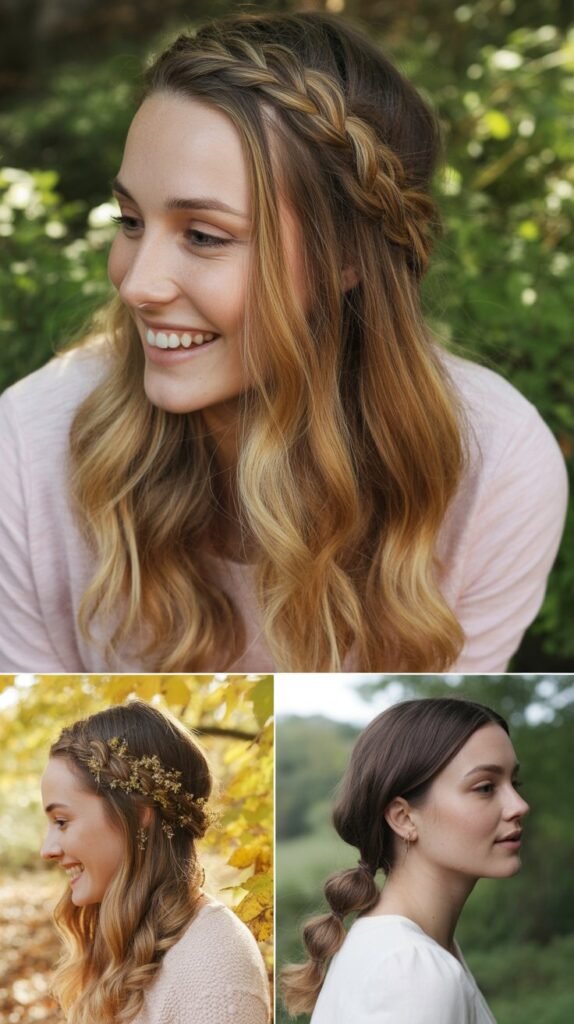
The waterfall braid creates a cascading effect that frames your face beautifully while allowing your curls to flow freely below.
This romantic style reduces frizz along your hairline while showcasing your natural curl texture.
- Start near your temple and take a small section of hair divided into three strands
- Begin a regular braid but drop the bottom strand after each stitch, replacing it with new hair from above
- Continue this pattern across your head toward the opposite ear, creating the waterfall effect
- The dropped sections cascade down naturally, blending with your loose curls below
- Secure the braid end behind your ear with bobby pins that match your hair color
- Refresh the loose curls below the braid with curl cream and scrunch gently
- This feminine style works beautifully for special occasions, date nights, or anytime you want to feel romantic
22. Curly Mohawk Braid

The curly mohawk braid combines edgy style with protective benefits, creating a center braid that keeps sides smooth while featuring volume on top. This bold look reduces frizz through intentional styling that lasts for days.
- Divide your hair into three sections: left side, right side, and center strip from forehead to nape
- Apply gel or edge control to the side sections and smooth them down flat against your head
- Create cornrows or flat twists on each side working from front to back for a sleek appearance
- French braid or Dutch braid the center section, pulling in hair as you work toward the nape
- Secure the end of the center braid and allow it to stand up prominently from your head
- Gently pull apart the center braid for added volume and texture contrast against the sleek sides
- This statement style can last several days and works perfectly for those who want something different
23. Curly Ballerina Bun
The curly ballerina bun delivers classic elegance while protecting your curls in a high, secure bun that minimizes frizz throughout busy days. This timeless style flatters all face shapes and works for any occasion.
- Create a high ponytail at the crown of your head, positioning it slightly toward your forehead
- Twist the ponytail loosely to maintain some curl texture throughout
- Wrap the twisted ponytail around the base in a circular motion, forming a bun shape
- Secure with bobby pins and optionally cover with a hair net that matches your color for extra hold
- Use a gel or edge control on a toothbrush to smooth your hairline and baby hairs
- Pull out a few small curls around your face for a softer, more approachable appearance
- This sophisticated style keeps your neck cool and looks polished from every angle
24. Side Dutch Braid
The side Dutch braid creates a raised, textured braid that showcases your curl pattern while keeping hair secured on one side. This practical style reduces frizz by containing curls within the braid structure.
- Sweep all your hair to one side and section out hair near your temple to begin
- Start a Dutch braid by crossing sections under rather than over as in a French braid
- Pull in additional hair with each stitch as you work the braid down toward your shoulder
- Keep the braid tight at the roots but allow it to loosen slightly at the ends for texture
- Secure the braid end with a clear elastic or decorative hair tie
- Gently pull apart sections of the braid to create fullness and dimension
- This versatile style looks casual enough for errands but polished enough for work settings
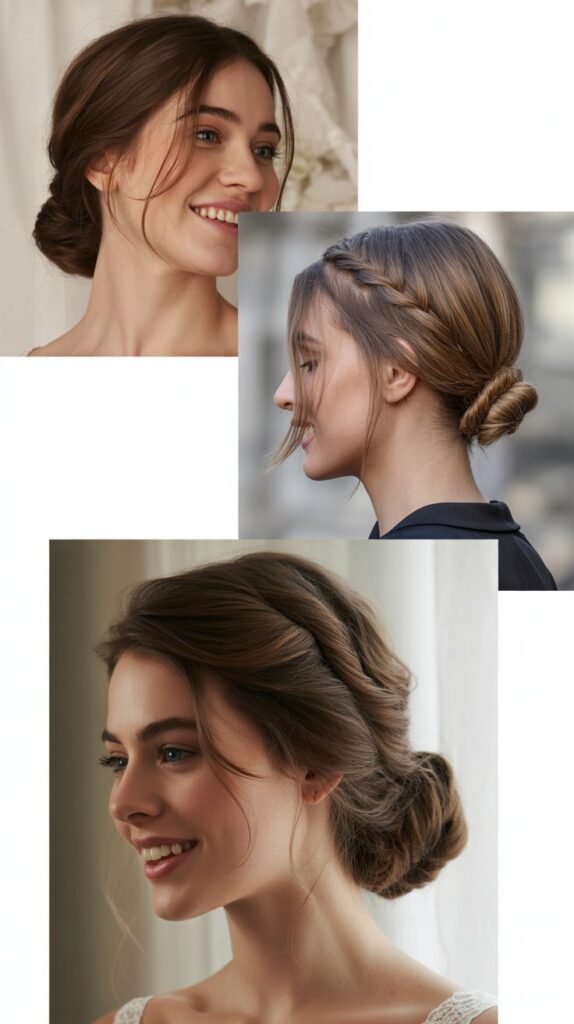
25. Curly Chignon
The curly chignon offers sophisticated simplicity, gathering curls into a low, twisted bun that sits elegantly at the nape of your neck. This classic style minimizes frizz while maintaining a polished, professional appearance.
- Gather your hair at the nape of your neck using your hands to maintain natural curl texture
- Twist the gathered hair loosely to create a rope-like shape
- Wrap the twisted hair in a figure-eight or circular pattern to form the chignon
- Secure with bobby pins inserted at various angles to distribute weight and ensure stability
- Pull out a few face-framing curls and leave some texture visible in the chignon for softness
- Use a light-hold hairspray to set the style without creating stiffness or crunchiness
- This timeless style works beautifully for weddings, formal events, or professional presentations
26. Twisted Half-Up Bun
The twisted half-up bun combines the best of both worlds, keeping the top half secured in a textured bun while allowing bottom curls to flow freely. This balanced style reduces frizz at the crown while showcasing length and volume.
- Section off the top half of your hair from ear to ear across the crown
- Gather the top section and twist it loosely to maintain curl definition
- Wrap the twisted section around itself to create a small, textured bun
- Secure the bun with bobby pins and optionally wrap a small section of hair around the base
- Use your fingers to loosen and expand the bun for added volume and dimension
- Refresh the bottom section of loose curls with a curl spray and scrunch gently
- This quick style takes under five minutes and works for both casual and dressy occasions
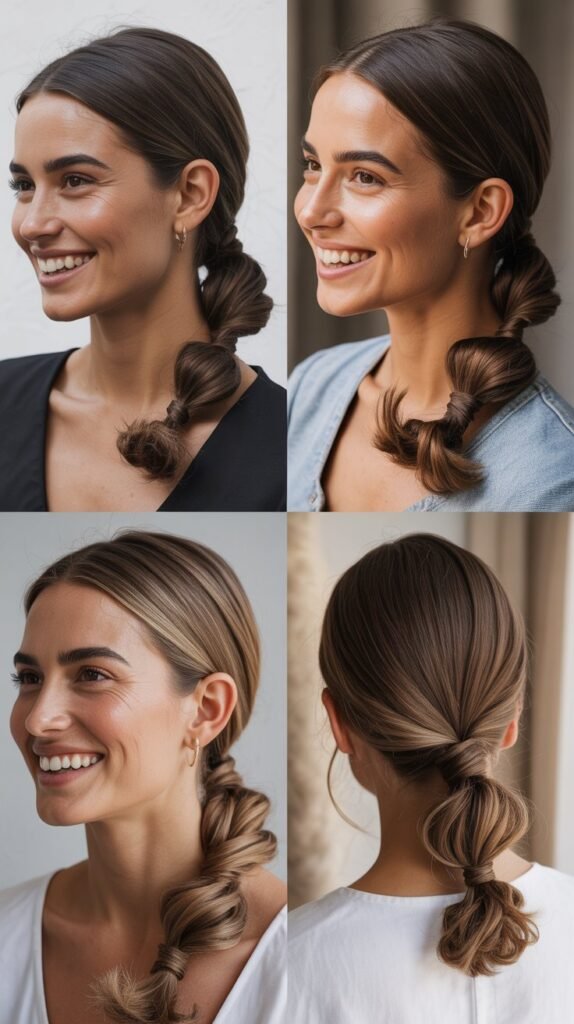
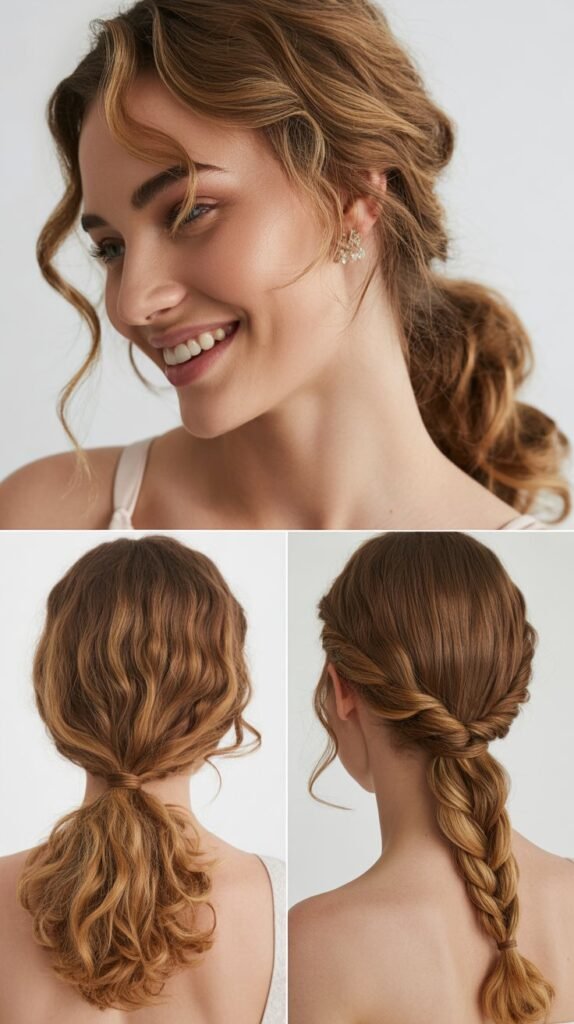
27. Rope Braid Ponytail
The rope braid ponytail delivers a unique twisted texture that’s easier to create than traditional braids while still reducing frizz and looking polished. This style showcases your curl texture throughout the twisted rope.
- Create a ponytail at your desired height and secure it with a hair tie
- Divide the ponytail into two equal sections
- Twist each section tightly in the same direction (both clockwise or both counterclockwise)
- Wrap the two twisted sections around each other in the opposite direction they were twisted
- Secure the end with another elastic and gently pull apart sections for added fullness
- The rope braid creates natural texture that celebrates your curls while keeping everything controlled
- This style works perfectly when you’re short on time but still want something more interesting than a basic ponytail
28. Crown Twist with Loose Curls

The crown twist with loose curls creates a romantic halo effect that keeps hair off your face while allowing the majority of your curls to cascade freely.
This style reduces frizz around your hairline while maintaining maximum volume below.
- Section out hair from your temples back to your ears on both sides, leaving the back section down
- Twist the hair on one side away from your face, pulling it taut as you work toward the back
- Repeat the twisting process on the other side, meeting the first twist at the back of your head
- Secure where the twists meet using bobby pins or a small claw clip
- Pull gently on the twists to loosen them for more volume and a softer appearance
- Allow the bottom section of curls to hang naturally or refresh them with curl spray
- This feminine style flatters all face shapes and works beautifully for warm weather days
29. Sock Bun with Curly Texture

The sock bun with curly texture creates a perfectly round, voluminous bun that looks salon-quality while being surprisingly simple to execute. This method reduces frizz by containing curls within a structured shape.
- Cut the toe off a clean sock and roll it into a donut shape that matches your hair color
- Create a ponytail at your desired height and pull it through the center of the sock donut
- Spread your curls evenly around the donut, covering it completely
- Tuck the ends of your hair under the donut and roll it down toward the ponytail base
- Secure with bobby pins around the perimeter to keep everything smooth and in place
- Use your fingers to adjust any sections that appear lumpy or uneven for a perfectly round appearance
- This technique creates a fuller-looking bun that’s perfect for thin or medium-density curly hair
30. Bubble Ponytail

The bubble ponytail transforms a basic ponytail into an eye-catching style with multiple bubble sections that showcase volume while keeping frizz controlled.
This trendy look is surprisingly easy and works beautifully with curly hair texture.
- Create a ponytail at your desired height using a scrunchie or elastic
- Place additional elastics down the length of the ponytail at even intervals (every 2-3 inches)
- Gently pull and separate the hair between each elastic to create rounded bubble shapes
- Work carefully to maintain curl definition while expanding each bubble section
- Use your fingers to fluff and adjust each bubble for maximum volume and uniformity
- Secure the final section at the bottom to complete the bubble effect throughout
- This playful style works for casual outings, festivals, or anytime you want to make a statement
31. Side Chignon
The side chignon delivers asymmetrical elegance while keeping all your curls secured and frizz-free in a sophisticated low bun.
This romantic style works beautifully for special occasions or when you want something different from center-back styling.
- Sweep all your hair to one side of your neck, choosing your preferred side
- Gather the hair loosely at the side of your nape without pulling too tightly
- Twist the gathered hair and wrap it around itself to create a circular bun shape
- Secure with bobby pins inserted at various angles, ensuring the chignon sits flush against your head
- Pull out a few curls at the front and around the chignon for a softer, more romantic appearance
- Apply a light oil or serum to add shine and tame any surface frizz
- This sophisticated style photographs beautifully and works for weddings, date nights, or formal events
32. Milkmaid Braids
Milkmaid braids create a charming crown effect by wrapping two braids over the top of your head, keeping all hair secured while reducing frizz through protective styling. This whimsical look has a timeless, fairy-tale quality.
- Part your hair down the center and create two low pigtails at the nape of your neck
- Braid each pigtail in a simple three-strand braid and secure the ends with elastics
- Lift one braid up and over your head like a headband, pinning it securely on the opposite side
- Repeat with the second braid, crossing it over your head and pinning it where the first braid began
- Tuck the ends of both braids underneath each other for a seamless, polished finish
- Gently pull and loosen sections of the braids for added volume and texture
- This protective style can last for multiple days and looks beautiful with both casual and dressy outfits
33. Twisted Side Ponytail
The twisted side ponytail combines elegance with ease, featuring twisted sections that add visual interest while keeping frizz controlled. This asymmetrical style flatters most face shapes and takes minutes to create.
- Divide your hair into four to six vertical sections from forehead to nape
- Twist each section individually from roots to ends in the same direction
- Gather all twisted sections to one side of your head at shoulder level or below
- Secure with a decorative hair tie or scrunchie that complements your style
- Allow the twisted sections to slightly unravel in the ponytail for added texture and volume
- Pull out a few face-framing curls on the opposite side for balance
- This romantic style works beautifully for both daytime activities and evening events
34. Curly Bun with Braid Accent
The curly bun with braid accent elevates a simple bun by adding a decorative braid that wraps around or leads into the bun. This detail-oriented style reduces frizz while creating an artistic, polished appearance.
- Section out a small portion of hair near your hairline or temple for the accent braid
- Create a three-strand or Dutch braid with this section, working toward where you’ll place the bun
- Gather the remaining hair into a bun at your desired location (high, mid, or low)
- Wrap the braid around the base of the bun or incorporate it into the bun structure
- Secure everything with bobby pins, ensuring both the braid and bun feel stable
- Gently loosen sections of both the braid and bun for added dimension and softness
- This versatile style works for professional settings, special occasions, or everyday elegance
35. Victory Rolls with Curls

Victory rolls with curls bring vintage glamour to modern curly hair, creating sculptural rolled sections at the front while letting remaining curls cascade freely.
This retro-inspired style minimizes frizz through smooth rolling techniques.
- Section out the front portion of hair from your temple to your crown on both sides
- Apply a strong-hold gel or mousse to one front section for control and shine
- Roll the section backward toward your scalp, creating a smooth cylindrical roll
- Pin the roll securely with bobby pins inserted vertically through the roll
- Repeat the process on the other side, creating a matching symmetrical roll
- Allow the remaining hair to fall naturally in curls behind the rolls
- This statement style works beautifully for themed parties, special events, or when you want dramatic vintage flair
36. Loose Side Bun
The loose side bun offers effortless romance with soft, intentionally messy texture that keeps hair secured while minimizing frizz. This relaxed style looks beautiful from every angle and works for various occasions.
- Gather all your hair loosely to one side at ear level or slightly below
- Twist the hair very loosely, maintaining as much natural curl texture as possible
- Wrap the twisted hair around itself in a relaxed circular pattern to create the bun
- Secure with bobby pins but don’t worry about perfect placement or smoothness
- Pull out several curls throughout the bun and around your face for that perfectly imperfect appearance
- Allow some shorter curls to escape naturally rather than pinning everything tightly
- This forgiving style looks beautiful even as it loosens throughout the day
37. Multi-Strand Twist Out

The multi-strand twist out creates complex definition using three or more strands twisted together, resulting in highly defined curls with minimal frizz. This advanced technique delivers stunning results that last for days.
- Start with damp, product-saturated hair divided into small to medium sections
- Take each section and divide it into three or four equal strands
- Twist all strands together in a rope-like fashion, working from roots to ends
- The multiple strands create a more complex pattern than traditional two-strand twists
- Allow twists to dry completely (overnight or under a dryer) before unraveling
- Carefully untwist each section and gently separate the strands for volume
- Apply a light oil to your palms and scrunch to define curls and add shine
- This technique provides maximum definition and can last up to a week with proper nighttime care
Frizz-Fighting Tips for Curly-Haired Moms
Understanding how to maintain these hairstyles and prevent frizz is just as important as knowing how to create them. The following strategies will help you keep your curls looking their best between styling sessions.
- Protect your hair at night by sleeping on satin or silk materials that won’t rough up your curl cuticle
- Avoid touching your hair throughout the day as the friction from your hands creates frizz and disrupts curl patterns
- Use the “praying hands” method when applying products to encourage curl clumps and seal the cuticle smoothly
- Refresh curls between wash days using a spray bottle with water and leave-in conditioner rather than rewetting completely
- Invest in quality styling products specifically formulated for curly hair that provide hold without crunchiness or stiffness
Conclusion
Managing curly hair as a busy mom no longer needs to feel overwhelming or time-consuming when you have the right arsenal of styles and techniques.
These 37 Easy Hairstyles for Moms with Curly Hair That Reduce Frizz provide practical solutions for every occasion, hair length, and skill level, empowering you to embrace your natural texture with confidence.
From quick five-minute styles like the pineapple updo and messy top knot to more elaborate options like Bantu knot outs and victory rolls, you now have diverse choices that work with your schedule and lifestyle.
The key to successfully reducing frizz lies in gentle manipulation, adequate moisture, protective styling, and nighttime care that preserves your hard work.
Remember that healthy, beautiful curls start with proper products and techniques that honor your hair’s natural texture rather than fighting against it.
Experiment with different styles from this collection to discover which ones make you feel most confident and comfortable in your daily routine.
Your curls are unique and beautiful, and with these frizz-fighting hairstyles at your fingertips, you can showcase them proudly while navigating the demands of motherhood.
Embrace the journey of learning what works best for your specific curl pattern, and don’t be afraid to adapt these styles to suit your personal preferences and lifestyle needs.