If you’re blessed with thick wavy hair, you already know it’s both a gift and a challenge—the volume is gorgeous, but styling can feel overwhelming.
The secret to making your thick waves work for you lies in braided hairstyles that embrace your hair’s natural texture while keeping it manageable and chic.
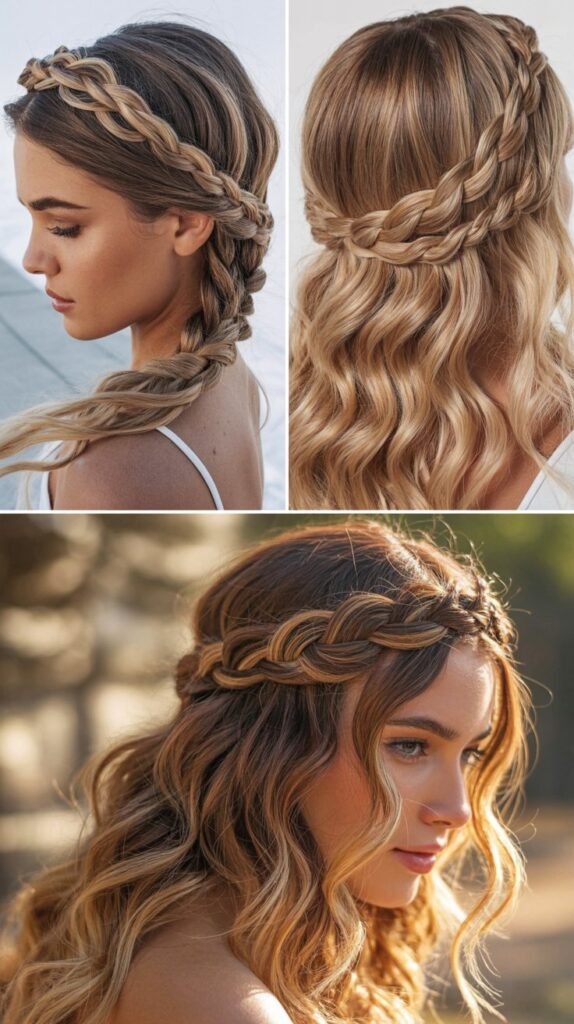
This article explores 42 Braided Hairstyles for Thick Wavy Hair That Look Effortless, offering you a complete guide from classic three-strand braids to intricate bohemian styles that turn heads.
Whether you’re heading to the office, a wedding, or just running errands, you’ll discover how to transform your thick waves into stunning braided looks that appear artfully undone yet polished.
Each style is designed specifically for your hair type, ensuring the braids hold beautifully without slipping while showcasing your hair’s natural body and movement.
Get ready to bookmark your favorites and say goodbye to bad hair days forever.
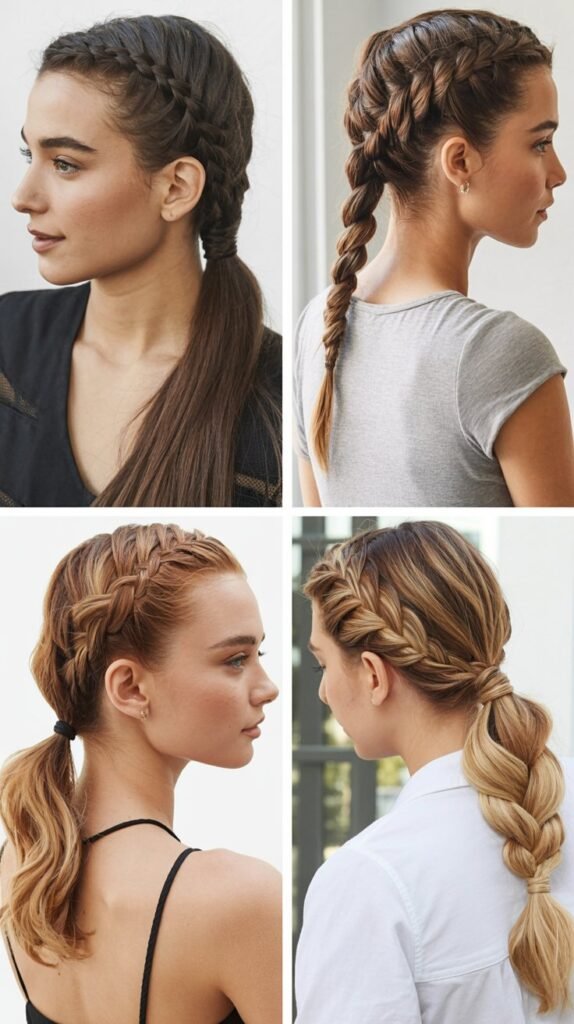
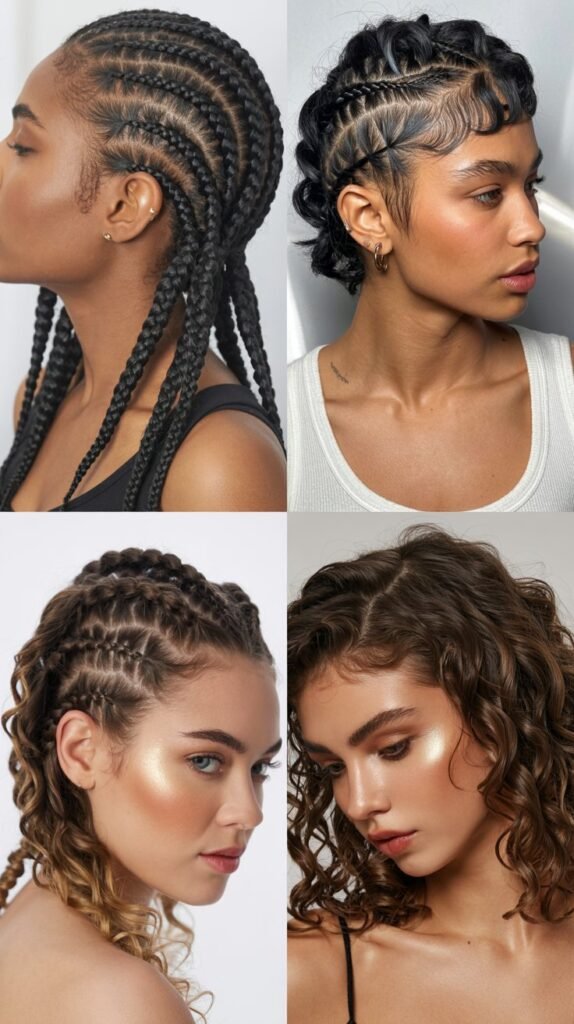
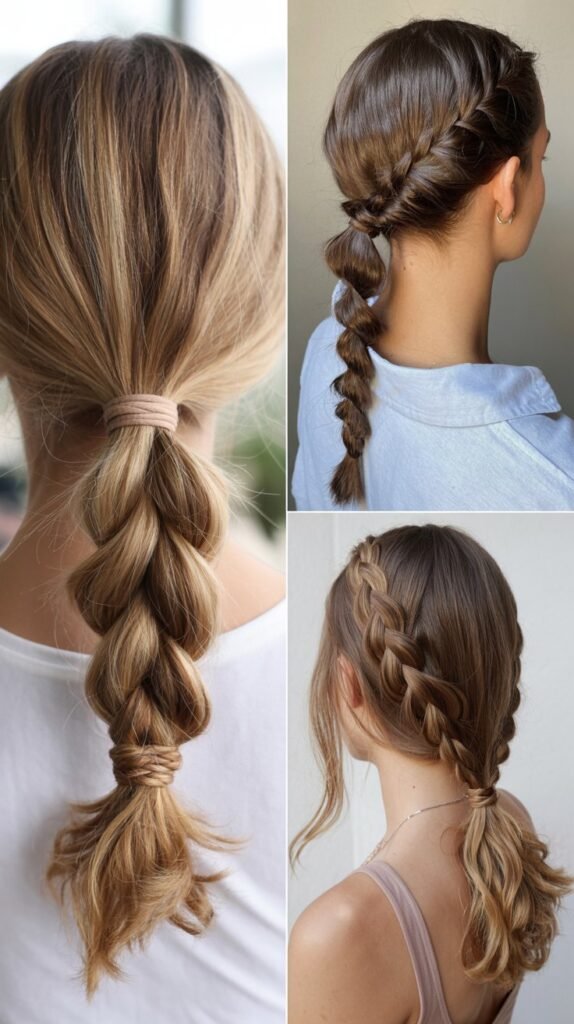
1. Classic Three-Strand Braid for Daily Wear
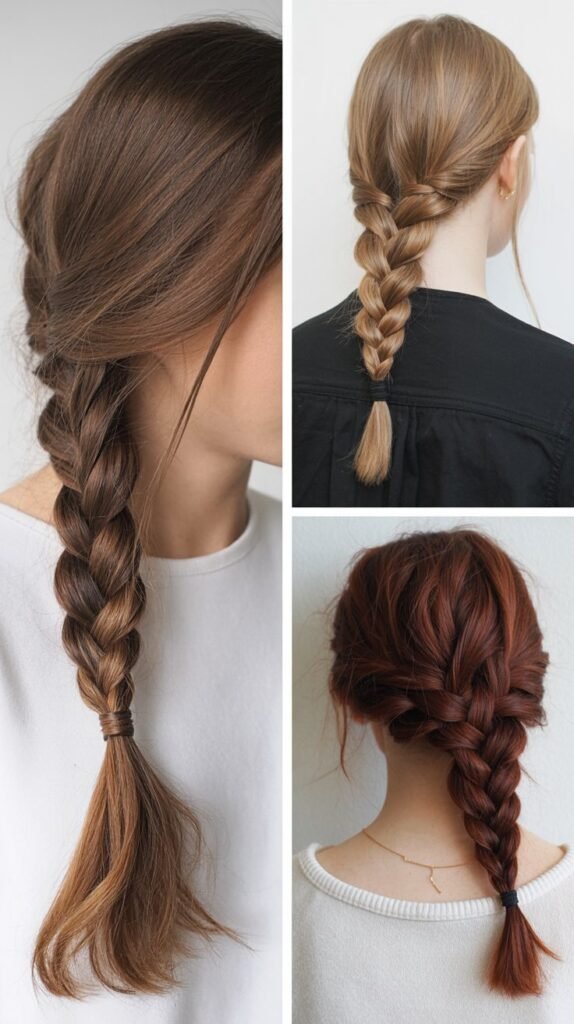
The three-strand braid serves as the foundation for nearly every braided style, making it essential to master for thick wavy hair.
This timeless technique works exceptionally well with your hair type because the natural texture adds grip and dimension that keeps the braid secure throughout the day.
- Thick wavy hair naturally holds the three-strand braid pattern better than fine or straight hair because the texture creates friction between sections.
- Start with slightly damp or day-old hair rather than freshly washed strands, as this provides better grip and prevents the braid from looking too fluffy.
- Divide your hair into three equal sections at the nape of your neck, ensuring each section contains a similar amount of hair for a balanced braid.
- Cross the right section over the middle section, then cross the left section over the new middle section, repeating this pattern consistently.
- Keep moderate tension throughout the braiding process—too tight creates discomfort, while too loose causes the braid to unravel.
- Secure the end with a hair elastic that matches your hair color for a seamless finish.
- Gently tug on the outer edges of the braid to create a fuller, more relaxed appearance that showcases your hair’s volume.
- Apply a light finishing spray to tame flyaways without weighing down your thick waves.
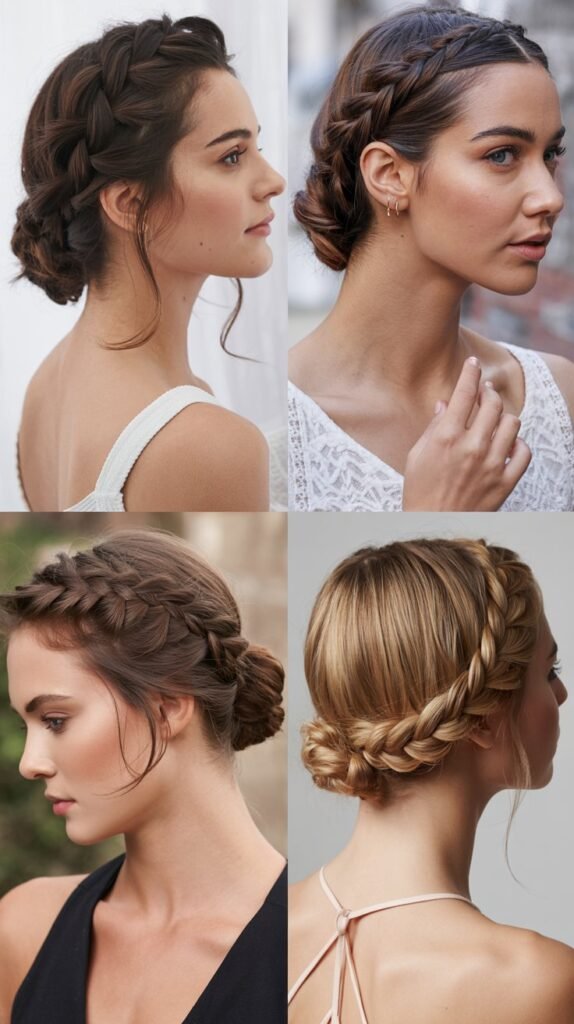
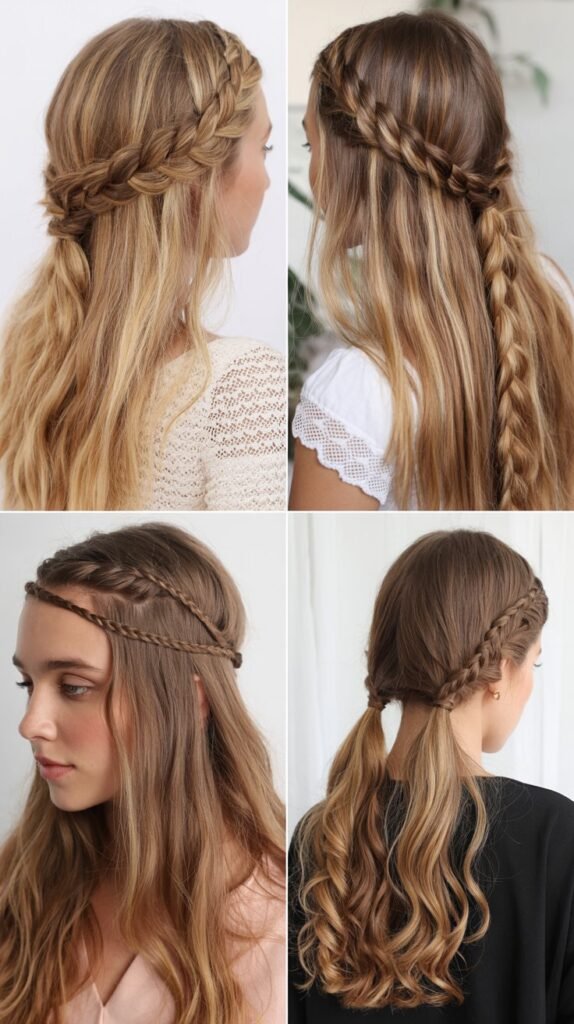
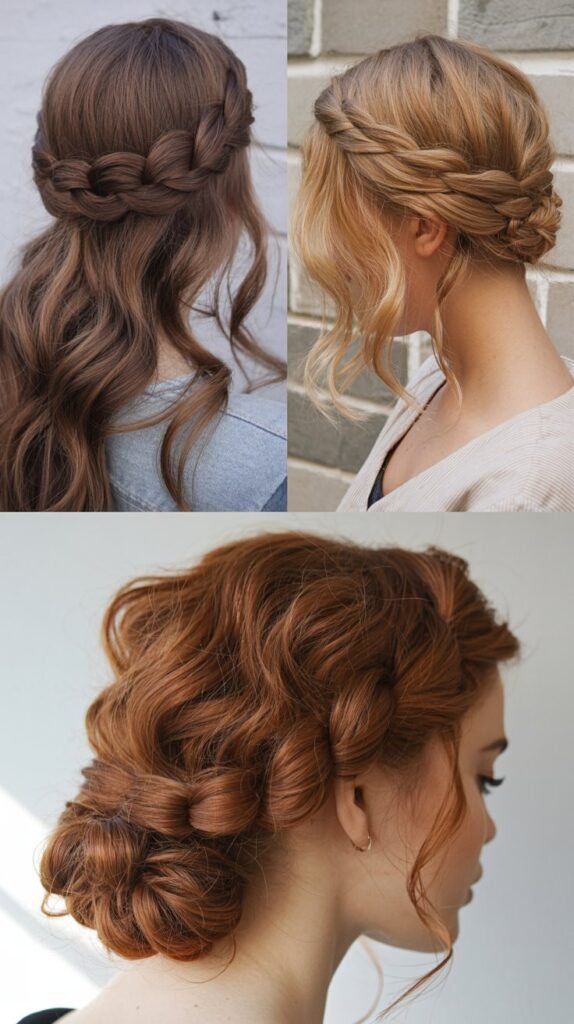
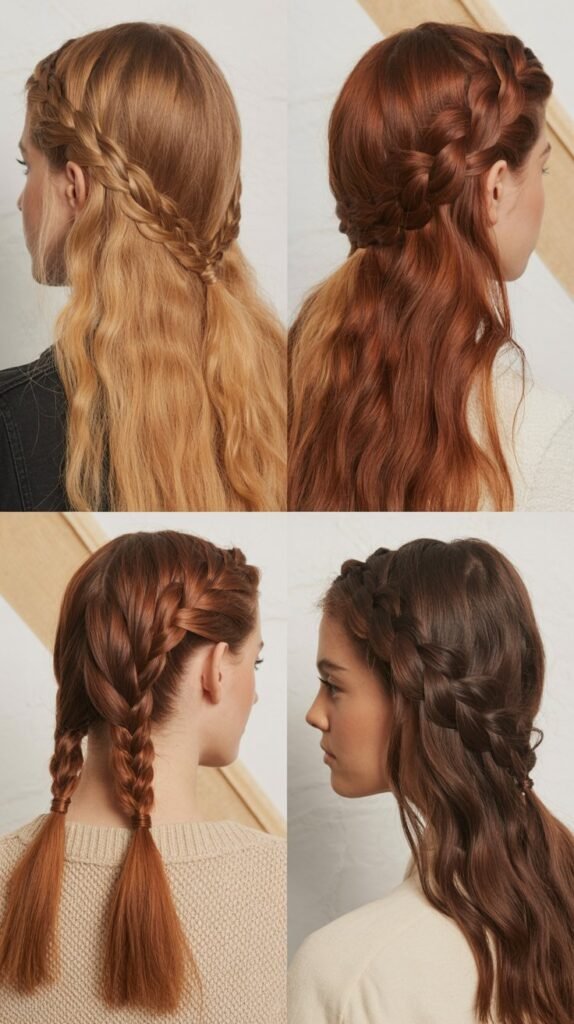
2. French Braid Crown for Elegant Occasions
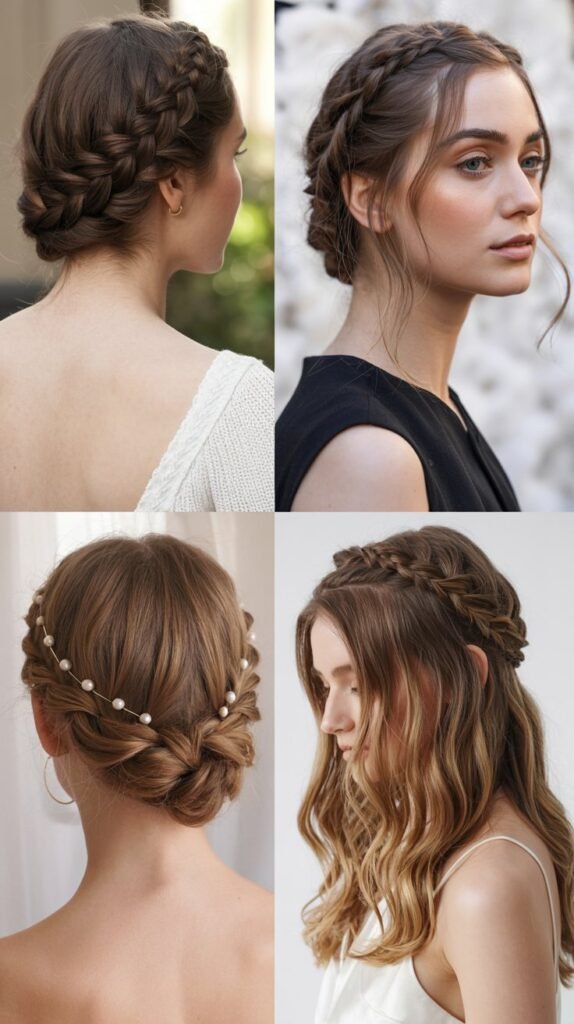
The French braid crown elevates thick wavy hair into a regal style perfect for weddings, formal events, or when you want to feel extra special.
This technique incorporates hair gradually as you braid around the head, creating a halo effect that looks intricate but becomes easier with practice.
- Begin by parting your hair down the middle from forehead to nape, creating two equal sections for symmetrical crown placement.
- Start the French braid just above your right ear, taking a small section and dividing it into three parts.
- As you braid toward the back of your head, continuously add small sections of hair from the hairline into each stitch.
- The thickness of wavy hair means you can create a substantial, visible braid that won’t look sparse or thin.
- Continue braiding along your natural hairline, following the curve of your head toward the left side.
- When you reach the starting point, either tuck the remaining tail under the crown and pin it securely, or continue into a regular braid and wrap it around.
- Use bobby pins that match your hair color every few inches along the crown to ensure it stays secure throughout your event.
- Pull gently on the outer loops of the braid to add width and create a softer, more romantic appearance.
- Finish with a flexible hold hairspray to maintain the style without creating stiffness.
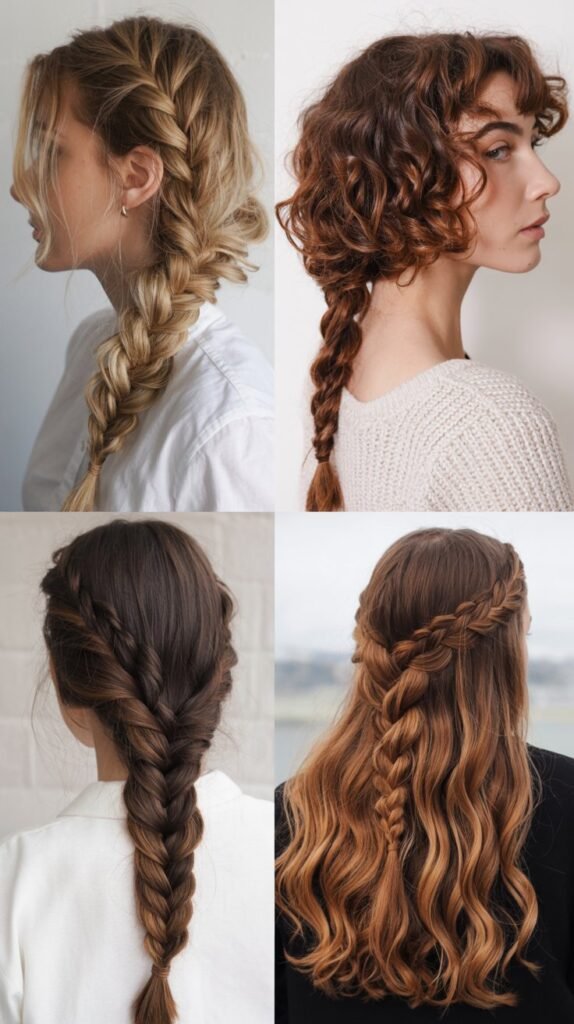
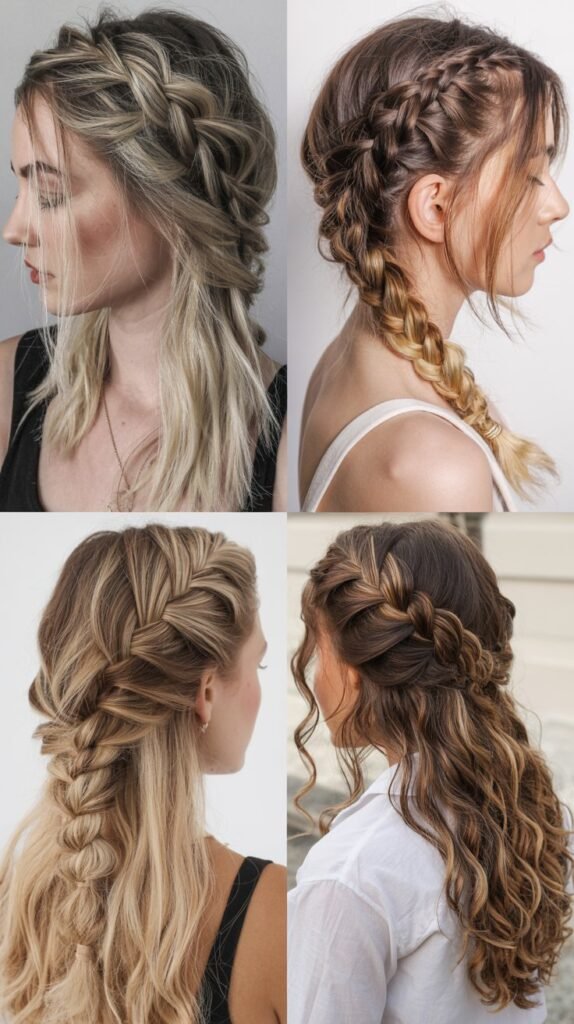
3. Dutch Braid with Volume Boost
Dutch braids, often called reverse French braids, sit on top of your hair rather than tucking underneath, making them ideal for showcasing the natural volume of thick wavy hair.
This style creates a bold, dimensional look that stands out while keeping your hair completely off your face.
- The Dutch braid technique involves crossing sections under the middle strand rather than over it, creating a braid that appears to sit on top of your hair.
- Start by brushing your thick waves back from your forehead and taking a section at your hairline about three inches wide.
- Divide this section into three equal parts and begin by crossing the right strand under the middle, then the left strand under the new middle.
- As you continue braiding down toward your neck, add small sections of hair from each side into the outer strands before crossing them under.
- The natural texture of wavy hair adds incredible dimension to Dutch braids, making each woven section clearly visible.
- Maintain consistent tension throughout the braid to ensure it lies flat against your scalp and doesn’t twist sideways.
- When you run out of hair to add, continue with a regular three-strand braid to the ends.
- Pancake the braid by gently pulling on the outer edges of each woven section to maximize volume and create an intentionally undone appearance.
- This style works beautifully for athletic activities, as it keeps thick hair completely secured while looking polished.
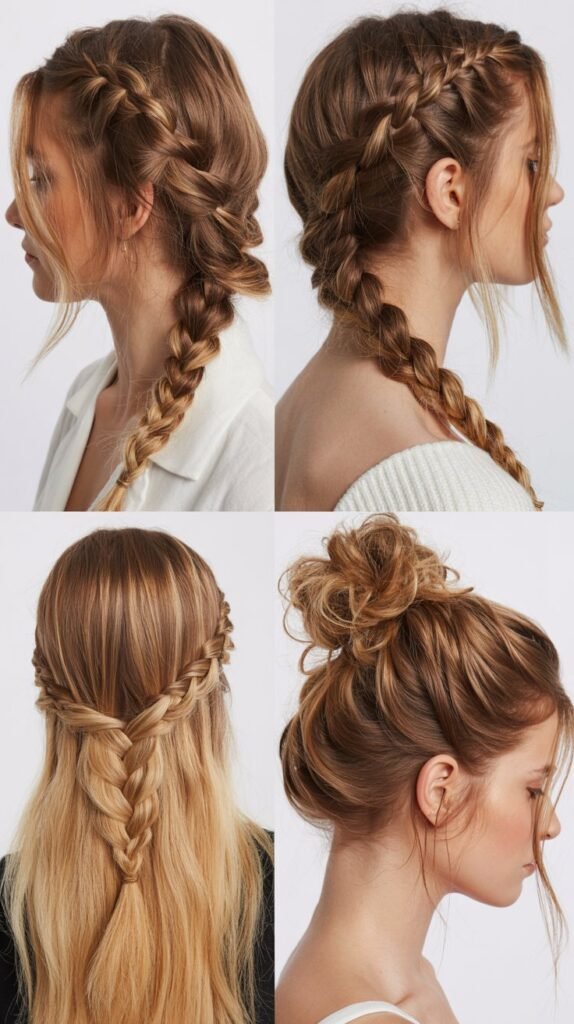
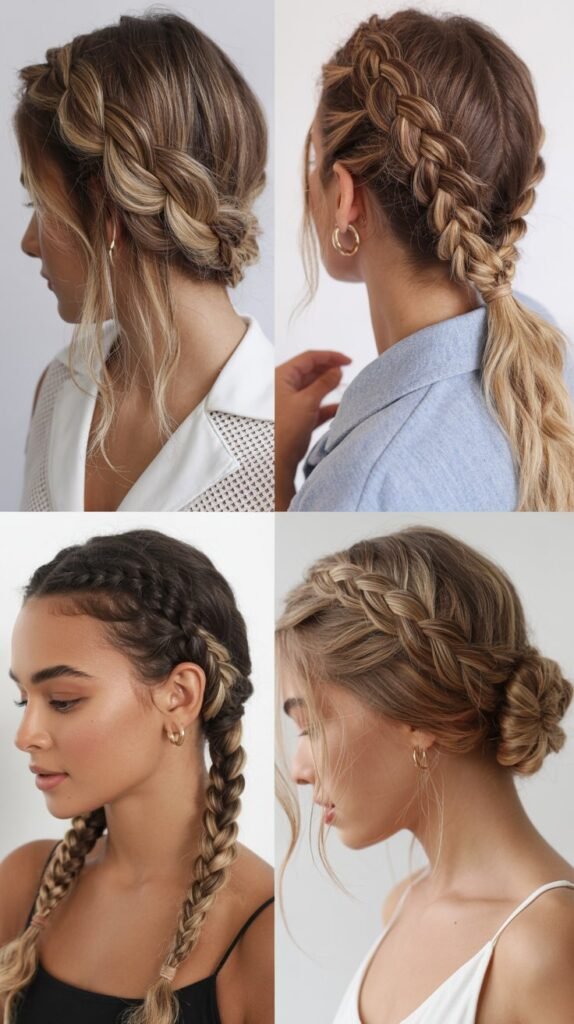
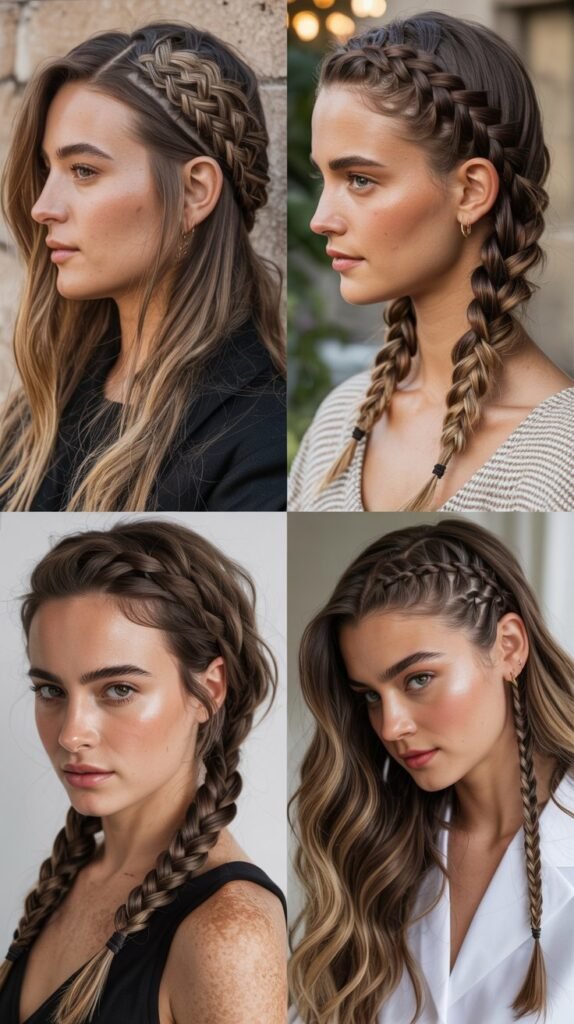
4. Fishtail Braid for Textured Appeal
The fishtail braid creates an intricate, woven pattern that appears complex but requires only two sections of hair instead of three.
Thick wavy hair brings this style to life with natural texture that makes the interlaced pattern stand out beautifully.
- Fishtail braids work by alternating small sections from each side of two main sections, creating a herringbone pattern.
- Divide your hair into two large, equal sections at the point where you want the braid to begin.
- Take a thin strand from the outer edge of the left section and cross it over to join the right section.
- Immediately take a thin strand from the outer edge of the right section and cross it over to join the left section.
- Continue this alternating pattern all the way down, keeping the small strands consistent in size for a uniform appearance.
- Thick wavy hair allows you to create either a tight, polished fishtail or a loose, bohemian version by adjusting how much you pull apart each section.
- The natural wave pattern adds depth and texture that makes the fishtail look incredibly intricate even when loosely styled.
- Secure the end with a clear elastic band, then gently pull on the outer edges to create width and a relaxed finish.
- This style lasts remarkably well on thick hair because the texture prevents the small sections from slipping out of place.
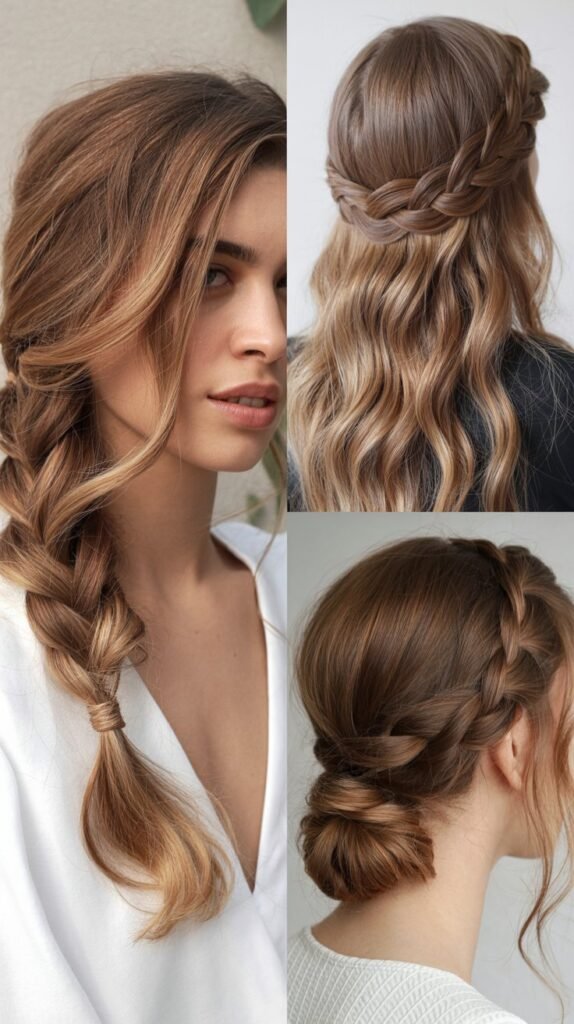
5. Side Braid with Face-Framing Waves

A side braid brings asymmetrical interest to thick wavy hair while keeping your style casual and approachable.
This versatile look transitions seamlessly from day to night and allows you to showcase your face while managing your hair’s volume.
- Begin by creating a deep side part on your preferred side, sweeping all your hair over one shoulder.
- Leave out a few face-framing pieces at the front to soften the overall look and highlight your features.
- Starting just behind your ear on the heavier side, gather your hair and begin a loose three-strand or fishtail braid.
- The weight and texture of thick wavy hair means your side braid will have beautiful body and won’t lie flat against your shoulder.
- Keep the braid loose and relaxed rather than tight, allowing the natural wave pattern to show through.
- Secure the end with an elastic band, leaving a few inches of wavy ends loose for a romantic finish.
- Gently pull apart the braid sections to increase volume and create an effortlessly undone appearance.
- Use your fingers to twist and arrange the face-framing pieces for a soft, flattering effect.
- This style works perfectly for second or third-day hair when your waves have natural texture and slight separation.
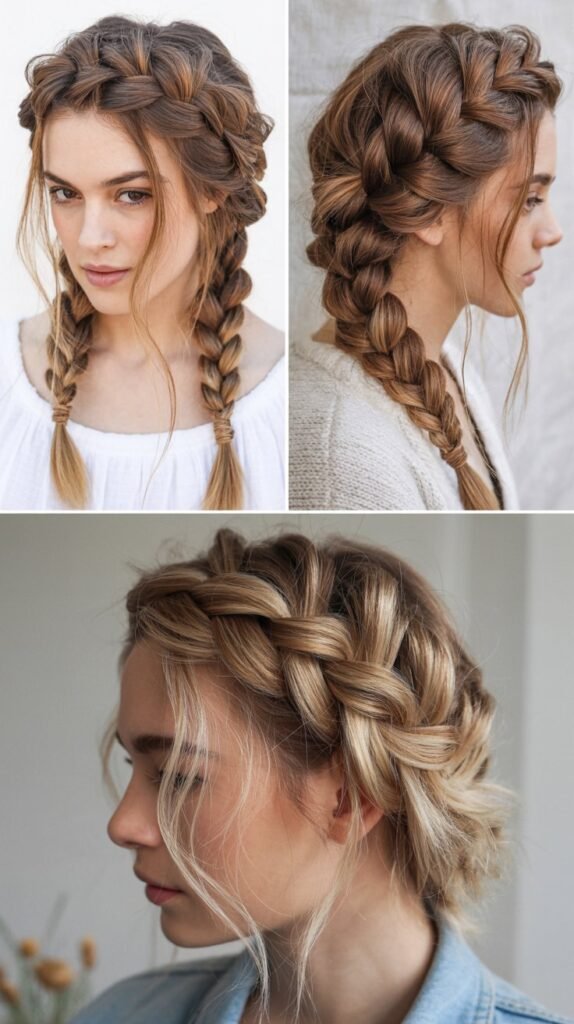
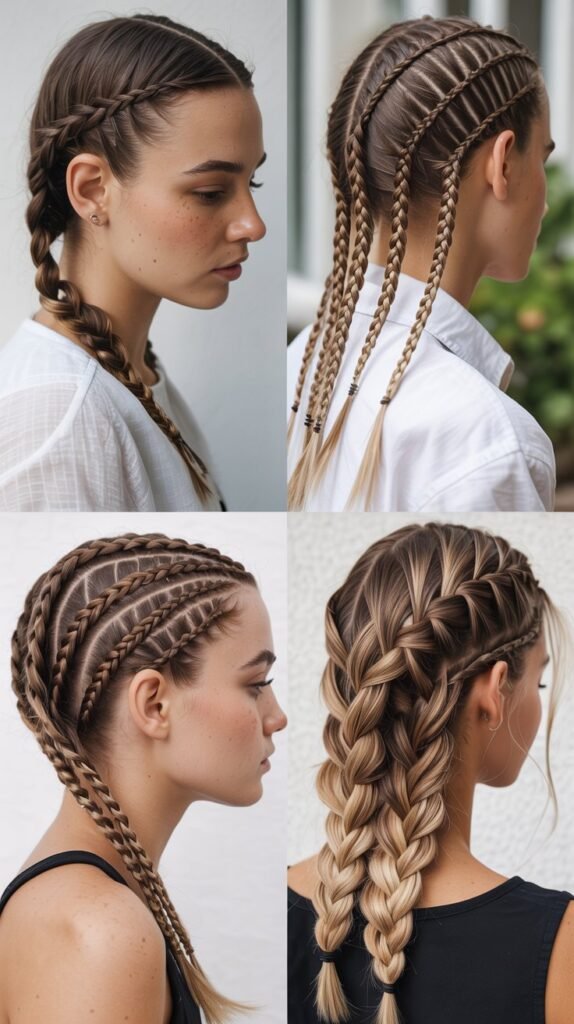
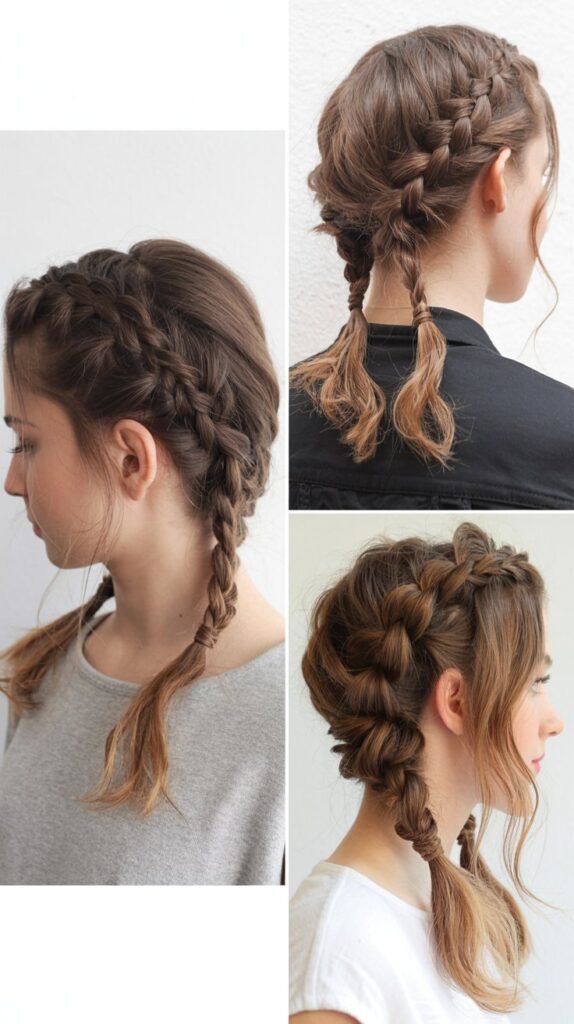
6. Boxer Braids for Athletic Chic
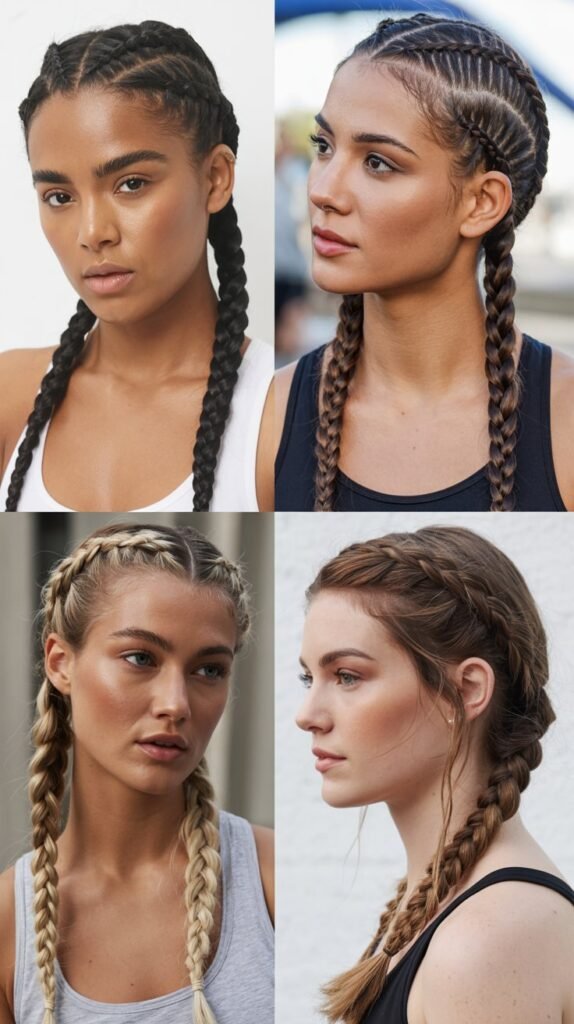
Boxer braids, consisting of two Dutch braids running parallel down each side of the head, provide maximum security for thick wavy hair during physical activities while delivering serious style points.
This athletic-inspired look has transcended the gym to become a fashion statement.
- Create a precise center part from your forehead straight back to the nape of your neck, dividing your hair into two completely equal sections.
- Clip one section away while working on the first boxer braid to prevent the sections from mixing.
- Begin the Dutch braid at your hairline, taking a section about two inches wide and dividing it into three parts.
- Cross the sections under rather than over while incorporating new hair from the sides as you braid down.
- The thickness of wavy hair creates substantial, chunky boxer braids that won’t look thin or sparse.
- Maintain tight tension throughout each braid to ensure they stay secure during movement and activity.
- Continue each braid all the way to the ends of your hair, securing with durable elastic bands.
- For a softer finish, gently pull on the outer edges of each braid to add width without loosening the core structure.
- This style can last multiple days on thick wavy hair, making it ideal for busy schedules or travel.
7. Waterfall Braid for Romantic Styling
The waterfall braid creates a cascading effect where sections of hair appear to flow through the braid like a waterfall, combining the structure of braiding with loose flowing waves.
This romantic style showcases thick wavy hair’s natural beauty while adding an intricate detail.
- Position yourself where you want the waterfall to flow, typically starting at one temple and moving toward the opposite ear.
- Take a three-inch section at your starting point and divide it into three strands to begin a basic braid.
- After the first cross-over, drop the bottom strand completely and let it fall, creating the waterfall effect.
- Pick up a new section of hair from above to replace the dropped strand and continue braiding.
- Repeat this pattern of dropping the bottom strand and replacing it with new hair from the top as you work across your head.
- The natural waves in thick hair make the dropped sections blend beautifully with the rest of your flowing hair.
- Continue the waterfall braid along your chosen path, either straight across, in a curve, or diagonally for different effects.
- Secure the end with a small elastic or bobby pins hidden within your hair.
- Curl or enhance the loose waves below the waterfall braid to create a cohesive, romantic finish.
8. Pull-Through Braid for Faux Volume

The pull-through braid creates the illusion of an intricate braid without actually braiding, using a series of ponytails pulled through each other.
This technique is perfect for thick wavy hair because it showcases volume while being surprisingly easy to create.
- Begin by creating a ponytail at the crown of your head with clear elastic bands to keep them invisible.
- Create a second ponytail directly below the first, incorporating the hair between the two ponytails.
- Split the first ponytail in half and bring each half around the sides of the second ponytail.
- Secure these halves temporarily with a clip while creating a third ponytail below.
- Release the halves from the first ponytail and combine them with new hair to form the third ponytail.
- Continue this pattern of splitting, wrapping around, and combining down the length of your hair.
- Thick wavy hair creates incredibly full, dimensional pull-through braids that appear expertly crafted.
- Once complete, gently pull on each section to maximize volume and create a statement-making braid.
- This technique works exceptionally well for special events where you want maximum impact with moderate effort.
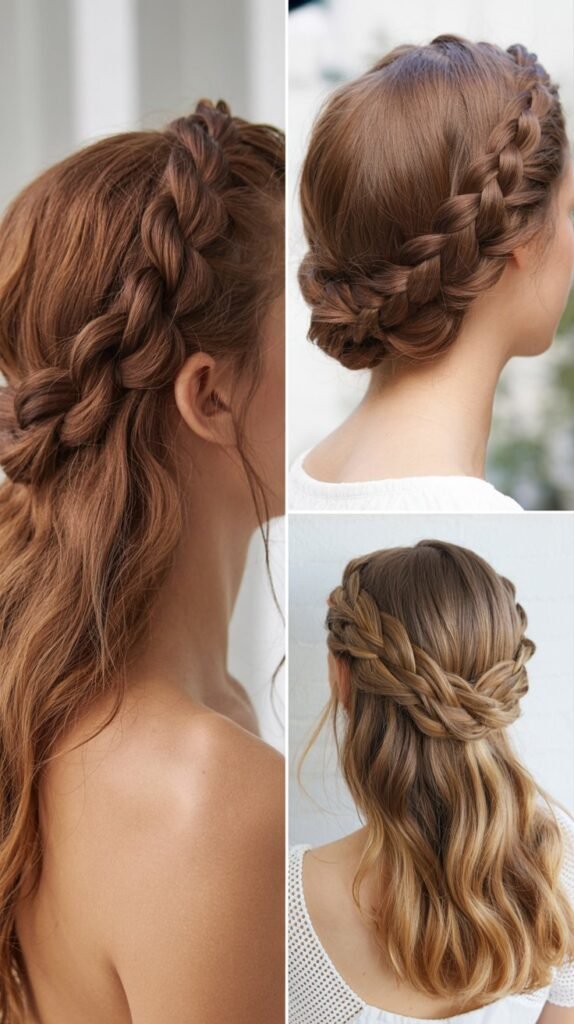
9. Milkmaid Braid for Festival Vibes

The milkmaid braid wraps two braids across the crown of your head, creating a halo effect that’s both bohemian and practical.
This style keeps thick wavy hair completely off your neck while delivering a whimsical, romantic aesthetic.
- Part your hair down the center from forehead to nape, creating two equal sections.
- Braid each section into a regular three-strand braid, starting from behind the ears and braiding all the way to the ends.
- Take the right braid and wrap it over the top of your head toward the left side, following your hairline.
- Secure this braid with bobby pins along its path, tucking the ends behind your left ear.
- Take the left braid and wrap it over the top of your head toward the right side, covering where the first braid was pinned.
- Secure the second braid with bobby pins, tucking its ends behind your right ear for a seamless finish.
- The thickness of wavy hair creates substantial braids that form a beautiful, visible crown.
- Gently pull on the braids to loosen them slightly and create a softer, more romantic appearance.
- Leave some face-framing pieces loose or pull out a few wispy strands around your hairline for an effortless, lived-in look.
10. Four-Strand Braid for Advanced Texture
The four-strand braid creates a complex, woven pattern that appears incredibly intricate and showcases the natural texture of thick wavy hair beautifully.
While it requires practice to master, the stunning result makes it worth the effort.
- Divide your hair into four equal sections instead of the traditional three, mentally numbering them from left to right as 1, 2, 3, and 4.
- Begin by crossing section 1 over section 2, then crossing section 4 under section 3.
- Next, cross the new section 2 over the new section 3 to complete the first sequence.
- Repeat this pattern continuously: outer left over, outer right under, middle sections over each other.
- The complexity of this braid becomes easier with muscle memory, typically mastered after several practice attempts.
- Thick wavy hair shows off the dimensional weave pattern exceptionally well due to natural texture and volume.
- Maintain even tension across all four sections to create a uniform, balanced braid.
- Secure the end with an elastic band and gently pull on the outer edges to emphasize the intricate pattern.
- This advanced technique works beautifully for special occasions when you want a truly unique braided style.
11. Rope Braid for Quick Elegance
The rope braid offers the fastest path to an elegant braided look, requiring only two sections twisted together.
Thick wavy hair naturally enhances this style’s texture and creates a substantial, eye-catching result with minimal effort.
- Gather your hair into a ponytail at your desired height, securing it with an elastic band.
- Divide the ponytail into two equal sections of hair.
- Twist the right section clockwise several times until it begins to coil on itself.
- Twist the left section clockwise the same number of times and with similar tightness.
- Now wrap the two twisted sections around each other in a counterclockwise direction.
- The opposing directions—twisting clockwise but wrapping counterclockwise—create the rope effect that prevents unraveling.
- Thick wavy hair holds this style exceptionally well because the texture adds grip between the twisted sections.
- Secure the end with another elastic band once you’ve twisted all the way down.
- Gently pull on sections of the rope braid to create more volume and a relaxed, undone finish.
12. Braided Ponytail for Polished Casual
A braided ponytail combines the ease of a ponytail with the detail of braiding, creating a polished yet casual style perfect for thick wavy hair.
This versatile look works for everything from office meetings to weekend brunches.
- Create a ponytail at your desired height—high for athletic looks, mid-level for versatility, or low for sophistication.
- For extra polish, take a small section from the ponytail and wrap it around the elastic band, securing it with a bobby pin.
- Braid the entire length of the ponytail using your preferred braiding technique—three-strand for classic, fishtail for texture, or Dutch for dimension.
- The thickness of wavy hair ensures your braided ponytail has substantial volume rather than looking thin or sparse.
- Leave the ends loose and wavy for a softer finish, or braid all the way to the tips for a sleek appearance.
- Secure the braid with a clear elastic band that won’t create harsh lines or visible bulk.
- Gently pull on the braid to increase its width and create an intentionally relaxed effect.
- Apply a light texturizing spray to enhance the wave pattern and add touchable, moveable hold.
- This style transitions beautifully from day to night and stays secure for extended wear.
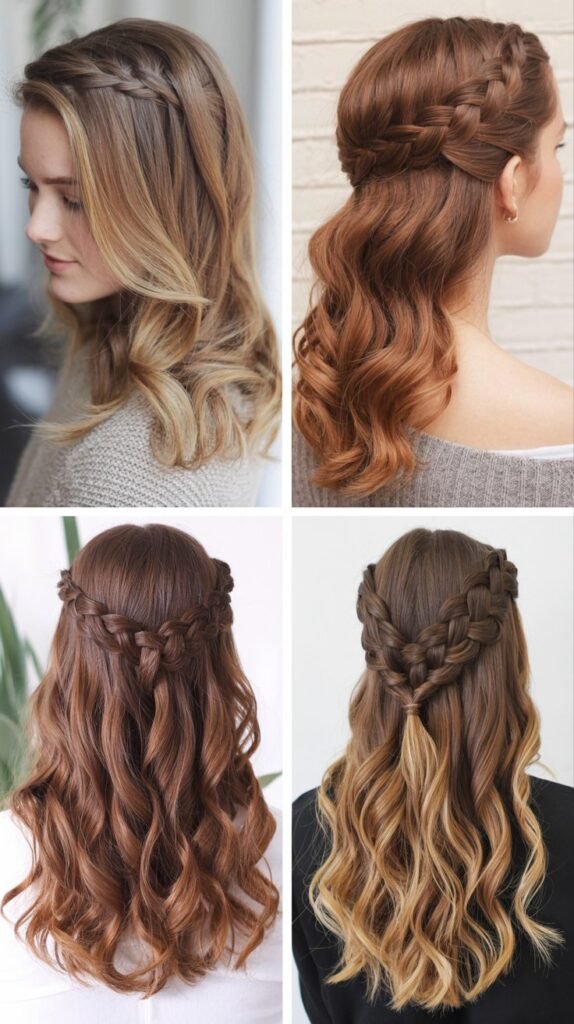
13. Halo Braid with Loose Waves

The halo braid creates a crown-like effect around the head while leaving the rest of your thick wavy hair flowing freely.
This style perfectly balances structure with movement, keeping hair off your face while showcasing your waves.
- Create a circular part around the crown of your head, separating the top section from the hair underneath.
- Leave the hair beneath the part down and loose—this will showcase your natural waves.
- Begin braiding the sectioned hair at the front hairline using a Dutch or French braid technique.
- Continue braiding along the circular part, following the shape of your head to create the halo effect.
- Incorporate hair only from the sectioned top portion as you braid around, leaving the underneath hair free.
- When you complete the circle and reach your starting point, continue the remaining hair into a regular braid.
- Tuck this tail under the halo and secure it with bobby pins for a seamless finish.
- The thick texture of wavy hair creates a substantial halo that frames your face beautifully.
- Enhance the loose waves underneath with a curling wand or by scrunching with mousse for added definition.
14. Infinity Braid for Unique Styling
The infinity braid creates a figure-eight pattern within the braid, producing a unique, eye-catching design that stands out from traditional braiding techniques.
Thick wavy hair beautifully showcases this intricate pattern.
- Begin with three sections of hair as you would for a standard braid.
- Instead of crossing sections straight over, create a figure-eight motion by looping the outer strand in an infinity symbol shape before crossing.
- Take the right section, loop it under and then over in a figure-eight motion, and bring it to the middle.
- Repeat the figure-eight motion with the left section, creating the distinctive infinity pattern.
- This technique requires practice to maintain the pattern consistently throughout the braid.
- Thick wavy hair adds natural texture that makes the infinity symbol more visible and defined.
- Work slowly at first to establish the rhythm and muscle memory for the looping motion.
- Secure the completed braid with an elastic band and avoid pulling it apart too much, as this can obscure the infinity pattern.
- This unique style works beautifully for special events or when you want to showcase your braiding skills.
15. Braided Bun for Formal Events
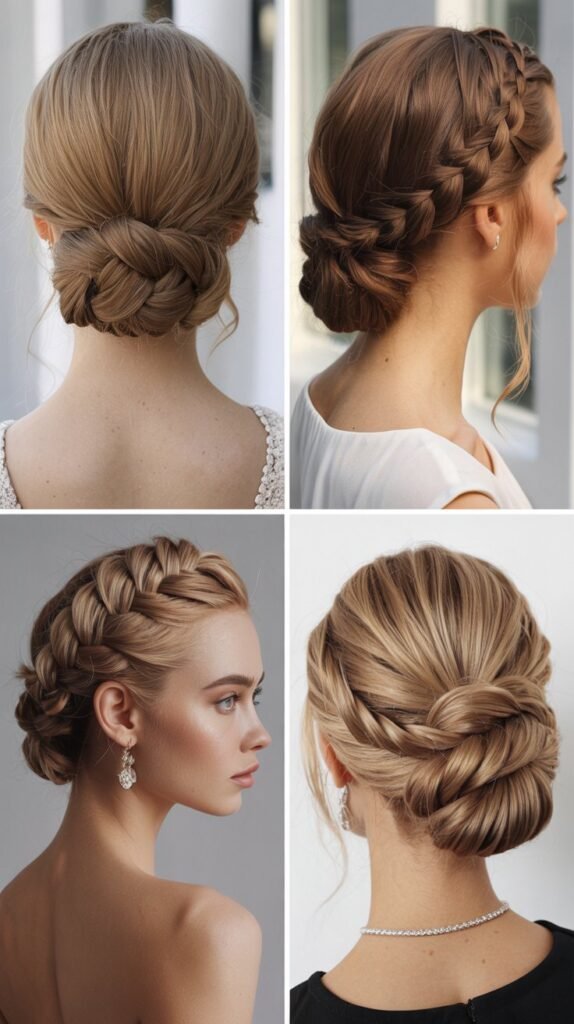
A braided bun combines elegant braiding techniques with the sophisticated structure of an updo, creating a formal style perfect for thick wavy hair.
This versatile approach offers countless variations from sleek to textured.
- Create one or two braids depending on your desired bun style—a single braid for simplicity or multiple braids for complexity.
- For a low bun, braid your hair from the nape and coil the braid into a circular shape at the base of your neck.
- For a high bun, create a high ponytail, braid it, then wrap the braid around the base in a spiral pattern.
- Thick wavy hair creates substantial, voluminous braided buns that make a statement without requiring excessive teasing or padding.
- Secure the bun with bobby pins inserted in different directions for maximum hold.
- Pull gently on sections of the braid before coiling to create a fuller, more textured appearance.
- Leave a few face-framing pieces loose or pull out some strategic wisps for a softer, more romantic finish.
- Finish with strong-hold hairspray to ensure your braided bun lasts through hours of dancing or formal activities.
- This style works beautifully for weddings, galas, or any event requiring an elegant updo.
16. Side-Swept Dutch Braid

A side-swept Dutch braid brings drama and dimension to thick wavy hair by creating a bold braid that travels diagonally across the head.
This eye-catching style combines the raised texture of Dutch braiding with asymmetrical appeal.
- Create a deep side part on your preferred side, sweeping most of your hair toward the opposite shoulder.
- Begin the Dutch braid at the heavy side of the part, starting near your temple.
- Braid diagonally across your head toward the opposite ear, creating a sweeping line.
- Incorporate hair from both sides as you braid, but angle the direction to maintain the diagonal path.
- The thickness of wavy hair creates a prominent, visible braid that stands out against your head.
- Continue the Dutch braid past your ear and down toward your opposite shoulder.
- Once you’ve incorporated all the hair, finish with a regular braid to the ends.
- Pancake the braid by pulling gently on the outer edges to create maximum volume and dimension.
- This style beautifully frames one side of your face while showcasing your neck and shoulder on the other side.
17. Messy Bohemian Braid
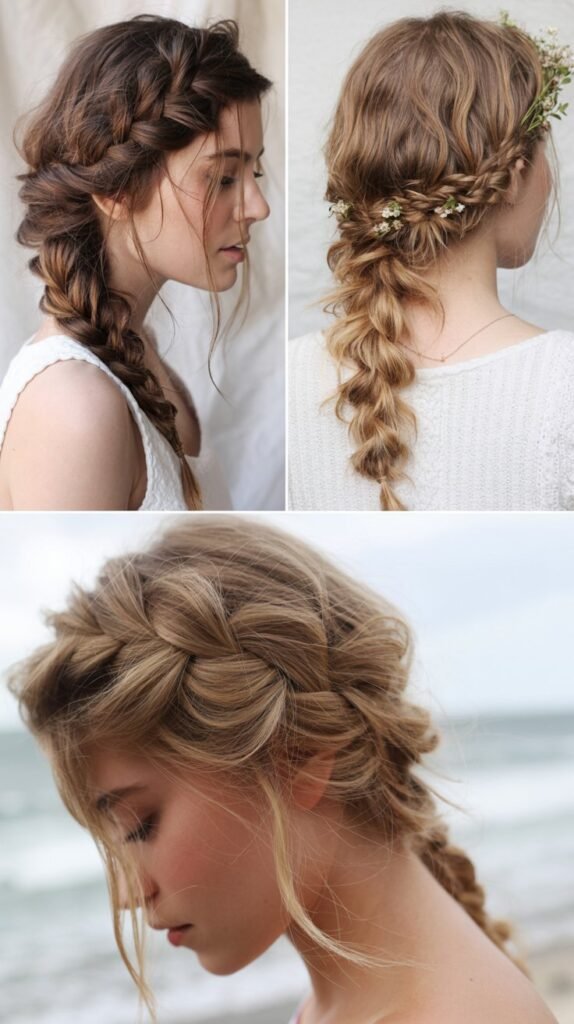
The messy bohemian braid embraces imperfection and celebrates the natural texture of thick wavy hair.
This intentionally undone style creates an effortless, carefree vibe perfect for casual occasions and relaxed settings.
- Start with day-old hair that has natural texture and slight separation rather than freshly washed hair.
- Apply a texturizing spray or sea salt spray throughout your hair to enhance the tousled effect.
- Create a loose braid of your choice—side braid, single back braid, or twin braids all work beautifully.
- Keep the tension relaxed throughout the braiding process rather than pulling tightly.
- Once the braid is complete, aggressively pull apart sections to create maximum volume and intentional messiness.
- Pull out face-framing pieces and allow small sections to escape the braid throughout its length.
- The natural wave pattern in thick hair contributes to the perfectly imperfect bohemian aesthetic.
- Twist and arrange the loose pieces with your fingers rather than using precise styling tools.
- This style should look like you casually braided your hair without a mirror—perfectly undone yet deliberately styled.
18. Crown Braid with Low Bun
Combining a crown braid with a low bun creates an elegant, sophisticated style that keeps thick wavy hair completely secured while looking exceptionally polished.
This combination works beautifully for formal events or professional settings.
- Part your hair from ear to ear across the top of your head, creating a front section and a back section.
- Create a French or Dutch braid with the front section, braiding from one temple across to the other temple like a headband.
- Gather the remaining back section into a low ponytail at the nape of your neck.
- Twist or braid this ponytail and wrap it into a bun, securing with bobby pins.
- Connect the end of the crown braid to the bun by tucking it underneath and pinning securely.
- Thick wavy hair creates a substantial crown and bun combination that appears full and luxurious.
- Pull gently on the crown braid to add width and soften the overall appearance.
- Use strong-hold bobby pins throughout to ensure the style lasts all day or evening.
- Finish with hairspray to tame flyaways while maintaining the natural texture of your waves.
19. Twisted Braids for Simple Elegance
Twisted braids combine the ease of twisting hair with the structure of braiding, creating elegant styles that take less time than complex braids but deliver sophisticated results.
This technique particularly suits thick wavy hair’s natural texture.
- Section your hair into multiple parts depending on how many twisted braids you want to create.
- Take each section and divide it in half, then twist both halves individually in the same direction.
- Wrap these twisted halves around each other in the opposite direction to create a rope-like effect.
- Secure each twisted section temporarily, then combine them into a larger braid or updo.
- The natural wave pattern in thick hair adds beautiful texture to twisted sections.
- This technique creates depth and dimension with less intricacy than traditional multi-strand braids.
- Twisted braids work beautifully as accent pieces along the sides while leaving the rest of your hair down.
- Secure all twisted elements with clear elastic bands or bobby pins that disappear into your hair.
- This style offers an elegant compromise between wearing your hair completely loose and creating an elaborate braided updo.
20. Diagonal Braids for Geometric Interest
Diagonal braids create striking geometric patterns across thick wavy hair by braiding in unexpected directions.
This modern approach transforms traditional braiding into contemporary art that flatters your hair’s natural volume.
- Plan your diagonal braid pattern before beginning—decide how many braids and which directions they’ll travel.
- Create clean, straight parts to section off each diagonal braid path.
- Begin each braid at your chosen starting point and braid at an angle rather than straight down.
- Dutch braids work particularly well for diagonal styles because they sit on top of the hair and create clear lines.
- Thick wavy hair makes diagonal braids incredibly visible and impactful against your head.
- You can create parallel diagonal braids all going the same direction or crisscrossing patterns for more complexity.
- Secure each braid with small elastic bands once you’ve incorporated all the hair in that section.
- The geometric precision of diagonal braids creates a modern, fashion-forward look that stands out.
- This style works exceptionally well for editorial shoots, creative events, or when you want to make a bold statement.
21. Bubble Braid for Playful Volume
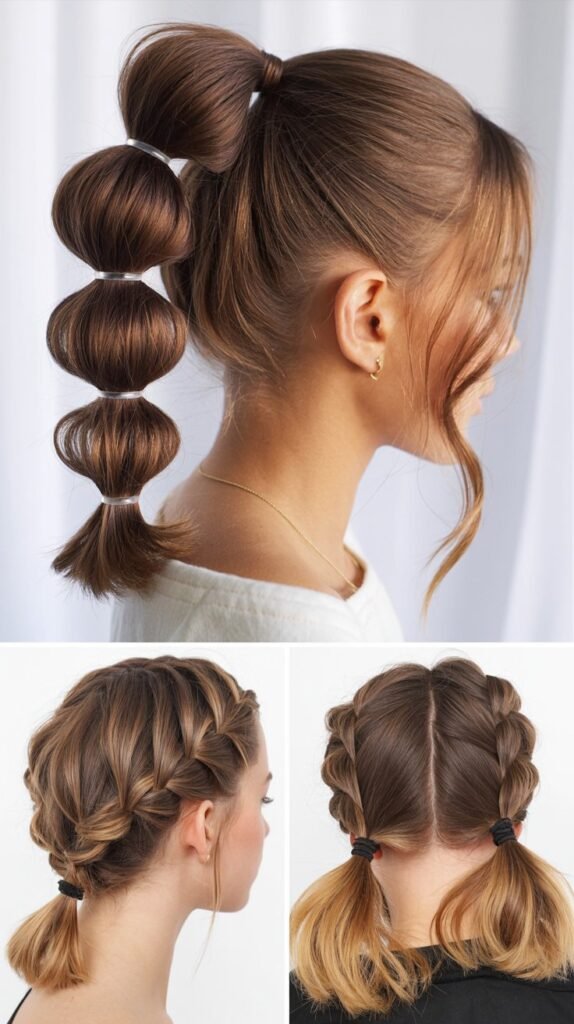
The bubble braid creates a series of volumized sections along a ponytail using multiple elastic bands, producing a playful style that maximizes the visual impact of thick wavy hair.
This trendy technique requires minimal skill but delivers maximum effect.
- Create a ponytail at your desired height and secure it with a clear elastic band.
- Measure down about two to three inches and add another clear elastic band around the ponytail.
- Gently pull on the hair between the two elastics, working around the entire circumference to create a bubble shape.
- Add another elastic band two to three inches below the second one.
- Create another bubble by pulling on the hair between the second and third elastics.
- Continue this pattern of adding elastics and creating bubbles all the way down your ponytail.
- Thick wavy hair creates substantial, voluminous bubbles that make a dramatic statement.
- Ensure each bubble is approximately the same size for a polished, intentional appearance.
- This style works beautifully for casual events, festivals, or anywhere you want to showcase personality through your hair.
22. Braided Half-Up Style
The braided half-up style combines the best of both worlds—keeping hair off your face while letting your thick waves flow freely down your back.
This versatile approach offers countless variations depending on which braiding technique you choose.
- Section the top half of your hair from temple to temple, leaving the bottom half loose.
- Create your chosen braid with the top section—French braid, Dutch braid, or fishtail all work beautifully.
- Braid back from your forehead toward the crown of your head where the top and bottom sections meet.
- Secure the braid with a clear elastic band at the point where you want the loose hair to begin flowing.
- The thick, wavy hair underneath provides beautiful volume and movement that contrasts with the structured braid.
- You can create a single center braid, two side braids that meet in the middle, or even multiple small braids for a bohemian effect.
- Pull gently on the braid sections to create width and a more relaxed appearance.
- Enhance the loose waves below with a curling iron or texturizing spray for added definition.
- This style works for virtually any occasion from casual outings to semi-formal events.
23. Cornrow-Inspired Flat Braids
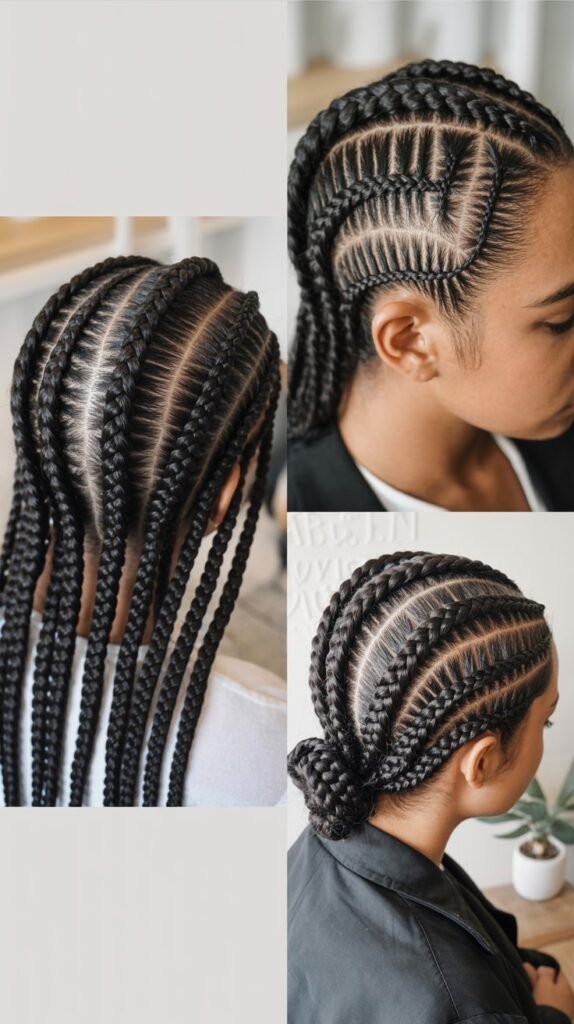
Cornrow-inspired flat braids create sleek, sculpted patterns against the scalp that showcase thick wavy hair’s versatility.
While traditional cornrows require specific techniques, this inspired version adapts the aesthetic for various hair textures.
- Part your hair into clean, straight sections according to your desired pattern—straight back, diagonal, or geometric designs.
- Create tight Dutch braids that lie flat against your scalp, incorporating small sections of hair as you work.
- Keep tension consistent and firm to ensure the braids lie flat and create clean, defined lines.
- The natural texture in thick wavy hair provides grip that helps maintain these structured braids.
- Work methodically from front to back, completing one braid before starting the next to maintain clean parts.
- These braids can extend all the way to the ends of your hair or stop partway down, leaving the rest loose and wavy.
- Secure each braid with small elastic bands that match your hair color for seamless integration.
- Apply edge control or pomade along your parts and at the hairline for an extra-smooth, polished finish.
- This style can last several days on thick wavy hair, making it practical for busy schedules or special events.
24.Lace Braid for Delicate Detail

The lace braid incorporates hair from only one side as you braid, creating a delicate, intricate appearance along the hairline.
This technique works beautifully on thick wavy hair to add feminine detail without overwhelming your natural texture.
- Begin at your temple or wherever you want the lace braid to start, taking a small section and dividing it into three parts.
- Start braiding using the French braid technique but incorporate new hair only from the side closest to your hairline.
- This one-sided incorporation creates the distinctive lace braid appearance—structured on one edge, loose on the other.
- Continue braiding along your hairline or in your desired pattern, consistently adding hair from only one side.
- The thickness of wavy hair means even this delicate braid will have beautiful substance and visibility.
- Lace braids work wonderfully as accent pieces while leaving most of your hair loose and flowing.
- Keep the incorporated sections small for a more intricate, detailed lace effect.
- Secure the end of the lace braid with a small elastic or bobby pin, or incorporate it into a larger style.
- This technique creates a romantic, ethereal look perfect for weddings, dates, or any occasion requiring soft feminine styling.
25. Braided Pigtails for Playful Style
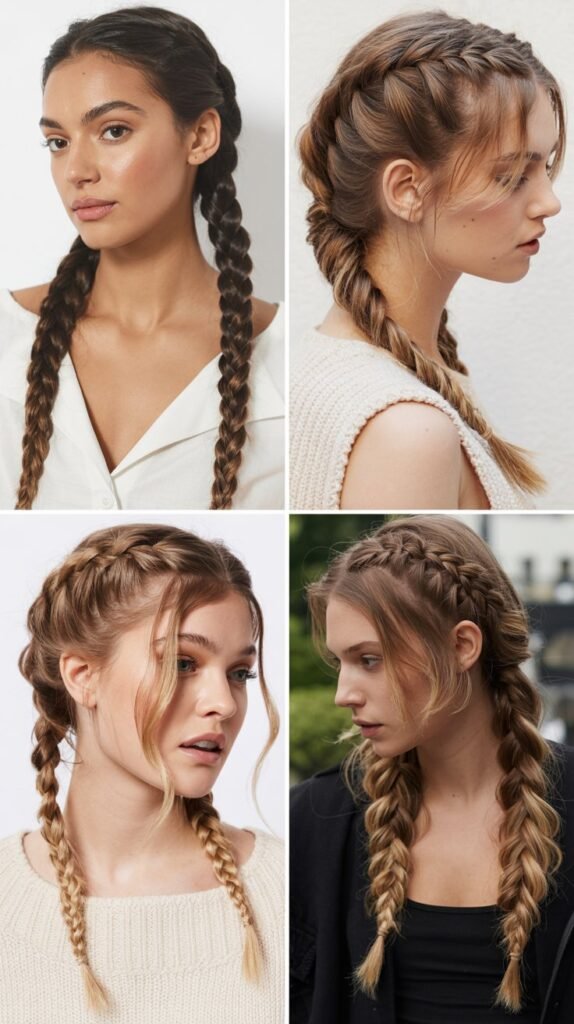
Braided pigtails bring youthful energy to thick wavy hair while providing practical, secure styling.
This playful approach can be dressed up or down depending on how you finish the braids and style the rest of your look.
- Create a center part from your forehead straight back to the nape of your neck, dividing your hair into two equal sections.
- Secure one section with a clip while working on the first pigtail to keep sections separate.
- Position each pigtail at your desired height—high for playful, low for sophisticated, or mid-level for versatility.
- Braid each section using your preferred technique—classic three-strand for simplicity or Dutch braids for added dimension.
- Thick wavy hair creates substantial pigtails that won’t look thin or childish but rather intentional and stylish.
- Keep both braids symmetrical in placement, tightness, and size for a polished appearance.
- Secure each braid with elastic bands, and consider wrapping a small section of hair around each elastic for a refined finish.
- Pull gently on the braid sections to create volume and a more relaxed, modern take on the classic pigtail.
- This style transitions beautifully from athletic activities to casual social settings.
26. Snake Braid for Intricate Texture

The snake braid creates a woven pattern that appears to slither down your hair like a serpent, producing an intricate, textured effect.
This advanced technique showcases thick wavy hair’s dimension beautifully.
- Divide your hair into two main sections and begin with a standard stitch as if creating a basic braid.
- Instead of continuing straight, angle your next incorporation diagonally, creating a winding path.
- Alternate the angle with each stitch, creating an S-curve or snake-like pattern as you work down.
- The key is to consistently alternate which direction you’re pulling new hair from to create the slithering effect.
- Thick wavy hair adds natural texture that makes the snake pattern more pronounced and visible.
- This technique requires practice and patience, as maintaining the pattern while keeping appropriate tension takes skill.
- Work slowly and deliberately, especially when first learning this braid, to establish the alternating rhythm.
- Secure the end with an elastic band and gently pull on sections to emphasize the winding pattern.
- This show-stopping braid works beautifully for creative events, photoshoots, or when you want to demonstrate advanced braiding skills.
27. Braided Headband Style

A braided headband uses braided sections of your own hair to create a headband effect across your forehead or crown while leaving the rest of your thick waves loose and flowing.
This bohemian-inspired style offers both function and fashion.
- Take a section of hair from behind one ear, about one to two inches wide.
- Braid this section tightly using a three-strand or rope braid technique all the way to the ends.
- Bring the completed braid across your forehead or crown like a headband, positioning it where you want it to sit.
- Secure the end of the braid behind your opposite ear with bobby pins that match your hair color.
- Thick wavy hair creates a substantial braided headband that won’t get lost in your volume.
- You can create one braided headband for simplicity or multiple parallel braided headbands for more impact.
- Position the braided headband to either hold back face-framing pieces or sit further back on your crown as an accent.
- Adjust the tightness of the braid depending on whether you want a sleek, defined headband or a softer, textured one.
- This style works beautifully for festivals, beach days, or casual occasions where you want effortless bohemian styling.
28. Zipper Braid for Modern Edge

The zipper braid creates a modern, edgy look by incorporating a technique that makes the braid appear to zip up your hair.
This contemporary style showcases thick wavy hair’s texture while adding geometric interest.
- Begin with a standard Dutch braid, creating the raised foundation that will become the zipper.
- As you braid, take very thin sections from alternating sides and cross them over the center of the braid before incorporating them.
- These thin, alternating sections create the teeth of the zipper running up the center of your braid.
- Maintain consistent tension and keep the zipper sections uniform in size for the most defined pattern.
- Thick wavy hair provides the perfect canvas for this technique, as the texture makes the zipper pattern clearly visible.
- This advanced braid requires practice to master the rhythm of creating the zipper effect while maintaining the braid structure.
- Work slowly and deliberately, especially when first attempting this technique, to establish the proper pattern.
- Secure the completed zipper braid with an elastic band and avoid pulling it apart too much, as this can obscure the zipper detail.
- This fashion-forward braid works beautifully for editorial shoots, fashion events, or when you want a distinctive, modern hairstyle.
29. Braided Top Knot
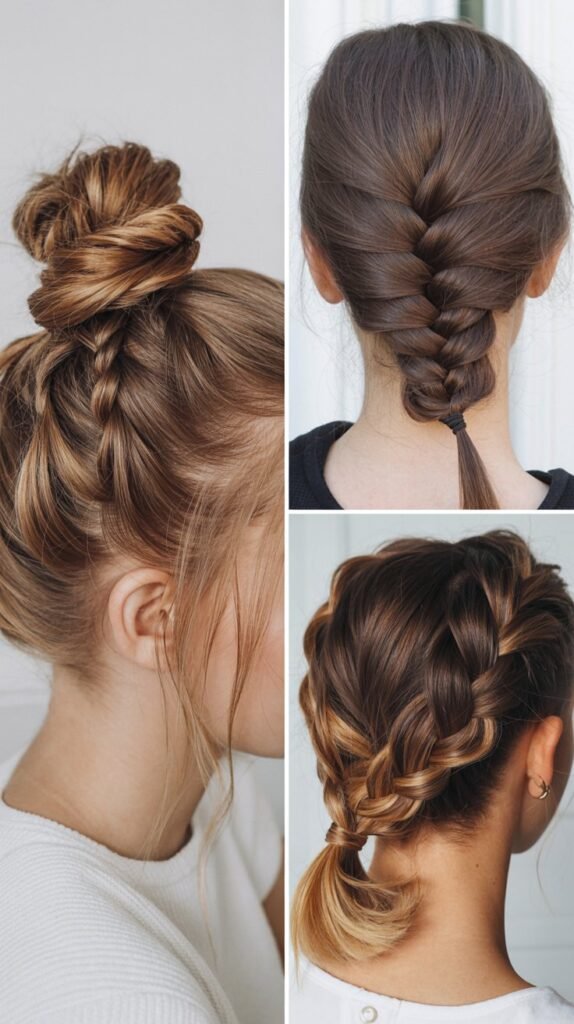
A braided top knot combines the casual ease of a high bun with the textured detail of braiding, creating a practical yet stylish option for thick wavy hair.
This elevated approach keeps hair completely off your neck while adding visual interest.
- Gather all your hair into a high ponytail at the crown of your head, securing it tightly with an elastic band.
- Braid the entire ponytail using your preferred braiding technique—classic, fishtail, or Dutch all work beautifully.
- Wrap the completed braid around the base of the ponytail in a circular motion, creating a bun shape.
- Thick wavy hair creates a substantial top knot that makes a statement without requiring excessive teasing or padding.
- Secure the braided bun with bobby pins inserted in multiple directions for maximum hold.
- Pull gently on sections of the braid before wrapping to create more volume and texture.
- Leave the end of the braid slightly loose and tuck it under the knot for a relaxed finish.
- Use strong-hold hairspray to ensure your braided top knot stays secure through activity.
- This style works equally well for yoga class, professional settings, or casual weekend activities.
30. Mermaid Braid for Whimsical Appeal

The mermaid braid combines multiple braiding techniques to create a flowing, fantastical style reminiscent of flowing water.
This romantic approach celebrates thick wavy hair’s natural texture while adding intricate detail.
- Begin with a lace braid at your hairline, incorporating hair from one side as you work along your head.
- Transition into a standard three-strand or four-strand braid once you’ve incorporated all the desired hair from the top.
- Continue with a fishtail braid for the middle section, creating texture variation.
- Finish with a rope braid or pull-through braid technique for the ends, maximizing the flowing effect.
- The combination of techniques creates a varied, organic appearance like flowing water or scales.
- Thick wavy hair provides beautiful texture that enhances the mermaid effect and prevents the braid from looking flat.
- Pull apart sections of each braid type to create volume and emphasize the transition between techniques.
- Consider adding small accessories like pearls, shells, or metallic thread woven through the braid for enhanced mermaid vibes.
- This whimsical style works beautifully for themed events, beach weddings, or when you want to embrace fantasy-inspired fashion.
31. Pretzel Braid for Artistic Flair

The pretzel braid creates loops and twists that form a pretzel-like shape, offering an artistic, sculptural approach to styling thick wavy hair.
This creative technique transforms your hair into wearable art.
- Divide your hair into three sections and create three separate braids of equal length.
- Take the first braid and create a loop by folding it back on itself and securing the loop with bobby pins.
- Take the second braid and thread it through the first loop, then create its own loop.
- Thread the third braid through the second loop and connect it back to the base, forming the pretzel shape.
- Thick wavy hair creates substantial loops that form a clearly defined pretzel pattern.
- This technique requires planning and patience, as you’re essentially creating a sculptural form with your braids.
- Secure all connection points with strong bobby pins to ensure the pretzel structure stays intact.
- Pull gently on the outer edges of each braid to create fuller loops and a more dramatic pretzel shape.
- This artistic style works beautifully for creative events, photoshoots, or when you want a truly unique hairstyle.
32. Braided Mohawk for Bold Statement
A braided mohawk creates a bold, edgy look by braiding the center section of hair upward while leaving the sides sleek or braided flat.
This dramatic style showcases thick wavy hair’s versatility and makes a powerful fashion statement.
- Section your hair from forehead to nape in a strip about three to four inches wide down the center of your head.
- Slick the hair on both sides of this center strip flat against your head or create small flat braids going back.
- Create a Dutch braid with the center section, braiding from your forehead toward your crown with maximum height.
- Pull aggressively on the outer edges of the center braid to create width and height, forming the mohawk shape.
- Thick wavy hair provides the volume needed to create a dramatic, substantial mohawk without requiring extensions.
- Continue the center braid all the way down or transition into a high ponytail for different variations.
- Secure the sides with strong-hold gel or pomade to create maximum contrast with the raised center braid.
- Use bobby pins strategically to lift and support the mohawk braid, creating the desired height.
- This bold style works for fashion events, concerts, or any occasion where you want to make a memorable impression.
33. Ladder Braid for Dimensional Detail

The ladder braid creates a pattern that resembles a ladder running alongside a standard braid, adding dimensional detail to thick wavy hair.
This technique combines the security of traditional braiding with eye-catching embellishment.
- Create a thin braid on one side of where your main braid will be—this becomes the “rail” of your ladder.
- Begin your main braid next to this thin rail braid.
- After every few stitches of your main braid, take a small section from the thin rail braid and weave it horizontally across to the opposite side.
- These horizontal sections become the “rungs” of your ladder, creating the distinctive pattern.
- Thick wavy hair makes both the main braid and the ladder detail clearly visible and defined.
- Maintain consistent spacing between your ladder rungs for a uniform, polished appearance.
- This technique requires practice to coordinate the main braid while creating horizontal connections.
- Secure both braids at the bottom with elastic bands and gently pull on the main braid for volume.
- This intricate style works beautifully for special occasions when you want to showcase advanced braiding techniques.
34. Twisted Crown Updo
A twisted crown updo combines twisted sections that wrap around the head with an updo at the back, creating an elegant style for thick wavy hair.
This sophisticated approach keeps hair completely secured while maintaining romantic, textured interest.
- Section the hair around your hairline from temple to temple across the front and down both sides.
- Divide this front section into two parts and twist each section as you work back toward the crown.
- As you twist, incorporate additional hair from the hairline to create a twisted crown effect.
- Secure the twisted sections at the back of your head with bobby pins.
- Gather the remaining hair at the nape into a low bun, chignon, or braided updo.
- Thick wavy hair creates substantial twisted sections that frame your face beautifully while providing the volume needed for an impressive updo.
- Pull gently on the twisted sections to create more width and a softer, more romantic appearance.
- Connect the twisted crown sections seamlessly into your updo for a cohesive, polished finish.
- This elegant style works perfectly for weddings, formal events, or professional occasions requiring sophisticated styling.
35. Five-Strand Braid for Maximum Complexity
The five-strand braid represents one of the most complex braiding techniques, creating an intricate, woven pattern that showcases thick wavy hair beautifully.
This advanced technique requires patience but delivers stunning, unique results.
- Divide your hair into five equal sections, mentally numbering them from left to right as 1, 2, 3, 4, and 5.
- Begin by crossing section 1 over section 2, then under section 3, creating the first sequence.
- Next, take section 5 and cross it under section 4, then over section 3.
- Repeat this pattern: outer left over-under-to-center, then outer right under-over-to-center.
- The complexity of this braid becomes manageable with practice, though it typically requires multiple attempts to master.
- Thick wavy hair showcases the intricate five-strand pattern exceptionally well due to natural texture providing visual separation between strands.
- Maintain even tension across all five sections to create a balanced, uniform braid throughout its length.
- Work slowly and deliberately, especially when learning, as losing track of the pattern means starting over.
- This showpiece braid works beautifully for special occasions, photoshoots, or when you want to demonstrate true braiding mastery.
36. Braided Space Buns
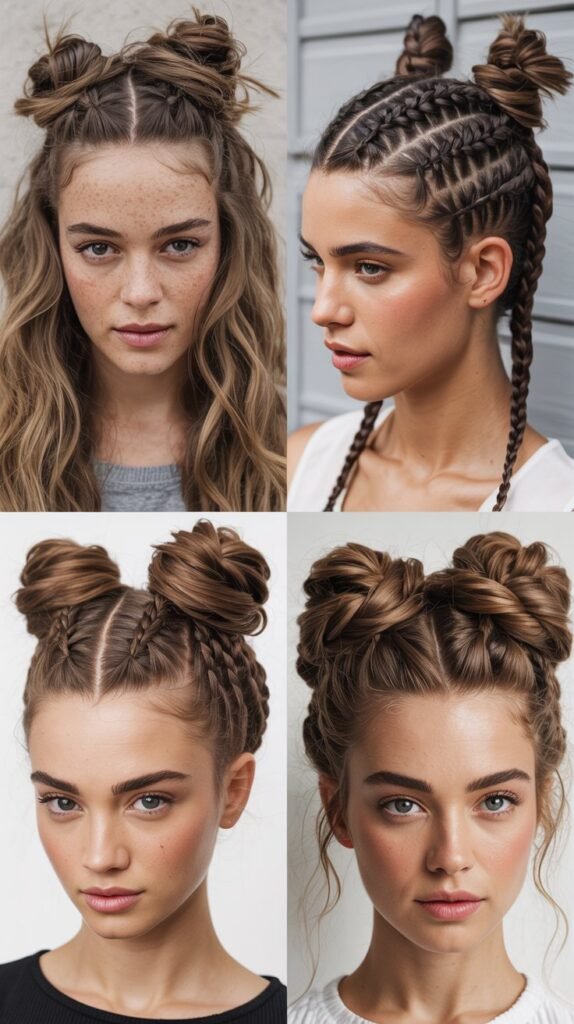
Braided space buns combine the playful energy of double buns with the textured detail of braiding, creating a fun, youthful style for thick wavy hair.
This trendy approach offers festival-ready vibes with secure, practical styling.
- Part your hair down the center from forehead to nape, creating two equal sections.
- Create a high pigtail on each side at approximately temple level or higher for authentic space bun placement.
- Braid each pigtail completely, using classic three-strand, Dutch, or fishtail braiding techniques.
- Thick wavy hair creates substantial braids that form voluminous space buns rather than looking sparse.
- Wrap each completed braid around its ponytail base in a circular motion, forming a bun shape.
- Secure each braided bun with multiple bobby pins inserted in different directions for maximum hold.
- Pull gently on sections of each braid before wrapping to create fuller, more textured buns.
- Leave some face-framing pieces loose or pull out strategic wisps for a softer, more lived-in appearance.
- This playful style works beautifully for music festivals, themed parties, or casual outings with friends.
37. Celtic Knot Braid

The Celtic knot braid recreates traditional Celtic knotwork patterns using braided hair, producing an intricate, symbolic style.
This artistic technique transforms thick wavy hair into wearable cultural art.
- Divide your hair into sections based on your chosen Celtic knot pattern—different knots require different starting configurations.
- Create multiple thin braids that will be woven together to form the knot pattern.
- Follow your chosen Celtic knot diagram, weaving the braids over and under each other in the specified pattern.
- The complexity ranges from simple three-loop knots to elaborate patterns requiring six or more braids.
- Thick wavy hair provides the texture and grip needed to maintain intricate Celtic knot patterns without slipping.
- Work slowly and methodically, referring frequently to your pattern guide to ensure accuracy.
- Secure all crossover points with small bobby pins to maintain the knot structure.
- This technique often works best as a partial style, creating a Celtic knot accent while leaving the rest of your hair loose.
- Celtic knot braids work beautifully for cultural celebrations, renaissance fairs, or when you want to honor Celtic heritage through your hairstyle.
38. Wrapped Ponytail Braid
A wrapped ponytail braid conceals the elastic band with a braided section, creating a polished, elevated take on the classic ponytail.
This refined approach showcases thick wavy hair’s versatility and attention to detail.
- Create a ponytail at your desired height and secure it with a durable elastic band.
- Leave out a small section of hair from the underside of the ponytail before securing it.
- Braid this reserved section using a tight three-strand technique.
- Wrap the completed braid around the elastic band multiple times to completely conceal it.
- Thick wavy hair creates a substantial wrapped section that makes a visual impact at the base of your ponytail.
- Secure the end of the wrapping braid underneath the ponytail with a bobby pin that matches your hair color.
- You can leave the remaining ponytail loose and wavy or braid the entire length for additional detail.
- This polished technique elevates a simple ponytail into a refined style suitable for professional or formal settings.
- The wrapped detail adds just enough interest to make your ponytail feel intentional and styled rather than rushed.
39. Herringbone Braid for Textured Sophistication
The herringbone braid creates a distinctive V-shaped pattern similar to a fishbone or herringbone fabric weave.
This sophisticated technique works beautifully with thick wavy hair to produce a textured, eye-catching braid.
- Divide your hair into two large, equal sections.
- Take a very thin strand from the outer edge of the left section and cross it to the inner edge of the right section at a sharp angle.
- Take an equally thin strand from the outer edge of the right section and cross it to the inner edge of the left section at the same angle.
- The key to herringbone pattern is crossing the thin strands at more acute angles than a regular fishtail.
- Continue this alternating pattern down the length of your hair, maintaining consistent strand thickness and crossing angle.
- Thick wavy hair beautifully showcases the distinct V-shaped pattern characteristic of herringbone braiding.
- Work with precision and patience, as uneven strand sizes or inconsistent angles will disrupt the herringbone pattern.
- Secure the end with a clear elastic band and gently pull on outer edges to emphasize the textured pattern.
- This sophisticated braid works perfectly for formal events, professional settings, or when you want a refined braided style.
40. Braided Faux Hawk with Loose Ends
A braided faux hawk creates the illusion of a mohawk using braiding techniques along the center of your head while leaving the ends loose and flowing.
This edgy yet romantic style showcases thick wavy hair’s versatility.
- Section a wide strip down the center of your head from hairline to crown, about three to four inches wide.
- Create multiple Dutch braids or one thick Dutch braid down this center section, braiding tightly to create height.
- Leave the hair on both sides of the center section loose and flowing or softly pulled back.
- Stop braiding at the crown or mid-head, allowing the remaining hair from all sections to flow together loosely.
- Thick wavy hair creates a dramatic faux hawk effect with substantial volume without looking sparse.
- Tease or backcomb the center braid slightly to increase height and drama.
- The loose, flowing ends create a romantic contrast with the structured, edgy braided faux hawk top.
- This versatile style works for concerts, nights out, or any occasion where you want edgy sophistication.
- Balance the boldness of the faux hawk with soft makeup and styling for a wearable, fashion-forward look.
41. Stacked Braids for Dimensional Layers
Stacked braids create multiple braids at different levels on your head, producing a layered, dimensional effect.
This technique showcases thick wavy hair’s volume while creating visual interest through varied placement.
- Divide your hair horizontally into three or more sections from top to bottom.
- Create a braid with the top section first, positioning it where you want the highest braid to sit.
- Move to the middle section and create another braid, positioning it below and slightly offset from the first.
- Create the bottom braid with the lowest section, again positioning it below and offset from the middle braid.
- The stacked arrangement creates a cascading, dimensional effect that showcases your hair’s natural volume.
- Thick wavy hair allows each stacked braid to maintain substantial size without looking thin or lost.
- Vary the braid types—combine French, Dutch, and fishtail braids in your stack for even more visual interest.
- Secure each braid individually before moving to the next level for clean, organized stacking.
- This creative style works beautifully for special events or when you want a unique, eye-catching braided look.
42. Twisted Rope Crown with Flowing Waves
A twisted rope crown combines simple rope braids wrapped around your head with loose, flowing waves beneath.
This elegant yet effortless style perfectly balances structure with the natural beauty of thick wavy hair.
- Create a horizontal part from ear to ear across the top of your head.
- Divide the front section into two parts on each side of a center part.
- Create a rope braid with each front section by twisting two strands together.
- Wrap both rope braids across your crown toward the opposite side, creating a crown or headband effect.
- Secure each rope braid behind the opposite ear with bobby pins.
- Leave all the hair below the crown loose and flowing to showcase your natural waves.
- Thick wavy hair creates substantial rope braids that form a visible, impressive crown.
- The contrast between the structured twisted crown and flowing waves creates an ethereal, romantic appearance.
- Enhance the loose waves with light texturizing spray or by running your fingers through with a small amount of hair cream.
Conclusion
Throughout this guide to 42 Braided Hairstyles for Thick Wavy Hair That Look Effortless, you’ve discovered the incredible versatility your hair type offers—from simple everyday braids to intricate artistic styles that turn heads.
Your thick waves provide the perfect foundation for braiding, offering natural grip, beautiful texture, and substantial volume that makes every style stand out.
Whether you’re mastering the basics like three-strand braids or challenging yourself with advanced techniques like five-strand or Celtic knot braids, remember that practice makes perfect and even imperfect braids have charming, effortless appeal.
The key to making these styles work for you lies in embracing your hair’s natural texture rather than fighting against it, using techniques that enhance rather than flatten your waves.
Start with the simpler styles to build your confidence and muscle memory, then gradually progress to more complex braids as your skills develop.
With these 42 options at your fingertips, you’ll never run out of ways to style your beautiful thick wavy hair, ensuring you always look polished, put-together, and effortlessly chic no matter what the occasion demands.