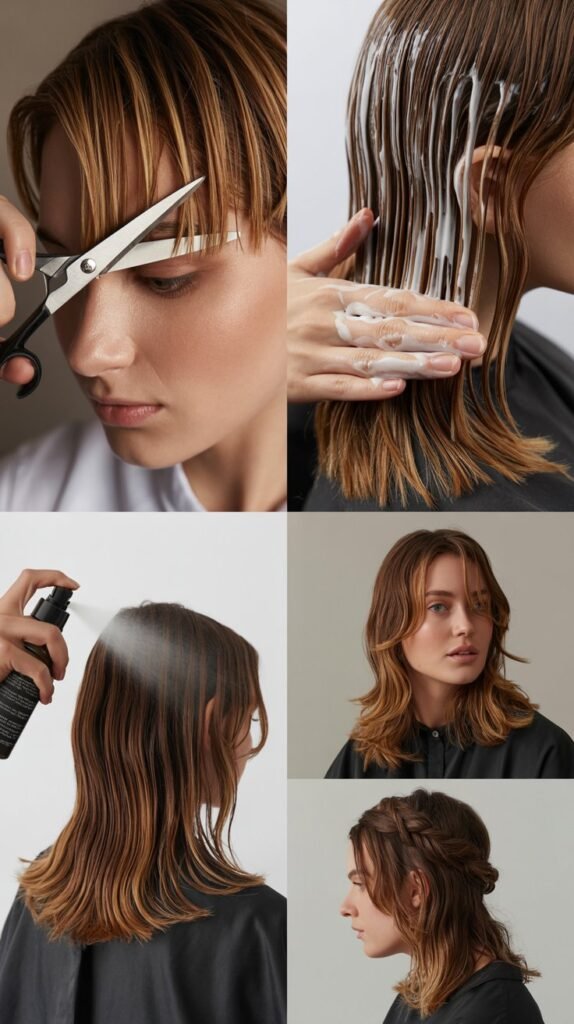
Cutting your own hair at home might seem intimidating, but with the right techniques and guidance, achieving salon-quality layers is absolutely within your reach.
The Best DIY Layered Haircut Tutorial at Home will transform the way you think about at-home hairstyling, empowering you to create beautiful, dimensional layers without spending hundreds at a salon.
Whether you’re looking to add volume, remove bulk, or simply refresh your current style, this comprehensive guide walks you through every step of the layering process with clarity and precision.
You’ll discover professional techniques adapted for home use, learn about the essential tools you need, and understand how to customize layers for your specific hair type and face shape.
This tutorial covers everything from preparing your workspace to executing various layering methods, troubleshooting common mistakes, and maintaining your new cut between styling sessions.
By the end of this article, you’ll have the confidence and knowledge to create stunning layered looks that rival professional results, all from the comfort of your own bathroom.
1. Essential Tools and Materials for DIY Layered Haircuts
Before you begin cutting, having the right tools makes the difference between a professional-looking result and a styling disaster.
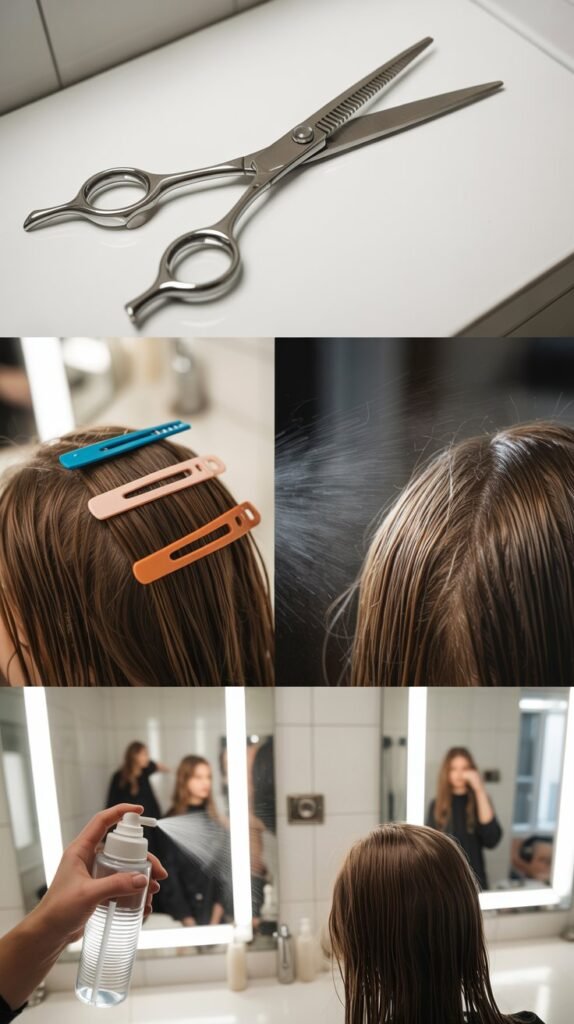
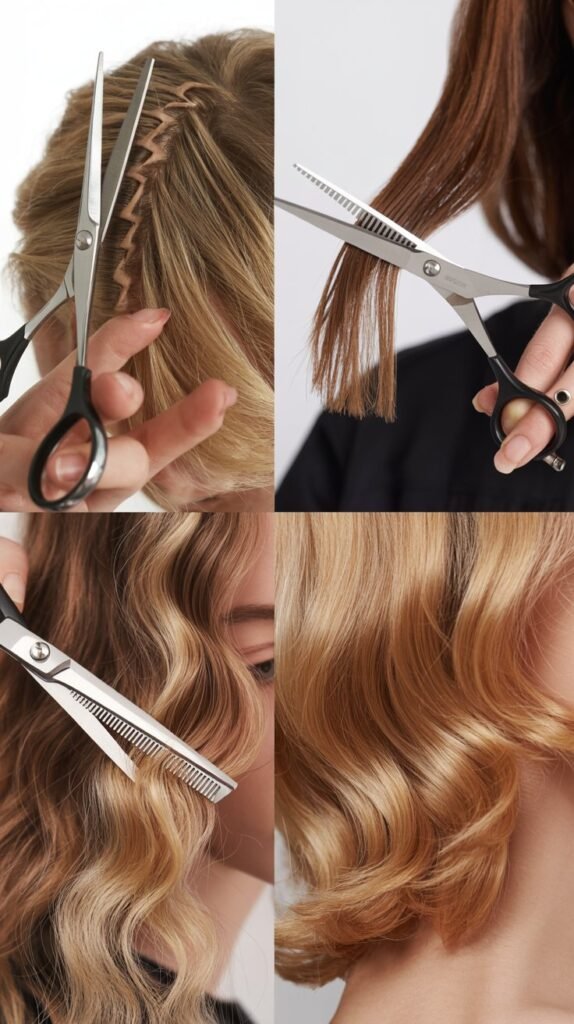
Professional hairstyling scissors, sectioning clips, a fine-toothed comb, and a spray bottle are the foundation of any successful home haircut.
- Professional hair cutting shears are sharper and more precise than regular scissors, creating clean cuts that prevent split ends and damage.
- Investing in 6-7 inch shears with a beveled edge gives you better control and maneuverability around your head.
- Regular household scissors crush the hair shaft rather than cutting cleanly, leading to frayed ends and uneven layers.
- Sectioning clips (at least 4-6 clips) help you divide your hair into manageable portions and keep sections separated while you work.
- Duckbill clips or alligator clips work best because they hold hair securely without creating creases or dents.
- A fine-toothed comb helps you create clean parts and ensures you’re cutting straight lines rather than jagged edges.
- A rat-tail comb with a pointed end is particularly useful for creating precise sections and subsections.
- A spray bottle filled with water keeps your hair damp throughout the cutting process, which is essential for accuracy and control.
- Damp hair (not soaking wet) shows the true length and texture, allowing you to see exactly where you’re cutting.
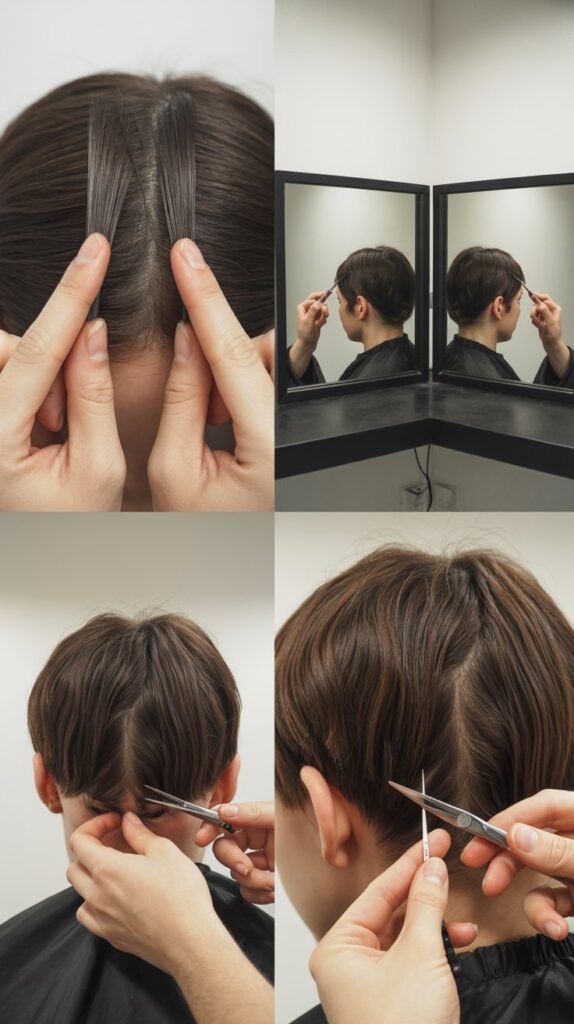
- Two mirrors (one handheld and one wall-mounted) let you see the back and sides of your head to check your progress and ensure evenness.
- Setting up mirrors at opposing angles creates a 360-degree view of your haircut as you work.
- Hair ties or elastics help you create ponytail methods for certain layering techniques that we’ll explore later in this tutorial.
- A cape or old towel protects your clothing from hair clippings and makes cleanup significantly easier.
- Additional helpful items include a ruler or measuring tape for precision, hair clips in different sizes for various section thicknesses, and good lighting from multiple angles to catch any uneven spots.
2. Understanding Face Shapes and Suitable Layer Styles
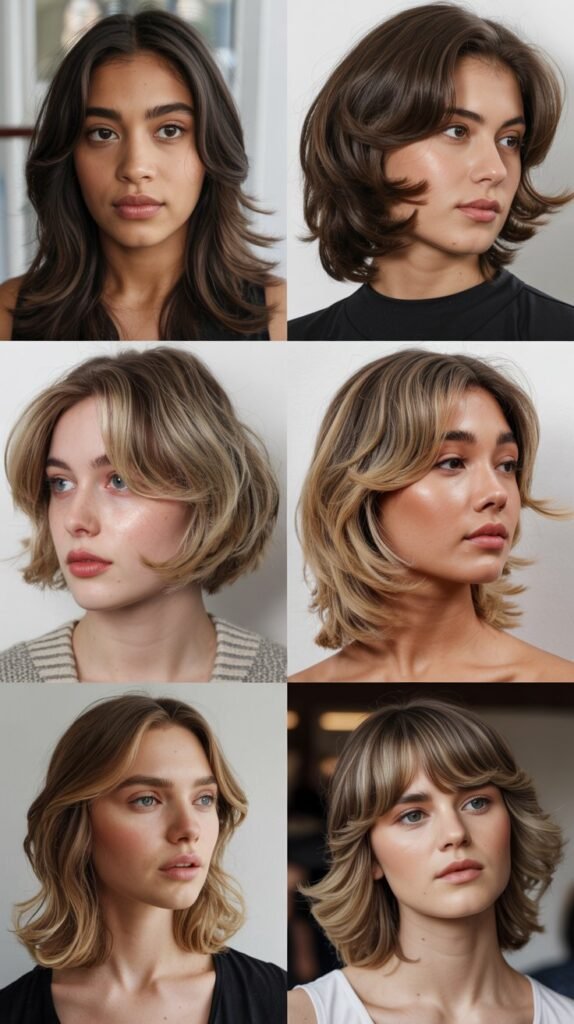
Choosing the right layering style for your face shape creates harmony and enhances your natural features rather than fighting against them.
Different layer placements can elongate, widen, or balance your facial proportions depending on what you’re trying to achieve.
- Oval face shapes are considered the most versatile and can wear virtually any layering style, from subtle face-framing pieces to dramatic choppy layers.
- Layers that start at the chin or below work beautifully for oval faces, adding movement without overwhelming balanced proportions.
- Round face shapes benefit from longer layers that start below the chin to create the illusion of length and avoid adding width at the cheeks.
- Avoid layers that end exactly at the widest part of your face (typically the cheekbones), as this emphasizes roundness rather than creating elongation.
- Side-swept bangs or longer face-framing layers that angle downward help slim round faces and draw the eye vertically.
- Square face shapes look best with soft, feathered layers that soften angular jawlines and create movement around the face.
- Layers that begin around the jawline or chin help balance strong jaw angles, while wispy ends create softness.
- Avoid blunt, heavy layers that end at the jaw, as these emphasize rather than soften angular features.
- Heart-shaped faces (wider at the forehead, narrower at the chin) are flattered by layers that add volume at the chin level to balance a wider forehead.
- Chin-length or slightly longer layers create width at the lower face, while side bangs can minimize a broad forehead.
- Long or rectangular face shapes benefit from horizontal layers and volume at the sides rather than length, which would further elongate the face.
- Layers that start at the cheekbones or below, combined with side volume, create width and break up vertical length.
- Bangs or shorter face-framing pieces also work well for long faces, shortening the appearance of facial length.
- Diamond face shapes (widest at the cheekbones) look great with layers that add fullness at the jawline and forehead while keeping volume minimal at the cheekbones.
- Understanding your face shape helps you make strategic decisions about where your shortest layers should begin and how dramatically to graduate the length.
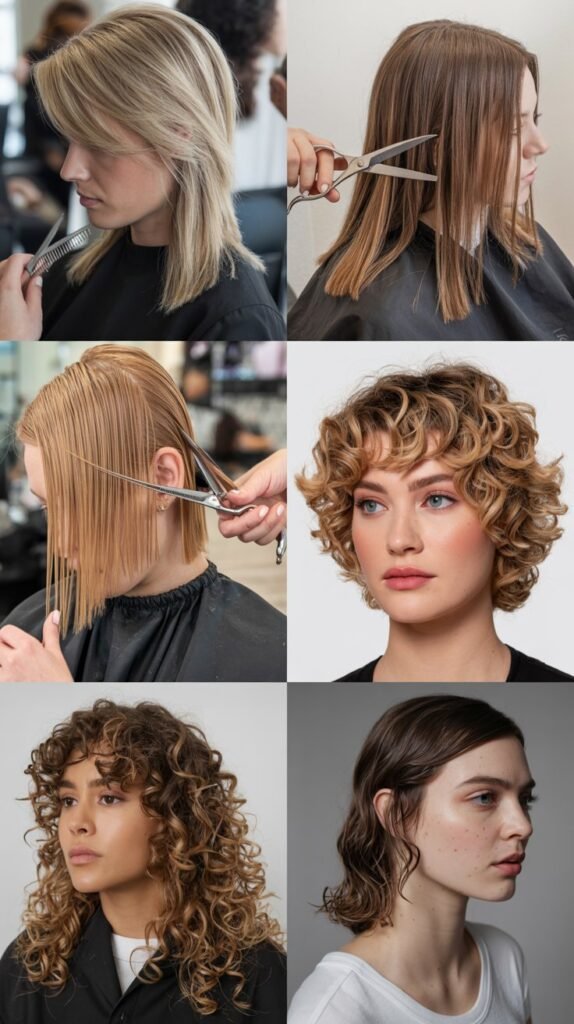
3. Hair Type Considerations Before Cutting
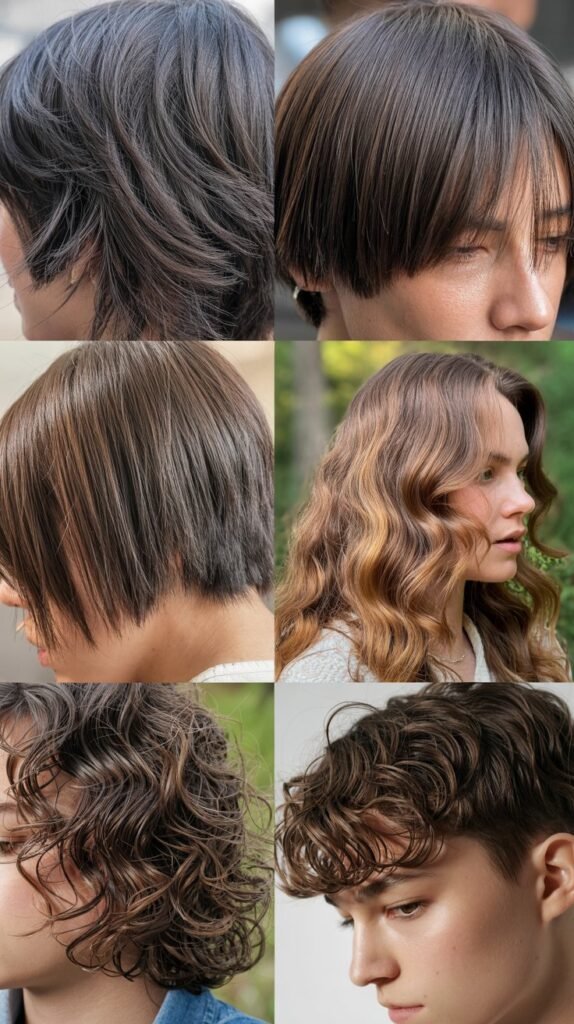
Your hair’s natural texture, thickness, and density dramatically affect how layers will look and behave, making it crucial to adapt your cutting technique to your specific hair type.
What works beautifully on fine, straight hair might create unflattering bulk or frizz on thick, curly hair.
- Fine or thin hair requires careful layering to avoid removing too much density, which can make hair look sparse or stringy at the ends.
- Subtle, long layers that start lower on the head add movement without sacrificing the appearance of thickness.
- Too many layers or layers cut too high can make fine hair look wispy and lack body at the bottom.
- Adding layers only around the face and crown can create the illusion of volume while maintaining weight at the ends.
- Thick or coarse hair benefits greatly from layering, as it removes bulk and allows the hair to move more freely rather than forming a heavy triangle shape.
- Multiple layers throughout thick hair reduce weight and prevent the “pyramid effect” that occurs when thick hair is all one length.
- Thick hair can handle more dramatic layering with shorter top layers and longer bottom layers without looking thin or damaged.
- Point cutting or texturizing techniques (cutting into the ends at an angle) work particularly well for thick hair to soften and blend layers.
- Straight hair shows layers very clearly, making precision and evenness especially important since mistakes are highly visible.
- Blunt layers on straight hair create clean, graphic lines, while textured layers create softer, more lived-in looks.
- Wavy hair typically responds beautifully to layers, as they enhance natural texture and prevent the weight that pulls waves straight.
- Layers in wavy hair should account for shrinkage—hair appears longer when wet and shorter when dry and forming wave patterns.
- Cutting wavy hair when dry or following the natural wave pattern ensures you don’t remove more length than intended.
- Curly hair requires special consideration because curls shrink significantly when dry, meaning you should cut conservatively to avoid cutting too short.
- Curly hair often looks best with layers cut on dry hair using a technique called “curl-by-curl” cutting, where each curl is shaped individually.
- Layering curly hair removes weight that pulls curls straight and allows curl pattern to spring up and show dimension.
- Avoid thinning shears on curly hair, as they create frizz and disrupt the curl pattern.
- Coily or kinky hair (type 4 hair) benefits from layers that enhance volume and shape while maintaining moisture at the ends.
- Cutting coily hair while stretched or in its natural state depends on the desired outcome and your comfort level with shrinkage.
4. Preparing Your Hair and Workspace
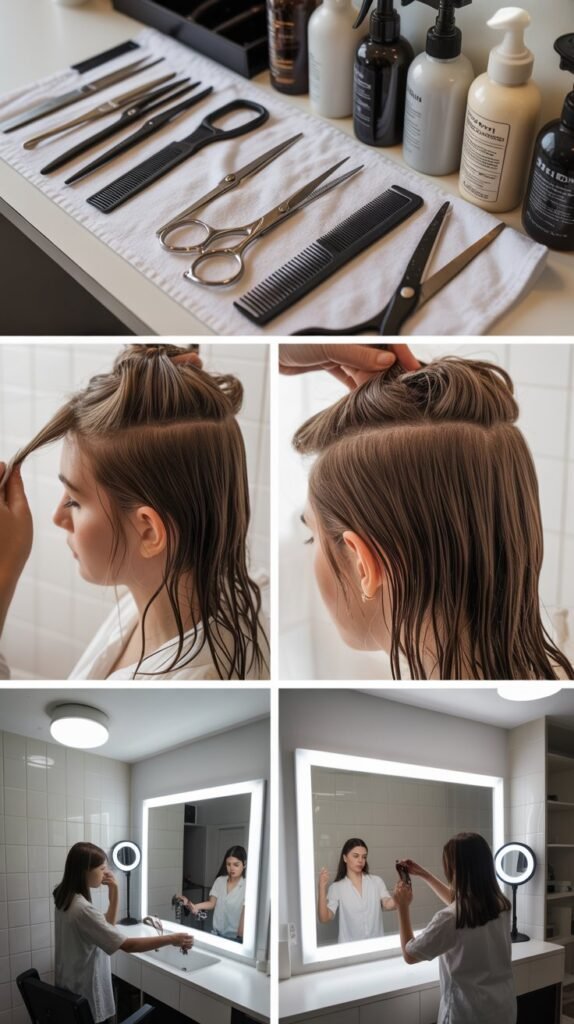
Proper preparation sets the foundation for a successful DIY haircut and minimizes the chances of mistakes that come from working in poor conditions or with unprepared hair.
Taking fifteen minutes to set up correctly saves hours of potential regret and correction.
- Start with freshly washed and conditioned hair that’s free of styling products, as buildup can affect how scissors glide through hair and how it sits naturally.
- Avoid using leave-in conditioners or oils before cutting, as these create slip that makes hair harder to grip and section accurately.
- Towel-dry your hair until it’s damp but not dripping wet, as the ideal cutting consistency is moist enough to show true length but not so wet that it weighs down differently than when dry.
- Soaking wet hair stretches longer than its true length, leading to cutting too much off when it dries and shrinks back up.
- Detangle thoroughly using a wide-tooth comb or detangling brush, working from ends to roots to remove all knots and snarls.
- Cutting through tangles damages scissors and creates uneven, jagged cuts rather than clean lines.
- Set up in a well-lit bathroom or room with natural light if possible, or use multiple light sources from different angles to avoid shadows that hide uneven sections.
- Overhead lighting alone creates shadows under sections, so add lamps or ring lights to illuminate your head from the sides and front.
- Protect your workspace by laying down a sheet, large towel, or tarp to catch hair clippings for easy cleanup.
- Hair clippings cling to fabric and are notoriously difficult to vacuum, so taking this step saves significant cleanup time.
- Position your mirrors so you can see the back, sides, and front of your head without straining or contorting yourself into uncomfortable positions.
- A handheld mirror held at opposing angles to a wall mirror lets you check the back and sides as you work.
- Wear a dark-colored cutting cape or button-up shirt (worn backwards) that you can remove without pulling it over your head and disturbing your haircut.
- Light-colored clothing makes it harder to see small hair pieces that you’ve cut and whether sections are even.
- Have a trash can or bag nearby for collecting hair clippings immediately rather than letting them fall to the floor.
- Remove jewelry that might catch in your hair or interfere with your cutting motion, including rings, bracelets, and dangling earrings.
5. The Ponytail Method for Basic Layers
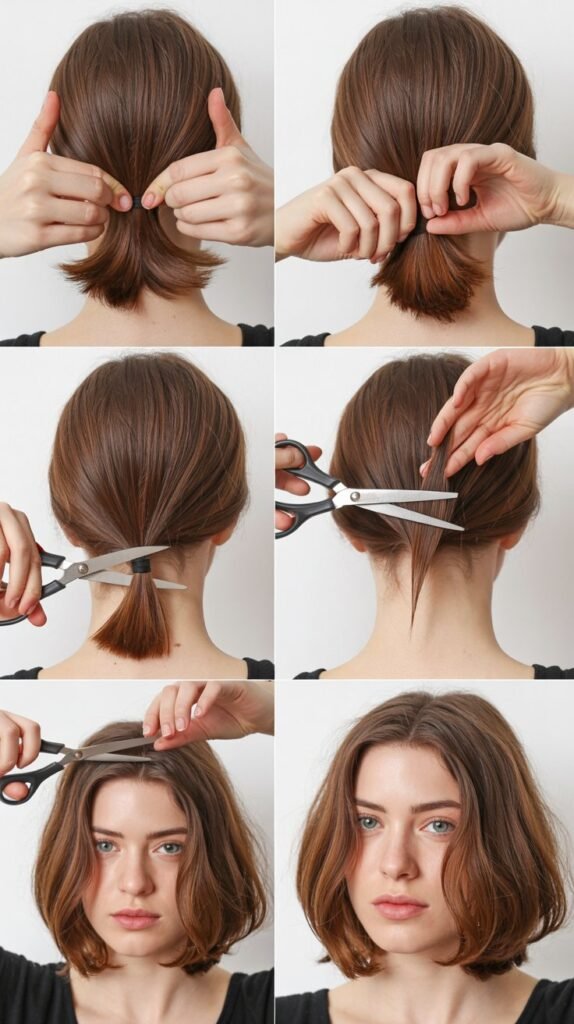
The ponytail method is one of the simplest and most foolproof techniques for creating basic layers at home, making it ideal for beginners who want to add dimension without complicated sectioning.
This method works by positioning your hair at different angles and cutting straight across, which automatically creates graduated layers.
- The unicorn ponytail technique involves gathering all your hair into a high ponytail at the front of your head (your forehead area) and creates face-framing layers with length at the back.
- Flip your head upside down and brush all hair forward toward your forehead, securing it in a high ponytail at your hairline.
- Slide the ponytail holder down to where you want your shortest layer to be, keeping it smooth and taut.
- Hold the ponytail straight up perpendicular to your head and cut straight across the ends, which creates layers when you release the ponytail.
- The amount you cut determines the intensity of your layers—one inch creates subtle layers while two or more inches creates dramatic layers.
- Always start conservatively, as you can always cut more but cannot add length back.
- The top-of-head ponytail method creates more uniform layers throughout rather than concentrated face-framing.
- Gather all your hair at the crown (top-center of your head) in a high ponytail, smoothing out bumps and ensuring even tension.
- Bend forward slightly or tilt your head back, then cut straight across the ponytail at your desired length.
- When released, this creates layers that are shorter on top and gradually longer toward the bottom.
- The back ponytail method focuses layers toward the back of your head and maintains length in the front.
- Pull all hair straight back into a low ponytail at the nape of your neck, keeping everything smooth and centered.
- Slide the elastic down to where you want to cut, then snip straight across while holding the ponytail perpendicular to your back.
- Tips for ponytail cutting success include keeping consistent tension, using sharp scissors for one clean cut (no sawing), and checking that your ponytail is centered before cutting.
- Part your hair in its natural position before creating the ponytail to ensure layers fall correctly when styled normally.
- For wavy or curly hair, account for shrinkage by cutting less than you think you need, as curls will bounce up significantly when dry.
- After cutting, release the ponytail and shake out your hair to see the layer placement, then make minor adjustments if needed.
6. The Twist and Cut Technique for Soft Layers
The twist and cut method creates soft, blended layers with a more natural, feathered appearance than the ponytail method, making it ideal for those who want subtle dimension.
This technique works well for all hair types and is particularly flattering for creating texture without obvious layer lines.
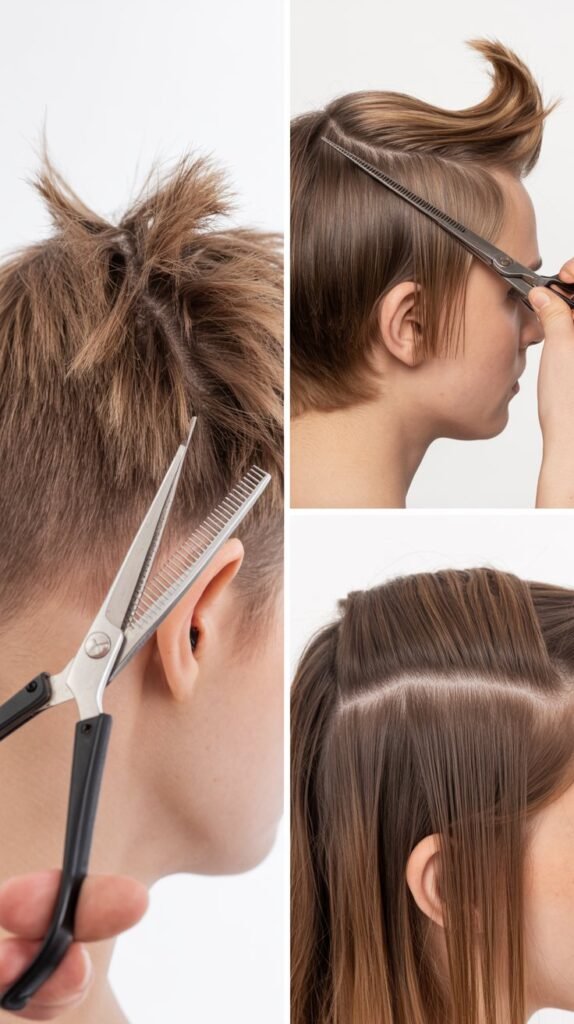
- Begin by dividing your hair into multiple vertical sections from your hairline to the nape of your neck, creating 4-6 sections depending on hair thickness.
- Use sectioning clips to keep hair you’re not working on out of the way and prevent accidentally cutting it.
- Select one section to start (side sections are easier to see than back sections when you’re beginning), and comb it smooth from root to end.
- Hold the section away from your head at a 45-90 degree angle, keeping consistent tension as you comb through it.
- Twist the section loosely from roots to ends, maintaining light tension without twisting so tightly that hair bunches up.
- The twist naturally causes shorter hairs to stick out and longer hairs to remain inside, creating a guide for graduated cutting.
- Identify where you want your layers to begin and slide your fingers down the twisted section to that point, holding firmly.
- Point your scissors upward or at an angle into the twisted section rather than cutting straight across, which creates softer, more blended edges.
- Use point cutting (snipping into the hair with the tips of your scissors at an angle) to remove length gradually and create texture.
- Make several small snips rather than one big cut, as this gives you more control and creates a feathered, natural-looking result.
- Work in small increments, cutting about half an inch at a time and checking your progress frequently in the mirror.
- It’s much easier to cut more if needed than to fix cutting too much off.
- Repeat this process on all sections, maintaining consistency in how far you twist and how much you cut to ensure even layers throughout.
- For symmetry, measure or visually compare sections on opposite sides of your head to ensure you’re cutting the same amount.
- The angle at which you hold each section affects where layers fall—holding hair straight up creates shorter top layers, while holding it at 45 degrees creates more subtle layering.
- After completing all sections, shake out your hair and check for any obvious unevenness, making small corrections as needed.
- Use the twist method on any pieces that need adjustment, twisting and point cutting until everything blends smoothly.
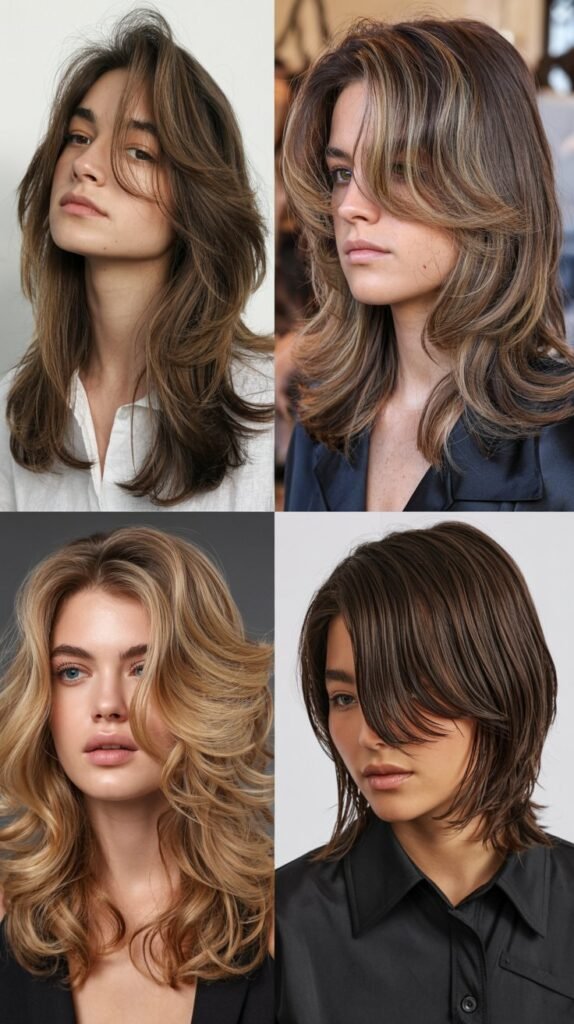
7. Creating Face-Framing Layers
Face-framing layers are shorter pieces around your face that draw attention to your features and create a flattering, dimensional look that’s softer than a single-length cut.
These strategic layers can highlight your cheekbones, jawline, and eyes while adding movement to your overall style.
- Determine where you want your shortest face-framing pieces based on your face shape and the features you want to emphasize—cheekbone, chin, or collarbone length are popular options.
- Longer face-framing pieces (chin-length or below) are more conservative and easier to blend into longer hair, while shorter pieces create more drama.
- Section off the front portions of your hair on both sides of your face, typically taking a triangular or rectangular section from your temple area to just behind your ears.
- The section should be about 1-2 inches wide at the temple and include hair that naturally falls around your face.
- Clip the rest of your hair back securely so you’re only working with these front sections.
- Comb one front section smooth and hold it out from your face at approximately 45 degrees, creating slight tension.
- Determine exactly where you want the shortest point of the layer to fall when the hair hangs naturally against your face.
- Use your fingers as a guide by sliding them down to your desired cutting point, then position your scissors at an angle rather than straight across.
- Cutting at an angle (about 45 degrees) creates a graduated effect where layers blend smoothly rather than creating a blunt, obvious line.
- Cut conservatively at first, removing less than you think you need since you can always cut more but can’t add length back.
- Face-framing layers shrink up noticeably when hair dries and styles, especially for wavy and curly hair types.
- Create symmetry by measuring the cut section against the opposite side, ensuring both sides frame your face evenly.
- Use the first side as a guide for the second, pulling both sections forward simultaneously to check that they match.
- Blend the face-framing layers into the rest of your hair by using point cutting or the twist technique on the sections where face-framing pieces meet longer hair.
- This prevents an obvious demarcation line between your face-framing layers and the rest of your haircut.
- Consider adding subtle graduation within your face-framing sections by making the very front pieces slightly shorter and gradually lengthening as you move toward the back.
- This creates a soft, cascading effect rather than all face-framing pieces being one length.
- Test the final result by letting your face-framing pieces fall naturally and checking them in the mirror from multiple angles and with different hair positions.
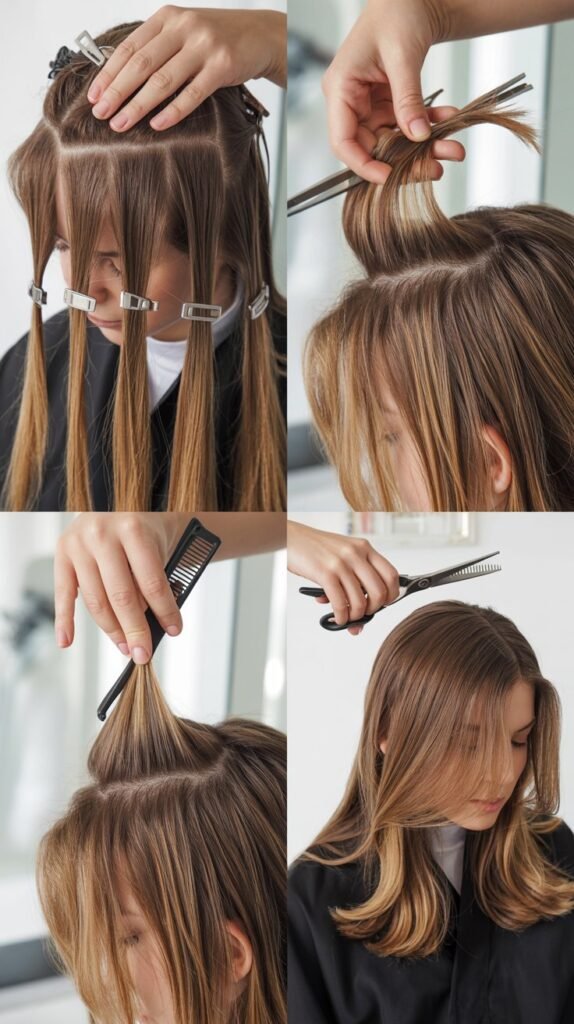
8. The Vertical Sectioning Method for Advanced Layering
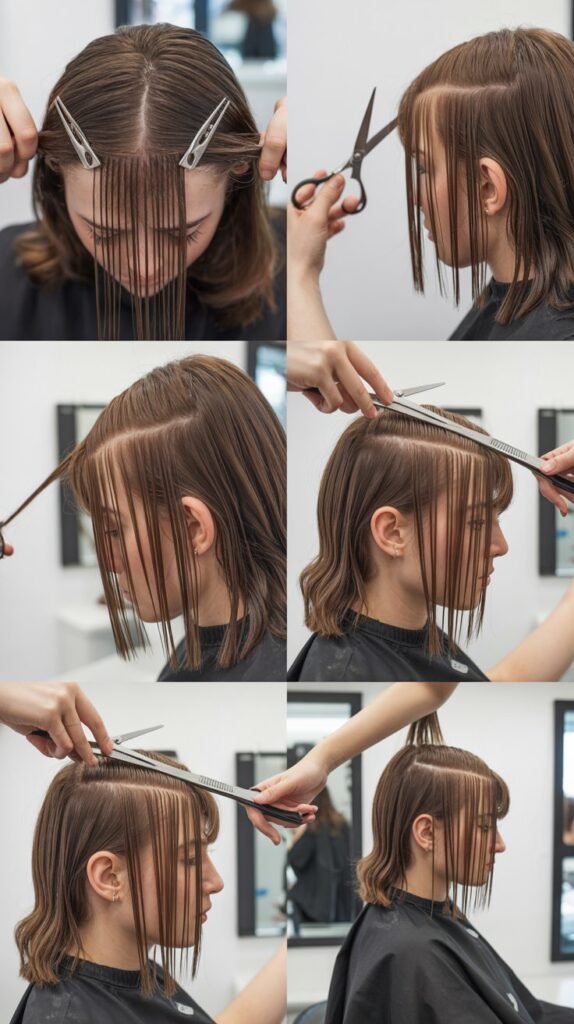
Vertical sectioning is a professional technique that creates seamless, well-blended layers throughout your entire head, ideal for those who want salon-quality results at home.
This method requires more time and precision but delivers the most polished, customizable layering.
- Begin by creating a center part from your forehead to the nape of your neck, dividing your hair into perfect left and right halves.
- Use the pointed end of a rat-tail comb to create a clean, straight part that serves as your central reference point.
- Divide each half into vertical sections approximately 1-2 inches wide, running from your part line down to your hairline or behind your ears.
- Clip each section separately, creating 6-10 vertical sections total depending on your hair thickness.
- Thinner sections provide more control and precision, while wider sections speed up the process but require more skill.
- Start with a section at the back-center of your head, as this is typically the longest part of your hair and establishes your baseline length.
- Comb this section smooth and determine the longest length you want to maintain—this becomes your guide for the rest of your haircut.
- Hold the section straight out from your head at a 90-degree angle (perpendicular to your scalp) for standard layering, or at 45 degrees for more subtle layers.
- The angle at which you hold hair determines the degree of layering—higher angles create more dramatic graduation, lower angles create subtle shifts.
- Cut straight across using the bottom of the section as your guide, removing any uneven ends and establishing your desired length.
- This first section becomes your guide section that you’ll match with subsequent sections.
- Move to an adjacent section and comb it smooth, then hold it out at the same angle as your guide section.
- Pull a small amount of hair from your already-cut guide section together with the new section to ensure consistency.
- Match the new section to your guide section and cut, using the guide as your reference point for where to cut the new section.
- This technique is called “traveling guide” or “mobile guide” and ensures even layering throughout your entire head.
- Continue section by section around your entire head, always bringing forward a small piece of the previously cut section as your guide.
- Work methodically in one direction (either left to right or right to left) to maintain organization and avoid missing sections.
- For the sections around your face and sides, you may need to adjust your holding angle to account for how hair naturally falls forward.
- Hold these sections slightly forward and down rather than straight out to create face-framing that works with natural hair flow.
- Check your progress frequently by releasing sections and looking at overall shape, blend, and symmetry in your mirror setup.
- If you notice any unevenness, identify which section needs correction and re-cut using adjacent sections as guides.
- Finish by checking the perimeter of your haircut—the very ends that form the outline of your style—and clean up any unevenness.
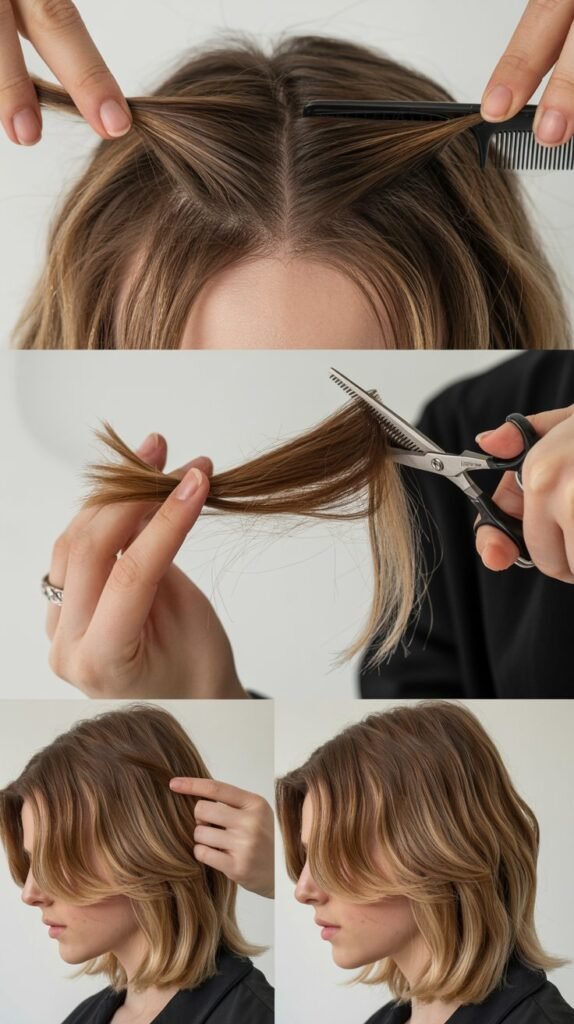
9. Texturizing and Blending Techniques
After creating your basic layer structure, texturizing and blending techniques soften the appearance of your cut, remove bulk, and create a more natural, lived-in finish.
These finishing techniques transform a good haircut into a great one.
- Point cutting involves holding your scissors vertically and snipping into the ends of hair at an angle rather than cutting straight across horizontally.
- This technique creates soft, feathered edges instead of blunt lines and helps layers blend seamlessly into each other.
- Hold a small section of hair between your fingers, then point your scissors upward and make small vertical snips into the ends, removing small triangular pieces.
- Work in small increments, making several tiny cuts rather than one big chop for the most natural results.
- Slide cutting creates internal texture by running partially-closed scissors down the hair shaft from mid-length to ends.
- This technique requires very sharp scissors and a light touch—the scissors should glide down the hair, removing small amounts of bulk throughout the section.
- Never slide cut dry hair, as this creates frizz and damage; hair should be damp and smooth for this technique.
- Slide cutting works particularly well on thick, coarse hair to reduce volume without creating obvious shorter layers.
- Notching or chipping removes small v-shaped sections from the ends of your hair to create separation and texture.
- Hold scissors at a 45-degree angle to the hair and make small snips that remove triangular pieces, creating deliberate gaps in the hair line.
- This technique prevents hair from looking too perfect or blunt and creates a modern, piecey finish.
- Thinning shears (scissors with teeth on one or both blades) remove bulk without changing the overall length of your hair.
- Use thinning shears sparingly, making 2-3 cuts per section in the mid-lengths to ends only, never near the scalp.
- For thick hair, thinning shears can remove weight that causes hair to pouf out or form triangular shapes.
- Never use thinning shears on curly hair, as they disrupt curl patterns and create frizz by cutting curls at different lengths within the same section.
- The twist and chip method combines twisting sections (as described earlier) with point cutting or notching for highly textured, piecey results.
- Twist a section, then use point cutting along the entire twisted length to create varied texture throughout the section rather than just at the ends.
- Blending shorter and longer layers requires focusing on the transition zones where different layer lengths meet.
- Use point cutting in these transition areas, removing tiny amounts and checking frequently until the layers flow smoothly together without visible demarcation lines.
- Check your texturizing work by running your fingers through your hair and looking for any areas that feel too bulky, heavy, or disconnected from surrounding hair.
- These are spots where additional texturizing will improve the overall finish and movement of your haircut.
10. Checking for Symmetry and Making Corrections
Even the most carefully executed DIY haircut requires checking and adjustments to ensure both sides match and layers are even throughout.
Taking time to assess and correct your work transforms an amateur-looking cut into a polished, professional finish.
- Start by checking horizontal symmetry—whether the left and right sides of your hair are the same length and have matching layer placement.
- Pull matching sections from each side of your head forward over your shoulders, holding them side by side to compare length directly.
- Look for any obvious discrepancies where one side is noticeably longer or shorter than the other.
- Check the back of your head using your two-mirror setup, looking for evenness across the nape area and whether layers on the back-left and back-right match.
- Run your fingers through both sides simultaneously to feel for lumps, longer pieces, or areas where layers don’t connect smoothly.
- Your sense of touch can catch unevenness that’s difficult to see in mirrors alone.
- Assess overall shape by shaking out your hair and letting it fall naturally, then looking at your silhouette from the front, both sides, and back.
- Does the shape look balanced and intentional, or are there obvious holes, heavy spots, or choppy areas?
- Look for vertical balance—whether layers graduate smoothly from shortest to longest without sudden jumps or gaps.
- If you notice a layer that seems significantly shorter or longer than it should be in the graduation sequence, this needs correction.
- Check your face-framing pieces specifically by ensuring both sides frame your face identically and fall at the same points on your cheeks, jawline, or shoulders.
- Stand directly facing your mirror and pull both face-framing sections forward, comparing them side by side.
- Make corrections by identifying the longer side or uneven area and carefully trimming to match the shorter/correct side.
- Always use the better-looking side as your guide and adjust the less successful side to match it.
- When making corrections, work in tiny increments of 1/8 to 1/4 inch, as over-correcting creates a new problem.
- Address any obvious choppy sections or disconnect areas where layers don’t blend smoothly by using point cutting or the twist method in those specific spots.
- Focus your correction efforts on transition zones where the problem is most noticeable rather than re-cutting entire sections.
- Do a final check of your perimeter (the outline of your haircut) by looking at where your hair ends and ensuring it forms an intentional, even shape.
- Whether you want a blunt baseline, a V-shape, or a rounded perimeter, make sure it’s clean and symmetrical.
- Step away and come back after 10-15 minutes with fresh eyes, as you’ll notice things you missed while focused intensely on the cutting process.
- Consider the dry test—blow dry or air dry your hair completely and style it as you normally would, then reassess for any corrections needed.
- Hair looks significantly different when styled than when wet, and some unevenness only becomes apparent once hair is dry and in its natural state.
11. Styling Your New Layers
Once you’ve completed cutting your layers, proper styling brings out the dimension, movement, and texture you’ve created while helping your new haircut settle into its optimal shape.
Different styling approaches work better for different layer intensities and hair types.
- Air drying is the gentlest styling option and allows you to see how your layers naturally fall, which helps you assess whether additional corrections are needed.
- Apply a light leave-in conditioner or styling cream to damp hair, focusing on mid-lengths to ends rather than roots.
- Scrunch wavy or curly hair gently to encourage natural texture, or comb straight hair smooth and let it dry naturally.
- For the first few days after cutting, air drying helps your hair “settle” into its new shape and reveals its true behavior.
- Blow drying with a round brush adds volume at the roots and smooth, polished ends, making layers look intentional and professionally styled.
- Use a round brush to lift hair at the roots while directing heat from roots to ends, following the hair’s natural direction.
- For face-framing layers, wrap them around a round brush and roll away from your face while applying heat to create soft, face-flattering bends.
- Focus the dryer’s nozzle down the hair shaft from roots to ends to seal the cuticle and add shine.
- Using a flat iron creates sleek, straight layers that show very clearly, making this style choice best for when your cut is precise and even.
- Apply a heat protectant before using any hot tools to prevent damage, especially on freshly cut ends.
- Work in small sections, gliding the flat iron from roots to ends in one smooth motion for each section.
- For added dimension, bend your wrist slightly outward when you reach the ends to create a subtle flip or wave.
- Curling iron or wand styling enhances layers by creating curls that showcase the different lengths and add dramatic movement.
- Layers naturally create varying curl sizes—shorter layers create smaller, tighter curls while longer layers form larger, looser waves.
- Curl away from your face for face-framing sections to create an open, flattering effect.
- Leave the last inch or two of hair out of the curling iron for a modern, undone finish rather than ringlets.
- Beach waves or texture sprays work beautifully with layers, as the varied lengths create natural-looking, effortless texture.
- Apply texture spray to damp hair, scrunch or twist sections, then air dry or diffuse for lived-in, dimensional waves.
- Styling products that enhance layers include volumizing mousse at roots, texturizing spray in mid-lengths, and light oils or serums on ends.
- Avoid heavy products that weigh down your layers and make them look limp or flat.
- The first wash and style after cutting is important for assessing your work, as this shows how your hair naturally behaves with its new layer structure.
- Make any final tweaking corrections after this first wash when you can see your hair’s true personality.
12. Common Mistakes and How to Fix Them
Even experienced home hair cutters make mistakes, but understanding common errors and their solutions prevents panic and helps you correct problems quickly.
Most DIY cutting mistakes are fixable with the right approach.
- Cutting too much length at once is the most common beginner mistake and unfortunately the hardest to fix since you cannot add hair back.
- If you’ve cut too short, focus on damage control by ensuring what you have is even and well-blended, then commit to growing it out.
- Use styling techniques like curling, extensions, or updos to work with shorter length while hair regrows.
- Prevention: Always cut less than you think you need and check frequently—you can always remove more hair in a second pass.
- Creating choppy, disconnected layers happens when you cut too much length variation between layers or don’t blend transition zones.
- Fix this by focusing on the areas where short and long sections meet, using point cutting and the twist method to create gradual transitions.
- Remove small amounts from the longer sections to create intermediary lengths that bridge the gap between very short and very long.
- Uneven sides where one side is noticeably longer or has different layer placement than the other destroys symmetry and makes the cut look unprofessional.
- To fix, identify which side looks better, then carefully trim the longer side to match, working in small increments.
- Use the “pull both sides forward” technique repeatedly to check your progress until they match exactly.
- Prevention: Constantly compare both sides throughout the cutting process rather than completing one entire side before starting the other.
- Cutting layers too high (starting layers too close to the scalp) removes too much weight and can make hair look thin, poufy, or triangular.
- Unfortunately, layers cut too high need to grow out, but you can minimize the appearance by adding texture through point cutting and using smoothing products.
- For very short layers, embrace the volume they create and style with that in mind rather than fighting against it.
- Creating steps or shelves where you can see obvious horizontal lines between layer lengths looks unnatural and amateur.
- Fix visible demarcation lines by using vertical point cutting along the line, removing bulk that creates the shelf appearance.
- Blend the problem area by taking small vertical sections where the shelf appears and using the twist-and-cut method to create graduation.
- Cutting at the wrong angle for your hair type—such as cutting curly hair straight across when damp, which creates uneven lengths when hair curls up.
- For curly hair mistakes, wait until hair is completely dry, then make corrections by cutting curl-by-curl in its natural state.
- Removing too much bulk with thinning shears creates frizzy, straggly ends that look damaged rather than textured.
- There’s no quick fix for over-thinning except trimming off the affected ends and allowing healthier hair to grow in.
- Use deep conditioning treatments and styling products designed to smooth and seal the cuticle while growing out the damage.
- Prevention: Use thinning shears very sparingly, making 2-3 cuts maximum per section and avoiding the last 2-3 inches of hair completely.
13. Maintaining Your DIY Layers Between Cuts
Keeping your layers looking fresh and intentional between cutting sessions requires specific maintenance strategies that preserve shape, prevent damage, and extend the life of your haircut.
Proper maintenance means you can go 8-12 weeks between trims rather than needing corrections every few weeks.
- Schedule regular trims every 8-12 weeks to maintain your layer structure and remove split ends that make layers look frizzy and poorly defined.
- You can do these maintenance trims yourself using the same techniques you used initially, simply removing 1/4 to 1/2 inch to clean up ends.
- Between major layering sessions, focus on maintaining the shape rather than creating new layers.
- Trim face-framing pieces more frequently (every 4-6 weeks) since they’re most visible and tend to grow out of their flattering placement quickly.
- These are easy to maintain yourself by pulling them forward and carefully trimming to maintain their original length.
- Deep condition regularly to keep ends healthy, as layers mean you have more ends exposed that can become dry or damaged.
- Use a deep conditioning mask or treatment once a week, focusing on the mid-lengths to ends where layers create more surface area.
- Healthy, moisturized hair holds its cut better and looks more polished even as it grows.
- Avoid heat damage by using heat protectant products before styling and limiting hot tool use to a few times per week maximum.
- Damaged ends fray and lose their clean lines, making layers look messy and poorly maintained.
- Sleep on silk or satin pillowcases to reduce friction that causes frizz, breakage, and tangles that disturb your layer structure.
- Regular pillowcases create friction that roughens the hair cuticle, making layers look undefined and messy.
- Use the right products for your hair type to maintain the texture and movement your layers were designed to showcase.
- Lightweight products for fine hair prevent weighing down layers, while richer products for coarse or curly hair keep texture defined.
- Learn to style your layers in multiple ways so you can work with them as they grow rather than feeling frustrated with in-between stages.
- Updos, half-up styles, and braids all work beautifully with layers and can disguise any awkward growing-out phases.
- Address split ends immediately by trimming them off individually rather than letting them travel up the hair shaft and ruin your layer lines.
- Carry small grooming scissors and snip visible split ends when you notice them between major trims.
- Refresh your layers without cutting by using styling techniques that enhance dimension—curling different sections in different directions, adding waves, or using volumizing products strategically.
- Document your cutting method by taking photos or notes about which technique you used, where you started layers, and how much you cut.
- This helps you maintain consistency when you do your next trim rather than trying to remember or recreate from scratch.
14. Troubleshooting Specific Hair Type Challenges
Different hair types present unique challenges when cutting layers at home, and understanding these specific issues helps you avoid problems and achieve better results.
Adapting your technique to your hair’s natural characteristics is essential for success.
- Fine, straight hair challenges: This hair type shows every mistake clearly and can look thin or stringy if over-layered.
- Solution: Keep layers subtle and start them lower on the head (below ear level) to maintain the appearance of fullness.
- Use minimal texturizing techniques, as fine hair doesn’t have bulk to spare and can look wispy if you remove too much.
- Focus layers around the face and crown while maintaining weight at the perimeter for fullness.
- Thick, straight hair challenges: This hair type can form a pyramid or triangle shape if not layered properly and tends to look heavy and blunt.
- Solution: Use multiple layers throughout to remove bulk and create movement, and don’t be afraid of significant graduation.
- Incorporate slide cutting and texturizing with thinning shears to reduce interior bulk without sacrificing perimeter length.
- Point cut the ends to soften and create separation rather than leaving them blunt and heavy.
- Wavy hair challenges: Waves shrink up significantly when they dry, making it easy to cut too much length if working with wet hair.
- Solution: Cut wavy hair when it’s about 80% dry or fully dry to see the true length and how layers will fall naturally.
- Account for shrinkage by cutting conservatively, as waves pull up about 1/2 to 1 inch shorter than wet length.
- Layer placement should enhance the natural wave pattern—usually starting layers around the jawline to chin area works beautifully.
- Curly hair challenges: Curls shrink dramatically (up to 50% or more), and cutting wet curls almost always results in cutting too much.
- Solution: Always cut curly hair completely dry using a curl-by-curl method where you shape individual curl clumps.
- Hold each curl clump in its natural position and carefully trim the ends or cut at an angle to create layers within that curl.
- Never use thinning shears on curly hair, as they disrupt curl patterns and create frizz by cutting curls at irregular lengths.
- Use layers to remove weight that pulls curls straight, allowing them to spring up and show their natural pattern.
- Coily or kinky hair challenges: This hair type shrinks the most dramatically and requires cutting in its natural state or with extreme caution if stretched.
- Solution: Work with completely dry hair in its natural coily state, or carefully stretch hair using the tension method while accounting for 50-70% shrinkage.
- Focus on shape and removing bulk rather than creating dramatic layers, as coily hair already has natural volume and texture.
- Use sharp scissors and clean cuts, as coily hair can be more resistant to cutting and dull scissors will snag.
- Damaged or porous hair challenges: Hair with previous damage, chemical processing, or high porosity doesn’t hold its shape well and can look frizzy.
- Solution: Trim away the most damaged portions first to create a healthy foundation for layering.
- Use conditioning treatments before cutting to temporarily smooth the cuticle, and avoid aggressive texturizing.
- Focus on clean, simple layers rather than complicated techniques that might emphasize the damaged texture.
15. When to Seek Professional Help
Knowing your limitations and recognizing when a professional hairstylist is necessary protects your hair from serious damage and ensures you achieve the look you want.
Some situations simply require professional expertise and tools.
- Seek professional help if you want a dramatic transformation like going from very long to short, adding bangs for the first time, or creating a specific trendy cut you’ve never attempted.
- Major changes are difficult to reverse if they go wrong, and professionals have the training to execute complex cuts successfully.
- If you find a photo of a cut you love, consider having a professional create the initial shape, then maintain it yourself at home.
- Complex cutting techniques like razor cutting, advanced texturizing methods, or precision cuts (like a bob or lob) are best left to professionals.
- These techniques require specialized training, specific tools, and the ability to see all angles of your head simultaneously.
- If you’ve made a significant mistake that you cannot fix through the correction techniques described here, consult a professional stylist immediately.
- Be honest about what happened so they can properly assess and create a correction plan—most stylists appreciate the honesty.
- Don’t try to keep “fixing” a mistake yourself, as each attempt usually makes things worse and gives the professional less to work with.
- Seek professional help for your first haircut in a new style to establish the shape and understand how the cut should look and behave.
- Once a professional creates the foundation, you’ll have a clear reference for maintaining that style at home between salon visits.
- Color and cut combinations should be done by professionals, as understanding how layers interact with color placement requires significant expertise.
- If you want highlights, balayage, or any color service along with your layers, having both done professionally ensures they complement each other.
- Very thick, very curly, or very textured hair can be challenging even for professionals, so if you struggle with your hair type, professional help might be worth the investment.
- Curl specialists and stylists who work primarily with textured hair understand techniques that create beautiful layers on these hair types.
- If you have a special event approaching within 2-4 weeks, don’t attempt a DIY layering project—the risk of mistakes when you need to look your best isn’t worth it.
- Schedule a professional appointment for event haircuts, then return to DIY maintenance once the event has passed.
- Signs you need professional intervention include: inability to create symmetry after multiple attempts, visible holes or gaps in your haircut, extreme regret or dissatisfaction, or hair that won’t style properly despite your best efforts.
- Remember that professional hairstylists spend years learning their craft—there’s no shame in using their services for cuts beyond your skill level.
- Use professionals for the major cuts and DIY for maintenance trims between appointments as a budget-friendly compromise.
- This approach keeps your hair looking professionally styled while reducing your annual hair budget significantly.
Conclusion
Mastering the Best DIY Layered Haircut Tutorial at Home empowers you to take control of your hair styling routine and achieve beautiful, dimensional results without the time and expense of regular salon visits.
Throughout this comprehensive guide, you’ve learned essential techniques from the simple ponytail method to advanced vertical sectioning, discovered how to adapt cutting strategies to your unique hair type and face shape, and gained the confidence to create face-framing pieces and blended layers that enhance your natural beauty.
Remember that becoming proficient at cutting your own hair takes practice—your first attempt may not be perfect, but each time you work with your hair, you’ll develop better instincts for angles, length, and technique.
Start conservatively with subtle layers and progress to more dramatic cuts as your skills improve, always prioritizing evenness and symmetry over trying to achieve too much too quickly.
Maintain your layers with regular trims, proper conditioning, and styling techniques that showcase the dimension you’ve created, and don’t hesitate to seek professional help for major transformations or if you encounter problems beyond your ability to fix.
With patience, attention to detail, and the techniques outlined in this tutorial, you now have everything you need to create stunning layered haircuts that rival salon quality—all from the comfort of your own home.
