Have you ever stared at your flat, lifeless hair in the mirror and wondered how those salon-perfect layers could possibly be achieved without professional help?
You’re not alone, and here’s the exciting news: cutting layers at home isn’t the intimidating challenge you think it is. In fact, there’s a brilliantly simple trick that beginners have been using to transform their hair from dull to dimensional in just minutes.
This article will walk you through everything you need to know about the Beginner Layered Haircut:
The Easiest At-Home Layering Trick, from understanding what layers actually do for your hair to mastering the foolproof ponytail method that hairstylists secretly wish you didn’t know about.
You’ll discover the essential tools you need, learn step-by-step techniques that guarantee success, and pick up professional tips for fixing common mistakes.
Whether you have straight, wavy, or curly hair, long locks or a medium-length mane, this comprehensive guide will empower you to take control of your hairstyle and save hundreds of dollars in salon visits while achieving results that look professionally done.
1. Understanding Layered Haircuts and Why They Work

Before diving into scissors and mirrors, it’s crucial to understand what layers actually are and why they’ve remained a timeless hairstyling technique.
Layers are essentially sections of hair cut at different lengths throughout your head, creating depth, movement, and dimension that a blunt cut simply cannot achieve.
This foundational knowledge will help you make better decisions as you cut and give you confidence in the process.
- Layers work by removing weight from your hair, which allows the remaining strands to move more freely and bounce with natural body.
- When you cut layers, you’re creating a cascading effect where shorter pieces sit on top of longer pieces, adding visual interest and preventing that heavy, triangular shape that occurs with one-length hair.
- Different layer types serve different purposes: face-framing layers draw attention to your features, long layers add subtle movement, and short choppy layers create dramatic texture.
- The science behind why layers look good involves how light reflects off hair at different angles, with varied lengths catching light differently to create a multi-dimensional appearance.
- For fine or thin hair, layers can create the illusion of fuller, thicker hair by removing excess weight that pulls hair flat against the scalp.
- For thick or heavy hair, layers provide essential relief by distributing weight more evenly and preventing that overwhelming bulk that makes styling difficult.
- Layers also help hair dry faster because there’s better air circulation between the different length sections, which is particularly beneficial for those with dense or long hair.
2. Essential Tools You Need for At-Home Layering
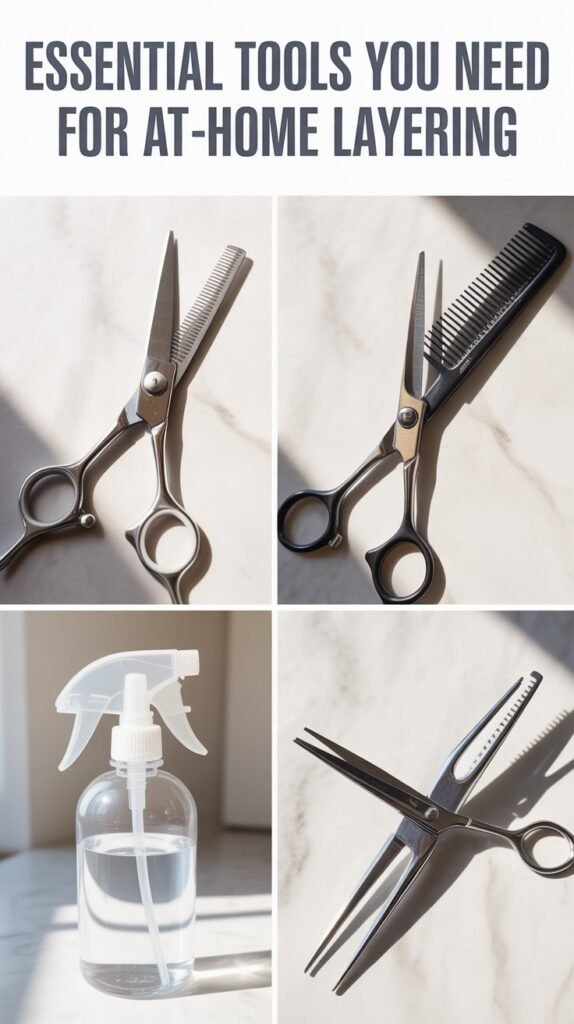
Success in cutting your own layers starts with having the right tools at your disposal.
Professional hairstylists invest in quality equipment for good reason, and while you don’t need to spend a fortune, using proper tools rather than kitchen scissors will make an enormous difference in your results.
- Hair cutting shears are absolutely essential and different from regular scissors because they have sharper, precision-ground blades that cut cleanly without creating split ends or jagged edges.
- You can find decent hair cutting scissors for $15-30 online through retailers like Amazon or Sally Beauty, and this small investment will serve you for years.
- Sectioning clips or hair ties help you divide your hair into manageable portions and keep sections out of the way while you work on specific areas.
- A fine-tooth comb allows you to create clean parts and smooth sections, ensuring your hair is tangle-free before you make any cuts.
- A spray bottle filled with water keeps your hair damp throughout the cutting process, which is crucial because wet hair is easier to control and cuts more evenly than dry hair.
- A handheld mirror in addition to your bathroom mirror gives you a view of the back of your head, helping you check your work from all angles.
- Hair elastics are particularly important for the ponytail method, and you’ll want ones that grip firmly without slipping but won’t damage your hair.
- Having a cape or old towel draped around your shoulders catches falling hair and makes cleanup significantly easier after your cutting session.
3. The Revolutionary Ponytail Method Explained
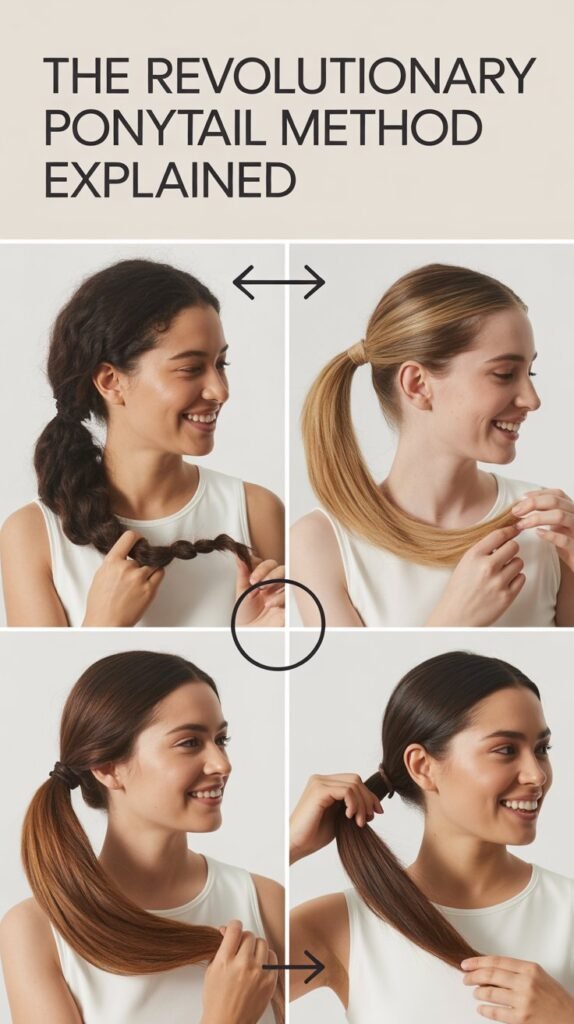
The ponytail method has become legendary among DIY hair enthusiasts because it’s nearly foolproof and delivers remarkably even layers with minimal effort.
This technique, sometimes called the unicorn cut, works by using gravity and a single cutting point to create graduated layers throughout your entire head.
- The ponytail method works because when you flip your hair forward and secure it at your forehead or crown, all the hair is brought to a central point where gravity naturally creates different lengths.
- Step one: Start with clean, damp hair that’s been thoroughly brushed to remove all tangles, as any knots will create uneven sections in your final result.
- Step two: Flip your head upside down and brush all your hair forward toward your forehead, making sure every strand is smoothly gathered without any bumps or sections left behind.
- Step three: Secure your hair in a ponytail at the very top of your head (at your forehead hairline if you want more dramatic layers, or further back at your crown for subtler layers).
- Step four: Slide the elastic down the ponytail to the point where you want to make your cut, keeping in mind that cutting higher up creates shorter layers while cutting lower creates longer, more subtle layers.
- Step five: Hold the ponytail straight up from your head with one hand, and with your scissors in the other hand, cut straight across the ponytail perpendicular to its length.
- For beginners, it’s safer to cut less rather than more—you can always go back and cut more, but you cannot reattach hair you’ve removed.
- After making the cut, remove the elastic, flip your head back up, and gently shake your hair out to see the layers fall naturally into place.
- The beauty of this method is that the hair closest to where the ponytail was secured (at the top of your head) becomes the shortest layer, while hair from the back of your head becomes the longest layer, creating a perfectly graduated effect.
4. Preparing Your Hair Before Making the Cut
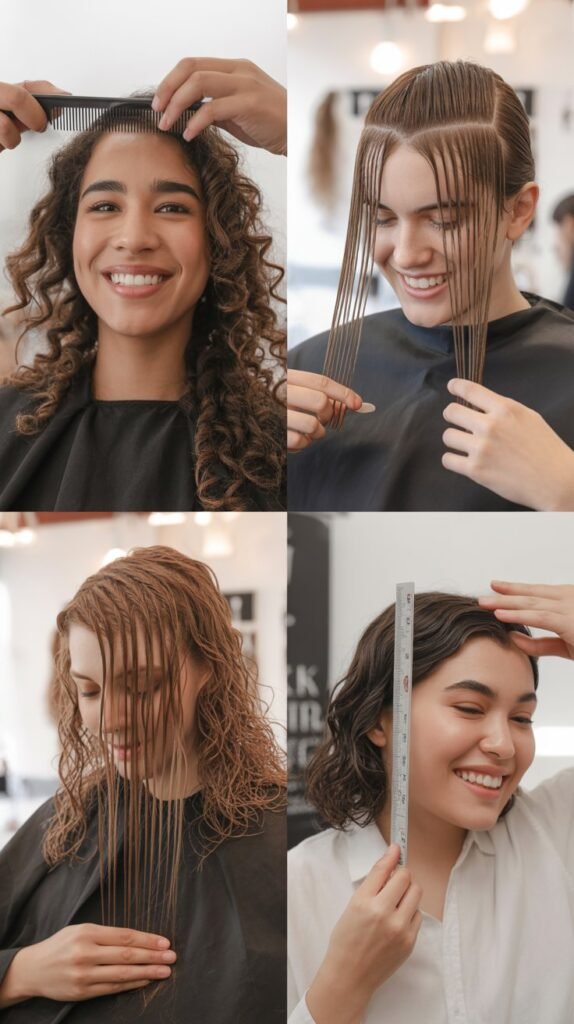
Proper preparation is half the battle when it comes to achieving professional-looking results at home.
Taking the time to set up correctly will prevent mistakes and ensure your layers turn out exactly as you envision them.
- Always start with freshly washed hair because clean hair allows you to see the true texture and allows scissors to glide smoothly without buildup or oils interfering.
- Condition your hair thoroughly to minimize tangles, but avoid heavy styling products before cutting as they can weigh hair down and give you a false impression of how your layers will look when styled normally.
- After washing, towel-dry your hair until it’s damp but not dripping wet—hair that’s too wet can appear longer than it actually is and lead to cutting more than intended.
- Use a wide-tooth comb first to gently detangle from the ends up to the roots, then follow with a fine-tooth comb for a perfectly smooth finish.
- Check your hair in natural lighting if possible, as bathroom lighting can be misleading and might cause you to misjudge lengths or see unevenness that isn’t really there.
- Set up your workspace in a well-lit area with both a main mirror and a handheld mirror positioned so you can see all angles of your head.
- Have all your tools within easy reach before you begin—stopping mid-cut to search for scissors or clips can lead to mistakes and uneven results.
- Take a “before” photo from multiple angles so you can track your progress and have a reference point if you need to make adjustments.
5. Step-by-Step Guide to Cutting Your First Layers
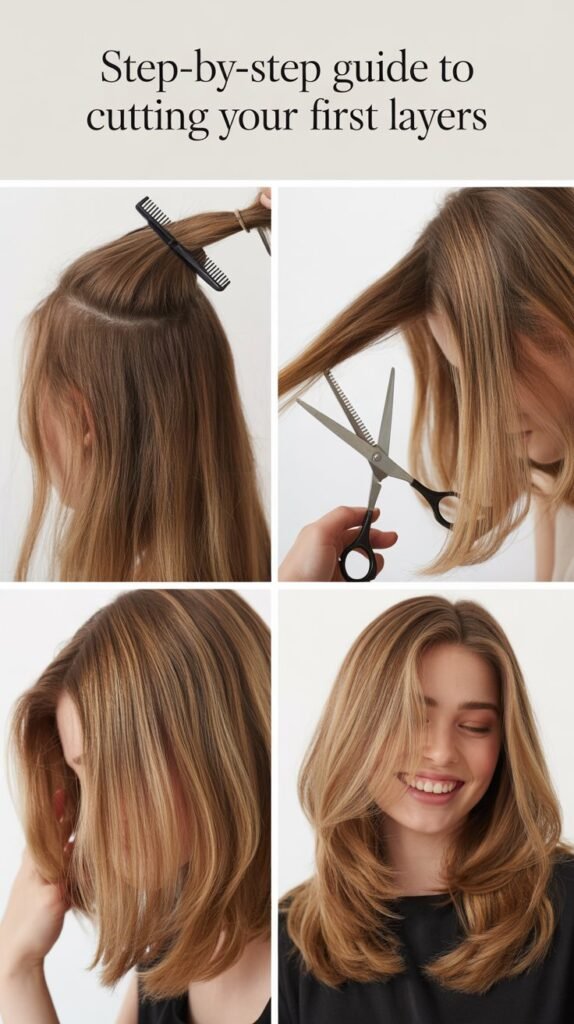
Now that you understand the theory and have prepared properly, it’s time to actually cut your layers using the proven ponytail method.
Follow these detailed steps carefully, and remember that patience and precision will give you the best results.
- Minute 0-2: Flip your head completely upside down so you’re looking at the floor, and use your brush to gather absolutely all of your hair forward toward the space between your eyebrows.
- Make sure you’ve captured every single strand, including the shorter hairs at the nape of your neck, by running your fingers through from the roots to ensure nothing is left behind.
- Minute 2-4: Secure all the hair with an elastic at the point on your head where you want the shortest layers to begin—at your hairline for dramatic layers, or 2-3 inches back from your hairline for moderate layers.
- The ponytail should feel tight and secure, positioned so that when you’re holding it, the ponytail points straight up toward the ceiling without pulling to the front or back.
- Minute 4-6: While keeping your head upside down, slide the elastic band down the length of the ponytail to establish your cutting point—for beginners, start conservatively by positioning it about 2 inches from the ends.
- Hold the ponytail firmly with your non-dominant hand, stretching it taut and straight so there’s no slack or curve in the hair.
- Minute 6-8: With your hair cutting scissors, make a single, clean cut straight across the ponytail, perpendicular to its length, in one smooth motion rather than multiple choppy cuts.
- Keep your scissors parallel to the floor and cut decisively—hesitant, sawing motions create jagged, uneven edges.
- Minute 8-10: Carefully remove the elastic, flip your head back up to a normal position, and gently shake your hair to allow the layers to fall naturally.
- Run your fingers through your hair from roots to ends to help separate the layers and get a first look at your new cut.
- Examine your layers from all angles using both mirrors, checking for symmetry and overall shape before deciding if any adjustments are needed.
6. Customizing Layers for Different Hair Types
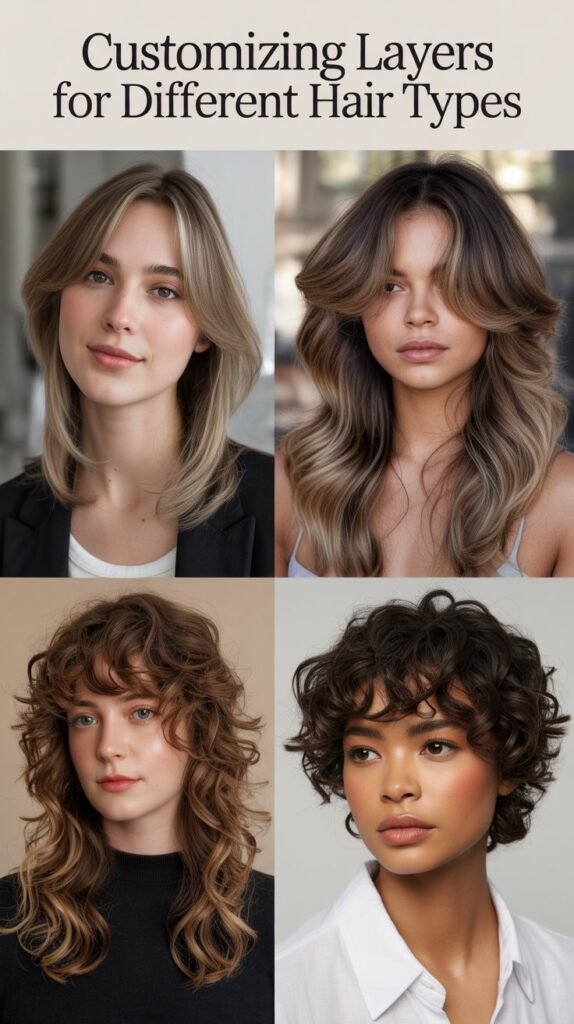
While the ponytail method works universally, small adjustments based on your specific hair type will optimize your results.
Understanding how your hair’s unique characteristics affect the layering process will help you avoid common pitfalls.
- For straight hair, what you cut is what you get, so measure carefully and cut conservatively since there’s no curl or wave to hide mistakes.
- Straight hair shows every imperfection, which means you need to be extra precise with your cutting line to ensure it’s perfectly even.
- For wavy hair, remember that waves will cause hair to appear shorter once dry, so cut your ponytail about half an inch to one inch longer than your desired final length.
- Wavy hair benefits from point-cutting (cutting into the ends at an angle) after the initial cut to create softer, more blended layers that work with the natural texture.
- For curly hair, the shrinkage factor is significant, and you should cut a full one to two inches longer than you think necessary because curls bounce up dramatically when dry.
- Consider cutting curly hair when it’s dry in its natural state for the most accurate length assessment, or if cutting wet, be extremely conservative.
- For fine or thin hair, stick to longer, more subtle layers that maintain density at the ends rather than short choppy layers that make hair look sparse.
- Avoid removing too much weight from fine hair, as some weight actually helps the hair lay smoother and appear fuller.
- For thick or heavy hair, you can be more aggressive with layering since removing weight is beneficial and your hair has plenty of density to maintain fullness.
- Thick hair often benefits from a second ponytail cut at a different position to create even more dimension and weight removal throughout.
7. Face-Framing Layers: The Advanced Touch
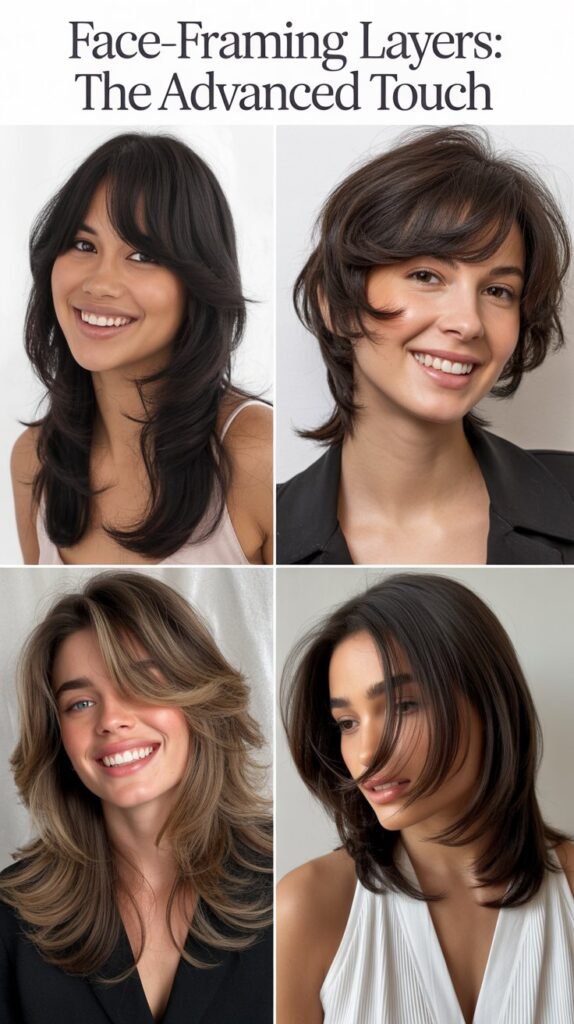
Once you’ve mastered the basic ponytail method, adding face-framing layers takes your cut from good to professional-looking.
These strategically placed shorter pieces around your face create a flattering, polished finish that draws attention to your features.
- Face-framing layers are the pieces of hair that fall in front of your ears and along the sides of your face, and they’re typically shorter than the rest of your layers.
- These layers serve to soften the overall look, highlight your cheekbones and jawline, and create a polished, salon-finished appearance.
- To create face-framing layers, start by sectioning out a small triangle of hair at each temple, with the point of the triangle at your part and the base extending to just in front of your ear.
- Comb these sections straight down along the sides of your face and decide where you want the shortest point—typically at chin length, mouth length, or cheekbone length depending on your preference.
- Hold the hair between your index and middle fingers where you want to cut, pulling it slightly forward and keeping the tension even.
- Instead of cutting straight across, angle your scissors slightly so you’re cutting at a 45-degree angle, which creates a softer, more graduated effect that blends into your other layers.
- Cut both sides separately while looking straight ahead into the mirror, and check frequently that you’re maintaining symmetry by bringing both sides forward to compare lengths.
- Face-framing layers look best when they’re cut to hit at flattering points on your face—avoid cutting right at the widest part of your cheekbones or jawline, and instead aim for slightly above or below these points.
- These layers can be adjusted over time, so start longer than you think you want them and gradually cut shorter in small increments until you achieve your ideal length.
8. Common Mistakes and How to Fix Them
Even with the best instructions, mistakes can happen when you’re learning to cut your own hair. Knowing how to identify and correct common errors will save your haircut and build your confidence for future attempts.
- Mistake: Uneven layers on the left versus right side usually happens when the ponytail wasn’t centered properly or when you cut at an angle instead of straight across.
- Fix: Create another high ponytail, making absolutely certain it’s centered on your head, and make a small corrective cut to the longer side, erring on the side of caution.
- Mistake: Layers that are too short occurs when you cut too close to the elastic or when you didn’t account for hair shrinkage as it dries.
- Fix: Unfortunately, hair doesn’t grow back overnight, but you can minimize the appearance of too-short layers by styling them with volumizing products, using a curling iron to blend them with longer pieces, or consulting a professional stylist to create a transitional style while your hair grows.
- Mistake: Choppy, disconnected layers that don’t flow smoothly happen when the ponytail had tangles or bumps, or when the hair wasn’t all gathered to the same central point.
- Fix: Use the ponytail method again with meticulous attention to creating a perfectly smooth, bump-free ponytail, and make a very conservative cut to blend the choppy sections.
- Mistake: Cutting too much off at once is the most common beginner error because people underestimate how much length they’re removing.
- Fix: Always cut less than you think you need initially—you can always do a second ponytail cut to create more dramatic layers, but you cannot add hair back.
- Mistake: Layers that disappear when hair is dry happens particularly with wavy or curly hair when you don’t account for shrinkage.
- Fix: Next time, cut significantly longer (1-2 inches for curly hair), or try cutting your hair dry in its natural state so you can see exactly how the layers will look.
- Mistake: Jagged or split-looking ends result from using dull scissors or making multiple choppy cuts instead of one clean cut.
- Fix: Invest in proper hair cutting scissors and practice making single, confident cuts rather than sawing back and forth through the hair.
- If you’ve made a mistake that you truly cannot fix yourself, don’t panic—professional hairstylists can work with almost any DIY cut and will often just charge for a trim rather than a full cut to correct your work.
9. Styling and Maintaining Your New Layers
Cutting the layers is only half the journey; styling them properly will showcase your hard work and maintain the healthy, dimensional look you’ve created.
Learning how to work with your layers will ensure they always look their best.
- The first 24 hours after cutting are crucial for styling your layers properly, as this sets the pattern for how your hair will naturally fall.
- For straight hair, blow-dry with a round brush by taking small sections of each layer and rolling the brush under as you direct heat from roots to ends, creating smooth, turned-under ends.
- For wavy hair, enhance your natural texture by applying a texturizing spray or mousse to damp hair, scrunching gently, and allowing it to air-dry or using a diffuser attachment on your dryer.
- For curly hair, apply a leave-in conditioner and curl-defining cream to soaking wet hair, scrunch gently, and either air-dry or diffuse on low heat to maintain curl definition and showcase the layers.
- Adding loose waves or curls with a curling iron or wand is the fastest way to make your layers look professionally styled, as the curves highlight the different lengths beautifully.
- When using heat styling tools, always apply a heat protectant spray first to prevent damage, and curl away from your face for the most flattering look.
- Trimming your layers every 8-12 weeks maintains the shape and prevents split ends from traveling up the hair shaft, keeping your cut looking fresh.
- Between trims, you can maintain the style by occasionally dust-cutting (removing just 1/4 inch from the ends) using the same ponytail method you used initially.
- Sleep on a silk or satin pillowcase to reduce friction that can cause tangles and frizz in your layers overnight.
- Refresh second-day hair by lightly misting with water and re-scrunching or re-curling just the front sections and face-framing layers for a quick refresh.
10. When to Seek Professional Help

While the at-home ponytail method is remarkably effective, there are certain situations where consulting a professional stylist is the smarter choice. Knowing your limitations and when to call in expert help will prevent costly mistakes.
- If you have very short hair (above shoulder length), the ponytail method becomes difficult to execute properly because there isn’t enough length to gather into a secure ponytail.
- Complex layering techniques like feathered layers, razor-cut layers, or highly graduated bobs require professional training and tools that go beyond basic at-home cutting.
- When you want a dramatic transformation or are cutting layers for the first time in hair that’s been one length for years, a professional consultation can provide a better foundation that you can then maintain at home.
- If you have any scalp conditions, recent chemical treatments, or very damaged hair, a professional can assess the health of your hair and advise whether layering is appropriate at this time.
- Correcting a major mistake, especially if you’ve cut too short or created severe unevenness, is best left to professionals who have the training to create transitional styles while your hair grows.
- For special occasions like weddings, graduations, or important photo sessions, investing in a professional cut ensures you’ll look your absolute best without any risk.
- Consider getting a professional layered cut once and then maintaining it at home with the ponytail method, which saves you money while ensuring the foundation of your style is expertly created.
- Many salons offer “cut consultations” where a stylist can teach you techniques specific to your hair type and face shape, which can be an invaluable investment in your at-home cutting education.
- Building a relationship with a trusted stylist means you have someone to turn to for advice, corrections, and seasonal style updates while handling routine maintenance yourself between visits.
Conclusion
The Beginner Layered Haircut: The Easiest At-Home Layering Trick isn’t just about saving money on salon visits, though that’s certainly a wonderful benefit. It’s about empowerment, creativity, and taking control of one aspect of your appearance that has likely felt intimidating or off-limits until now.
By following the ponytail method outlined in this guide, understanding your hair type’s specific needs, and approaching the process with patience and proper preparation, you’ve equipped yourself with a skill that will serve you for years to come.
Remember that even professional hairstylists didn’t master their craft overnight, so give yourself grace if your first attempt isn’t absolutely perfect. Each time you cut your layers, you’ll gain more confidence, develop a better eye for what works with your hair, and refine your technique.
Whether you’re maintaining your style between salon visits or embracing DIY hair care entirely, the knowledge you’ve gained here transforms what once seemed like an impossible task into a simple, achievable process that takes less than fifteen minutes from start to finish.
Your hair is your canvas, and now you have the tools and knowledge to create beautiful, dimensional layers whenever the mood strikes.
