Cutting your own hair might seem intimidating at first, but with the right guidance and tools, it transforms into an empowering skill that saves both time and money.
This Self-Haircut Tutorial: Easy Steps for Trimming & Shaping Your Own Hair will walk you through everything you need to know to confidently trim and shape your hair at home.
Whether you’re maintaining your current style, dealing with overgrown ends, or simply wanting to take control of your appearance between salon visits, this comprehensive guide provides practical techniques that work for various hair types and lengths.
You’ll discover how to gather the essential tools, prepare your workspace, master basic cutting techniques, and avoid common mistakes that beginners make.
By the end of this article, you’ll have the knowledge and confidence to give yourself professional-looking haircuts without stepping foot in a salon.
1. Understanding Your Hair Type and Texture Before Cutting
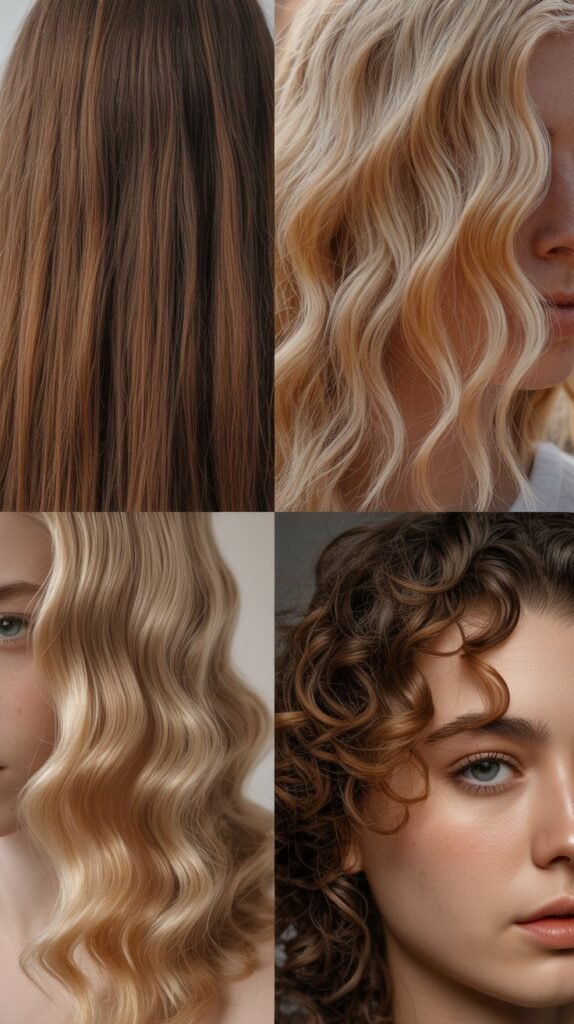
Before you pick up scissors, understanding your specific hair characteristics ensures you choose the right cutting approach and achieve results that complement your natural texture.
Different hair types respond differently to cutting techniques, and what works beautifully for straight hair might create problems for curly or coily textures.
- Straight hair shows every cut line clearly, making precision essential since mistakes are immediately visible and uneven cuts stand out prominently.
- Wavy hair has natural movement that can disguise minor imperfections, but cutting it wet versus dry produces dramatically different results that you must account for.
- Curly hair shrinks significantly when it dries, meaning you should always cut it dry or account for substantial length reduction after styling.
- Coily and textured hair requires specialized techniques like twist cutting or working in small sections to maintain the natural curl pattern without creating bulk.
- Fine hair needs blunt cuts to maintain the appearance of thickness, while thick hair benefits from layering and texturizing to remove excess weight.
- Hair growth patterns including cowlicks, whorls, and natural parts influence how hair falls and should guide your cutting decisions to work with rather than against these natural tendencies.
2. Essential Tools and Equipment for Self-Haircuts
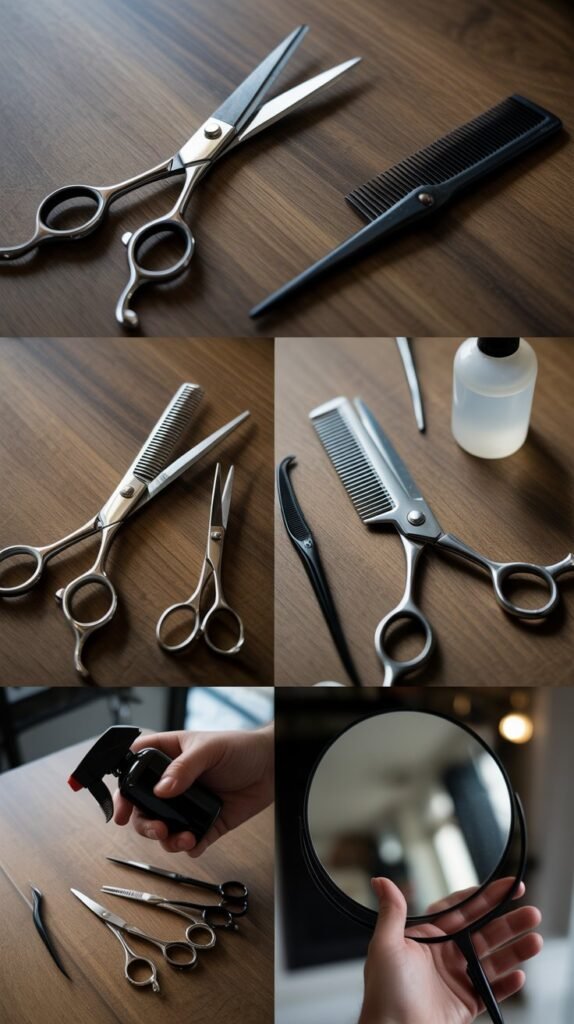
Having professional-quality tools makes the difference between a frustrating experience with poor results and a smooth cutting process that yields salon-worthy outcomes.
Investing in the right equipment from the start prevents common problems and makes each subsequent haircut easier and more successful.
- Professional haircutting scissors with blades between 5.5 to 7 inches provide the sharpness and control necessary for clean cuts, while kitchen or craft scissors crush hair strands and create split ends.
- Thinning shears or texturizing scissors remove bulk without shortening length, creating softer edges and blending layers for a more natural finish.
- Sectioning clips hold hair firmly in place while you work on different areas, preventing hair from falling into your cutting zone and ensuring consistent results.
- A fine-tooth comb helps create clean sections and guides your scissors for straight, even cuts across each section you’re trimming.
- A spray bottle filled with water keeps hair damp during cutting if your technique requires it, though many modern methods work better on dry hair.
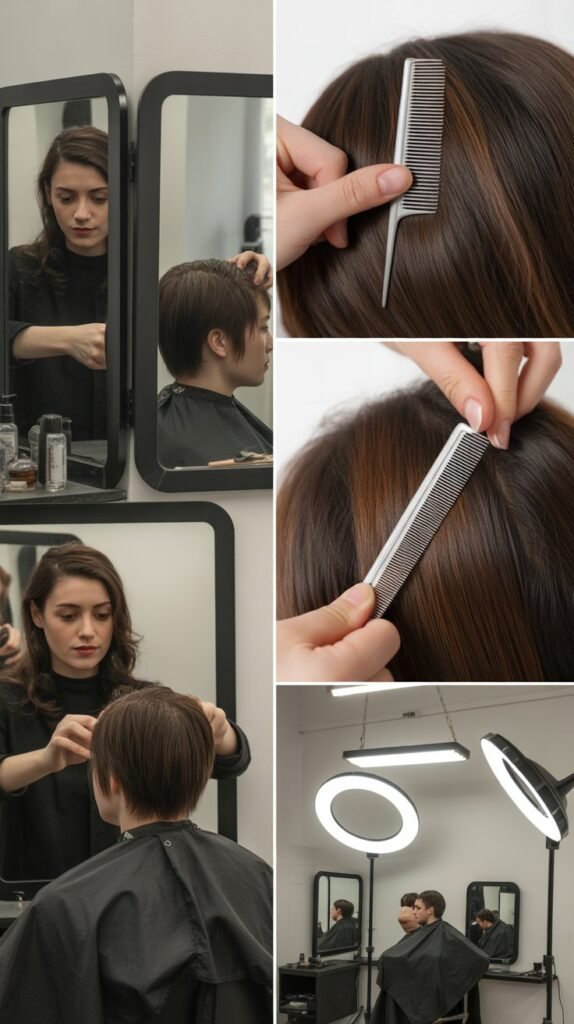
- A handheld mirror combined with your bathroom mirror creates a three-way view that lets you see the back and sides of your head clearly.
- A cape or old towel draped around your shoulders catches falling hair and keeps your clothes clean throughout the cutting process.
- Hair clippers with various guard attachments work perfectly for buzzcuts, fades, and maintaining short hairstyles with consistent length.
3. Preparing Your Workspace and Hair
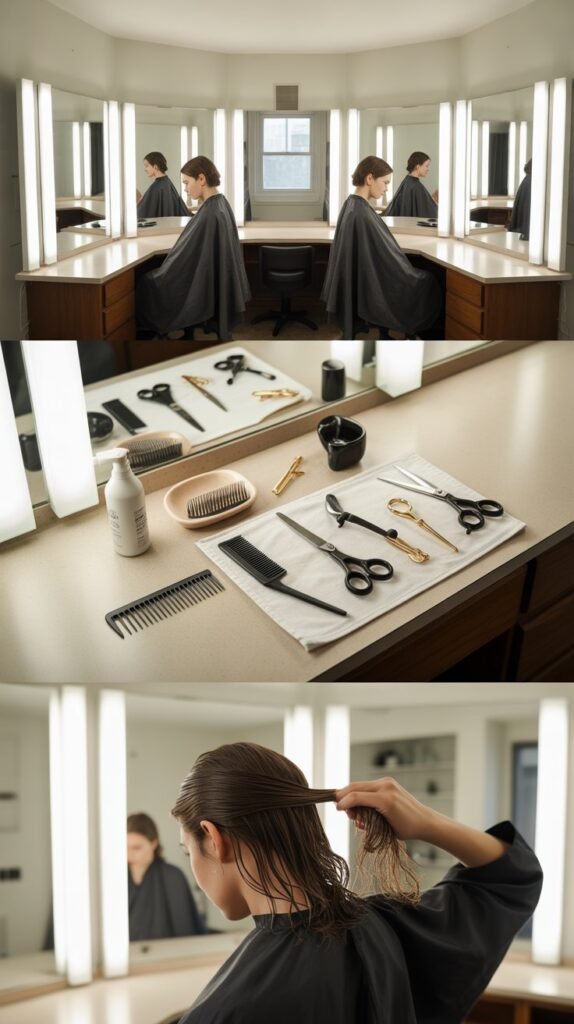
Proper preparation creates the foundation for a successful self-haircut by ensuring you have adequate lighting, a comfortable setup, and hair that’s in optimal condition for cutting.
Rushing through preparation leads to avoidable mistakes that compromise your final results.
- Choose a location with excellent lighting from multiple angles, preferably natural daylight supplemented with bright overhead lights that eliminate shadows around your head.
- Position mirrors strategically to see all angles of your head, placing a handheld mirror opposite your main mirror to view the back clearly.
- Lay out all your tools within easy reach before starting, organizing them in the order you’ll use them to maintain workflow efficiency.
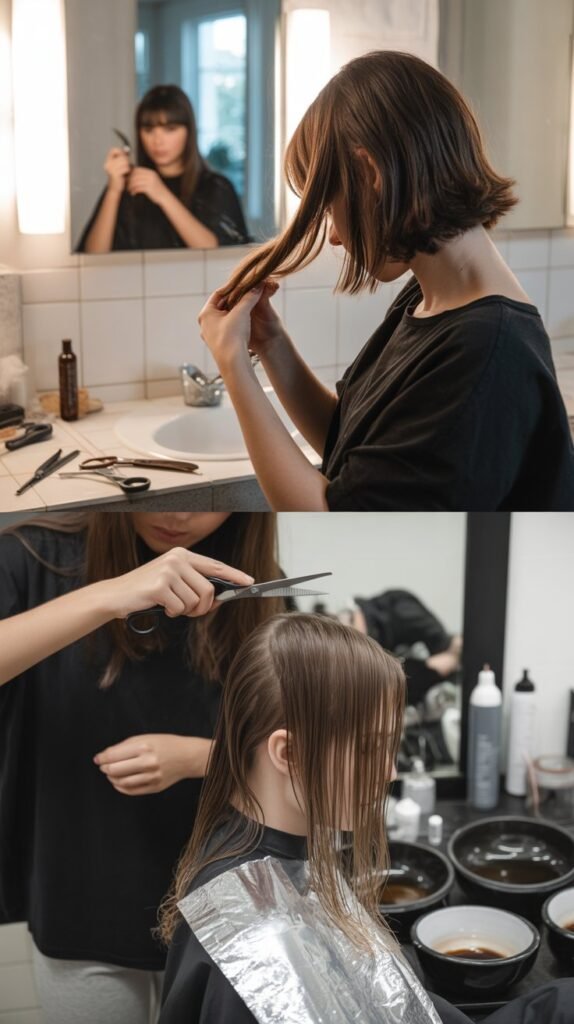
- Wash and condition your hair before cutting if you’re working with wet hair, as clean hair cuts more easily and shows the true texture.
- Detangle hair completely using a wide-tooth comb or brush, working from ends to roots to remove all knots that could interfere with even cutting.
- Decide whether to cut wet or dry based on your hair type—straight hair can be cut wet, while curly and wavy hair should typically be cut dry to see the true length.
- Section your hair using clips before you begin cutting, dividing it into manageable zones that you’ll work through systematically.
- Cover surrounding surfaces with towels or newspapers to make cleanup easier after you’ve finished your haircut.
4. Basic Cutting Techniques for Beginners
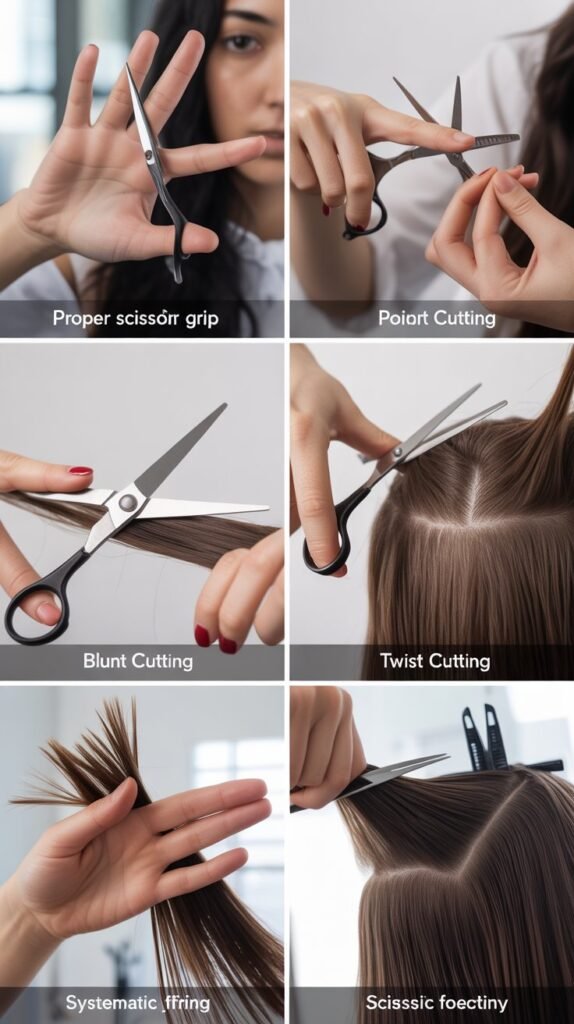
Mastering fundamental cutting techniques gives you the skills to tackle various hairstyles and corrections while minimizing the risk of major mistakes.
These methods form the building blocks that professional stylists use, adapted for the unique challenges of cutting your own hair.
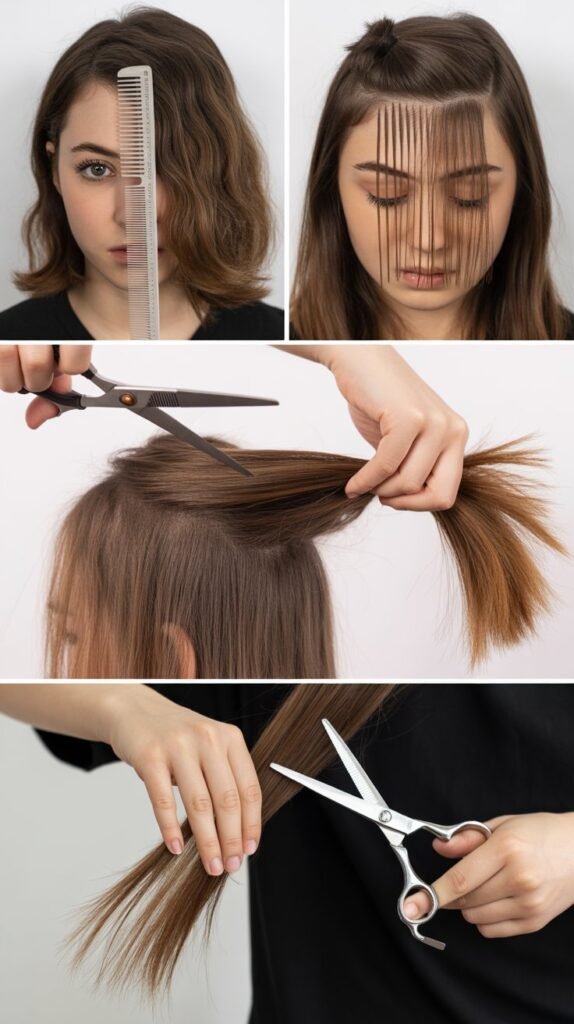
- The point-cutting technique involves holding scissors vertically and snipping into the hair ends at an angle, creating soft, textured edges rather than blunt lines.
- Blunt cutting keeps scissors horizontal to create clean, straight lines across sections, ideal for maintaining length while removing damaged ends.
- The twist method works excellently for curly hair—twist small sections and trim the ends that stick out, following the natural curl pattern.
- Slide cutting (also called slithering) involves closing scissors while sliding them down the hair shaft, thinning and texturizing in one motion.
- The dusting technique removes only the very tips of hair ends, cutting less than a quarter inch to eliminate split ends while preserving length.
- Always cut less than you think you need initially, remembering that hair cannot be reattached but you can always take more off after assessing your progress.
- Work in small sections rather than large chunks, which gives you better control and makes it easier to maintain consistent length throughout.
- Use your fingers as a guide by holding hair between your index and middle fingers, cutting just above where your fingers grip the section.
5. Step-by-Step Guide to Trimming Split Ends
Trimming split ends regularly maintains hair health and prevents damage from traveling up the hair shaft, keeping your overall style looking fresh between major cuts. This maintenance task requires minimal skill and delivers immediate visual improvement with low risk.
- Examine your hair in bright light to identify split ends, looking for strands that fork, have white dots, or appear frayed at the tips.
- Twist small sections of hair tightly, which causes damaged ends and shorter broken strands to stick out from the twisted section.
- Carefully snip only the damaged ends that protrude from the twisted section using sharp scissors held at an angle.
- Work through your entire head section by section, maintaining consistency in how much you remove from each area.
- Alternatively, use the “search and destroy” method by examining hair strands individually and cutting only visible splits, preserving maximum length.
- Trim approximately one-quarter to one-half inch above the visible split to ensure you remove all damage and prevent immediate re-splitting.
- Check your work after completing each section by running fingers through hair to feel for rough, uneven ends that need additional attention.
- Schedule split end trims every 6-8 weeks to maintain hair health, though frequency varies based on heat styling, chemical treatments, and hair condition.
6. Creating Layers and Adding Texture
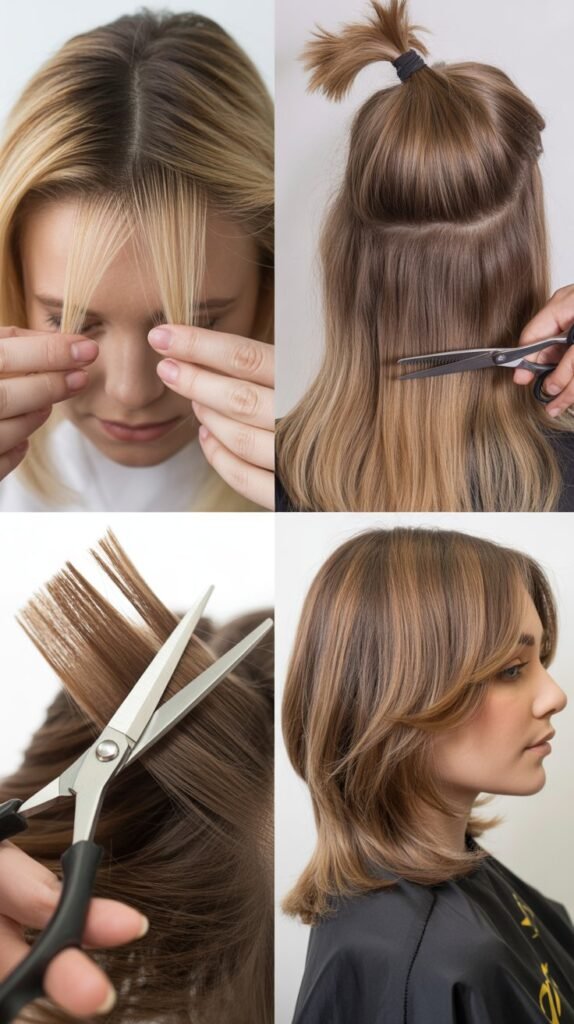
Layers remove weight, add movement, and create dimension in hair, transforming flat or heavy styles into dynamic looks with volume and flow. While more advanced than simple trims, basic layering techniques are achievable at home with careful execution.
- The ponytail method for long layers involves gathering all hair into a high ponytail at your forehead, pulling it straight up, and cutting straight across the ends.
- Face-framing layers require pulling front sections forward, deciding how short you want them near your face, and cutting at an angle away from your face.
- The unicorn cut technique brings all hair to a ponytail at the top of your forehead and cuts straight across, creating graduated layers throughout when released.
- Vertical layering involves taking sections from crown to nape, holding them perpendicular to the head, and cutting at your desired length for even layers.
- Texturizing with thinning shears removes bulk without changing length by making cuts throughout the mid-lengths and ends rather than at the tips.
- Always cut layers on dry hair so you can see exactly how they fall and adjust them gradually to achieve your desired effect.
- Start with subtle layers and add more if desired, as overly aggressive layering creates volume that’s difficult to control and style.
- Check symmetry constantly by comparing both sides of your head, ensuring layers frame your face evenly and fall at matching lengths.
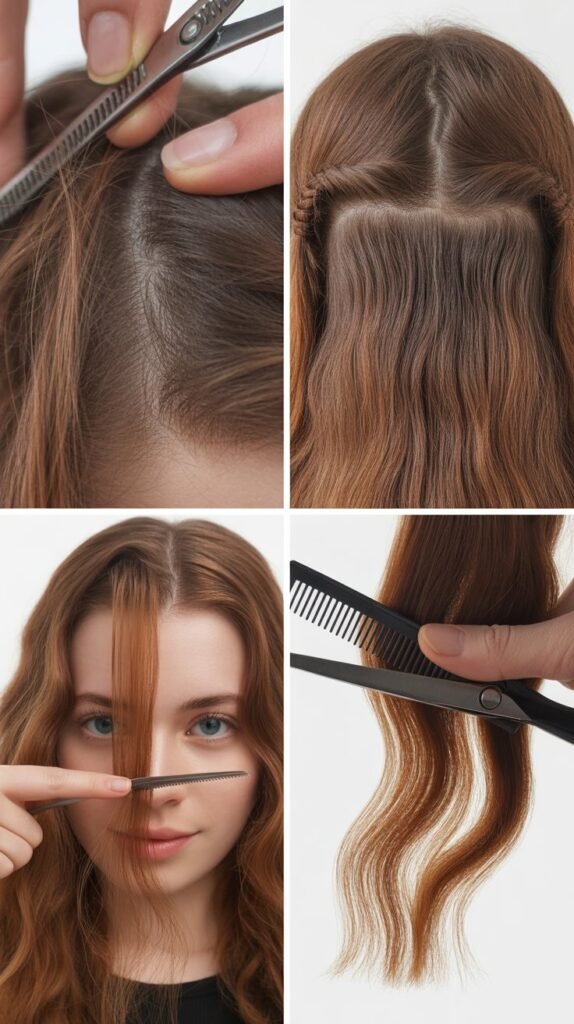
7. Trimming Bangs and Fringe at Home

Bangs grow quickly and often need maintenance between regular haircuts, making them the perfect starting point for building self-cutting confidence. Different bang styles require specific techniques, but all follow basic principles that minimize mistakes.
- Section bangs completely from the rest of your hair using clips, creating a clean triangle or rectangle from your hairline to work with exclusively.
- Always cut bangs dry so you can see the true length, as wet bangs appear longer and will shrink significantly when they dry.
- Hold scissors vertically rather than horizontally when cutting bangs, using a point-cutting motion to create soft edges that blend naturally.
- Cut bangs slightly longer than your target length initially, then gradually trim shorter until you reach the perfect point.
- For straight-across bangs, work in small vertical sections from one side to the other, maintaining consistent tension and angle with each snip.
- Side-swept bangs require cutting at an angle from shorter on one side to longer on the other, following the direction you’ll style them.
- Curtain bangs need a middle part with gradual lengthening on each side, creating a soft frame that opens in the center.
- Twist and point-cut technique works beautifully for wispy, textured bangs by twisting small sections and snipping into the twisted hair at varying heights.
8. Self-Cutting Techniques for Short Hair
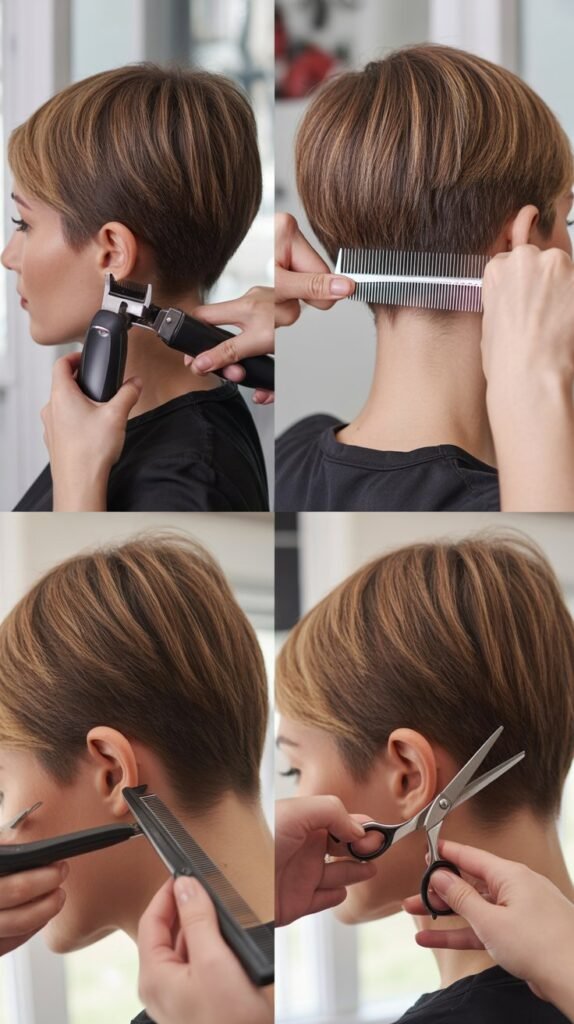
Short hairstyles require more frequent maintenance than long hair, making self-cutting skills particularly valuable for keeping styles crisp and well-shaped between professional cuts.
Short hair shows mistakes more obviously, but simple techniques keep basic styles looking fresh.
- Clippers with appropriate guard attachments maintain consistent length across the head, making them ideal for buzzcuts and maintaining short, even styles.
- The scissor-over-comb technique involves holding a comb in hair and cutting the hair that extends beyond the comb teeth with scissors running along the comb.
- Clipper-over-comb provides more control than guards alone by using clippers alongside a comb to gradually blend and taper hair length.
- Neck cleanup requires a handheld mirror to see clearly while using clippers or scissors to create a clean hairline at the nape.
- Trimming around ears demands careful attention and steady hands, using scissors or clipper edges to define clean lines without nicking skin.
- Fading or tapering the sides creates gradual length transitions by starting with longer guards at the top and shorter guards toward the hairline.
- The top section of short hair can be trimmed by pulling small vertical sections upward and cutting to desired length, working from front to back.
- Regular maintenance every 2-3 weeks keeps short styles looking sharp, preventing the overgrown appearance that happens quickly with shorter cuts.
9. Managing Long Hair Cuts and Maintenance
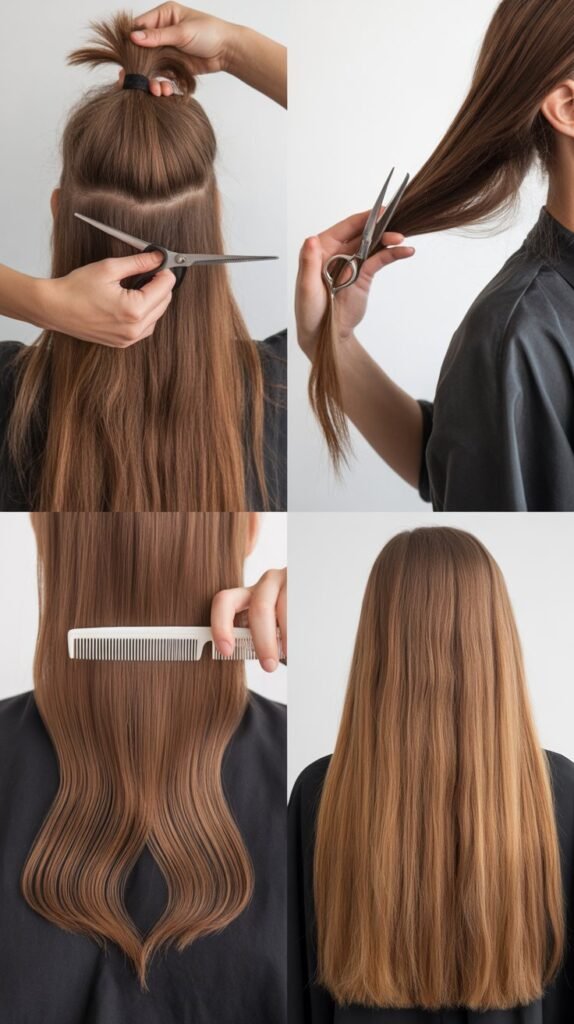
Long hair requires different approaches than short styles, with techniques focused on maintaining healthy ends, preserving length, and adding subtle shape without dramatic changes. Self-maintenance for long hair centers on regular trims and strategic layering.
- The ponytail method works well for long hair by gathering hair into a low ponytail at the nape, sliding the elastic to desired cutting point, and trimming straight across.
- Creating a V-shape at the back involves dividing hair down the middle, bringing each section forward over the shoulders, and cutting at an angle that creates a point.
- U-shaped cuts add softness to long hair by cutting the middle sections slightly shorter than the sides, creating gentle curves rather than blunt lines.
- Dusting techniques preserve maximum length while removing damage by trimming only one-eighth to one-quarter inch from the ends.
- The hair-flip method brings all hair forward over your head toward the floor, combing it smooth, and cutting straight across while bent over.
- Self-trimming long layers involves dividing hair into horizontal sections, bringing each section forward, and cutting at an angle for graduated length.
- Always cut long hair dry unless you have perfectly straight hair, as texture causes significant length changes between wet and dry states.
- Schedule maintenance trims every 8-12 weeks for long hair to prevent split ends from traveling up the shaft and causing extensive damage.
10. Common Mistakes and How to Avoid Them
Understanding typical self-cutting errors helps you anticipate problems and take preventive measures, significantly improving your results and confidence. Learning from common mistakes saves you from the frustration of fixing avoidable problems.
- Cutting too much at once is the most common error—always start conservatively and take multiple passes, as you can always cut more but cannot add hair back.
- Using dull scissors crushes hair instead of cutting cleanly, creating split ends and ragged edges that look damaged rather than freshly trimmed.
- Cutting hair at inconsistent angles while moving around your head creates uneven lengths that become obvious once hair settles naturally.
- Pulling hair too tightly while cutting causes sections to spring up shorter than intended when released, resulting in unexpected shortness.
- Attempting complex techniques without mastering basics leads to frustration and mistakes, so build skills gradually starting with simple trims.
- Cutting curly or wavy hair while wet causes dramatic shrinkage when dry, making hair much shorter than anticipated during cutting.
- Working in poor lighting creates shadows that hide uneven sections and mistakes until you see your hair in different lighting conditions.
- Rushing through the process increases error likelihood, so always allocate adequate time without pressure or distractions.
- Neglecting to check symmetry from multiple angles results in unbalanced cuts that look fine from one direction but obviously uneven from others.
- Cutting perpendicular to natural growth patterns fights against how hair naturally falls, creating styles that require excessive styling to look good.
11. Tools for Checking and Correcting Your Work
Quality control during and after cutting ensures you catch problems early and achieve balanced, professional results. Systematic checking methods reveal issues that might not be obvious during the cutting process itself.
- The three-mirror technique positions mirrors so you can simultaneously see front, back, and side views of your head without awkward turning.
- Taking photos from multiple angles after cutting provides objective views that help you spot asymmetry or uneven areas you might miss in mirrors.
- The finger-slide test involves running fingers through hair from roots to ends, feeling for inconsistencies, bumps, or uneven lengths that need correction.
- Comparing symmetry requires bringing matching sections from each side forward simultaneously to check if they’re cut to the same length.
- Natural light inspection shows your haircut in the most revealing conditions, exposing problems that forgiving indoor lighting might hide.
- Styling hair as you normally wear it reveals how the cut works with your natural texture and whether any sections need adjustment.
- The shake test involves moving your head naturally and watching how hair falls back into place, showing whether the cut works with your hair’s movement.
- Checking the perimeter involves running fingers along the outside edges of your haircut to feel for irregular or uneven spots that need blending.
12. Sanitizing and Maintaining Your Cutting Tools
Proper tool care extends the life of your equipment, maintains cutting performance, and prevents hygiene issues that can affect scalp health. Professional maintenance habits ensure your tools remain as effective as the day you bought them.
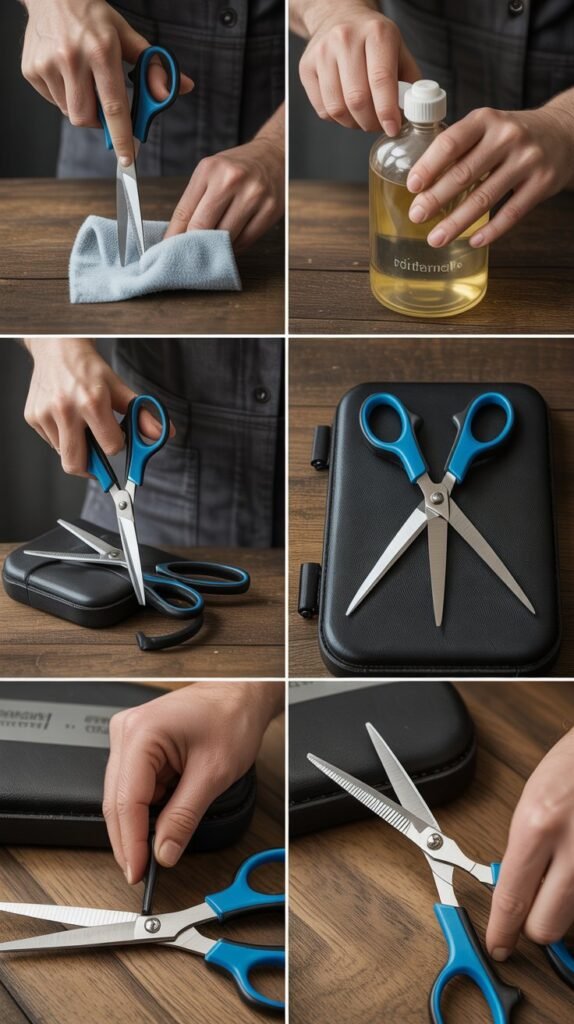
- Clean scissors after each use by wiping blades with rubbing alcohol or specialized clipper spray to remove hair, oils, and product residue.
- Dry tools thoroughly after cleaning to prevent rust formation, paying special attention to the pivot point and screw areas where moisture collects.
- Oil clipper blades before and after each use with specialized clipper oil, applying just one or two drops while the clipper is running.
- Store scissors in a protective case or pouch rather than loose in drawers where they can be damaged by contact with other objects.
- Check scissor tension regularly by opening blades to 90 degrees and releasing them—they should close about halfway from their own weight.
- Professional sharpening every 6-12 months maintains optimal cutting performance, as even quality scissors gradually lose their edge with regular use.
- Sterilize tools completely if sharing them with others using barbicide solution or ultraviolet sterilizers to prevent transmission of bacteria or infections.
- Replace clipper blades when they begin pulling hair rather than cutting cleanly, typically after 3-6 months of regular home use.
13. When to DIY vs. When to See a Professional
Knowing the limits of self-cutting abilities prevents major mistakes and helps you decide which tasks you can handle at home versus which require professional expertise. Strategic use of both approaches maintains great hair while maximizing the benefits of self-cutting.
- Simple maintenance tasks including split end removal, bang trims, and length dusting work perfectly well at home with minimal risk.
- Major style changes like going from long to short, adding dramatically different layers, or changing face-framing shapes should be done professionally first.
- Color corrections, highlighting, and complex color techniques require professional skills and products that aren’t suitable for home application.
- Fixing previous mistakes, especially from self-cuts gone wrong, benefits from professional assessment and correction by someone with trained eyes.
- Annual or semi-annual professional cuts establish the foundation of your style, which you then maintain at home between appointments.
- Thick, coarse, or very curly hair often benefits from professional cutting initially, with home maintenance focusing on ends and minor touch-ups.
- Special occasion styles for events like weddings or important presentations deserve professional attention to ensure flawless results.
- Experimentation with new techniques can happen at home on small sections, but commit to full-head changes only after mastering basics.
14. Building Confidence Through Practice
Developing self-cutting skills happens gradually through repeated practice, patient learning, and accepting that improvement comes with experience. Building confidence transforms an anxiety-inducing task into an empowering routine that saves money and gives you control.
- Start with the lowest-risk tasks like dusting ends or trimming bangs before attempting more complex cuts that significantly alter your appearance.
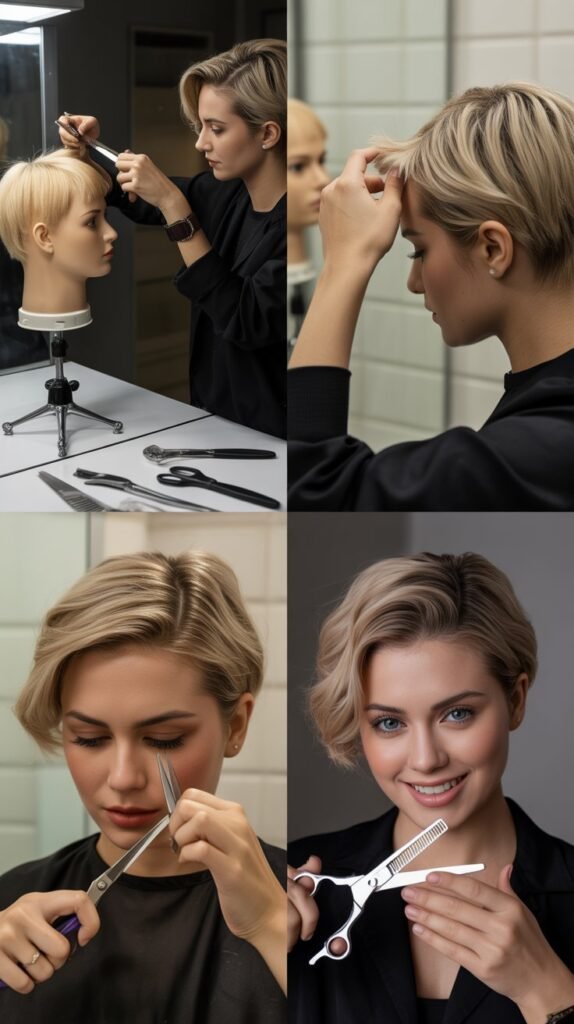
- Practice cutting techniques on synthetic hair extensions or mannequin heads available from beauty supply stores before working on your own hair.
- Schedule practice sessions when you have time to fix mistakes if needed rather than attempting self-cuts before important events or commitments.
- Document your progress with photos that show your improvement over time, celebrating successes and learning from areas that need more work.
- Join online communities focused on self-haircuts to share experiences, get advice, and learn from others who have mastered similar techniques.
- Watch video tutorials multiple times before attempting techniques, pausing frequently to ensure you understand each step completely.
- Accept that early attempts might not be perfect and view them as learning experiences rather than failures that discourage future efforts.
- Gradually increase complexity as basic skills become comfortable, adding new techniques only after mastering fundamental cuts.
Conclusion
Mastering the Self-Haircut Tutorial: Easy Steps for Trimming & Shaping Your Own Hair empowers you with practical skills that provide convenience, cost savings, and creative control over your personal style.
Throughout this comprehensive guide, you’ve learned how to identify your hair type, gather essential tools, prepare properly, and execute various cutting techniques with confidence.
You now understand the fundamental difference between basic maintenance tasks you can easily handle at home and complex changes best left to professionals.
The step-by-step techniques for trimming split ends, creating layers, managing bangs, and maintaining both short and long styles give you a versatile skill set that adapts to your changing needs.
Remember that confidence builds with practice, mistakes are valuable learning opportunities, and even professional stylists started as beginners learning their craft.
By starting conservatively, working systematically, and prioritizing hair health over dramatic changes, you’ll develop the expertise to keep your hair looking fresh and well-maintained between salon visits.
Your journey toward self-haircut mastery begins with a single trim, and with the knowledge from this guide, you’re fully equipped to take those confident first steps toward hair care independence.
