Have you ever looked in the mirror and wished your short hair had more body, movement, and life? You’re not alone.
Thousands of people with short hairstyles struggle with flat, lifeless locks that seem impossible to transform without expensive salon visits.
But here’s the exciting truth: learning how to layer your own short hair can completely change your look, boost your confidence, and save you hundreds of dollars each year.
This comprehensive guide will walk you through every step of the process, from understanding what layers actually do for short hair to mastering the cutting techniques that professionals use.
You’ll discover the essential tools you need, learn how to identify your face shape and choose the most flattering layer placement, and gain the confidence to pick up those scissors yourself.
Whether you have a pixie cut, a bob, or anything in between, this article will show you exactly how to create salon-quality volume and dimension in your own home.
By the time you finish reading “Instant Volume: Layer Your Own Short Hair Perfectly (No Salon Needed!),” you’ll have all the knowledge and skills necessary to transform your hair from flat to fabulous whenever you choose.
1. Understanding Layers and Why They Work for Short Hair
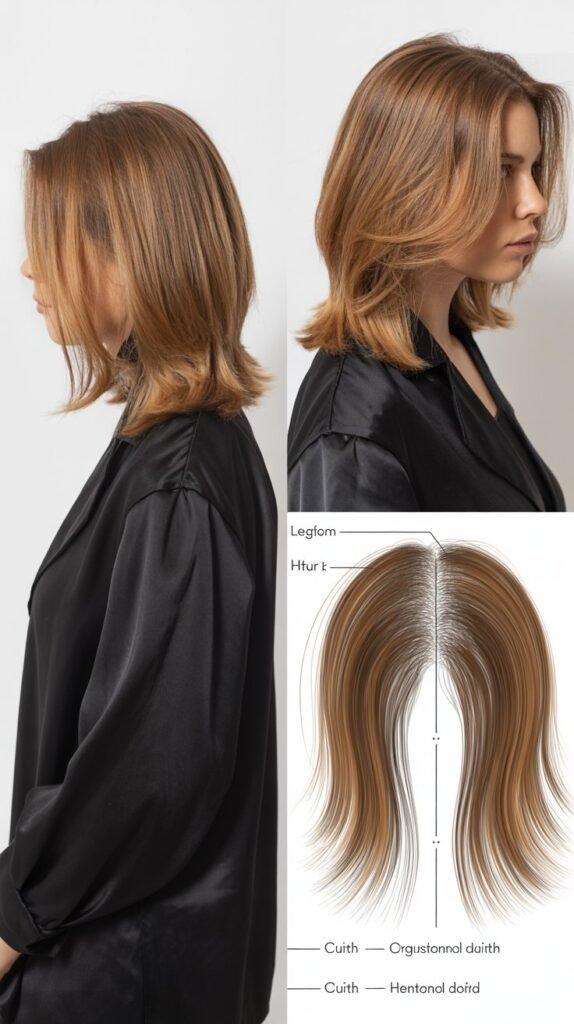
Layers are strategic cuts made at different lengths throughout your hair to create dimension, movement, and volume.
When you cut hair in uniform length, it often falls flat and heavy, but layers remove weight in specific areas while maintaining length in others.
For short hair specifically, layers are transformative because they prevent the common “helmet head” look and create the illusion of thicker, fuller hair.
The Science Behind Volume Creation
- Layers work by reducing the weight of your hair at strategic points, allowing the roots to lift more naturally away from your scalp.
- When hair is all one length, the weight pulls everything downward, creating a flat appearance that lacks body.
- Shorter layers on top sit above longer layers underneath, creating space between the hair strands that translates to visible volume.
- This technique allows air to flow through your hair more easily, making it appear fuller and more dynamic.
- The different lengths also catch light differently, creating the optical illusion of more hair than you actually have.
Benefits Specifically for Short Hair
- Short hair has less natural weight to pull it down, so layers can create dramatic lift without making hair look stringy or thin.
- Layers in short hair frame your face more effectively, drawing attention to your best features like cheekbones or eyes.
- They reduce bulk in areas where short hair tends to stick out awkwardly, particularly around the ears and nape of the neck.
- Layered short hair dries faster and styles more easily because the different lengths naturally fall into place.
- You can achieve multiple looks with the same layered cut by changing how you style it—sleek and smooth or tousled and textured.
- Layers grow out more gracefully than blunt cuts, meaning you won’t need to cut your hair as frequently to maintain a good shape.
2. Essential Tools You Need to Layer Your Hair at Home
Before you start cutting, gathering the right tools is crucial for achieving professional-looking results.
Using proper hair-cutting equipment rather than regular household scissors makes an enormous difference in how clean your cuts are and how your finished style looks.
The investment in these tools pays for itself after just one or two cuts compared to salon prices.
Must-Have Cutting Tools
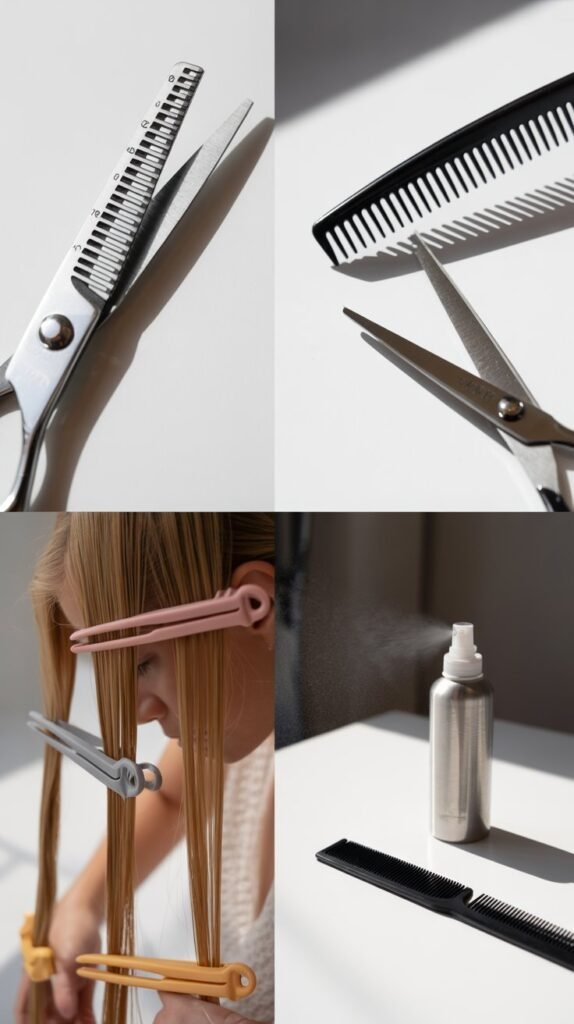
- Professional hair-cutting shears are essential—they typically range from 5.5 to 6.5 inches for at-home use and feature extremely sharp, precision-ground blades.
- Regular household scissors crush and tear hair rather than cutting cleanly, which leads to split ends and an uneven appearance.
- Thinning shears (also called texturizing shears) have teeth on one or both blades and remove bulk without shortening length dramatically.
- A spray bottle filled with clean water keeps hair damp throughout the cutting process, which is crucial for even cutting.
- Sectioning clips (at least 6-8 clips) hold hair out of the way while you work on specific sections, preventing accidental cuts.
- A wide-tooth comb helps detangle and section hair smoothly without pulling or breaking strands.
- A fine-tooth comb is useful for precise parting and checking that sections are even.
Additional Helpful Items
- A handheld mirror allows you to see the back of your head when used with your bathroom mirror.
- A cutting cape or old towel protects your clothing from hair clippings and makes cleanup easier.
- Hair elastics can help section larger portions of hair before you begin detailed cutting.
- Good lighting is absolutely critical—consider getting a bright LED lamp if your bathroom lighting is inadequate.
- A vacuum or broom should be nearby for easy cleanup of hair clippings.
Where to Purchase Quality Tools
- Professional beauty supply stores carry salon-quality tools at reasonable prices for home use (https://www.sallybeauty.com).
- Online retailers specializing in hair tools offer extensive selections with customer reviews to guide your choices.
- Many professional brands offer affordable “student” or “home stylist” kits that include everything you need.
- Investing $50-$100 in quality tools will serve you for years and save thousands in salon costs.
3. Preparing Your Hair and Workspace for Cutting
Proper preparation is half the battle when cutting your own hair.
Taking time to set up your workspace correctly and prepare your hair properly will dramatically improve your results and make the entire process less stressful.
A well-organized space helps you work methodically and reduces the chances of mistakes.
Setting Up Your Workspace
- Choose a room with excellent lighting—natural light is ideal, but bright LED bulbs work well if cutting in the evening.
- Position yourself between two mirrors or use a handheld mirror to see the back of your head clearly.
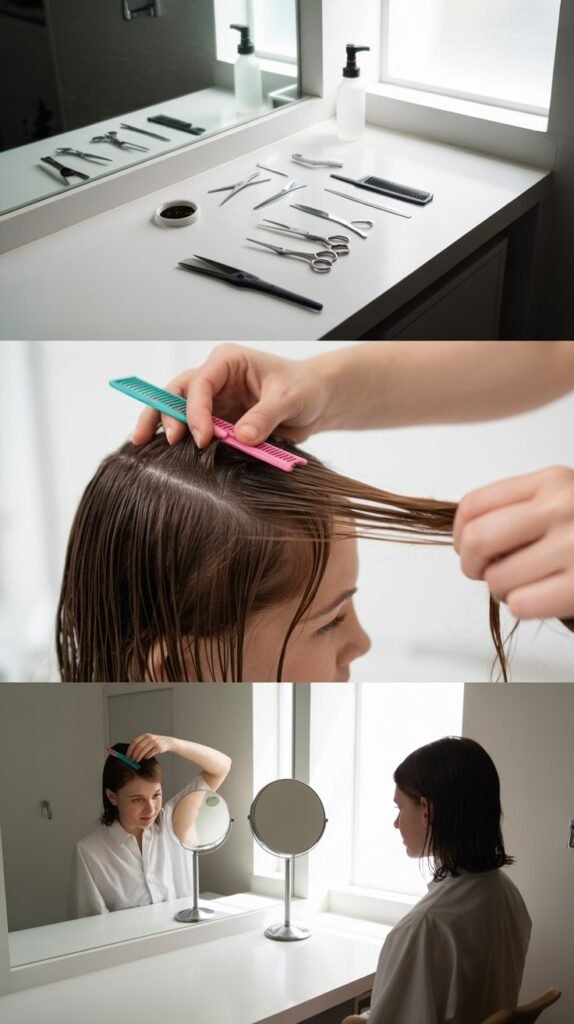
- Clear your counter or workspace completely so you have room to lay out all your tools within easy reach.
- Place a towel or cutting cape around your shoulders to catch hair clippings and protect your clothing.
- Have a trash bin nearby for disposing of hair clippings immediately.
- Ensure the room is at a comfortable temperature—you’ll be standing still for 30-45 minutes.
- Remove any distractions like your phone or other devices so you can focus completely on the task.
Washing and Preparing Your Hair
- Start with freshly washed hair that’s free from styling products, oils, or buildup that could affect how scissors glide through it.
- Condition your hair thoroughly to ensure it’s smooth and tangle-free before you begin cutting.
- Gently towel-dry your hair until it’s damp but not dripping—hair should be wet enough to comb smoothly but not soaking.
- Comb through your hair completely with a wide-tooth comb to remove all tangles and ensure smooth, even sections.
- If your hair has a natural part, comb it into its natural position so you can work with how it naturally falls.
- For curly or wavy hair, consider whether you want to cut it wet (for more length) or dry (to see exactly how it will look when styled).
Mental Preparation
- Take a few deep breaths and remind yourself that hair grows back—most minor mistakes are barely noticeable and easily corrected.
- Start conservatively by cutting less than you think you need to; you can always cut more but can’t add it back.
- Plan to spend at least 45 minutes to an hour on your first attempt—rushing leads to mistakes.
- Have reference photos nearby showing the type of layers you want to create.
4. Identifying Your Face Shape for Optimal Layer Placement
Understanding your face shape is crucial for determining where to place layers for the most flattering effect.
Different face shapes benefit from different layering strategies, and placing layers in the wrong areas can actually emphasize features you’d prefer to minimize.
Spending a few minutes identifying your face shape will guide all your cutting decisions.
How to Determine Your Face Shape
- Pull your hair completely back from your face and look straight into a mirror in good lighting.
- Trace the outline of your face on the mirror with a washable marker or lipstick, or take a straight-on photo.
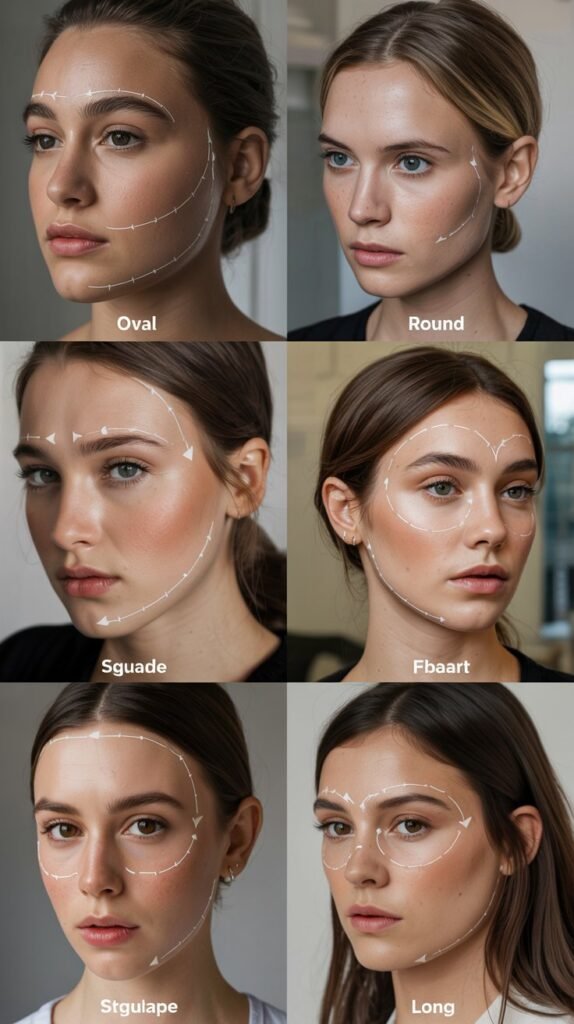
- Compare your face outline to common face shape categories: oval, round, square, heart, diamond, or oblong.
- Measure the width of your forehead, cheekbones, and jawline to see which is widest—this is a key indicator.
- Measure the length of your face from hairline to chin and compare it to the width at your cheekbones.
- Oval faces have balanced proportions with the face length about 1.5 times the width and gently rounded contours.
- Round faces have similar width and length measurements with soft, curved lines and fuller cheeks.
- Square faces have a strong, angular jawline with similar measurements for width and length.
- Heart-shaped faces are widest at the forehead and cheekbones with a narrow, pointed chin.
- Long or oblong faces have significantly more length than width with a relatively straight cheekline.
Optimal Layer Placement by Face Shape
Face-Framing Considerations
- Face-framing layers are the pieces that fall forward around your face and have the most impact on how flattering your cut is.
- These layers should draw attention to your best features—if you love your eyes, position layers at eye level or slightly above.
- For a softer look, angle face-framing layers so they’re slightly longer at the front than at the sides.
- For more drama and lift, make face-framing layers shorter at the front and gradually longer as they move toward the back.
- Consider your cheekbones as the focal point for most face-framing layers since they create natural lift and dimension.
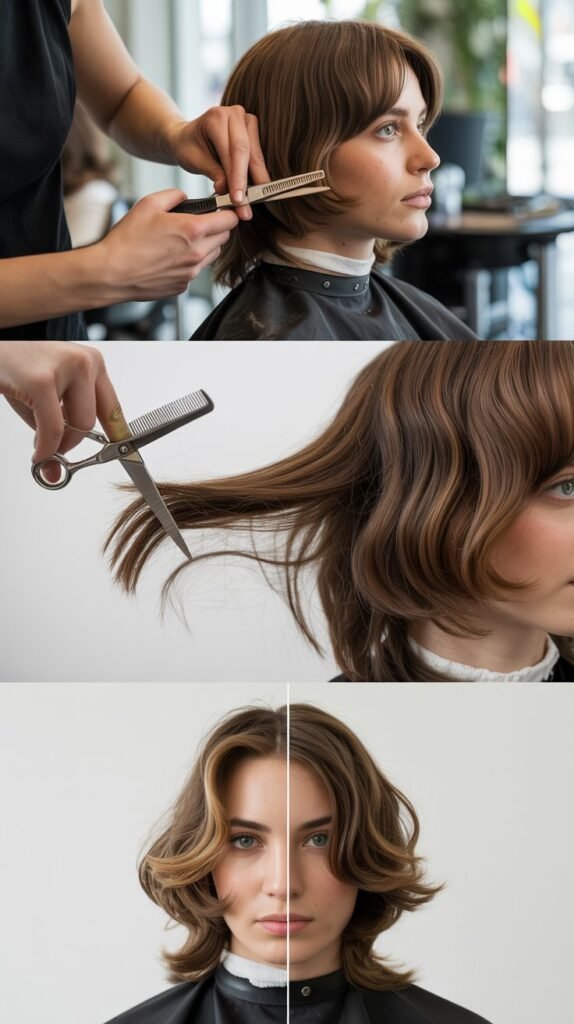
5. The Basic Layering Technique for Short Hair
Now we get to the actual cutting process.
This fundamental technique works for most short hairstyles and can be adapted based on how dramatic you want your layers to be.
Work slowly and methodically, checking your progress frequently, and remember that conservative cuts are always safer for beginners.
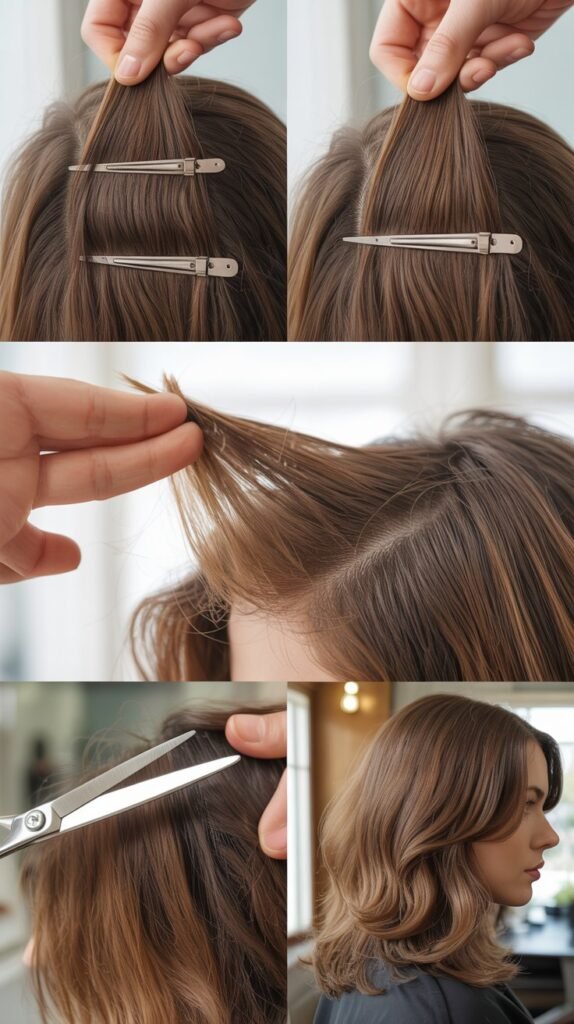
Sectioning Your Hair Properly
- Begin by creating a horizontal part from ear to ear across the crown of your head, dividing hair into top and bottom sections.
- Clip the top section securely out of the way—you’ll work on the bottom section first.
- Create another horizontal part about an inch above the first one, creating a thin section to work with.
- Working with thin sections (about half an inch to one inch thick) gives you more control and more even results.
- Continue creating horizontal sections as you work your way up from the nape of your neck to the crown.
The Vertical Cutting Method
- Take your first section at the nape of your neck and comb it straight down smoothly.
- Hold the section between your index and middle fingers, pulling the hair away from your head at a 90-degree angle.
- This elevation is crucial—it’s what creates the layered effect rather than a blunt cut.
- Decide on your guide length (the shortest layer you want) and cut straight across with your scissors perpendicular to the hair.
- This first cut becomes your “guide” that you’ll match with subsequent sections.
- Move to the next section directly above, including a small amount of the previously cut hair in your fingers as a guide.
- Pull this new section at the same 90-degree angle and cut to match the guide hair showing through.
- Continue working upward in horizontal sections, always including some guide hair from the previous section.
Checking and Refining Your Work
- After completing one side, stop and check your work by combing all the hair down naturally.
- You should see graduated layers with the shortest on top and longest at the bottom.
- Repeat the entire process on the other side of your head, working to create symmetry.
- For the back of your head, create a vertical part down the center and work each side separately.
- Use your mirrors to check the back frequently—this is where mistakes are most likely to happen.
- Once all sections are cut, go back through and check for any uneven pieces by pulling matching sections from both sides together.
- If you find uneven areas, carefully trim the longer side to match the shorter one.
Adjusting for Desired Volume
- For more dramatic volume and layers, increase your elevation angle from 90 degrees to 180 degrees (straight up from the head).
- For softer, more subtle layers, reduce your elevation angle to 45 degrees.
- The higher you elevate the hair before cutting, the more dramatic the layering effect will be.
- Remember that you’re seeing the hair wet—it will appear slightly shorter and have more volume when dry.
6. Creating Face-Framing Layers for Maximum Impact
Face-framing layers are the pieces that make the biggest difference in how flattering and polished your haircut looks.
These strategic pieces draw attention to your best features and create movement around your face.
Getting these layers right is more important than any other part of your haircut.
Planning Your Face-Framing Strategy
- Decide where you want your shortest face-framing pieces to fall—popular options include eyelash length, cheekbone length, or chin length.
- Look at photos of similar haircuts to identify the face-framing style that appeals to you most.
- Consider your daily styling routine—very short face-framing layers require more styling to look polished.
- For most people, starting face-framing layers at the cheekbones creates the most universally flattering effect.
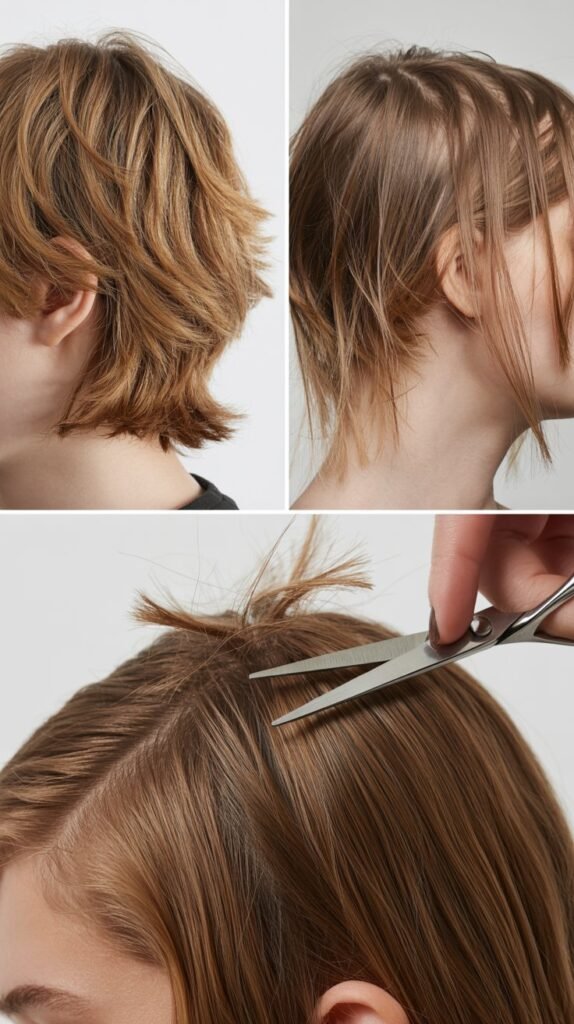
Cutting Face-Framing Layers
- Create a triangular section at the front of your head starting at the highest point of your eyebrow arch on each side.
- This triangle should extend back to approximately where your head begins to curve—about two inches from your hairline.
- Comb this section forward and divide it down the middle to work on each side separately.
- On one side, comb the hair forward along your face and decide on your desired length.
- Hold the hair between your fingers at the desired length and cut at a slight diagonal angle—shorter in front, gradually longer toward the back.
- This diagonal cut creates a soft, graduated effect that blends naturally with the rest of your hair.
- Repeat on the other side, carefully measuring to ensure both sides match perfectly.
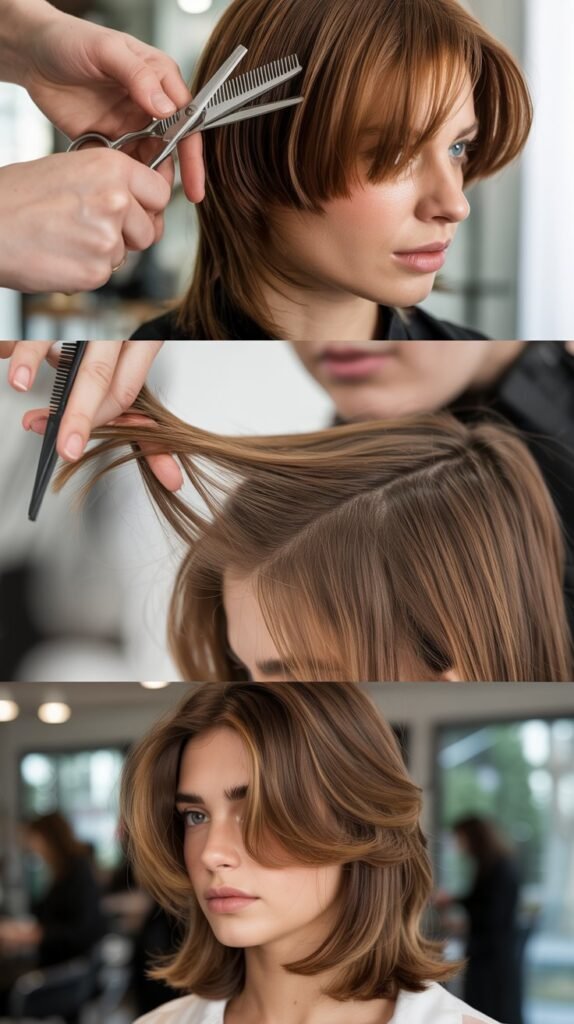
Blending Face-Framing Layers with the Rest
- Take thin sections from just behind your face-framing pieces and blend them using point-cutting technique.
- Point-cutting means holding scissors vertically and cutting into the hair at an angle rather than straight across.
- This creates a softer, more textured edge that blends seamlessly instead of showing a harsh line.
- Work gradually, taking thin sections and point-cutting to remove weight and create connection between face-framing layers and longer hair behind them.
- Check your work by pushing hair behind your ears—the transition should look smooth and natural, not choppy.
Styling Tips for Face-Framing Layers
- Face-framing layers look best when styled with a slight bend or wave toward your face using a round brush or flat iron.
- Apply a small amount of styling cream or serum to these pieces to define them and prevent frizz.
- When blow-drying, direct these pieces forward first, then sweep them back for natural-looking volume.
- For extra impact, curl just the face-framing pieces while leaving the rest of your hair straight.
7. Using Thinning Shears to Perfect Your Layers
Thinning shears are the secret weapon for creating professional-looking layers that have movement and texture without appearing choppy or heavy.
These specialized scissors remove bulk and weight without changing the overall length of your hair significantly. Learning to use them properly elevates your DIY haircut from good to salon-quality.
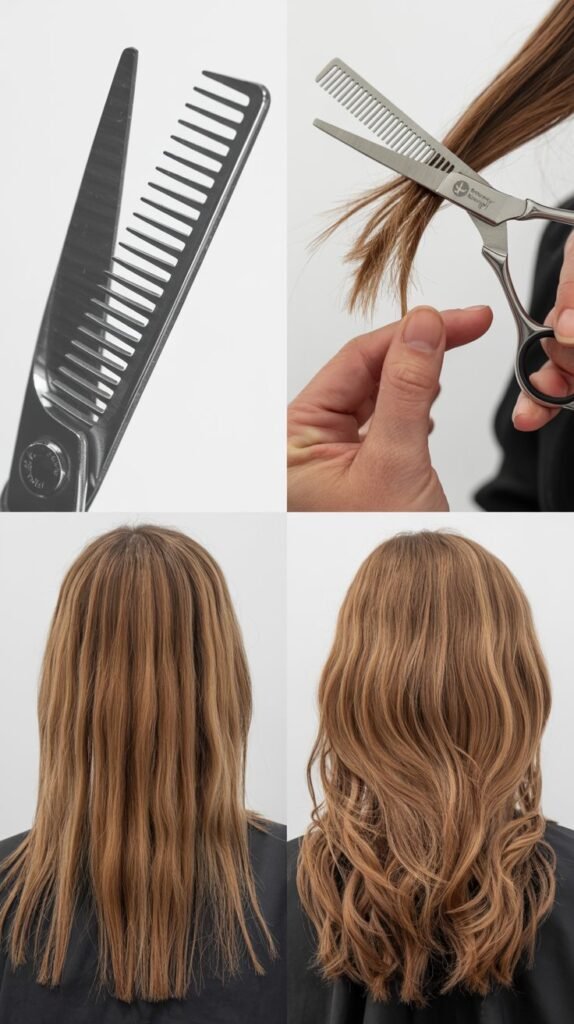
Understanding Thinning Shears
- Thinning shears have teeth on one or both blades that remove approximately 40-70% of hair in each cut, depending on the tooth pattern.
- They create texture by cutting some hairs while leaving others at full length, which reduces bulk without sacrificing coverage.
- Single-sided thinning shears (teeth on one blade only) provide more control and are better for beginners.
- Double-sided thinning shears (teeth on both blades) remove more hair with each cut and work faster but require more skill.
- Never use thinning shears at the roots or very close to your scalp—this creates uneven texture that’s difficult to fix.
Where and How to Use Thinning Shears
- Use thinning shears primarily on the mid-lengths to ends of your hair, typically starting about 2-3 inches from your scalp.
- Take a section of hair about 1-2 inches wide and comb it smooth.
- Hold the thinning shears at a 45-degree angle to the hair shaft—never cut straight across perpendicular to the hair.
- Close the shears once on the mid-length of the section, then once again closer to the ends.
- Limit yourself to 2-3 cuts per section to avoid over-thinning, which creates a wispy, insubstantial appearance.
- Work through your entire head systematically, taking similar-sized sections and applying the same technique to each.
Creating Texture in Specific Areas
- Focus thinning shear work on areas where your hair tends to be bulky or stick out awkwardly—commonly around the ears and nape.
- Use them sparingly on the crown area where you want to maintain volume rather than reduce it.
- For hair that flips out at the ends, use thinning shears on the underneath layers to remove weight and encourage inward movement.
- If you have very thick hair, you may need to make multiple passes through your hair with thinning shears to achieve desired results.
Thinning Shear Mistakes to Avoid
- Never use thinning shears on the very top surface layer of your hair—this creates frizzy, uncontrolled pieces that stick up.
- Don’t thin hair that’s already fine or thin in texture—this will make it look even thinner and more sparse.
- Avoid using thinning shears on dry hair for your initial cut—wet hair shows more accurate results.
- Don’t go back over the same section repeatedly—step away, check your results, and only thin more if absolutely necessary.
- Be especially conservative with thinning shears around your face-framing layers where every cut is highly visible.
8. Fixing Common Layering Mistakes
Even experienced stylists occasionally make cutting mistakes, so don’t panic if something doesn’t turn out exactly as planned.
Most mistakes are fixable, and learning how to correct errors is an important part of becoming confident at cutting your own hair.
Here are solutions for the most common layering problems.
Uneven Layer Lengths
- If one side is noticeably shorter than the other, don’t immediately cut the longer side to match.
- First, ensure your hair is styled the same way on both sides—sometimes styling inconsistency creates the appearance of uneven cutting.
- Pull matching sections from both sides forward over your shoulders where you can see them together clearly.
- Carefully trim the longer side to match the shorter side, cutting conservatively and checking frequently.
- It’s better to make multiple small corrections than one large cut that might overcompensate.
Choppy or Disconnected Layers
- Choppy layers happen when the transition between layer lengths is too abrupt without smooth blending.
- Fix this by using point-cutting technique along the harsh lines to soften and blend them.
- Take thin sections that include hair from both the shorter and longer layers.
- Hold scissors vertically and cut into the hair at various depths, removing small amounts to create a gradient effect.
- Work slowly, checking your progress frequently until the transition looks smooth and natural.
Overly Thinned or Wispy Ends
- If you’ve removed too much hair with thinning shears, you can’t add it back, but you can improve the appearance.
- Trim the very ends of your hair bluntly to remove the most sparse, damaged pieces and create the appearance of more density.
- Style your hair with volumizing products focused on the roots and mid-lengths rather than the ends.
- Avoid using thinning shears for several months to allow hair to grow in and restore density.
- Consider cutting your hair slightly shorter overall so the proportions look better with less bulk at the ends.
Layers That Are Too Short
- If you’ve cut layers shorter than intended, styling becomes your primary tool for managing the situation.
- Use hair wax, pomade, or gel to style very short pieces back and keep them controlled.
- Focus on growing out the short layers by getting small trims on the longer pieces every 4-6 weeks until everything evens out.
- Wear headbands, clips, or hair accessories strategically to disguise pieces that stick up or out.
- Remember that hair grows approximately half an inch per month—problematic short layers will grow out faster than you think.
Creating Balance After Over-Layering One Area
- If you’ve created too many layers or too much volume in one specific area, you need to create balance by addressing the surrounding areas.
- Add subtle layers to areas that look comparatively heavy to create a more balanced overall shape.
- Use thinning shears sparingly throughout the rest of your hair to create textural consistency.
- Sometimes the solution is to shorten the overlayered area slightly to make it less dramatic compared to the rest.
9. Styling Your Newly Layered Hair for Maximum Volume
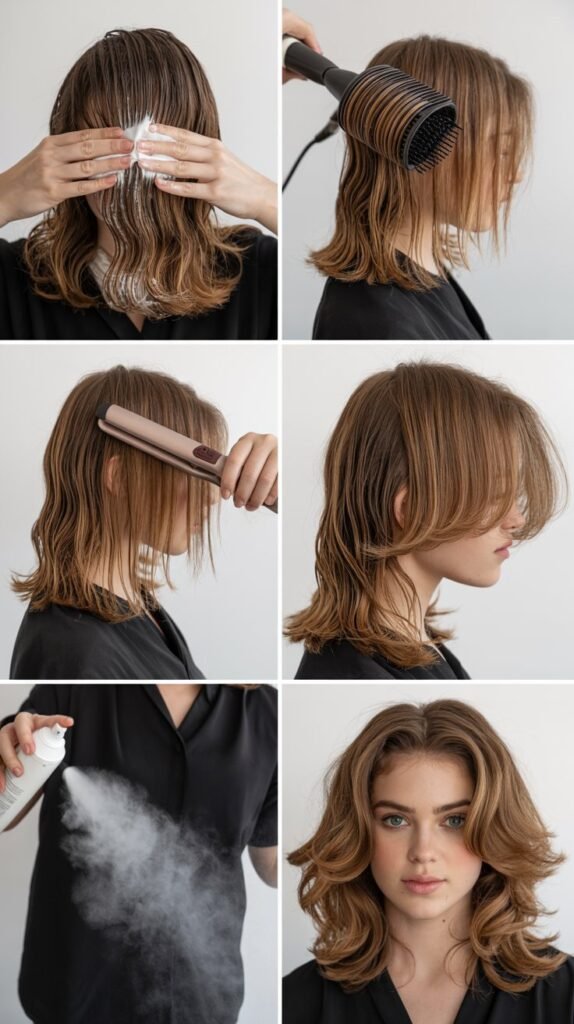
Having beautifully layered hair is only half the equation—styling it properly brings out the dimension and volume you’ve created.
The right styling techniques and products can make the difference between flat, shapeless hair and full, bouncy layers that turn heads.
Here’s how to style your layered short hair for maximum impact.
Essential Styling Products for Layered Hair
- Volumizing mousse applied to damp hair before blow-drying creates lift at the roots and body throughout.
- Root-lifting spray targets the area where you need the most volume and provides longer-lasting lift than mousse alone.
- Heat protectant spray is non-negotiable if you’re using hot tools—it prevents damage that makes hair fall flat.
- Texturizing spray or powder adds grit and separation to finished styles, emphasizing individual layers.
- Light-hold hairspray maintains your style without weighing down the volume you’ve created.
- Shine serum or oil used sparingly on ends adds polish without reducing volume.
Blow-Drying Techniques for Volume
- Start with hair that’s about 70% dry—blow-drying soaking wet hair takes too long and causes more heat damage.
- Apply volumizing mousse and root-lifting spray before you begin blow-drying for best results.
- Use a round brush that’s appropriately sized for your hair length—generally 1.5 to 2 inches in diameter for short hair.
- Work in sections, clipping away hair you’re not actively working on to maintain control.
- Place the round brush under each section at the roots and lift upward as you direct the dryer’s airflow downward from above.
- This technique lifts hair away from your scalp while smoothing the cuticle, creating volume and shine simultaneously.
- Roll the ends of each section under or outward depending on your desired style as you dry them.
- Finish with a blast of cool air to set your style and close the hair cuticle for extra shine.
Adding Bends and Texture to Layers
- Face-framing layers benefit from subtle bends created with a flat iron or small curling iron.
- For face-framing pieces, clamp the flat iron about 2 inches from your roots and rotate it half a turn away from your face as you pull it through.
- This creates a soft bend that directs hair away from your face rather than a full curl.
- For the layers throughout the rest of your hair, alternate the direction of bends (some toward face, some away) to create natural-looking movement.
- Use your fingers to gently separate and tousle hair after adding bends so it doesn’t look too uniform or styled.
Finishing Touches for Definition
- Spray texturizing spray onto your hands and scrunch it into the mid-lengths and ends of your hair.
- This creates separation between layers and emphasizes the dimension you’ve cut into your hair.
- For extra volume at the crown, lift small sections and spray hairspray at the roots, then gently lower them back into place.
- Use a very small amount of pomade or wax on your fingertips to piece out and define individual face-framing layers.
- Avoid touching or running your fingers through your styled hair excessively, which breaks down the style and reduces volume.
Styling for Different Occasions
- For a polished, professional look, blow-dry smooth and add only subtle bends to keep layers defined but controlled.
- For casual, everyday styling, rough-dry with your fingers instead of a brush for an effortlessly tousled appearance.
- For evening or special occasions, add more defined curls or waves throughout and use stronger-hold products for longevity.
- For athletic or active days, style with light products and secure face-framing pieces with small clips or pins.
10. Maintaining Your Layered Cut Between Trims
Once you’ve successfully layered your hair, maintaining the shape between major trims is essential for keeping your style looking fresh.
Regular maintenance prevents your layers from becoming grown-out and shapeless while extending the time between full haircuts.
These strategies help you preserve your DIY masterpiece.
Scheduling Maintenance Trims
- Short layered hair typically needs refreshing every 4-6 weeks to maintain optimal shape and volume.
- Face-framing layers grow out most noticeably and may need touching up every 3-4 weeks.
- You don’t need to recut all your layers during maintenance—focus on areas that look heavy or unbalanced.
- Calendar reminders help you stay on schedule and prevent your hair from getting too overgrown before you address it.
Quick Maintenance Techniques
- For face-framing pieces that have grown too long, simply recut them following the same technique you used initially.
- Check your layers by pulling small sections from various areas—if any section is noticeably longer than surrounding sections, trim it carefully.
- Use thinning shears every other maintenance session to refresh texture and prevent buildup of bulk.
- Focus maintenance cutting on the areas around your ears and nape where short hair grows fastest and most noticeably.
- Point-cut the very ends of your layers to remove split ends and maintain a textured, soft appearance.
Adjusting Layers as Your Hair Grows
- As your hair grows, you have the option to maintain the same length while refreshing layers or allow everything to grow longer.
- If growing out your cut, trim only the shortest layers during maintenance to allow the longest pieces to catch up.
- This gradual evening-out process typically takes 3-4 months depending on how dramatically different your layer lengths are.
- Document your haircut with photos immediately after cutting so you have a reference for maintenance trims.
Product Recommendations for Layer Maintenance
- Sulfate-free shampoo prevents stripping natural oils that keep layered hair looking healthy and manageable.
- Deep conditioning treatments weekly maintain moisture balance and prevent the frizzy, damaged appearance that makes layers look choppy.
- Leave-in conditioner smooths the hair cuticle and makes layers more manageable between washes.
- UV protection spray prevents sun damage that can make layered hair look dry and brittle.
- Quality hair-cutting scissors should be professionally sharpened every 6-12 months to maintain clean cuts.
Conclusion
You’ve now learned everything you need to transform your short hair from flat and lifeless to voluminous and dimensional with professional-quality layers—all without spending hundreds of dollars at a salon.
“Instant Volume: Layer Your Own Short Hair Perfectly (No Salon Needed!)” has equipped you with the knowledge to understand how layers create volume, the tools required for successful home haircutting, and the step-by-step techniques that professional stylists use every day.
You’ve discovered how to identify your face shape and place layers strategically for the most flattering effect, mastered the fundamental cutting techniques that work for various short styles, and learned how to use specialized tools like thinning shears to add texture and movement.
Beyond the cutting process itself, you now know how to fix common mistakes with confidence, style your layered hair to emphasize the volume you’ve created, and maintain your cut between major trims.
Remember that becoming skilled at layering your own hair is a journey that improves with practice—your second and third attempts will be significantly better than your first.
The confidence and satisfaction that come from looking in the mirror and seeing a haircut you created yourself, combined with the money you’ll save over time, make this skill incredibly worthwhile. Take your time, work carefully, and don’t be afraid to start conservatively.
Your short hair has enormous potential for volume and style, and you now have the power to unlock it whenever you choose.
