Have you ever stared at your reflection, scissors in hand, wondering if you could pull off a salon-worthy haircut in your own bathroom? The idea of cutting and layering your own hair might seem intimidating at first, but it’s a skill that thousands of people have successfully mastered, saving both time and money while gaining complete control over their look.
Whether you’re tired of expensive salon visits, struggling to get appointments that fit your schedule, or simply curious about taking your hair care into your own hands, learning to cut and layer your hair at home is more achievable than you might think.
This guide on How I Cut & Layer My Hair at Home will walk you through every essential step, from gathering the right tools to executing professional-looking layers, helping you transform from hesitant beginner to confident home hairstylist.
You’ll discover the preparation techniques that make all the difference, the sectioning methods that professionals use, and the cutting angles that create those coveted layers you’ve always wanted.
By the end of this article, you’ll have the knowledge and confidence to create a beautifully layered haircut without ever leaving your home.
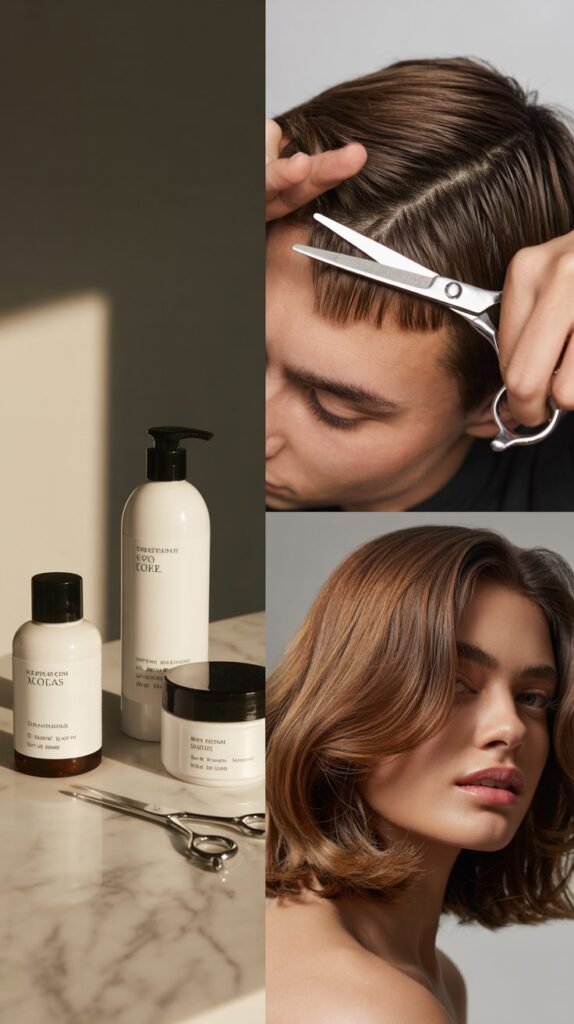
1. Gathering the Essential Tools for Home Hair Cutting
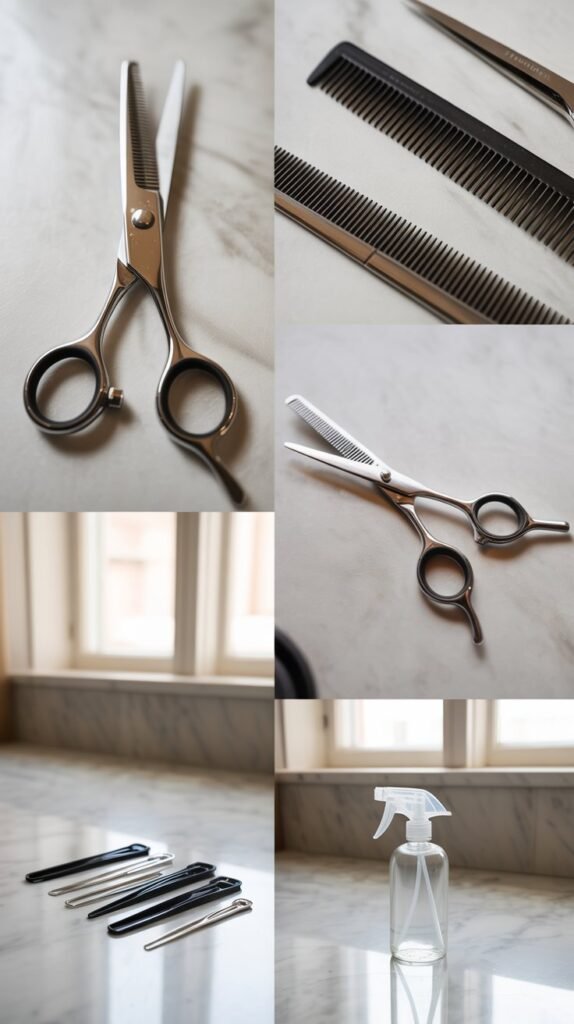
Before you make that first cut, having the right tools makes the difference between a professional-looking result and a hair disaster you’ll regret.
Investing in quality equipment designed specifically for hair cutting ensures cleaner cuts, better control, and results that actually look intentional rather than accidental.
- Professional hair cutting shears are absolutely essential and should never be replaced with regular household scissors that will create split ends and uneven cuts.
- A wide-tooth comb helps detangle hair gently before cutting, while a fine-tooth comb is perfect for precise sectioning and creating clean parts.
- Sectioning clips or hair ties keep different portions of your hair separated and organized, preventing you from accidentally cutting sections you meant to leave alone.
- A spray bottle filled with clean water helps keep your hair damp throughout the cutting process, which is crucial for even and accurate cutting.
- A handheld mirror allows you to check the back of your head and ensure your layers are even on all sides, not just the front you can easily see.
- Sharp cutting shears specifically designed for hair should be at least 5.5 to 6.5 inches long for better control and should only be used for hair cutting to maintain their sharpness.
- Thinning shears or texturizing scissors are optional but helpful for blending layers and removing bulk without creating harsh lines.
2. Preparing Your Hair Before Cutting
Proper preparation is what separates amateur home haircuts from professional-looking results.
Taking the time to wash, condition, and properly set up your hair before making any cuts ensures you’re working with the best possible canvas.
- Wash your hair thoroughly with your regular shampoo to remove all products, oils, and buildup that could affect how the hair falls and cuts.
- Apply a lightweight conditioner focusing on the mid-lengths and ends to make the hair more manageable and easier to comb through without tangles.
- Towel-dry your hair gently until it’s damp but not dripping wet, as hair that’s too wet can appear longer than it actually is and lead to cutting too much.
- Comb through your entire head of hair with a wide-tooth comb first to remove any tangles, then follow with a fine-tooth comb for smoother sectioning.
- Set up in a well-lit room with access to a large mirror and ideally a handheld mirror so you can see all angles of your head clearly.
- Decide whether you’ll cut your hair damp or dry based on your hair type—straight hair cuts well when damp, while curly hair often cuts better when dry so you can see the natural curl pattern.
- Take before photos from multiple angles so you can track your progress and remember what you started with in case you need to make adjustments.
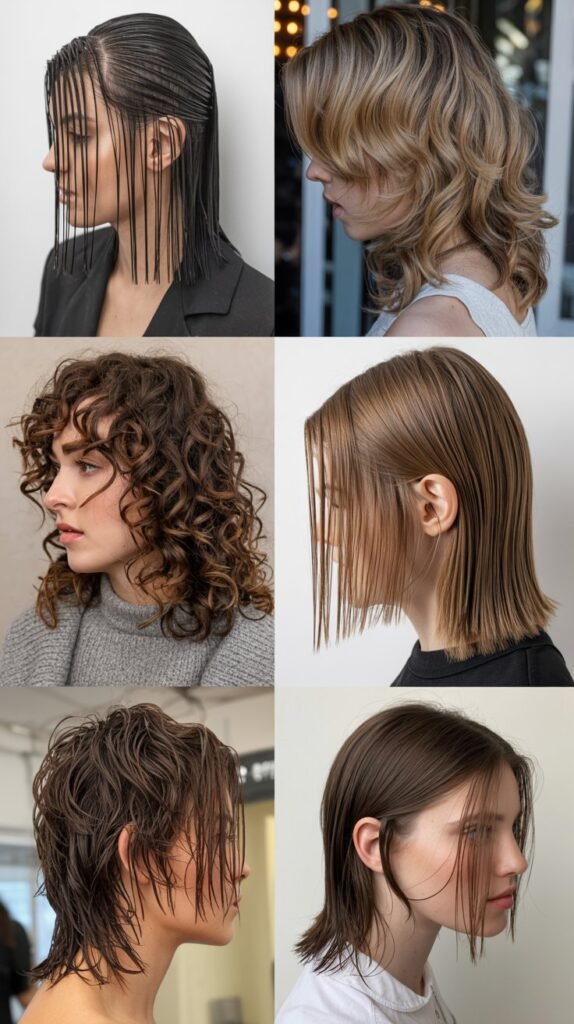
3. Understanding Different Layer Types and Styles
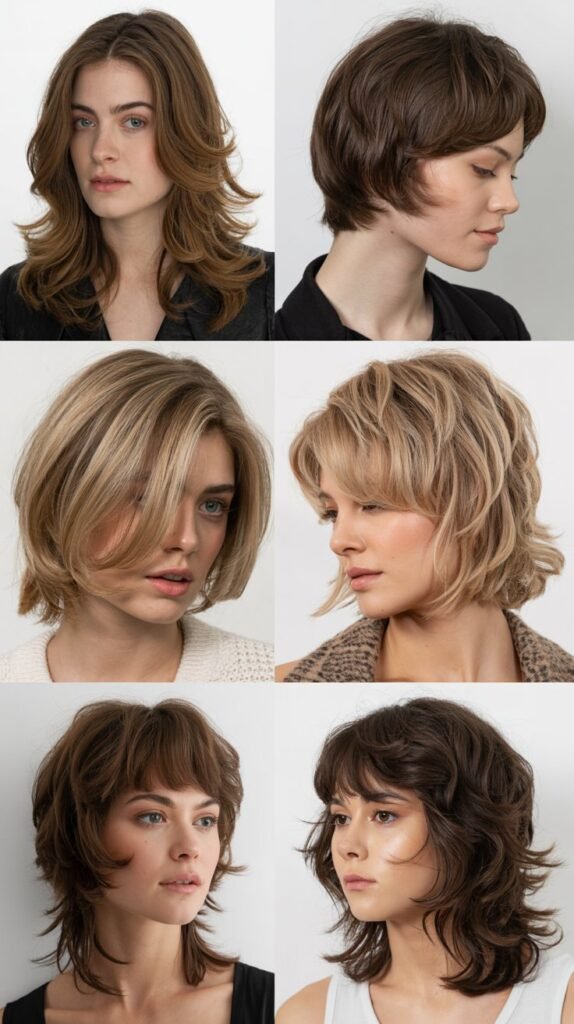
Knowing what kind of layers you want before you start cutting prevents you from creating a style that doesn’t match your vision or suit your face shape.
Different layering techniques create dramatically different looks, from subtle movement to bold, choppy dimension.
- Long layers create subtle movement and dimension while maintaining most of your hair’s length, making them perfect for those who want texture without dramatic change.
- Short layers add significant volume and movement, especially around the crown, but remove more length and create a more dramatic, textured appearance.
- Face-framing layers specifically target the hair around your face, creating flattering angles that highlight your cheekbones and soften your jawline.
- Choppy layers feature more defined, piece-y sections with varying lengths throughout, creating an edgier, more textured look with deliberate unevenness.
- Feathered layers blend seamlessly into each other with soft, graduated transitions that create flowing movement without harsh lines or obvious cutting points.
- The length difference between your shortest and longest layers determines how dramatic your haircut will look—smaller differences create subtle effects while larger gaps create bold statements.
- Your face shape should influence your layer placement, with round faces benefiting from longer layers that elongate, while square faces look great with softer, face-framing pieces.
4. Sectioning Your Hair Properly for Even Layers

Proper sectioning is the secret that professional hairstylists use to create symmetrical, balanced layers that look intentional rather than haphazard.
Taking time to divide your hair correctly before cutting ensures even results all around your head.
- Start by creating a center part from your forehead to the nape of your neck, dividing your hair into equal left and right sections for symmetrical cutting.
- Create horizontal sections by parting your hair from ear to ear across the top of your head, separating the top section from the bottom sections.
- The bottom section should extend from your ears down to your nape and represents the longest layer you’ll keep in your haircut.
- The middle section runs from ear to ear and will typically be cut to a medium length that bridges your longest and shortest layers.
- The top section includes all the hair from your crown forward to your hairline and will often become your shortest layer depending on your desired style.
- Secure each section firmly with clips or hair ties, ensuring the hair stays in place and doesn’t slip into other sections while you’re cutting.
- Work with sections that are no more than one to two inches thick, as thicker sections make it harder to cut evenly and see what you’re doing.
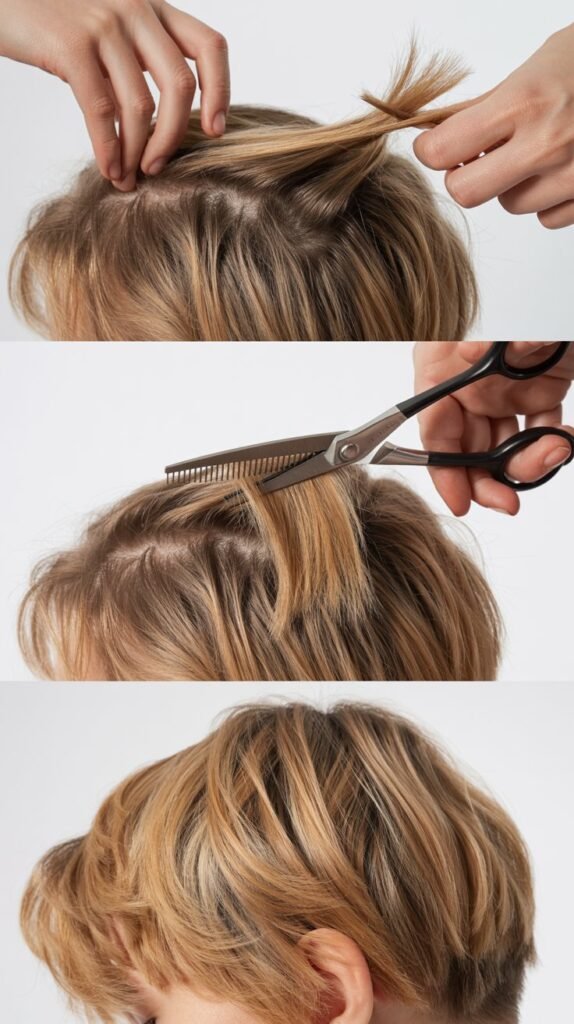
5. The Basic Layering Technique Step by Step
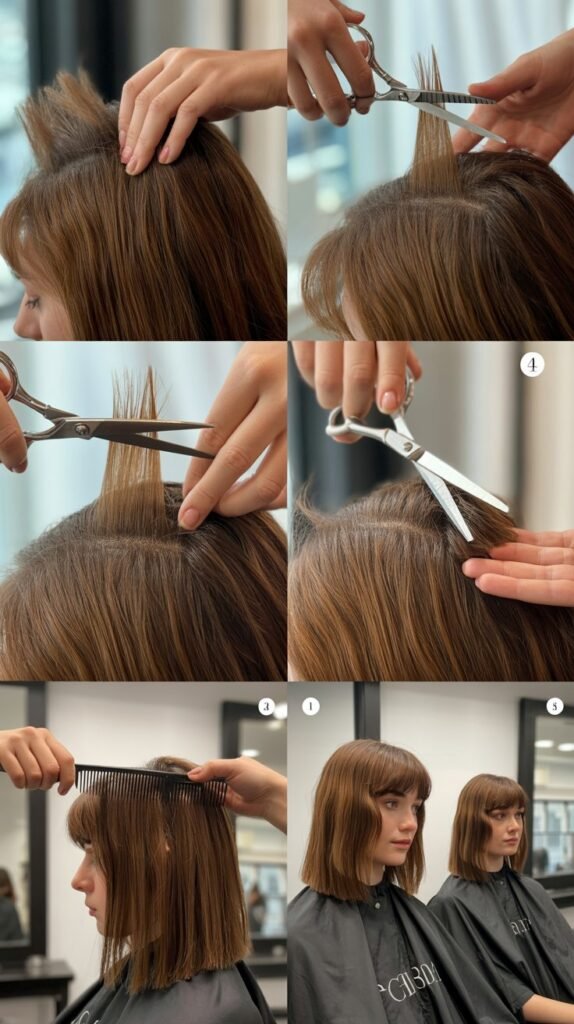
Once your hair is properly sectioned, executing the actual cutting technique requires steady hands, patience, and following a systematic approach.
This fundamental method works for most hair types and creates beautiful, natural-looking layers.
- Begin with the bottom section, taking a small horizontal subsection of hair and combing it straight down to see the natural length.
- Hold the hair between your index and middle fingers, sliding your fingers down to the point where you want to make your cut, keeping the hair taut and straight.
- Angle your scissors at a 45-degree angle rather than cutting straight across, which creates softer, more blended edges that look more natural.
- Use point cutting technique by snipping into the ends vertically rather than cutting straight across, which removes bulk and creates texture without harsh lines.
- Move systematically through each section, taking small subsections and cutting at consistent angles to ensure each layer flows into the next smoothly.
- Check your work constantly by releasing the hair and seeing how it falls naturally, making sure both sides match in length and angle.
- Work your way from bottom sections to top sections, with each layer being slightly shorter than the one below it to create that graduated, dimensional effect.
- Take frequent breaks to step back and assess your overall progress, looking at your hair from all angles before continuing to cut more.
6. Creating Face-Framing Layers Around Your Face

Face-framing layers require special attention because they’re the most visible parts of your haircut and dramatically affect how your entire style looks from the front.
These strategic pieces can transform your appearance and highlight your best features.
- Pull forward the sections of hair that naturally fall in front of your shoulders when you’re standing straight, as these will become your face-framing pieces.
- Decide where you want your shortest face-framing layer to hit—common choices include chin-length, cheekbone-length, or just below the ear.
- Hold the hair section at a 180-degree angle directly in front of your face, then slide your fingers down to the desired length and make your cut.
- Create a gradual angle by making your face-framing pieces shortest near your face and gradually longer as they move toward the back of your head.
- Use the same point-cutting technique with your scissors angled vertically to avoid blunt, harsh edges that look too severe.
- Check for symmetry by pulling both sides forward simultaneously and comparing the lengths side by side in front of your nose.
- Blend these face-framing pieces into your existing layers by creating smooth transitions rather than dramatic jumps in length.
7. Fixing Mistakes and Making Adjustments
Even experienced home hair cutters sometimes make mistakes, but knowing how to address common issues prevents panic and helps you salvage your haircut.
Small errors are usually fixable with strategic adjustments and blending techniques.
- If one side appears longer than the other, resist the urge to keep cutting back and forth, which creates an endless cycle of cutting shorter and shorter.
- Instead, identify the shorter side as your guide and carefully bring only the longer side down to match that length with small, conservative cuts.
- Choppy or uneven layers can be softened by using point cutting or texturizing shears to blend harsh lines and create smoother transitions between lengths.
- If you’ve cut too short in one area, focus on blending that section into the surrounding hair rather than cutting everything else to match the mistake.
- Let your hair dry completely before making final adjustment cuts, as wet hair appears longer and you might think you’ve cut too much when you actually haven’t.
- Use a straightener or blow dryer to style your hair as you normally would, then assess whether adjustments are truly needed or if styling solves the issue.
- When in doubt, cut less rather than more—you can always take off additional length later, but you cannot put hair back once it’s cut.
8. Maintaining Your Layers Between Home Cuts
After successfully cutting your own layers, proper maintenance keeps your style looking fresh and prevents it from growing out awkwardly.
Regular touch-ups and good hair care practices extend the life of your home haircut.
- Trim your ends every six to eight weeks by taking small vertical sections and removing just a quarter-inch to prevent split ends from traveling up the hair shaft.
- Dust your layers by going through small sections and snipping off any obvious split ends or damaged pieces without removing significant length.
- Use quality hair care products appropriate for your hair type to keep your layers looking healthy, shiny, and well-defined.
- Deep condition regularly to prevent dryness and damage that makes layers look frizzy and unkempt rather than smooth and intentional.
- Style your layers with products that enhance texture and movement, such as mousse for volume or texturizing spray for piece-y definition.
- Protect your hair from heat damage by using heat protectant sprays before blow-drying, straightening, or curling your layered hair.
- Consider getting a professional cut once or twice a year to correct any accumulated unevenness and refresh your overall shape while maintaining your home-cutting routine.
9. Special Considerations for Different Hair Types
Different hair textures and types require modified techniques to achieve beautiful layers that work with your hair’s natural characteristics rather than against them.
Understanding your specific hair needs prevents disappointment and ensures better results.
- Straight hair shows every cutting imperfection clearly, so precision and symmetry are absolutely critical when creating layers on this hair type.
- Wavy hair has more forgiveness for small mistakes and benefits from layers that enhance the natural wave pattern and prevent triangle-shaped volume.
- Curly hair should ideally be cut when dry so you can see the natural curl pattern and avoid cutting too short, as curls bounce up significantly when dry.
- Thick hair requires more aggressive layering to remove bulk and prevent a heavy, mushroom-like shape that overwhelms your frame.
- Fine hair needs subtle, carefully placed layers that add volume and movement without removing so much hair that it looks thin and wispy.
- Coarse hair with lots of texture benefits from point cutting and slide cutting techniques that soften the ends and prevent bluntness.
- Color-treated or chemically processed hair may be more fragile and require sharper scissors and gentler handling to prevent additional damage while cutting.
10. When to Seek Professional Help Instead
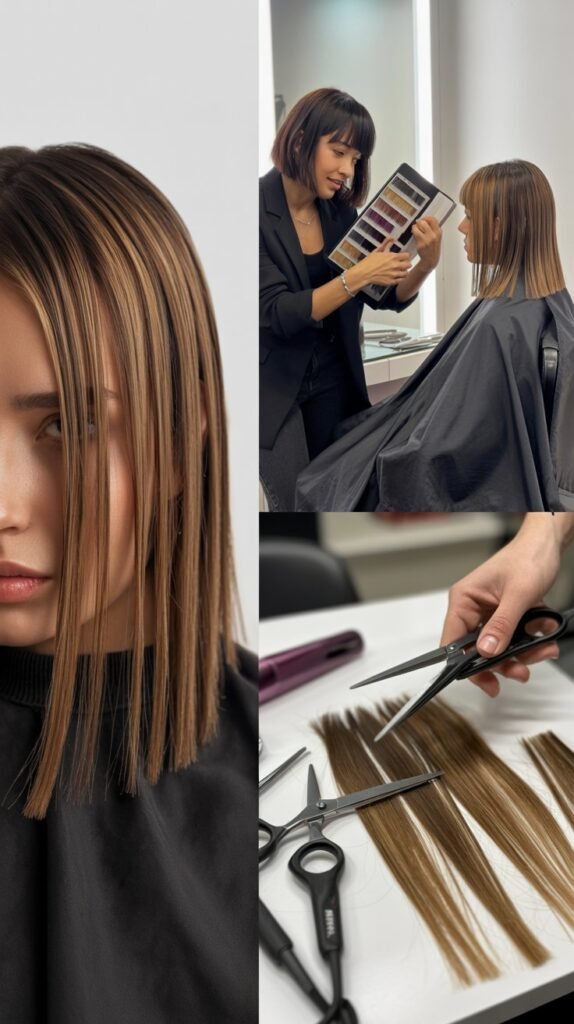
While cutting your own hair can be empowering and economical, recognizing when you need professional assistance prevents disasters and keeps your hair looking its best.
Some situations genuinely require expert hands.
- Dramatic length changes of more than three to four inches are best left to professionals who can ensure proper proportions and shape throughout the cutting process.
- Major style transformations like going from long layers to a short pixie cut require advanced techniques and experience that most home cutters haven’t developed.
- Cutting bangs for the first time involves precise measurements and cutting angles that are difficult to achieve on yourself, especially face-framing bangs.
- Correcting previous bad haircuts, whether from yourself or someone else, often requires professional assessment to determine the best path forward.
- Very thick or very curly hair can be challenging to layer evenly at home without professional training in specialized cutting techniques for these textures.
- If you feel anxious, uncertain, or unsafe using scissors near your face and head, that discomfort is a sign that professional help might be the better choice.
- Chemical services like color, bleach, perms, or keratin treatments combined with cutting should always be handled by licensed professionals to prevent severe damage.
Conclusion
Learning How I Cut & Layer My Hair at Home has transformed not just my hair care routine, but my entire relationship with my appearance and self-care practices.
The journey from nervous beginner to confident home hairstylist isn’t always smooth, and there were certainly moments of doubt and a few minor mishaps along the way, but the skills I’ve gained have been absolutely worth every practice session.
By investing in the right tools, taking time to understand proper techniques, and approaching each cut with patience and realistic expectations, I’ve saved countless hours and significant money while gaining complete control over my look.
The confidence that comes from knowing I can create salon-quality layers in my own bathroom, on my own schedule, without relying on appointment availability or salon prices, has been genuinely empowering.
Whether you’re motivated by budget concerns, scheduling challenges, or simply the desire for creative control over your appearance, cutting and layering your own hair is a practical skill that rewards patience and practice.
Remember that even professional hairstylists spent years developing their expertise, so be kind to yourself during the learning process, start with conservative cuts until you build confidence, and don’t hesitate to seek professional help when situations exceed your current skill level.
With the comprehensive guidance provided throughout this article on How I Cut & Layer My Hair at Home, you now have the knowledge foundation to begin your own home hair cutting journey and discover the satisfaction of creating beautiful, layered hairstyles with your own hands.
