Imagine transforming your long hair into a gorgeously layered masterpiece without spending hours at the salon or draining your wallet.
The beauty of a long layered haircut lies in its versatility, movement, and ability to breathe life into flat, lifeless hair.
Whether you’re a busy professional, a budget-conscious student, or simply someone who loves the satisfaction of DIY beauty, learning to cut your own layers at home is a game-changing skill.
This comprehensive guide will walk you through every step of achieving a professional-looking long layered haircut in just five minutes, from gathering the right tools to perfecting your cutting technique.
You’ll discover the secrets hairstylists use, learn foolproof methods that eliminate guesswork, and gain the confidence to maintain your style between salon visits.
By the end of this article on A 5-Minute Haircut at Home: Long Layered Haircut, you’ll have all the knowledge needed to create beautiful, face-framing layers that add dimension, volume, and style to your long locks.
1. Essential Tools You Need for a Long Layered Haircut
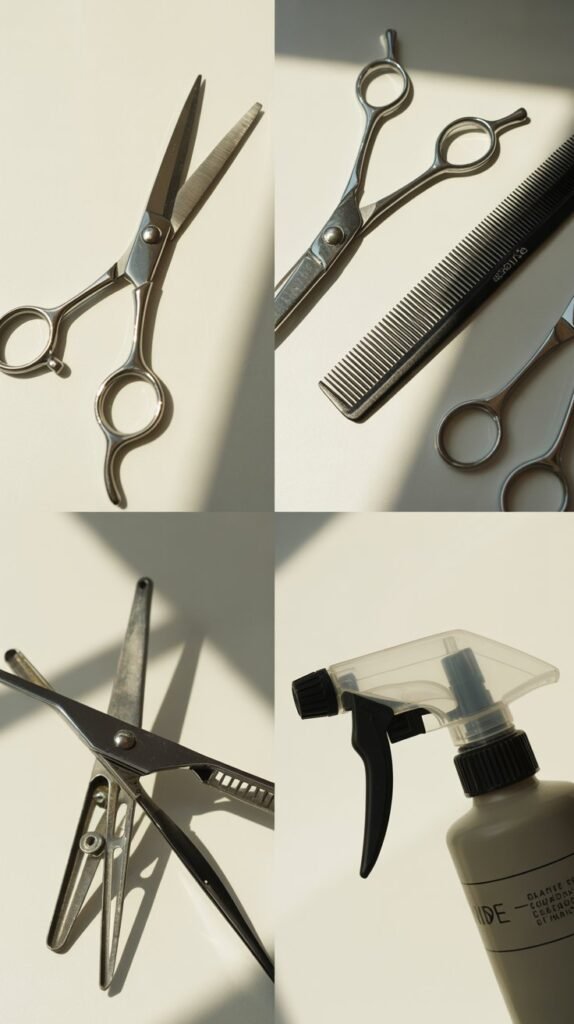
Before you begin cutting, having the right tools makes all the difference between a professional-looking result and a hair disaster.
Investing in quality cutting tools ensures precision, safety, and ease during the cutting process.
- Professional hair cutting scissors are absolutely essential and should never be replaced with regular household scissors that can damage and split your hair ends.
- A fine-tooth comb helps create clean sections and ensures you’re cutting evenly across each layer without missing any strands.
- Hair clips or elastics keep sections separated and prevent you from accidentally cutting the wrong portions of your hair during the layering process.
- A spray bottle filled with water keeps hair damp throughout the cutting process, making it easier to see the true length and create smooth, even cuts.
- A handheld mirror allows you to check the back of your head and ensure your layers are symmetrical and balanced on all sides.
- Sharp scissors specifically designed for hair cutting will glide through your strands smoothly and create clean lines rather than jagged, uneven edges.
2. Preparing Your Hair Before Cutting
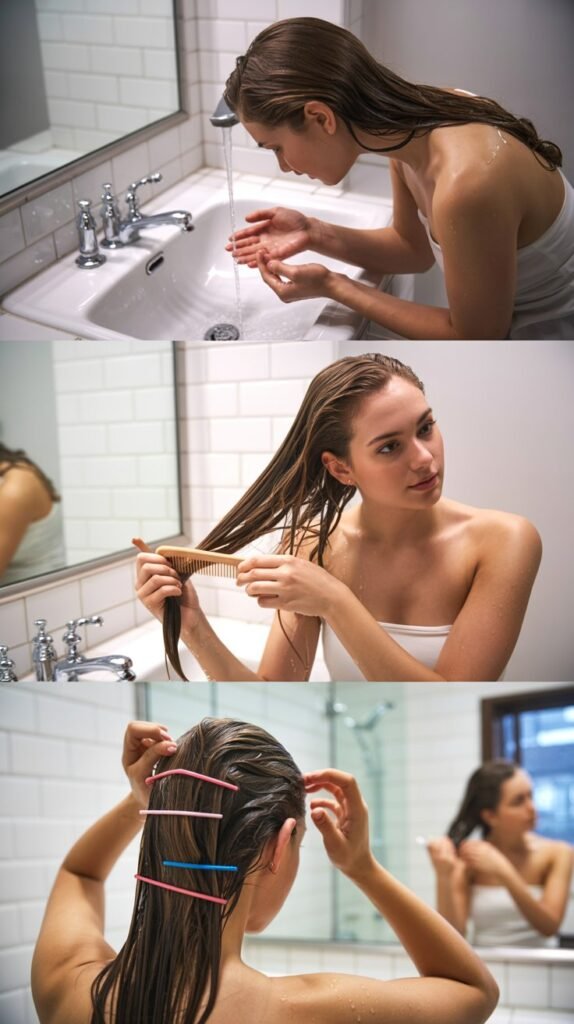
Proper preparation sets the foundation for a successful layered haircut and prevents common mistakes that lead to uneven results.
Taking time to prepare your hair correctly ensures you’ll achieve salon-quality layers.
- Wash your hair thoroughly with shampoo and conditioner to remove any product buildup, oils, or dirt that might interfere with accurate cutting.
- Towel-dry your hair until it’s damp but not dripping wet because cutting soaking wet hair can lead to length miscalculations when it dries and shrinks.
- Comb through all tangles and knots completely using a wide-tooth comb first, then a fine-tooth comb to ensure absolutely smooth, knot-free hair.
- Avoid applying any styling products before cutting such as mousse, gel, or leave-in conditioner that can weigh down hair and distort its natural fall.
- Part your hair exactly as you normally wear it whether that’s a center part, side part, or no part, so your layers will frame your face correctly.
- Section your hair into manageable portions by dividing it into top, middle, and bottom sections secured with clips for better control during cutting.
3. The Ponytail Method for Long Layers
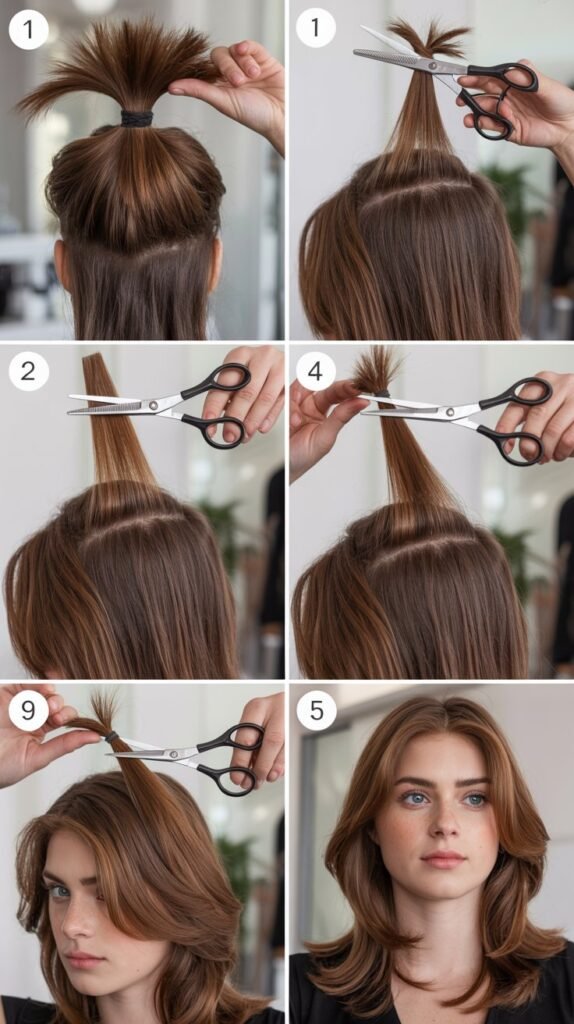
The ponytail method is the easiest and most foolproof technique for creating beautiful long layers at home in minutes.
This method has been used by DIY hair cutters for years with consistently excellent results.
- Flip your head upside down and brush all your hair forward toward your forehead, gathering every strand from the back, sides, and top of your head.
- Create a high ponytail at your forehead or top of your head using a hair elastic, positioning it exactly where you want the shortest layers to begin.
- Slide the elastic down the ponytail to the point where you want to make your cut, typically 2-3 inches from the ends for subtle layers.
- Hold the ponytail straight up perpendicular to your head with one hand while using your scissors to cut straight across in the other hand.
- Cut slowly and deliberately in small sections rather than attempting to chop through the entire ponytail at once, which ensures a cleaner cut.
- Release the ponytail and shake out your hair to reveal beautifully graduated layers that are shorter in the front and longer in the back.
- The higher you position the ponytail on your head the more dramatic and shorter your face-framing layers will be throughout your hair.
4. The Twist and Cut Method for Subtle Layers
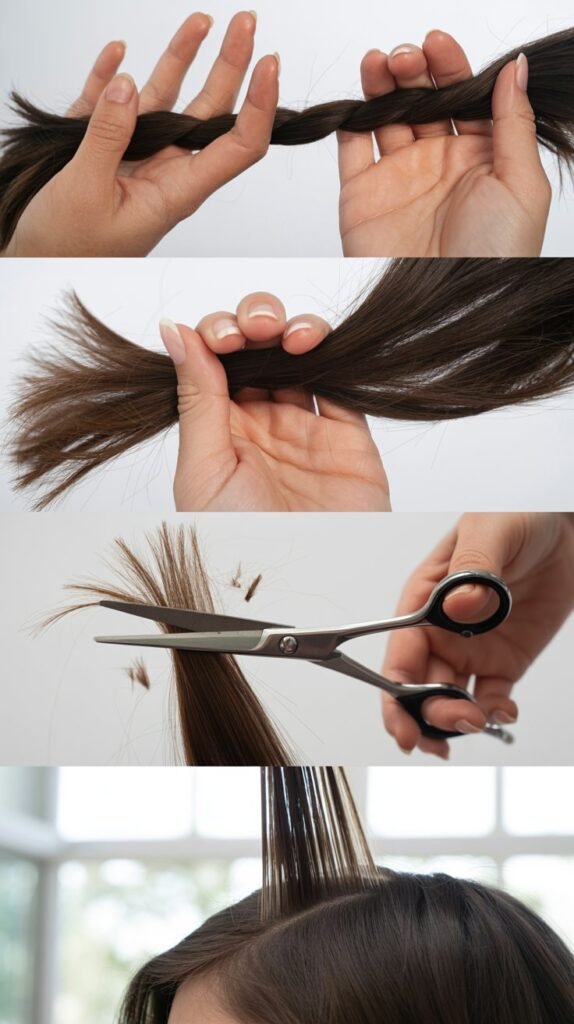
The twist and cut method offers more control and creates softer, more subtle layers perfect for those wanting minimal change.
This technique works exceptionally well for beginners who want to start conservatively.
- Divide your hair into multiple vertical sections from front to back, creating 4-6 sections depending on your hair thickness and density.
- Take one section at a time and twist it tightly from root to tip, which naturally brings shorter hairs to the outside of the twist.
- Hold the twisted section away from your head at the angle you want your layers to fall, typically 45-90 degrees from your scalp.
- Cut small amounts from the end of the twist using point-cutting technique (cutting into the hair at an angle) for a softer, more blended look.
- Untwist the section and examine the result before moving to the next section, ensuring you’re creating consistent layers throughout your head.
- Repeat this process on each section working systematically around your head to maintain symmetry and balance in your layering.
- This method creates softer, less defined layers that blend seamlessly with your existing length for a natural, sun-kissed appearance.
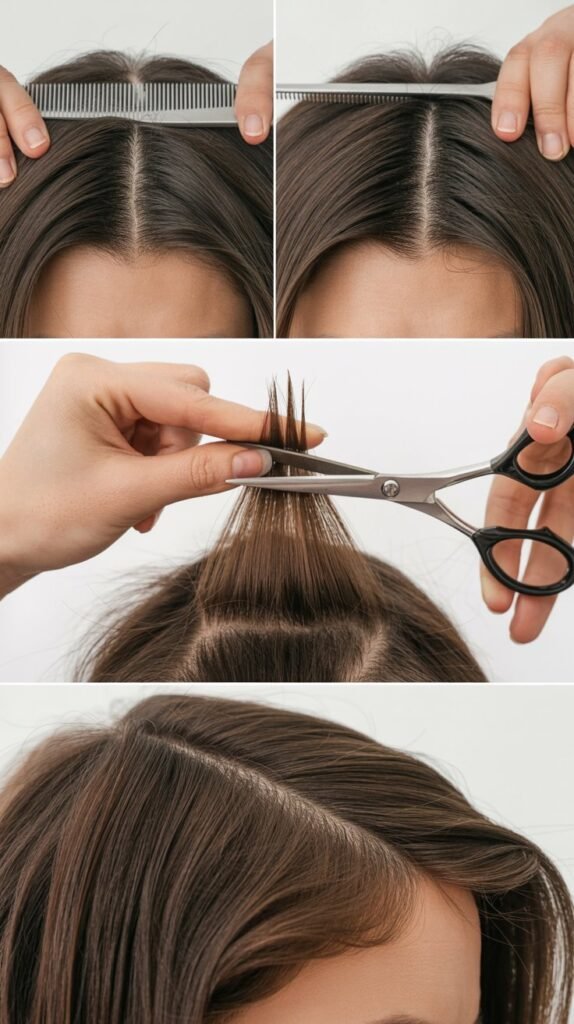
5. Face-Framing Layers Technique
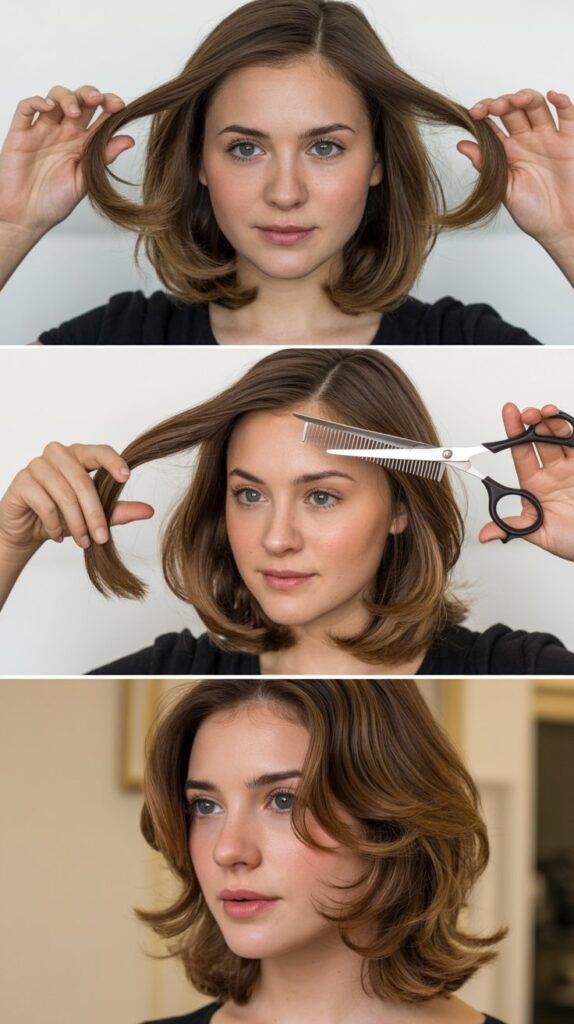
Face-framing layers draw attention to your best features and add dimension around your face for a flattering, polished look.
These strategic layers can transform your entire appearance and enhance your facial structure.
- Section out the front portions of your hair by taking triangular or rectangular sections from your hairline back to approximately your ears on each side.
- Determine where you want your shortest face-framing layer to hit whether at your cheekbones, jawline, or collarbone for the most flattering effect.
- Pull the front section straight down along your face and position your scissors at a slight angle rather than cutting straight across.
- Cut gradually and conservatively starting longer than you think you need because you can always cut more but cannot add length back.
- Use the slide-cutting technique by keeping scissors slightly open and sliding them down the hair shaft to create soft, blended edges.
- Check both sides frequently for symmetry by pulling both front sections forward together and comparing their lengths at eye level.
- Point-cut into the ends after achieving your desired length to remove any blunt lines and create movement and texture in your layers.
6. Layering the Crown and Top Sections
Adding layers to your crown creates volume and lift that prevents your hair from looking flat and lifeless.
Properly layered crown sections give your hairstyle dimension and fullness from every angle.
- Section off the crown area by creating a circular or square section at the top of your head from approximately ear to ear.
- Clip away the surrounding hair to prevent accidentally cutting sections you don’t intend to layer during this process.
- Take horizontal subsections within the crown working from front to back in manageable pieces of about 1-2 inches wide.
- Pull each subsection straight up perpendicular to your head and hold it taut between your fingers at the desired cutting length.
- Cut each subsection at a slight angle rather than blunt across to create graduated layers that blend naturally with surrounding hair.
- The crown layers should be slightly shorter than your face-framing layers to create lift and prevent heaviness at the top of your head.
- Use the point-cutting method on crown layers to soften edges and prevent any harsh lines or visible demarcation between layers.
7. Blending and Checking Your Layers
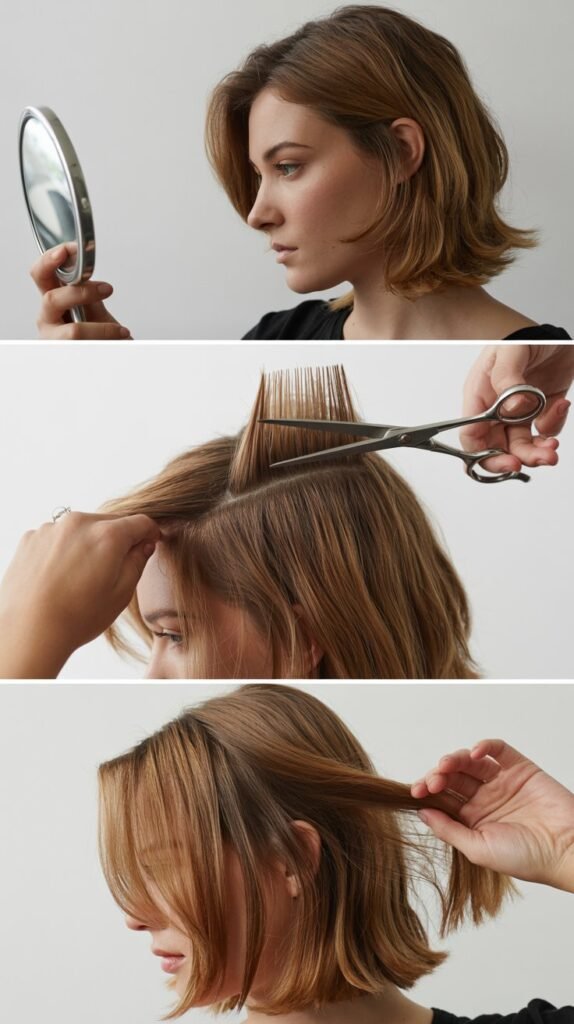
Blending ensures your layers flow seamlessly together without obvious lines or choppy sections for a professional finish.
Taking time to properly blend your layers distinguishes amateur cuts from salon-quality results.
- Dry your hair completely or at least partially using your normal drying method to see how your layers actually fall in their natural state.
- Examine your layers from all angles using a handheld mirror to check the back, sides, and overall silhouette of your haircut.
- Look for any obvious lines or disconnections where one layer ends and another begins, which indicates areas that need additional blending.
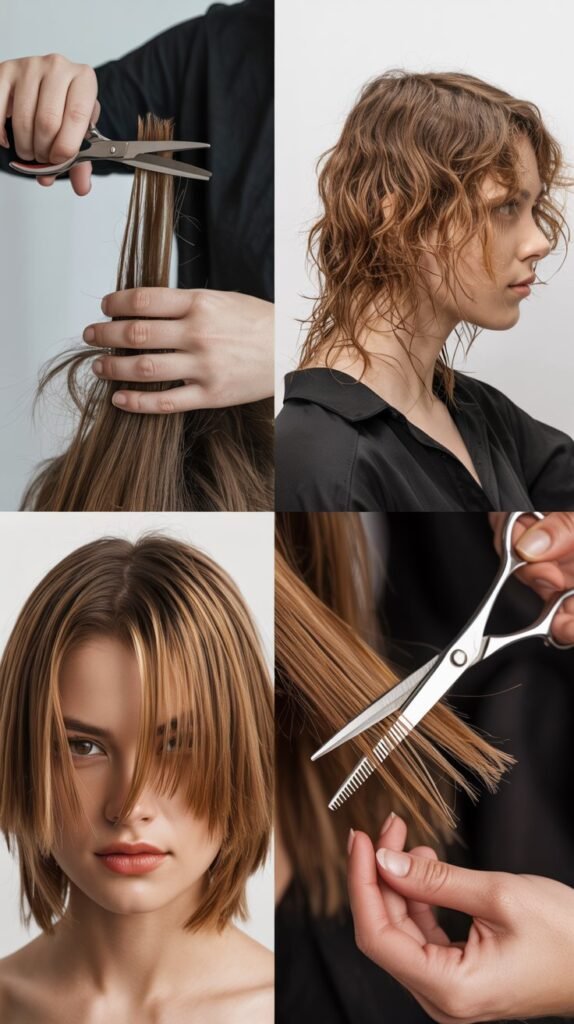
- Use point-cutting to soften harsh lines by holding scissors vertically and cutting into the hair at various depths rather than across.
- Twist small sections and cut into the ends to remove bulk and create a softer, more textured appearance throughout your layers.
- Check the lengths of both sides by pulling comparable sections from each side forward together to ensure symmetry and balance.
- Make only tiny adjustments during blending because multiple small corrections create better results than large, drastic changes that risk overcutting.
8. Common Mistakes to Avoid
Understanding common pitfalls helps you sidestep the errors that typically ruin home haircuts and lead to regrettable results.
Learning what not to do is just as valuable as learning proper techniques.
- Never cut your hair when it’s completely dry because curly and wavy hair especially will shrink significantly and appear much shorter than anticipated.
- Avoid cutting in poor lighting conditions which makes it impossible to see what you’re actually doing and leads to uneven, sloppy results.
- Don’t rush through the process even though this is marketed as a five-minute haircut, taking your time ensures better results than hurrying.
- Never use kitchen scissors or craft scissors which are not sharp enough for hair and will create damaged, split ends.
- Avoid cutting perfectly straight across because blunt lines look harsh and unnatural compared to slightly angled or point-cut edges.
- Don’t cut both sides simultaneously unless you’re extremely experienced, as working on one side at a time ensures better symmetry.
9. Styling Your New Layered Haircut
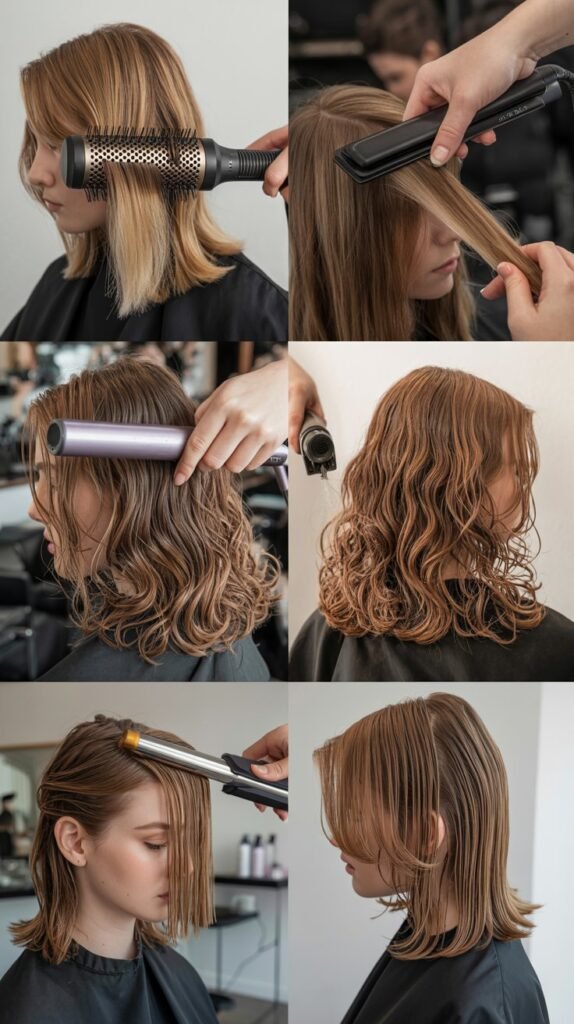
Proper styling techniques enhance your new layers and show off all the dimension and movement you’ve created.
Learning to style your layered hair maximizes the benefits of your home haircut.
- Blow-dry your hair using a round brush by wrapping sections around the brush and directing heat from roots to ends for volume and smoothness.
- Add texture spray or sea salt spray to damp hair before drying to enhance the natural movement and separation of your layers.
- Curl your layers with a curling iron or wand focusing the curls around your face-framing pieces to emphasize the dimensional layering.
- Use a straightener or flat iron on individual layers to create sleek, smooth sections that showcase the different lengths beautifully.
- Apply a small amount of hair oil or serum to the ends of your layers to prevent frizz and add shine without weighing down your hair.
- Scrunch your layers while drying if you have naturally wavy or curly hair to encourage definition and prevent layers from looking stringy.
- Experiment with different parting styles because layers look dramatically different depending on whether you wear a center part, side part, or no part.
10. Maintaining Your Layered Haircut at Home

Regular maintenance keeps your layers looking fresh and prevents them from growing out awkwardly or losing their shape.
Establishing a maintenance routine extends the life of your home haircut significantly.
- Trim your ends every 6-8 weeks to prevent split ends from traveling up the hair shaft and ruining the clean lines of your layers.
- Refresh face-framing layers more frequently every 3-4 weeks since these sections frame your face and are most noticeable when overgrown.
- Use quality hair care products including moisturizing shampoo and conditioner to keep your layers looking healthy, shiny, and well-maintained.
- Deep condition your hair weekly especially if you heat style regularly, to prevent damage that makes layers look stringy and unkempt.
- Schedule regular dusting appointments where you trim just 1/4 inch from the ends to maintain shape without losing significant length.
- Take progress photos from multiple angles immediately after cutting to reference during future maintenance sessions for consistency.
- Keep your cutting tools clean and sharp by regularly sanitizing your scissors and having them professionally sharpened when necessary.
Conclusion
Mastering A 5-Minute Haircut at Home: Long Layered Haircut empowers you with the skills and confidence to maintain beautiful, salon-quality hair without the expense or time commitment of regular appointments.
Throughout this guide, you’ve learned essential techniques from the foolproof ponytail method to more advanced face-framing and crown layering approaches that create dimension, movement, and style.
You now understand the importance of proper tools, preparation, and blending techniques that separate amateur attempts from professional-looking results.
The common mistakes section helps you avoid pitfalls that typically derail home haircuts, while the maintenance tips ensure your layers stay fresh and beautiful for months.
Remember that practice makes perfect, and even professional hairstylists didn’t master their craft overnight.
Start conservatively with your first attempt, cutting less than you think you need, because you can always take more but cannot add length back.
With each subsequent trim, you’ll gain more confidence and develop an intuitive understanding of your hair’s texture, growth patterns, and ideal layer placement.
The money you save on salon visits, combined with the convenience of maintaining your style on your own schedule, makes learning this skill incredibly worthwhile.
Embrace the journey of becoming your own hairstylist, celebrate small victories, and enjoy the freedom that comes with taking control of your hair care routine.
