Mornings as a mom are chaotic—packing lunches, finding lost shoes, and getting everyone out the door on time leaves little room for elaborate beauty routines.
If you’re a busy mom with long hair, you know the struggle of wanting to look put-together while racing against the clock.
The good news?
You don’t need to choose between style and speed.
This comprehensive guide to 36 Easy Hairstyles for Moms with Long Hair That Take No Time will transform your morning routine with practical, beautiful styles that work for school runs, playdates, work meetings, and everything in between.
From classic ponytails with a twist to elegant buns that take seconds, you’ll discover hairstyles that fit seamlessly into your busy life.
Each style is designed to be accomplished in five minutes or less, requires minimal tools, and stays secure through all your daily activities.
Whether you’re dealing with second-day hair, need something gym-friendly, or want to look polished for an unexpected video call, these hairstyles have you covered.
Get ready to reclaim your mornings and feel confident throughout your day with these time-saving hair solutions that prove you can have it all—even on the busiest days.
1. The Classic High Ponytail
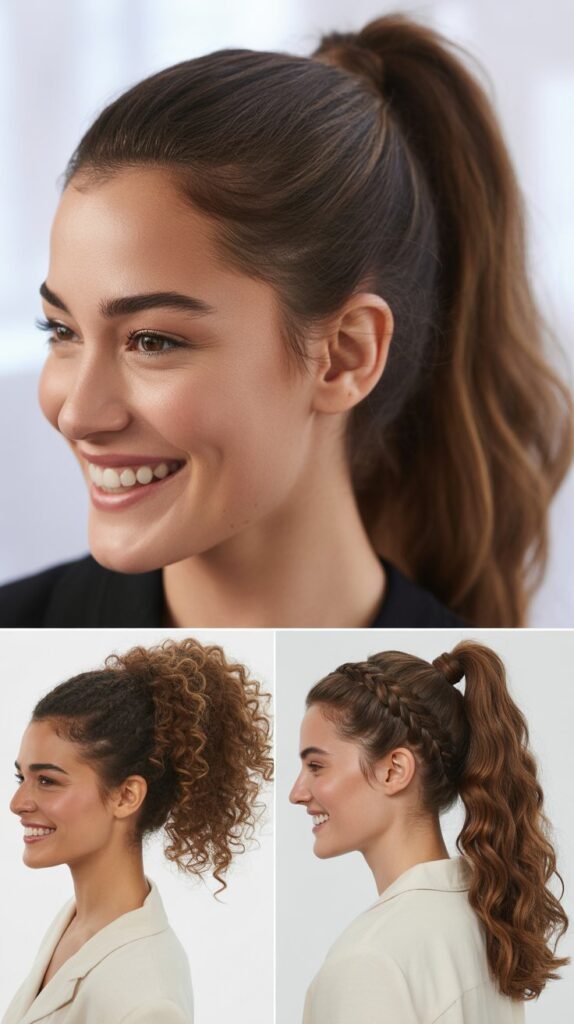
The high ponytail remains one of the most versatile and quickest hairstyles for busy moms, offering both style and practicality in under two minutes.
- Brush your hair upward toward the crown of your head to eliminate any bumps or tangles
- Gather all your hair at the highest point of your head, just above where your skull begins to curve
- Secure with a strong elastic band that won’t slip throughout the day
- For added polish, take a small section of hair from the ponytail and wrap it around the elastic to hide it
- Secure the wrapped section with a bobby pin underneath the ponytail for a seamless finish
- This style works perfectly for workouts, errands, or casual outings when you need your hair completely off your face
- The high placement creates a natural face-lift effect that’s flattering for all face shapes
2. The Messy Bun
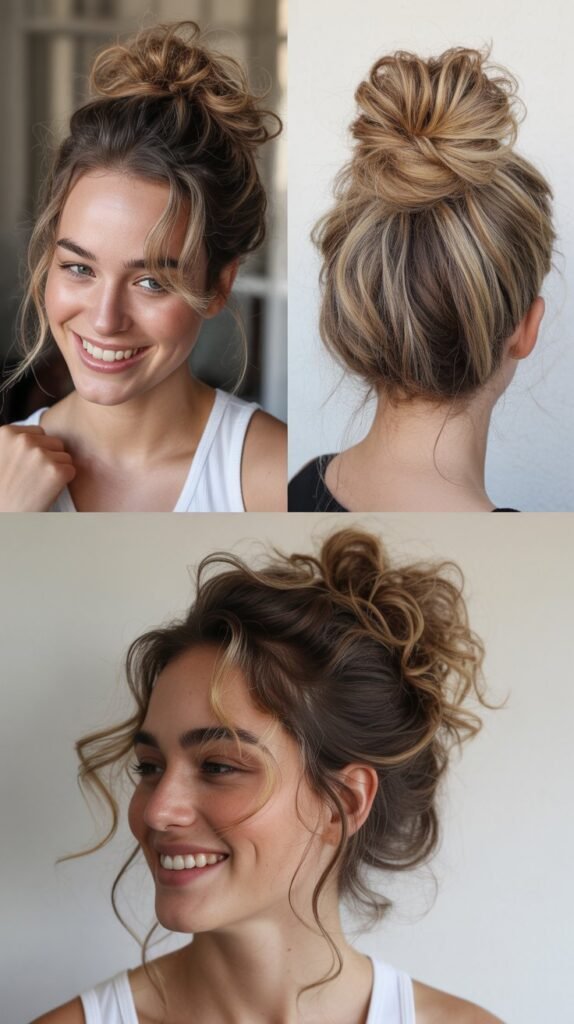
The messy bun is the ultimate go-to style for moms who want to look effortlessly chic while keeping hair completely out of the way during busy days.
- Flip your head upside down and gather all your hair into a high ponytail without worrying about perfection
- Twist the ponytail loosely around the base, creating a coiled shape
- Secure the bun with another elastic or use bobby pins to anchor it in place
- Gently pull out a few face-framing pieces to soften the look and add dimension
- Allow some texture and volume by not smoothing everything down perfectly
- The beauty of this style lies in its imperfection—the looser and more relaxed, the better
- This works exceptionally well on second or third-day hair when your hair has natural texture
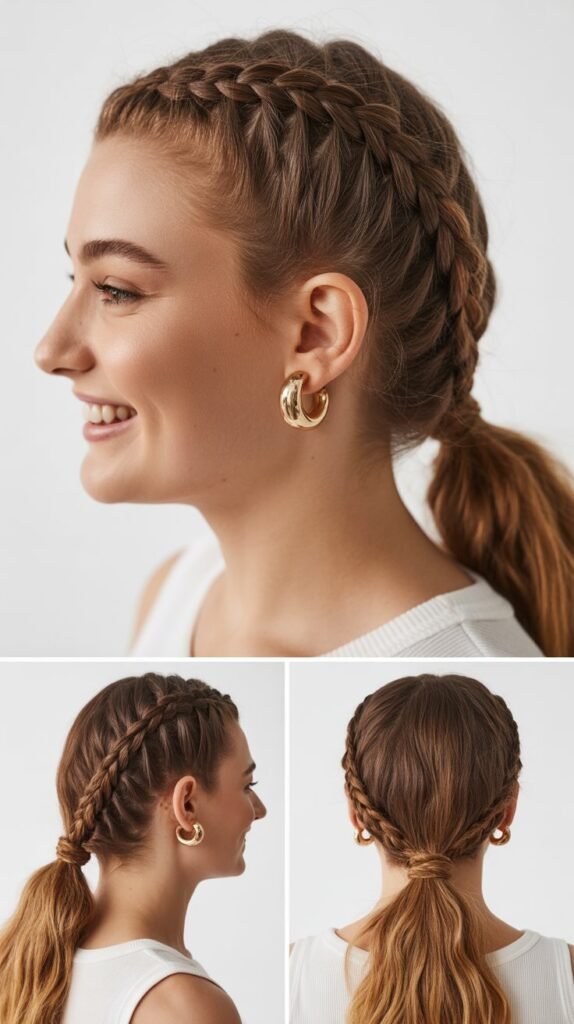
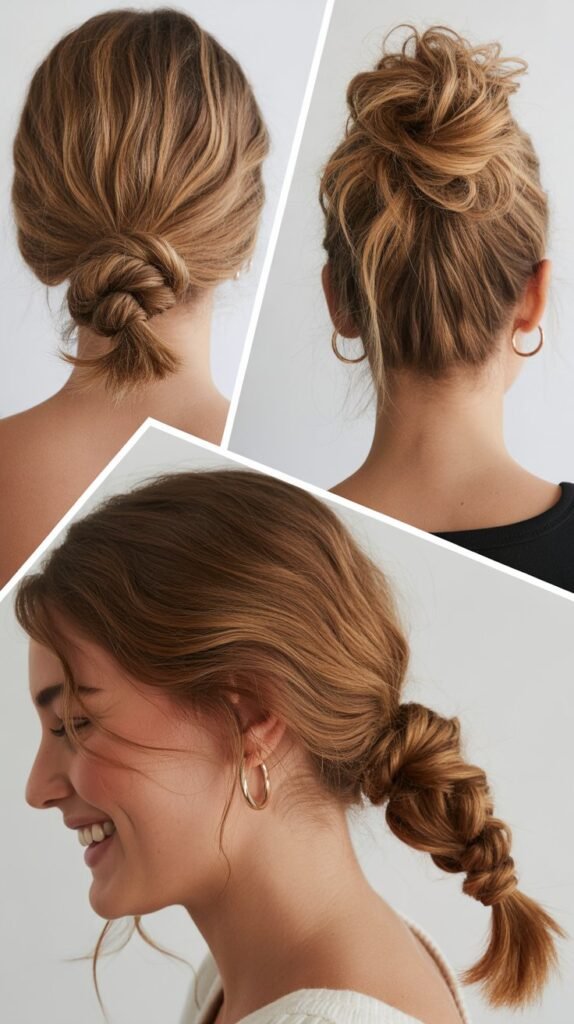
3. The Low Twisted Ponytail
This elegant variation on the basic ponytail adds sophistication without requiring extra time or advanced styling skills.
- Gather your hair into a low ponytail at the nape of your neck and secure with an elastic
- Create a small opening in the hair just above the elastic by separating it into two sections
- Flip the ponytail up and through the opening from back to front
- Pull the ponytail through completely and gently tug to tighten and secure the twist
- This creates a beautiful twisted detail that looks intricate but takes less than a minute
- The style works perfectly for professional settings or when you need something slightly dressier than a basic ponytail
- You can leave the ponytail straight or add waves for extra texture
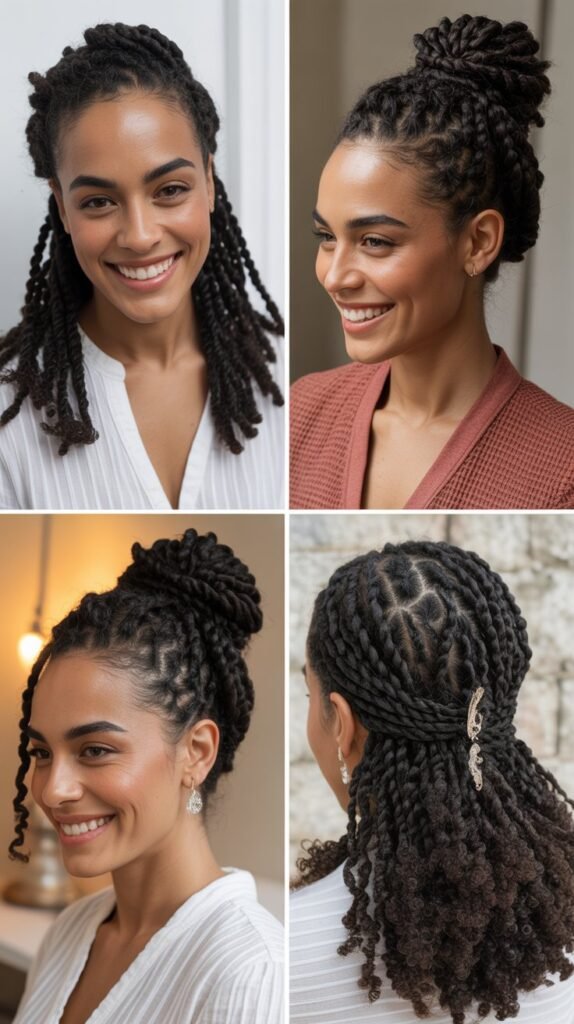
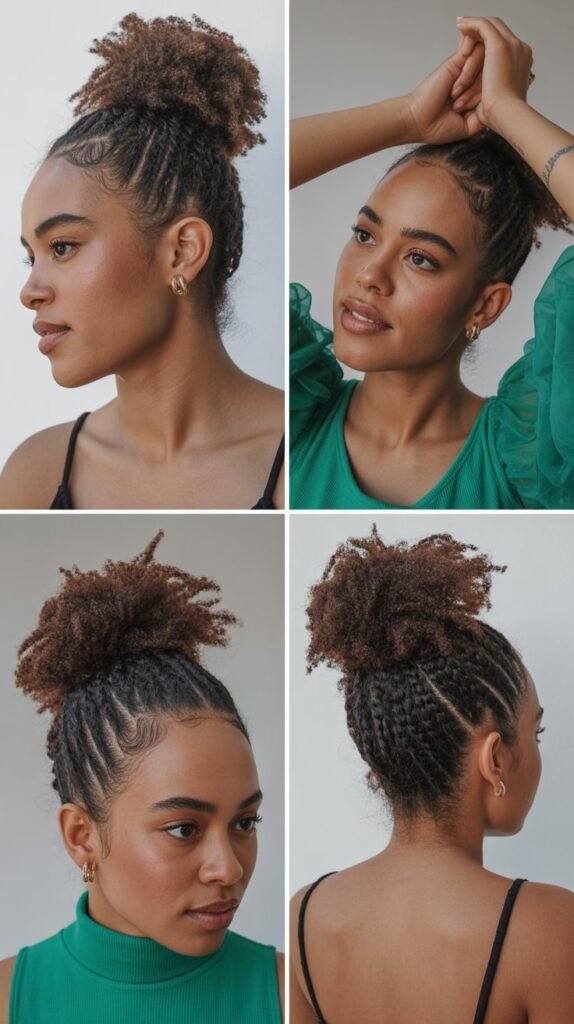
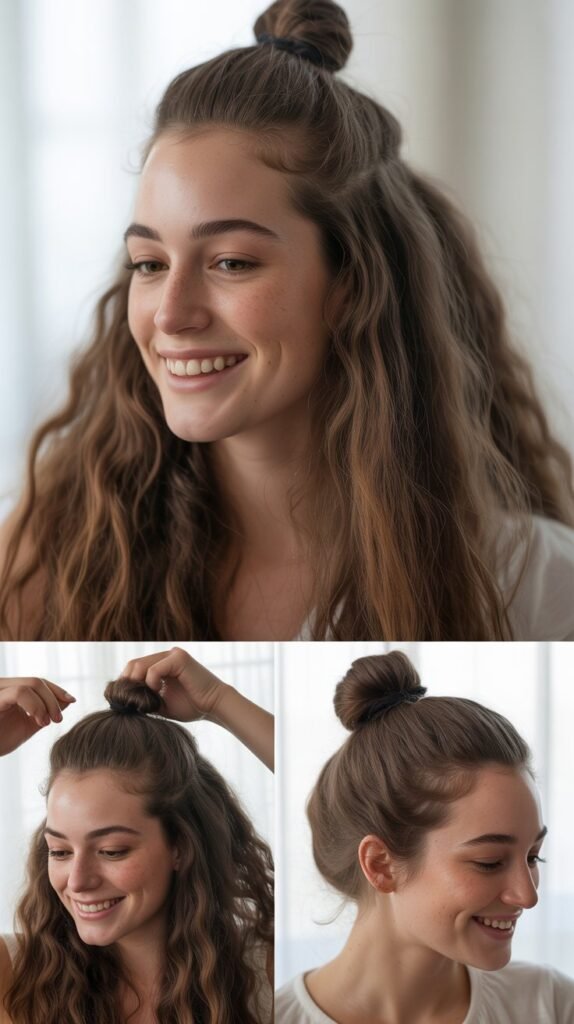
4. The Half-Up Top Knot
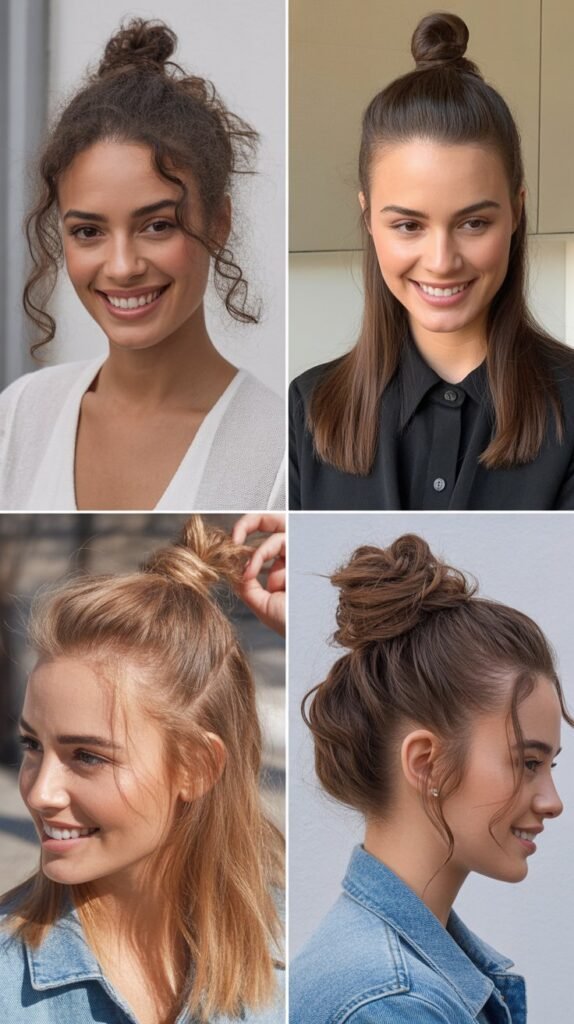
The half-up top knot combines the best of both worlds—keeping hair off your face while showing off your length and keeping cool.
- Section off the top half of your hair from ear to ear across the crown
- Gather this top section into a high ponytail and secure with an elastic
- Twist the ponytail and wrap it around the base to create a small bun or knot
- Secure the knot with bobby pins or another elastic band
- Leave the bottom half of your hair flowing freely for a relaxed, youthful appearance
- This style is perfect for transitioning from day to night activities without needing to restyle
- The top knot keeps hair secure during active play with kids while maintaining a trendy look
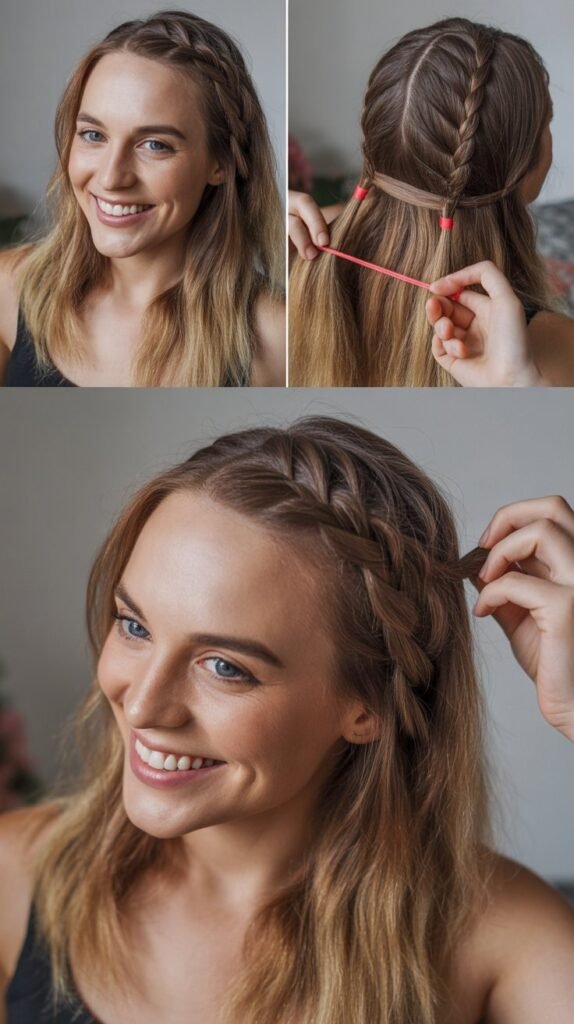
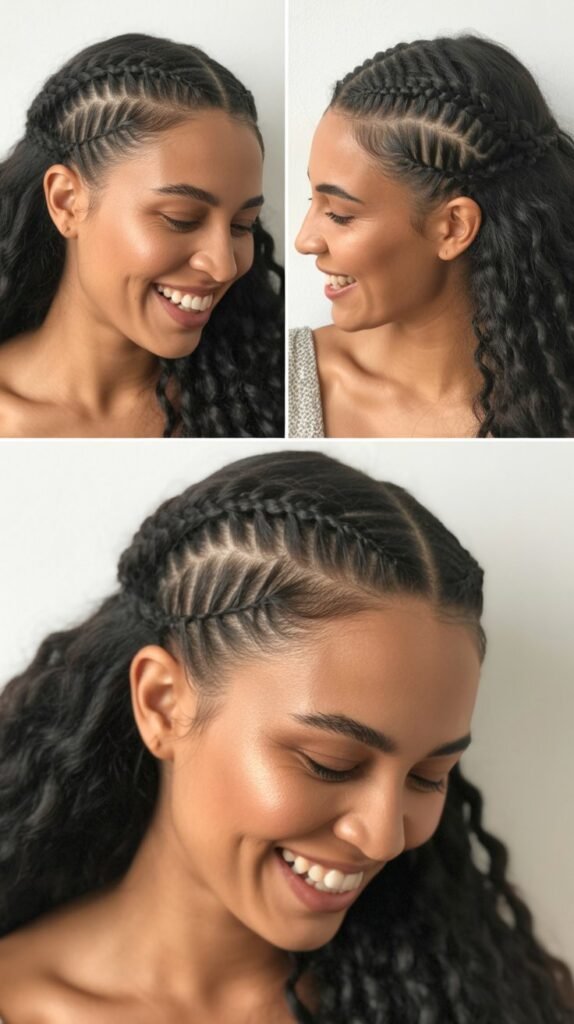
5. The Braided Headband
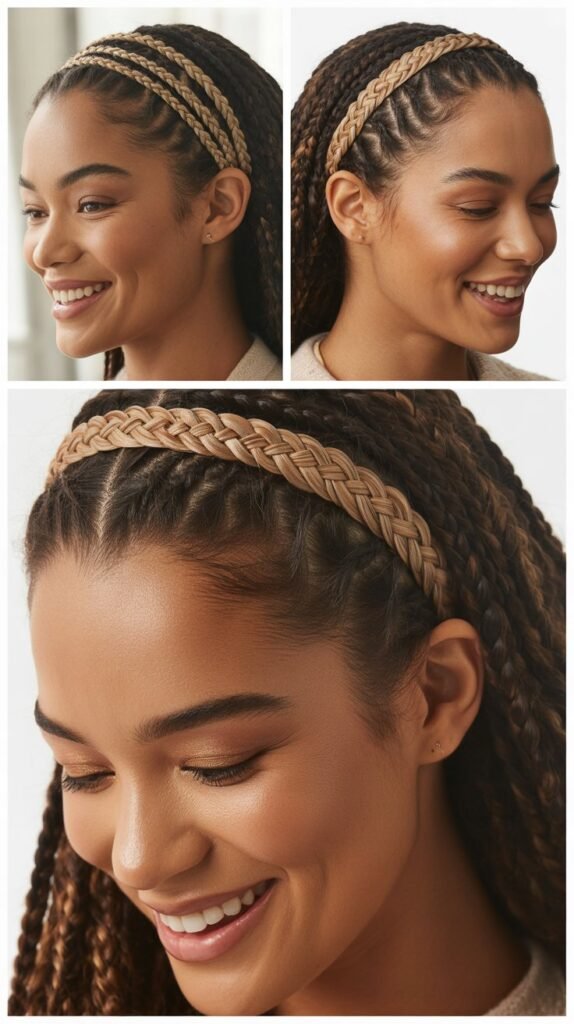
Create a bohemian look by using your own hair as a headband—this style keeps flyaways controlled while looking intentionally stylish.
- Take a two-inch section of hair from behind one ear and divide it into three strands
- Create a simple three-strand braid along your hairline toward the opposite ear
- Secure the braid behind your other ear with bobby pins that match your hair color
- Leave the rest of your hair down and flowing, or gather it into a low ponytail
- This technique works beautifully for disguising greasy roots or taming bangs that are in an awkward growing phase
- You can create braids on both sides for a more elaborate headband effect
- The style holds up well throughout active days and adds texture without requiring heat styling
6. The Quick French Twist
This classic updo looks complicated but can be mastered in under three minutes once you get the technique down.
- Gather all your hair to one side at the back of your head as if creating a low side ponytail
- Twist the gathered hair upward toward the crown in a rolling motion
- Continue twisting until the hair naturally wants to fold against your head
- Tuck the ends into the twist and secure everything with bobby pins along the fold
- Use additional pins at the top and bottom for extra security throughout busy days
- This sophisticated style works perfectly for parent-teacher conferences, date nights, or professional settings
- A few strategic bobby pins can keep this style secure for hours despite movement and activity
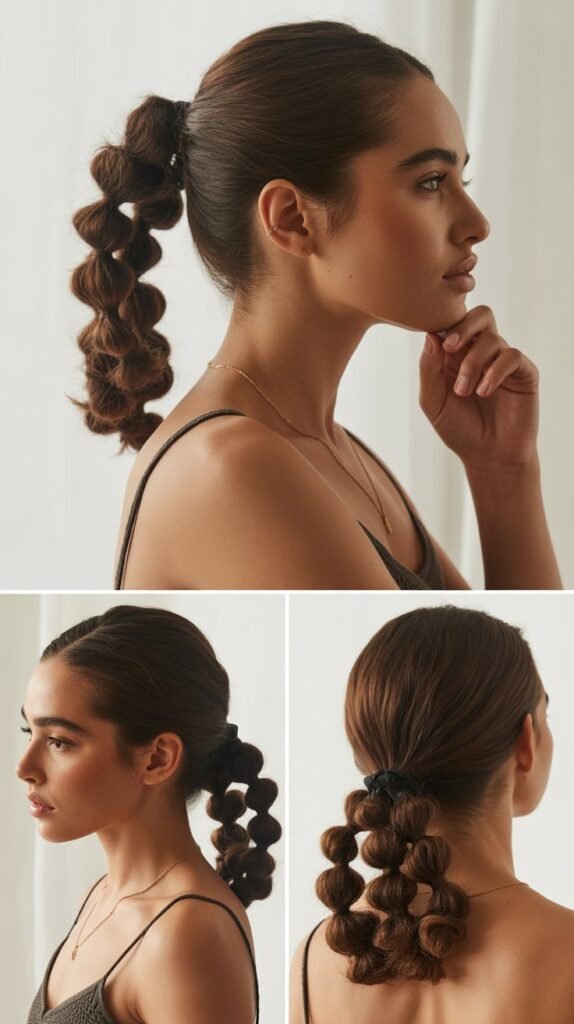
7. The Bubble Ponytail
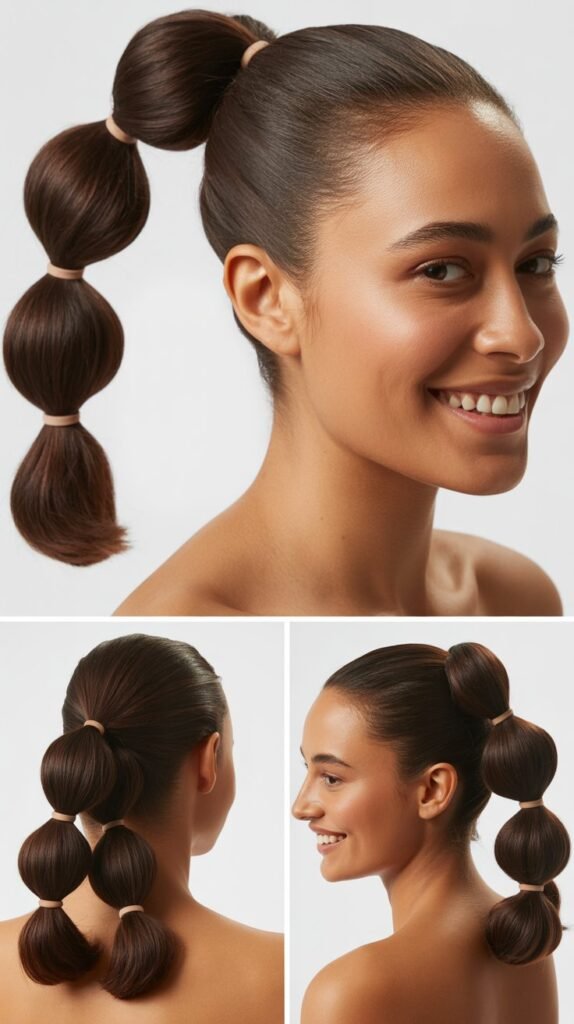
Add visual interest to a basic ponytail by creating “bubbles” down the length—this playful style is quick and kid-approved.
- Create a high or low ponytail and secure it with a strong elastic band
- Place additional elastics down the length of the ponytail at evenly spaced intervals
- Gently pull and fluff each section between the elastics to create rounded bubble shapes
- The bubbles add volume and dimension that make thin hair appear fuller
- This style works exceptionally well for active days because the multiple elastics keep everything secure
- You can create as many or as few bubbles as your hair length allows
- Kids often love this playful style and may request it for themselves too
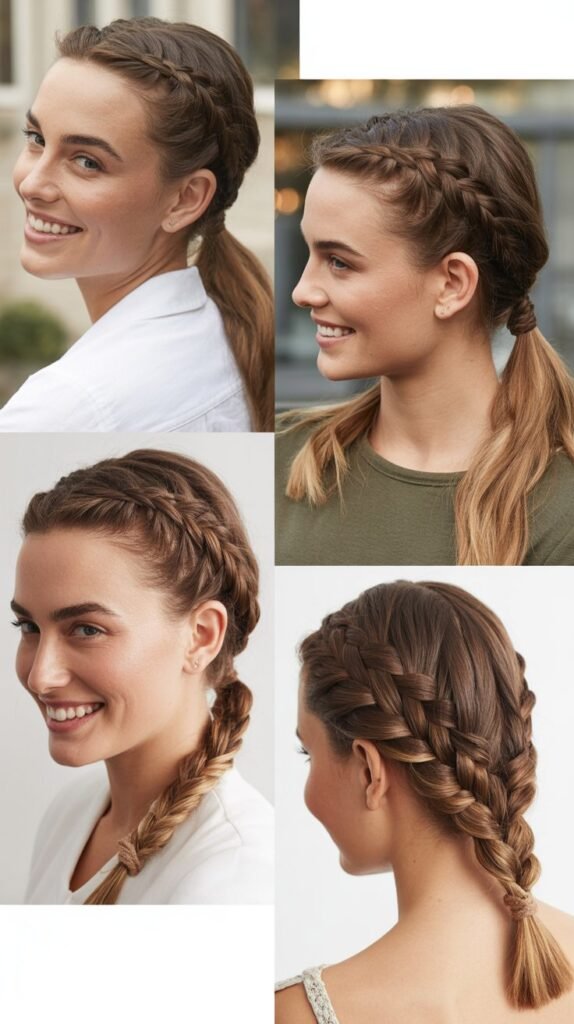
8. The Side Braid
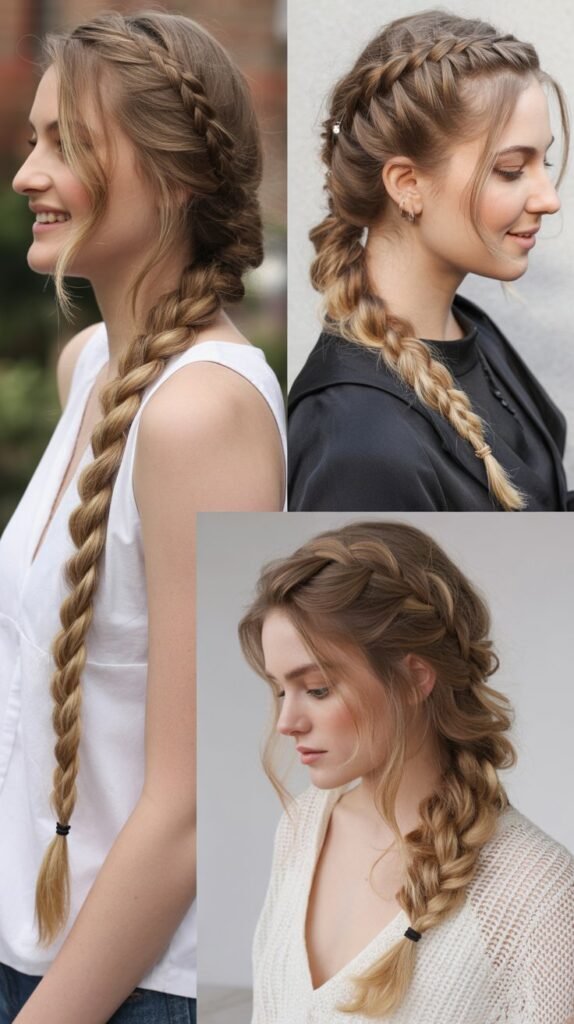
A single side braid offers effortless style while keeping all your hair controlled and manageable throughout the day.
- Sweep all your hair over one shoulder to your preferred side
- Divide the hair into three equal sections at the nape of your neck
- Create a simple three-strand braid by alternating outer sections over the middle section
- Continue braiding down to the ends and secure with an elastic band
- Gently pull on the outer edges of the braid to loosen it and create a fuller, more relaxed appearance
- This style works beautifully for all hair types and can be dressed up or down depending on the occasion
- The over-the-shoulder placement prevents hair from getting caught in car doors or backpack straps
9. The Double Dutch Braids
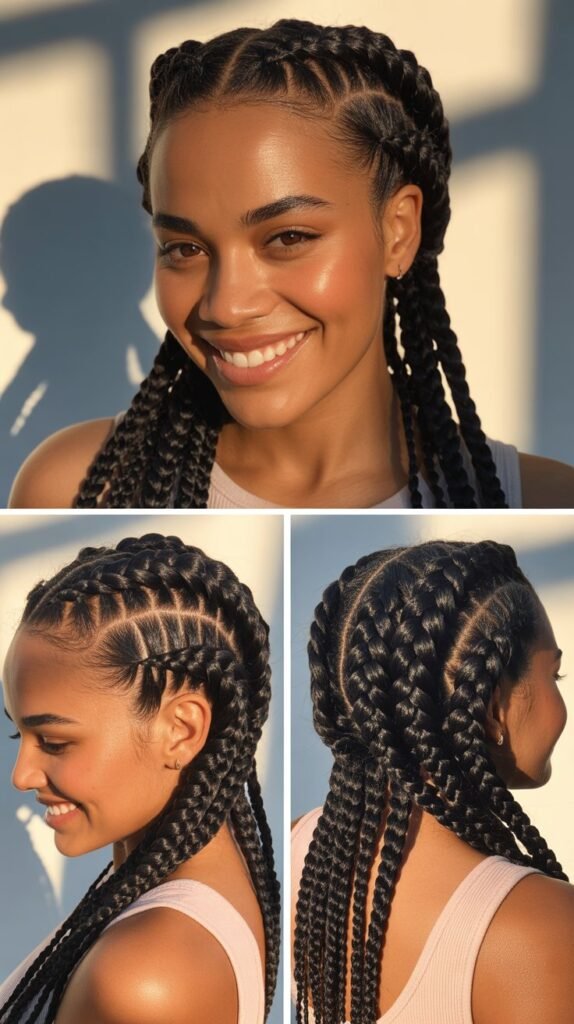
Two braids are sometimes easier than one, especially when you need a style that will last all day without requiring touch-ups.
- Part your hair straight down the middle from forehead to nape, creating two equal sections
- Work on one side at a time, taking a section at the hairline and dividing it into three strands
- Create a Dutch braid by crossing the outer strands under the middle strand while adding new hair with each pass
- Continue braiding down to the ends and secure with an elastic
- Repeat the exact process on the other side for symmetry
- These braids stay put through playground activities, workouts, and windy weather
- The style looks especially polished when both braids are the same size and tension
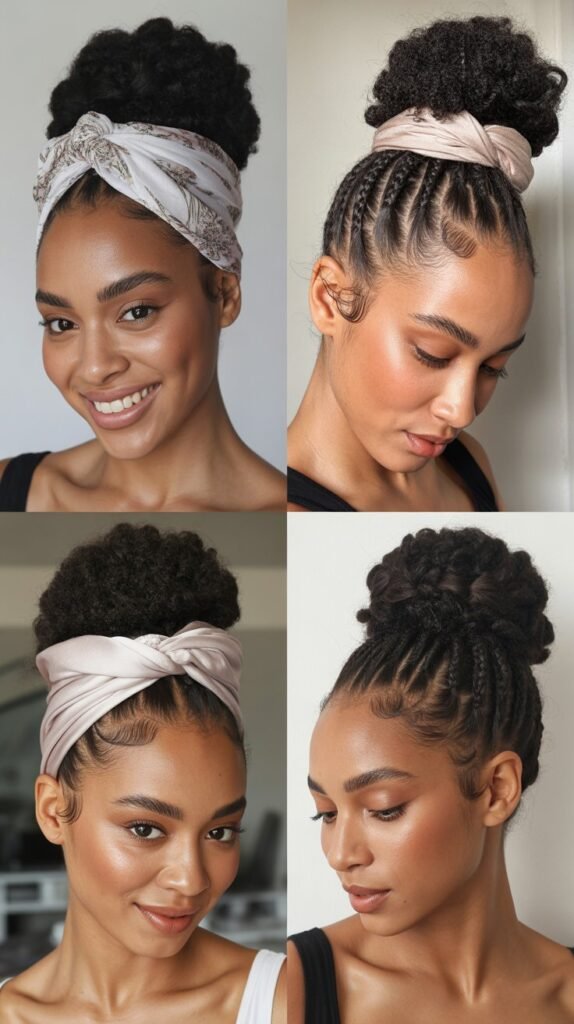
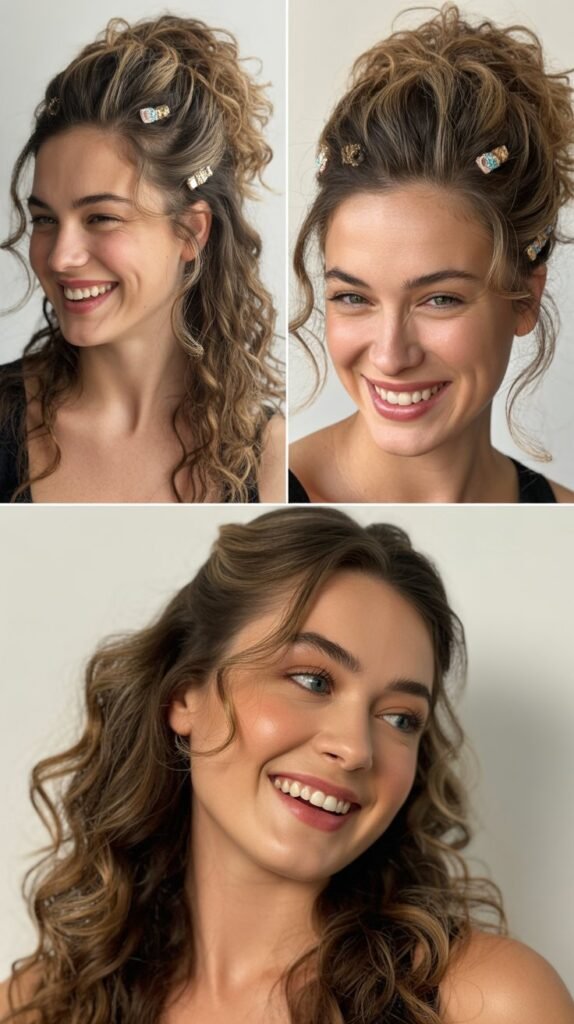
10. The Textured Waves with Headband
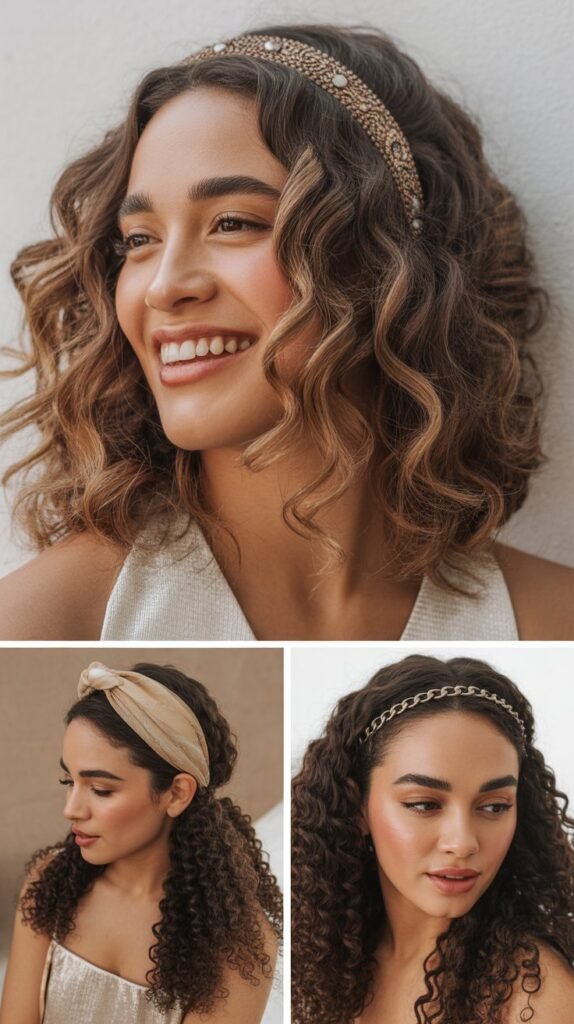
Achieve an effortlessly polished look by combining natural or enhanced waves with a stylish headband accessory.
- If your hair is naturally straight, create loose waves by braiding damp hair before bed or using a quick curling technique
- Place a fabric or elastic headband about an inch back from your hairline
- Tuck any shorter pieces or bangs behind the headband for a controlled yet relaxed appearance
- Allow the rest of your hair to flow freely with the textured waves adding movement and volume
- This style disguises roots that need touching up and keeps hair off your face during activities
- Headbands come in countless styles—from sporty to elegant—making this versatile for any occasion
- The combination of waves and a headband creates dimension that makes thin hair appear fuller
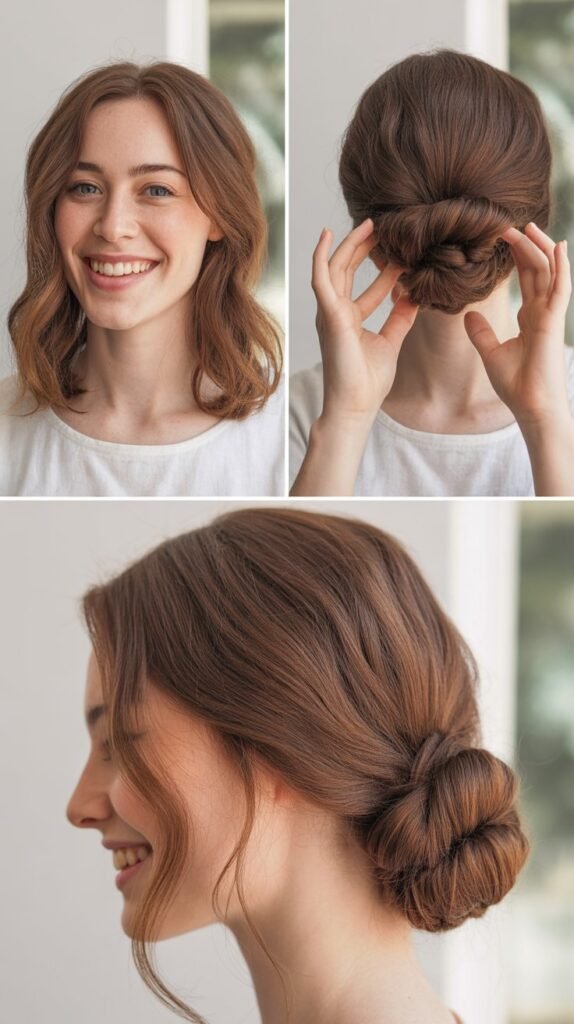
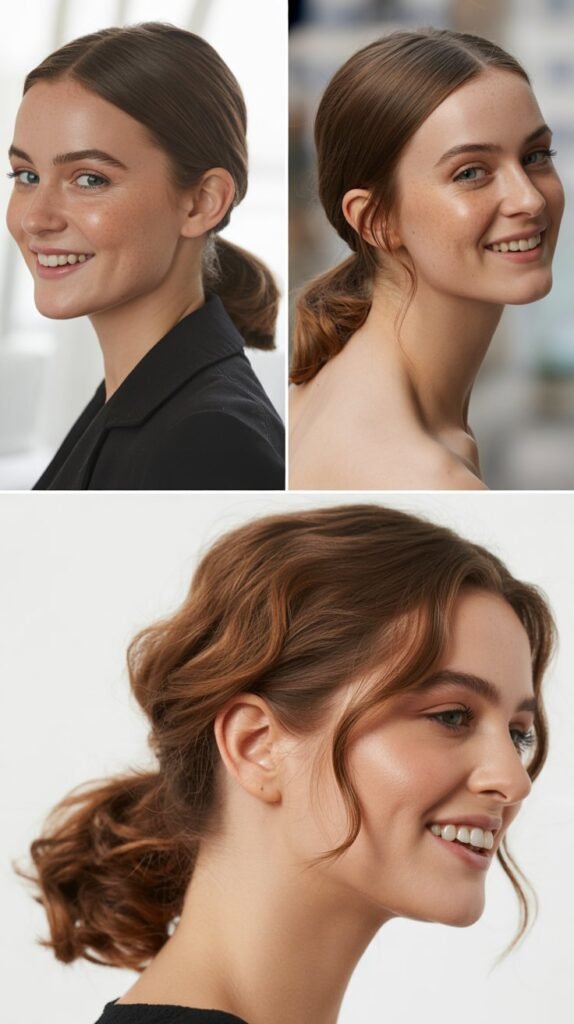
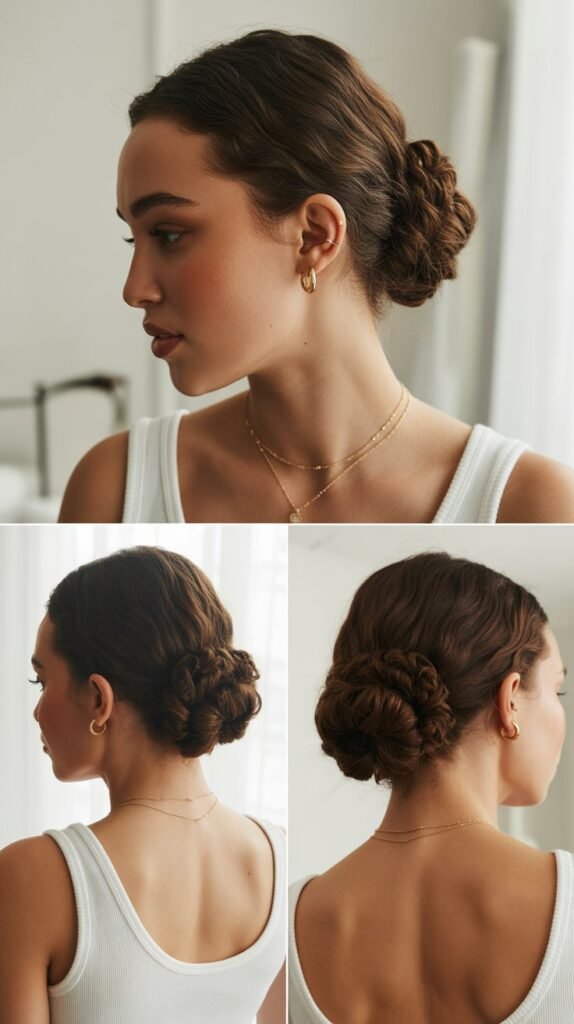
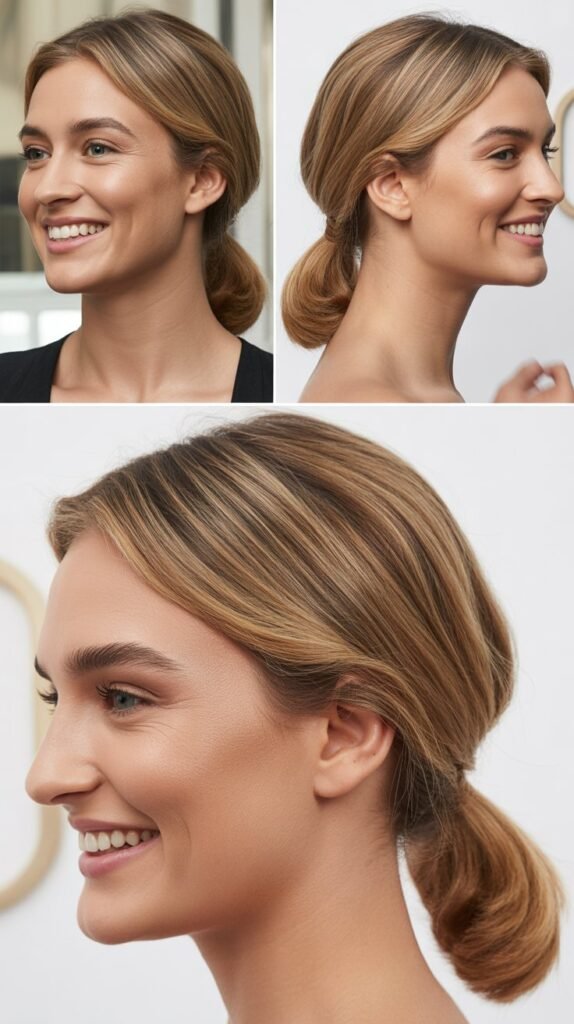
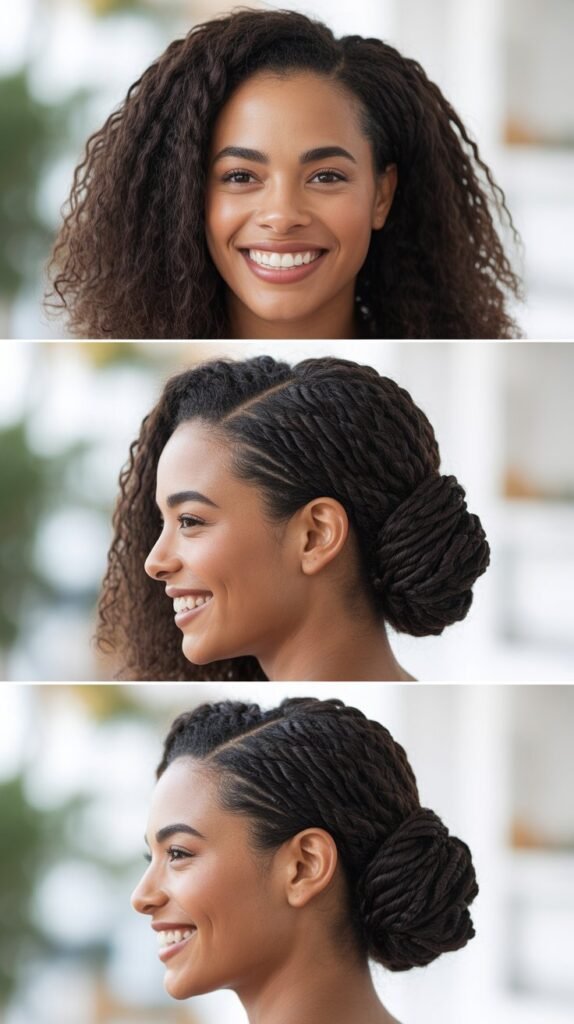
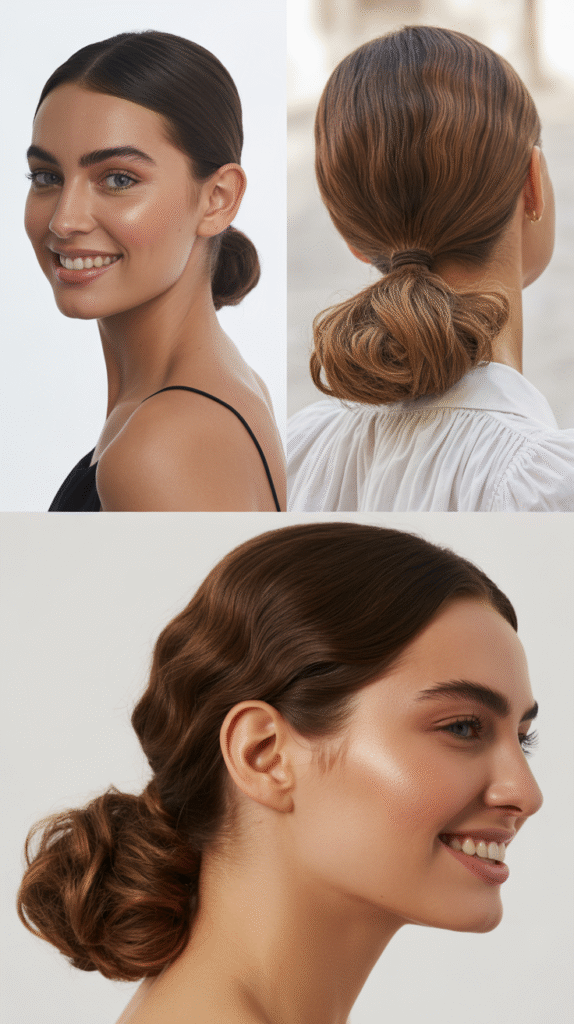
11. The Low Bun with Side Part
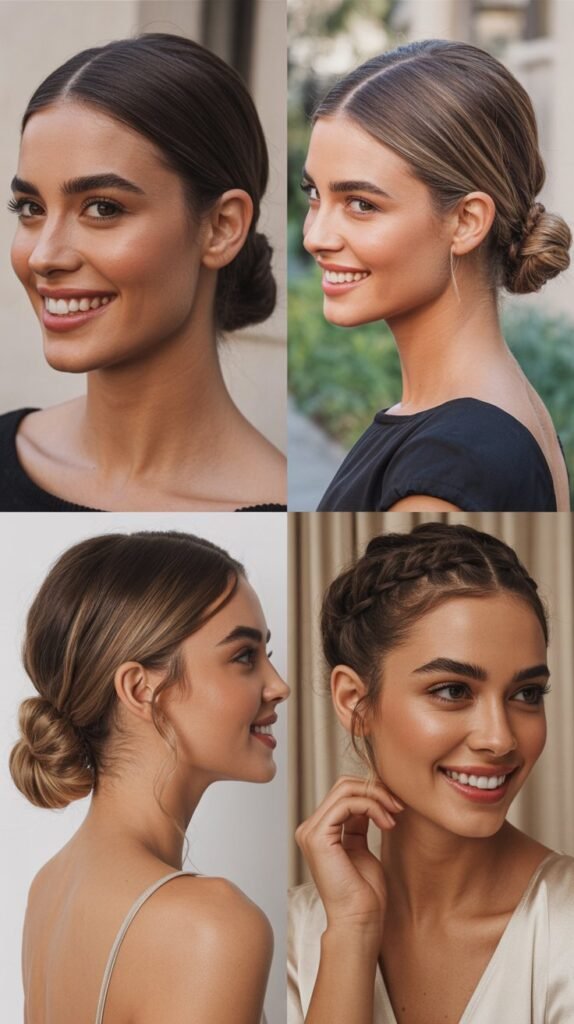
This elegant low bun offers sophistication and works perfectly for both casual and professional settings without requiring complicated techniques.
- Create a deep side part on your preferred side using a comb for precision
- Gather all your hair at the nape of your neck, keeping the part intact
- Twist the gathered hair into a rope and coil it around itself to form a bun
- Secure the bun with bobby pins inserted in multiple directions for stability
- Smooth any flyaways with a light hairspray or styling cream
- The side part adds visual interest and asymmetry that elevates a simple bun
- This style keeps hair completely controlled during childcare activities while maintaining a polished appearance
12. The Scarf-Wrapped Ponytail
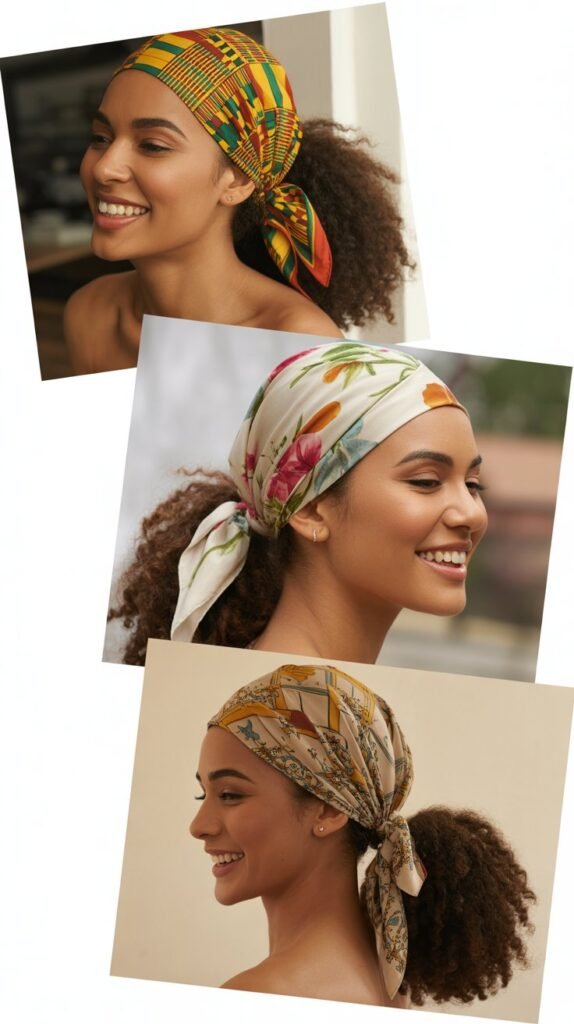
Transform a basic ponytail into something special by incorporating a colorful scarf for instant style with minimal effort.
- Create a ponytail at your desired height—low, mid, or high depending on your preference
- Fold a long rectangular scarf lengthwise into a thin band
- Wrap the scarf around the base of the ponytail and tie it in a knot to secure
- Continue wrapping the scarf down the length of the ponytail in a spiral pattern
- Tie off the scarf at the end or leave the tails flowing for added movement
- This technique adds color and personality while disguising hair that needs washing
- Silk or satin scarves add luxury while preventing friction and breakage
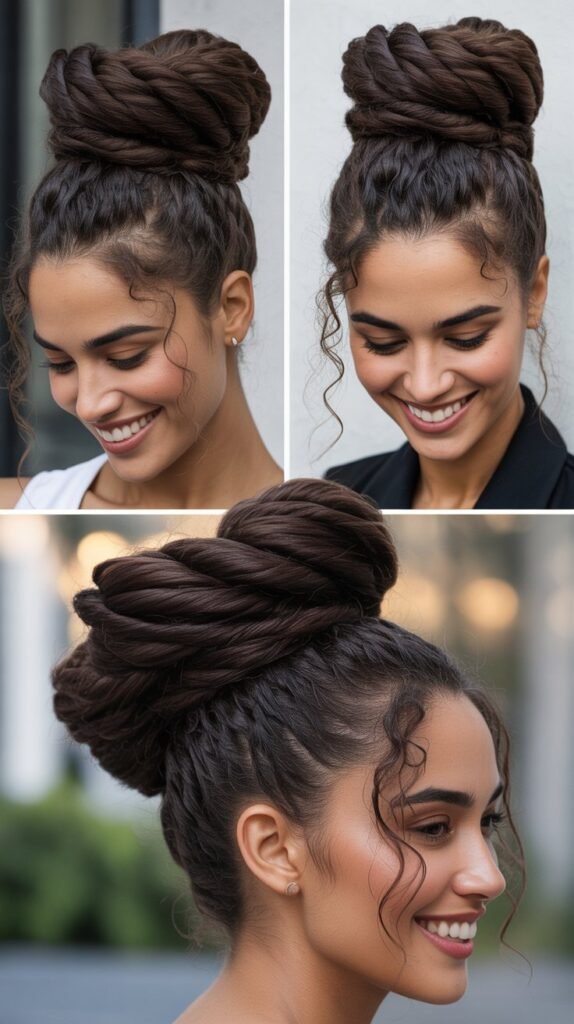
13. The Rope Braid Ponytail
The rope braid offers a fresh alternative to traditional braiding techniques and creates a unique twisted texture down your ponytail.
- Pull your hair into a high or low ponytail and secure with an elastic band
- Divide the ponytail into two equal sections
- Twist each section clockwise individually until the entire length is tightly twisted
- Wrap the two twisted sections around each other in a counterclockwise direction
- The opposing twist directions create a rope effect that naturally holds its shape
- Secure the end with another elastic band to prevent unraveling
- This technique works quickly because you’re only managing two sections instead of three or more
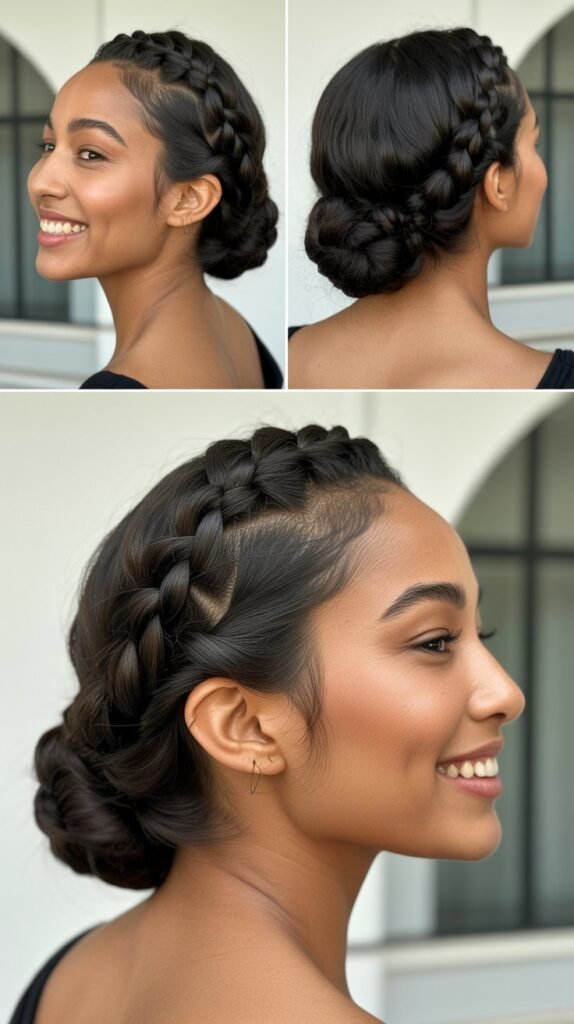
14. The Crown Braid
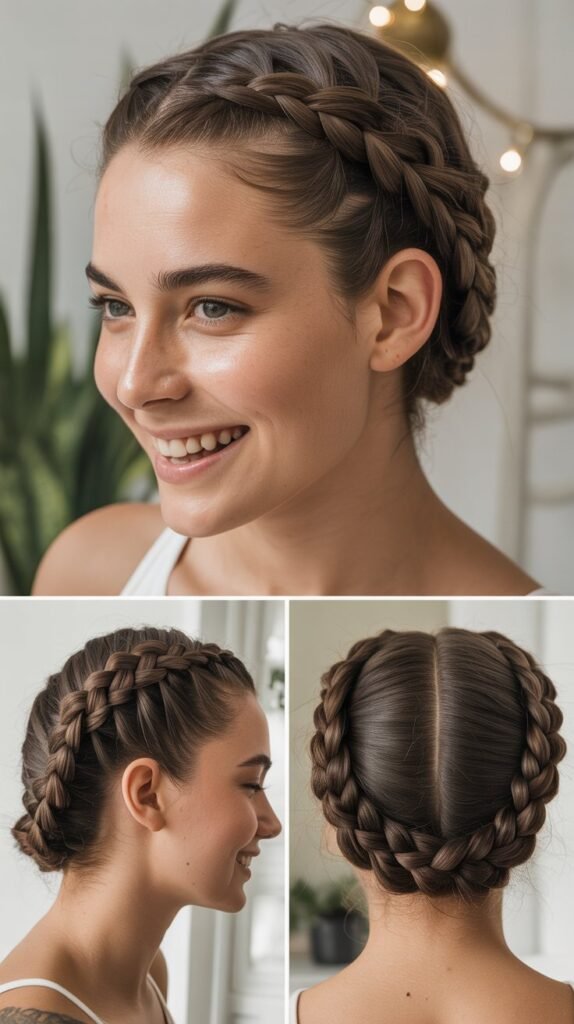
Create a regal look by braiding a section of hair around your head like a crown while leaving the rest flowing freely.
- Take a two-inch section of hair from behind one ear and begin a simple three-strand braid
- Gradually add small pieces of hair from the hairline as you braid toward the opposite ear
- Continue the braid around the back of your head in a curved path that follows your crown
- Secure the braid behind the opposite ear with bobby pins that blend with your hair color
- The remaining hair flows down naturally for a romantic, bohemian appearance
- This style works beautifully for special occasions or when you want something more elaborate than usual
- The crown braid keeps front sections controlled while showing off your hair’s length and texture
15. The Twisted Half-Up Style
Combine elegance with simplicity by creating twisted sections that meet at the back of your head in this quick half-up style.
- Take a two-inch section of hair from one side of your part at temple level
- Twist this section backward toward the crown, keeping it smooth and tight
- Secure the twist temporarily with a small clip while you work on the other side
- Repeat the twisting process on the opposite side, creating symmetrical twists
- Bring both twisted sections together at the back of your head and secure with bobby pins or a small elastic
- Leave the rest of your hair down for a look that’s polished yet relaxed
- This style showcases your hair length while keeping your face completely visible
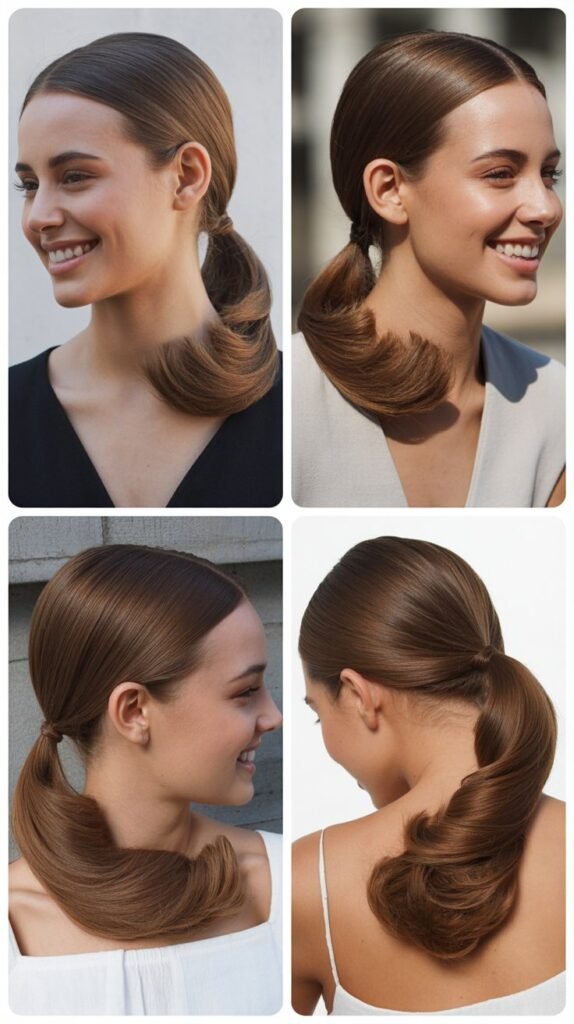
16. The Side-Swept Low Ponytail
Add romance and softness to your look with this asymmetrical ponytail that works for both casual and dressier occasions.
- Create a deep side part and sweep all your hair over one shoulder
- Gather the hair at the base of your neck on the same side as your hair sweep
- Secure with an elastic band, positioning the ponytail to rest on your shoulder
- Take a small section from the ponytail and wrap it around the elastic to conceal it
- Secure the wrapped section underneath with a bobby pin
- This asymmetrical placement adds visual interest and feels more intentional than a centered ponytail
- The style works particularly well with wavy or curly hair texture for added dimension
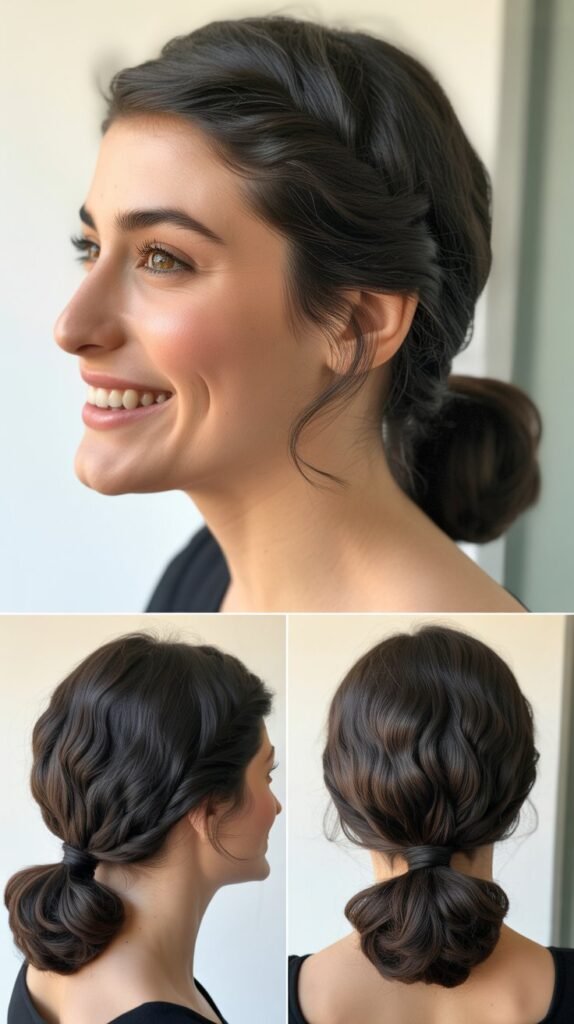
17. The Quick Chignon
This classic French-inspired updo looks sophisticated but comes together in minutes with a simple twisting technique.
- Gather your hair into a low ponytail at the nape of your neck without securing it with an elastic
- Twist the entire ponytail into a tight rope moving in one direction
- Coil the twisted rope around itself at the base, forming a circular bun shape
- Tuck the ends under the chignon and secure the entire style with bobby pins
- Insert pins in an X pattern for maximum hold that lasts through busy activities
- The chignon sits elegantly at the nape and works beautifully for professional settings or evening events
- This style keeps hair completely controlled without the bulk of a higher bun
18. The Braided Ponytail
Combine two classic styles into one by incorporating a braid into your ponytail for added texture and visual interest.
- Create a standard high or low ponytail and secure it with a strong elastic band
- Divide the ponytail into three equal sections starting from the base
- Create a simple three-strand braid down the entire length of the ponytail
- Secure the end of the braid with another elastic band
- Gently pull on the braid’s outer edges to create a fuller, more voluminous appearance
- This style prevents the ponytail from becoming tangled throughout active days
- The braided texture makes thin hair appear significantly thicker and fuller
19. The Tucked-In Ponytail
Create the illusion of a bob without cutting your hair by tucking your ponytail under itself for a faux short hairstyle.
- Create a low ponytail at the nape of your neck and secure it with an elastic
- Fold the ponytail upward and tuck it under itself toward your scalp
- Pin the folded ponytail in place against your head using multiple bobby pins
- Arrange the ends so they’re hidden completely underneath for a polished appearance
- This style gives you a fresh short-hair look while keeping your length intact
- The tucked style feels lighter and cooler during warm weather or physical activity
- You can adjust the height of where you tuck for different bob lengths
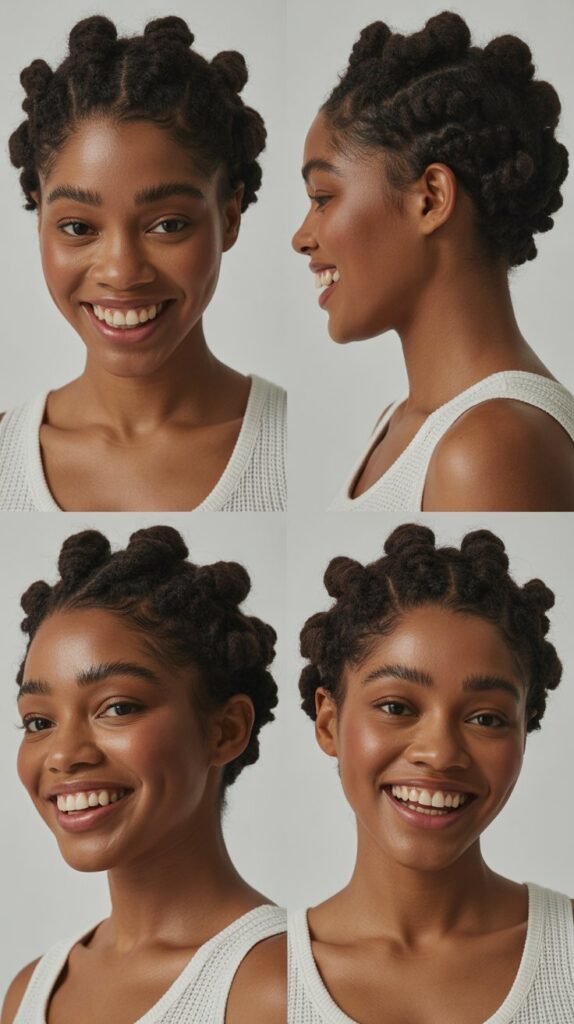
20. The Double Twisted Bun
Create visual interest by forming two small buns side by side for a playful yet polished appearance that’s unexpectedly easy.
- Part your hair down the middle from forehead to nape, creating two equal sections
- Gather one section into a ponytail at your desired height and secure with an elastic
- Twist the ponytail and wrap it around the base to create a small bun, securing with bobby pins
- Repeat the exact process on the other side, matching the height and size of the first bun
- The symmetrical buns create a youthful, fun look that’s perfect for casual days
- This style keeps all hair completely secured and works exceptionally well for active pursuits
- You can position the buns high for a playful look or low for something more sophisticated
21. The Knotted Ponytail
Add an unexpected detail to your ponytail by literally tying your hair in a knot for a unique style element.
- Divide your hair into two equal sections as if you’re creating pigtails
- Tie these two sections together in a single overhand knot at your desired ponytail position
- After tying the knot, gather all the hair together below it and secure with an elastic band
- Gently adjust the knot to make it prominent and visible as a style feature
- This technique creates a three-dimensional element that makes a basic ponytail extraordinary
- The knot holds surprisingly well and adds architectural interest to your hairstyle
- You can create multiple knots down the length if your hair is long enough
22. The Wrapped Low Bun
Elevate a simple low bun by wrapping sections of hair around it for added dimension and sophistication.
- Gather your hair into a low ponytail and secure it with an elastic band
- Before creating the bun, separate out a one-inch section from the ponytail
- Twist the remaining ponytail and wrap it into a bun shape, securing with bobby pins
- Take the separated section and wrap it around the outside of the bun horizontally
- Tuck the ends underneath and secure with additional bobby pins for a seamless finish
- The wrapped detail creates the illusion of a more complex style while taking minimal extra time
- This works beautifully for occasions when you need to look more polished than usual
23. The Pull-Through Braid
Create the appearance of an intricate braid without actually braiding—this illusion technique looks complex but couldn’t be simpler.
- Create a ponytail at your crown and secure it with a clear elastic band
- Place another elastic a few inches down from the first one
- Split the section between the two elastics in half and pull the hair above the second elastic through this opening
- Add another elastic a few inches below and repeat the splitting and pulling-through process
- Continue this pattern down the length of your hair until you reach the ends
- Gently pull on each section to create volume and the appearance of a traditional braid
- This technique works faster than actual braiding and creates impressive dimension
24. The Twisted Crown
Frame your face beautifully by creating twisted sections that wrap around your head like a natural crown or halo.
- Take a two-inch section of hair from one side near your temple
- Twist this section backward toward the crown, keeping tension even throughout
- Secure the twist at the back center of your head with bobby pins
- Repeat on the opposite side, bringing that twisted section to meet the first one
- Cross the twists over each other and secure them together with additional pins
- Leave the remaining hair flowing down for a romantic, feminine appearance
- This style keeps hair off your face while showcasing length and works for all textures
25. The Side Fishtail Braid
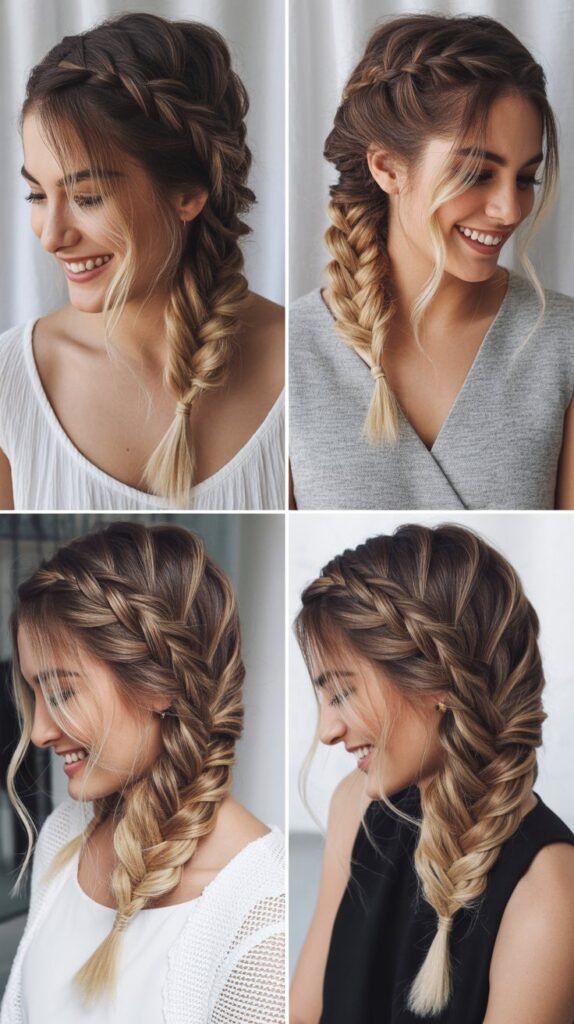
The fishtail braid looks intricate and impressive but is surprisingly simple once you understand the basic two-section technique.
- Sweep all your hair over one shoulder to your preferred side
- Divide the hair into two large equal sections instead of three
- Take a thin strand from the outer edge of the left section and cross it over to join the right section
- Take a thin strand from the outer edge of the right section and cross it over to join the left section
- Continue alternating sides, taking thin outer strands and crossing them to the opposite section
- The smaller the strands you take, the more intricate and detailed the braid will appear
- Secure the end with an elastic and gently pull on the braid’s edges to create a fuller look
26. The Accessorized Bun
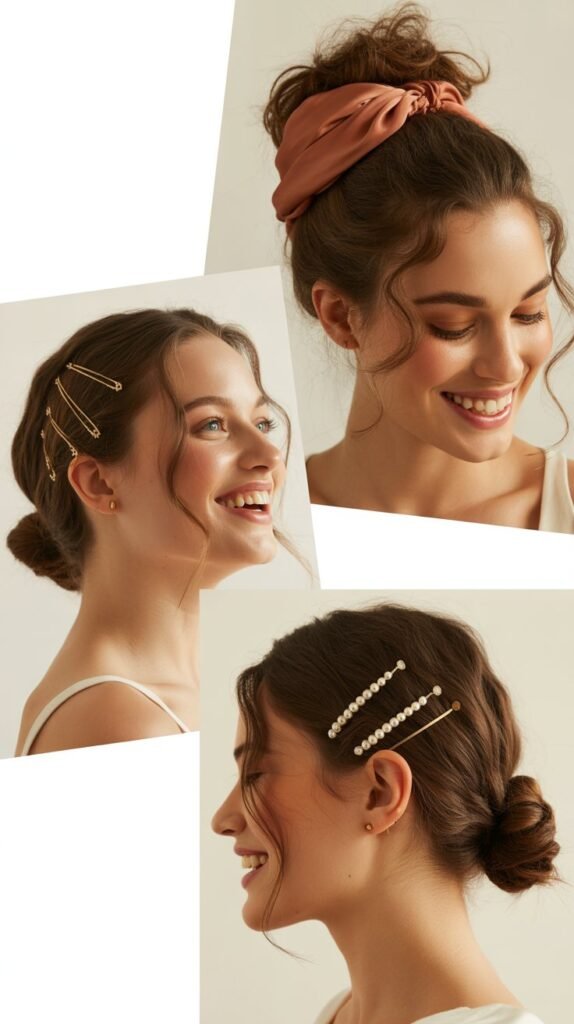
Transform a basic bun into something special by incorporating decorative accessories that add personality and style.
- Create your preferred bun style—messy, sleek, high, or low depending on your mood
- Choose an accessory such as a decorative hair stick, ornamental comb, or statement clip
- Insert the accessory into the bun at an angle that showcases its design
- For hair sticks, weave them through the bun for both decoration and additional security
- Decorative combs can be inserted at the base of the bun for a vintage-inspired look
- Statement clips work beautifully positioned on the side of the bun
- Accessories elevate an everyday style to something special without requiring additional time
27. The Low Ponytail with Volume
Add height and dimension to a basic low ponytail by creating volume at the crown for a more polished appearance.
- Tease the hair at your crown gently with a comb to create lift and volume
- Smooth the top layer of hair over the teased section to hide any visible texture
- Gather all your hair into a low ponytail at the nape of your neck
- Secure with an elastic band while maintaining the volume you created at the crown
- Take a small section from the ponytail and wrap it around the elastic to conceal it
- This technique prevents the flat, severe appearance that sometimes comes with slicked-back ponytails
- The added volume creates a more flattering silhouette and balances facial features
28. The Criss-Cross Ponytail
Add an interesting detail to your ponytail by creating a criss-cross pattern with sections of hair from the base.
- Create a regular high or low ponytail and secure it with an elastic band
- Take a small section from one side of the ponytail base
- Wrap this section diagonally across the elastic and secure it underneath with a bobby pin
- Take another small section from the opposite side of the ponytail
- Cross this section over the first one, creating an X pattern, and pin it underneath
- Continue alternating sides if desired to create multiple criss-crosses down the ponytail
- This decorative technique disguises the elastic while adding visual complexity
29. The Half-Up Braided Crown
Combine the practicality of half-up styling with the beauty of a braided crown for a look that’s both functional and feminine.
- Take a section of hair from behind one ear and create a simple three-strand braid
- Bring the braid across the top of your head like a headband toward the opposite ear
- Secure the braid with bobby pins that match your hair color, hiding the ends underneath
- Leave the rest of your hair flowing down naturally
- This style keeps front sections controlled while allowing you to show off your hair’s length
- The braided crown adds texture and interest to otherwise simple half-up styling
- You can make the braid tight for a sleek look or loosen it for a more relaxed appearance
30. The Sock Bun
Create a perfectly shaped, voluminous bun using an old sock as a shaping tool—this technique ensures a professional-looking result every time.
- Cut the toe off a clean sock and roll it into a donut shape
- Pull your hair into a high ponytail and slide the sock donut over the ponytail to the base
- Spread your hair evenly around the sock donut to completely cover it
- Tuck the ends of your hair under the donut and roll it down toward your head
- As you roll, the hair wraps around the sock, creating a perfectly shaped bun
- Secure the bun with bobby pins around the edges for extra hold
- This technique creates volume even for those with fine or thin hair
31. The Twisted Side Bun
Position your bun asymmetrically for a romantic, elegant look that feels more special than a centered style.
- Gather all your hair to one side at the level where you want your bun positioned
- Secure the hair with an elastic band to create a side ponytail
- Twist the ponytail tightly and wrap it around the base in a circular motion
- Tuck any loose ends underneath the bun and secure everything with bobby pins
- The side placement creates visual interest and prevents the bun from interfering with headrests in the car
- This style showcases one side of your face while keeping hair completely controlled
- The twisted texture adds dimension and prevents the bun from looking too flat
32. The Looped Ponytail
Create the illusion of a fuller, more voluminous ponytail by looping it through on itself in this clever styling trick.
- Create a ponytail at your desired height and secure it with an elastic band
- When pulling your hair through the elastic on the final pass, don’t pull it all the way through
- Leave a loop of hair with the ends still pulled partially through the elastic
- Arrange the loop and the ends to create the appearance of more volume and fullness
- Gently separate and fluff the loop to make it appear intentionally styled
- This technique makes thin ponytails appear significantly thicker and more substantial
- The style holds well throughout the day and requires only a single elastic
33. The Braided Low Bun
Combine braiding and bun techniques for a textured updo that looks far more complicated than it actually is.
- Create a low ponytail at the nape of your neck and secure with an elastic
- Braid the entire length of the ponytail using a simple three-strand technique
- Secure the end of the braid with another elastic band
- Wrap the braid around the base of the ponytail in a circular motion to form a bun
- Tuck the end of the braid underneath and secure the entire bun with bobby pins
- The braid adds texture and interest that prevents the bun from looking too plain
- This style works beautifully for both casual and more formal occasions
34. The Voluminous Half-Up
Create height and drama by teasing the crown before securing a half-up style that maintains fullness throughout the day.
- Section off the top portion of your hair from ear to ear across the crown
- Gently tease this section at the roots to create volume and lift
- Smooth the top layer of the teased section to hide any visible texture
- Gather the teased section and secure it at the back of your head with an elastic or clip
- Leave the bottom half of your hair flowing down naturally
- This style adds height that’s particularly flattering for round or heart-shaped faces
- The volume makes fine hair appear significantly thicker and fuller
35. The Sleek Low Ponytail
Achieve a polished, professional look with a smooth, sleek low ponytail that exudes sophistication
Conclusion
“These 35 easy hairstyles for moms with long hair prove that looking stylish doesn’t have to be time-consuming.
Whether you’re running errands, attending school events, or enjoying a busy day at work, these quick and simple hairstyles offer effortless elegance and practicality.
With just a few minutes and minimal tools, you can feel confident, polished, and ready to take on your day without sacrificing style.”
