Being a mom means juggling countless responsibilities while still wanting to feel beautiful and put-together.
If you’re blessed with curly hair, you already have a gorgeous texture that can be transformed into stunning styles with minimal effort.
This comprehensive guide on “35 Cute and Easy Curly Hairstyles for Moms You Can Do at Home” will walk you through quick, practical, and adorable hairstyles that work perfectly for busy mornings, school runs, work meetings, or date nights.
Whether you have loose waves, tight coils, or anything in between, these hairstyles are designed to save you time while keeping you looking fabulous.
From simple updos to creative braids and elegant buns, you’ll discover styles that take minutes to create but look like you spent hours at the salon.
Each style is mom-tested and approved for durability, meaning they’ll hold up through playground adventures, grocery shopping, and everything else your day throws at you.
Get ready to fall in love with your curls all over again and build a rotation of go-to styles that make your morning routine effortless and enjoyable.
1. The Classic High Puff

The high puff is a timeless style that celebrates your natural curl pattern while keeping hair away from your face.
This versatile look works for any occasion and takes less than five minutes to create, making it perfect for those hectic mornings when you’re rushing to get everyone ready.
- Gather all your curls at the crown of your head using your fingers to smooth the sides gently.
- Secure with a fabric-covered elastic band that won’t damage your curls or cause breakage.
- Fluff out the puff by gently pulling and separating curls to create maximum volume and definition.
- Use a light holding spray to tame any flyaways around the hairline without weighing down your curls.
- This style works beautifully on second or third-day hair when your curls have natural volume.
2. Messy Curly Bun

The messy bun is every mom’s best friend when you need to look effortlessly chic in under three minutes.
This relaxed style embraces the natural texture of your curls and gives you a casual yet polished appearance that transitions seamlessly from morning carpool to evening activities.
- Flip your head upside down and gather your curls into a high ponytail without worrying about perfection.
- Twist the ponytail loosely and wrap it around the base to form a bun shape.
- Secure with bobby pins inserted in different directions for maximum hold throughout your busy day.
- Pull out a few face-framing curls to soften the look and add dimension.
- Leave some curls loose at the nape of your neck for a romantic, undone aesthetic.
- This style actually looks better when it’s not perfectly neat, so embrace the imperfections.
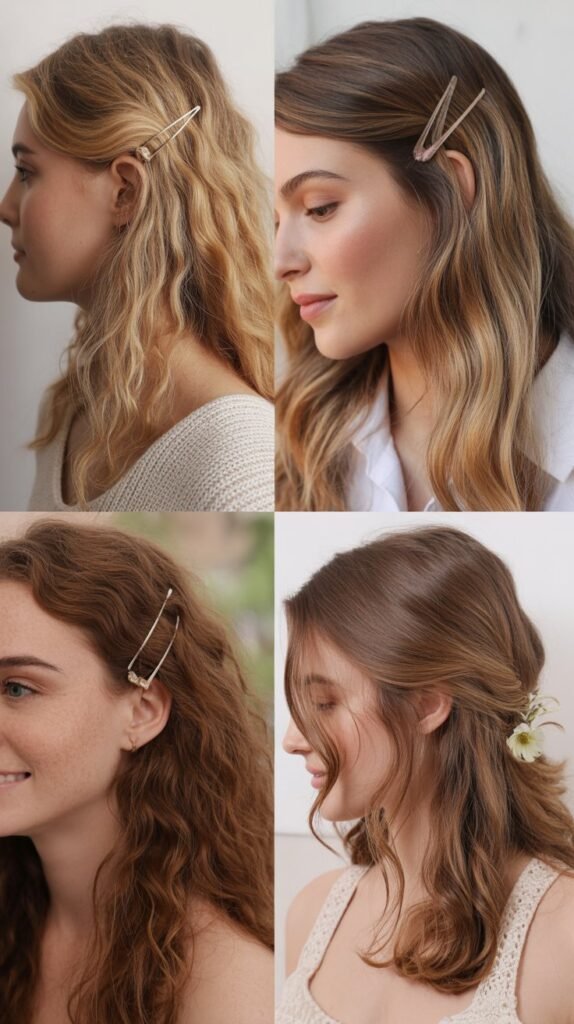
3. Side-Swept Curls

Side-swept curls offer an elegant solution when you want to showcase your curl pattern while keeping one side neat and controlled.
This asymmetrical style adds sophistication to your look and works wonderfully for both casual outings and more formal occasions.
- Create a deep side part that extends from your hairline to the crown of your head.
- Take the smaller section of hair and sweep it behind your ear on one side.
- Secure the swept side with decorative bobby pins or small clips that complement your style.
- Allow the majority of your curls to fall over the opposite shoulder for dramatic effect.
- Apply a curl-defining cream to enhance the natural pattern and add shine to your curls.
- This style is particularly flattering for moms with medium to long curly hair.
4. Double Twisted Crown

The double twisted crown creates a beautiful halo effect that keeps hair off your face while maintaining a feminine, romantic appearance.
This style combines practicality with elegance and is surprisingly simple to achieve once you master the basic twisting technique.
- Part your hair down the middle from forehead to crown to create two equal sections.
- Take a small section of hair near your temple on one side and begin twisting it backward.
- Continue adding small amounts of hair to the twist as you work your way around toward the back.
- Repeat the same process on the other side, creating symmetrical twists that meet at the back.
- Secure both twists together with bobby pins where they meet, hiding the ends underneath.
- Leave the remaining curls flowing freely down your back for a soft, feminine finish.
- This style works exceptionally well for special occasions or when you want to feel extra pretty.
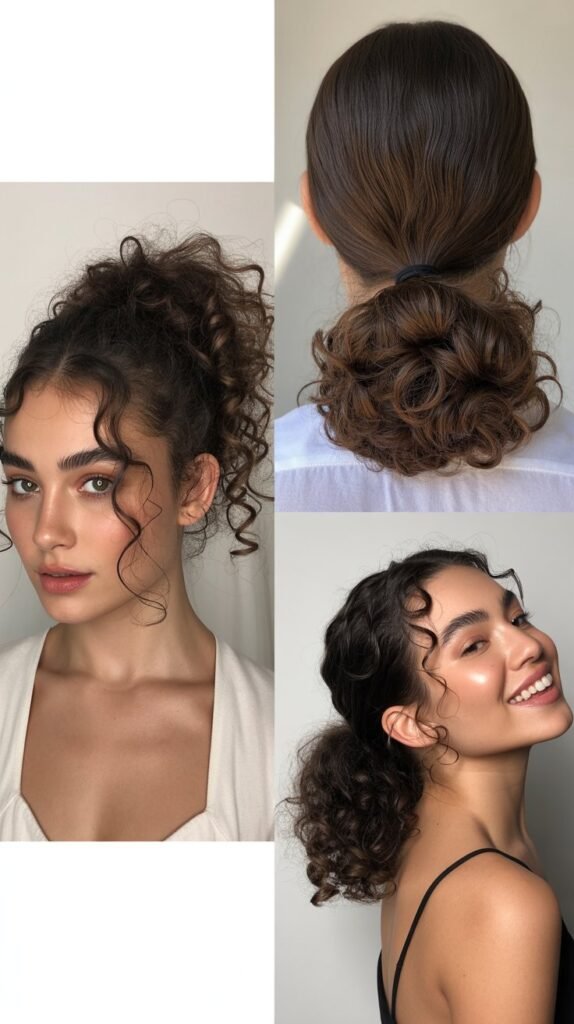
5. Low Curly Ponytail
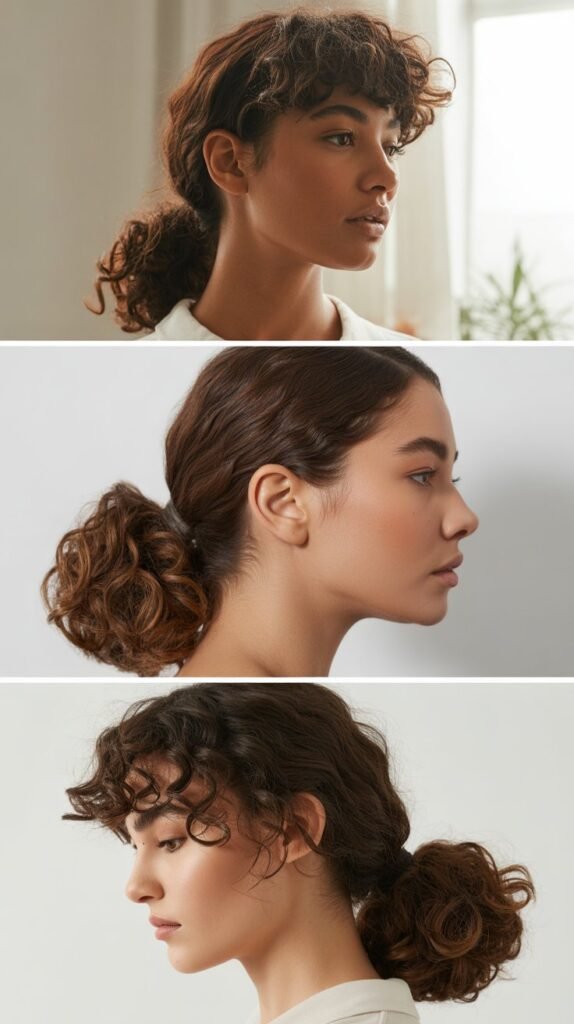
The low curly ponytail offers a sophisticated alternative to the high ponytail and creates an elegant silhouette that flatters most face shapes.
This refined style is perfect for professional settings or when you need a polished look that still celebrates your natural texture.
- Smooth your hair back gently with your fingers or a wide-tooth comb to avoid disrupting curl pattern.
- Gather all your curls at the nape of your neck, positioning the ponytail at the base of your skull.
- Secure with a strong elastic band that can support the weight of your curls without slipping.
- Take a small section of hair from the ponytail and wrap it around the elastic to conceal it.
- Pin the wrapped section underneath the ponytail with a bobby pin for a seamless finish.
- Pull out a few wisps around your hairline to soften the look and frame your face beautifully.
6. Half-Up Half-Down with Twist

The half-up half-down style strikes the perfect balance between controlled and free-flowing, making it ideal for moms who want their hair out of their face but still visible.
Adding a twist element elevates this classic style and gives it a more sophisticated appearance.
- Section off the top half of your hair from ear to ear, leaving the bottom section loose.
- Divide the top section into two parts and twist each section backward toward the crown.
- Cross the two twisted sections at the back of your head and secure with bobby pins.
- Allow the remaining curls to cascade down freely, maintaining their natural bounce and definition.
- Gently pull on the twisted sections to create volume and a slightly loosened effect.
- This style is incredibly versatile and transitions easily from day to night activities.
- Add decorative pins or a small barrette at the crossing point for extra visual interest.
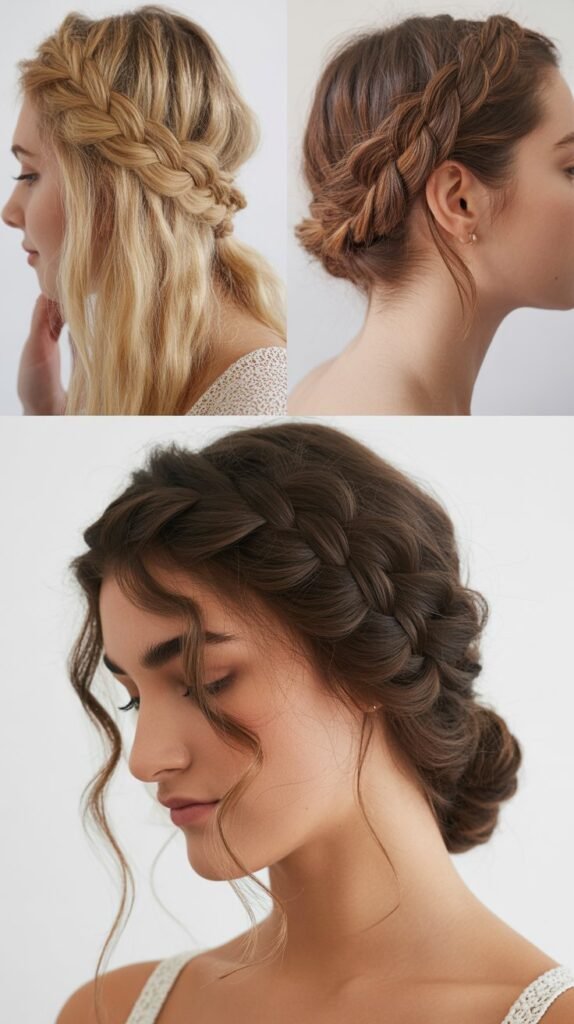
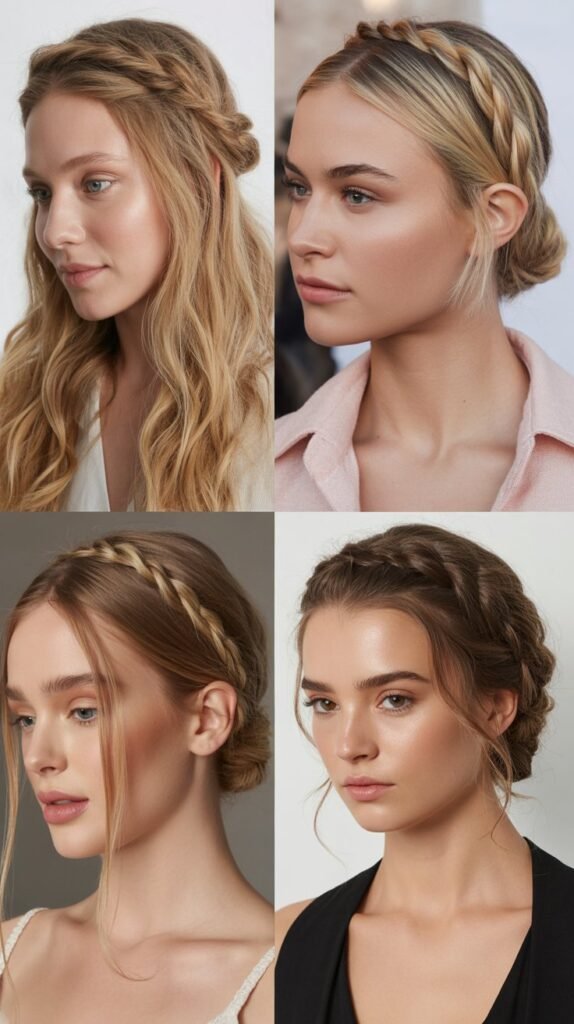
7. Braided Headband Style
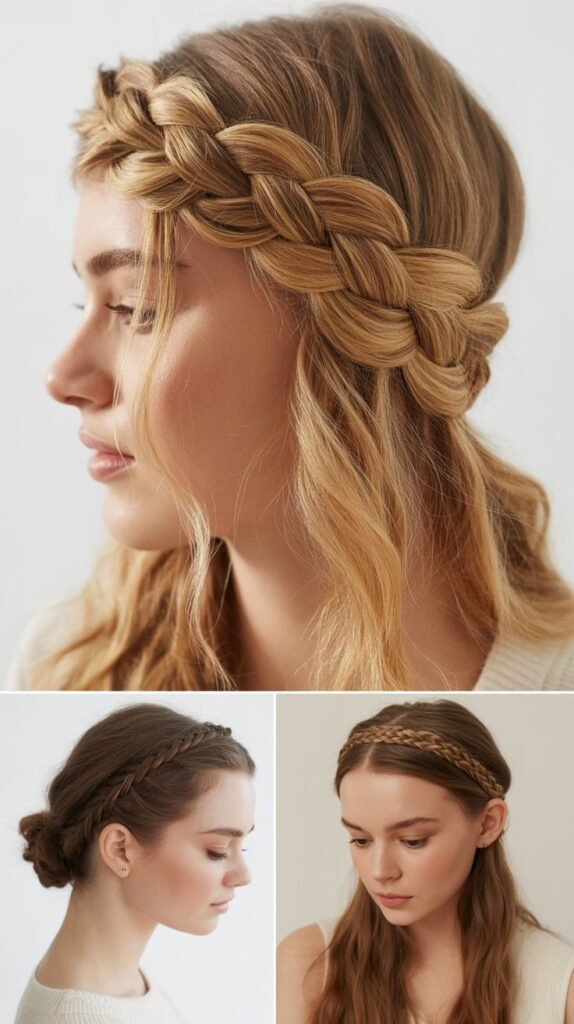
The braided headband creates a beautiful frame for your face while incorporating your natural curls into a functional accessory.
This bohemian-inspired look is perfect for keeping hair controlled during active days while maintaining a stylish, put-together appearance.
- Take a section of hair from behind one ear and divide it into three equal parts.
- Create a regular three-strand braid working across your hairline toward the opposite ear.
- Keep the braid relatively tight to ensure it stays in place throughout your busy day.
- Secure the end of the braid behind your opposite ear with bobby pins that match your hair color.
- Allow all remaining curls to flow naturally, creating a beautiful contrast with the structured braid.
- This style works particularly well when you’re growing out bangs or dealing with shorter layers around your face.
8. Pineapple Updo

The pineapple updo is a protective style favorite that maintains curl integrity while creating a fun, youthful appearance.
Named for its resemblance to a pineapple top, this style is especially popular for preserving curls overnight but works beautifully as a daytime look as well.
- Bend forward and gather all your curls at the very top of your head as if creating a unicorn horn placement.
- Use a silk or satin scrunchie to secure the ponytail loosely without creating a crease in your curls.
- Don’t pull the curls all the way through on the last wrap, leaving them in a looped position.
- Adjust the curls around the base to create a fountain effect that cascades in all directions.
- This style minimizes manipulation of your curl pattern and helps maintain definition between wash days.
- The pineapple works best on medium to long curly hair with enough length to reach the crown.
9. Side Braid with Loose Curls

Combining a single side braid with loose flowing curls creates dimension and visual interest while keeping your style manageable.
This romantic look is perfect for date nights, special occasions, or when you simply want to feel feminine and beautiful without much effort.
- Create a deep side part and section off a portion of hair on the heavier side near your temple.
- Braid this section using a traditional three-strand technique, working downward toward your shoulder.
- Keep the braid slightly loose to maintain a relaxed, effortless vibe that complements your curls.
- Secure the end of the braid with a small elastic that matches your hair color.
- Leave all remaining curls loose and flowing on both sides for a soft, balanced appearance.
- Gently pancake the braid by pulling on the outer edges to create width and texture.
10. Top Knot Bun

The top knot bun is a sleek and stylish option that keeps all your curls contained while creating a bold, confident look.
This high-impact style is perfect for workouts, cleaning days, or when you need your hair completely off your neck and shoulders.
- Gather all your hair at the highest point of your head, smoothing sides with water or gel if needed.
- Twist the entire ponytail tightly as you wrap it in a circular motion around the base.
- Tuck the ends underneath the bun and secure with multiple bobby pins inserted at various angles.
- Use an elastic headband to smooth any flyaways around your hairline for a polished finish.
- This style works exceptionally well for high-intensity activities because it keeps hair completely secure.
- The top knot elongates the neck and creates a sophisticated silhouette that looks intentional and chic.
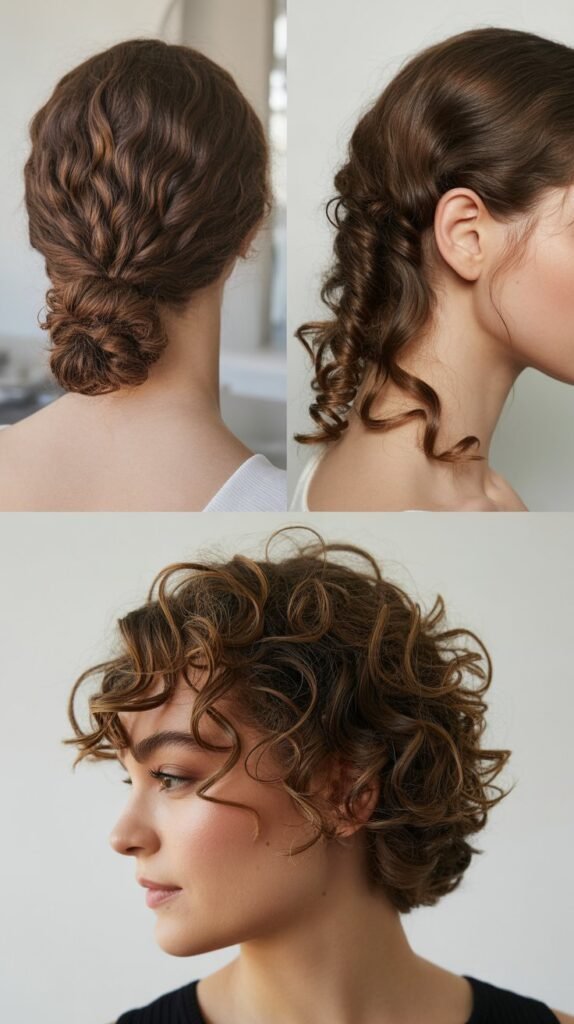
11. Curly Faux Hawk

The curly faux hawk brings an edgy, modern twist to traditional mom hairstyles and shows off your adventurous side.
This bold style uses your natural volume to create height down the center while keeping the sides controlled and sleek.
- Apply gel or mousse to the sides of your hair and use a brush or comb to smooth them back toward your ears.
- Pin the smoothed sides down with bobby pins placed vertically along the curve of your head.
- Encourage maximum volume in the center section by fluffing and lifting curls at the roots.
- Use your fingers to arrange the center curls into an elevated mohawk shape running from forehead to crown.
- This style makes a statement and works best when you’re feeling confident and want to try something different.
- The faux hawk is surprisingly versatile and can be dressed up or down depending on your outfit and occasion.
12. Twisted Low Bun
The twisted low bun exudes elegance and sophistication while being remarkably simple to create with curly hair.
This classic updo is perfect for formal events, professional meetings, or any time you want to project polish and refinement.
- Divide your hair into two equal sections down the middle from crown to nape.
- Twist each section individually in the same direction, keeping the twists relatively tight for structure.
- Cross the two twisted sections over each other at the nape of your neck to create an X shape.
- Wrap both twisted sections together into a bun formation, tucking ends underneath neatly.
- Secure with bobby pins placed around the perimeter and through the center for maximum stability.
- This style stays put for hours and maintains its shape even through long, busy days.
- Add decorative hairpins or a small brooch at the base for extra elegance during special occasions.
13. Curly Space Buns

Space buns bring playful, youthful energy to your look and are surprisingly practical for keeping curls contained.
This fun style has made a major comeback and works beautifully with naturally curly hair, showcasing your texture in a creative way.
- Part your hair down the middle from forehead all the way to the nape of your neck.
- Create a high ponytail on each side of the part, positioning them symmetrically above your ears.
- Twist each ponytail and wrap it around its base in a circular motion to form rounded buns.
- Secure each bun with bobby pins inserted through the center and around the edges.
- Pull out a few face-framing curls on each side to soften the look and prevent it from appearing too severe.
- This style is perfect for theme parks, festivals, or days when you want to embrace your playful side.
14. One-Sided Updo
The one-sided updo creates asymmetry and drama by sweeping all your curls to one side and pinning them up.
This red-carpet-worthy style looks complex but comes together quickly once you understand the basic technique.
- Create a deep side part that extends all the way to the back of your head.
- Sweep all your curls over to one side, allowing them to cascade over one shoulder.
- Begin pinning curls up on that side using bobby pins in a random, organic pattern.
- Continue pinning until you’ve created a textured, voluminous updo concentrated on one side.
- The opposite side should remain smooth and sleek, creating a beautiful contrast with the textured side.
- Use hairspray to set the style and ensure it holds for the duration of your event.
15. Bandana-Wrapped Curls

Incorporating a bandana or scarf into your curly hairstyle adds color, personality, and vintage charm while serving a functional purpose.
This retro-inspired look is perfect for bad hair days or when you want to add a pop of pattern to your outfit.
- Fold a square bandana or scarf into a long strip approximately three inches wide.
- Place the center of the bandana at the nape of your neck with curls flowing freely.
- Bring both ends of the bandana forward around your hairline, crossing them at your forehead.
- Tie the bandana at the top of your head in a knot or bow, adjusting the placement as desired.
- Allow your curls to fountain out from the top of the bandana for maximum volume and drama.
- This style works well with both subtle and bold patterns depending on your personal style and outfit.
- Bandanas also help protect your edges and can absorb sweat during warm weather or workouts.
16. Curly Ponytail with Wrapped Base
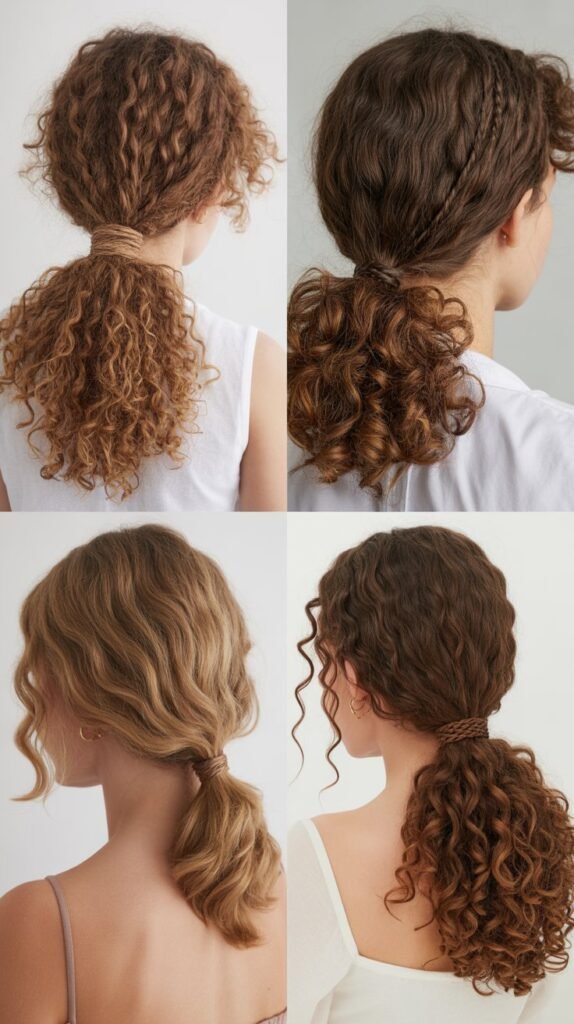
Elevating a simple ponytail by wrapping the base with your own hair creates a polished, finished look.
This small detail makes a significant difference in the overall appearance and shows attention to style even when you’re short on time.
- Gather your curls into a ponytail at your desired height, whether high, mid, or low.
- Secure firmly with a strong elastic band that can support the weight of your curls.
- Take a small section of hair from underneath the ponytail and wrap it around the elastic band.
- Continue wrapping until the elastic is completely concealed and the appearance is seamless.
- Secure the wrapped section with a bobby pin tucked underneath where it won’t be visible.
- This technique works at any ponytail height and instantly elevates the sophistication of the style.
17. Crown Braid with Loose Curls
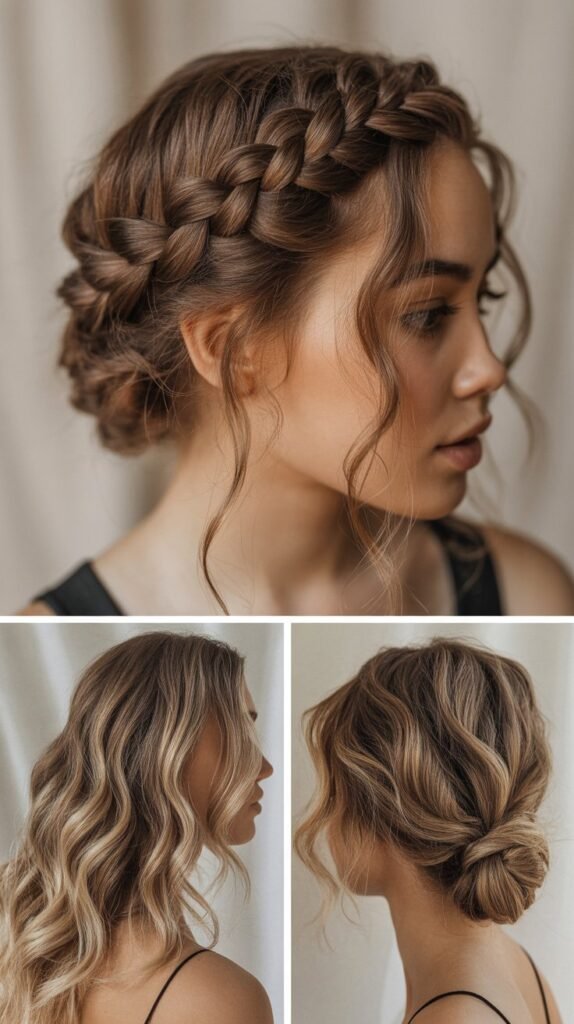
The crown braid creates a beautiful halo effect around your head while allowing your curls to flow freely beneath.
This ethereal style is perfect for special occasions, weddings, or when you want to feel like royalty going about your daily mom duties.
- Section off a band of hair around your head from temple to temple across the crown.
- Begin braiding at one temple, working across the front of your head toward the opposite side.
- Continue the braid around the back of your head to create a complete circle or crown effect.
- Secure the end of the braid by tucking it underneath and pinning it at your starting point.
- Gently pull on the outer edges of the braid to create width and a more relaxed appearance.
- Allow all remaining curls beneath the crown braid to flow naturally for a romantic, flowing effect.
- This style stays secure while still looking soft and feminine throughout the day.
18. Twisted Side Ponytail
The twisted side ponytail adds an unexpected twist to a classic style by incorporating texture and asymmetry.
This quick style works beautifully for both casual and dressy occasions and shows off your curls from a flattering angle.
- Create a deep side part and divide your hair into two unequal sections.
- Take the smaller section and twist it tightly backward toward the opposite side of your head.
- Gather the twisted section together with the remaining hair into a low side ponytail.
- Position the ponytail just behind and below your ear on one side of your neck.
- Secure with an elastic band and consider wrapping a small section of hair around the base.
- This style beautifully showcases your curls while keeping them manageable and controlled.
19. Gibson Tuck for Curls

The Gibson tuck is a vintage-inspired style that works surprisingly well with curly hair and creates an elegant, formal appearance.
This tucked style is perfect for weddings, formal dinners, or any occasion where you want to look refined and put-together.
- Create a low ponytail at the nape of your neck, leaving it slightly loose rather than tight to the head.
- Create a small opening in the hair just above the elastic band by separating it with your fingers.
- Flip the ponytail up and through this opening, creating an inside-out effect.
- Continue tucking the ends of your curls up into the opening until they’re completely concealed.
- Secure the tucked section with bobby pins distributed throughout to ensure stability.
- Smooth the top and sides of your hair for a polished finish while the back maintains beautiful texture.
- This style keeps curls completely contained while looking sophisticated and intentional.
20. Diagonal Waterfall Braid

The waterfall braid creates a cascading effect where curls fall through the braid like a waterfall.
This intricate-looking style is actually quite simple once you learn the basic technique and creates a stunning focal point in your hairstyle.
- Begin with a small section of hair near your temple on one side of your head.
- Start a regular three-strand braid but drop the bottom section after each crossover instead of continuing to braid it.
- Pick up a new section of hair to replace the dropped section and continue the braiding pattern.
- Work diagonally across your head from one temple toward the opposite shoulder.
- The dropped sections create the waterfall effect as they cascade down with your curls.
- Secure the end of the braid with a small elastic once you reach your desired ending point.
- This style works best on day-old curls that have some texture and grip.
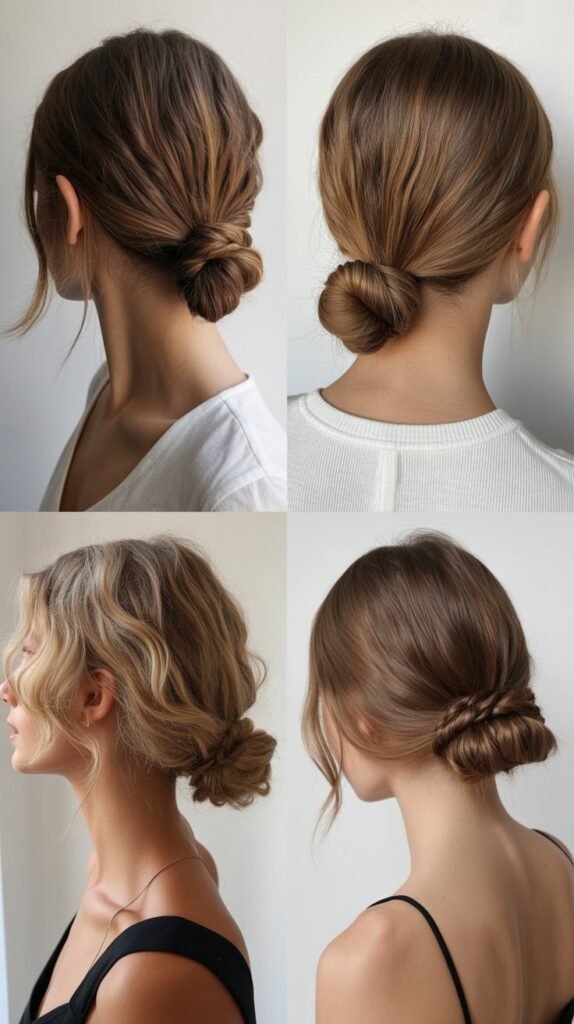
21. Low Rolled Chignon

The low rolled chignon brings classic elegance to curly hair and works beautifully for formal occasions or professional settings.
This sophisticated updo tames your curls into a sleek, controlled style while still showcasing some texture.
- Gather all your hair into a very low ponytail at the nape of your neck.
- Divide the ponytail into two or three sections and twist each section individually.
- Roll the twisted sections horizontally along the nape of your neck, tucking ends underneath.
- Secure the rolled chignon with bobby pins placed horizontally through the roll.
- Use additional pins around the perimeter to ensure the style stays secure throughout the day.
- Apply light hairspray to smooth any flyaways and add shine to the finished style.
- This timeless updo flatters all face shapes and projects professionalism and sophistication.
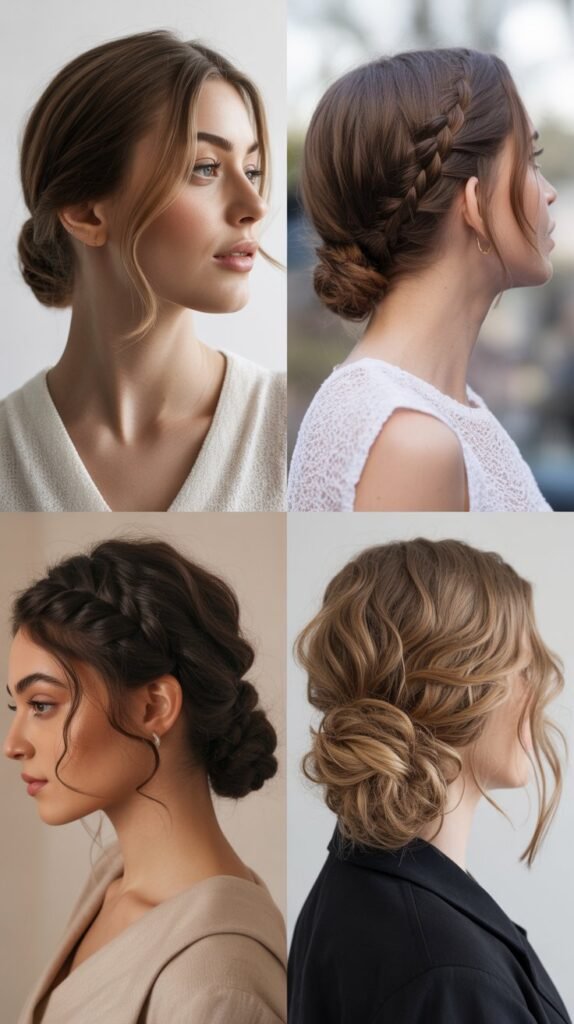
22. Curly Side Swept Low Bun

Combining side-swept styling with a low bun creates romance and elegance while keeping your curls beautifully controlled.
This asymmetrical approach adds visual interest and works wonderfully for evening events or date nights.
- Create a deep side part and brush or finger-comb all hair toward one side of your neck.
- Gather your curls into a low ponytail positioned behind one ear rather than at center back.
- Twist the ponytail and wrap it into a loose bun at this side placement.
- Secure the bun with bobby pins, allowing some curls to remain loose for texture.
- Pull out a few face-framing tendrils on the opposite side to balance the asymmetry.
- This style looks intentionally romantic and works beautifully with dresses and formal attire.
23. Braided Crown Updo
The braided crown updo combines the beauty of braiding with the practicality of an updo, creating a style that’s both functional and stunning.
This intricate-looking style keeps all hair secured while showcasing your styling skills.
- Part your hair down the middle and create two low pigtails behind your ears.
- Braid each pigtail using a traditional three-strand technique all the way to the ends.
- Take one braid and wrap it across the top of your head like a crown or headband.
- Pin this braid securely along its entire length with bobby pins inserted through the braid.
- Take the second braid and wrap it across the back of your head, tucking the end underneath the first braid.
- Secure all loose ends with pins tucked underneath where they won’t be visible.
- This style creates a beautiful frame for your face while keeping all hair completely controlled.
24. Curly High Ponytail with Volume
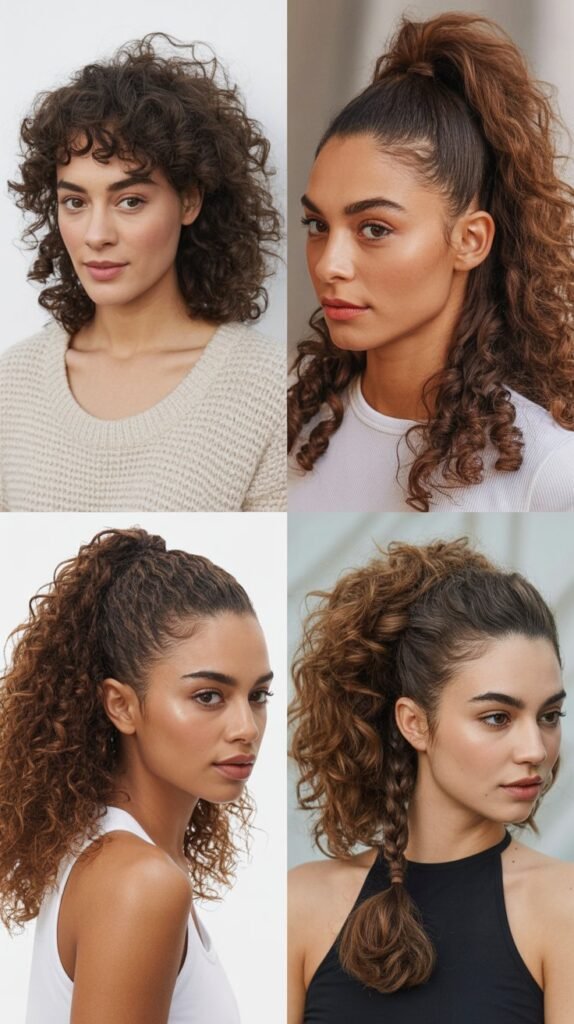
The high ponytail with added volume creates a cheerleader-worthy style that’s both fun and practical.
This energetic look is perfect for workouts, running errands, or any time you want your hair completely off your neck with maximum bounce.
- Tease the crown area gently with a wide-tooth comb to create height at your roots.
- Smooth the top layer of hair back toward your crown while maintaining the teased volume underneath.
- Gather all your hair into a high ponytail at the crown of your head.
- Secure tightly with a strong elastic band that can support the weight of your curls.
- Fluff the ponytail by separating curls with your fingers to maximize fullness and bounce.
- Use a curl-defining cream on the ponytail to enhance definition and control frizz.
- This style showcases your curls while projecting energy, youth, and confidence.
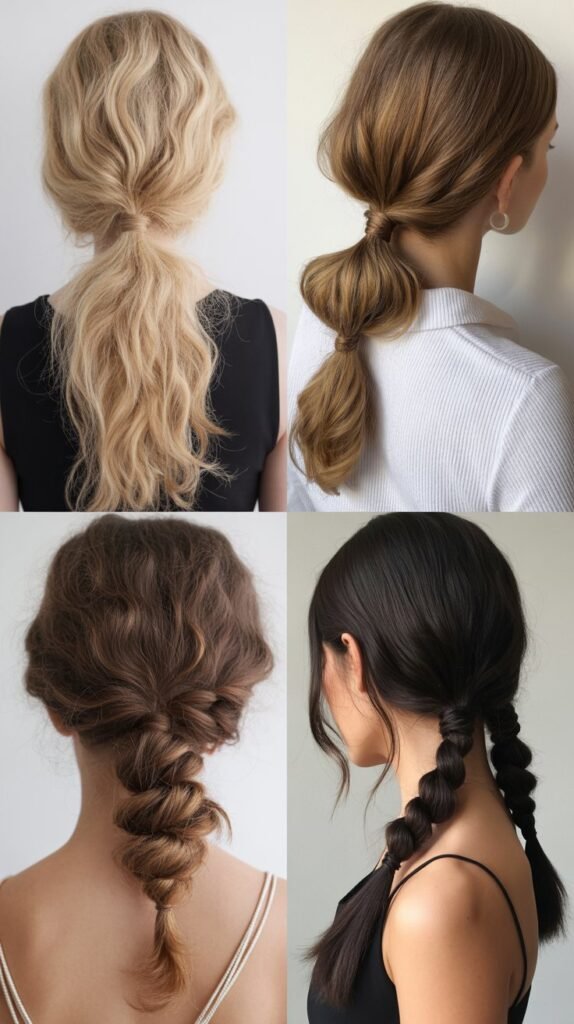
25. Rope Braid Ponytail

The rope braid creates a different texture than traditional three-strand braids and adds visual interest to a simple ponytail.
This twisted technique is actually easier than regular braiding and creates a beautiful spiral effect.
- Create a ponytail at your desired height and secure it with a strong elastic band.
- Divide the ponytail into two equal sections from top to bottom.
- Twist each section individually in the same direction, keeping the twists tight and consistent.
- Cross the two twisted sections over each other in the opposite direction from which you twisted them.
- Continue twisting and crossing until you reach the end of your hair.
- Secure the rope braid with another elastic band and gently pull on the braid to create width.
- This technique works beautifully with curly hair texture and creates a unique spiral appearance.
26. Accessorized Low Bun

Adding accessories to a simple low bun transforms it from basic to beautiful and allows you to express your personal style.
Accessories also serve the practical purpose of adding extra security to your updo while enhancing its visual appeal.
- Gather your curls into a low ponytail at the nape of your neck without pulling too tightly.
- Twist the ponytail and wrap it into a rounded bun shape, securing with bobby pins.
- Add decorative hairpins, a jeweled clip, or a floral accessory to one side of the bun.
- Position accessories strategically to both secure the bun and add visual interest.
- Choose accessories that complement your outfit, jewelry, or the occasion you’re attending.
- This simple addition elevates a basic style into something special and memorable.
- Pearl pins, metallic barrettes, or fresh flowers all work beautifully with curly buns.
27. Half-Pineapple Style
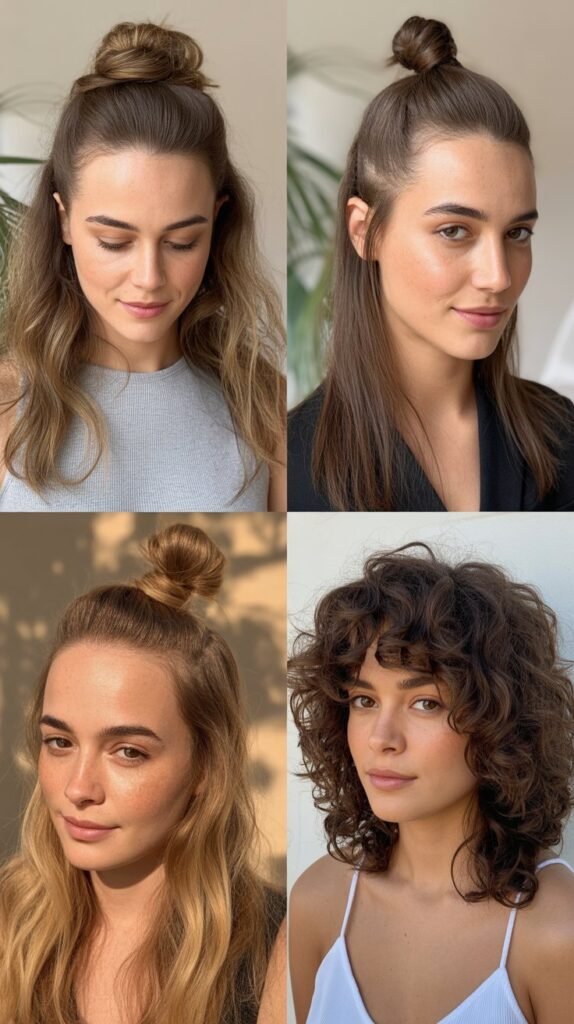
The half-pineapple combines the protection and volume of a full pineapple with the beauty of loose-flowing curls.
This hybrid style is perfect for showcasing your curl pattern while keeping the top portion controlled and lifted.
- Section off the top half of your hair from ear to ear across your crown.
- Gather this top section at the highest point of your head as you would for a full pineapple.
- Secure with a scrunchie or fabric-covered elastic, leaving curls in a fountain formation.
- Allow the bottom section of your curls to flow freely down your back and shoulders.
- This style provides lift and volume at the crown while showcasing length and curl pattern below.
- The half-pineapple works well as a protective overnight style that transitions easily to daytime wear.
28. Twisted Halo Updo
The twisted halo updo creates an angelic crown effect by twisting your hair around the perimeter of your head.
This romantic style keeps all hair secured while creating a soft, feminine appearance perfect for special occasions.
- Part your hair down the center and divide it into two equal sections from front to back.
- Begin twisting one section backward from your hairline, adding hair as you work toward the back.
- Pin the twist along the way to secure it to your head in a halo shape.
- Repeat the process on the other side, working backward to meet the first twist at the back.
- Tuck all ends underneath the twists and secure with pins placed strategically throughout.
- This style creates a beautiful frame around your face while keeping all curls elegantly controlled.
- Add small flowers or decorative pins throughout the halo for extra romantic flair.
29. Bubble Ponytail with Curls
The bubble ponytail adds playful dimension to a traditional ponytail by creating segmented sections.
This trendy style works beautifully with curly hair and is surprisingly easy to create despite its intricate appearance.
- Create a high or mid-level ponytail and secure it with a strong elastic band at the base.
- Add additional elastic bands down the length of the ponytail at regular intervals of two to three inches.
- Gently pull and pancake each section between elastics to create rounded bubble shapes.
- Continue adding elastics and creating bubbles until you reach the end of your ponytail.
- Use colorful elastics that coordinate with your outfit for a fun, playful appearance.
- This style works particularly well for children’s parties, themed events, or when you’re feeling playful.
30. Side-Pinned Waves
Side-pinned waves create elegant movement and showcase your natural curl pattern while keeping one side neatly secured.
This asymmetrical style is perfect for showing off statement earrings or highlighting your facial features from your best angle.
- Create a side part that extends from your hairline back to your crown area.
- Take hair from the smaller side and sweep it back behind your ear in a smooth wave.
- Use decorative bobby pins or jeweled clips to secure this section at various points.
- Arrange the pins in an interesting pattern such as a straight line, X formation, or scattered design.
- Allow all remaining curls on the opposite side to cascade freely over your shoulder.
- This style works beautifully for events where you want one side of your face clearly visible.
31. French Twist with Curly Texture
The French twist brings timeless sophistication to curly hair by creating a vertical roll along the back of your head. While traditionally sleek, adapting this style for curls creates beautiful texture and a
This response paused because Claude reached its max length for a message. Hit continue to nudge Claude along.Continue
These 35 cute and easy curly hairstyles for moms prove that you don’t need salon visits or hours of styling to look polished and confident.
From quick buns and ponytails to soft half-up styles and defined curls, each look is designed to work with your natural texture while fitting into a busy schedule. With the right techniques and a little creativity, you can embrace your curls, save time, and still feel your best—right from the comfort of home.
