Medium-length hair with bangs offers the perfect canvas for achieving that coveted salon blowout look right at home.
Whether you’re seeking effortless waves, sleek sophistication, or voluminous bounce, the combination of shoulder-grazing length and face-framing bangs creates endless styling possibilities that flatter every face shape and hair texture.
This comprehensive guide explores 27 blowout-ready medium-length hairstyles with bangs for a salon finish, each designed to help you master professional-level styling techniques while discovering the perfect look that complements your personal style.
From curtain bangs paired with beachy waves to blunt fringes with pin-straight strands, you’ll find detailed styling instructions, product recommendations, and expert tips that transform your daily routine into a luxurious salon experience.
These versatile hairstyles work beautifully for various occasions—whether you’re heading to the office, attending a special event, or simply want to feel polished and put-together for everyday life.
Get ready to discover how the right combination of length, bangs, and blowout technique can elevate your entire look and boost your confidence with styles that photograph beautifully and hold up throughout your busiest days.
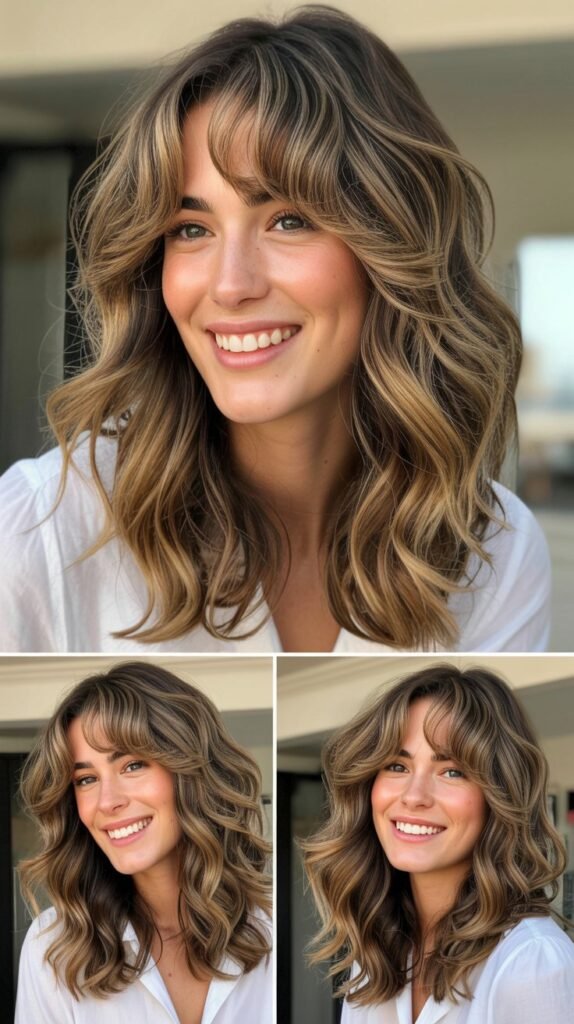
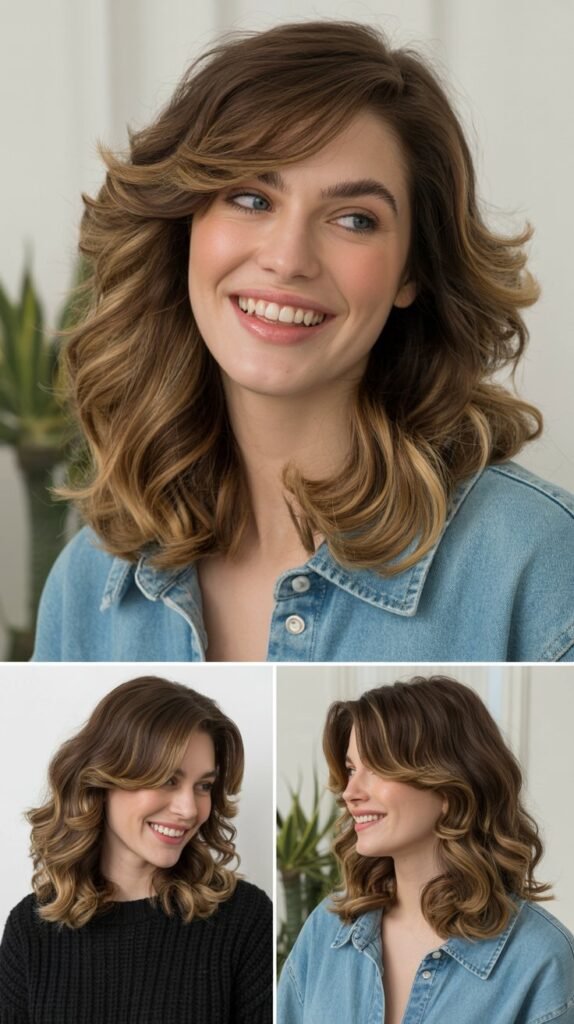
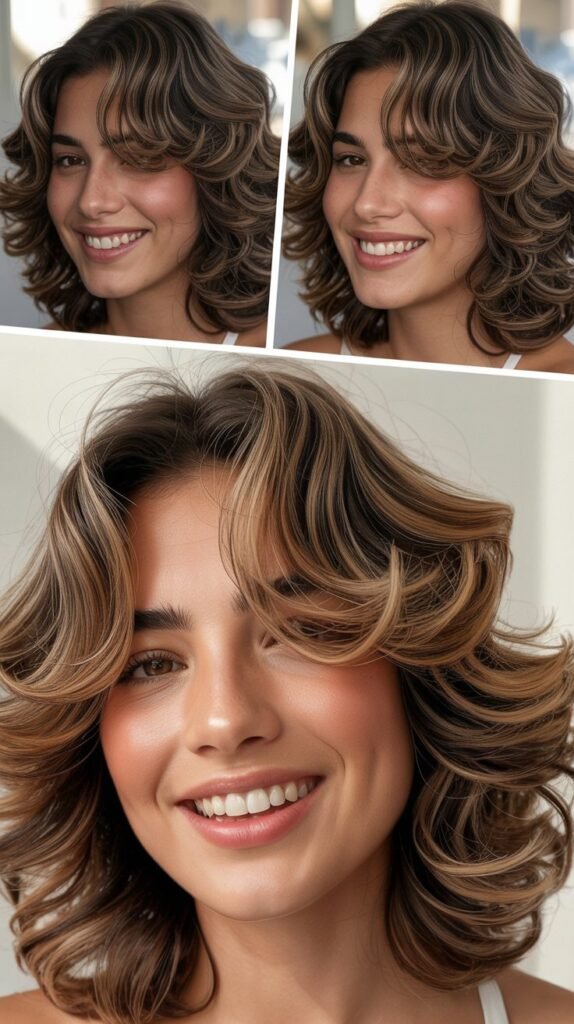
1. Classic Curtain Bangs with Volumized Layers
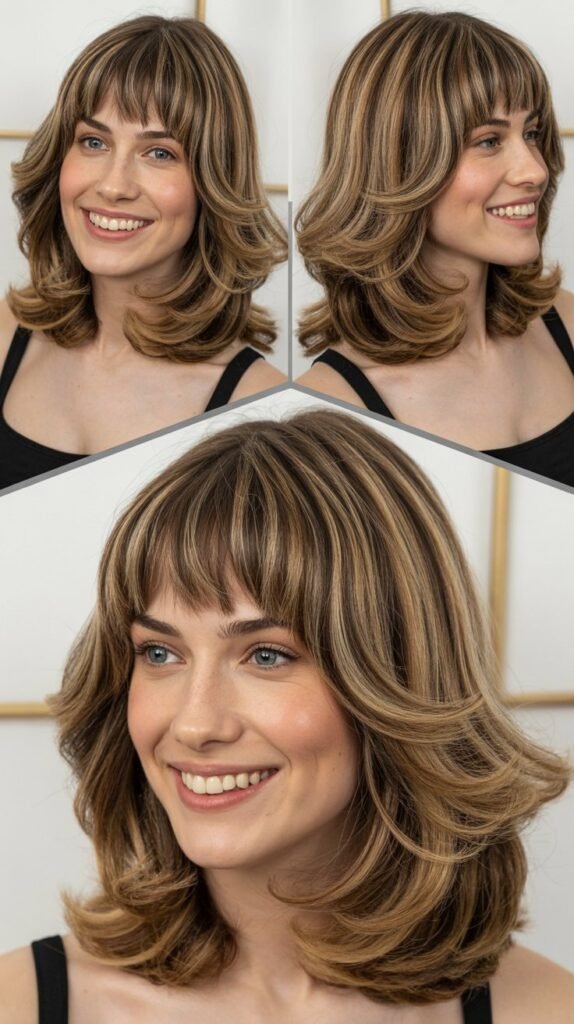
Curtain bangs have made a powerful comeback and pair exceptionally well with medium-length hair featuring volumized layers.
This timeless style creates a soft, face-framing effect that flatters oval, heart, and square face shapes while maintaining an effortlessly chic appearance.
Styling Technique
- Start with damp hair and apply a volumizing mousse from roots to mid-lengths
- Section the curtain bangs separately and clip the rest of the hair away
- Use a medium round brush to blow-dry the bangs away from the center part, creating the signature curtain effect
- Blow-dry the remaining hair in sections, directing the brush upward and outward for maximum volume
- Focus on the roots by lifting hair perpendicular to the scalp while applying heat
- Once 90% dry, switch to a cooler setting to set the style and add shine
- Finish with a light-hold hairspray to maintain movement without stiffness
Best Products for This Style
- Volumizing mousse: Creates lift at the roots without weighing down fine to medium hair textures
- Heat protectant spray: Essential for preventing damage during the blow-drying process
- Round ceramic brush (2-3 inch): The ideal size for medium-length hair to create smooth volume
- Lightweight finishing spray: Locks in the style while allowing natural movement
- Dry texture spray: Adds grip and enhances the piecey, lived-in texture of the layers
Maintenance Tips
- Refresh the style between washes by focusing dry shampoo at the roots
- Sleep on a silk or satin pillowcase to reduce friction and preserve the blowout
- Touch up the curtain bangs in the morning with a small round brush and quick blast of heat
- Schedule trims every 6-8 weeks to maintain the layered shape and bang length
- Use a deep conditioning treatment weekly to keep hair healthy and manageable
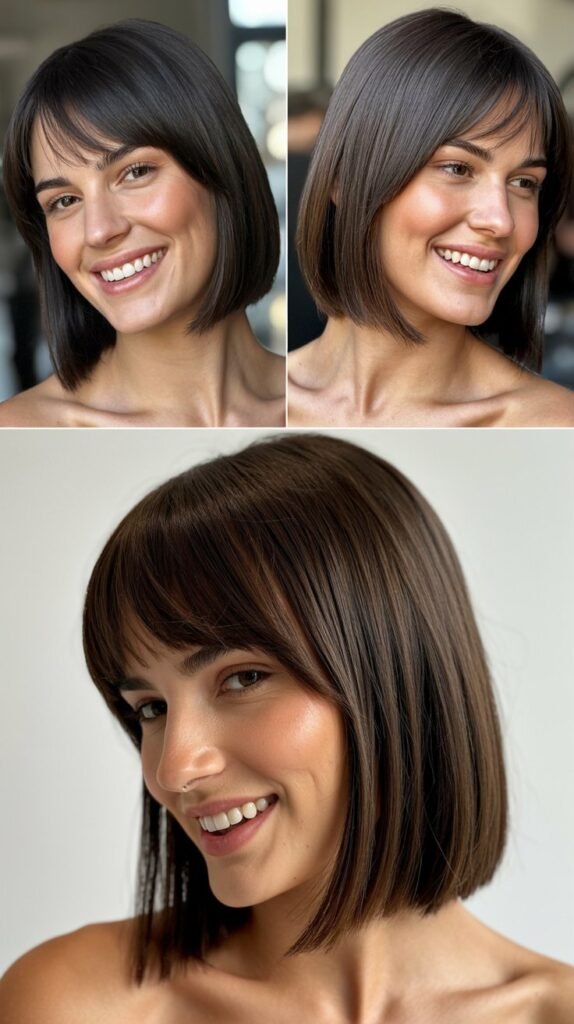
2. Sleek and Straight with Blunt Bangs
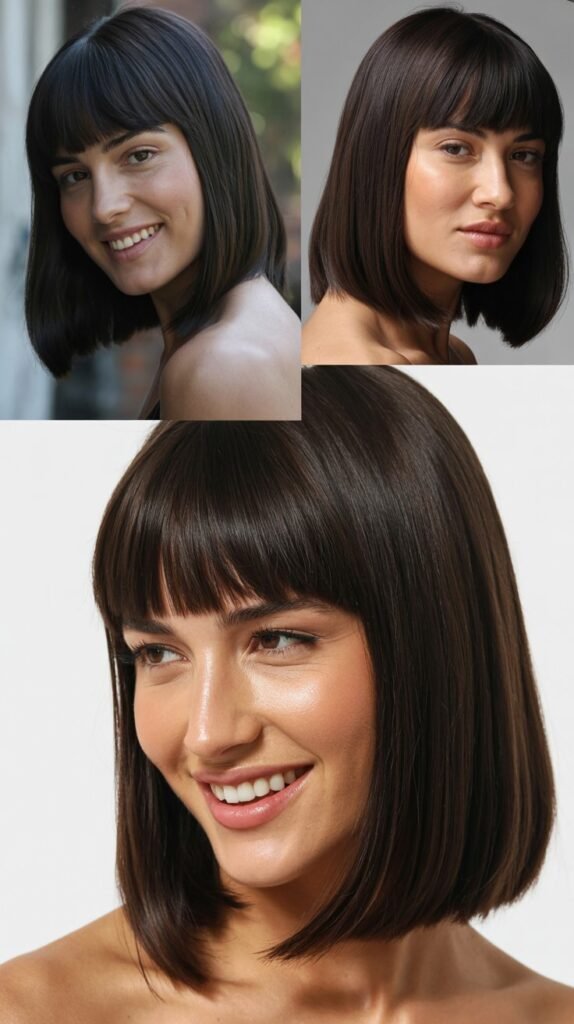
The sleek, straight blowout combined with blunt bangs delivers a polished, editorial look that exudes modern sophistication. This precision style works particularly well for those with naturally straight or slightly wavy hair textures.
Achieving the Perfect Straight Blowout
- Begin with freshly washed hair and towel-dry gently to remove excess moisture
- Apply a smoothing serum throughout the hair, concentrating on the mid-lengths and ends
- Use a paddle brush and blow dryer with a concentrator nozzle for precise airflow
- Blow-dry hair in sections from roots to ends, keeping the dryer moving to prevent heat damage
- Pull the brush taut through each section to create tension for maximum smoothness
- Dry the blunt bangs straight down using a flat paddle brush for sharp, clean lines
- Finish with a flat iron on low-medium heat if additional sleekness is desired
- Apply a shine serum to the ends and lightly over the surface for glossy perfection
Face Shapes That Benefit
- Oval faces: The blunt bangs balance proportions and highlight facial features beautifully
- Long faces: Horizontal lines created by blunt bangs visually shorten facial length
- Heart-shaped faces: The straight, heavy fringe draws attention to the eyes and away from a wider forehead
- Diamond faces: Softens angular cheekbones and creates visual balance
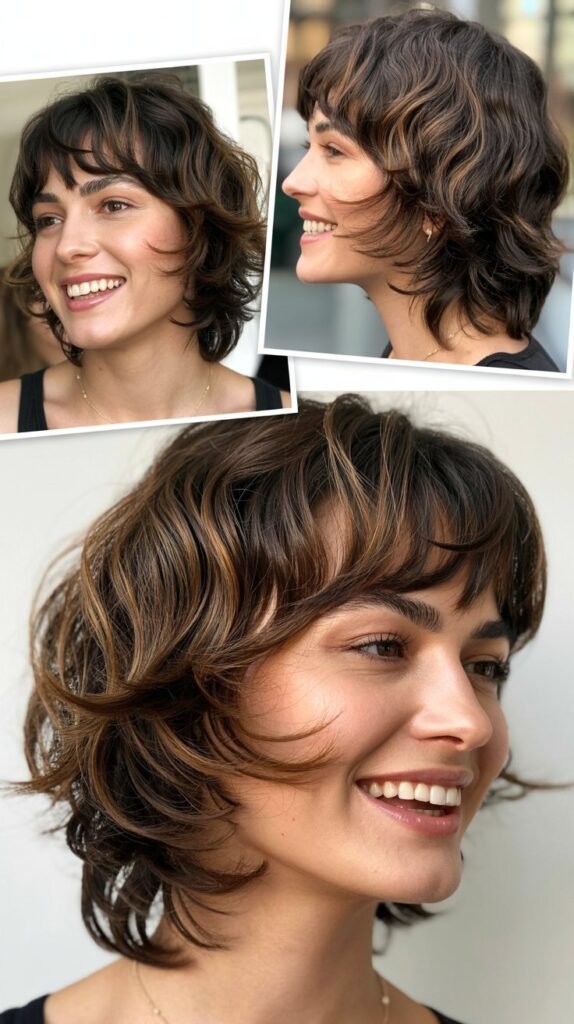
3. Textured Waves with Wispy Bangs
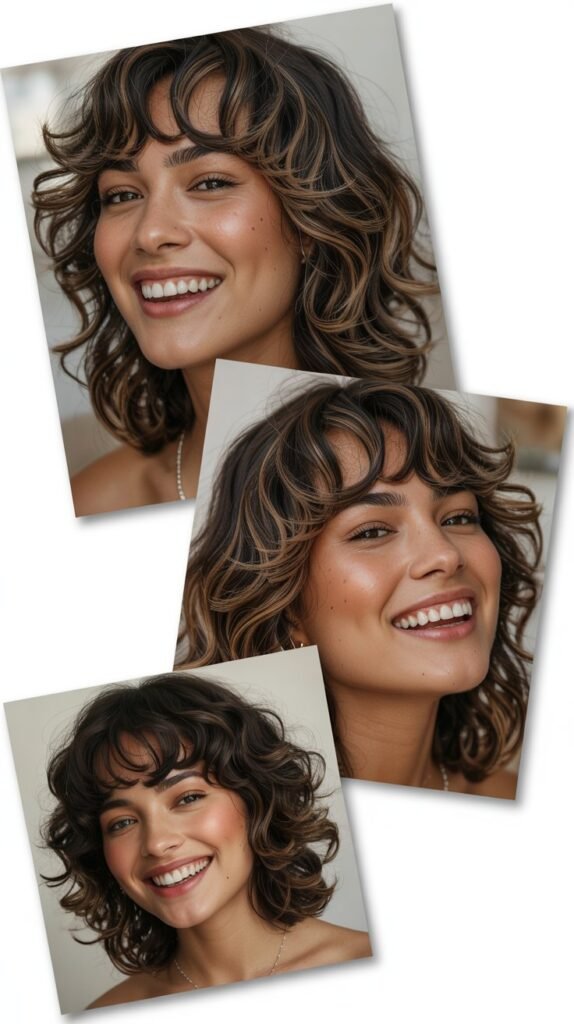
Combining textured waves with wispy bangs creates an effortlessly romantic look that appears both casual and carefully styled. This versatile approach suits various hair types and offers a softer alternative to more structured styles.
Creating Natural-Looking Texture
- Apply a sea salt spray or texturizing spray to damp hair for enhanced wave formation
- Rough-dry hair with your fingers until about 70% dry, scrunching as you go
- Divide hair into 2-inch sections and wrap around a 1.25-inch curling iron or wand
- Alternate the direction of curls (some toward the face, some away) for a natural effect
- Allow curls to cool completely before touching them
- Gently separate the curls with your fingers to create soft, lived-in waves
- Style wispy bangs by twisting small sections and applying brief heat
- Finish with a flexible-hold texturizing spray for movement and definition
Why Wispy Bangs Work
- They provide a softer, less committed alternative to heavy, blunt bangs
- Wispy bangs blend seamlessly with various face shapes and hair textures
- They’re easier to grow out gracefully compared to thicker bang styles
- The airy texture complements the relaxed nature of wavy hairstyles
- They require less maintenance and styling time than structured bangs
4. Side-Swept Bangs with Bouncy Blowout
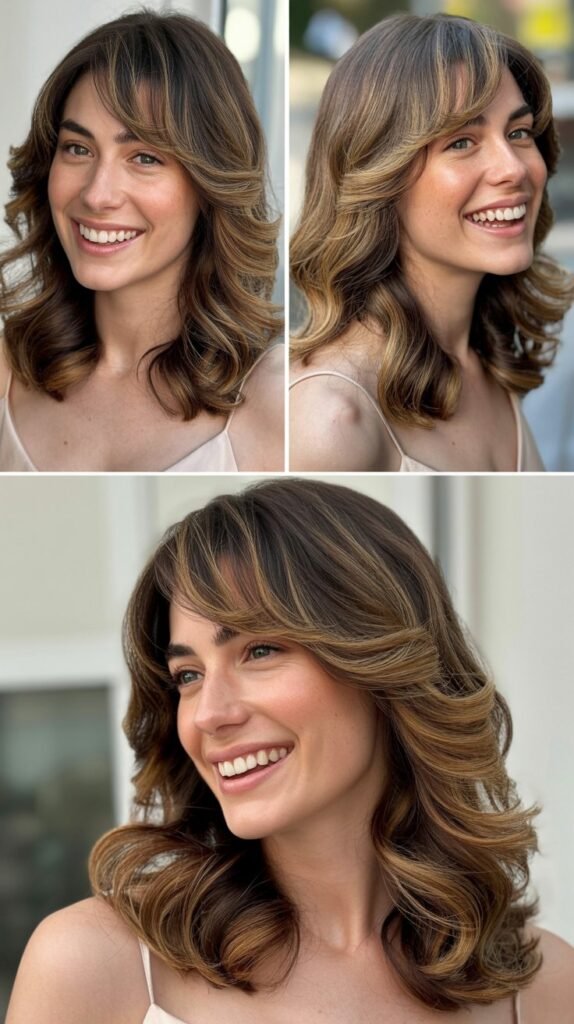
Side-swept bangs paired with a bouncy blowout create timeless glamour with volume and movement. This classic combination flatters virtually every face shape and works beautifully for both professional and social settings.
Step-by-Step Bouncy Blowout
- Prep hair with a heat protectant and volumizing spray on damp strands
- Create a deep side part where you want the bangs to sweep across
- Begin blow-drying the bangs in the desired direction using a round brush
- Work through the rest of the hair in horizontal sections, starting at the nape
- Wrap each section around a large round brush (3+ inches) and apply heat while rolling
- Hold the brush in place for a few seconds after applying heat to set the curl
- Allow each section to cool while still wrapped around the brush before releasing
- Once all sections are dry, gently brush through with a paddle brush for cohesive bounce
- Set the side-swept bangs by pinning them in place while they cool completely
Professional Tips
- The key to lasting bounce is allowing each section to cool completely before moving on
- Use clips to hold sections in place as they cool for maximum volume retention
- Overdirect the hair (pull it in the opposite direction of where it falls) for increased lift
- Finish with a cold shot from your dryer to seal the hair cuticle and enhance shine
- Apply volumizing powder at the roots if hair tends to fall flat throughout the day
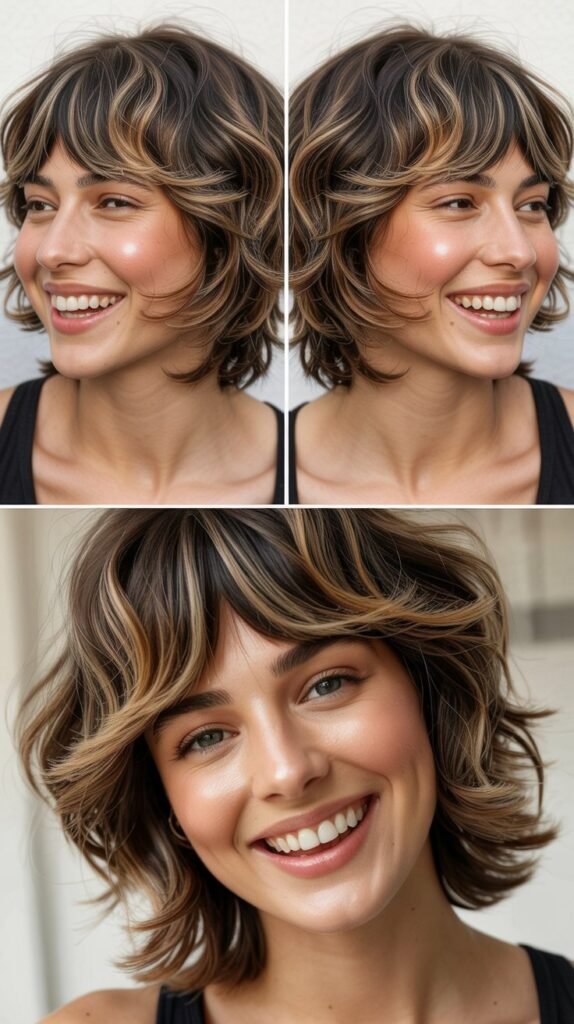
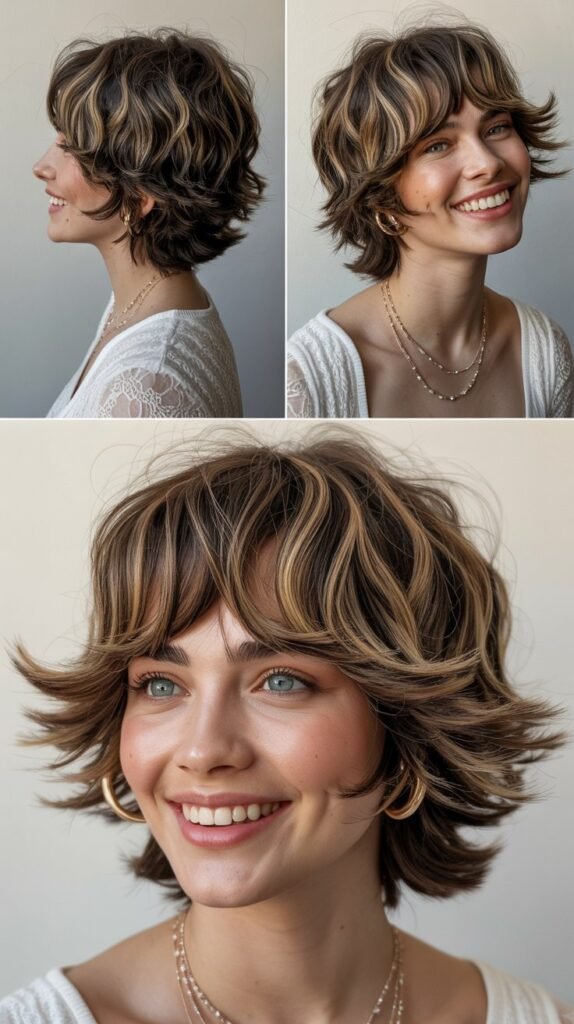
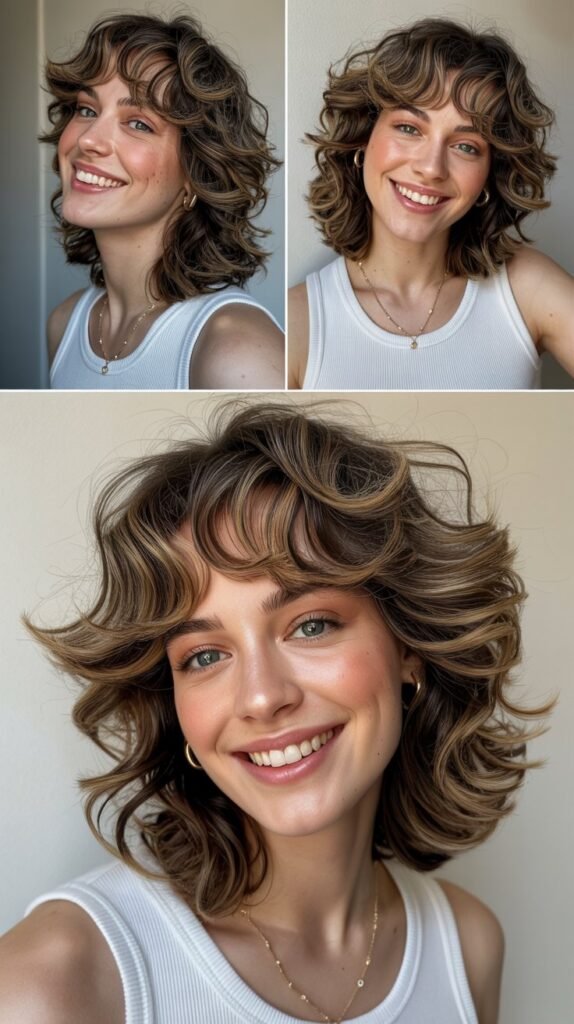
5. Shaggy Layers with Baby Bangs
The shaggy layered cut with baby bangs brings edgy, contemporary style to medium-length hair. This bold look requires confidence but delivers maximum impact with its statement-making proportions.
Styling Shaggy Texture
- Apply a texturizing cream to damp hair for enhanced separation and definition
- Blow-dry hair with a diffuser attachment or with your fingers for natural texture
- Use a smaller round brush on select pieces to add directional interest
- Style baby bangs straight down with a flat iron or small round brush
- Create additional texture by point-cutting into dried layers with styling shears
- Apply a matte paste or clay to ends and throughout layers for piecey definition
- Rough up the crown area with your fingers to enhance the shaggy effect
- Finish with a light mist of texturizing spray for hold without stiffness
Considerations for Baby Bangs
- Baby bangs work best on those with smaller foreheads or who want to make a bold statement
- They require frequent trims every 2-3 weeks to maintain the cropped length
- This style draws significant attention to the eyes and eyebrows
- Baby bangs can be challenging to grow out, so commitment is important
- They pair exceptionally well with edgy, fashion-forward personal styles
6. Retro-Inspired Flipped Ends with Full Bangs
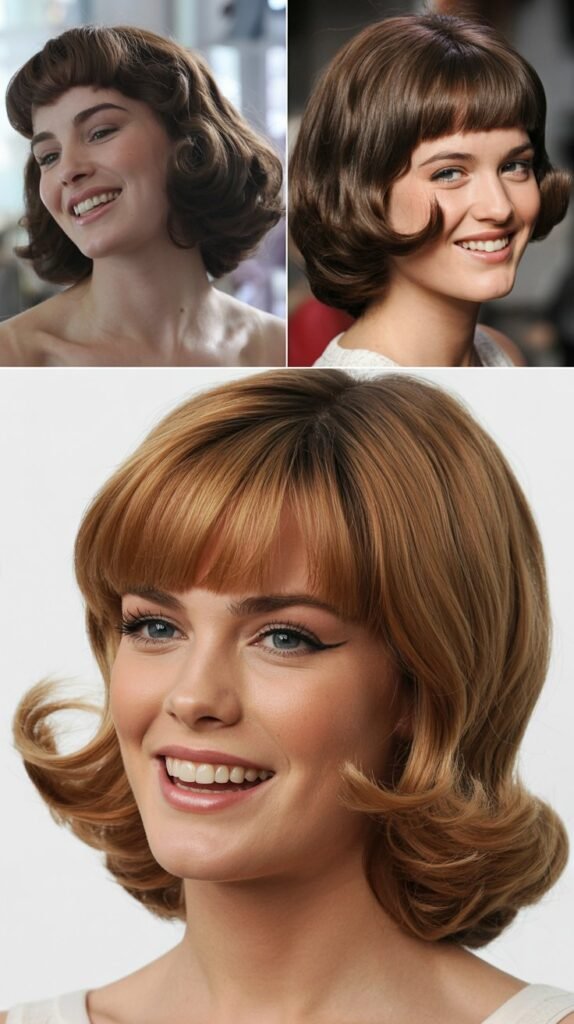
Channel vintage glamour with flipped ends and full bangs that recall the sophisticated styles of the 1960s. This polished look works beautifully for special occasions and adds instant elegance to any ensemble.
Creating the Classic Flip
- Start with completely dry hair and section into manageable pieces
- Apply a smoothing cream to control frizz and add shine
- Use a large round brush (3-4 inches) to blow-dry bangs smooth and rounded
- For the body of the hair, work in horizontal sections from bottom to top
- Wrap hair under the round brush and blow-dry until smooth
- At the ends, flip the brush outward while applying heat to create the signature curve
- Set each flipped section with a blast of cool air before releasing
- Use a large barrel curling iron on ends if additional flip definition is needed
- Finish with a strong-hold hairspray to maintain the structured shape throughout the day
Vintage Styling Products
- Smoothing balm or cream for sleek, frizz-free results
- Large barrel curling iron (1.5-2 inches) for reinforcing the flipped ends
- Firm-hold hairspray with shine for setting the style
- Shine spray for that glossy, polished vintage finish
- Teasing comb for adding subtle volume at the crown if desired
7. Layered Lob with Feathered Bangs
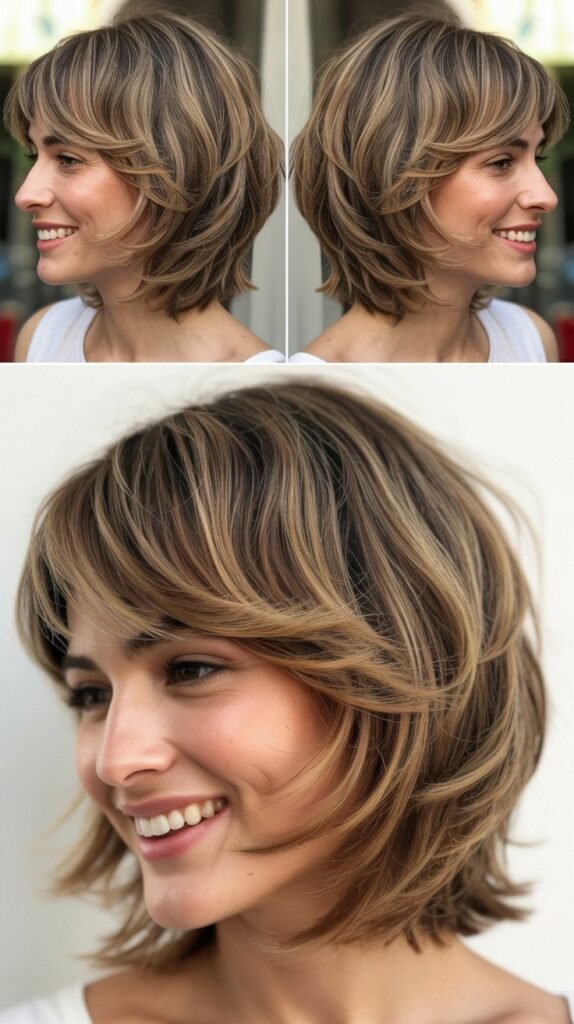
The layered lob (long bob) with feathered bangs offers a modern take on the classic 1970s feathered look. This style provides incredible movement and works exceptionally well with fine to medium hair textures.
Feathering Technique
- Apply a lightweight volumizing spray to roots and a smoothing cream to lengths
- Blow-dry feathered bangs using a small to medium round brush, flipping ends outward
- Create lift at the roots by directing the brush upward and away from the face
- Work through the lob in sections, using a round brush to create subtle bends
- At the ends, twist the brush outward to create the feathered effect throughout
- Use a flat iron with a flicking motion at the ends for additional feathering
- Apply a texturizing spray and use fingers to separate and enhance the feathered pieces
- Finish with a light-hold spray that allows natural movement
Benefits of the Layered Lob
- The length is versatile enough to wear down or pull back into ponytails and buns
- Layers remove weight and add natural movement to thicker hair types
- The style is low-maintenance yet looks polished and intentional
- It flatters most face shapes by creating balanced proportions
- The lob length is professional enough for work while remaining stylish for social events
8. Voluminous Roots with See-Through Bangs
See-through bangs, popular in Korean beauty trends, combined with voluminous roots create an ultra-feminine, youthful appearance. This style emphasizes lightness and airiness while maintaining structure.
Achieving Voluminous Roots
- Apply root-lifting spray directly to the scalp on damp hair
- Flip head upside down and rough-dry the roots for immediate volume
- Section hair and use a round brush to lift roots perpendicular to the scalp
- Apply heat from the blow dryer while holding the brush in place for 10-15 seconds
- Use a volumizing powder or dry shampoo at the roots for added lift
- Style see-through bangs sparingly, using minimal product for a wispy effect
- Blow-dry bangs straight down with a paddle brush, keeping them thin and separated
- Set the volume with cool air and finish with flexible-hold hairspray
Creating See-Through Bangs
- These bangs are intentionally thin and sparse, allowing the forehead to show through
- They work best when cut in a triangular section that’s narrower than traditional bangs
- The key is maintaining a lightweight, barely-there appearance
- Use a straightening iron on cool-medium heat to keep them sleek without bulk
- These bangs are perfect for those who want the bang look without heavy commitment
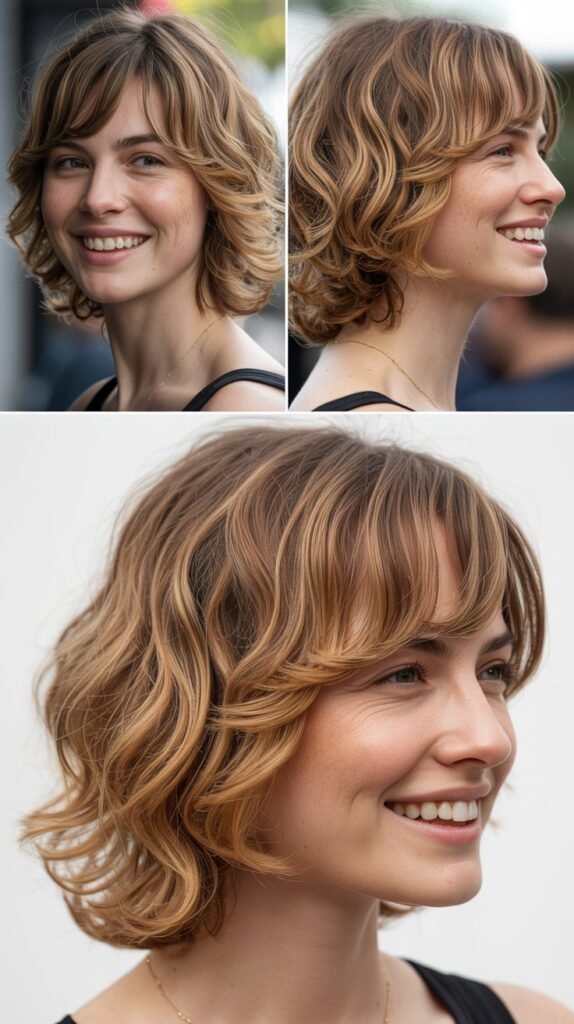
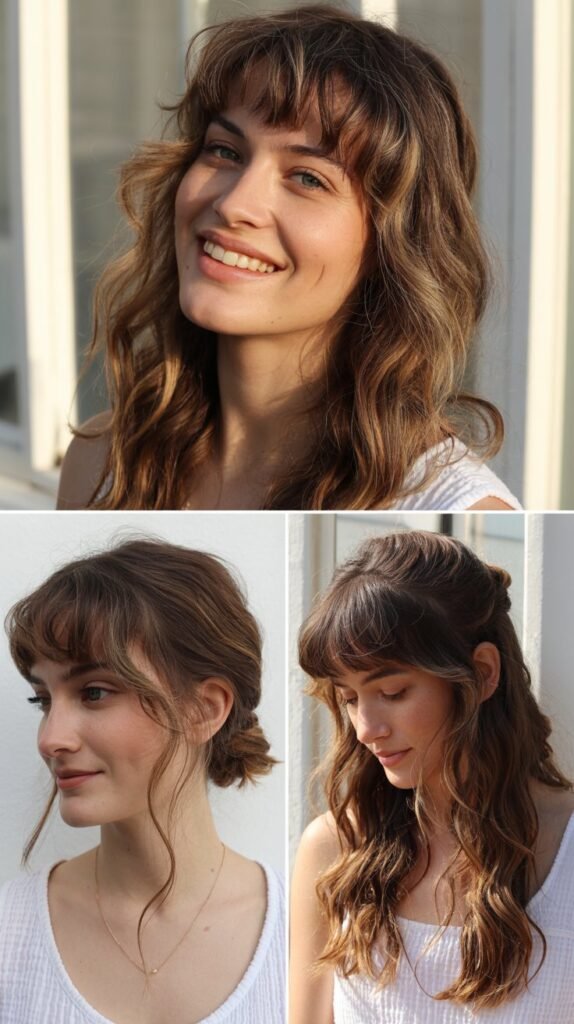
9. Beachy Waves with Curtain Bangs
Combining beachy waves with curtain bangs creates the ultimate effortless, California-cool aesthetic. This relaxed style appears carefree but can be achieved through specific techniques.
Beach Wave Tutorial
- Spray damp hair generously with sea salt spray or texturizing mist
- Scrunch hair with your hands while blow-drying on low heat to encourage natural texture
- Once mostly dry, divide hair into 1-2 inch sections
- Twist each section loosely and wrap around a 1-inch curling wand
- Hold for just 5-7 seconds for loose, imperfect waves
- Allow curls to cool, then shake them out with your fingers
- Style curtain bangs by blow-drying them away from the center part with a round brush
- Apply a small amount of texturizing cream to enhance separation and definition
- Finish with a sea salt spray for lived-in, touchable texture
Products for Beachy Texture
- Sea salt spray for natural wave enhancement and gritty texture
- Texturizing cream for piecey definition without crunchiness
- Wave-enhancing mousse for those with straighter hair who need extra help
- Dry shampoo for adding grip and volume at the roots
- Lightweight oil for controlling frizz while maintaining the natural look
10. Smooth Blowout with Micro Bangs

Micro bangs paired with a smooth, sleek blowout create an ultra-modern, fashion-forward statement. This bold combination requires precision styling but delivers editorial impact.
Perfecting the Smooth Blowout
- Apply anti-frizz serum to damp hair, focusing on the mid-lengths and ends
- Use a boar bristle paddle brush to smooth hair while blow-drying in sections
- Keep the dryer nozzle pointing downward to seal the cuticle and enhance shine
- Blow-dry micro bangs with a small paddle brush, pulling them straight down
- Use a flat iron on low-medium heat for additional sleekness if needed
- Run the flat iron through micro bangs multiple times for pin-straight precision
- Apply shine serum to the surface of the hair for a glossy, polished finish
- Set the style with a lightweight, humidity-resistant hairspray
Micro Bang Maintenance
- Micro bangs require trimming every 1-2 weeks to maintain the cropped length
- They’re best suited for those with straight or easily straightened hair
- These bangs make a strong style statement and attract attention
- Daily styling is essential to keep micro bangs looking intentional rather than grown-out
- Consider visiting a professional for the initial cut to ensure proper placement and length
11. Layered Shag with Bottleneck Bangs
The layered shag cut with bottleneck bangs brings contemporary edge with its distinctive shape. Bottleneck bangs—wider at the forehead and tapering at the temples—create a flattering frame for the face.
Styling the Shag
- Apply a texturizing spray to damp hair for enhanced layer separation
- Rough-dry hair with your fingers, scrunching to encourage natural texture
- Use a medium round brush on random sections to create directional interest
- Blow-dry bottleneck bangs in their natural fall, slightly rounding them with a brush
- Add texture by twisting and wrapping select pieces around a curling wand
- Use a texturizing paste on the ends to create definition and separation
- Shake out the hair with your fingers to blend all the textured pieces
- Finish with a matte texturizing spray for hold without shine
Why Bottleneck Bangs Are Flattering
- The wider top portion balances the forehead and draws attention to the eyes
- The tapered sides elongate the face and create a slimming effect
- This bang style complements round, square, and oval face shapes particularly well
- They’re easier to style than blunt bangs due to their graduated shape
- Bottleneck bangs grow out more gracefully than straight-across styles
12. Pin-Straight Middle Part with Full Fringe
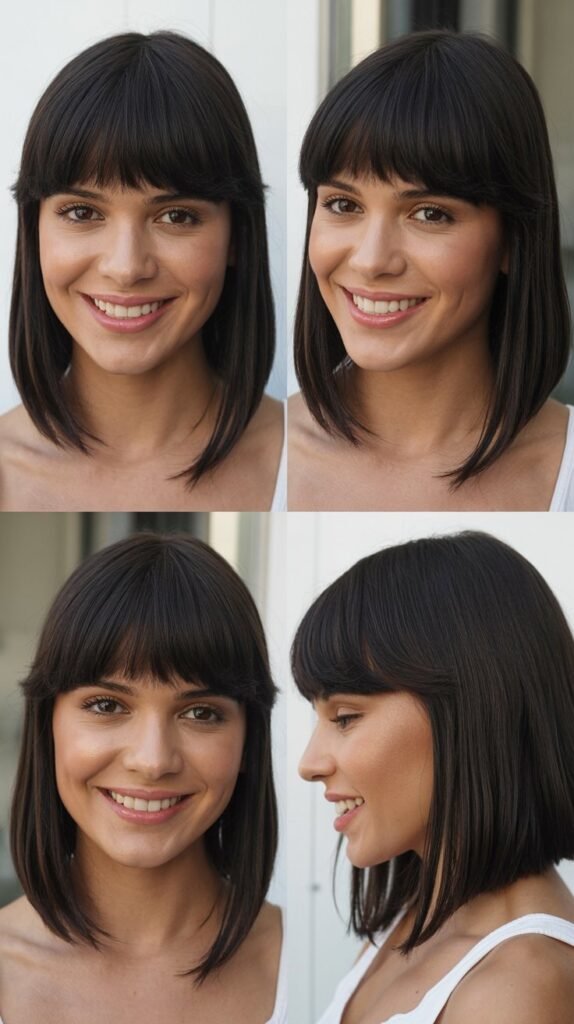
The pin-straight middle part with a full fringe delivers minimalist sophistication with clean lines. This precise style works beautifully for those who appreciate sleek, geometric aesthetics.
Achieving Ultra-Straight Hair
- Start with clean, completely dry hair for best flat iron results
- Apply a heat protectant spray throughout, ensuring even coverage
- Create a precise middle part using a tail comb for clean division
- Section hair into 1-inch horizontal layers for thorough straightening
- Use a high-quality flat iron with ceramic or titanium plates
- Clamp the iron close to roots and slowly glide through to the ends
- Make multiple passes if necessary, but keep the iron moving to prevent damage
- Straighten the full fringe by pulling the iron straight down with slight tension
- Apply a glossing serum for mirror-like shine and polish
Maintaining the Straight Style
- Sleep with hair in a loose, low ponytail or wrapped in silk to reduce bending
- Use dry shampoo at roots only to maintain volume without adding texture
- Touch up with a flat iron in the morning, focusing on any bent sections
- Invest in a high-quality flat iron with adjustable temperature settings
- Use a heat protectant every single time you apply heat to prevent long-term damage
13. Tousled Mid-Length with Side Bangs
Tousled, effortless waves with side bangs create the perfect balance between polished and relaxed. This versatile style transitions easily from day to night.
Creating Tousled Texture
- Apply a volumizing mousse to damp hair before blow-drying
- Rough-dry hair until about 80% dry, using your fingers to add natural movement
- Divide hair into 2-inch sections and loosely wrap around a 1.25-inch curling iron
- Hold for 8-10 seconds, then release without manipulating the curl
- Allow all curls to cool completely before touching
- Flip head upside down and shake hair vigorously to break up the curls
- Run fingers through hair to create soft, tousled waves
- Style side bangs by blow-drying them to one side with a round brush
- Finish with a texturizing spray, scrunching as you apply
Styling Versatility
- This style can be dressed up with accessories for formal occasions
- It looks equally appropriate for casual weekend activities
- The tousled texture disguises second or third-day hair beautifully
- Side bangs can be swept in either direction depending on your preference
- The style photographs well and looks flattering in various lighting conditions
14. Sleek Lob with Asymmetrical Bangs
An asymmetrical bang combined with a sleek lob creates modern sophistication with an unexpected twist. The uneven bang line adds visual interest while maintaining elegance.
Perfecting Asymmetrical Bangs
- Asymmetrical bangs are longer on one side, creating a diagonal line across the forehead
- Blow-dry the longer side first, directing it to frame the face
- Use a flat iron to smooth both sides, following the diagonal line
- The shorter side should just graze the eyebrow while the longer side extends to cheekbone level
- Apply smoothing serum to control any flyaways or frizz
- For the lob, blow-dry in sections using a paddle brush for sleekness
- Finish with a shine spray for a polished, sophisticated appearance
Face Shape Recommendations
- Round faces: The diagonal line of asymmetrical bangs creates length and angles
- Square faces: Softens angular jawlines with the asymmetric sweep
- Oval faces: Adds interest to balanced proportions without overwhelming features
- Heart-shaped faces: The longer side draws attention downward, balancing a wider forehead
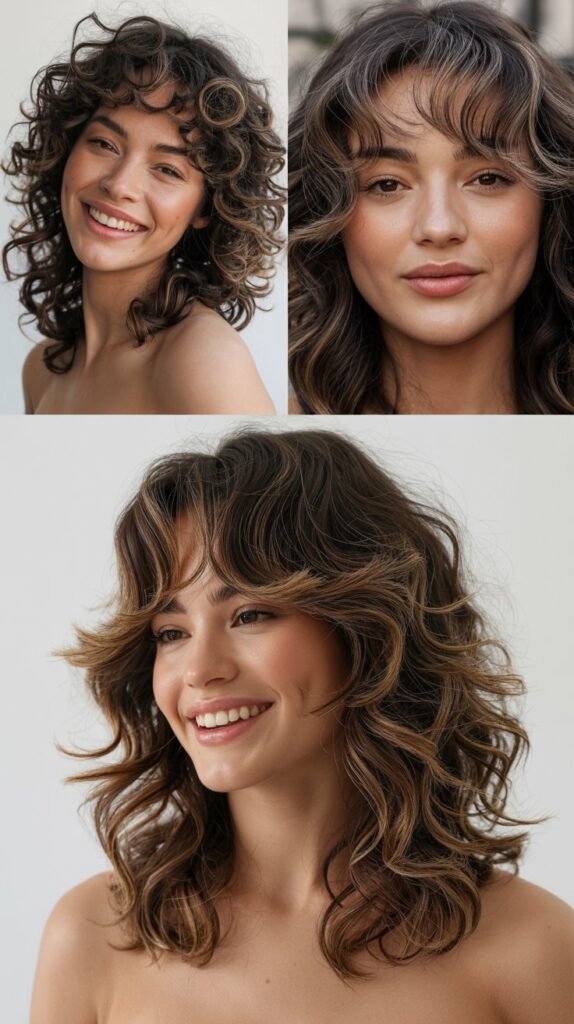
15. Romantic Curls with Wispy Curtain Bangs
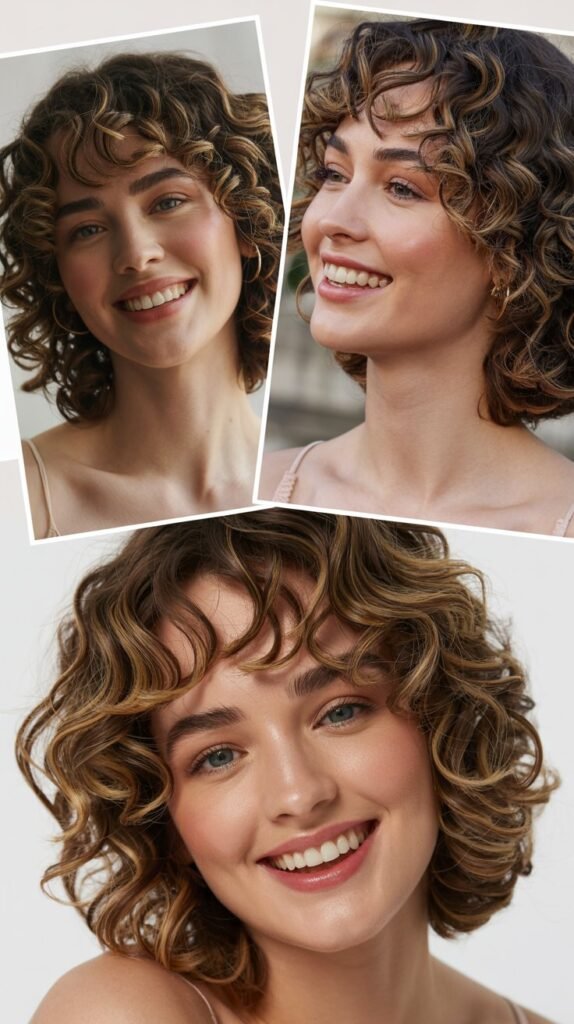
Romantic, bouncy curls paired with wispy curtain bangs create an ultra-feminine, special-occasion-worthy style. This look combines structure with softness for maximum impact.
Creating Romantic Curls
- Start with damp hair and apply a curl-enhancing mousse throughout
- Blow-dry hair until completely dry using a diffuser to maintain natural texture
- Section hair into 1-inch pieces for defined, bouncy curls
- Use a 1-inch curling iron, wrapping hair around the barrel away from the face
- Hold for 10-12 seconds for long-lasting curls
- Allow each curl to cool in your hand before releasing for maximum hold
- Once all curls are complete and cooled, gently separate them with your fingers
- Style wispy curtain bangs by lightly curling the ends away from the center
- Finish with a flexible-hold hairspray that allows movement while maintaining curl shape
Curl Longevity Tips
- Clean hair holds curls better than hair with heavy product buildup
- Allowing curls to cool completely before touching is crucial for lasting results
- Use a curling iron with a temperature suitable for your hair type (fine hair needs less heat)
- Avoid touching or brushing curls throughout the day to maintain definition
- Refresh curls the next day with a small curling iron on select pieces
16. Choppy Layers with Piecey Bangs
Choppy layers combined with piecey, textured bangs deliver an edgy, rock-and-roll vibe. This low-maintenance style embraces texture and imperfection.
Achieving Choppy Texture
- Apply a texturizing spray to damp hair before blow-drying
- Rough-dry hair with your fingers, avoiding smoothness
- Use a round brush sporadically on select sections for varied texture
- Allow some pieces to air-dry for natural, undone texture
- Style piecey bangs by separating them into small sections with texturizing paste
- Use a flat iron to add slight bends in different directions throughout the bangs
- Apply a matte clay or paste to the ends of layers for definition and separation
- Finish with a texturizing spray, scrunching to enhance the choppy effect
Styling Products for Edge
- Matte texturizing paste for separation without shine
- Sea salt spray for gritty, undone texture
- Dry shampoo for added volume and grip
- Lightweight wax for defining individual pieces
- Flexible-hold spray that maintains movement
17. Polished Waves with Swooping Side Bangs
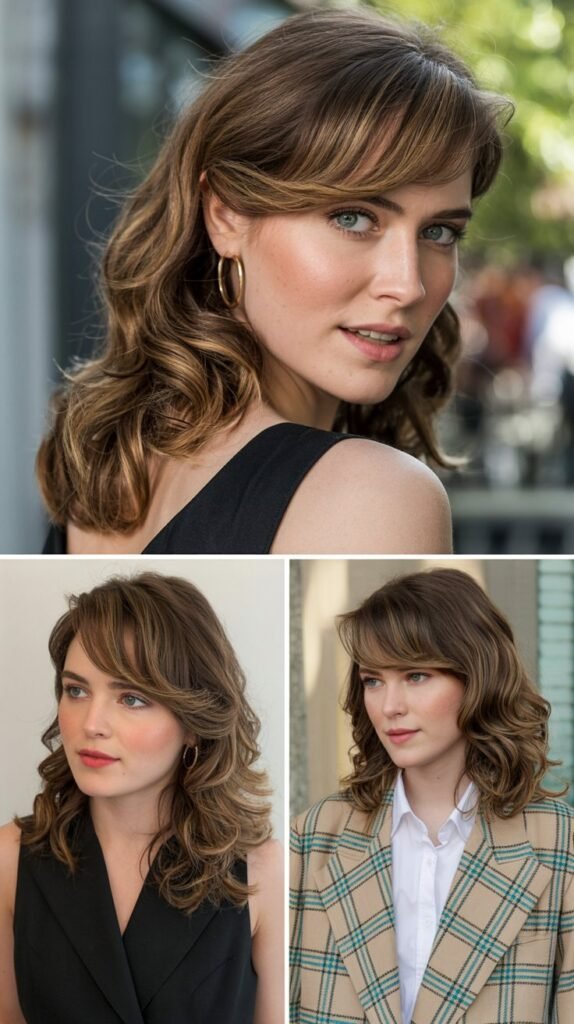
Polished waves with swooping side bangs create Old Hollywood glamour that’s perfect for formal events and special occasions. This style balances structure with romantic movement.
Creating Polished Waves
- Start with dry hair and apply a heat protectant throughout
- Create a deep side part where you want the side bangs to sweep
- Section hair into 2-inch pieces and curl away from the face using a 1.25-inch iron
- Clamp the iron midway down the hair shaft, leaving roots smooth
- Hold for 10 seconds, then release the curl without disturbing its shape
- Pin each curl in place with a clip while it cools to set the wave pattern
- Once all sections are curled and cooled, remove clips and brush through with a paddle brush
- This brushing creates the polished wave pattern rather than separate curls
- Style swooping side bangs by curling them dramatically to one side
- Finish with a strong-hold, shine-enhancing hairspray
Old Hollywood Technique
- The key to this look is brushing out defined curls to create waves
- Using clips while curls cool helps set the wave pattern more permanently
- A paddle brush with natural bristles creates the smoothest wave effect
- Apply shine serum before and after styling for maximum gloss
- This technique was used by actresses in the 1940s and remains timeless
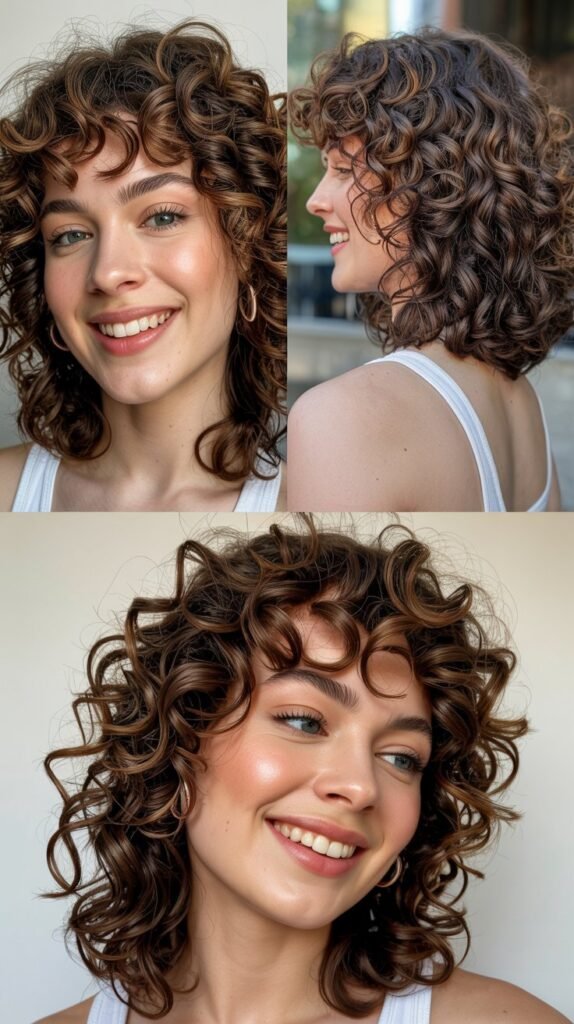
18. Natural Air-Dried with Grown-Out Bangs
Embracing natural texture with grown-out bangs creates an effortlessly cool, low-maintenance look. This style celebrates your hair’s natural patterns while looking intentionally styled.
Enhancing Natural Texture
- Apply a curl-enhancing cream to soaking wet hair, scrunching as you work it through
- Use a microfiber towel or t-shirt to gently squeeze out excess water without causing frizz
- Apply a leave-in conditioner to mid-lengths and ends for hydration
- Scrunch hair with your hands to encourage natural wave or curl formation
- Allow hair to air-dry completely without touching (this is crucial for frizz prevention)
- Once dry, gently scrunch out any crunchiness from styling products
- Style grown-out bangs by tucking them behind ears or letting them fall naturally
- Apply a small amount of oil to palms and lightly smooth over the surface to control flyaways
Working with Grown-Out Bangs
- Grown-out bangs add face-framing layers that blend seamlessly with the rest of the hair
- They’re in the awkward stage between full bangs and being completely grown out
- Pin them back with decorative clips for a different look
- Twist them and secure with bobby pins for an elegant updo option
- Use the transition period to experiment with different partings and styles
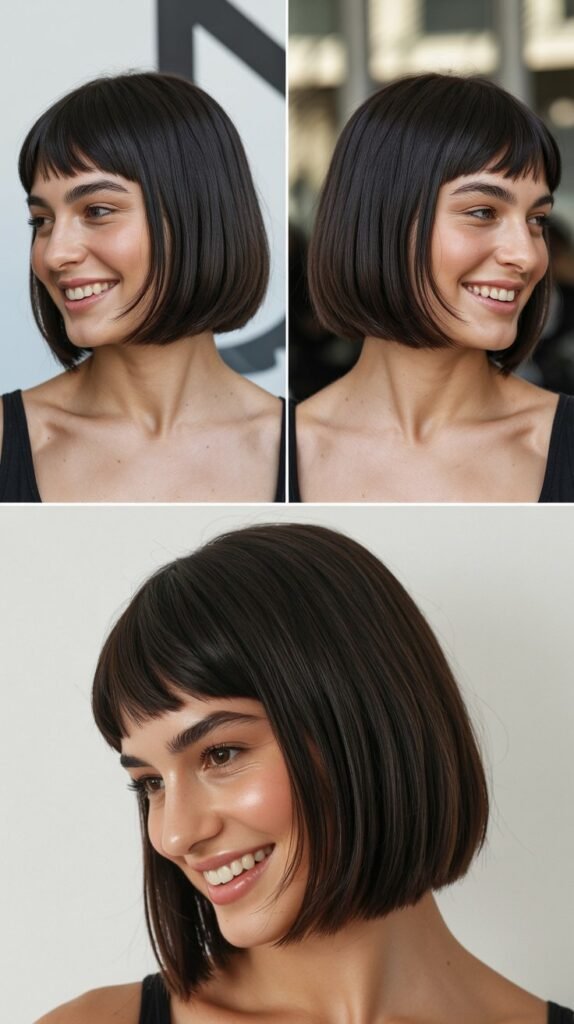
19. Bouncy Bob with Full Straight-Across Bangs
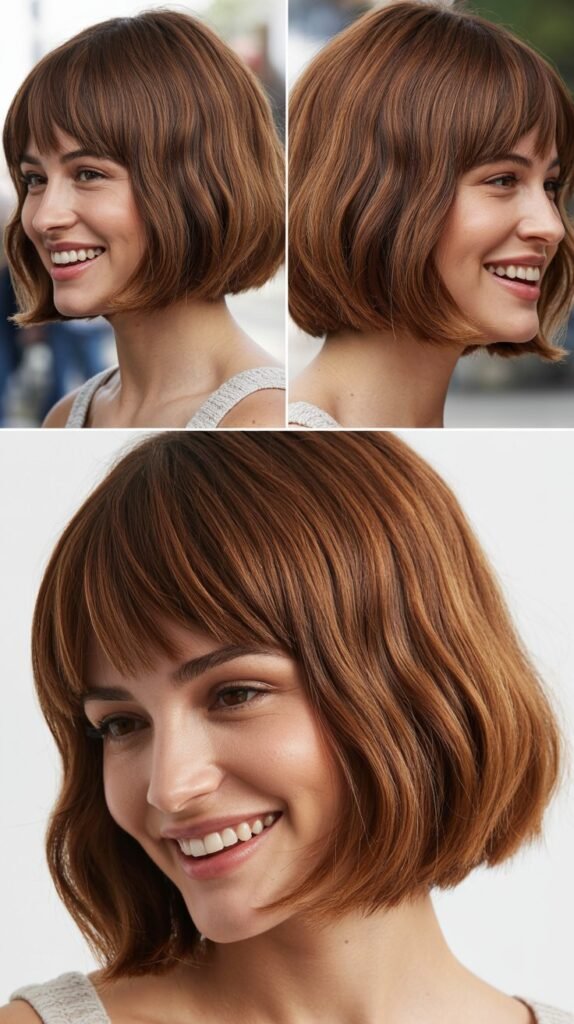
The bouncy bob with full straight-across bangs is a quintessentially chic style that never goes out of fashion. This combination creates a balanced, polished look with retro appeal.
Creating Bounce in a Bob
- Apply volumizing mousse to damp hair, focusing on roots
- Blow-dry hair using a large round brush (3+ inches for maximum bounce)
- Section hair horizontally and work from bottom to top
- Wrap each section around the brush, applying heat while rolling the brush under
- Hold the brush in place for several seconds to set the curve
- Allow each section to cool while wrapped around the brush before releasing
- Style straight-across bangs by blow-drying them straight down with a paddle brush
- Finish by gently brushing through the bob to create cohesive, bouncy movement
- Set with a medium-hold hairspray that maintains bounce without stiffness
Bob Variations
| Bob Type | Length | Best For | Maintenance Level |
|---|---|---|---|
| Classic Bob | Chin-length | All face shapes | Moderate |
| Long Bob (Lob) | Shoulder-length | Fine hair, elongated faces | Low to Moderate |
| Angled Bob | Longer in front, shorter in back | Square and round faces | Moderate to High |
| Blunt Bob | One-length, no layers | Thick hair, creating sleek lines | Moderate |
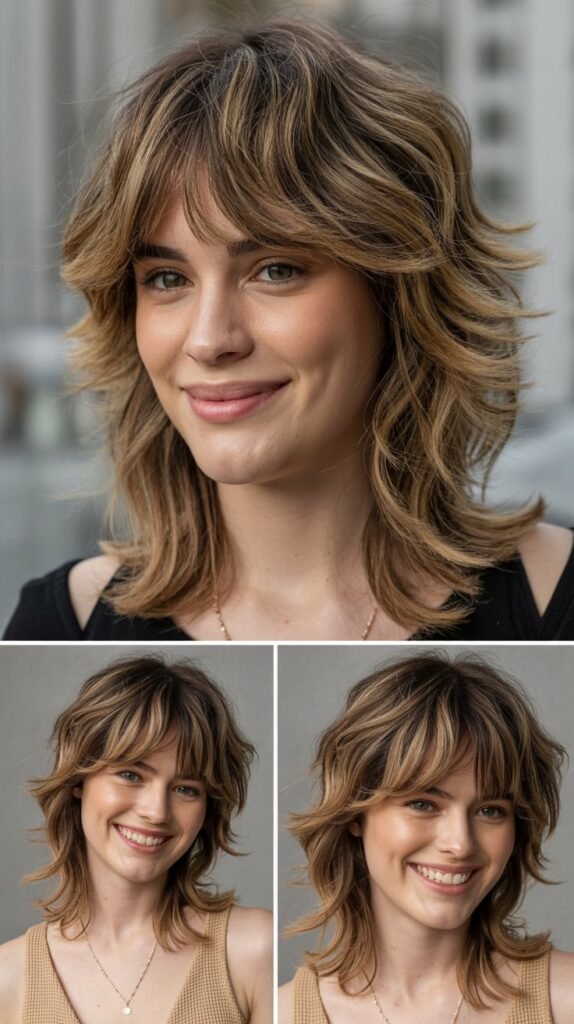
20. Textured Shag with Razored Bangs
The textured shag with razored bangs brings rock-and-roll edge with a modern twist. This style emphasizes movement, texture, and effortless cool.
Styling the Modern Shag
- Apply a sea salt spray to damp hair for enhanced texture
- Rough-dry hair with your fingers, encouraging natural bends and waves
- Use a diffuser attachment on low heat to maintain texture while drying
- Once dry, use a small curling iron to add random bends throughout for additional interest
- Style razored bangs by separating them into small pieces with texturizing paste
- Use a flat iron or curling iron to add slight, imperfect bends to the bangs
- Apply a matte pomade to the ends of the shag layers for definition
- Finish with a texturizing spray, tousling with your fingers for an undone effect
Benefits of Razored Cuts
- Razor cutting creates softer, more feathered edges compared to scissor cuts
- The technique removes bulk while adding movement and texture
- Razored layers blend more seamlessly for a natural, lived-in appearance
- This cutting method works particularly well for thick, coarse hair textures
- Razored bangs have a piecey, separated quality that looks modern and effortless
21. Sleek Ponytail-Ready Style with Face-Framing Bangs
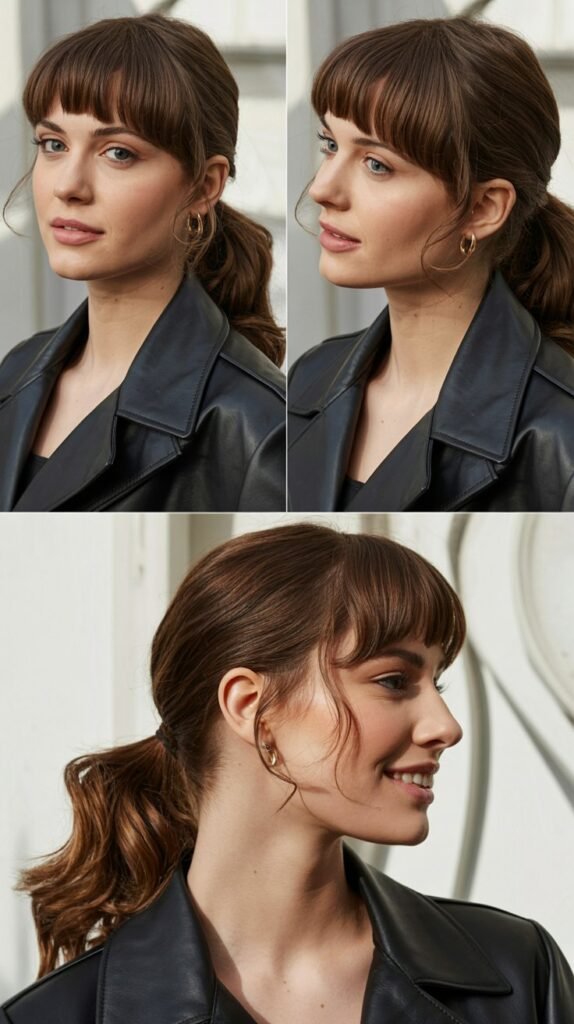
A sleek blowout designed to be worn down or pulled into a polished ponytail offers incredible versatility. Face-framing bangs add dimension whether hair is up or down.
Blowout Technique for Versatility
- Apply a smoothing serum to damp hair for frizz control
- Blow-dry hair completely smooth using a paddle brush
- Keep the dryer nozzle pointing downward to seal the cuticle
- Pay special attention to smoothing the crown and sides for a polished ponytail option
- Style face-framing bangs by blow-drying them forward with a round brush, then sweeping to the side
- For wearing hair down, apply a shine serum to the surface
- To create the ponytail, gather hair at the desired height and secure with an elastic
- Wrap a small section of hair around the elastic to conceal it
- Smooth any flyaways with a light-hold hairspray and a fine-tooth comb
Face-Framing Bang Benefits
- These bangs create a flattering frame whether hair is up or down
- They’re typically cut to start around temple level and angle toward the chin
- Face-framing pieces soften the appearance of a pulled-back style
- They create dimension and visual interest even in a simple ponytail
- This style works for professional settings while remaining stylish
22. Voluminous Blow-Dry with Longer Side-Swept Bangs
Voluminous hair with longer side-swept bangs creates drama and sophistication. This style emphasizes lift at the roots while maintaining movement throughout. professional photography.
Maximizing Volume
- Apply a root-lifting spray directly to the scalp on damp hair
- Blow-dry hair while flipping your head upside down for the first few minutes
- Section hair and use a large round brush to create lift at the roots
- Focus heat at the roots while pulling the brush perpendicular to the scalp
- Use volumizing powder or dry shampoo at the roots after blow-drying for extra lift
- Tease sections at the crown gently with a fine-tooth comb for added height
- Smooth the top layer over the teased sections to conceal the backcombing
- Style longer side-swept bangs by blow-drying them to one side with a round brush
- Finish with a volumizing hairspray, lifting roots as you spray
Product Recommendations for Volume
- Root-lifting spray applied before blow-drying
- Volumizing powder for instant lift at the crown
- Dry shampoo used at roots on clean hair for added texture and grip
- Large round brush (3-4 inches) for maximum volume during blow-drying
- Strong-hold hairspray that maintains lift without weighing hair down
23. Messy Undone Waves with Textured Bangs
Messy, undone waves with textured bangs embody the “I woke up like this” aesthetic while still looking intentionally styled. This approach celebrates imperfection and natural beauty.
Creating Perfectly Imperfect Waves
- Apply a texturizing spray to damp hair and allow to air-dry 50-70%
- Roughly blow-dry the remaining damp sections without using a brush
- Divide hair into random-sized sections (varying between 1-3 inches)
- Wrap sections loosely around a 1-1.5 inch curling iron in alternating directions
- Hold for just 5-7 seconds for loose, imperfect waves
- Don’t worry about making waves uniform—variation adds to the messy aesthetic
- Style textured bangs by scrunching them with texturizing cream
- Once all sections are waved, shake head vigorously to break up the pattern
- Apply dry texture spray and scrunch throughout for enhanced separation
Embracing the Undone Aesthetic
- This style should look effortless rather than overly polished
- Slight frizz and flyaways are part of the charm
- Don’t stress about perfection—the goal is intentional imperfection
- This look works beautifully for casual settings and creative industries
- It’s ideal for those who prefer low-maintenance styling routines
24. Sleek One-Length with Micro Fringe
The sleek one-length cut with micro fringe creates ultra-modern, editorial style with bold lines. This precision look makes a confident statement.
Achieving One-Length Perfection
- One-length hair has no layers, creating a blunt, uniform bottom edge
- Blow-dry hair completely smooth using a paddle brush and concentrator nozzle
- Work in sections to ensure every strand is sleek and frizz-free
- Use a flat iron on low-medium heat for additional sleekness
- Pay special attention to the ends, ensuring they’re perfectly aligned
- Style micro fringe by flat ironing it multiple times until pin-straight
- The fringe should sit well above the eyebrows for the micro effect
- Apply a shine serum for glossy, polished perfection
- Set with an anti-humidity spray to maintain sleekness throughout the day
Considerations for One-Length Hair
- This style showcases hair health—any damage or split ends are immediately visible
- Regular trims every 6-8 weeks are essential to maintain the blunt line
- One-length cuts can make fine hair appear thicker
- The style works best on straight or easily straightened hair
- Micro fringe requires very frequent trims (every 1-2 weeks) to maintain the short length
25. Retro Finger Waves with Side-Parted Bangs
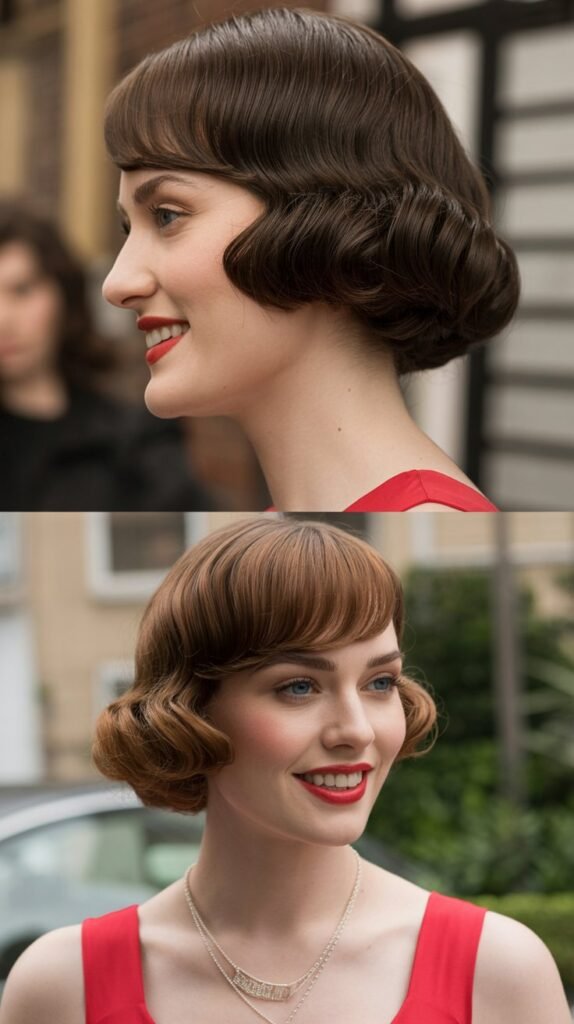
Retro finger waves with side-parted bangs bring 1920s glamour to modern styling. This intricate technique creates stunning S-shaped waves for special occasions.
Creating Finger Waves
- Start with damp (not wet) hair for optimal wave formation
- Apply a generous amount of strong-hold setting lotion or gel
- Create a deep side part where you want the bangs to begin
- Using a fine-tooth comb, shape the first wave by pushing hair forward to create a ridge
- Hold the ridge in place with your finger while combing the hair backward to create the next wave
- Continue creating alternating S-shaped waves down the length of the hair
- Use duckbill clips to secure each wave ridge while the hair sets
- Allow hair to air-dry completely or sit under a hooded dryer
- Once dry, carefully remove clips and lightly brush the surface for softness
- Style side-parted bangs into the finger wave pattern
Modern Finger Wave Tips
- This technique requires practice and patience to master
- Using modern strong-hold gels makes the process easier than historical methods
- Consider practicing on a mannequin head before attempting on yourself
- Finger waves work best on hair that’s shoulder-length or shorter
- This style is perfect for themed events, weddings, or costume parties
- Professional styling may be worth considering for important occasions
26. Layered Waves with Feathered Front Pieces
Layered waves with feathered front pieces create movement and dimension that flatters every face shape. This style combines structured layers with soft, romantic waves.
Styling Layered Waves
- Apply a heat protectant and wave-enhancing spray to damp hair
- Blow-dry hair until 90% dry using a round brush to add body
- Section hair into 1.5-2 inch pieces for waving
- Use a 1.25-inch curling iron, alternating the direction of each curl
- Focus on creating looser, more relaxed curls rather than tight spirals
- Allow curls to cool, then gently brush through with a paddle brush to create waves
- Style feathered front pieces by using a flat iron with a flipping motion at the ends
- These pieces should frame the face and flip outward for a feathered effect
- Apply a light-hold texturizing spray and scrunch to enhance the wave pattern
Why Feathered Front Pieces Work
- They create a soft, face-framing effect that’s universally flattering
- Feathered pieces add movement and prevent the style from looking heavy
- This technique works particularly well with layered cuts
- The feathering effect softens harsh lines and adds dimension
- These pieces can be styled in or out depending on personal preference
27. Voluminous Curls with Blended Curtain Bangs
Voluminous curls paired with blended curtain bangs create the ultimate romantic, glamorous look. This style combines structure with softness for maximum impact and femininity.
Creating Voluminous Curls
- Start with clean, dry hair and apply a heat protectant spray throughout
- Section hair into 1-inch pieces for defined, voluminous curls
- Use a 1-inch curling iron, wrapping hair around the barrel away from the face
- Hold for 10-12 seconds to ensure long-lasting curl formation
- Allow each curl to cool in your hand before releasing to set the shape
- Once all sections are curled and cooled, flip head upside down
- Gently shake hair to add volume and create natural-looking fullness
- Style curtain bangs by curling them away from the center part with a small curling iron
- The curtain bangs should blend seamlessly into the curled hair
- Finish with a flexible-hold hairspray that maintains curl definition while allowing movement
Blending Curtain Bangs with Curls
- The key is ensuring the bangs flow naturally into the curled hair
- Curl the curtain bangs in the same direction as the surrounding hair
- Use the same size curling iron for consistency
- Don’t separate the curls in the bang area too much—they should blend rather than stand out
- This creates a cohesive, pulled-together appearance
Maintaining Voluminous Curls
- Sleep with hair in a loose pineapple ponytail on top of the head to preserve curls
- Use a silk or satin pillowcase to reduce friction and frizz
- Refresh curls in the morning with a curling iron on select pieces
- Apply dry shampoo at the roots to maintain volume between washes
- Use a curl-refreshing spray and scrunch to revive curls on day two or three
Essential Tools for All These Styles
To achieve salon-quality results at home, investing in professional-grade tools makes a significant difference in the final outcome.
Must-Have Styling Tools
| Tool | Size/Type | Best For | Key Features |
|---|---|---|---|
| Blow Dryer | 1800+ watts with concentrator nozzle | All styles requiring smooth blowouts | Multiple heat settings, cool shot button |
| Round Brushes | Small (1-2″), Medium (2-3″), Large (3-4″) | Creating volume, shaping bangs, adding curl | Ceramic barrel for even heat distribution |
| Paddle Brush | Boar bristle or mixed bristles | Smoothing, creating sleek styles | Wide surface area for efficient styling |
| Curling Iron | 1-1.5 inch barrel | Medium-length waves and curls | Adjustable temperature, quick heat-up |
| Flat Iron | 1-1.5 inch ceramic or titanium plates | Straightening, creating bends | Temperature control, smooth glide |
Professional Product Categories
- Heat protectants: Shield hair from damage during blow-drying and heat styling
- Volumizing products: Mousses, sprays, and powders that create lift and body
- Smoothing products: Serums, creams, and oils that control frizz and add shine
- Texturizing products: Sprays, pastes, and creams that enhance separation and definition
- Finishing products: Hairsprays that set styles while maintaining natural movement
Styling Tips for Longevity
Making your salon-quality blowout last requires proper techniques and maintenance between styling sessions.
Extending Your Blowout
- Sleep strategically: Use a silk or satin pillowcase to reduce friction, or sleep with hair in a loose, high ponytail
- Apply dry shampoo proactively: Use it before bed on clean hair to absorb oils before they develop
- Avoid touching: Constantly running fingers through hair transfers oils and disrupts the style
- Use minimal water: When washing face or showering, keep hair away from water and steam
- Refresh selectively: Only restyle the sections that need it rather than starting over completely
Common Styling Mistakes to Avoid
- Applying too much product, which weighs hair down and creates buildup
- Using heat tools on wet or damp hair, causing damage and ineffective styling
- Skipping heat protectant, leading to long-term hair damage and breakage
- Blow-drying too close to the hair, concentrating heat in one spot
- Not allowing hair to cool before manipulating it, preventing styles from setting properly
- Using tools at temperatures that are too high for your hair type
- Neglecting regular trims, allowing split ends to travel up the hair shaft
Choosing the Right Style for Your Face Shape
Different face shapes are complemented by specific bang styles and overall hair shapes that create balance and harmony.
Face Shape Guide
Oval Face:
- Most versatile face shape that can wear virtually any bang style
- Blunt bangs, curtain bangs, side-swept bangs all work beautifully
- Focus on personal style preference rather than face shape constraints
Round Face:
- Side-swept bangs create angles and elongate the face
- Longer curtain bangs that part in the center add length
- Avoid heavy, straight-across bangs that emphasize roundness
- Layered styles with volume on top create the illusion of length
Square Face:
- Soft, wispy bangs that blend into the hairline soften angular features
- Side-swept or curtain bangs that graze the jawline create balance
- Avoid blunt, heavy bangs that emphasize the strong jaw
- Texture and movement throughout the hair soften squared features
Heart-Shaped Face:
- Full, side-swept bangs balance a wider forehead with a narrow chin
- Curtain bangs draw attention to the eyes and cheekbones
- Avoid micro or baby bangs that emphasize the wider forehead
- Volume at the chin level creates balance with the forehead width
Long/Oblong Face:
- Straight-across, full bangs visually shorten a long face
- Blunt cuts that add width create better proportions
- Avoid excessive height or volume on top, which elongates further
- Horizontal lines created by bangs break up vertical length
Conclusion
Finding your perfect look among these 27 Blowout-Ready Medium-Length Hairstyles with Bangs for a Salon Finish empowers you to achieve professional results at home while expressing your unique personal style.
Medium-length hair offers the ideal canvas for experimentation—long enough to create beautiful movement and styling options yet short enough to remain manageable and practical for daily life.
The addition of bangs, whether curtain, blunt, wispy, or side-swept, adds dimension and face-framing beauty that can transform your entire appearance.
By understanding the proper techniques, investing in quality tools, and selecting the styles that complement your face shape and lifestyle, you can master salon-worthy blowouts that boost your confidence and turn heads wherever you go.
Remember that achieving these looks takes practice, so be patient with yourself as you develop your styling skills. Start with the techniques that seem most approachable, gradually building your confidence and expanding your repertoire of styles.
Don’t be afraid to experiment with different looks for various occasions, adapting these styles to suit your personal aesthetic and the demands of your daily life.
With the comprehensive guidance provided throughout this article, you now have everything you need to create stunning, professional-looking hairstyles that make you feel beautiful, confident, and ready to take on the world with your perfect medium-length hair and bangs combination.
