Finding the perfect hairstyle for a wedding can feel overwhelming, but it doesn’t have to be a source of stress. Whether you’re attending a formal evening celebration or a casual garden ceremony, having an elegant updo that you can create yourself saves time, money, and last-minute panic.
This comprehensive guide to the Top 27 Easy Wedding Guest Updos will walk you through stunning hairstyles that look professionally done but are simple enough to master at home.
From classic chignons to romantic twisted styles, you’ll discover versatile options suitable for every hair type, length, and skill level, ensuring you look absolutely radiant while celebrating the happy couple.
1. Classic Low Bun
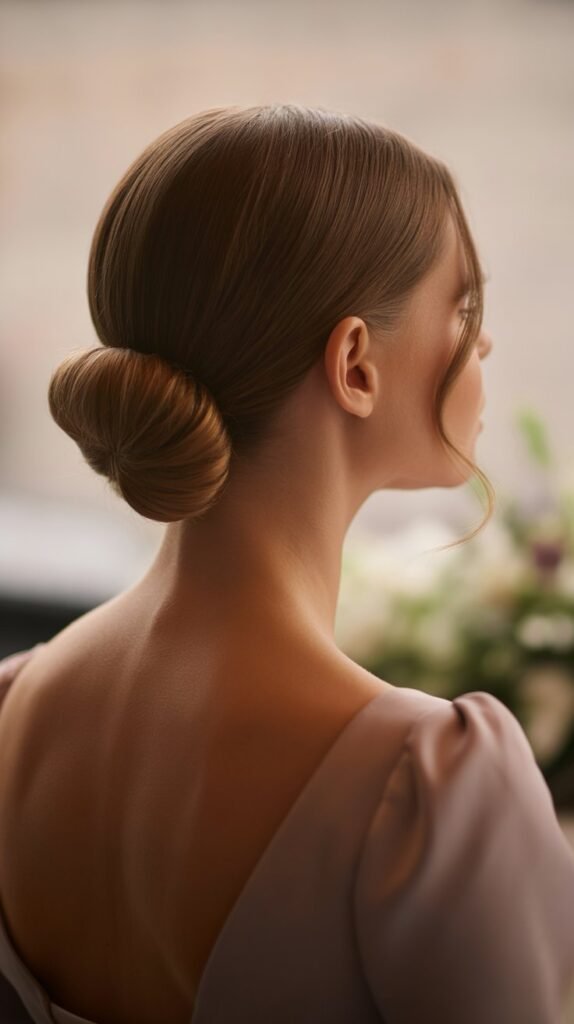
The classic low bun remains a timeless choice for wedding guests seeking understated elegance.
This versatile style works beautifully with both casual and formal attire, making it a reliable option regardless of the wedding’s dress code.
How to Create:
- Brush your hair thoroughly to remove all tangles and create a smooth base for styling.
- Apply a smoothing serum or light styling cream to tame flyaways and add shine.
- Gather your hair at the nape of your neck and secure it with a hair elastic.
- Twist the ponytail gently and wrap it around the base to form a circular bun shape.
- Secure the bun with bobby pins, inserting them at various angles for maximum hold.
- Finish with a light mist of hairspray to maintain the style throughout the event.
Best For: All hair types, particularly straight to wavy hair textures, and works perfectly for formal wedding settings.
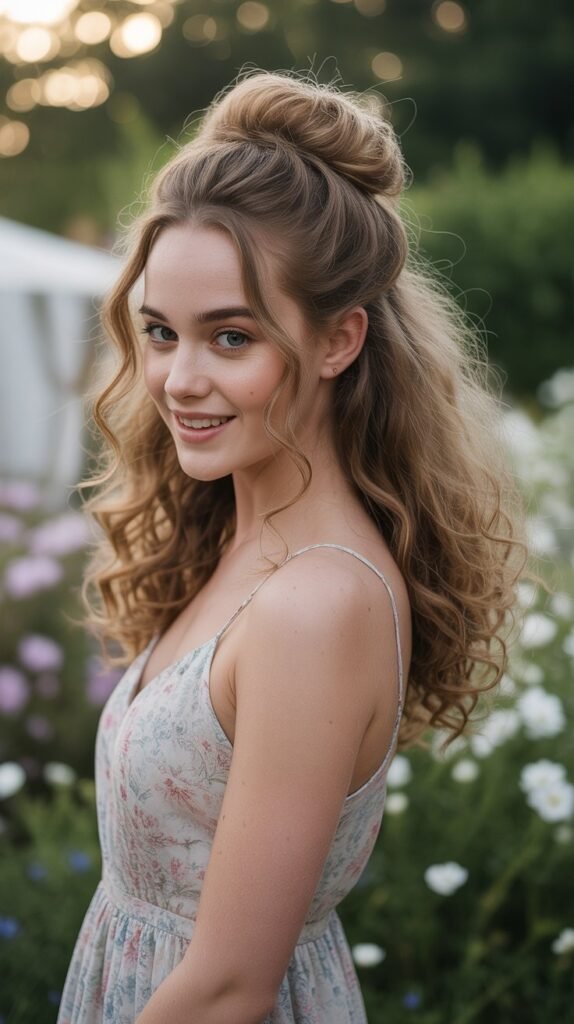
2. Messy Top Knot
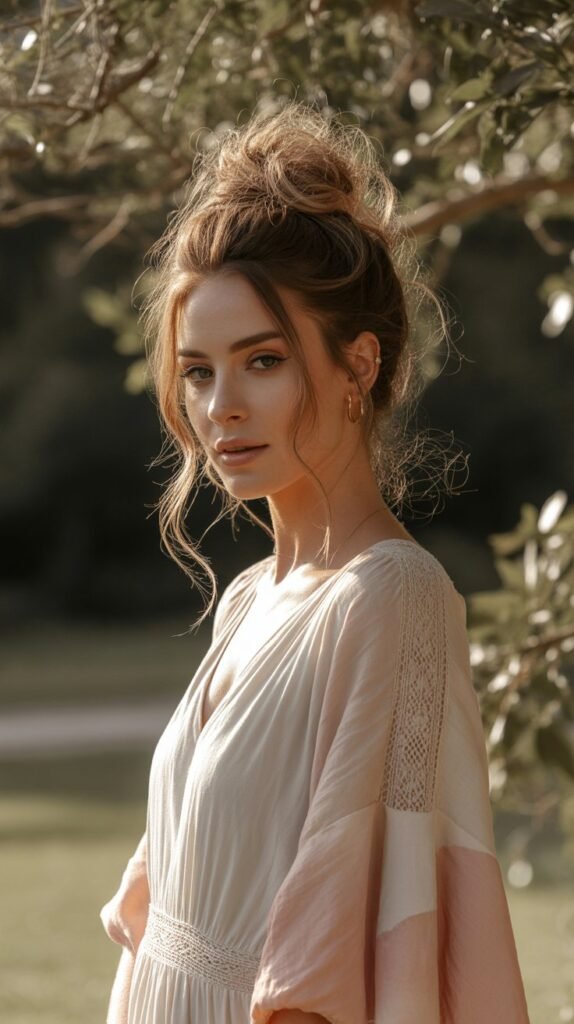
The messy top knot brings effortless chic to any wedding guest look.
This relaxed style balances sophistication with a carefree vibe, perfect for outdoor or boho-themed celebrations.
Styling Steps:
- Flip your head upside down and gather all your hair at the crown of your head.
- Secure the hair with a strong elastic, leaving the ends loosely pulled through on the final wrap.
- Gently pull and separate sections of the bun to create volume and texture.
- Allow a few face-framing pieces to fall naturally for a softer appearance.
- Use your fingers to adjust the messiness level according to your preference.
- Set with a flexible-hold hairspray that maintains movement while keeping the style intact.
Best For: Medium to long hair lengths, casual to semi-formal weddings, and those wanting a quick styling solution.
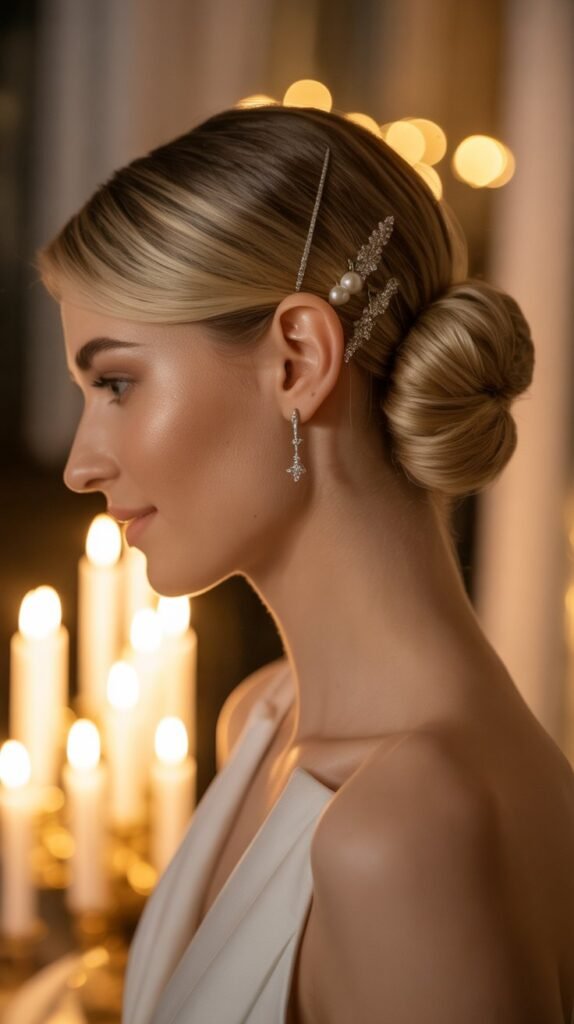
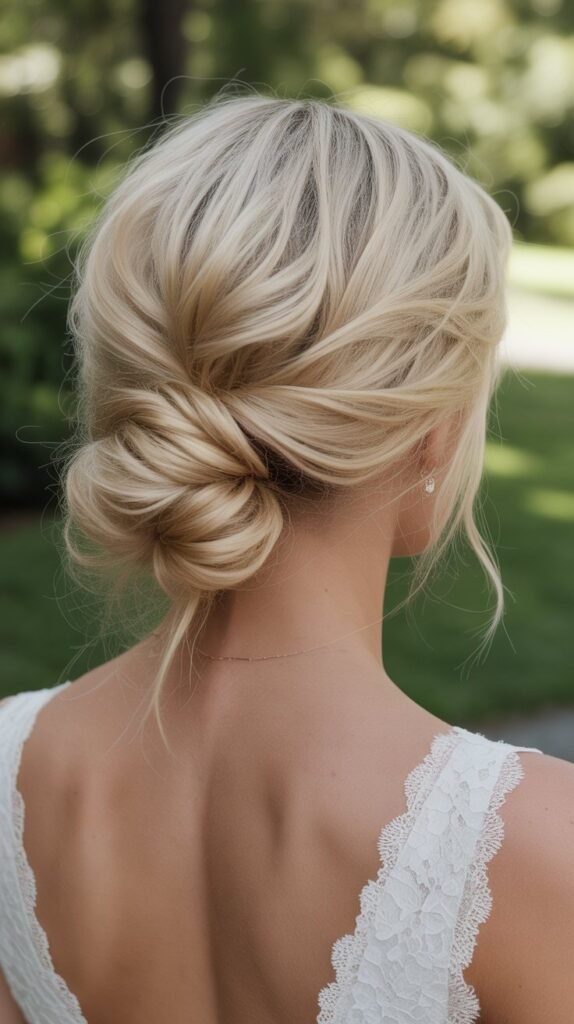
3. Twisted Low Chignon
The twisted low chignon elevates the simple bun with elegant twists that add visual interest.
This sophisticated style offers a polished appearance while remaining comfortable for hours of celebrating.
Creation Process:
- Part your hair down the middle or create a deep side part based on your preference.
- Divide your hair into two equal sections at the nape of your neck.
- Twist each section individually in the same direction, working from roots to ends.
- Cross the twisted sections over each other and continue twisting them together.
- Wrap the combined twist into a low bun at one side of your nape.
- Secure firmly with bobby pins and apply hairspray for lasting hold.
Best For: Fine to medium hair textures, formal evening weddings, and vintage-inspired wedding themes.
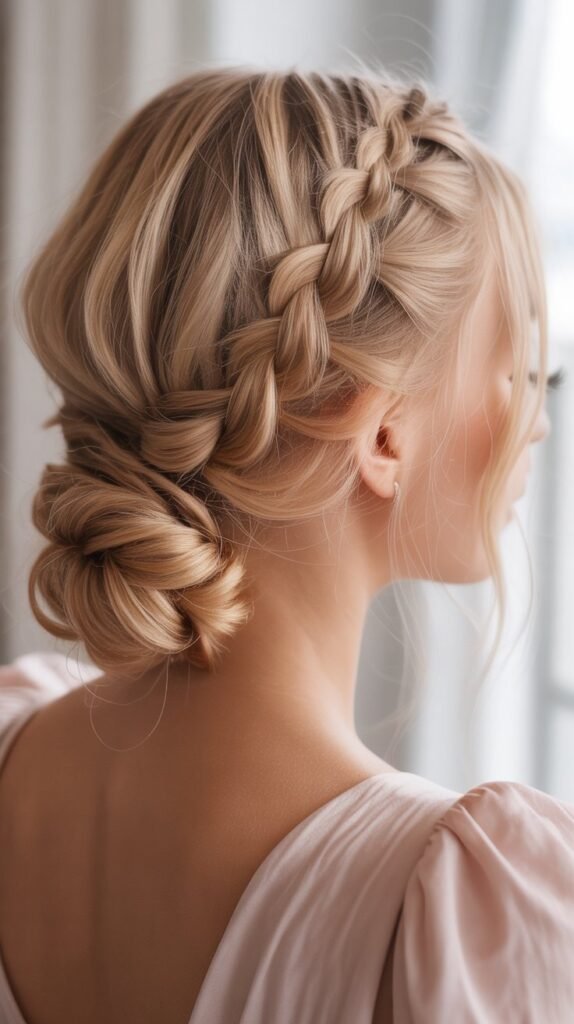
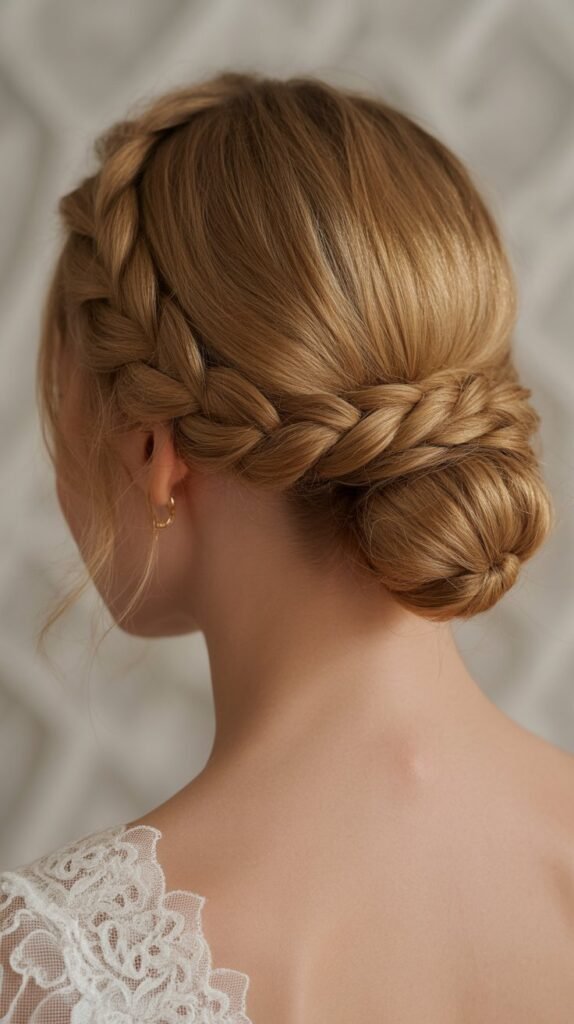
4. Braided Crown Updo
The braided crown updo creates a romantic, fairy-tale aesthetic perfect for garden or spring weddings.
This style combines the beauty of braiding with the practicality of an updo.
Instructions:
- Create a deep side part and separate a two-inch section of hair near your part.
- Begin a Dutch or French braid along your hairline, incorporating new hair as you work around your head.
- Continue the braid crown until you reach the opposite side behind your ear.
- Gather the remaining loose hair and the braid end into a low bun or twisted chignon.
- Secure the bun with pins and gently pancake the braid to create width and texture.
- Finish by tucking any loose ends into the style and misting with hairspray.
Best For: Long hair, romantic or rustic wedding themes, and those comfortable with basic braiding techniques.
5. Sleek High Bun
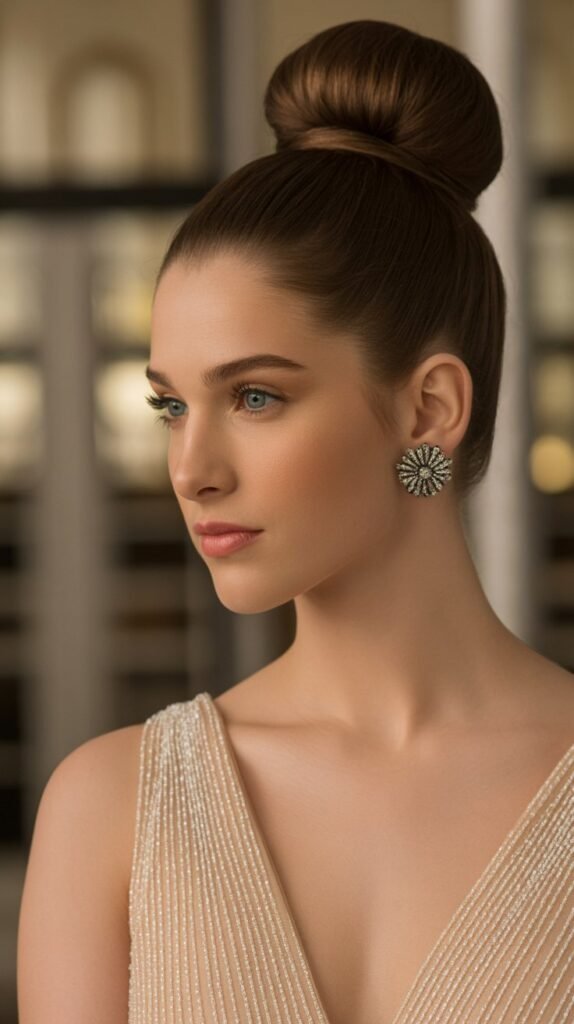
The sleek high bun delivers modern sophistication with its polished, refined appearance.
This style showcases your facial features beautifully and pairs perfectly with statement earrings.
Styling Method:
- Apply smoothing cream throughout your hair while it’s slightly damp for maximum sleekness.
- Use a fine-tooth comb to brush all hair straight up toward the crown of your head.
- Secure the high ponytail tightly with a strong elastic band.
- Smooth any bumps or flyaways with a boar bristle brush and additional product.
- Twist the ponytail and wrap it around the base to create a compact, neat bun.
- Pin securely and use edge control or gel to slick down baby hairs along the hairline.
Best For: Straight or relaxed hair types, black-tie weddings, and modern minimalist aesthetics.
6. Side-Swept Low Bun
The side-swept low bun offers asymmetrical elegance that photographs beautifully from every angle.
This style adds drama while maintaining classic sophistication.
How to Achieve:
- Create a deep side part on your preferred side for maximum impact.
- Sweep all your hair to one side at the nape of your neck behind your ear.
- Secure with an elastic positioned slightly off-center to one side.
- Twist or roll the ponytail and pin it into a bun shape along the side of your neck.
- Leave a few soft pieces around your face or tuck everything smoothly for different looks.
- Apply finishing spray and add decorative pins or hair jewelry if desired.
Best For: All hair types, cocktail attire weddings, and those wanting Hollywood glamour.
7. Double Twisted Bun
The double twisted bun creates dimension through two separate twists combined into one sophisticated updo.
This technique adds interest to what might otherwise be a simple style.
Step-by-Step:
- Divide your hair vertically down the middle from forehead to nape into two equal sections.
- Create a low ponytail with each section, positioning them side by side at your nape.
- Twist each ponytail individually several times until they begin to coil.
- Wrap one twisted ponytail around its base to form a small bun and pin securely.
- Repeat with the second twisted ponytail, positioning it next to or slightly overlapping the first bun.
- Adjust both buns to create a cohesive look and secure any loose pieces with additional pins.
Best For: Thick hair, semi-formal weddings, and adding volume to fine hair through the double bun technique.
8. Pinned Curl Updo
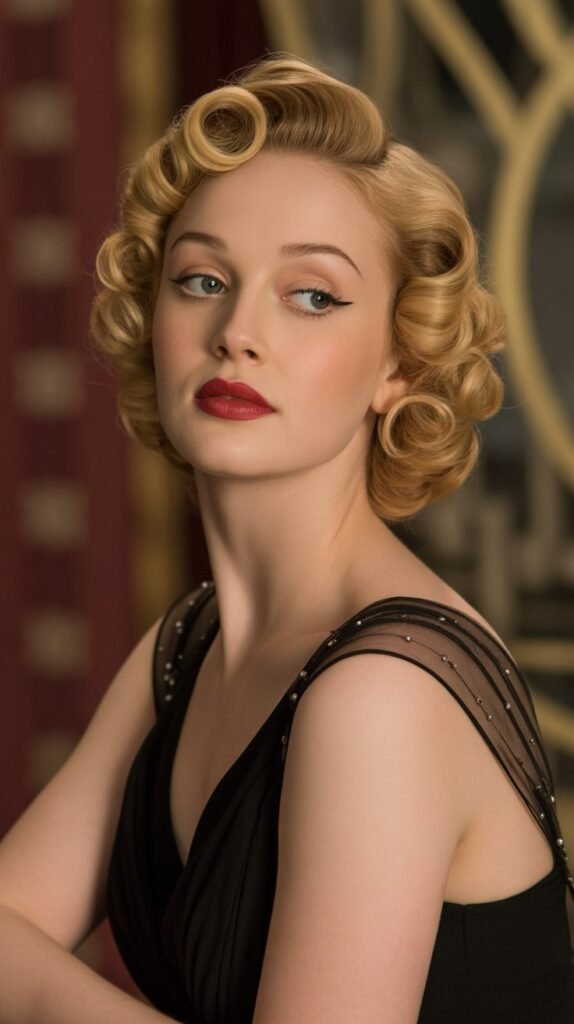
The pinned curl updo brings vintage glamour reminiscent of Old Hollywood starlets.
This style works exceptionally well for retro-themed weddings or evening celebrations.
Creating the Look:
- Start with hair that has been curled with a medium-barrel curling iron throughout.
- Allow the curls to cool completely, then gently brush them out for a softer wave texture.
- Section the hair and begin pinning curls up toward the back of your head in rolled formations.
- Continue pinning curls in a random or structured pattern until all hair is secured.
- Leave some curls slightly loose for dimension rather than pinning everything flat against the head.
- Set with medium-hold hairspray and add a decorative hair clip for extra vintage appeal.
Best For: Medium to long hair, vintage-themed or formal evening weddings, and those loving retro aesthetics.
9. Bubble Ponytail Updo
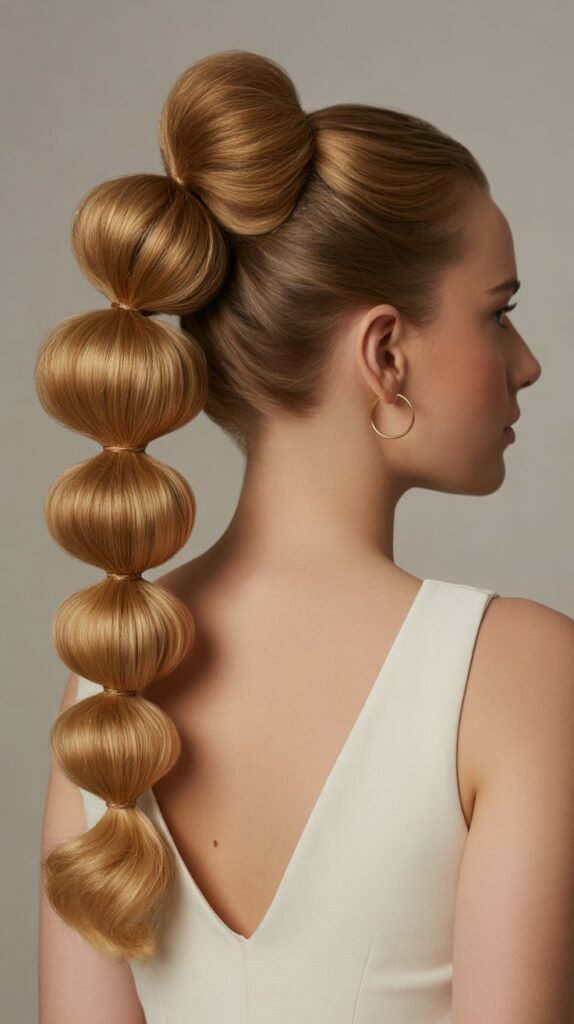
The bubble ponytail updo transforms a playful style into an elegant wedding-appropriate look.
This modern technique creates visual drama through segmented, voluminous sections.
How to Style:
- Create a high or mid-height ponytail at the back of your head and secure tightly.
- Place additional elastic bands down the length of the ponytail at 2-3 inch intervals.
- Gently pull and pancake each section between elastics to create bubble-like segments.
- Once all bubbles are formed, roll or wrap the entire ponytail upward toward the base.
- Pin the rolled bubbled ponytail against your head to create an updo formation.
- Finish with hairspray and adjust the bubble volumes for your desired fullness.
Best For: Long hair, contemporary or trendy weddings, and those wanting an Instagram-worthy hairstyle.
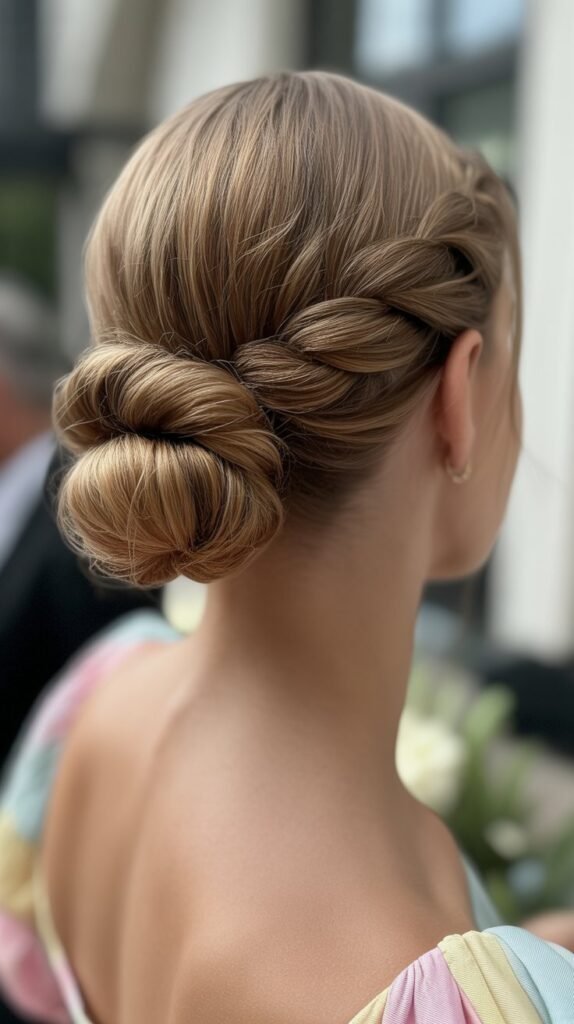
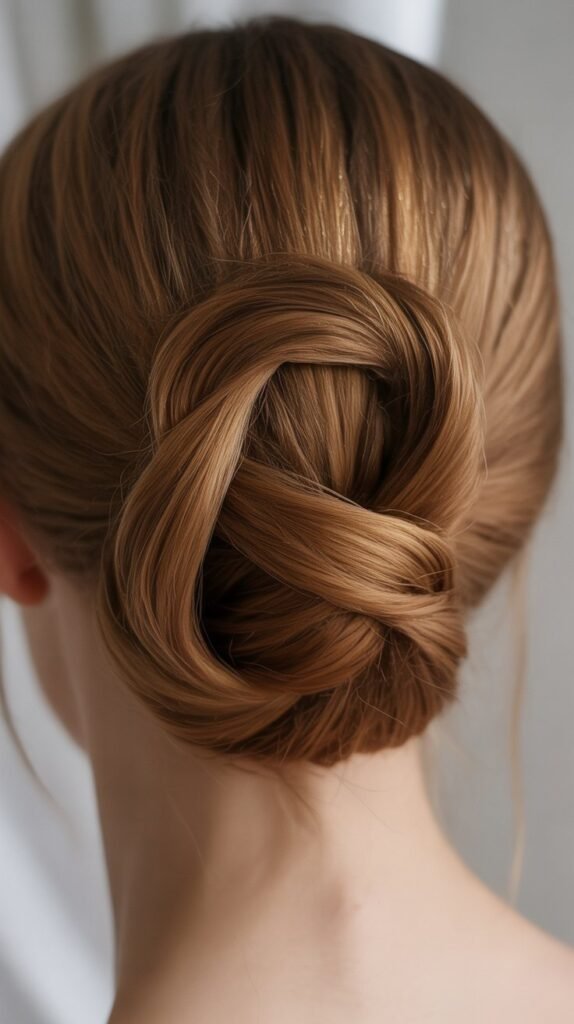
10. Knotted Low Updo
The knotted low updo uses simple hair-tying techniques to create an intricate-looking style.
This approach requires no braiding skills while still delivering impressive results.
Instructions:
- Divide your hair into two equal sections down the middle from crown to nape.
- Tie these two sections into a simple overhand knot at the nape of your neck.
- Continue knotting the same two sections one or two more times depending on hair length.
- Tuck the remaining ends under the knotted sections and pin them securely out of sight.
- Gently pull on the knots to loosen them slightly for added texture and volume.
- Set the style with hairspray and add small decorative pins between knots if desired.
Best For: Medium to long hair, bohemian or casual weddings, and beginners seeking easy techniques.
11. French Twist
The French twist epitomizes timeless elegance and Parisian chic.
This classic updo has graced countless formal events and remains a sophisticated choice for wedding guests.
Creating the French Twist:
- Brush all your hair straight back and gather it at the center back of your head.
- Hold the hair with one hand and begin twisting the length upward toward your crown.
- As you twist, the hair will naturally fold over itself creating the characteristic roll shape.
- Continue rolling upward until you reach the desired height, typically mid-head level.
- Secure the twist vertically with bobby pins inserted through the roll into the scalp underneath.
- Tuck the ends into the top of the twist or allow them to fan out slightly for a softer finish.
Best For: Straight to wavy hair, formal or black-tie weddings, and those wanting sophisticated elegance.
12. Braided Low Bun
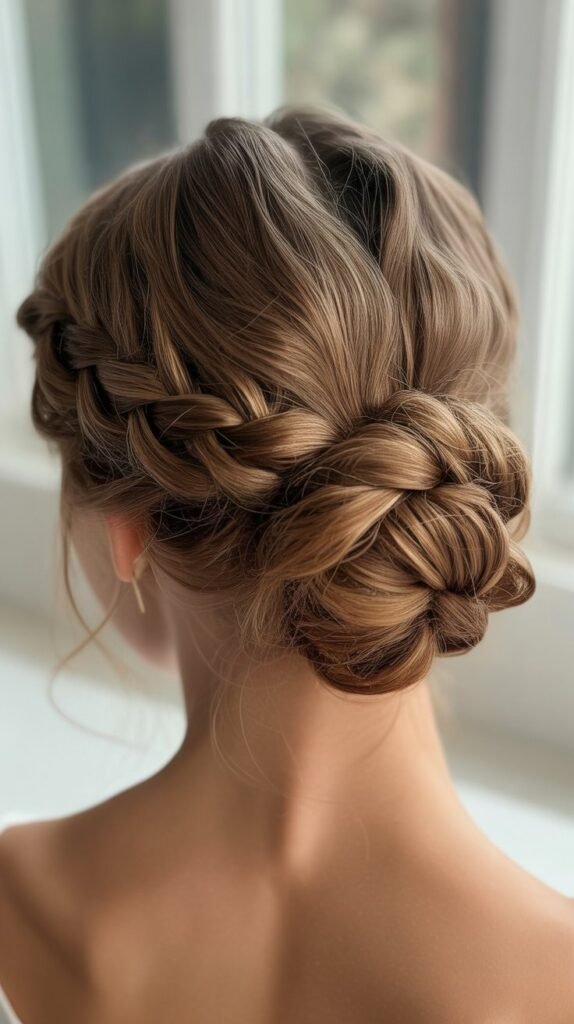
The braided low bun combines two beloved techniques into one stunning style.
The braid adds texture and visual interest to an otherwise simple bun formation.
Styling Steps:
- Create a low ponytail at the nape of your neck and secure with an elastic.
- Braid the entire length of the ponytail using a three-strand, fishtail, or rope braid technique.
- Secure the braid end with a small clear elastic to hold it in place.
- Wrap the completed braid around the base of the ponytail in a circular motion.
- Tuck the braid end underneath the bun and secure the entire formation with bobby pins.
- Gently pancake the braid before or after wrapping to create fuller, more textured appearance.
Best For: All hair types, rustic or romantic weddings, and adding interest to simple bun styles.
13. Half-Up Twisted Bun
The half-up twisted bun provides the best of both worlds by keeping hair off your face while showing off your length.
This versatile style suits various wedding formalities.
How to Create:
- Section the top half of your hair from ear to ear, leaving the bottom half down.
- Gather the top section at the crown or slightly lower depending on preference.
- Twist the gathered section several times until it begins to coil upon itself.
- Wrap the twisted section into a small bun and secure with bobby pins.
- Leave the bottom half of your hair straight, wavy, or curled based on your desired look.
- Apply light hairspray to the bun section while leaving the bottom half more natural.
Best For: Medium to long hair, semi-formal to casual weddings, and showcasing colored or highlighted hair.
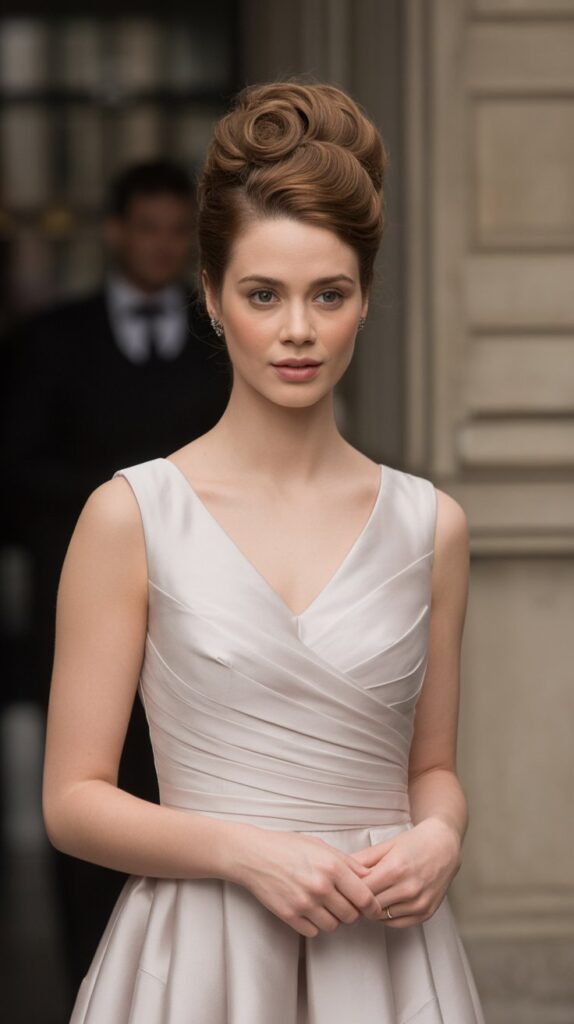
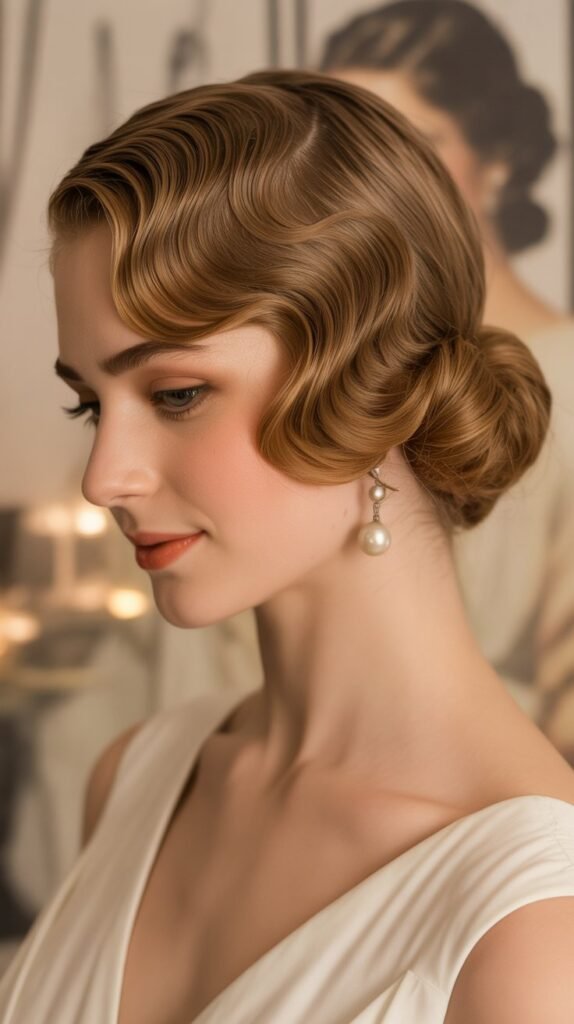
14. Rolled Updo
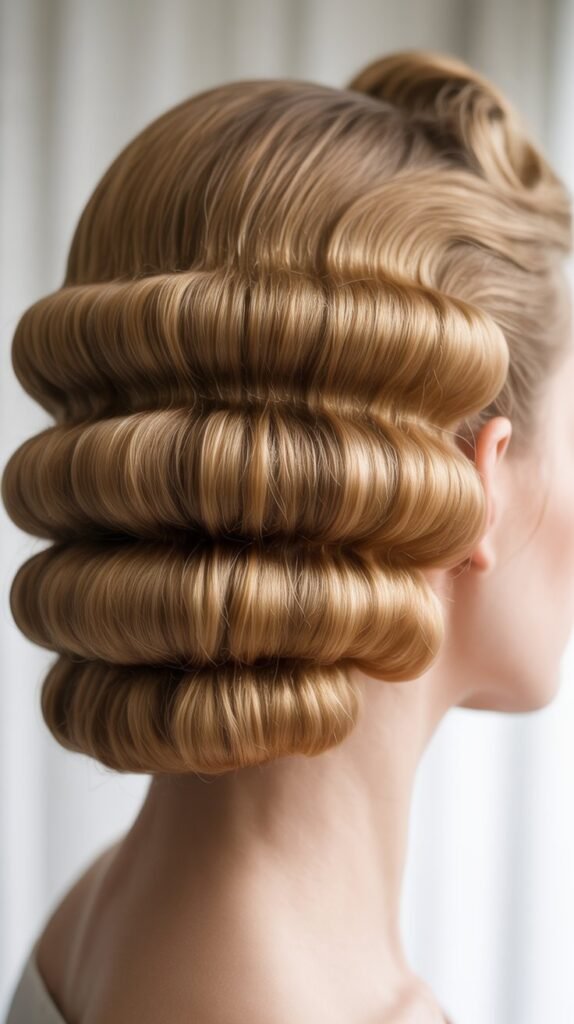
The rolled updo creates vintage-inspired sophistication through strategic rolling and pinning techniques.
This style evokes 1950s glamour while remaining wedding-appropriate.
Instructions:
- Section your hair into three horizontal layers: bottom, middle, and top sections.
- Begin with the bottom section, rolling the ends under toward your scalp and pinning horizontally.
- Move to the middle section and repeat the rolling process, pinning above the first roll.
- Continue with the top section, rolling and pinning it to complete the stacked formation.
- Smooth any flyaways and ensure all pins are hidden within the rolled sections.
- Finish with strong-hold hairspray to maintain the structured shape throughout the event.
Best For: Medium to long hair, vintage-themed weddings, and structured formal events.
15. Textured Low Ponytail Updo
The textured low ponytail updo elevates a simple ponytail through added volume and strategic pinning.
This style appears complex while remaining straightforward to create.
Styling Method:
- Tease the crown section of your hair to create volume and height at the top.
- Smooth the top layer over the teased section to hide the backcombing while maintaining volume.
- Gather all hair into a low ponytail, positioning it at the nape or slightly to one side.
- Wrap a small section of hair around the elastic to conceal it for a polished appearance.
- Take the ponytail and fold it upward, pinning it against your head to create an updo effect.
- Pull out small face-framing pieces and apply texturizing spray for a lived-in, romantic finish.
Best For: Fine to medium hair needing volume, bohemian or garden weddings, and romantic aesthetics.
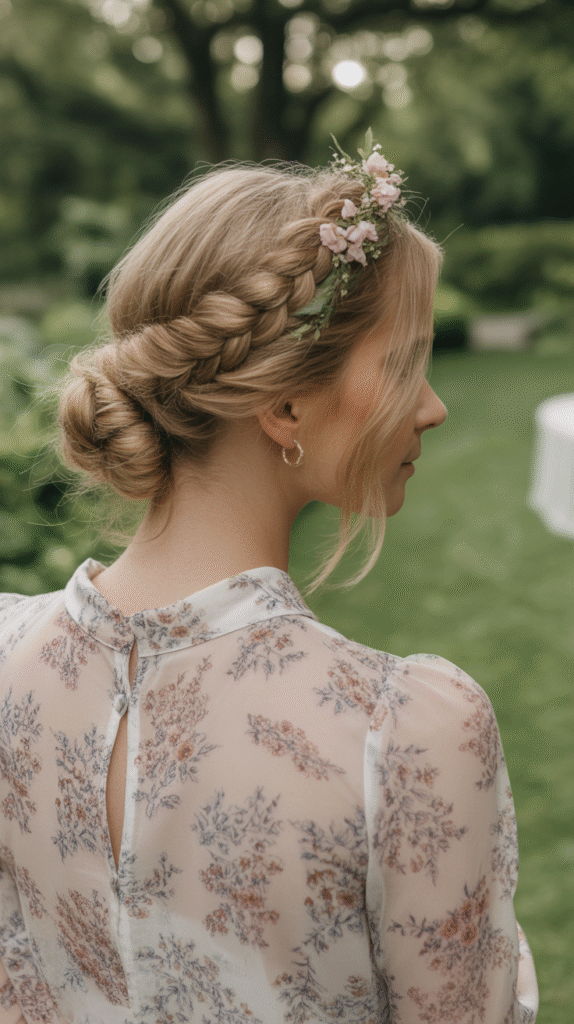
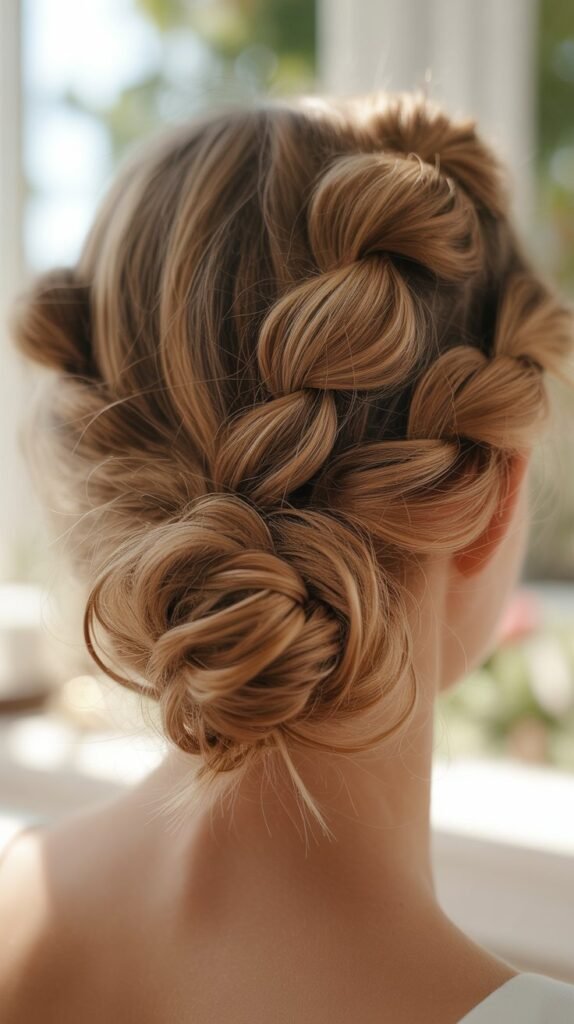
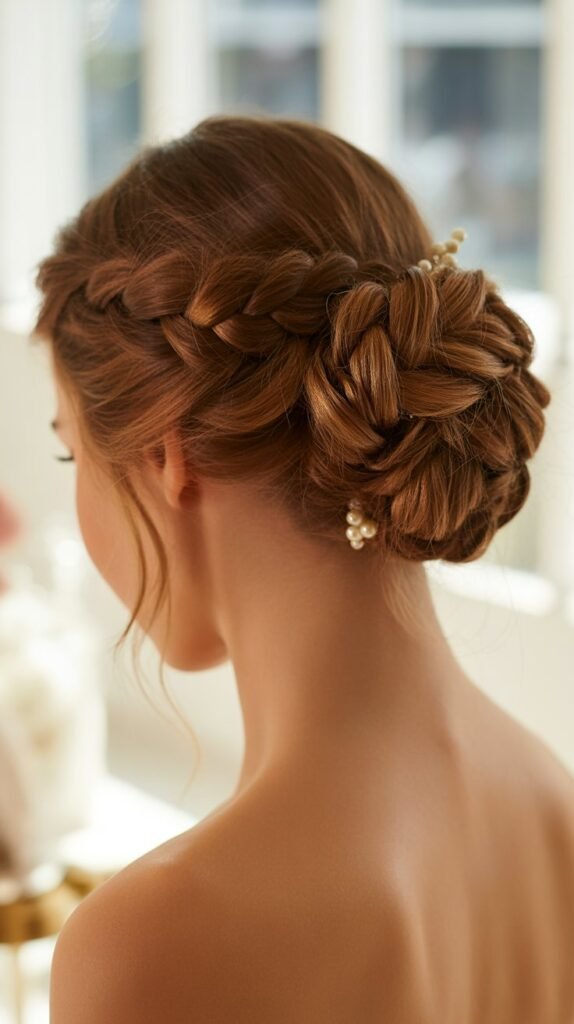
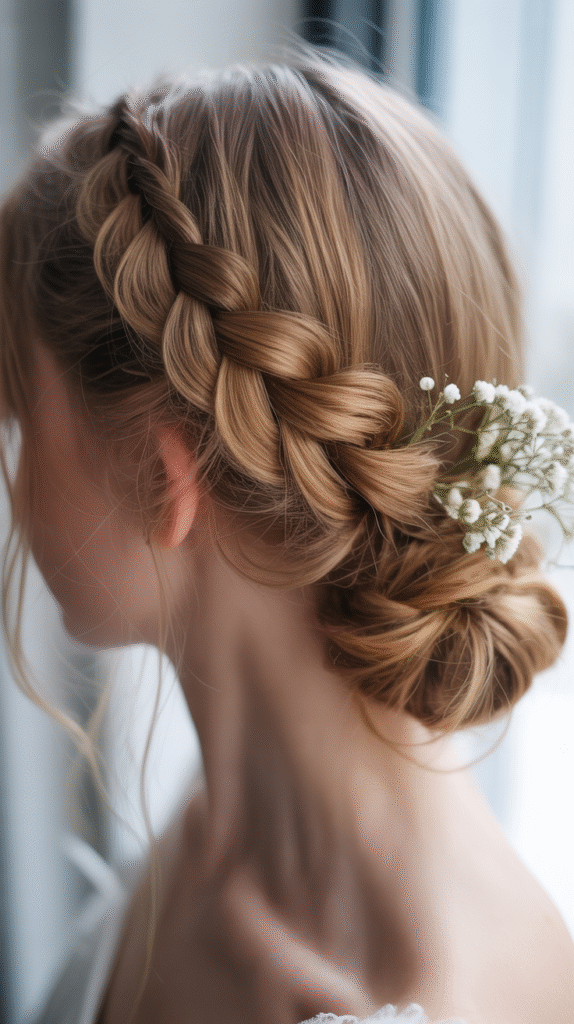
16. Braided Updo with Flowers

The braided updo with flowers creates a whimsical, romantic look perfect for spring or summer celebrations.
Fresh or artificial flowers elevate this style from beautiful to breathtaking.
Creating the Style:
- Begin by creating a Dutch or French braid starting from one side of your hairline.
- Continue the braid loosely around the back of your head toward the opposite side.
- Gather any remaining loose hair and incorporate it into a low bun or twisted chignon.
- Gently pancake the braid to create width and a more relaxed, romantic appearance.
- Insert small fresh flowers, baby’s breath, or decorative floral pins throughout the braid and bun.
- Secure flowers with small bobby pins or hairpins, ensuring they’re stable for the duration of the event.
Best For: Long hair, outdoor or garden weddings, and romantic or bohemian themes.
17. Crossover Low Bun
The crossover low bun uses intersecting sections to create a unique geometric pattern.
This modern technique offers visual interest through its distinctive crossed appearance.
Step-by-Step:
- Divide your hair into two equal sections vertically down the middle of your head.
- Create a low ponytail with the right section on the left side of your nape.
- Create a low ponytail with the left section on the right side of your nape, crossing over the first.
- Twist each ponytail and wrap them around their respective bases to form two small buns.
- Adjust the crossed sections to ensure the pattern is visible and aesthetically pleasing.
- Secure both buns firmly with bobby pins and finish with hairspray for hold.
Best For: Medium to thick hair, contemporary or modern weddings, and those wanting unique styling.
18. Low Twisted Ponytail Tuck
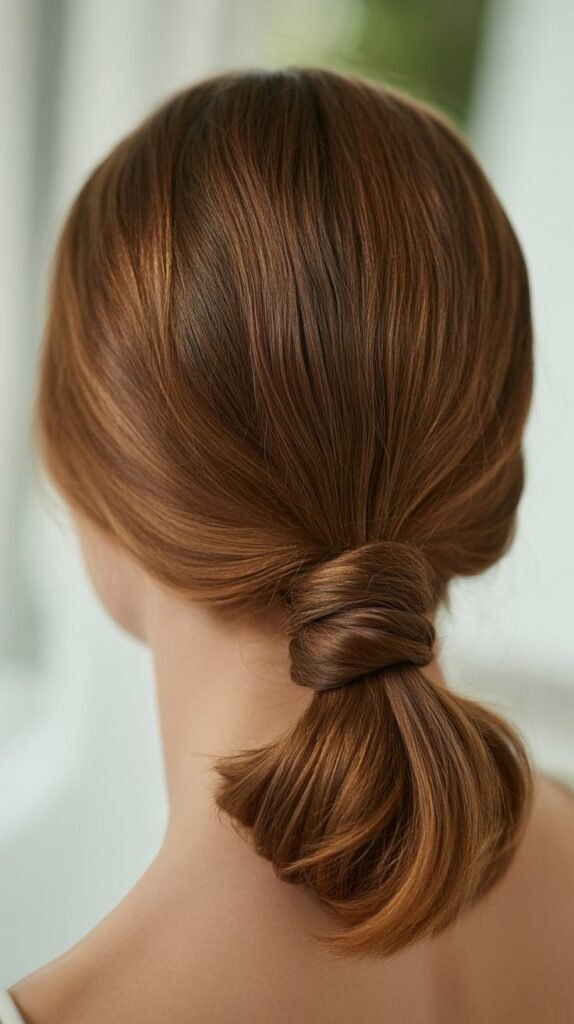
The low twisted ponytail tuck provides effortless elegance through a simple tucking technique.
This understated style offers sophistication without requiring advanced skills.
How to Achieve:
- Create a low ponytail at the nape of your neck, securing it with an elastic.
- Position your fingers above the elastic and create a small opening in the hair.
- Flip the ponytail up and through this opening, creating an inverted or topsy-tail effect.
- Take the length of the ponytail and tuck it upward into the space above the elastic.
- Pin the tucked hair securely against your head, creating a rolled updo appearance.
- Adjust the tightness and smooth any bumps for your desired finish, then apply hairspray.
Best For: Medium length hair, casual to semi-formal weddings, and quick styling needs.
19. Faux Hawk Updo
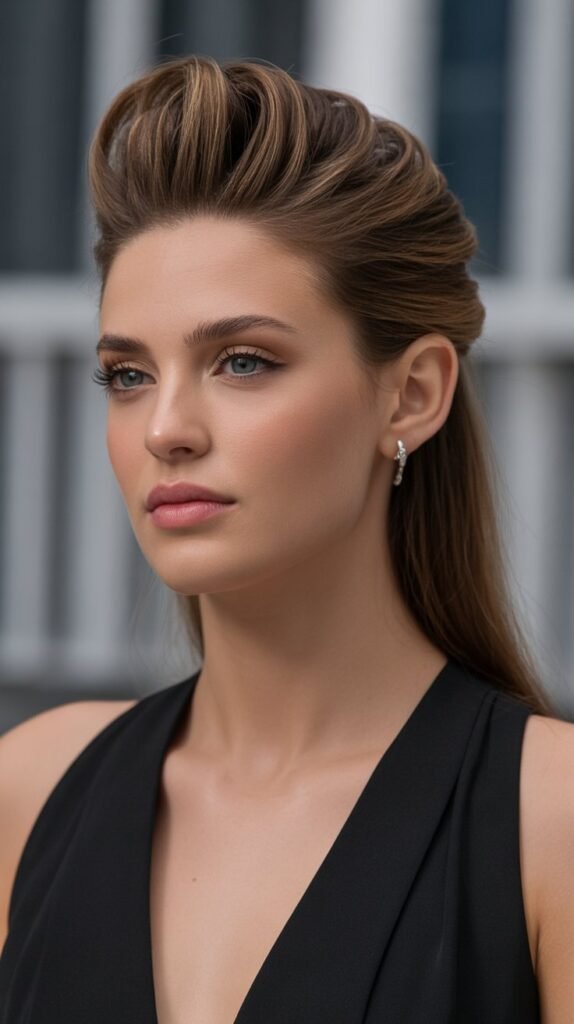
The faux hawk updo brings edgy sophistication to wedding guest styling.
This bold choice works surprisingly well for fashion-forward celebrations while maintaining appropriate elegance.
Instructions:
- Section your hair into three vertical sections: center and two sides.
- Pin or slick the side sections down flat against your head toward the back.
- Tease the center section generously to create substantial height and volume.
- Smooth the top layer of the center section while maintaining the volume underneath.
- Pin the center section back in rolled or twisted formations to create the faux hawk shape.
- Secure all sections firmly and finish with strong-hold hairspray for lasting structure.
Best For: Medium to long hair, contemporary or unconventional weddings, and bold fashion statements.
20. Gibson Tuck
The Gibson Tuck offers vintage charm through its characteristic tucked and rolled appearance.
This classic style has endured through decades while maintaining its romantic appeal.
Styling Steps:
- Create a low ponytail at the nape, securing it loosely with an elastic.
- Form an opening above the elastic by separating the hair into two sections.
- Tuck the ponytail up and through this opening, rolling it under into the space.
- Continue tucking the length of hair upward, rolling and pinning it against your head.
- Ensure all ends are hidden within the tuck and secure with multiple bobby pins.
- Gently pull and loosen the rolled sections for a softer, more romantic appearance.
Best For: Medium to long hair, vintage or classic wedding themes, and romantic aesthetics.
21. Rope Braid Bun
The rope braid bun creates texture through a simple two-strand twisting technique that mimics rope.
This style offers visual interest while remaining easy to execute.
How to Create:
- Gather your hair into a ponytail at your desired height and secure with an elastic.
- Divide the ponytail into two equal sections for the rope braid technique.
- Twist each section individually in a clockwise direction several times until tight.
- Cross the two twisted sections over each other in a counter-clockwise direction, creating the rope effect.
- Continue twisting and crossing until you reach the ends, then secure with an elastic.
- Wrap the rope braid around the ponytail base and pin securely to form the bun.
Best For: All hair types, rustic or casual weddings, and adding texture to straight hair.
22. Side Braid into Bun
The side braid into bun combines asymmetrical styling with practical updo formation.
This romantic style works beautifully for various wedding themes and seasons.
Creating the Look:
- Sweep all your hair to one side of your head, either left or right based on preference.
- Begin a three-strand or Dutch braid starting from behind your ear on the opposite side.
- Continue braiding as you bring the hair toward your preferred side, incorporating all hair.
- Once the braid reaches the side, secure the end and wrap it into a low side bun.
- Pin the bun securely behind or below your ear for a romantic side placement.
- Pancake the braid gently and finish with hairspray to maintain the style.
Best For: Long hair, romantic or bohemian weddings, and showcasing side styling.
23. Ballerina Bun
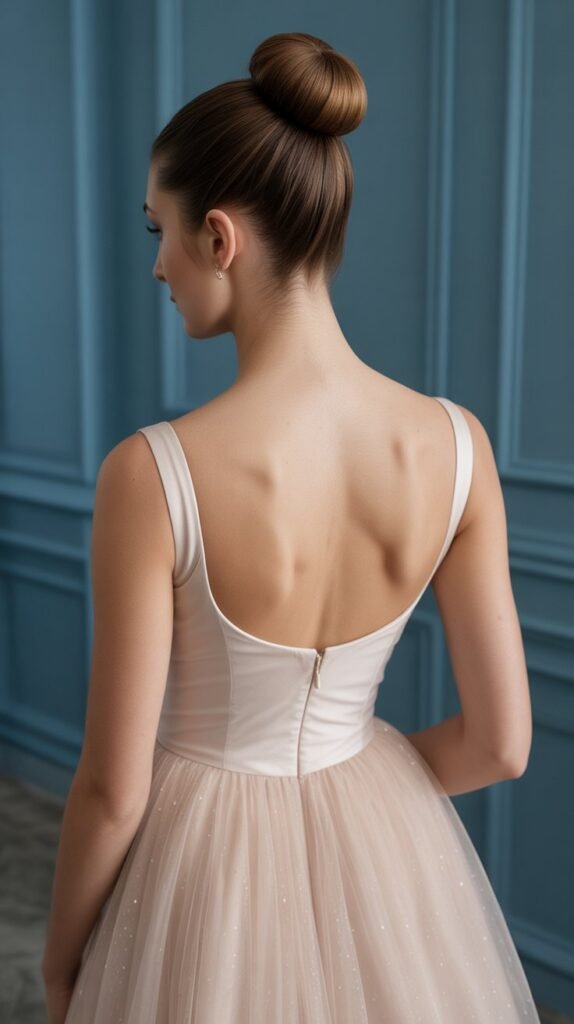
The ballerina bun delivers classic sophistication with its high, smooth placement.
This dance-inspired style offers timeless elegance suitable for formal wedding celebrations.
Styling Method:
- Brush all hair upward and gather it at the crown of your head into a high ponytail.
- Secure the ponytail tightly with a strong elastic to ensure it stays elevated throughout wear.
- Twist the ponytail length and wrap it around the base in a circular motion.
- Tuck the ends underneath the bun and secure with bobby pins inserted at various angles.
- Use a hair donut or bun form underneath if you desire additional volume and perfect roundness.
- Smooth any flyaways with gel or edge control and finish with hairspray for a polished result.
Best For: Long hair, formal or black-tie weddings, and classic elegant aesthetics.
24. Infinity Bun
The infinity bun creates a unique figure-eight shape that stands out from traditional circular buns.
This creative style offers modern flair while remaining wedding-appropriate.
Instructions:
- Create two separate low ponytails positioned side by side at the nape of your neck.
- Twist each ponytail individually to prepare them for wrapping.
- Wrap the left ponytail in a circular motion to form the left loop of the figure-eight.
- Wrap the right ponytail to form the right loop, ensuring both loops are similar in size.
- Pin both loops securely where they meet in the center to reinforce the infinity shape.
- Adjust both sides for symmetry and finish with hairspray to maintain the distinctive shape.
Best For: Thick hair, contemporary weddings, and those wanting unique creative styling.
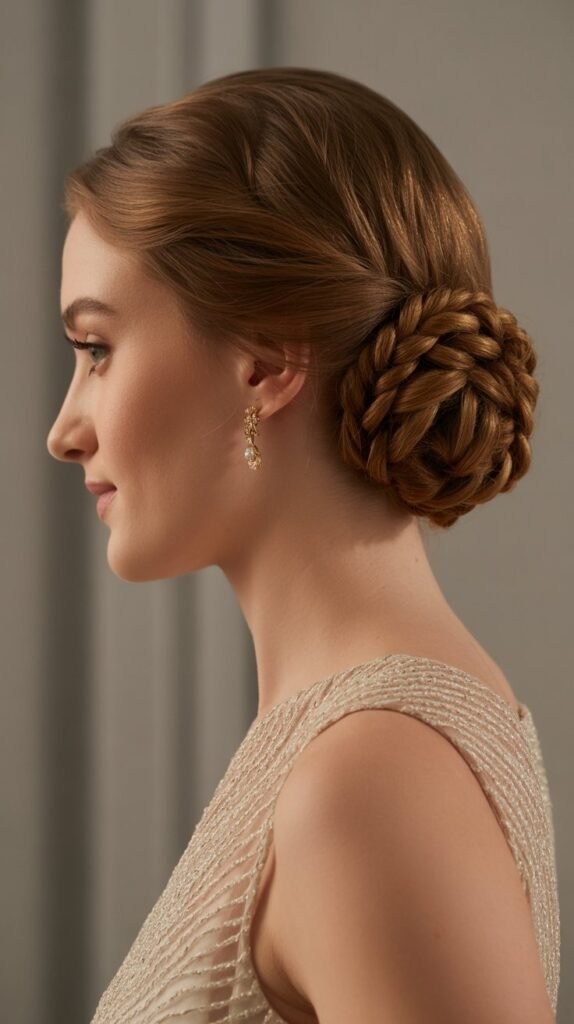
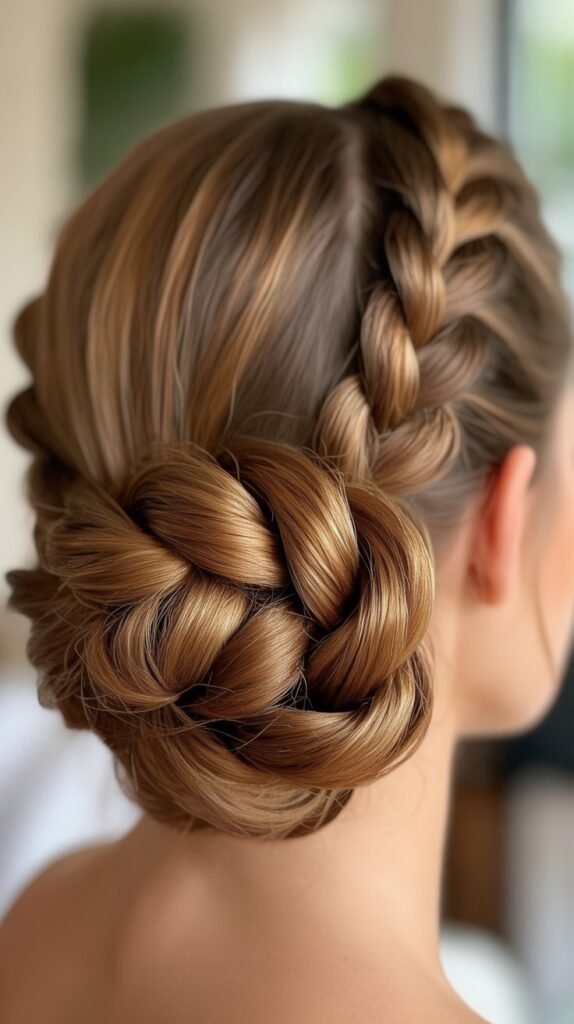
25. Braided Chignon
The braided chignon combines the sophistication of a classic chignon with the textured beauty of braiding.
This hybrid style offers the best elements of both techniques.
Step-by-Step:
- Create one large braid or multiple smaller braids with all of your hair length.
- Leave the braids slightly loose rather than pulling them extremely tight for better texture.
- Gather the braid or braids at the nape of your neck into a low cluster.
- Wrap and fold the braids around themselves to create a chignon shape at the nape.
- Pin the braided chignon securely from multiple angles to ensure stability.
- Gently pull on the braids to create additional volume and dimension before setting with spray.
Best For: Medium to long hair, formal or romantic weddings, and combining multiple techniques.
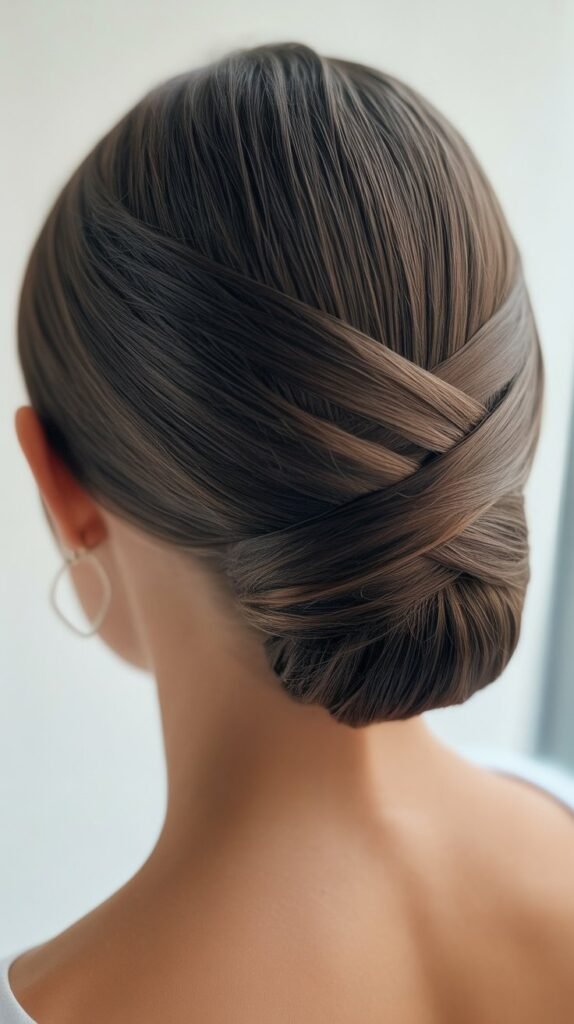
26. Twisted Crown into Low Bun
The twisted crown into low bun creates a regal appearance through crown-framing twists.
This style offers face-framing beauty while keeping hair secured and elegant.
How to Achieve:
- Create a center or side part and section out the front portions of hair along your hairline.
- Twist each front section backward toward the crown, keeping the twists tight and smooth.
- Secure each twist at the crown area with bobby pins, creating a crown-like frame.
- Gather the remaining loose hair at the nape and form it into a low bun using your preferred technique.
- Ensure the twists connect smoothly with the bun formation for a cohesive appearance.
- Finish with hairspray and consider adding decorative pins where the twists meet the bun.
Best For: Medium to long hair, formal or semi-formal weddings, and face-framing styles.
27. Waterfall Braid into Bun
The waterfall braid into bun showcases the delicate beauty of waterfall braiding technique.
This romantic style creates the illusion of cascading hair sections before gathering into a bun.
Creating the Style:
- Begin a waterfall braid at one temple, taking three strands and starting a basic braid pattern.
- As you braid, drop the bottom strand and pick up a new section from above to replace it.
- Continue the waterfall pattern around the back of your head toward the opposite side.
- Once you’ve completed the waterfall section, transition into a regular braid with remaining hair.
- Gather all loose hair including the dropped waterfall sections into a low bun at the nape.
- Pin the bun securely and adjust the waterfall sections to ensure they’re visible and flowing gracefully.
Best For: Long hair, romantic or outdoor weddings, and those comfortable with advanced braiding.
Essential Tools and Products for Wedding Guest Updos
Creating beautiful updos requires the right tools and products to ensure your style lasts throughout the celebration.
Must-Have Tools:
- Quality bobby pins in colors matching your hair for invisible hold and security.
- Small clear elastic bands to create foundation ponytails without visible bulk.
- Fine-tooth comb for smoothing sections and creating clean parts throughout your style.
- Paddle brush for detangling and smoothing hair before beginning the styling process.
- Tail comb for precise sectioning and creating the opening for tucked styles.
- Hair donut or bun form for added volume in traditional bun styles.
Recommended Products:
- Smoothing serum or cream to eliminate frizz and add shine to polished styles.
- Texturizing spray for creating grip and volume in messy or textured updos.
- Strong-hold hairspray that maintains style without creating stiffness or crunchiness.
- Dry shampoo for adding volume at roots and extending the life of second-day hair.
- Edge control or gel for smoothing baby hairs and flyaways in sleek styles.
- Lightweight styling mousse applied to damp hair before blow-drying for lasting volume.
External Resource: For comprehensive hair styling tutorials and techniques, visit Good Housekeeping’s Hair Styling Guide.
Tips for Making Your Wedding Guest Updo Last All Day
Ensuring your updo survives hours of celebrating requires strategic preparation and smart product choices.
Pre-Styling Preparation:
- Wash your hair the day before the wedding rather than the same day for better texture and grip.
- Apply volumizing products to roots while hair is damp to create lasting lift and body.
- Blow-dry hair completely before styling since any dampness will cause the style to fall.
- Consider using hot tools to add waves or texture before creating the updo for additional hold.
- Avoid using heavy conditioners or oils that can make hair too slippery to secure properly.
During Styling:
- Use more bobby pins than you think necessary, inserting them in criss-cross patterns for maximum security.
- Create a strong foundation with elastic bands before building the decorative elements of your updo.
- Layer different product types: mousse for volume, spray for hold, and serum for shine.
- Test your updo by shaking your head gently to ensure everything stays secure before leaving.
- Take photos from all angles to check for any gaps, loose sections, or visible pins needing adjustment.
Maintenance Throughout the Event:
- Carry extra bobby pins, a small hairspray travel size, and a compact mirror for touch-ups.
- Avoid repeatedly touching or adjusting your hair as this loosens pins and disrupts the style.
- If dancing or in humid conditions, apply additional hairspray before the activity begins.
- Gently pat down any flyaways rather than brushing which could disturb the entire updo structure.
External Resource: For expert advice on hair care and styling, check Allure’s Hair Section.
Choosing the Right Updo for Your Hair Type
Different hair textures require specific approaches to achieve beautiful, lasting updos for wedding guest occasions.
Fine or Thin Hair:
- Choose styles with teasing or volume-building elements like the textured low ponytail updo or messy top knot.
- Use hair donuts or bun forms to create the illusion of fuller, thicker buns.
- Apply volumizing mousse before blow-drying and backcomb strategic sections for added body.
- Avoid sleek, tight styles that emphasize the lack of density in fine hair textures.
- Consider styles with visible texture like braids or twists that create the appearance of fullness.
Thick or Coarse Hair:
- Select structured styles like the classic low bun or sleek high bun that harness your hair’s natural fullness.
- Use strong elastic bands and numerous bobby pins to manage the weight of thick hair.
- Apply smoothing products to control volume and create polish in sleek styles.
- Embrace your hair’s natural texture in messy or romantic styles that benefit from abundant hair.
- Section hair into smaller portions when styling to maintain control throughout the creation process.
Curly or Textured Hair:
- Work with your natural texture rather than fighting it by choosing styles that incorporate curls.
- Try the pinned curl updo or twisted styles that showcase your hair’s natural pattern.
- Use curl-defining cream before styling to enhance and control your curl pattern.
- Avoid excessive brushing which creates frizz and disrupts the curl formation.
- Consider protective styles that minimize manipulation while still looking elegant for the occasion.
Straight Hair:
- Add texture through braiding, twisting, or using hot tools before creating the updo.
- Straight hair works beautifully for sleek styles like the French twist or sleek high bun that showcase smoothness.
- Apply texturizing spray if creating messy or romantic styles to provide grip and prevent slipping.
- Use minimal product in polished styles to avoid weighing down straight hair’s natural shine.
- Consider adding waves with a curling iron before styling to create dimension and visual interest.
External Resource: For detailed information about hair types and textures, visit Byrdie’s Hair Type Guide.
Accessorizing Your Wedding Guest Updo
The right accessories can transform a simple updo into a statement hairstyle while complementing the wedding’s theme and your outfit.
Classic Hair Accessories:
- Decorative bobby pins with pearls, crystals, or metallic finishes add subtle elegance to any updo.
- Hair combs positioned at the base of buns or securing twists provide both function and beauty.
- Barrettes in various sizes work beautifully to accent side-swept styles or secure sections elegantly.
- Headbands or hair bands can frame updos while adding color or sparkle to your overall look.
- U-pins with decorative ends peek out from buns and chignons creating unexpected details.
Seasonal and Theme-Appropriate Accessories:
- Fresh flowers or greenery sprigs perfect for spring and summer garden weddings create romantic touches.
- Metallic or jeweled pieces suit formal evening weddings and complement elegant attire beautifully.
- Feather accents work wonderfully for vintage-themed celebrations adding 1920s glamour to updos.
- Ribbon woven through braids or wrapped around bun bases offers soft, romantic embellishment.
- Minimalist gold or silver pins suit modern, contemporary wedding aesthetics with understated sophistication.
Placement Guidelines:
- Position accessories where the eye naturally travels: at the base of buns, along braids, or where twists meet.
- Use odd numbers of decorative pins for more visually appealing and balanced arrangements.
- Ensure accessories complement rather than compete with your earrings and necklace choices.
- Consider the wedding formality when choosing accessories: subtle for formal, bolder for casual celebrations.
- Test accessory placement before the event to ensure they’re secure and comfortable for extended wear.
External Resource: For inspiration on hair accessories and styling ideas, explore The Knot’s Wedding Hair Accessories Guide.
Common Updo Mistakes to Avoid
Understanding frequent pitfalls helps ensure your wedding guest updo looks polished and professional rather than hastily assembled.
Technical Mistakes:
- Using too few bobby pins results in styles that fall apart within hours of the celebration.
- Placing all pins in the same direction reduces holding power compared to criss-cross insertion patterns.
- Starting with hair that’s too clean and slippery makes it difficult to create secure, lasting styles.
- Pulling sections too tightly creates unflattering tension and can cause headaches throughout the event.
- Forgetting to hide elastic bands by wrapping small hair sections around them for polished appearances.
- Skipping the hairspray or applying it incorrectly without proper layering throughout the styling process.
Aesthetic Mistakes:
- Creating styles that don’t suit your face shape or hair type results in unflattering appearances.
- Over-accessorizing with too many decorative elements creates visual clutter rather than elegance.
- Choosing styles too complicated for your skill level leads to frustration and messy results.
- Ignoring the overall proportion between your updo size and your body frame or outfit.
- Styling hair too perfectly without any softness creates severe, unflattering rigidity in the style.
Timing Mistakes:
- Attempting a new, untested style on the wedding day without prior practice runs.
- Rushing through the styling process without allowing adequate time for careful execution.
- Creating the updo too early before the event allowing it to fall or become messy.
- Forgetting to account for weather conditions like humidity, wind, or rain when choosing your style.
Prevention Tips:
- Practice your chosen updo at least twice before the wedding day to perfect your technique.
- Take photos during practice sessions to identify any adjustments needed for the actual event.
- Watch tutorial videos multiple times and pause frequently while recreating the style yourself.
- Ask a friend to help with back sections that are difficult to see or reach.
- Build extra time into your wedding day schedule to accommodate any styling challenges or do-overs.
Updo Styles for Different Wedding Venues and Seasons
Matching your updo to the wedding’s setting and season ensures you look appropriately styled and comfortable throughout the celebration.
Outdoor Garden or Beach Weddings:
- Choose romantic, textured styles like the messy top knot or braided crown updo that suit natural settings.
- Avoid overly structured or sleek styles that will be affected by outdoor elements like breeze or humidity.
- Consider styles that secure all hair away from your face to remain comfortable in warm conditions.
- Embrace loose, face-framing pieces that move naturally with outdoor air currents for romantic effects.
- Apply extra-hold products to combat humidity and ensure your style lasts in outdoor conditions.
Formal Ballroom or Hotel Weddings:
- Opt for polished, sophisticated styles like the French twist, sleek high bun, or classic low bun.
- These controlled environments allow for more structured, refined updos without weather concerns.
- Consider elegant accessories like jeweled pins or combs that complement formal attire beautifully.
- Sleek styles photograph exceptionally well under professional indoor lighting conditions.
Rustic Barn or Vineyard Weddings:
- Select bohemian-inspired styles such as the braided low bun, twisted crown, or knotted low updo.
- Incorporate natural elements like small flowers or greenery that complement the venue’s aesthetic.
- Choose textured, relaxed styles over perfectly polished looks for better venue harmony.
- Consider styles that work with natural hair texture rather than fighting against it.
Seasonal Considerations:
- Spring weddings pair beautifully with floral-adorned updos and romantic, soft styling approaches.
- Summer celebrations call for secure updos that keep hair off the neck in warm temperatures.
- Fall weddings complement richer, more structured styles with warm metallic accessories.
- Winter events suit sleek, polished updos that won’t be affected by coats, scarves, or hats.
Quick Fixes for Updo Emergencies
Even the most carefully planned updo can encounter problems, but knowing quick solutions keeps you looking flawless throughout the celebration.
For Falling or Loosening Styles:
- Add additional bobby pins in criss-cross patterns wherever the style feels unstable or loose.
- Apply dry shampoo to roots and throughout the style to create texture and grip.
- Mist with hairspray, then gently push and re-pin any sections that have begun to slip.
- If a bun is falling, carefully remove existing pins, re-twist the section, and re-pin more securely.
- Consider converting a failing complicated style into a simpler version like a basic low bun.
For Frizz and Flyaways:
- Lightly spray hairspray onto your hands and smooth over frizzy areas without disturbing the overall style.
- Use a clean toothbrush sprayed with hairspray to tame baby hairs along the hairline precisely.
- Apply a tiny amount of hair oil or serum to ends or frizzy sections for instant smoothing.
- If flyaways are extensive, embrace them as part of a romantic, textured aesthetic.
For Visible Pins or Elastics:
- Carefully pull small sections of hair over visible hardware to conceal it naturally.
- Replace visible bobby pins with ones that match your hair color more closely.
- Wrap a small section of hair around visible elastic bands and secure with matching pins.
- Adjust decorative accessories to strategically cover any areas where pins show through.
Emergency Kit Essentials:
- Travel-size hairspray for quick touch-ups and hold reinforcement throughout the event.
- Extra bobby pins in your hair color stored in a small container or makeup bag.
- Small comb or brush for smoothing without disrupting the entire updo structure.
- Clear elastic bands for quick repairs or modifications if major reconstruction becomes necessary.
- Compact mirror to check all angles and identify problems before they become obvious.
- Hair oil or serum in a small container for addressing unexpected frizz or dryness.
Face Shape Guide for Choosing Flattering Updos
Selecting updos that complement your face shape ensures you look your absolute best as a wedding guest.
Oval Face Shape:
- Most updo styles work beautifully with oval faces due to balanced proportions throughout.
- Feel free to experiment with height at the crown, side-swept styles, or centered updos.
- Both sleek and textured styles flatter oval faces without creating unflattering imbalances.
- Consider the wedding’s formality and your personal style rather than face shape limitations.
Round Face Shape:
- Choose updos with height at the crown like the sleek high bun or ballerina bun to elongate appearance.
- Avoid flat styles or low buns that emphasize roundness rather than creating length.
- Side-swept styles like the side-swept low bun create asymmetry that flatters round faces.
- Leave face-framing pieces to break up roundness and create more angular facial lines.
Square Face Shape:
- Select soft, romantic styles with curves rather than angular lines that echo facial structure.
- The messy top knot, twisted low chignon, or romantic pinned curls soften strong jawlines beautifully.
- Avoid severe center parts or slicked-back styles that emphasize angular features.
- Incorporate soft, wispy pieces around the face to create gentle framing and softness.
Heart Face Shape:
- Choose styles with volume at the nape rather than the crown to balance wider foreheads.
- The classic low bun, Gibson tuck, or braided low bun work exceptionally well for heart shapes.
- Side parts and face-framing pieces balance wider foreheads with narrower chins effectively.
- Avoid excessive height at the crown which further emphasizes the heart shape’s natural proportions.
Long or Oblong Face Shape:
- Select styles with width rather than height to create horizontal balance for elongated faces.
- The side-swept low bun, double twisted bun, or styles with volume at the sides work beautifully.
- Avoid high buns or excessive crown height that further elongates the face vertically.
- Consider bangs or face-framing pieces to shorten the appearance of face length.
Professional Styling Tips from Hair Experts
Incorporating professional techniques elevates your home-styled updo to salon-quality results for wedding guest occasions.
Preparation Secrets:
- Apply styling products to damp hair and blow-dry with a round brush for maximum volume and smoothness.
- Use hot tools on completely dry hair only to prevent damage and ensure curls or waves hold properly.
- Allow curls to cool completely in coiled formation before brushing out for longer-lasting texture.
- Consider washing hair the night before and sleeping on it for ideal texture that’s neither too clean nor too dirty.
Execution Techniques:
- Work with small, manageable sections rather than large chunks for more controlled, precise styling results.
- Twist sections before pinning to create ropes of hair that hold better and create cleaner lines.
- Insert bobby pins with the wavy side against your scalp for maximum grip and security.
- Cross bobby pins in X-patterns at stress points where hair is most likely to slip or fall.
- Use a tail comb to push and adjust sections into place without disrupting the overall formation.
Finishing Touches:
- Apply hairspray from 10-12 inches away in sweeping motions rather than concentrated streams.
- Use your fingers to gently loosen overly tight sections for a more natural, lived-in appearance.
- Check your updo in natural lighting and from all angles including back and side profiles.
- Take a final photo before leaving to document how the style should look for evening touch-ups.
Professional Product Application:
- Layer products strategically: volumizer at roots, smoothing cream on lengths, and oil on ends.
- Less is more with styling products as too much weighs hair down and creates buildup.
- Refresh second-day updos with dry shampoo sprayed at roots then brushed through before styling.
External Resource: For professional hair styling advice and tutorials, visit Cosmopolitan’s Hair Section.
Adapting Updos for Different Hair Lengths
Understanding how to modify updo styles based on your hair length ensures you can recreate beautiful styles regardless of your current length.
Short Hair (Chin to Shoulder Length):
- Focus on styles that work with shorter lengths like the twisted low chignon or pinned curl updo.
- Use bobby pins to create the illusion of updos by pinning sections upward even if hair doesn’t wrap.
- Consider half-up styles like the half-up twisted bun that work beautifully with limited length.
- Embrace texture and volume rather than trying to create sleek, smooth styles that require more length.
- Use small hair donuts or padding to create fuller-looking buns with shorter hair amounts.
Medium Hair (Shoulder to Mid-Back Length):
- Most updos work well with medium length including buns, twists, and basic braided styles.
- You may need to modify wrapped bun styles to create smaller, more compact formations.
- The classic low bun, messy top knot, and Gibson tuck all work beautifully with medium lengths.
- Consider using hair extensions if you desire fuller, more dramatic updos for special occasions.
Long Hair (Mid-Back and Longer):
- All updo styles work with long hair, though some may require additional pins for security.
- Be mindful of weight distribution and use extra pins to support the volume of longer hair.
- Complex braided styles like the braided crown or waterfall braid showcase long hair beautifully.
- Consider your hair’s weight when choosing styles as very long, thick hair can feel heavy in high updos.
- Long hair offers the most versatility for wrapping, braiding, and creating elaborate formations.
Extensions and Hairpieces:
- Clip-in extensions add instant length and volume for creating more dramatic updos.
- Bun forms and hair donuts create fuller-looking updos regardless of your natural hair amount.
- Hairpieces in matching colors can be pinned into styles to add volume without permanent extensions.
- Always secure extensions thoroughly as their weight can cause styles to fall if improperly pinned.
Conclusion
Mastering the art of creating beautiful wedding guest updos empowers you to look stunning at any celebration without the stress or expense of salon appointments.
This comprehensive guide to the Top 27 Easy Wedding Guest Updos has provided you with diverse options ranging from classic elegance to modern creativity, ensuring you’ll find the perfect style for every wedding you attend.
Whether you prefer the timeless sophistication of a French twist, the romantic charm of a braided crown, or the contemporary appeal of a bubble ponytail updo, you now have the knowledge and techniques to create salon-worthy styles at home.
Remember that practice makes perfect, so experiment with these styles before the big day, choose the updo that best complements your face shape and hair type, and most importantly, wear your chosen style with confidence.
With these easy-to-follow instructions and expert tips, you’re fully prepared to turn heads as an impeccably styled wedding guest at every celebration you grace with your presence.
