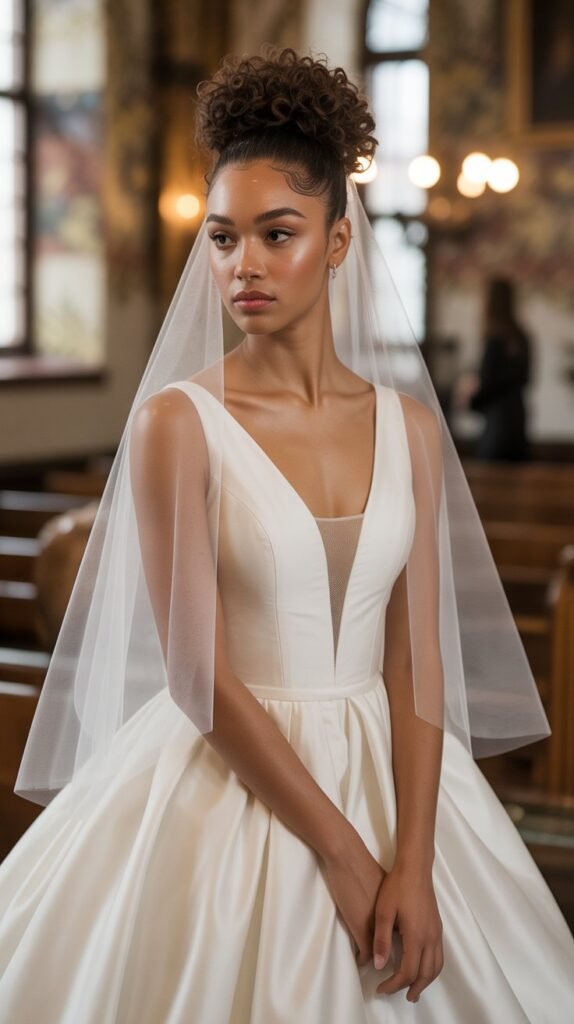
When it comes to wedding day beauty, curly-haired brides have an extraordinary advantage with their naturally voluminous texture that creates stunning updo hairstyles.
Finding the perfect updo wedding hairstyle for curly hair can transform your bridal look from beautiful to absolutely breathtaking, and this comprehensive guide is designed to help you discover exactly that.
The 30+ Latest Updo Wedding Hairstyles for Curly Hair featured in this article showcase everything from romantic loose buns to elegant structured updos, each specifically crafted to celebrate and enhance your natural curls.
Whether you’re planning a classic church ceremony, a bohemian beach wedding, or a modern minimalist celebration, you’ll find hairstyles that complement your wedding theme while keeping your curls healthy and gorgeous throughout your special day.
This article covers essential topics including curly hair preparation techniques, styling methods that protect your curl pattern, accessory options that enhance updo styles, and practical tips for working with professional hairstylists to achieve your dream bridal look.
We’ll explore trending styles that range from vintage-inspired designs to contemporary artistic creations, ensuring every curly-haired bride finds inspiration for their perfect wedding day hairstyle.
Get ready to fall in love with updos that honor your natural texture while creating the elegant, sophisticated bridal aesthetic you’ve always imagined for 30+ Latest Updo Wedding Hairstyles for Curly Hair.
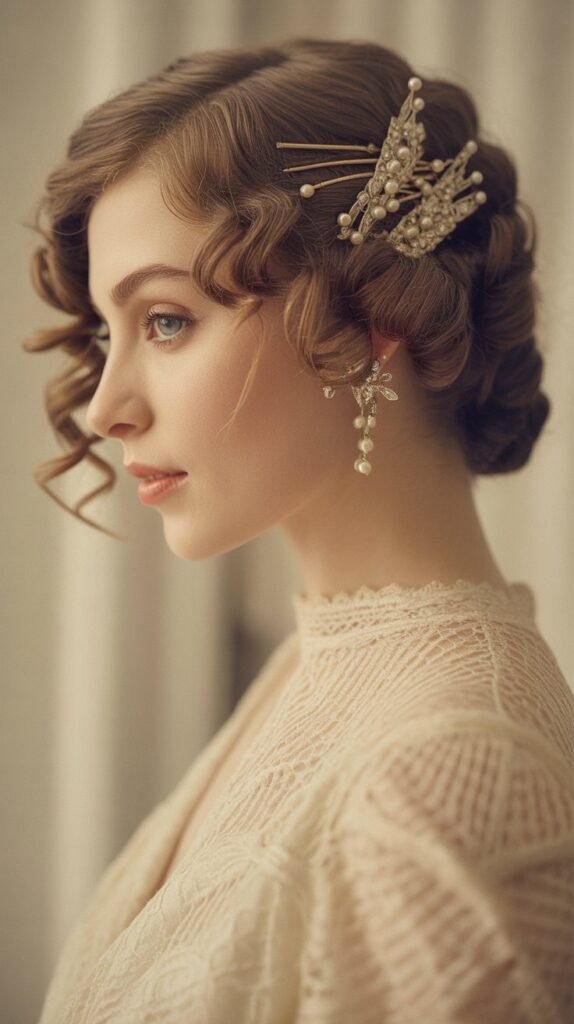
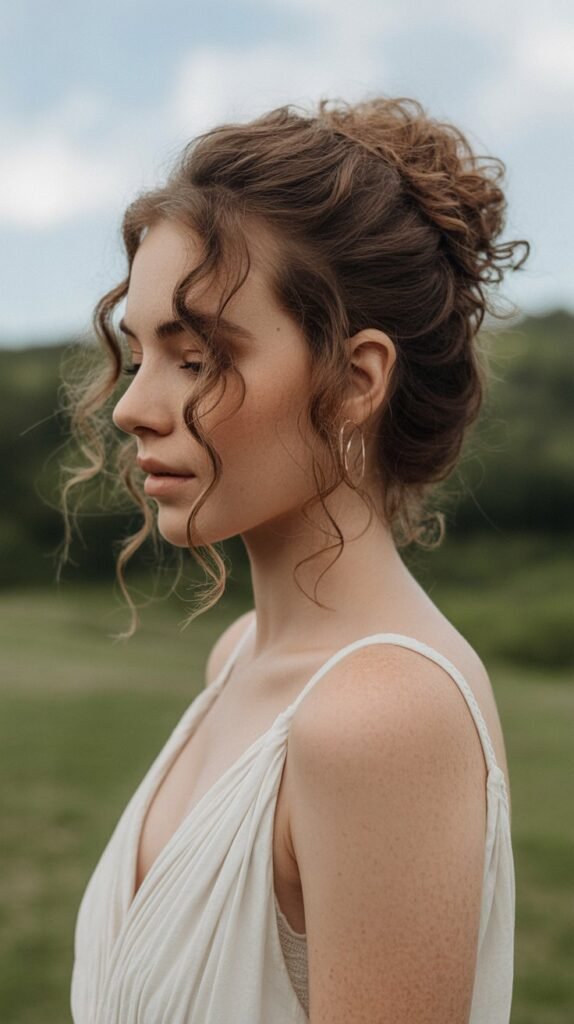
1. Classic Curly Low Bun
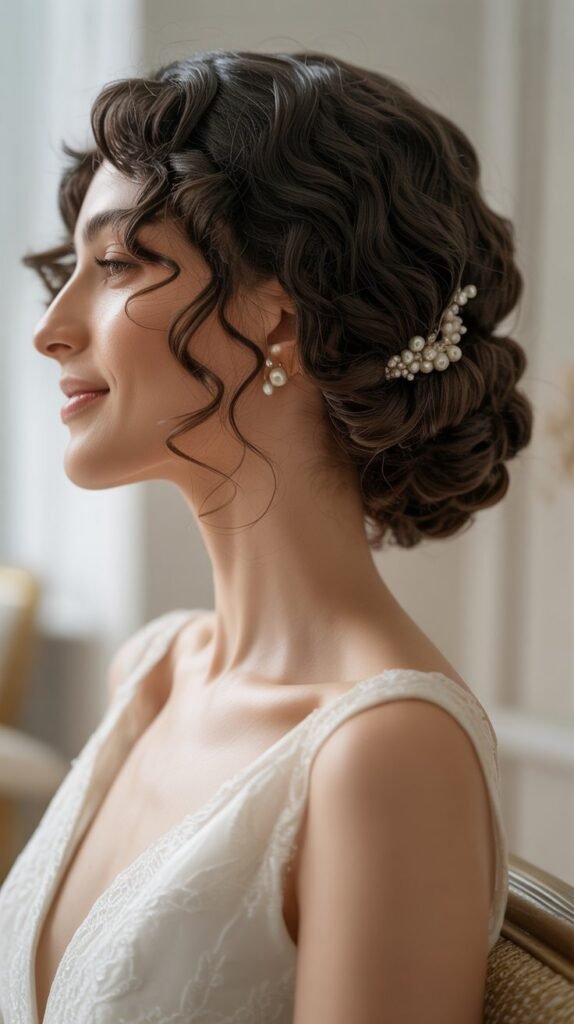
The classic curly low bun remains one of the most timeless and elegant choices for brides with naturally curly hair, offering sophistication that works beautifully with virtually any wedding dress style or venue.
This versatile updo positions the bun at the nape of the neck, allowing your curls to create beautiful texture and dimension while maintaining a refined, polished appearance.
Styling Technique
- The foundation of a perfect classic curly low bun begins with properly moisturized and defined curls that have been prepared with curl-enhancing products.
- Hair is typically gathered at the nape of the neck and secured with a hair tie that won’t cause breakage or damage to the curl pattern.
- Individual curls are then pinned around the base to create a dimensional, textured bun rather than pulling curls tight and losing their natural shape.
- Bobby pins should be strategically placed to secure the style while remaining invisible, with pins inserted in the direction of the curl pattern for maximum hold.
Best Face Shapes
- Oval faces look stunning with classic low buns as the style’s balanced proportions complement the face’s natural symmetry.
- Heart-shaped faces benefit from the width at the nape of the neck, which balances a wider forehead and narrower chin.
- Round faces can elongate their appearance by adding height at the crown before securing the low bun.
- Square faces are softened by leaving a few face-framing curls loose around the temples and jawline.
Accessory Options
- Pearl pins scattered throughout the bun add vintage elegance without overwhelming the natural beauty of the curls.
- A delicate hair vine can be woven through the bun to add sparkle and create a more elaborate bridal look.
- Fresh flowers tucked into the bun bring romantic, garden-wedding vibes and complement outdoor ceremonies beautifully.
- A jeweled comb placed above or beside the bun creates a focal point and adds glamorous sophistication to the style.
2. Romantic Curly Top Knot
The romantic curly top knot brings youthful elegance and modern sophistication to bridal hairstyles, positioning voluminous curls at the crown of the head for maximum impact.
This elevated style works exceptionally well for brides who want to showcase statement earrings or a detailed neckline on their wedding dress.
Height and Volume Considerations
- The top knot’s positioning at the crown creates natural height that can elongate the entire silhouette and add drama to your bridal look.
- Curly hair naturally provides the volume needed for an impressive top knot without requiring excessive teasing or damaging techniques.
- A donut-shaped hair form can be used underneath the curls to create even more volume and ensure the knot maintains its shape throughout the day.
- The key to a romantic rather than severe look is allowing some curls to remain loose and soft rather than pulling everything tight.
Securing Methods
- A strong elastic band forms the foundation of the top knot, positioned exactly where you want the center of the style to sit.
- Curls are wrapped around the base of the ponytail and secured with bobby pins that match your hair color for seamless integration.
- Hairspray with flexible hold keeps the style secure without making curls crunchy or losing their natural movement.
- Strategic pinning at multiple angles ensures the top knot stays secure even during dancing and celebration activities.
Ideal Wedding Venues
- Outdoor garden weddings pair beautifully with romantic top knots, especially when adorned with fresh flowers that complement the natural setting.
- Beach ceremonies benefit from this style as it keeps hair completely off the neck and shoulders in warm, humid conditions.
- Modern urban venues and contemporary spaces are enhanced by the sleek, elevated aesthetic of a well-executed top knot.
- Barn and rustic venue weddings work wonderfully when the top knot is styled with a slightly undone, bohemian finish.
3. Cascading Curly Chignon

The cascading curly chignon combines the structure of a traditional chignon with the organic beauty of flowing curls, creating a hairstyle that feels both polished and naturally romantic.
This style features curls artfully arranged to cascade from a central gathering point, typically positioned at the back of the head.
Creating the Cascade Effect
- The cascade begins by sectioning hair and creating a foundation of pinned curls that flow in a deliberate downward direction.
- Each curl is individually placed and secured to create the appearance of naturally falling ringlets rather than a constructed updo.
- The illusion of movement is achieved by varying the lengths at which different curls are pinned, creating dimensional layers.
- Leaving some curls slightly looser than others adds to the romantic, organic quality of the cascading effect.
Texture Enhancement
- Curl-defining cream applied to damp hair before styling ensures each ringlet is beautifully formed and frizz-free.
- A diffuser attachment on a blow dryer can enhance natural curl patterns without causing heat damage or disrupting the curl structure.
- Light-hold mousse added at the roots provides volume without weighing down the cascading curls or making them stiff.
- A shine serum applied sparingly to the finished style adds luminosity that photographs beautifully without creating greasiness.
Traditional vs. Modern Interpretations
- Traditional cascading chignons feature tighter, more uniform curls arranged in symmetrical patterns that evoke vintage glamour.
- Modern interpretations embrace looser, more varied curl patterns with an intentionally undone quality that feels contemporary and relaxed.
- Classic versions often sit lower at the nape of the neck, while modern takes may position the cascade slightly higher or to one side.
- Traditional styles pair beautifully with cathedral veils and formal ballgowns, while modern versions complement minimalist wedding dresses and bohemian aesthetics.
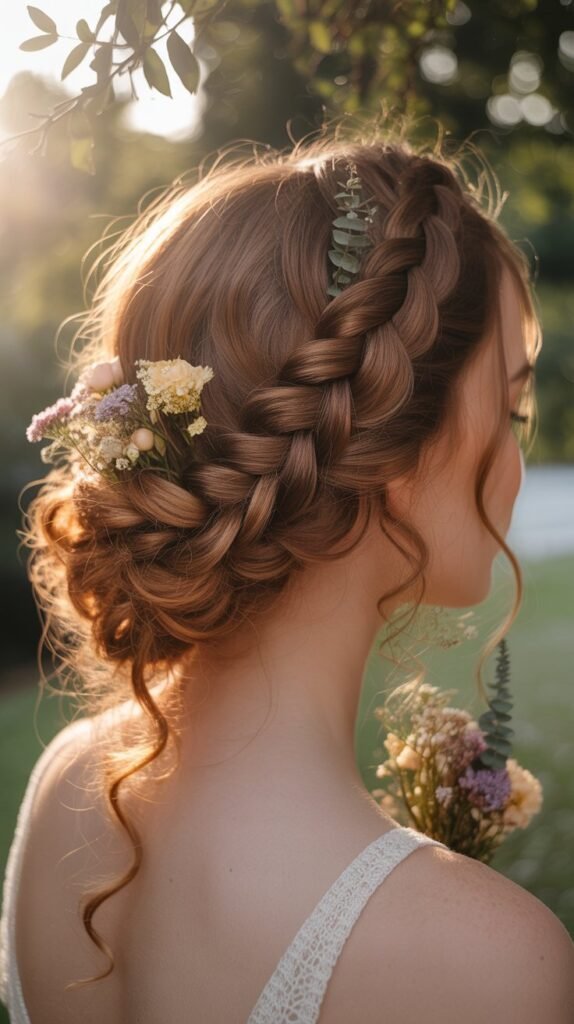
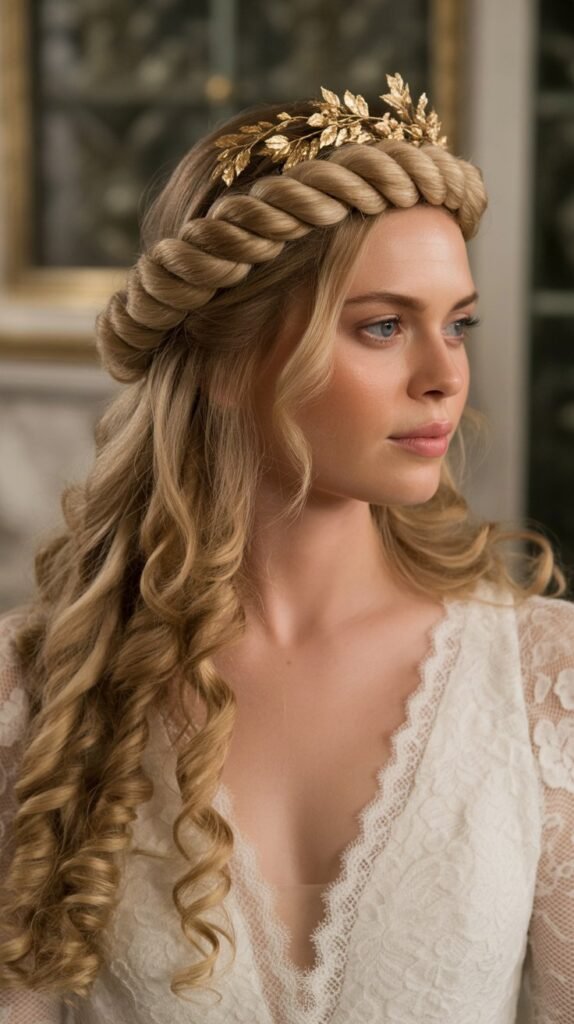
4. Braided Crown with Curly Bun
The braided crown with curly bun combines two beloved hairstyle elements into one stunning bridal look that offers both structure and romantic texture.
This style features braids that wrap around the head like a crown, leading into a voluminous bun filled with beautiful curls.
Braiding Techniques for Curly Hair
- Dutch braids work exceptionally well for curly hair as they sit on top of the head and showcase the braid’s texture rather than sinking into the curls.
- French braids can be used for a more subtle crown effect, though they may require slightly stretched curls for clean definition.
- Fishtail braids create an intricate, detailed crown that adds visual interest and works beautifully with both tight and loose curl patterns.
- The braid should be slightly loosened after completion by gently pulling on the edges to create width and a softer, more romantic appearance.
Bun Placement Options
- A low bun positioned at the nape creates balance with the braided crown and works well for brides with longer necks.
- A side bun adds asymmetry and modern appeal, with the braided crown leading gracefully into the off-center placement.
- A mid-level bun sits at the occipital bone and provides a classic, balanced look that complements most face shapes.
- Multiple smaller buns can replace a single large bun for a more intricate, fashion-forward interpretation of this style.
Incorporating Flowers and Greenery
- Small flowers woven directly into the braided crown create a whimsical, garden-inspired aesthetic perfect for outdoor weddings.
- Greenery such as eucalyptus or olive branches can be tucked into the braid for a more natural, organic appearance.
- Flower placement concentrated at the point where the braid meets the bun creates a focal point and draws the eye through the hairstyle’s flow.
- Preserved or silk flowers offer a practical alternative to fresh blooms, maintaining their appearance throughout long wedding days without wilting.
5. Twisted Curly Updo

The twisted curly updo offers an artistic, sculptural approach to bridal hairstyling that showcases curls through deliberate twisting and pinning techniques.
This style creates beautiful dimension and visual interest through the interplay of twisted sections and voluminous curls.
Twisting Methods
- Two-strand twists work beautifully with curly hair, maintaining the curl pattern while adding structure and direction to the overall style.
- Rope twists create a more defined, cord-like appearance that adds textural contrast against softer, looser curls.
- Flat twists can be used along the sides of the head to create a sleek foundation before transitioning into a curly updo at the back.
- Each twist should be secured with bobby pins inserted horizontally and then vertically for maximum hold that lasts throughout the wedding day.
Creating Dimension
- Varying the size of twisted sections throughout the hairstyle creates visual interest and prevents the style from appearing too uniform or flat.
- Combining thick and thin twists adds complexity and makes the updo more visually engaging from all angles.
- Allowing some untwisted curls to remain loose among the twisted sections creates a beautiful contrast between structured and organic elements.
- Directional twisting, where some twists move vertically while others move horizontally, adds architectural interest to the overall design.
Maintenance Throughout the Day
- A strong-hold hairspray applied in light layers throughout the styling process ensures twists stay secure without becoming stiff or crunchy.
- Bobby pins should be placed at strategic intervals along each twist rather than only at the ends to prevent sections from loosening.
- A small emergency kit with extra bobby pins and hairspray allows for quick touch-ups during the reception if needed.
- Choosing pins that match your exact hair color ensures any visible pins blend seamlessly and maintain the polished appearance of the style.
6. Side-Swept Curly Updo
The side-swept curly updo brings asymmetrical elegance to bridal hairstyles, drawing all the gorgeous texture and volume to one side for a dramatic, romantic effect.
This style particularly flatters brides who want to create a focal point and showcase their facial features from their best angle.
Creating the Sweep
- The sweep begins by creating a deep side part that positions significantly more hair on one side than the other.
- Hair is gradually gathered toward the chosen side using a technique that maintains volume at the crown rather than flattening it against the head.
- Curls are pinned along a curved path from the opposite side toward the focal point, creating graceful movement and flow.
- The underside of the sweep should be secured with multiple bobby pins in a grid pattern to ensure stability and prevent sliding.
Balance and Proportion
- The side with more hair should feature substantial volume to justify the asymmetrical placement and create visual impact.
- Face-framing pieces left loose on the opposite side prevent the style from looking too heavy or unbalanced.
- The sweep’s positioning should consider your facial features, generally sweeping toward your more photogenic side.
- Overall silhouette balance is achieved by ensuring the style doesn’t appear too heavy on one side when viewed from the front.
Accessorizing the Side Placement
- A jeweled comb placed at the point where hair begins its sweep creates a beautiful focal point and adds sparkle that catches light.
- Flowers clustered on the heavier side complement the asymmetry and enhance the romantic quality of the style.
- A delicate hair vine can follow the curve of the sweep, emphasizing the graceful line and adding continuous sparkle.
- Statement earrings work beautifully with side-swept styles, especially worn on the ear that’s more exposed by the asymmetrical design.
7. Vintage-Inspired Victory Rolls with Curly Base

Vintage-inspired victory rolls combined with a curly base create a retro-glamorous bridal hairstyle that pays homage to 1940s elegance while celebrating natural curl texture.
This distinctive style works wonderfully for themed weddings or brides who appreciate classic Hollywood aesthetics.
Creating Perfect Victory Rolls
- Victory rolls are created by rolling sections of hair from the ends toward the roots, forming tube-like rolls that sit prominently at the front hairline.
- Each roll should be secured with multiple bobby pins inserted from different angles to ensure stability throughout the day.
- The rolls can be symmetrical on both sides or asymmetrical with one roll larger than the other for a more modern interpretation.
- Smoothing products help create the sleek, polished appearance characteristic of authentic victory rolls while keeping curls intact in the remaining hair.
Integrating with Curly Texture
- The back hair’s natural curls provide beautiful contrast against the smooth, structured victory rolls at the front.
- Curls can be pinned in a low cluster at the nape or arranged in a higher updo depending on your preference and dress neckline.
- The transition between the smooth rolls and curly base should be seamless, with any visible pins concealed within the curl pattern.
- Maintaining your natural curl texture in the base section prevents the style from requiring excessive heat styling that could damage hair.
Era-Appropriate Styling
- Authentic vintage styling includes smoothed, polished victory rolls with precise definition and symmetry.
- Period-appropriate accessories such as birdcage veils, feather fascinators, or pearl-adorned combs enhance the vintage aesthetic.
- Red or deep berry lipstick completes the 1940s-inspired bridal look and photographs beautifully with this hairstyle.
- A tea-length or midi wedding dress with vintage details pairs perfectly with this historically-inspired hairstyle choice.
8. Curly Faux Hawk Updo
The curly faux hawk updo offers a bold, fashion-forward alternative to traditional bridal hairstyles, perfect for edgy brides who want to make a statement.
This style features height and volume concentrated in a central mohawk-like section while the sides are styled sleekly or incorporated into the design.
Building Height
- The foundation of a faux hawk requires backcombing or teasing at the roots of the central section to create lift and support.
- Curls are arranged vertically along the center of the head, pinned to maintain their upward direction and create dramatic height.
- A hair form or padding placed underneath the central section can add extra volume and ensure the height is maintained throughout the day.
- The highest point typically sits at the crown, with the height gradually decreasing toward the front hairline and back of the head.
Side Styling Options
- Sleek sides created with gel or pomade provide stark contrast against the voluminous curly center and emphasize the faux hawk’s drama.
- Braided sides offer a softer, more intricate alternative that maintains the faux hawk structure while adding textural interest.
- Twisted sides create sculptural elements that complement the central mohawk section and work beautifully with curly hair texture.
- Shaved or undercut sides create the most dramatic version of this style, though this is a significant commitment that may not suit all brides.
Modern Bridal Interpretation
- The bridal faux hawk typically features softer, more romantic elements than traditional mohawk styles, such as flowers or delicate accessories.
- Volume is often created through curl manipulation rather than extreme teasing, maintaining a more elegant rather than punk aesthetic.
- The style can be modified to be more or less dramatic depending on your comfort level and wedding formality.
- Pairing this bold hairstyle with a minimalist wedding dress creates beautiful balance and prevents the overall look from becoming overwhelming.
9. Loose Curly French Twist
The loose curly French twist reimagines the classic French twist to accommodate and celebrate natural curls, creating a sophisticated updo with deliberately soft, romantic edges.
This style offers timeless elegance while maintaining the texture and movement that makes curly hair so beautiful.
Adapting the Classic Technique
- Rather than twisting hair tightly against the head, the curly French twist allows curls to maintain volume and texture throughout the twist.
- Hair is gathered at the back center of the head and twisted upward, but without the tension that would stretch out or damage curl patterns.
- Curls are allowed to escape artfully at the crown and along the twist, creating a softer, more romantic interpretation than traditional sleek versions.
- The finished twist appears intentionally loose and organic rather than perfectly smooth and controlled.
Securing Curly Twists
- Long bobby pins or hair pins work better than standard bobby pins for securing the bulk and texture of curly hair in a twist.
- Pins should be inserted both horizontally through the twist and vertically into the base for maximum security.
- A decorative hair comb placed at the base of the twist adds both visual interest and practical support for the style.
- Hairspray with flexible hold helps maintain the twist’s structure without eliminating the natural movement of escaping curls.
Formality Levels
- A tighter, more controlled curly French twist suits formal ballroom weddings and traditional ceremonies.
- A looser, more undone version works beautifully for garden parties, outdoor weddings, and bohemian celebrations.
- The amount of curl allowed to escape affects formality, with more escaping curls creating a relaxed, romantic vibe.
- Accessory choices can adjust formality, with diamond or crystal pieces elevating elegance and flowers creating casual romance.
10. Curly Mohawk Braid Updo
The curly mohawk braid updo combines braiding techniques with voluminous curls to create a show-stopping hairstyle that offers both structure and texture.
This style features a central braid running down the middle of the head, with curls adding dramatic volume on either side or incorporated into the braid itself.
Braid Structure
- A Dutch braid forms the foundation of the mohawk, sitting prominently on top of the head and creating clear definition down the center.
- The braid should be kept intentionally loose and wide by gently pulling on the edges after completion to create maximum visual impact.
- Curls can be incorporated into the braid itself as you work, creating a mixed-texture effect that’s uniquely beautiful.
- The braid typically extends from the front hairline to the crown or nape, depending on whether the style ends in a bun or cascades into loose curls.
Volume Distribution
- Curls positioned on either side of the central braid create width and frame the mohawk structure beautifully.
- The height of the braid should be proportional to the face shape, with more height suiting longer faces and less height better for rounder faces.
- Volume concentrated at the crown adds drama and photograph beautifully from all angles.
- The sides can be styled sleekly to emphasize the braid or left with natural texture to create a softer, more bohemian effect.
Bohemian Elements
- Flowers woven through the braid create a garden goddess aesthetic perfect for outdoor and nature-inspired weddings.
- Greenery such as ivy or fern fronds adds organic texture and enhances the bohemian vibe.
- A delicate chain or hair jewelry woven through the braid creates festival-inspired glamour.
- Leaving face-framing pieces loose and curly softens the style and creates a more relaxed, romantic finish.
11. Asymmetrical Curly Updo
The asymmetrical curly updo embraces off-center design to create a modern, artistic bridal hairstyle that draws the eye and creates memorable visual interest.
This style intentionally avoids symmetry, instead creating balance through thoughtful placement and proportion.
Design Principles
- Asymmetry is achieved by positioning the majority of hair and volume to one side rather than centering everything.
- The “heavier” side should feature concentrated curls and volume that create a clear focal point.
- The opposite side typically features sleeker styling or smaller, more controlled elements that don’t compete with the focal point.
- Balance is created through proportion rather than symmetry, ensuring the overall look feels intentional rather than lopsided.
Creating Visual Interest
- Varying curl sizes throughout the updo adds dimension and prevents the style from appearing monotonous.
- Directional pinning that creates spiral patterns or architectural shapes elevates the artistic quality of the design.
- Negative space—areas where hair is smooth or less dense—provides visual rest and emphasizes the dramatic sections.
- Textural contrast between sleek areas and voluminous curly sections enhances the modern, editorial quality of the style.
Modern Bridal Aesthetic
- This style pairs beautifully with contemporary wedding dresses featuring clean lines and minimal embellishment.
- Modern venues such as art galleries, industrial spaces, and urban rooftops complement the artistic nature of asymmetrical updos.
- The unconventional design suits brides who want their hairstyle to feel like a fashion statement rather than following traditional expectations.
- Minimalist accessories or a single statement piece work better than multiple traditional bridal hair accessories.
12. Curly Gibson Tuck
The curly Gibson tuck offers vintage-inspired elegance with a technique that tucks hair under at the nape of the neck, creating a rolled effect that beautifully showcases curls.
This romantic style originated in the Edwardian era and continues to enchant modern brides with its timeless sophistication.
Traditional Gibson Tuck Technique
- Hair is gathered at the nape of the neck and tucked underneath itself, creating a horizontal roll that sits along the base of the skull.
- The tuck is secured by inserting bobby pins upward through the rolled section and into the base hair above.
- Curls can be maintained throughout the tuck or smoothed slightly for a more polished, vintage-authentic appearance.
- The front hair is typically styled with soft waves or gentle curls that frame the face and flow into the tucked section.
Modernizing the Style
- Contemporary versions allow more texture and looser curls to show through the tuck rather than creating a perfectly smooth roll.
- The positioning of the tuck can vary, sitting higher at the occipital bone or lower at the nape depending on personal preference.
- Face-framing pieces left intentionally loose create a softer, more romantic effect than the traditionally severe vintage versions.
- Mixed textures, with some smoothed sections and some curly sections, create an updated interpretation that feels both classic and current.
Vintage Accessories
- Decorative hair combs placed above or within the Gibson tuck add sparkle and serve as the jewelry of the hairstyle.
- Vintage-style hair pins with pearl or crystal embellishments enhance the Edwardian aesthetic.
- A birdcage veil attached just above the Gibson tuck creates a cohesive vintage bridal look.
- Art deco-inspired accessories with geometric patterns complement the structured nature of the tucked style.
13. Pulled-Back Curly Ponytail Updo
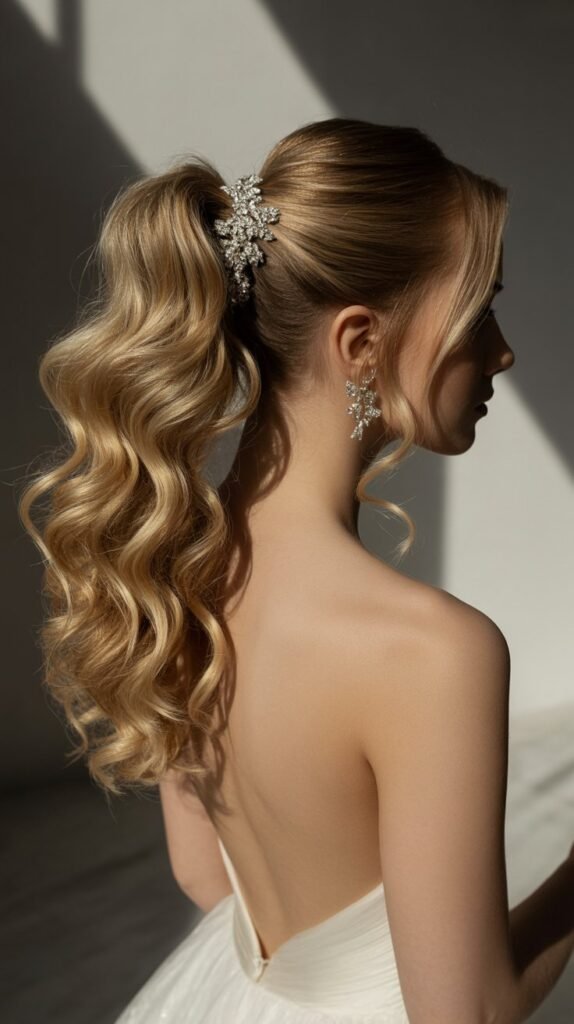
The pulled-back curly ponytail updo elevates the casual ponytail into elegant bridal territory through sophisticated styling and strategic placement.
This style gathers voluminous curls at the back of the head, creating a fountain of texture that can be styled formally or left with romantic movement.
Ponytail Positioning
- A high ponytail positioned at the crown creates drama and works beautifully with backless or open-back wedding dresses.
- A mid-level ponytail at the occipital bone offers balance and suits most face shapes and body types.
- A low ponytail at the nape provides understated elegance and pairs well with high-neck or detailed-back dresses.
- The positioning should consider your height, with taller brides able to carry higher ponytails and shorter brides often better suited to mid or low placement.
Curl Arrangement
- Curls cascading from the ponytail can be left loose and free-flowing for romantic movement throughout the day.
- Pinning some curls upward creates an updo effect while maintaining the ponytail’s volume and texture.
- Wrapping a section of hair around the ponytail base conceals the elastic and creates a polished, intentional appearance.
- Strategically placed curls can frame the back and sides of the head, softening the overall look and adding dimension.
Base Concealment
- Wrapping hair around the elastic creates seamless integration and a more expensive, professional appearance.
- Decorative hair ties with jewels or pearls can be showcased rather than hidden for added glamour.
- The wrapped section should be secured with bobby pins underneath the ponytail to prevent unwrapping during the celebration.
- Small flowers or greenery clustered at the base create a romantic focal point and enhance garden or outdoor wedding themes.
14. Textured Curly Space Buns
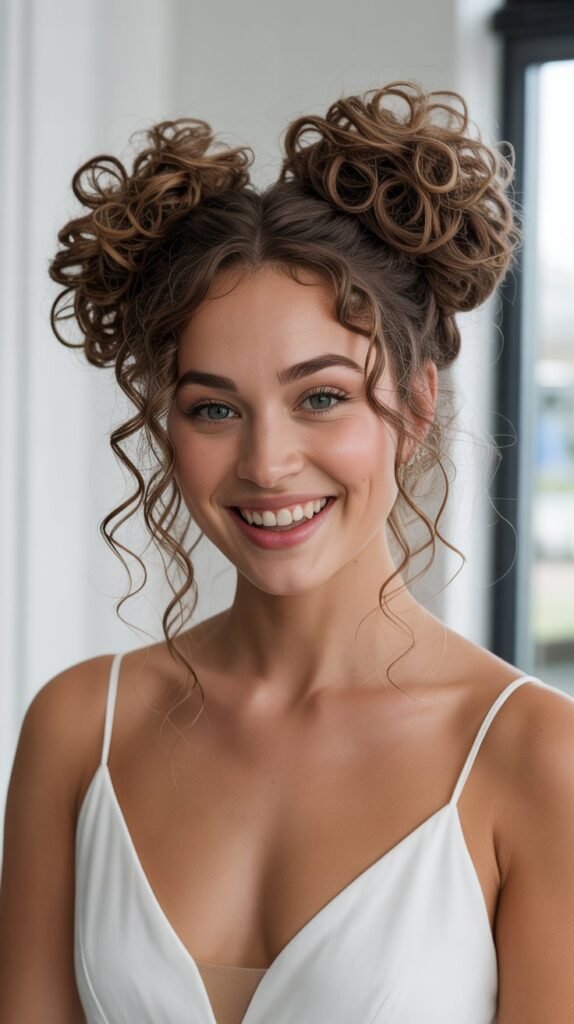
Textured curly space buns bring playful sophistication to bridal hairstyles, featuring two buns positioned symmetrically on either side of the head at varying heights.
This style works wonderfully for modern, fashion-forward brides who want to showcase their personality through their wedding day look.
Bun Placement Options
- High space buns positioned near the crown create a youthful, playful aesthetic perfect for casual or festival-inspired weddings.
- Lower placement at ear level offers a more sophisticated, fashion-editorial interpretation of the style.
- The distance between buns affects the overall look, with wider spacing creating a more dramatic effect.
- Positioning slightly back from the hairline rather than directly on top creates a more wearable, elegant version suitable for weddings.
Size and Proportion
- Larger buns make a bold statement and work well for brides with thick, abundant curly hair.
- Smaller, more controlled buns offer subtlety while maintaining the style’s distinctive character.
- The buns should be proportional to your head size and frame, avoiding overwhelming smaller faces or appearing too small on larger frames.
- Using hair donuts or padding underneath can increase bun size if desired while maintaining structure throughout the day.
Making it Bridal
- Adding delicate flowers to both buns creates romantic elegance and transforms the playful style into wedding-appropriate beauty.
- Leaving loose, romantic curls at the nape and around the face softens the geometric nature of the double buns.
- Incorporating sparkle through small crystal pins scattered throughout the buns adds bridal glamour.
- Pairing this bold hairstyle with a simple, understated wedding dress creates beautiful balance and prevents the overall look from becoming too busy.
15. Curly Waterfall Braid Updo
The curly waterfall braid updo combines the intricate beauty of waterfall braiding with the volume and romance of curly hair, creating a style that appears both delicate and dramatic.
This technique features a braid where strands are dropped and replaced as you work, creating a cascading effect that flows beautifully into an updo.
Waterfall Braiding Technique
- The waterfall braid begins at one side of the head and works across, dropping strands as you progress to create the signature cascading effect.
- Each dropped strand is replaced with a new section picked up from underneath, maintaining the braid’s continuity.
- The dropped strands should remain curly and defined, creating beautiful ribbon-like streams of texture flowing through the style.
- The braid typically travels from one side across the crown to the opposite side before being incorporated into an updo.
Incorporating into Updo
- Dropped curls from the waterfall braid can flow into a low bun, creating seamless integration between the braided and gathered sections.
- The braid itself can wrap around the perimeter of a bun, serving as both decorative element and structural component.
- Multiple waterfall braids can converge into a single updo point, creating complex, multi-dimensional designs.
- The ends of the braid should be carefully secured and hidden within the updo to maintain the magical, flowing appearance.
Complexity Levels
- A single waterfall braid across the crown offers elegant simplicity that’s beautiful without being overwhelming.
- Dual waterfall braids on both sides create symmetry and increased intricacy for brides wanting more elaborate styling.
- Combining waterfall braids with other braid types (Dutch, fishtail) throughout the same updo creates a master-level intricate design.
- The number of dropped strands affects the overall density and drama of the cascading effect.
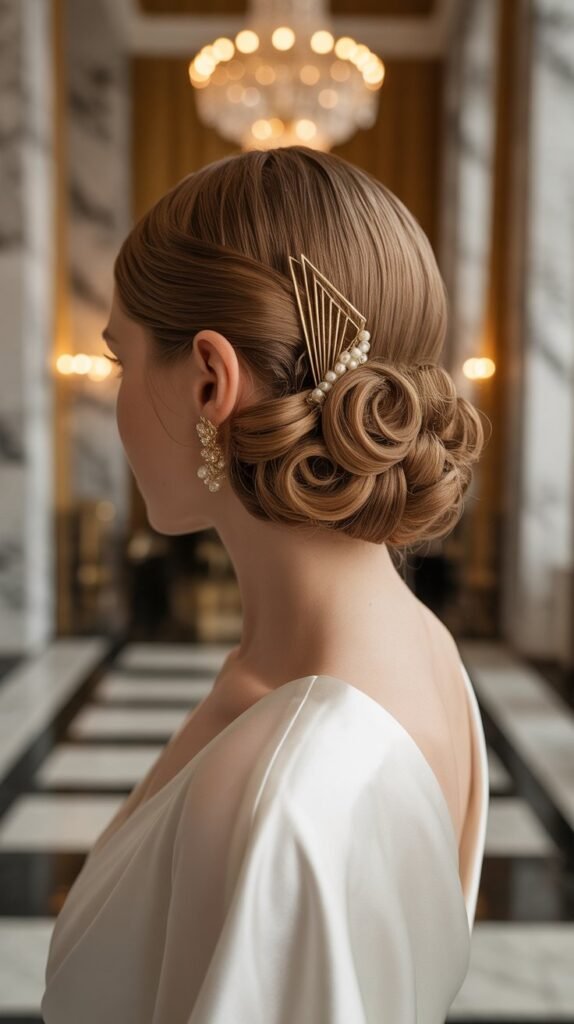
16. Elegant Curly Ballerina Bun
The elegant curly ballerina bun adapts the classic dance-inspired hairstyle to celebrate curly texture, creating a sophisticated updo that sits high on the head with beautiful volume.
This style offers timeless grace and works wonderfully for traditional, formal wedding celebrations.
Achieving Perfect Roundness
- A hair donut form creates the foundation for a perfectly round bun shape that maintains its structure throughout the day.
- Curls are wrapped around the donut in a consistent direction, creating smooth coverage that conceals the form completely.
- Each section of hair should be secured with bobby pins before moving to the next section to ensure even distribution.
- The bun’s edges should be smooth and refined, with any flyaways secured with gel or edge control and bobby pins.
Height Considerations
- The ballerina bun typically sits at the crown or slightly behind, creating maximum height and elegance.
- Face shape should influence exact positioning, with longer faces accommodating very high placement and rounder faces benefiting from slightly lower positioning.
- The bun’s height should be proportional to your body height, with taller brides able to carry larger, higher buns.
- Consider your veil attachment point when determining bun placement to ensure seamless integration.
Classic Bridal Appeal
- The ballerina bun’s timeless silhouette complements traditional wedding dresses with classic ballgown or A-line silhouettes.
- This style photographs beautifully from all angles, creating consistently elegant images throughout your wedding album.
- The height of the bun allows for stunning veil placement, whether cathedral-length, fingertip, or birdcage styles.
- Minimal accessories work best, allowing the pure elegance of the bun itself to be the focal point of the hairstyle.
17. Bouffant Style with Curly Base
The bouffant style with curly base combines retro volume at the crown with natural curl texture throughout the rest of the hair, creating a hairstyle that’s both dramatic and romantic.
This style offers height and sophistication while celebrating your curls’ natural beauty.
Creating Crown Volume
- The bouffant’s signature volume is created through backcombing or teasing at the crown area, creating a cushion of lift that sits prominently.
- Hair is smoothed over the teased section to create a polished exterior while maintaining the height underneath.
- The bouffant section should extend from the front hairline to approximately mid-crown, with curls taking over in the back and sides.
- Strong-hold hairspray applied in layers during the teasing process ensures the volume maintains its structure throughout the wedding day.
Smoothing Techniques
- A boar bristle brush gently smooths the surface layer of hair over the teased foundation without deflating the volume.
- Smoothing serum or pomade applied sparingly to the very top layer creates shine and controls any surface frizz.
- The sides of the bouffant should be sleek and smooth, creating contrast with the textured curly sections below.
- Bobby pins inserted horizontally at the back of the bouffant secure it to the base hair and prevent backward sliding.
Retro Glamour Elements
- The bouffant style evokes 1960s sophistication and pairs beautifully with winged eyeliner and statement lashes for cohesive retro glamour.
- A decorative headband or jeweled band placed at the base of the bouffant adds sparkle and defines the separation between smooth and curly sections.
- Vintage-inspired wedding dresses with tea-length hems or structured bodices complement the retro aesthetic of the bouffant.
- This style works particularly well for courthouse weddings, intimate ceremonies, or vintage-themed celebrations.
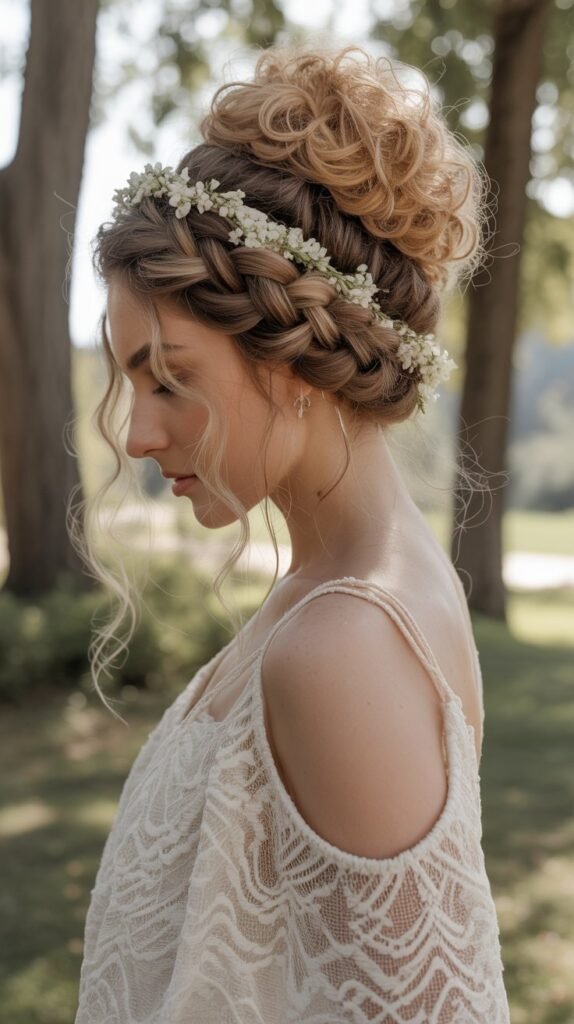
18. Curly Half-Up Crown Braid

The curly half-up crown braid combines the romantic appeal of loose, flowing curls with the structured elegance of a braided crown, creating a hairstyle that offers the best of both updo and down styles.
This versatile option allows brides to showcase their curl length while keeping hair styled and off the face.
Crown Braid Construction
- The crown braid typically begins at one temple and wraps around the head like a halo before ending at the opposite temple.
- A Dutch braid technique creates a braid that sits on top of the hair rather than sinking into it, making it more visible and prominent.
- The braid should be loosened after completion by gently pulling on the outer edges to create width and a softer, more romantic appearance.
- Hair is incorporated into the braid only from the top section, leaving the bottom half free to flow in beautiful curls.
Curl Display
- The lower half of hair should be left with natural curl definition enhanced through curl cream and proper drying techniques.
- Curls can be left completely loose for maximum movement and romantic flow throughout the ceremony and reception.
- Strategic pinning of a few curls on one side creates asymmetry and prevents the bottom section from appearing too heavy or uniform.
- Curl refresher spray helps revive any curls that may lose definition throughout the day, maintaining the style’s beauty from ceremony to last dance.
Versatility for Different Settings
- Garden and outdoor weddings benefit from the natural, organic quality of this half-up style combined with fresh flower accents.
- Beach ceremonies work beautifully as the style keeps hair controlled at the crown while allowing the romantic flow that suits coastal settings.
- Church and formal venues appreciate the polished crown braid while the flowing curls maintain appropriate elegance and sophistication.
- This style transitions seamlessly from ceremony to reception, maintaining its beauty without requiring touch-ups or adjustments.
19. Sculptural Pinned Curls Updo
The sculptural pinned curls updo transforms individual curls into artistic elements, deliberately placing and pinning each curl to create an intentional, gallery-worthy design.
This high-fashion approach to curly updos results in a hairstyle that’s truly one-of-a-kind and unforgettable.
Curl Placement Strategy
- Each curl is treated as an individual design element and placed with intention to create specific patterns or shapes within the overall updo.
- Curls can be arranged in circular patterns, spiral formations, or abstract designs depending on the desired artistic effect.
- Varying the direction of individual curls creates dimension and ensures the style is interesting from every viewing angle.
- The most prominent, perfectly formed curls should be positioned in focal areas where they’ll be most visible and photographed.
Pin Curl Techniques
- Traditional pin curls can be incorporated into the design, where wet or damp hair is wrapped around fingers and pinned flat to dry before being released and arranged.
- Set curls using curl-enhancing products ensure each ringlet is defined, frizz-free, and maintains its shape throughout the styling process.
- Bobby pins should be carefully hidden within the curl structure, maintaining the artistic illusion while providing necessary security.
- Each curl may require multiple pins inserted from different angles to ensure it maintains its exact position throughout the wedding day.
Editorial Sophistication
- This avant-garde style suits fashion-forward brides who view their wedding as an opportunity for artistic expression and memorable aesthetic choices.
- Pairing sculptural updos with modern, architectural wedding dresses creates a cohesive high-fashion bridal look.
- Professional photography that captures the detail and artistry of the hairstyle from multiple angles showcases the investment in this elaborate styling.
- Consider scheduling extra time for this labor-intensive style, as creating sculptural perfection requires patience and precision from skilled stylists.
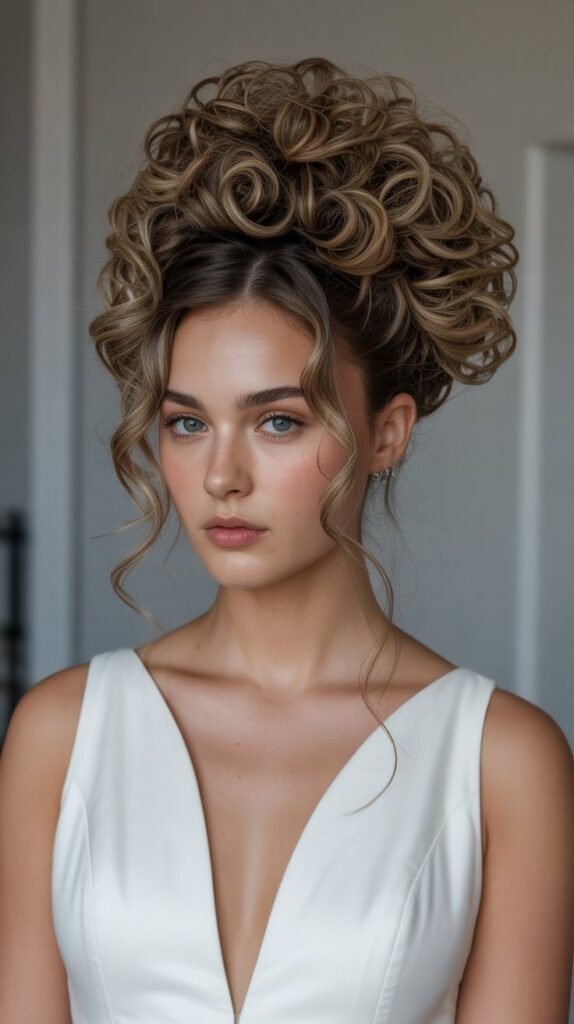
20. Curly Bantu Knot Updo

The curly Bantu knot updo celebrates natural texture through a traditional African hairstyling technique that creates small, coiled knots throughout the head.
This culturally significant style offers stunning geometric beauty and works wonderfully for brides embracing their natural hair texture.
Bantu Knot Formation
- Each Bantu knot is created by sectioning hair, twisting it tightly, and then wrapping the twisted section around itself to form a compact coiled knot.
- Knots can be uniform in size for a clean, geometric look or varied for a more organic, artistic arrangement.
- The knots are secured with bobby pins inserted through the center and base, ensuring they remain intact throughout all wedding activities.
- Smaller knots create a more intricate, detailed appearance while larger knots offer bold visual impact with less time investment.
Pattern Design
- Knots can be arranged in straight rows for a structured, architectural appearance that creates clean lines across the head.
- Circular or spiral patterns create organic, flowing designs that feel artistic and less rigid.
- Asymmetrical arrangements with concentrated knots on one side create modern, fashion-forward interpretations of the traditional style.
- The pattern should be planned before beginning the knotting process to ensure balanced distribution and intentional design.
Cultural Significance
- Bantu knots have deep roots in African hairstyling traditions and carry cultural meaning that makes them powerful choices for heritage celebration.
- This style allows brides to honor their roots while creating stunning bridal beauty that’s unique and personally meaningful.
- Traditional African wedding customs often influence hairstyle choices, and Bantu knots can be part of cultural expression on the wedding day.
- Incorporating traditional elements like gold accessories, cowrie shells, or specific color symbolism enhances the cultural significance of the style.
21. Romantic Curly Milkmaid Braid
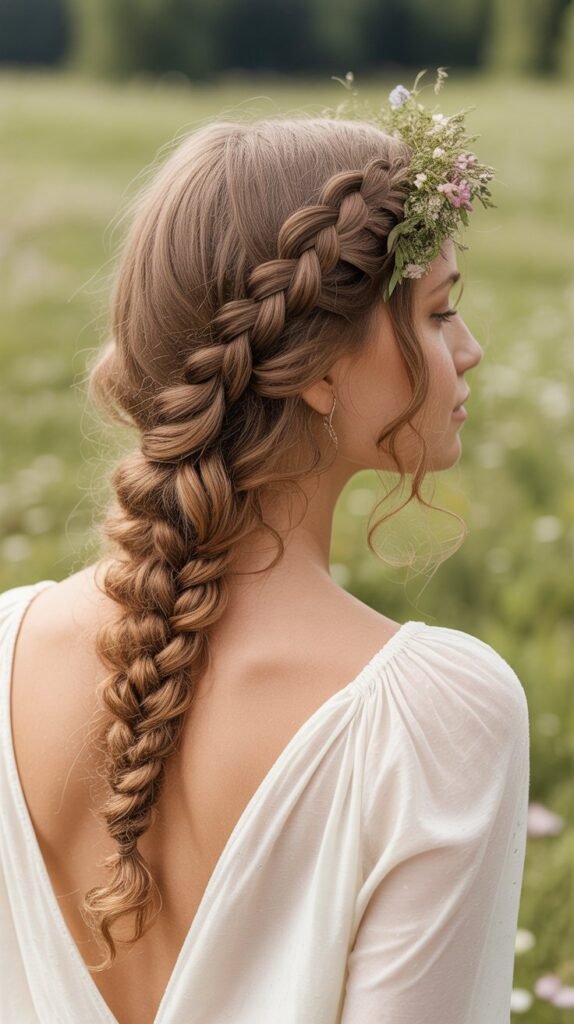
The romantic curly milkmaid braid wraps braided sections around the head like a crown, creating a soft, pastoral aesthetic perfect for garden weddings and bohemian celebrations.
This style combines the structure of braiding with the softness of curls for a look that’s both polished and naturally beautiful.
Double Braid Technique
- Hair is parted down the middle, creating two equal sections that will each be braided separately.
- Each side is braided using a technique that maintains curl texture, typically a looser three-strand or rope braid that doesn’t require pulling curls straight.
- The braids are wrapped over the top of the head and secured on the opposite side from where they began, creating the characteristic crown effect.
- The ends of the braids can be tucked and hidden under the opposite braid or left slightly visible and adorned with flowers or accessories.
Loose vs. Tight Styling
- Tighter milkmaid braids create a more structured, traditional appearance suitable for formal settings and classic wedding aesthetics.
- Looser braids with intentionally pulled sections create a bohemian, undone quality perfect for casual outdoor celebrations.
- The amount of loosening dramatically affects the style’s character, with “messier” versions feeling more contemporary and romantic.
- Face-framing curls left completely out of the braids soften the overall look and create a more relaxed, approachable aesthetic.
Pastoral and Garden Themes
- The milkmaid braid’s country-inspired origins make it perfect for barn weddings, farm venues, and rustic celebrations.
- Garden parties and outdoor ceremonies among flowers and greenery complement the naturally romantic quality of this style.
- Fresh flower crowns placed over or woven into the milkmaid braids create an ethereal, nature-goddess aesthetic.
- This style pairs beautifully with lace wedding dresses, flowing fabrics, and bohemian-inspired bridal fashion.
22. Curly Ponytail with Twisted Details
The curly ponytail with twisted details elevates a simple gathered style through the addition of twisted sections that create visual interest and sophistication.
This enhanced ponytail approach offers elegance while maintaining the ease and security of a traditional ponytail updo.
Twist Integration
- Twists can wrap around the ponytail base, creating a decorative element that conceals the elastic and adds dimension.
- Multiple thin twists incorporated throughout the ponytail itself create ribbon-like details that wind through the curls.
- Rope twists created from two sections of hair add textural contrast against single-strand curls.
- The twists should be secured with small clear elastics or bobby pins at strategic intervals to maintain their structure and prevent unraveling.
Ponytail Height Options
- High ponytails create youthful drama and work beautifully with backless dresses and statement back necklaces.
- Mid-level ponytails offer versatility and suit most face shapes without creating extreme height or drama.
- Low ponytails with twisted details provide sophisticated elegance appropriate for traditional venues and formal celebrations.
- Side ponytails combined with twists create asymmetrical interest and modern appeal.
Adding Visual Interest
- Wrapping sections of hair around the elastic in a crisscross pattern creates a woven appearance that’s both functional and decorative.
- Incorporating small flowers or greenery along the twists adds romantic, garden-inspired beauty.
- Crystal or pearl pins placed along the twisted sections create sparkle without requiring heavy hair accessories.
- Varying twist thickness throughout the style creates dimension and prevents monotony in the overall design.
23. Textured Curly Beehive
The textured curly beehive brings 1960s iconic volume into contemporary bridal styling by incorporating natural curl texture into the classic cone-shaped silhouette.
This dramatic style makes a statement and works beautifully for brides who want maximum impact and retro-inspired glamour.
Building Volume
- The beehive’s foundation requires significant backcombing at the crown and mid-back of the head to create the necessary height.
- Curls are smoothed over the teased foundation or incorporated into the structure while maintaining visible texture.
- The shape should taper gradually from wider at the top to narrower at the nape, creating the signature cone or dome silhouette.
- Strong-hold products including mousse, gel, and hairspray work together to ensure the beehive maintains its structure throughout the entire wedding day.
Maintaining Structure
- A hair rat (padding) placed underneath the teased hair can provide additional support and create more dramatic height.
- Bobby pins inserted in an X-pattern throughout the beehive secure the style from multiple angles and prevent collapsing.
- A final application of strong-hold hairspray, allowed to dry completely, creates a protective shell that weather-proofs the style.
- The beehive should be constructed in sections, with each section secured before moving to the next, ensuring stable layered structure.
Contemporary vs. Vintage
- Vintage-authentic beehives feature smooth, lacquered finishes with very little visible texture and maximum height.
- Contemporary interpretations embrace textured curls throughout the beehive, creating a softer, more organic version of the dramatic style.
- Modern beehives may be smaller and less extreme than 1960s versions while still providing significant height and retro appeal.
- Accessorizing with modern elements like minimalist combs or fresh flowers updates the vintage silhouette for today’s weddings.
24. Curly Side Bun with Braided Detail
The curly side bun with braided detail combines asymmetrical placement with the added interest of braiding, creating a romantic, dimensional style perfect for brides who want elegance with artistic flair.
This style showcases both curl texture and intricate braiding techniques in one cohesive design.
Side Placement Strategy
- The side bun typically positions at or slightly below ear level on the chosen side, creating flattering angles and interesting asymmetry.
- Positioning should consider your best side for photography and which shoulder is exposed by your dress neckline.
- The opposite side from the bun should feature smoothed hair or a small braid leading into the bun to maintain balance.
- Face-framing pieces left loose on both sides prevent the asymmetry from appearing unintentional or lopsided.
Braid Incorporation
- A braid can wrap around the perimeter of the bun like a crown, creating a frame that defines and accentuates the curly texture within.
- Multiple thin braids can flow into the bun from different directions, creating complex, multi-dimensional designs.
- A fishtail braid offers intricate detail that photographs beautifully and adds delicate texture contrast against larger curls.
- The braid can begin at the opposite temple and sweep across and down toward the bun, creating a flowing line that guides the eye.
Balance and Proportion
- The bun size should be proportional to head size and overall body frame to avoid appearing overwhelming or too small.
- Additional volume on the opposite side from the bun, through teasing or strategic curl placement, creates visual balance.
- The braid’s thickness should complement rather than compete with the bun’s volume.
- Accessories placed within or near the braid add sparkle without requiring heavy pieces that might overwhelm the delicate balance.
25. Elegant Curly Bun Cluster
The elegant curly bun cluster features multiple smaller buns arranged together to create a sophisticated, multi-dimensional updo.
This style offers complexity and visual interest through the repetition of circular forms in varying sizes.
Multiple Bun Arrangement
- Buns can be arranged vertically down the back of the head, creating a stacked effect that elongates the silhouette.
- Horizontal arrangement across the back creates width and works beautifully for brides with longer or thinner necks.
- Triangular placement with one bun above and two below (or vice versa) creates geometric interest and balanced composition.
- The number of buns typically ranges from two to four, with three being most common for balanced visual impact.
Size Variation
- Graduating bun sizes from largest to smallest creates a dynamic, flowing appearance with clear intentional design.
- Uniform-sized buns offer structured elegance and geometric precision for modern, minimalist bridal aesthetics.
- The largest bun typically contains the most hair and serves as the focal point of the arrangement.
- Smaller buns can be created using hair donuts in various sizes or by simply using less hair to form each bun.
Cohesive Design
- All buns should be styled using the same technique to create unity and cohesion within the overall design.
- The space between buns should be consistent, creating rhythm and intentional spacing throughout the arrangement.
- Curls can flow between buns, connecting them visually and creating seamless transitions rather than distinct separate elements.
- A single type of accessory (pearl pins, crystals, or flowers) repeated throughout all buns creates harmonious decoration.
26. Twisted Crown with Curly Cascade
The twisted crown with curly cascade features twisted sections that wrap around the head like a crown, with the remaining curls left to cascade freely down the back or gathered in a loose arrangement.
This style offers regal elegance combined with romantic, flowing texture.
Crown Construction
- Sections of hair from each temple are twisted backward toward the back of the head, where they meet and are secured together.
- The twists can be rope twists (two strands) for a more casual appearance or flat twists for sleeker, more structured designs.
- The twisted sections should be pinned securely at the back, either by crossing them over each other or joining them into a single point.
- Additional twists can be added above the first layer to create a more elaborate, stacked crown effect.
Cascade Styling
- The remaining curls below the twisted crown can flow freely for a romantic, princess-like aesthetic perfect for fairytale weddings.
- Curls can be gathered into a loose low bun or chignon, maintaining the crown while creating an updo effect.
- Strategic pinning of some cascading curls creates volume and prevents all the hair from hanging straight down.
- Half of the cascade can be pinned while the other half flows free, creating asymmetry and modern interest.
Royal Aesthetic
- This style evokes royal, princess-like beauty and pairs wonderfully with ballgown wedding dresses and formal venues.
- Tiara or crown placement works beautifully with this style, positioned above the twisted crown or integrated into it.
- Cathedral veils attach seamlessly beneath the twisted crown, allowing the twists to remain visible beneath the veil.
- Gold or metallic accessories enhance the regal quality of the style, particularly hair vines that follow the curve of the twisted crown.
27. Curly Low Side Chignon
The curly low side chignon positions all the elegance of a classic chignon in an asymmetrical, modern placement at the lower side of the head.
This sophisticated style offers timeless beauty with a contemporary twist through its off-center positioning.
Side Positioning Benefits
- Side placement creates interesting angles in photographs, ensuring variety in your wedding album images.
- This positioning flatters most face shapes by drawing attention diagonally across the face rather than straight on.
- The chignon’s weight positioned to one side creates a feeling of ease despite the formal styling.
- Dresses with asymmetrical necklines or one-shoulder designs are complemented perfectly by side-placed hairstyles.
Chignon Shaping
- The chignon’s circular or oval shape should be carefully formed, with curls pinned in a specific pattern to create the classic shape.
- Each curl is smoothed slightly and wrapped around the chignon’s center, building outward in concentric circles or spirals.
- The finished chignon should appear polished and intentional, with no pieces appearing accidentally placed or stray.
- Bobby pins inserted horizontally through the chignon and vertically into the base hair secure the style from multiple directions.
Sophistication Elements
- The curly low side chignon works beautifully for black-tie weddings and formal evening celebrations.
- Pairing this refined style with elegant jewelry, particularly dramatic earrings on the exposed ear, creates cohesive glamour.
- Minimal accessories allow the chignon’s beautiful shape to be the focal point, though a single statement piece can add sparkle.
- This style photographs beautifully in formal portraits and creates timeless wedding images that won’t look dated years later.
28. Braided Mohawk with Curly Ends

The braided mohawk with curly ends combines edgy structure through central braiding with the soft romance of curly ends, creating a style that’s both bold and beautiful.
This contemporary interpretation of mohawk styling suits confident brides who want to make a memorable statement.
Central Braid Series
- Multiple connected braids run down the center of the head from front to back, creating the mohawk’s characteristic central strip.
- French or Dutch braids work well, with Dutch braids providing more prominent, raised texture.
- Each section can be braided separately and connected, or one continuous braid can extend from front to nape.
- The braids should be kept intentionally full and wide by gently loosening them after completion.
Curly End Integration
- The final braid transitions into loose, flowing curls that cascade from the nape or are gathered into a curly ponytail.
- The contrast between structured braids and loose curls creates visual interest and balances edginess with femininity.
- Curls can be enhanced with curl-defining products to ensure they’re bouncy and full of movement.
- The length of the curly ends affects the overall balance, with longer curls creating more drama and romantic flow.
Modern Bridal Edge
- This style suits non-traditional brides, LGBTQ+ weddings, and celebrations that embrace personal style over convention.
- Unconventional venues like art galleries, urban rooftops, or industrial spaces complement this fashion-forward hairstyle.
- Pairing the bold hairstyle with equally statement-making fashion choices creates a cohesive, editorial bridal aesthetic.
- This style celebrates individuality and works beautifully for brides in creative industries or with alternative personal style.
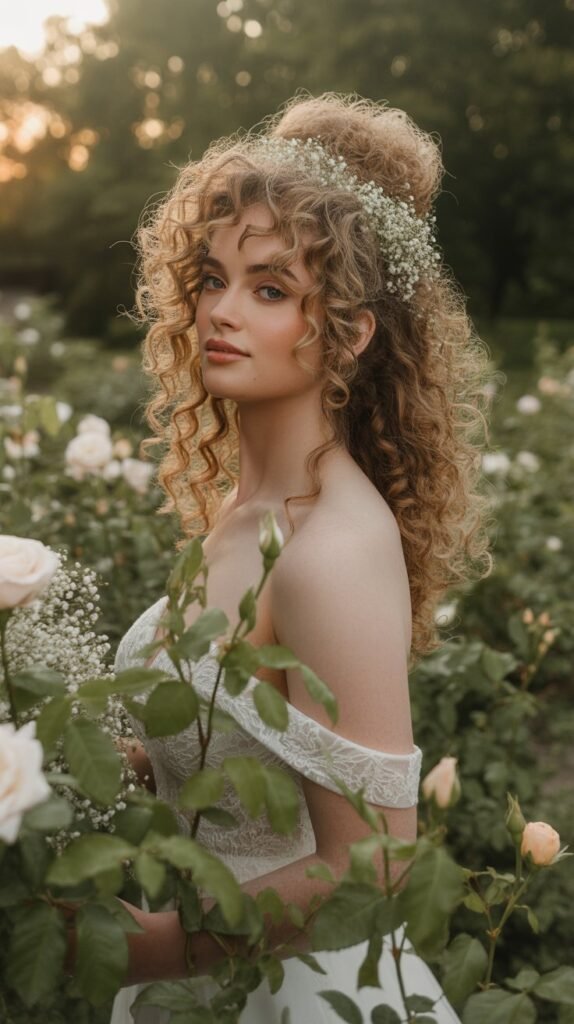
29. Curly Flower Crown Updo
The curly flower crown updo integrates fresh or preserved flowers directly into the hairstyle, creating a nature-inspired updo where flowers and curls intertwine seamlessly.
This romantic style blurs the line between hairstyle and accessory, creating a garden goddess aesthetic.
Flower Integration Methods
- Flowers can be woven into braids that form part of the updo structure, securing them both to the hair and within the braid pattern.
- Individual blooms can be bobby-pinned throughout the updo, placed strategically among curls for natural-looking distribution.
- A pre-made flower crown can be placed over the updo, with curls arranged around and through the flowers for integrated appearance.
- Flower crown placement should consider the flowers’ weight and the hair’s ability to support them throughout the day.
Flower Selection
- Smaller, lighter flowers like baby’s breath, wax flowers, or small roses work best for integration without weighing down the style.
- Flowers should be selected based on your wedding color palette and seasonal availability for freshness and longevity.
- Preserved or silk flowers offer practical alternatives that maintain their appearance throughout long wedding days without wilting.
- Greenery such as eucalyptus, ivy, or fern adds texture and helps connect individual flowers into a cohesive natural element.
Natural Romance
- This style epitomizes garden party weddings, outdoor ceremonies, and celebrations in natural settings.
- The organic quality of flowers integrated with natural curls creates authentic, uncontrived beauty.
- Minimal additional accessories are needed as the flowers themselves provide all the decoration and sparkle necessary.
- This style works beautifully for bohemian, rustic, and romantic wedding themes where nature plays a central role.
30. Voluminous Curly Top Bun with Wrap
The voluminous curly top bun with wrap combines dramatic height and volume at the crown with the elegant detail of hair-wrapped concealment around the bun base.
This style creates maximum impact through size and positioning while maintaining polished refinement.
Maximum Volume Creation
- All hair is gathered at the crown and secured with a strong elastic, creating the foundation for maximum volume.
- A large hair donut placed over the ponytail provides structure and ensures the bun maintains impressive size throughout the day.
- Curls are spread evenly around the donut, creating full coverage that makes the bun appear entirely composed of voluminous curls.
- Additional curls can be pinned on top of the initial bun layer to create even more dramatic volume and dimension.
Base Wrapping Technique
- A section of hair is left out of the bun specifically for wrapping around the base to conceal the elastic.
- This section is smoothed and wrapped tightly around where the bun meets the head, creating a polished transition.
- The wrapped section is secured with bobby pins tucked underneath, invisible to viewers but providing necessary hold.
- Multiple wraps around the base may be necessary to completely conceal the elastic and create a seamless, professional appearance.
Statement-Making Impact
- This bold style suits confident brides who want their hairstyle to be a defining feature of their bridal look.
- The dramatic volume creates stunning profile photographs and ensures the hairstyle is visible even from a distance.
- This style works beautifully for brides with longer necks and balanced facial proportions who can carry significant height.
- Minimalist dress designs allow the statement hairstyle to be the focal point without creating competing visual elements.
31. Twisted Halo with Curly Base

The twisted halo with curly base features twisted sections of hair that wrap around the head like a halo, with the remaining curls gathered at the base in a low updo.
This angelic style combines structure and softness for romantic elegance with ethereal beauty.
Halo Formation
- Hair from one side of the head is divided into two sections and twisted together, creating a rope-like strand that wraps around the head.
- The twist continues all the way around the head, following the hairline like a crown or halo.
- The twist can sit directly on the hairline for maximum visibility or slightly back from it for a subtler appearance.
- When the twist reaches its starting point, it’s secured by tucking the end underneath and pinning it invisibly to the base hair.
Base Updo Styling
- The remaining hair not incorporated into the halo is gathered at the nape and styled into a curly bun, chignon, or loose cluster.
- The base updo should be substantial enough to balance the halo’s presence without competing for visual dominance.
- Curls within the base updo can be left loose and romantic or pinned more formally depending on your wedding’s overall aesthetic.
- The transition between the halo and base updo should be seamless, with any gaps or awkward spaces filled with strategically placed curls.
Angelic Appeal
- The halo’s symbolic significance adds meaningful beauty to wedding day styling, representing purity and divine blessing.
- This style works beautifully for religious ceremonies and traditional church weddings.
- White or ivory flowers placed along the halo enhance the angelic, heavenly quality of the style.
- Simple, elegant wedding dresses with minimal embellishment allow the halo hairstyle to be the decorative focal point.
32. Curly Messy Bun with Tendrils
The curly messy bun with tendrils embraces intentionally undone styling, creating a romantic, effortless-looking updo despite careful construction.
This style features a loosely gathered bun with strategically placed face-framing tendrils that soften the overall appearance.
Achieving Controlled Messiness
- The “messy” appearance is actually carefully constructed, with each loose piece and tendril deliberately placed for optimal effect.
- Hair is gathered loosely rather than pulled tight, allowing natural volume and texture to remain visible.
- Curls are pinned randomly around the gathering point rather than in organized patterns, creating organic, unstructured beauty.
- Some curls are left intentionally looser than others, creating the impression that the style is naturally undone rather than constructed.
Strategic Tendril Placement
- Face-framing tendrils are carefully selected before creating the bun, typically choosing curls from around the temples and sideburns.
- These pieces should be the most defined, beautiful curls as they’ll frame your face in all photographs.
- Tendrils can be enhanced with curl cream or gel to ensure they maintain perfect definition throughout the day.
- The length and thickness of tendrils should flatter your specific face shape, with thinner pieces suiting rounder faces and fuller pieces complementing longer faces.
Casual Elegance
- This style suits laid-back, intimate weddings where relaxed beauty is preferred over formal perfection.
- Beach weddings, backyard celebrations, and casual destination weddings pair beautifully with the effortless aesthetic of messy buns.
- The style requires minimal accessories, often needing nothing more than the natural beauty of the curls themselves.
- This approach to bridal beauty feels modern and authentic, celebrating natural texture rather than fighting against it.
Hair Preparation and Care Tips
Pre-Wedding Hair Health
- Begin a hair care routine at least three months before your wedding to ensure curls are in optimal condition.
- Deep conditioning treatments weekly help strengthen hair and enhance curl definition for photography.
- Avoid chemical treatments like coloring or relaxers within six weeks of your wedding to prevent damage or unpredictable results.
- Regular trims every six to eight weeks remove split ends and keep curl shape uniform throughout all sections.
Day-Before Preparation
- Wash hair the evening before your wedding rather than the morning of to allow natural oils to provide hold and shine.
- Apply a curl-enhancing product to damp hair and either diffuse or air-dry to ensure perfect curl formation overnight.
- Sleep on a silk or satin pillowcase to prevent frizz and maintain curl integrity while you sleep.
- Avoid touching or manipulating your curls excessively, as this can cause frizz and disrupt the curl pattern.
Morning-Of Care
- Refresh curls with a water-based curl refresher spray rather than re-wetting completely, which could create drying time issues.
- Use a microfiber towel or t-shirt to gently scrunch away excess moisture without disrupting curl pattern.
- Allow hair to dry completely before your stylist begins working, as damp hair doesn’t hold updo styles as securely.
- Communicate clearly with your stylist about your curl type and any products that work particularly well or poorly for your hair.
Working with Your Hairstylist
Initial Consultation
- Bring multiple inspiration photos showing the exact updo style from various angles for clear communication.
- Schedule your consultation at least two months before the wedding to allow time for any necessary adjustments.
- Discuss your curl pattern, density, and length to ensure your chosen style is achievable with your specific hair.
- Ask about the stylist’s experience with curly hair specifically, as techniques differ significantly from straight hair styling.
Trial Run Importance
- A trial run is essential for curly hair updos as curl behavior can be unpredictable and varies with weather conditions.
- Schedule the trial at least one month before your wedding to allow time for modifications if the first attempt isn’t perfect.
- Wear a shirt with a similar neckline to your wedding dress so you can see how the hairstyle interacts with the dress style.
- Take photos from all angles during the trial, including front, back, both sides, and three-quarter views for comprehensive documentation.
- Test the style’s durability by wearing it for several hours after the trial to see how it holds up with normal movement.
Communication Strategies
- Create a visual board with multiple examples of your desired style, including photos of hairstyles you don’t want to avoid miscommunication.
- Explain your hair’s specific needs, including whether it tends toward frizz in humidity, loses curl when products are applied, or requires specific techniques.
- Discuss the timeline for your wedding day, ensuring your stylist knows what time you need to be ready and can allocate sufficient time.
- Be honest about your comfort level with different amounts of product, pins, and overall hair manipulation.
- Ask your stylist to explain their process and reasoning for product and technique choices so you understand what’s happening.
Questions to Ask
- “How many curly-haired brides have you styled, and can I see photos of your curly updo work?”
- “What products do you plan to use, and how will they affect my curl pattern and texture?”
- “How long will this style take to create on my wedding day, and what’s your backup plan if something goes wrong?”
- “Will this style hold up in my wedding venue’s conditions (outdoor humidity, air-conditioned ballroom, etc.)?”
- “What is your policy on touch-ups during the reception, and do you offer on-site services?”
Product Recommendations for Curly Updos
Curl Definition Products
- Curl-defining creams provide hold while maintaining natural texture and preventing frizz throughout the styling process.
- Leave-in conditioners offer moisture that keeps curls supple and prevents the brittleness that can occur with extensive pinning.
- Curl-enhancing gels provide stronger hold for updos that need to last 12+ hours through ceremony and reception.
- Mousse applied to damp hair adds volume at the roots while defining curls without heaviness or crunchiness.
Hold and Setting Products
- Flexible-hold hairspray allows movement while maintaining the updo structure, preventing the helmet-like appearance of maximum-hold sprays.
- Strong-hold hairspray can be used strategically on specific sections like braids or twists that need absolute security.
- Setting sprays applied before styling begins provide a foundation that helps styles last longer without requiring excessive product at the end.
- Edge control products smooth the hairline and baby hairs without creating greasiness or product buildup.
Finishing Products
- Shine serum adds luminosity that photographs beautifully but should be used sparingly to avoid appearing greasy.
- Anti-humidity products create a barrier against moisture in the air, essential for outdoor or summer weddings.
- Frizz-control products smooth the hair cuticle without weighing down curls or eliminating natural texture.
- Texture sprays can add grip and volume to specific sections that need extra fullness or hold.
Product Application Tips
- Less is more with curly hair products; start with small amounts and add more only if necessary.
- Apply products section by section rather than to all hair at once for even distribution and better control.
- Allow each product layer to dry or set before applying the next to prevent pilling or product buildup.
- Test all products several weeks before your wedding to ensure they don’t cause allergic reactions or unexpected results.
Accessory Selection Guide
Hair Jewelry Options
- Crystal or rhinestone pins scattered throughout the updo add sparkle that catches light beautifully in photographs.
- Pearl-adorned bobby pins create vintage elegance and work particularly well with classic updo styles.
- Decorative hair combs can serve both functional and aesthetic purposes, securing heavy sections while adding visual interest.
- Hair vines with delicate metallic work and stones can wrap around buns, follow braids, or accent the overall updo design.
Floral Accessories
- Fresh flowers should be added as close to ceremony time as possible to ensure they look vibrant in photos.
- Preserved flowers offer longer-lasting beauty and can be applied earlier in the day without wilting concerns.
- Silk or fabric flowers provide the most durability and can be kept as keepsakes after the wedding.
- Flower selection should consider both color palette and the flowers’ physical weight to ensure they don’t pull down or damage the updo.
Veils and How They Attach
- Cathedral veils typically attach above or below the updo depending on the style, with longer veils often requiring professional attachment.
- Fingertip-length veils work beautifully with most updo styles and can attach directly into the updo structure.
- Birdcage veils and blusher veils attach near the front of the hairstyle, often with small combs that integrate into the style.
- Veil placement should be discussed with your stylist during the trial to ensure secure attachment that doesn’t compromise the updo’s integrity.
Matching Accessories to Dress
- The formality of hair accessories should match your dress; heavily beaded dresses pair with elaborate hair jewelry while simple dresses need minimal accessories.
- Metal tones in hair accessories should coordinate with jewelry and dress embellishments (silver with silver, gold with gold, rose gold with rose gold).
- The style period of your dress should inform accessory choices; vintage dresses need vintage-inspired accessories for cohesive aesthetics.
- Less formal dresses and outdoor weddings suit natural elements like flowers and greenery over heavy crystal or metal pieces.
Seasonal Considerations
Spring Weddings
- Spring’s moderate temperatures and occasional humidity require products that combat moisture without feeling heavy.
- Fresh seasonal flowers like tulips, peonies, and cherry blossoms integrate beautifully into spring wedding updos.
- Light, breathable styles work well as temperatures can vary significantly from morning to evening.
- Pastel-colored or white flower crowns complement the season’s aesthetic and create romantic, garden-inspired beauty.
Summer Weddings
- Humidity-resistant products are essential for maintaining updo integrity in hot, moist summer conditions.
- Styles that keep hair completely off the neck and shoulders provide comfort during outdoor ceremonies and receptions.
- Waterproof or water-resistant hairspray ensures styles withstand perspiration without falling apart.
- Lighter accessories prevent additional heat and discomfort during already warm summer celebrations.
Fall Weddings
- Richer, more dramatic updo styles complement fall’s deeper color palettes and more formal aesthetic.
- Seasonal flowers and foliage like dahlias, roses, and autumn leaves create stunning fall-appropriate accessories.
- Cooler temperatures allow for more elaborate, heavier styles that might be uncomfortable in summer heat.
- Deeper, warmer hair accessory tones like gold, bronze, and copper complement fall wedding color schemes.
Winter Weddings
- Dry winter air requires extra moisturizing products to prevent static and frizz in curly updos.
- Indoor venue temperatures can be quite warm, so styles should account for the contrast between cold outdoor and heated indoor conditions.
- Elegant, formal updo styles suit winter’s sophisticated aesthetic and traditional holiday season celebrations.
- Crystal and metallic accessories complement winter’s sparkle and glamour, evoking ice and snow in their appearance.
Troubleshooting Common Issues
Humidity and Frizz
- Apply anti-humidity products as the final layer of your styling routine to create a protective barrier.
- Avoid touching your hair throughout the day, as the oils from hands can disrupt products and cause frizz.
- Keep a small emergency kit with you containing anti-frizz serum and bobby pins for quick touch-ups.
- If humidity is severe, consider slightly adjusting your style choice to embrace rather than fight natural volume.
Pins Showing or Slipping
- Use bobby pins that exactly match your hair color; even slight color differences can make pins visible in photos.
- Insert pins in X-patterns rather than parallel to create mechanical advantage and stronger hold.
- Spray bobby pins with hairspray before inserting them to increase grip and prevent sliding.
- Open bobby pins slightly before inserting to ensure they grip more hair and create more secure hold.
Style Falling Throughout the Day
- Ensure hair is completely dry before styling begins; damp hair cannot hold updo shapes as effectively.
- Use adequate product for your hair’s thickness and texture; fine hair needs less while thick hair requires more.
- Check that bobby pins are inserted deeply enough to reach the scalp and secure to base hair rather than just outer layers.
- Consider a more structured style if your hair naturally loses hold quickly, as looser styles may not last.
Discomfort or Headaches
- Communicate immediately with your stylist if you feel pulling or tension; updos should never cause pain.
- Tight updos can cause headaches, so ensure your stylist doesn’t pull sections too taut during construction.
- Heavy accessories or very large updos can strain the neck; choose proportional styles for your frame.
- Take breaks to gently massage your scalp during long styling sessions to prevent tension buildup.
Timeline Planning
12 Months Before Wedding
- Begin researching updo styles and creating inspiration boards with photos of hairstyles that appeal to you.
- Start or continue a hair health routine including regular trims, deep conditioning, and minimal heat styling.
- Research hairstylists in your area who specialize in curly hair and updos, reading reviews and viewing portfolios.
6 Months Before Wedding
- Book your hairstylist after reviewing their work and discussing your vision during initial consultations.
- Continue hair health maintenance and consider consulting a hairstylist about optimal length for your desired updo.
- Avoid major hair changes like cuts, color, or chemical treatments that could affect your wedding day results.
2-3 Months Before Wedding
- Schedule your hair trial, ensuring it’s far enough before the wedding to allow for a second trial if needed.
- Purchase or order any hair accessories you’ll need, allowing time for delivery and exchanges if necessary.
- Discuss veil attachment with your stylist if you’re wearing one, bringing it to your trial if possible.
1 Month Before Wedding
- Have a final trim to remove any split ends without significantly changing your length.
- Finalize all details with your stylist including timing, location, and payment arrangements.
- Create an emergency hair kit with bobby pins, hairspray, and any specific products your stylist recommends.
Week Before Wedding
- Avoid trying new products or treatments that could cause unexpected reactions or results.
- Get plenty of sleep and stay hydrated to ensure your hair and scalp are in optimal condition.
- Confirm all final details with your hairstylist including arrival time and any last-minute changes.
Day Before Wedding
- Wash and condition your hair in the evening, allowing it to dry naturally or with a diffuser.
- Sleep on a silk or satin pillowcase to maintain curl integrity overnight.
- Avoid heat styling or heavy manipulation that could cause frizz or damage.
Wedding Day
- Eat a light breakfast before your hair appointment to maintain energy without feeling overly full.
- Wear a button-up or zip-up shirt that won’t need to be pulled over your head after hair is complete.
- Arrive at your appointment with clean, dry hair as discussed with your stylist during the trial.
- Trust your stylist’s expertise and try to relax, knowing you’ve prepared thoroughly for this moment.
Professional Styling Costs
- Bridal updo styling typically ranges from $75 to $300+ depending on location, stylist experience, and style complexity.
- Trial runs usually cost 50-100% of the final styling fee and are essential for curly hair updos.
- Travel fees may apply if your stylist comes to your venue rather than styling at their salon.
- Additional fees may apply for very early morning appointments or services on high-demand weekend dates.
DIY Considerations
- DIY updos can save money but require significant practice and may cause unnecessary stress on your wedding day.
- Curly hair updos are more complex than straight hair styles and benefit greatly from professional expertise.
- Even if you’re skilled with your hair, the pressure of your wedding day can affect your ability to style effectively.
- Consider having a professional handle the updo while you DIY other aspects of your beauty routine if budget is a concern.
Accessory Investment
- Hair accessories range from affordable costume jewelry pieces ($20-50) to high-end designer options ($200-500+).
- Fresh flowers are generally the most affordable accessory option at $25-75 depending on types and quantities.
- Consider that well-made accessories can become family heirlooms and be worn by future brides in your family.
- Rental options exist for very expensive pieces like designer hair combs or vintage accessories.
Value Optimization
- Book early to secure your preferred stylist at their current rates before potential price increases.
- Consider group bookings if multiple people in your bridal party need styling; some stylists offer package discounts.
- Prioritize the updo itself over expensive accessories; a beautifully executed style needs minimal additional decoration.
- Clear communication during trials prevents the need for multiple trials which increase overall costs.
Maintenance and Touch-Ups
During the Reception
- Designate a bridesmaid or family member as your “hair assistant” who can check your updo periodically and alert you to any issues.
- Keep your emergency kit accessible in a bridesmaid’s purse or at the head table for quick fixes.
- Avoid touching your hair frequently, as this can disturb bobby pins and loosen the overall structure.
- If your stylist offers on-site touch-up services during the reception, consider this investment for peace of mind.
Emergency Kit Contents
- 10-15 bobby pins in your exact hair color for quick securing of any loose sections.
- Travel-size bottle of the hairspray your stylist used for touch-ups that match the original products.
- Small mirror for checking the back of your hairstyle when necessary.
- Anti-frizz serum or curl-refreshing spray for managing humidity-related issues.
- Hair pins or clips that were used in your original style in case any are lost.
Quick Fixes
- If a section loosens, gather it and secure with crossed bobby pins in an X-pattern for strongest hold.
- Smooth any frizz with a small amount of serum warmed between palms and applied gently without disrupting the overall style.
- If accessories shift, remove and reinsert them rather than trying to adjust them while they’re still in place.
- For significant issues, step away to a private area rather than attempting fixes in front of guests.
Knowing When to Seek Help
- Structural issues like the entire updo shifting or major sections falling require professional intervention if your stylist is available.
- If you feel discomfort or pain, address it immediately even if it means slightly altering the style for comfort.
- Multiple small issues occurring simultaneously may indicate a foundational problem that requires more than quick fixes.
- Trust your instincts; if something feels wrong, it’s better to address it than worry throughout your celebration.
Real Bride Testimonials and Tips
Advice from Recently Married Brides
- “I wish I’d done a second trial after my first one didn’t feel quite right; the final result would have been perfect instead of just okay.”
- “Bring photos from multiple angles to your stylist; what looks great from the front might not photograph well from the back.”
- “My curls handled humidity better than I expected because we used the right products; don’t assume outdoor summer weddings and curly updos are incompatible.”
- “The bobby pins that matched my hair color exactly were invisible in photos while the ones that were slightly off showed up constantly.”
- “I let go of trying to control every curl and embraced my hair’s natural texture, which made the whole styling process less stressful and the result more beautiful.”
Lessons Learned
- Starting hair health treatments early makes a visible difference in photos; healthy curls photograph significantly better than damaged ones.
- The trial run timing matters; scheduling it too early means you might forget important details, while too late doesn’t leave room for adjustments.
- Communication with your stylist about your hair’s quirks prevents surprises on your wedding day.
- Your updo will photograph differently than it appears in the mirror; trust your stylist’s experience with what translates well to photos.
- The style that looks perfect in magazines might not suit your face shape, hair texture, or wedding aesthetic; personalization is essential.
What Worked Well
- Choosing a style that worked with rather than against natural curl patterns resulted in longer-lasting, more comfortable updos.
- Keeping emergency kits stocked and accessible prevented minor issues from becoming major stressors.
- Building extra time into the wedding day timeline for hair styling prevented rushing and allowed for perfection.
- Trusting experienced stylists who specialize in curly hair resulted in better outcomes than trying to force a generalist to work with unfamiliar textures.
- Embracing personal style rather than following trends created unique, memorable hairstyles that reflected individual personalities.
Photography Considerations
Angles That Flatter Updos
- Three-quarter views showcase both the front styling and updo details, creating dimensionally interesting portraits.
- Back-lit photos emphasize curl texture and create romantic, glowing effects around the updo’s perimeter.
- Profile shots highlight the updo’s silhouette and work particularly well for styles with interesting shapes or heights.
- Over-the-shoulder poses allow brides to show their faces while displaying updo details in the same frame.
Lighting Effects on Curly Texture
- Natural light highlights curl definition and creates soft, flattering shadows that enhance dimensional texture.
- Direct flash can flatten curly texture in photos; discuss lighting approaches with your photographer beforehand.
- Golden hour (sunset) light creates warm, romantic glow that’s especially beautiful with curly updo textures.
- Backlighting creates halo effects around curls and emphasizes the updo’s overall shape dramatically.
Showcasing Updo Details
- Communicate with your photographer about capturing updo details from various angles throughout the day.
- Getting-ready photos provide opportunities for close-up updo shots that showcase intricate details.
- Veil photos should be taken from angles that show how the veil integrates with your updo.
- Action shots during dancing and celebration show how your updo moves and holds up, documenting its longevity.
Working with Your Photographer
- Share photos of your updo trial with your photographer so they can plan angles and lighting that will showcase it beautifully.
- Discuss specific updo detail shots you want, such as close-ups of accessories or the back of the style.
- If your updo has a particularly beautiful side, communicate this so your photographer can prioritize that angle.
- Request photos that show your updo’s evolution throughout the day, documenting how it held up and changed.
Cultural and Personal Significance
Celebrating Natural Texture
- Curly updo styles allow brides to honor their natural hair texture on their wedding day rather than conforming to traditional straight-hair expectations.
- Embracing natural hair in wedding styling reflects broader movements toward authenticity and self-acceptance in bridal beauty.
- These styles can represent cultural pride, particularly for brides whose natural texture has historically been deemed “unprofessional” or “inappropriate” for formal events.
- Choosing curly updos sends powerful messages to younger family members and guests about the beauty of natural hair.
Family Traditions
- Some curly updo styles carry cultural significance and can honor family heritage and traditions.
- Incorporating accessories or techniques passed down through generations connects your wedding to family history.
- Mothers, grandmothers, or other relatives may have expertise with curly hair styling that can be incorporated into your wedding day preparations.
- Creating new traditions around natural hair celebration can become legacies for future generations in your family.
Personal Expression
- Your wedding hairstyle is an opportunity to express your personality, values, and aesthetic preferences.
- Choosing between traditional and unconventional updos reflects your relationship’s character and your personal style philosophy.
- The decision to embrace or minimize natural curl texture can be deeply personal and should always be respected.
- Your updo choice contributes to how you’ll remember yourself on your wedding day and how you’ll appear in photos viewed for generations.
Representation Matters
- Visible representation of beautiful curly hair updos in wedding contexts helps change narrow beauty standards.
- Sharing your wedding photos publicly (if comfortable) contributes to broader representation of diverse hair textures in bridal beauty.
- Choosing vendors who understand and celebrate curly hair supports businesses that prioritize inclusivity.
- Your choices can inspire other curly-haired brides to embrace their natural texture rather than fighting against it.
Conclusion
The journey to finding your perfect wedding hairstyle among the 30+ Latest Updo Wedding Hairstyles for Curly Hair is both exciting and deeply personal, offering countless opportunities to celebrate your natural texture while achieving the elegant bridal aesthetic you’ve always envisioned.
From classic low buns that offer timeless sophistication to bold braided mohawks that make unforgettable statements, curly hair provides unique advantages in creating updos with natural volume, dimension, and romantic texture that straight hair simply cannot replicate.
The key to success lies in choosing styles that work with your curl pattern rather than against it, selecting experienced stylists who understand curly hair’s specific needs, and preparing your hair properly through consistent care and quality products.
Whether you’re drawn to vintage-inspired victory rolls, bohemian flower crowns, or modern sculptural designs, there’s an updo style within these 30+ options that perfectly suits your wedding theme, venue, personal style, and comfort level.
Remember that your wedding hairstyle should make you feel confident, beautiful, and authentically yourself while providing the security and longevity needed to last through ceremony, photos, and celebration.
The investment in professional styling, quality trial runs, and appropriate products pays dividends in the form of stunning photos, lasting comfort, and the peace of mind that allows you to fully enjoy your special day.
As you move forward with planning, trust your instincts, communicate clearly with your stylist, and embrace the natural beauty that makes your curly hair absolutely perfect for creating breathtaking updo wedding hairstyles.
Your wedding day is a celebration of love, commitment, and the beauty of being authentically yourself, and your choice among these 30+ Latest Updo Wedding Hairstyles for Curly Hair will reflect that beautiful truth in every photo, every moment, and every memory created on your most special day.
