Embracing your natural 4C texture in a short style opens up a world of stunning, low-maintenance possibilities that celebrate your hair’s unique beauty.
Whether you’re transitioning to natural hair, seeking a dramatic change, or simply want manageable styles that showcase your texture, short 4C hairstyles offer the perfect blend of elegance, versatility, and ease.
This comprehensive guide explores over 37 chic and easy styles specifically designed for short 4C natural hair, from protective styles and twist-outs to tapered cuts and creative updos.
You’ll discover styling techniques, maintenance tips, and inspiration for every occasion—whether you’re heading to the office, a special event, or simply enjoying your everyday routine.
Get ready to fall in love with your coils all over again as we dive into the best short 4C hairstyles that prove natural hair is both beautiful and incredibly manageable.
1. Tapered TWA (Teeny Weeny Afro)
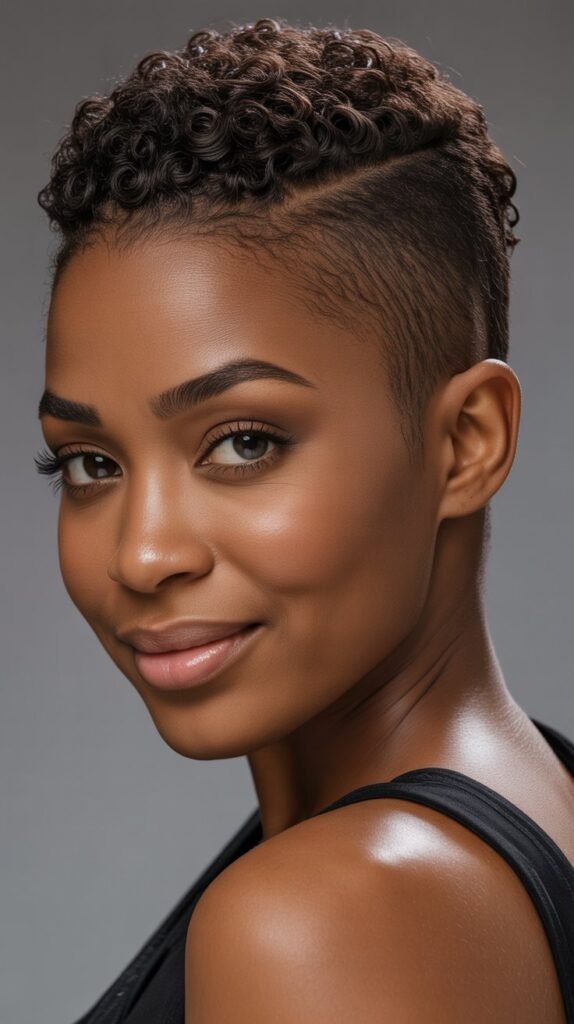
The tapered TWA represents one of the most liberating and stylish options for short 4C hair, combining minimal maintenance with maximum impact.
This cut features longer hair on top that gradually shortens toward the nape and sides, creating a beautifully sculpted silhouette that enhances your facial features.
The tapered TWA works exceptionally well for busy lifestyles while still making a bold fashion statement.
Key Features and Benefits:
- The tapered design creates natural dimension and shape without requiring extensive styling time each morning.
- This cut reduces shrinkage concerns since the hair is already short, allowing your natural texture to shine in its truest form.
- Maintenance involves simple moisturizing routines and occasional edge-ups every 2-4 weeks to keep the taper sharp.
- The style flatters various face shapes, with the ability to adjust the taper angle to complement your specific features.
- You can add personality through hair color, designs shaved into the tapered sides, or by styling the top section in different ways.
Styling Variations:
- Keep the top moisturized and defined with a curl-enhancing cream for a polished, professional look.
- Create a mini mohawk effect by styling the top section upward with edge control or styling gel.
- Add hair accessories like headbands, clips, or scarves to transform the look from casual to dressy.
- Experiment with temporary color on the longer top section for events or creative expression.
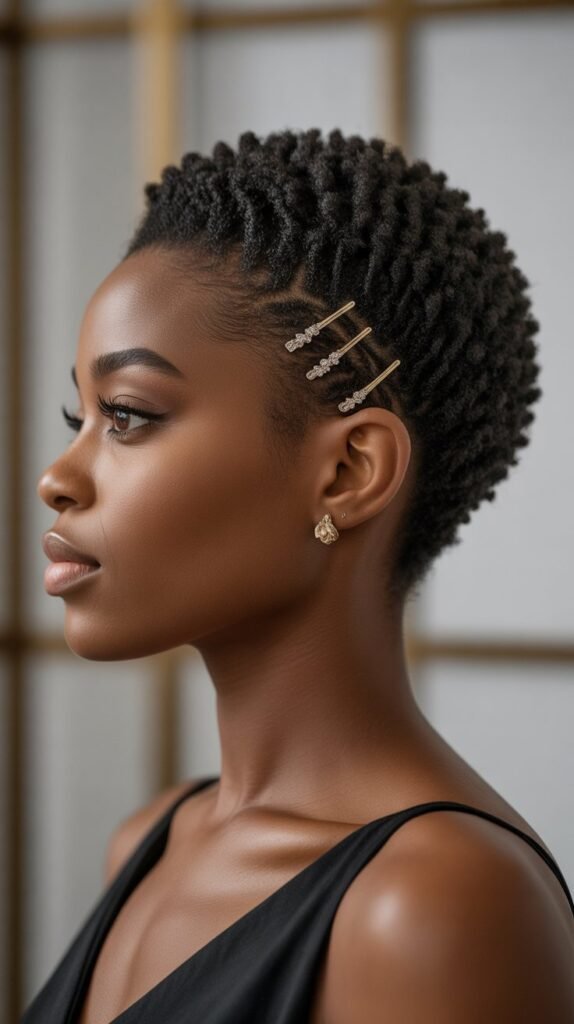
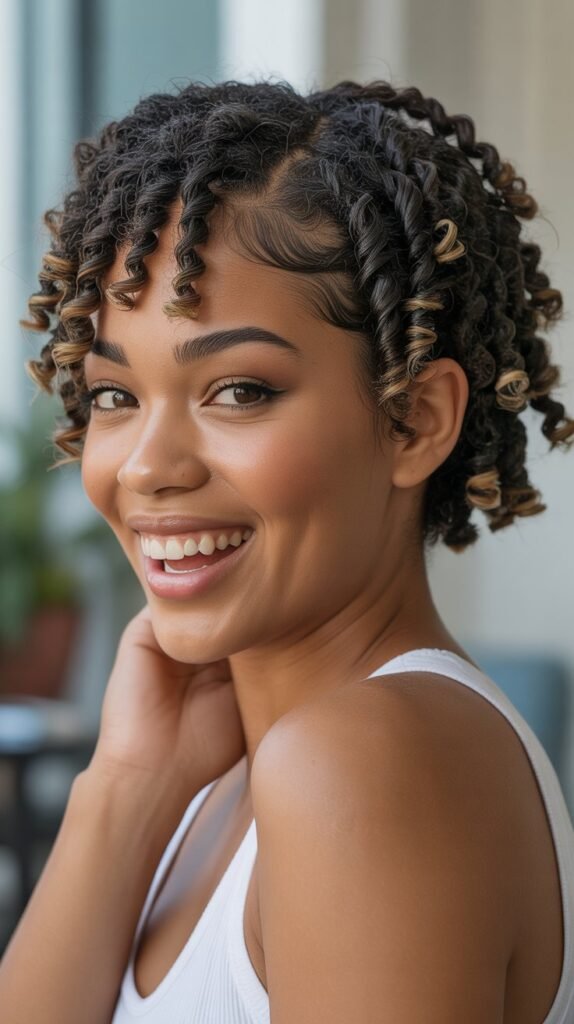
2. Finger Coils
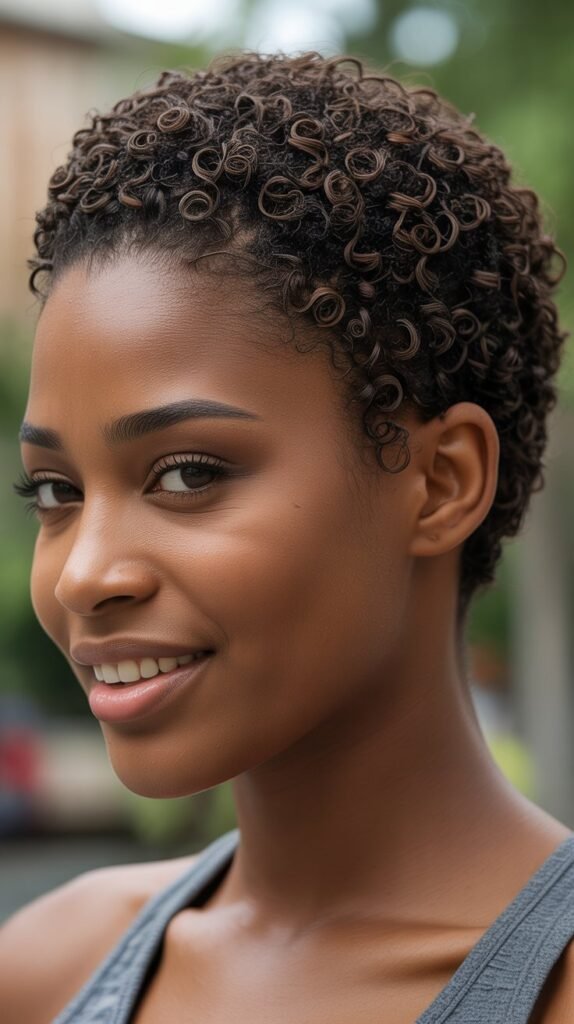
Finger coils create uniformly defined spirals throughout your short 4C hair, offering a polished and intentional look that showcases your hair’s natural pattern.
This technique involves wrapping small sections of hair around your finger to form tight, springy coils that last for several days.
Finger coils work beautifully on short 4C hair because the reduced length makes the process faster and the results more manageable.
Application Process:
- Start with freshly washed and conditioned hair that’s still damp but not dripping wet for optimal product distribution.
- Apply a generous amount of styling cream or curl-defining gel to small sections, typically about the width of a pencil.
- Wrap each section tightly around your finger from root to tip, sliding your finger out carefully to maintain the coil shape.
- Allow the coils to air dry completely or sit under a hooded dryer to speed up the process and reduce frizz.
- Once fully dry, you can separate some coils gently for added volume or leave them as-is for maximum definition.
Longevity and Maintenance:
- Finger coils typically last 5-7 days with proper nighttime care using a satin bonnet or pillowcase.
- Refresh the style by lightly misting with water and applying a small amount of moisturizer to revive the coils.
- This style serves as an excellent protective option since manipulation is minimal once the coils are set.
- The uniform appearance makes finger coils appropriate for professional environments and formal occasions.
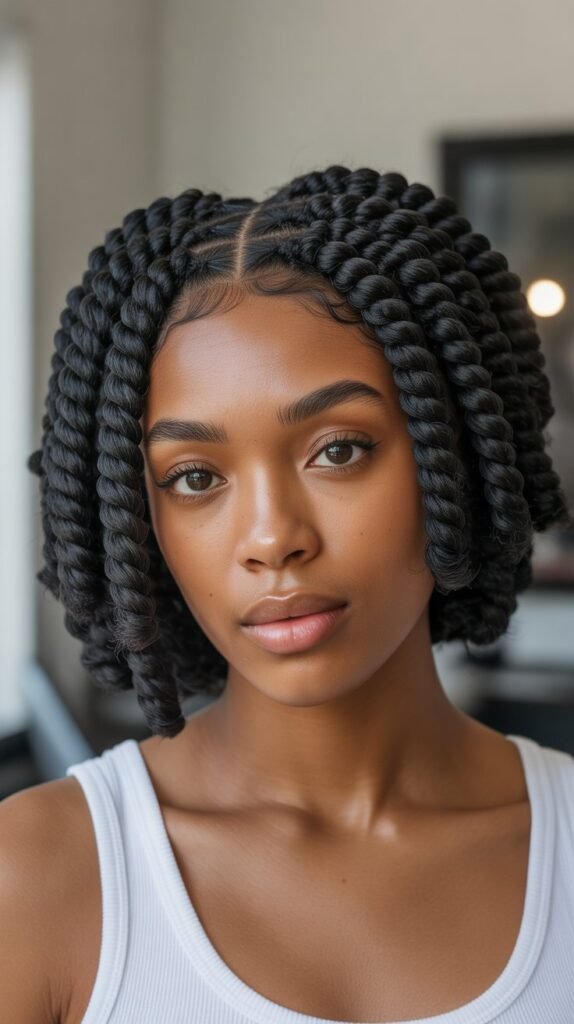
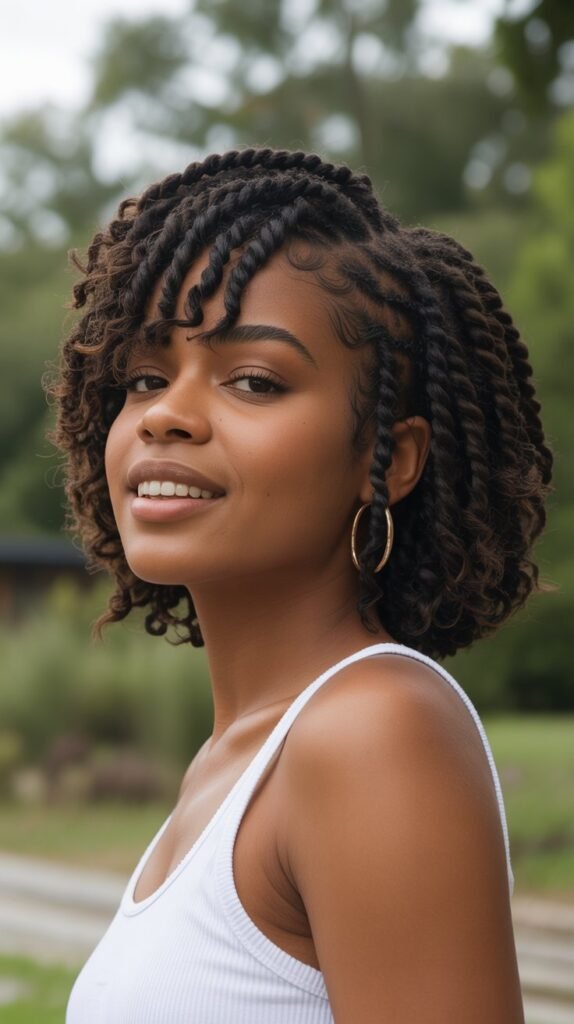
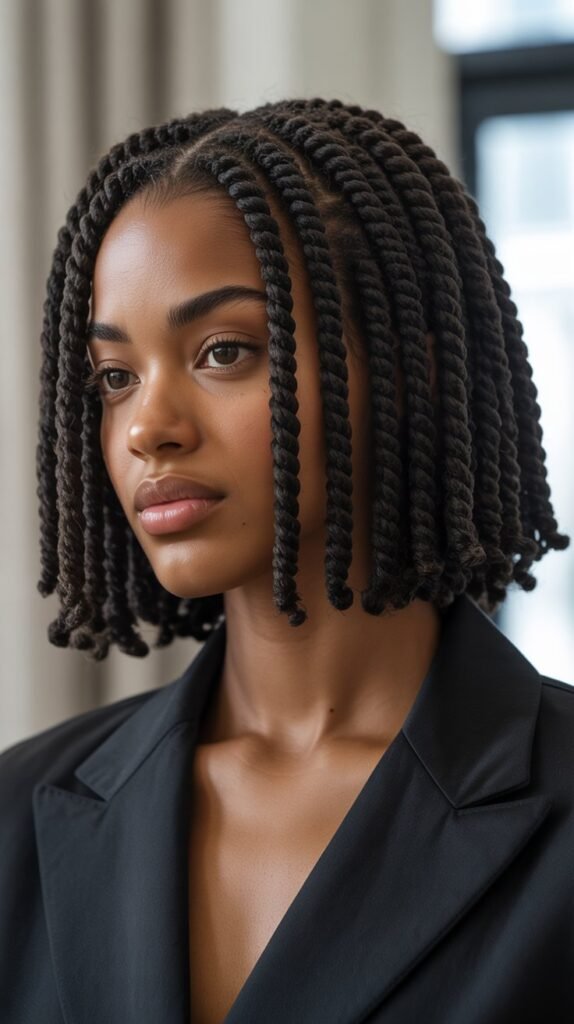
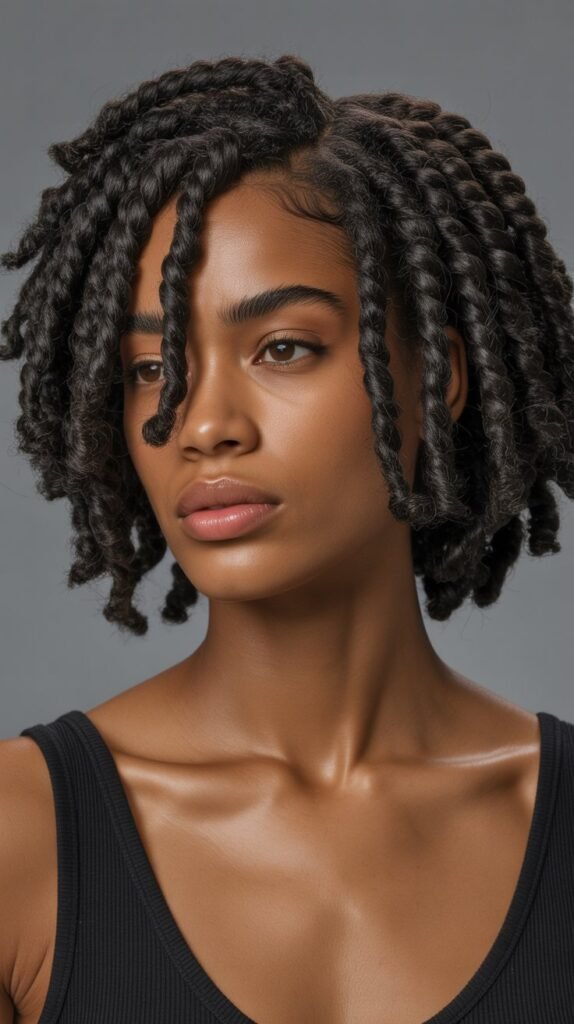
3. Two-Strand Twists
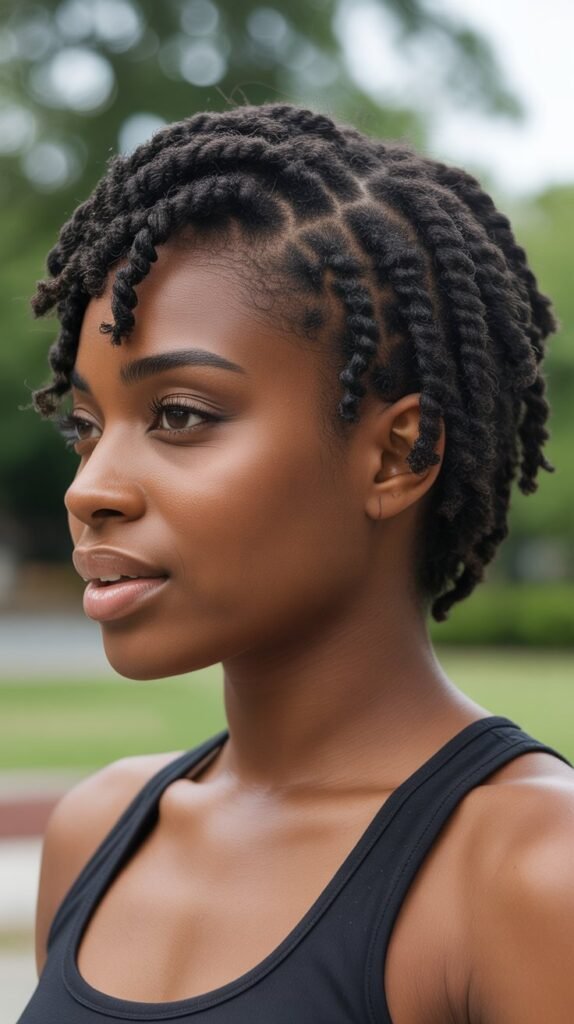
Two-strand twists remain one of the most versatile and protective styles for short 4C hair, creating rope-like sections that can be worn as-is or unraveled for a different texture.
This classic technique involves dividing hair into small sections and twisting two strands around each other from root to tip.
Short two-strand twists offer quick installation, easy maintenance, and multiple styling options throughout their lifespan.
Installation Guidelines:
- Section freshly washed and stretched hair into small, manageable parts using clips to organize your workspace.
- Apply a moisturizing cream or butter to each section before twisting to ensure the hair stays hydrated and pliable.
- Divide each section into two equal strands and twist them around each other with consistent tension for uniform results.
- The smaller your sections, the more defined your twist-out will be when you eventually unravel them.
- Secure the ends by twisting tightly and allowing them to coil around themselves, or use small rubber bands if needed.
Styling Options:
- Wear the twists as a standalone style for 1-2 weeks, making them an excellent protective option.
- Unravel the twists after a few days to create a fluffy, voluminous twist-out with beautiful wave definition.
- Pin sections up to create mini updos or side-swept styles for variety throughout the week.
- Add colorful thread wrapping or beads to the ends for a bohemian or playful aesthetic.
- Combine larger twists in the crown with smaller twists on the sides for textural contrast.
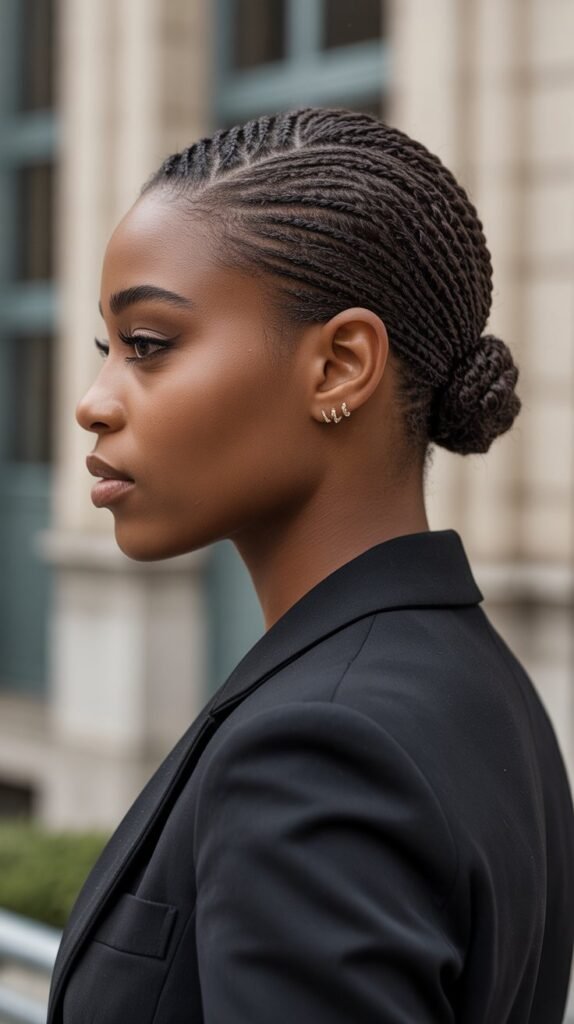
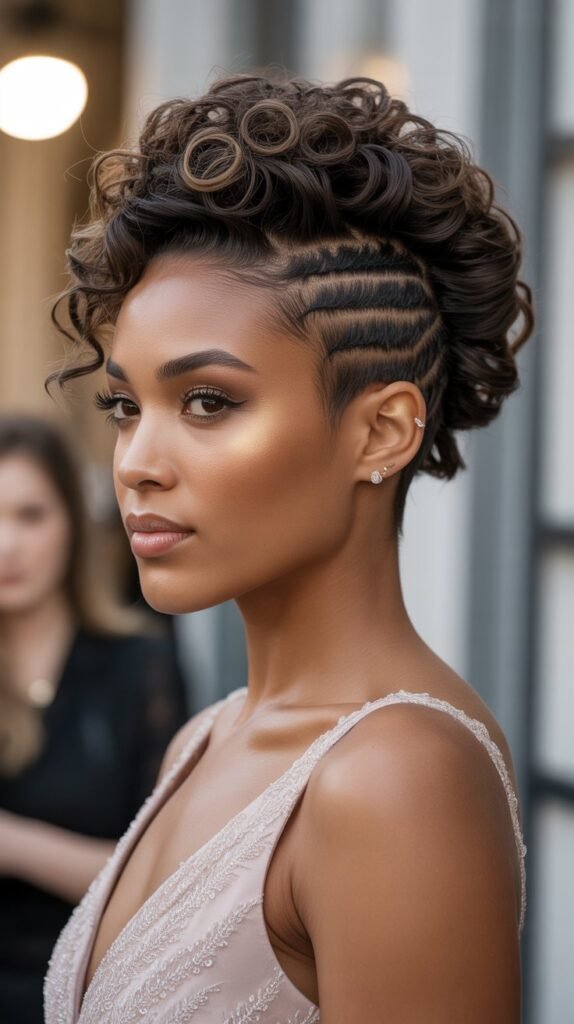
4. Flat Twist Updo
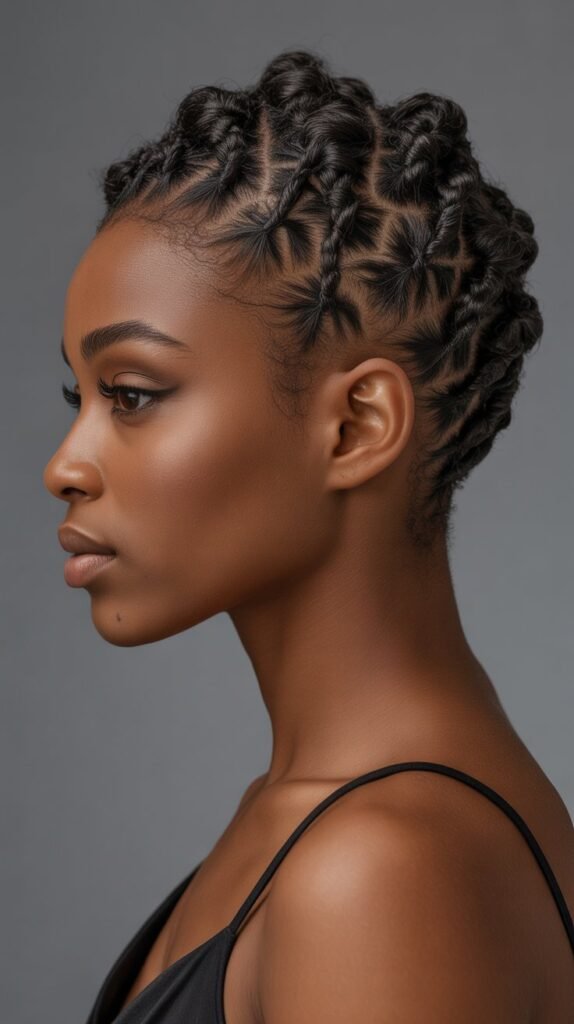
The flat twist updo elegantly combines the security of cornrows with the texture of two-strand twists, creating a sophisticated style perfect for formal events or professional settings.
This technique involves twisting hair flat against the scalp in various patterns that converge into an updo at the crown or back of the head.
For short 4C hair, flat twist updos provide an opportunity to create the illusion of more length while keeping hair protected and neatly styled.
Design Patterns:
- Create parallel flat twists moving from the front hairline straight back toward the crown for a classic, streamlined appearance.
- Design curved flat twists that swirl from the sides toward a center point, creating a more intricate and eye-catching pattern.
- Combine different sized flat twists throughout the head for added dimension and visual interest.
- Incorporate cornrows alongside flat twists for a mixed-texture effect that adds complexity to the style.
- Leave out the edges and baby hairs to frame the face softly while the main body of hair is secured upward.
Updo Variations:
- Gather all flat twists at the crown and pin them into a small bun or knot using bobby pins that match your hair color.
- Create a faux hawk effect by styling the gathered twists upward and securing them in a vertical arrangement.
- Pin the twists in a circular pattern at the back of the head for a flower-like design that showcases the twist texture.
- Add decorative pins, flowers, or hair jewelry to the updo section for special occasions and celebrations.
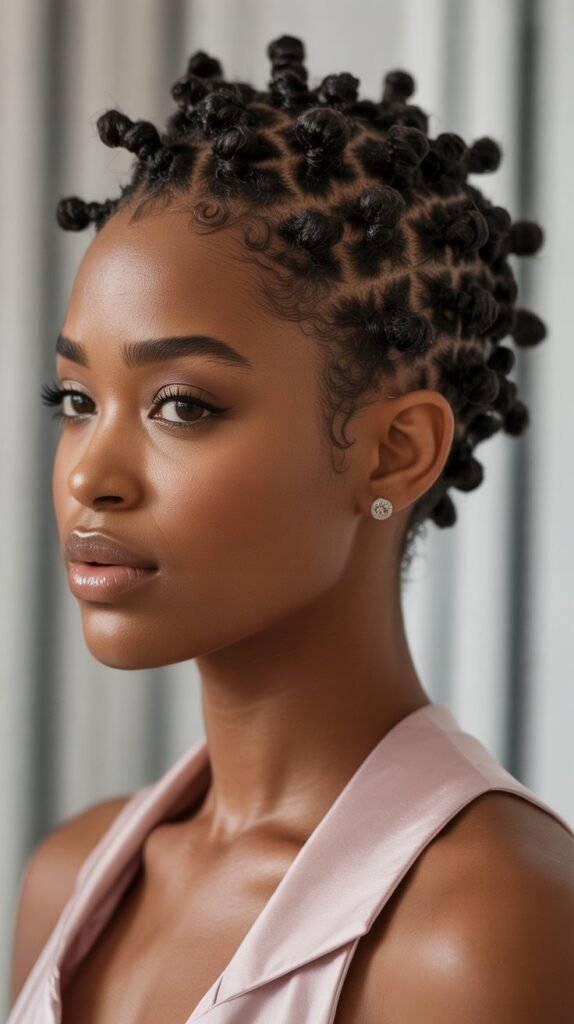
5. Bantu Knots
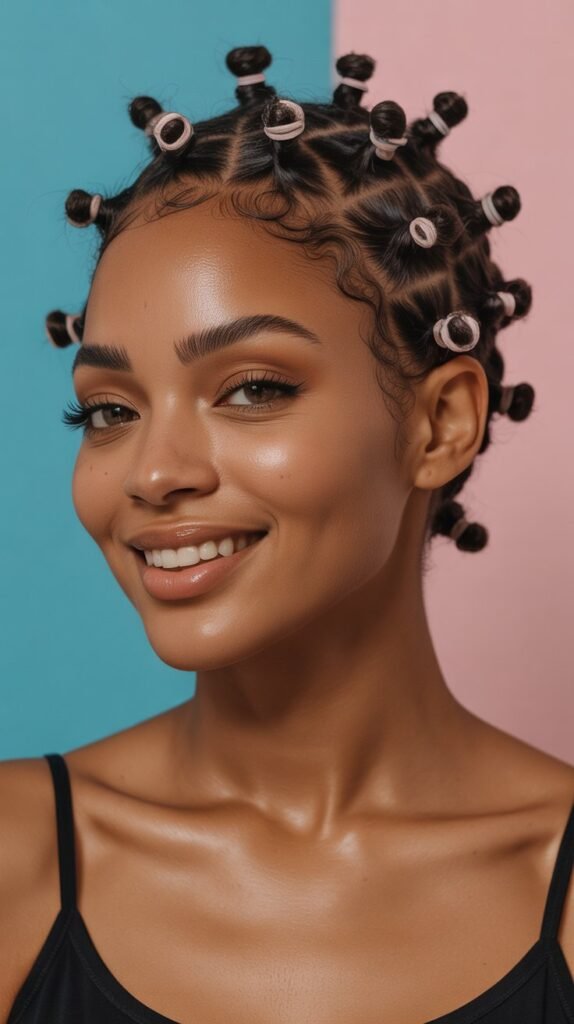
Bantu knots transform short 4C hair into adorable, sculptural mini-buns that can be worn as a complete style or unraveled to create gorgeous curls.
This traditional African hairstyle involves sectioning hair and twisting each section into a tight knot that sits against the scalp.
On short 4C hair, Bantu knots are particularly striking because they create a unique textured look that celebrates natural hair in its most creative form.
Creating Perfect Bantu Knots:
- Work with stretched hair by blow-drying or banding your 4C hair beforehand to make sectioning and twisting easier.
- Part hair into small to medium sections depending on whether you want many tiny knots or fewer larger ones.
- Apply a styling cream with good hold to each section before beginning the twisting process.
- Twist the section from root to tip until it begins to coil on itself, then wrap it around the base in a circular pattern.
- Tuck the ends under the knot and secure by continuing to twist or using small bobby pins if necessary.
Wearing and Styling Options:
- Sport the Bantu knots themselves for a bold, artistic look that works for 3-5 days with proper nighttime care.
- Unravel the knots after they’ve completely dried to reveal bouncy, defined Bantu knot-outs with beautiful curl definition.
- Create patterns with your knot placement, such as straight rows, curved lines, or scattered arrangements for different aesthetics.
- Add color to individual knots using temporary hair chalk or spray for festival-ready, playful styling.
- Combine Bantu knots with flat twists or cornrows on one section while leaving another section in knots for contrast.
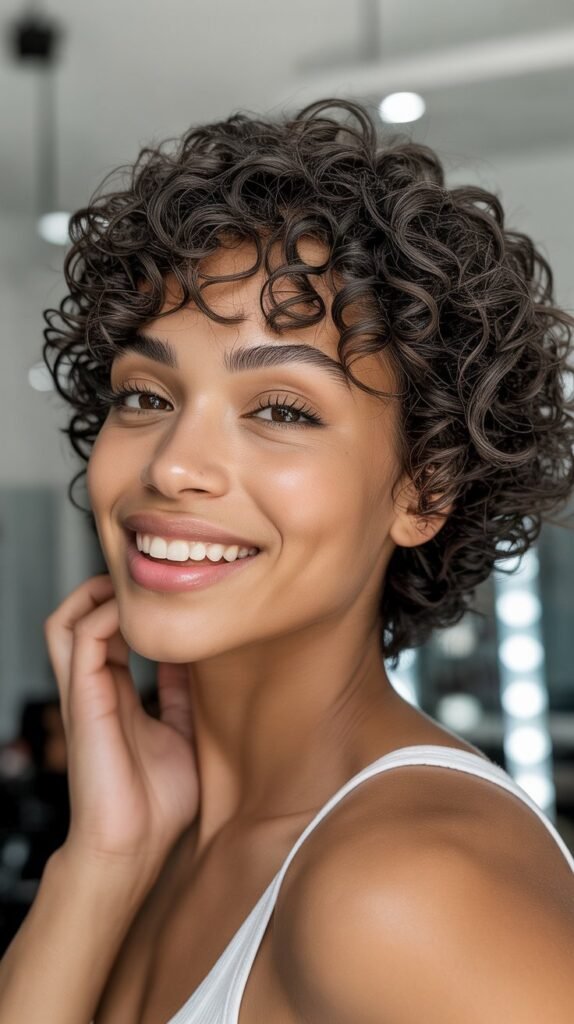
6. Wash and Go

The wash and go represents the ultimate celebration of natural 4C texture, allowing your coils to shrink and spring into their natural pattern with minimal manipulation.
This style involves applying product to freshly washed hair and allowing it to air dry or diffusing it to enhance natural definition.
While 4C hair can shrink significantly, short wash and gos create a beautifully full, textured crown that requires minimal daily maintenance.
Product Application Technique:
- Begin with hair that’s soaking wet immediately after washing to ensure maximum product penetration and definition.
- Apply a leave-in conditioner first to provide a moisturizing base layer that keeps coils hydrated.
- Follow with a gel or curl-enhancing cream, using the shingling method by smoothing product down each small section.
- Scrunch the hair gently upward to encourage the coils to clump together and form defined sections.
- Allow hair to air dry completely or use a diffuser attachment on low heat to speed the process while minimizing frizz.
Maintenance and Longevity:
- A proper wash and go can last 3-5 days when protected at night with a satin bonnet or pineappling technique.
- Refresh the style by misting with water and applying a small amount of gel or cream to any frizzy areas.
- The shorter your 4C hair, the less shrinkage affects your overall length perception, making this style more manageable.
- This technique builds your styling skills and helps you understand which products work best with your specific hair texture.
7. Twist Out

The twist out delivers gorgeous waves and definition by unraveling two-strand twists after they’ve completely dried, creating a style that’s fuller and more stretched than a wash and go.
This technique works exceptionally well on short 4C hair because it provides definition while adding length through the stretching process.
Twist outs offer versatility in size, ranging from chunky waves to tighter crimped patterns depending on your twist size.
Achieving the Perfect Twist Out:
- Install two-strand twists on freshly washed, stretched hair using a moisturizing cream and holding gel combination.
- Allow twists to dry completely overnight or for at least 8-12 hours to ensure the pattern fully sets.
- Apply a light oil to your hands before unraveling to minimize frizz and add shine to the finished style.
- Unravel each twist gently by unwinding from the bottom up rather than pulling apart to maintain definition.
- Separate the unraveled sections carefully with your fingers to create volume while preserving the wave pattern.
Styling and Volume Tips:
- Create smaller twists for more definition and a tighter wave pattern throughout your short 4C hair.
- Use larger twists for a looser, more voluminous look with bigger wave formations.
- Pick out the roots with an afro pick to add height and create a more dramatic silhouette.
- Pin back one side with decorative bobby pins for an asymmetrical style that works for both casual and dressy occasions.
- The twist out typically lasts 4-7 days and can be refreshed by re-twisting select sections at night.
8. Mini Afro Puffs
Mini afro puffs bring playful charm to short 4C hair by sectioning hair into two or more puff formations positioned strategically around the head.
This youthful yet versatile style works for all ages and occasions, from casual weekends to creative professional environments.
The beauty of mini puffs on short hair lies in their ability to create shape and interest despite limited length.
Creating Mini Puffs:
- Part your hair into your desired number of sections—two puffs (classic pigtail placement) or four puffs (two in front, two in back) are most common.
- Smooth edges with edge control or gel for a polished look, or leave them natural for a more relaxed aesthetic.
- Use small, snag-free hair ties or elastic bands to secure each section at your desired height.
- Fluff out each puff with your fingers or an afro pick to maximize volume and create round, full shapes.
- The positioning of your puffs can be adjusted higher or lower to create different silhouettes and match your mood.
Styling Variations:
- Add colorful scrunchies, ribbons, or decorative elastics to the base of each puff for a fun, accessories-focused look.
- Create asymmetrical puffs by positioning them at different heights for an editorial, fashion-forward appearance.
- Combine mini puffs with flat twists or cornrows on the sides, leaving only the crown sections as puffs.
- Wrap the base of each puff with thread in coordinating or contrasting colors for an Afrocentric aesthetic.
- Style the front puffs forward and the back puffs upward for dimensional variety in a four-puff arrangement.
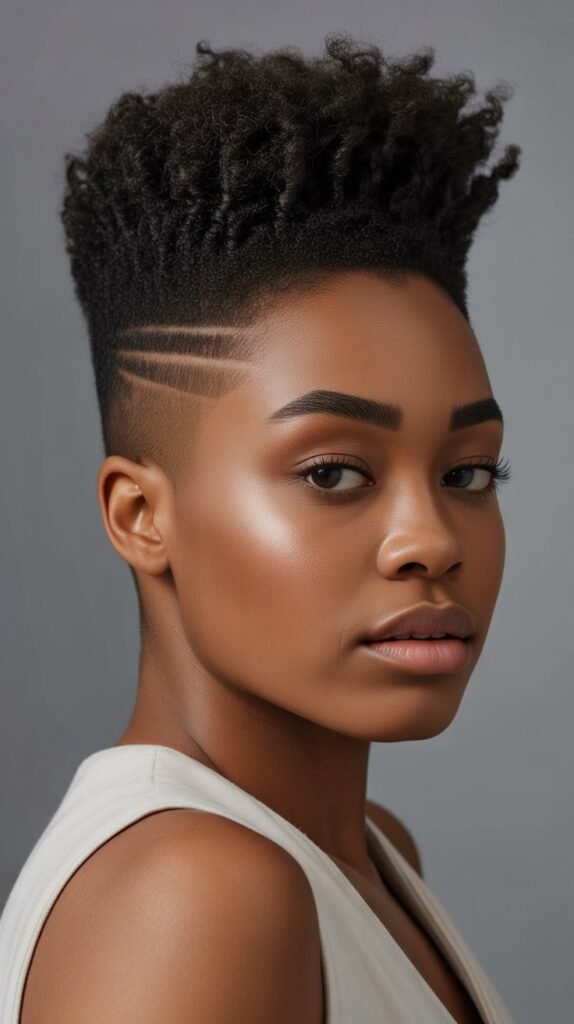
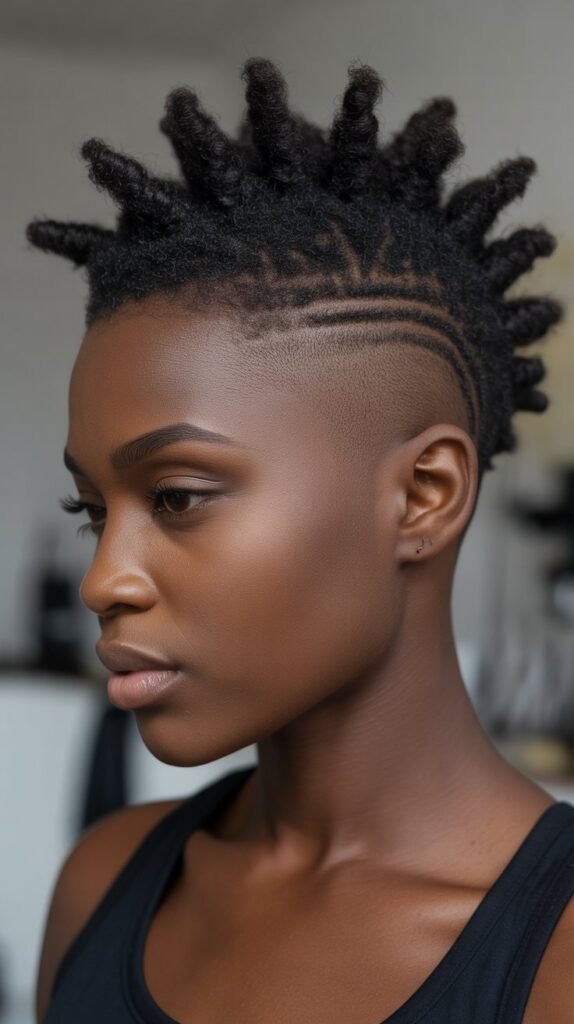
9. Tapered Cut with Design
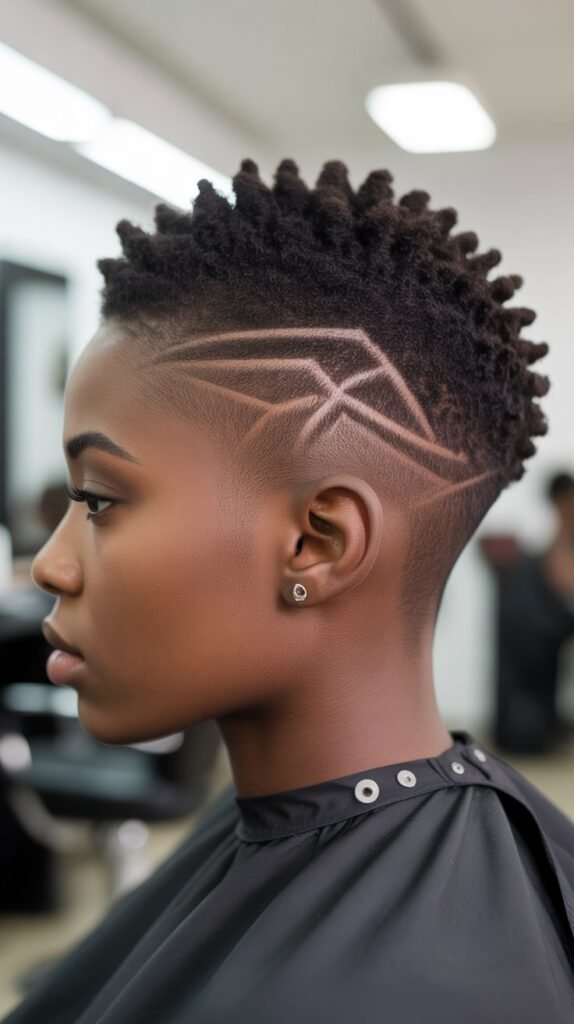
The tapered cut with shaved designs elevates the classic tapered TWA into artistic territory by incorporating intricate patterns carved into the shortened sides and back.
This bold style makes a strong statement while remaining professionally appropriate depending on the design complexity and placement.
For short 4C hair, designs add personalization and edge to an already striking cut.
Popular Design Options:
- Geometric patterns like straight lines, zigzags, or triangular shapes create modern, architectural interest in the tapered sections.
- Curved designs including waves, swirls, or spiral patterns offer a softer, more organic aesthetic.
- Symbolic designs such as stars, lightning bolts, or initials add personal meaning to your hairstyle.
- Abstract artistic designs allow your barber to showcase their creativity while giving you a truly unique look.
- Layered designs with multiple elements at different lengths create three-dimensional visual effects as hair grows.
Maintenance Considerations:
- Designs typically need refreshing every 2-3 weeks as hair growth begins to blur the sharp lines and patterns.
- Regular barber visits are essential to maintain both the taper shape and the design clarity.
- The top section can be styled in various ways while the designs remain visible on the sides and back.
- Consider the professional requirements of your workplace when choosing design complexity and placement.
- Designs can be temporarily covered with headbands or scarves if needed for more conservative settings.
10. Slicked Down Pixie
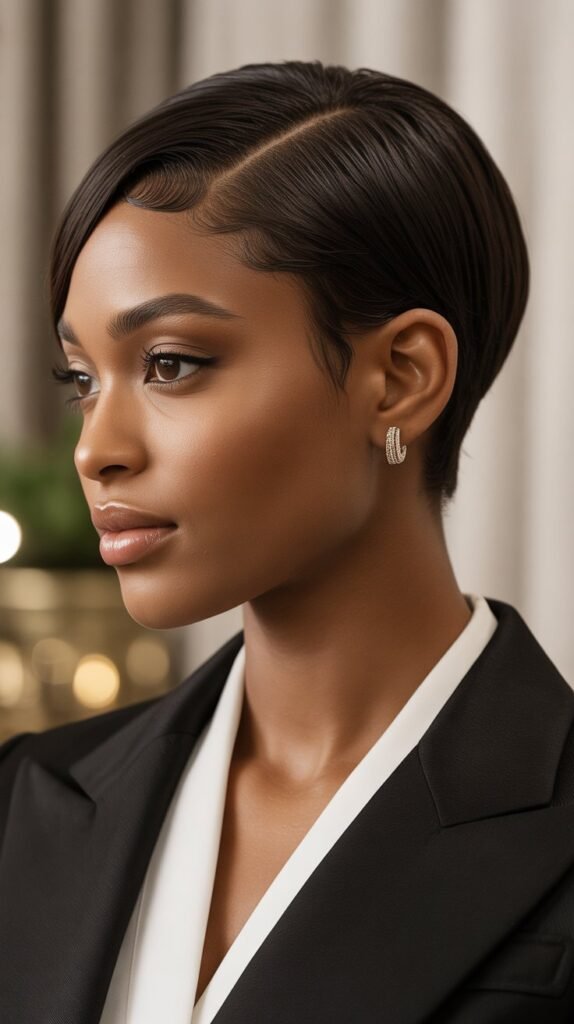
The slicked down pixie brings old Hollywood glamour to short 4C natural hair by smoothing the hair close to the scalp while maintaining texture and volume in strategic areas.
This sophisticated style works beautifully for formal events, professional settings, or anytime you want a polished, refined appearance.
The key lies in using the right products to achieve sleekness without damaging your natural texture.
Achieving the Slicked Look:
- Apply a generous amount of edge control or strong-hold gel to freshly moisturized hair to create the foundation for smoothing.
- Use a brush with natural bristles or a fine-toothed comb to smooth hair in your desired direction—typically back from the hairline.
- Create defined parts or designs using the tail of a rat-tail comb for added visual interest.
- Tie down smoothed sections with a silk scarf while the product sets to ensure maximum sleekness and eliminate frizz.
- Leave some texture at the crown or back to prevent the style from appearing too flat and to showcase your natural pattern.
Styling Variations:
- Create deep side parts with one side slicked completely flat and the other side featuring more volume and texture.
- Slick the front and sides while leaving the back in defined curls for a mullet-inspired contemporary look.
- Add finger waves into the slicked sections for vintage-inspired elegance perfect for special occasions.
- Use metallic or glittery edge control for evening events to add subtle sparkle to your slicked sections.
- Combine with a tapered cut for a style that’s sleek on top with gradually shorter sides and back.
11. Chunky Flat Twists
Chunky flat twists offer a bolder, faster alternative to traditional small flat twists while still providing the protective benefits and sleek appearance.
These larger twists move quickly during installation, making them perfect for busy lifestyles, and they create striking visual lines across the scalp.
On short 4C hair, chunky flat twists can last up to two weeks with proper care.
Installation Method:
- Section hair into larger parts, typically creating 6-12 flat twists total depending on your head size and desired look.
- Apply a creamy moisturizer or twisting butter to each section before beginning the flat twist process.
- Start each flat twist close to the scalp, picking up additional hair as you twist along the scalp surface.
- Maintain even tension throughout the twist to ensure the style lays flat and looks uniform.
- Once you reach the end of the hair attached to the scalp, continue two-strand twisting the loose ends.
Design Patterns:
- Create straight-back chunky flat twists moving from hairline to nape for a simple, classic pattern.
- Design curved flat twists that follow the natural contours of your head for a more organic appearance.
- Combine vertical and horizontal flat twists in different sections for a geometric, grid-like pattern.
- Create a mohawk effect with one or two large flat twists down the center and smaller twists or shaved sides.
- Experiment with asymmetrical patterns where one side features different sizes or directions than the other.
12. Perm Rod Set

Perm rod sets transform short 4C hair into beautifully uniform curls with a soft, romantic appearance that differs from your natural texture.
This heatless setting method uses small foam or plastic rods to create curls that last several days while keeping hair protected.
The defined spiral pattern achieved through perm rods offers a polished look suitable for professional and formal settings.
Application Process:
- Start with freshly washed hair that’s been deep conditioned to ensure maximum moisture and softness.
- Apply a generous amount of setting lotion or mousse to small sections before rolling onto perm rods.
- Choose rod sizes based on your desired curl tightness—smaller rods create tighter spirals while larger rods produce looser curls.
- Roll each section from ends to roots, ensuring the hair wraps smoothly around the rod without overlapping or bunching.
- Secure rods with the attached clip or use end papers to keep hair in place throughout the drying process.
Drying and Finishing:
- Allow rods to air dry overnight or sit under a hooded dryer for 45-90 minutes depending on hair density and rod size.
- Ensure hair is completely dry before removing rods to prevent frizz and ensure curl longevity.
- Remove rods carefully by unclipping and gently unrolling rather than pulling to maintain curl definition.
- Separate curls gently with fingers or leave them as individual spirals for different fullness levels.
- Apply a light oil or serum to add shine and reduce any frizz from the separation process.
13. High Top Fade
The high top fade brings ’90s nostalgia into contemporary styling with a dramatic silhouette featuring significant height at the crown while the sides remain closely tapered.
This iconic style works exceptionally well with 4C texture because the hair’s natural density creates impressive height and structure.
Modern interpretations of the high top fade range from subtle to extreme, allowing for personal expression.
Creating the High Top:
- Consult with an experienced barber who understands how to shape and proportion a high top for your specific head shape.
- The barber creates a clean fade on the sides and back, typically very short at the bottom and blending into the longer top section.
- The top section is shaped into a rectangular or rounded form, with height being the defining feature.
- Hair at the crown can range from 2-6 inches or more depending on your desired drama level and hair length.
- Regular trims maintain the shape while allowing the top section to continue growing for increased height.
Styling the Top Section:
- Use a pick or wide-tooth comb to lift the top section upward, creating maximum height and volume.
- Apply a light moisturizer to keep the top section defined without weighing it down or reducing height.
- Some people prefer a more defined curl pattern on top while others embrace a fuller, picked-out afro texture.
- The flat top variation keeps the crown section flat across the top rather than rounded for a more geometric look.
- Experiment with shaping the edges of the high top into curves, angles, or asymmetrical designs for personalization.
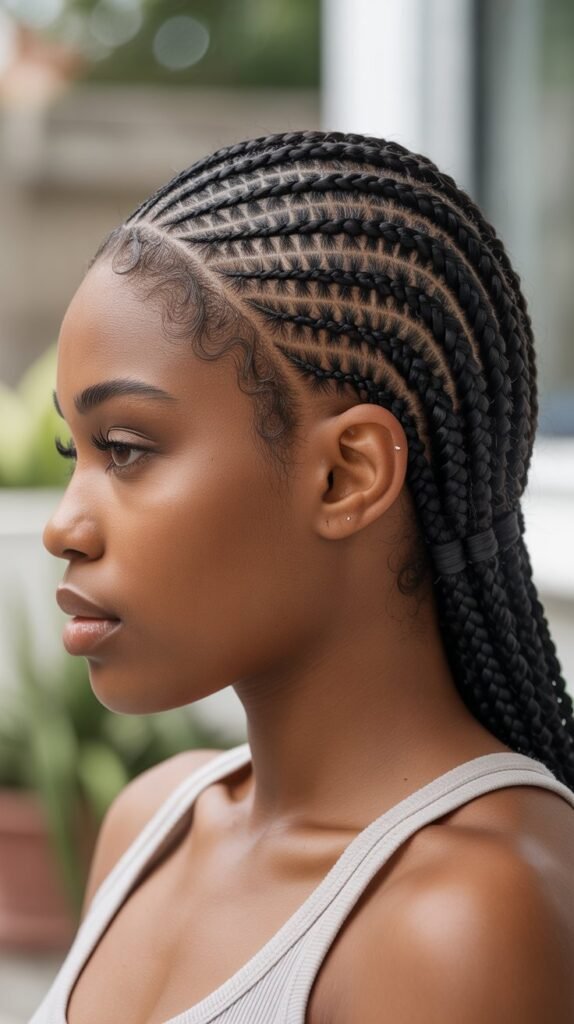
14. Cornrows
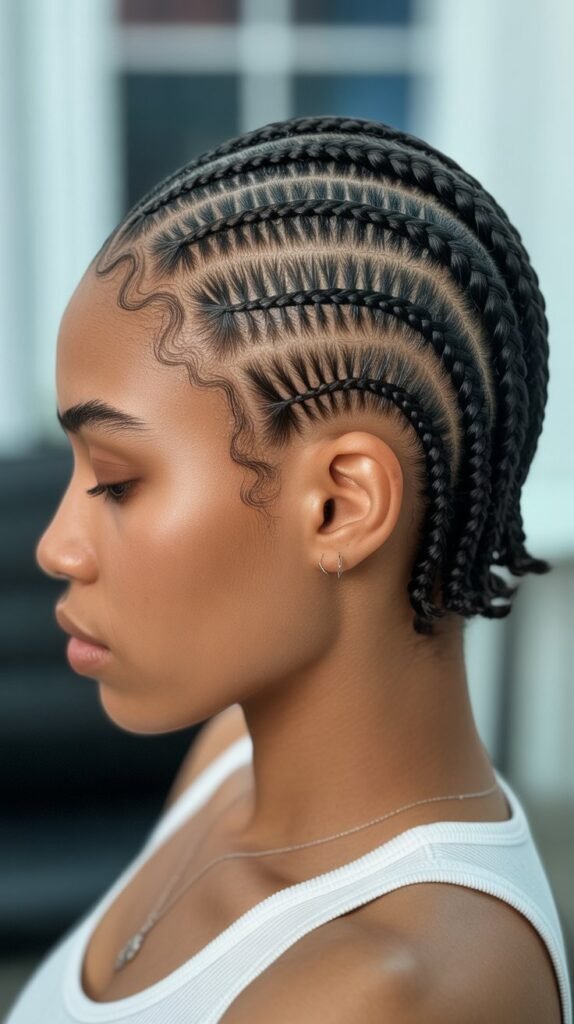
Cornrows remain one of the most recognizable and versatile protective styles for short 4C hair, featuring three-strand braids created flat against the scalp in straight or curved patterns.
While often associated with longer hair, cornrows work beautifully on short natural hair, offering 2-3 weeks of protection while showcasing intricate design possibilities.
This ancient African hairstyle adapts to modern aesthetics while honoring its cultural roots.
Braiding Technique:
- Section freshly washed and moisturized hair into your desired pattern using the tail of a rat-tail comb for precision.
- Apply a braiding gel or cream to each section to provide hold and prevent frizz throughout the braiding process.
- Divide the section at the hairline into three equal strands to begin the cornrow foundation.
- Braid by crossing the side strands under the middle strand while picking up additional hair with each crossing motion.
- Maintain consistent tension throughout the cornrow to ensure it lays flat and appears uniform from start to finish.
Design Possibilities:
- Create straight-back cornrows in uniform sizes for a classic, timeless appearance that suits any setting.
- Design curved or zigzag patterns that follow creative paths across the scalp for artistic expression.
- Combine different sized cornrows—thicker braids alongside thinner ones—for textural contrast.
- Create geometric patterns including triangles, diamonds, or other shapes using strategic cornrow placement.
- Add extensions for length if desired, though the style works beautifully with natural short hair alone.
15. Straw Set Curls
Straw set curls offer an inventive, budget-friendly method for creating defined spiral curls on short 4C hair using ordinary drinking straws as setting tools.
This creative technique produces tight, uniform curls with impressive longevity while being completely heatless and gentle on natural hair.
The resulting style offers a fun, bouncy texture that differs from your natural pattern while maintaining hair health.
Setting Process:
- Gather enough straight drinking straws for your entire head—typically 30-50 depending on hair density and desired curl size.
- Work with damp, freshly conditioned hair that’s been treated with a leave-in conditioner and setting lotion.
- Section hair into small parts about the width of a pencil for tighter curls, or slightly larger for looser spirals.
- Wrap each section around a straw from root to end, rolling the straw close to the scalp.
- Secure each straw by bending the ends toward each other or using small bobby pins to hold them in place.
Drying and Results:
- Allow hair to air dry completely overnight, or use a hooded dryer for 60-90 minutes if time is limited.
- Once fully dry, carefully unbend and remove each straw by gently sliding it out of the curl.
- The resulting curls will be very tight initially, resembling small springs arranged across your head.
- Separate and fluff the curls with your fingers to create volume and a more natural, blended appearance.
- This style typically lasts 5-7 days with proper nighttime care using a satin bonnet or pineappling technique.
16. Mohawk with Shaved Sides
The mohawk with shaved sides creates maximum drama by contrasting closely shaved or faded sides with a pronounced strip of textured hair running from forehead to nape.
This edgy style celebrates 4C texture’s natural volume while offering a bold, contemporary aesthetic.
Modern mohawks range from subtle to extreme, making them adaptable to various personal styles and comfort levels.
Creating the Mohawk:
- Visit an experienced barber who can create clean, symmetrical shaved sides that are perfectly balanced.
- The shaved sections typically start very short (guard 1 or 2) at the bottom and may fade into the mohawk strip.
- The mohawk strip’s width varies from narrow (2-3 inches) for dramatic looks to wider (4-5 inches) for more subtle versions.
- The hair in the mohawk section can be left at its natural length or cut to a specific height for uniform appearance.
- Consider whether you want a fohawk (more subtle, natural fade) or true mohawk (dramatic shaved sides).
Styling the Mohawk Strip:
- Style the mohawk section upward for maximum height and drama using strong-hold gel or edge control.
- Create a twist-out or braid-out in the mohawk section for defined texture that stands up beautifully.
- Install mini braids, twists, or cornrows within the mohawk strip for added detail and protection.
- Add temporary color to the mohawk section for festivals, events, or creative expression.
- Slick the mohawk strip to one side for a more subtle, business-appropriate variation of the style.
17. Protective Wig with Cornrow Base
Using a protective wig over a cornrow base gives short 4C hair a break from daily manipulation while offering unlimited styling versatility.
This approach combines the protective benefits of cornrows with the ability to change your look instantly by switching wigs.
For those with short natural hair, this method supports healthy growth while allowing experimentation with different lengths, colors, and textures.
Creating the Cornrow Base:
- Braid your short 4C hair into neat, flat cornrows moving straight back or in a circular pattern around your head.
- Keep cornrows relatively flat against the scalp to minimize bulk under the wig for a more natural appearance.
- Ensure the cornrow base covers your entire scalp completely, leaving no loose or unbraided sections.
- Apply moisturizer to your scalp and hair before braiding to maintain hydration throughout the protective period.
- The cornrow base typically lasts 2-4 weeks before needing to be taken down, washed, and reinstalled.
Wig Selection and Application:
- Choose wigs with adjustable straps and combs inside to ensure secure fit over your cornrow base.
- Glueless wigs offer the healthiest option since they don’t involve adhesives on your skin or hairline.
- Consider wig caps that match your skin tone to wear between your cornrows and the wig for a seamless look.
- Synthetic wigs offer affordability and low maintenance, while human hair wigs provide more styling versatility.
- Remove your wig nightly to allow your scalp to breathe and to maintain both the wig and your cornrow base properly.
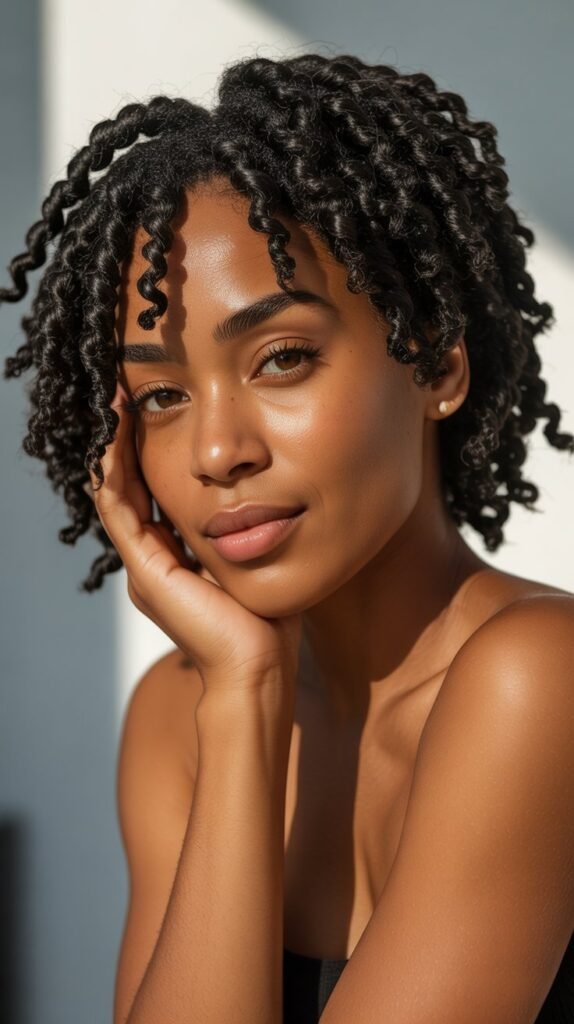
18. Defined Coil Out
The coil out creates gorgeous definition by setting hair in individual coils using perm rods, flexi rods, or the finger coil method, then carefully separating them for a full, textured style.
This technique differs from a wash and go by providing more uniformity and longer-lasting definition while still celebrating your 4C texture.
The coil out works particularly well on short hair because the reduced length makes the process faster and more manageable.
Setting Methods:
- Finger coils wrapped around your finger create the tightest, most defined pattern with maximum control over each coil’s placement.
- Perm rods in small sizes produce uniform spiral curls throughout with a slightly softer appearance than finger coils.
- Flexi rods offer more flexibility in curl size and create smoother, rounder spirals compared to perm rods’ tighter springs.
- The shingling method involves smoothing product through each small section before coiling to maximize definition and minimize frizz.
- All methods require completely dry hair before separation—rushing this step results in frizz and reduced definition.
Separation and Styling:
- Apply a light oil to your hands before separating to add shine and minimize frizz during the manipulation process.
- Carefully unravel or separate each coil into 2-4 smaller sections depending on your desired fullness level.
- Use an afro pick at the roots only to add height without destroying the curl definition throughout the length.
- The resulting style features voluminous, defined texture that maintains its shape for 4-7 days with proper care.
- Reshape individual sections that lose definition by re-coiling them overnight with a small amount of product.
19. Side-Swept Style
The side-swept style creates elegant asymmetry by directing all or most of your short 4C hair to one side of your head using strategic pinning and product placement.
This sophisticated look works beautifully for special occasions, professional settings, or anytime you want to add drama and interest to your short natural hair.
The style elongates the face and draws attention to your facial features.
Creating the Side Sweep:
- Start with a defined side part, positioning it where you naturally prefer or experimenting with deeper side placements for more drama.
- Apply edge control or strong-hold gel to the side being swept over to ensure it stays in place throughout the day.
- Use a brush or comb to smooth hair from the part line toward the opposite side, directing everything at a consistent angle.
- Secure the swept section with bobby pins that match your hair color, hiding them within the texture for invisible hold.
- The opposite side can be slicked flat against the scalp, pinned behind the ear, or feature visible bobby pins as decorative elements.
Styling Variations:
- Create defined curls or a twist-out in your hair before sweeping it to one side for added texture and dimension.
- Add decorative bobby pins, jeweled clips, or flowers along the swept section for formal events and celebrations.
- Combine with a tapered cut where one side is much shorter, emphasizing the asymmetrical nature of the style.
- Style the swept section into mini twists or braids that all move in the same direction for textural interest.
- Use edge control to create baby hairs and swirls along the hairline on the swept side for a polished finishing touch.
20. Mini Twist Updo
The mini twist updo combines the protective benefits of two-strand twists with elegant upward styling that keeps hair secured and polished.
This style works wonderfully for short 4C hair by creating length through the twisting process, then gathering those twists into various updo configurations.
The versatility of this style makes it appropriate for everything from professional meetings to weddings and formal events.
Installation Process:
- Begin by installing mini two-strand twists throughout your entire head using small sections for maximum definition and styling flexibility.
- Keep the twists uniform in size for a cohesive, polished appearance when gathered into the updo formation.
- Allow twists to dry completely before attempting to style them upward to prevent frizz and maintain definition.
- Apply a light oil or moisturizer to the twists before styling to add shine and make them more pliable for manipulation.
- The smaller your twists, the more intricate and delicate your updo will appear when completed.
Updo Styling Options:
- Gather all twists at the crown and secure with bobby pins, creating a small bun or knot that sits atop your head.
- Pin twists in a circular or spiral pattern at the back of the head for a rose-like design that showcases the twist texture.
- Create a faux hawk by pinning twists upward along the center of your head while leaving sides smooth or flat-twisted.
- Arrange twists into a low updo at the nape for a more conservative, workplace-appropriate style.
- Leave some twists loose around the face while securing the rest upward for a softer, romantic aesthetic.
21. Halo Braid Crown
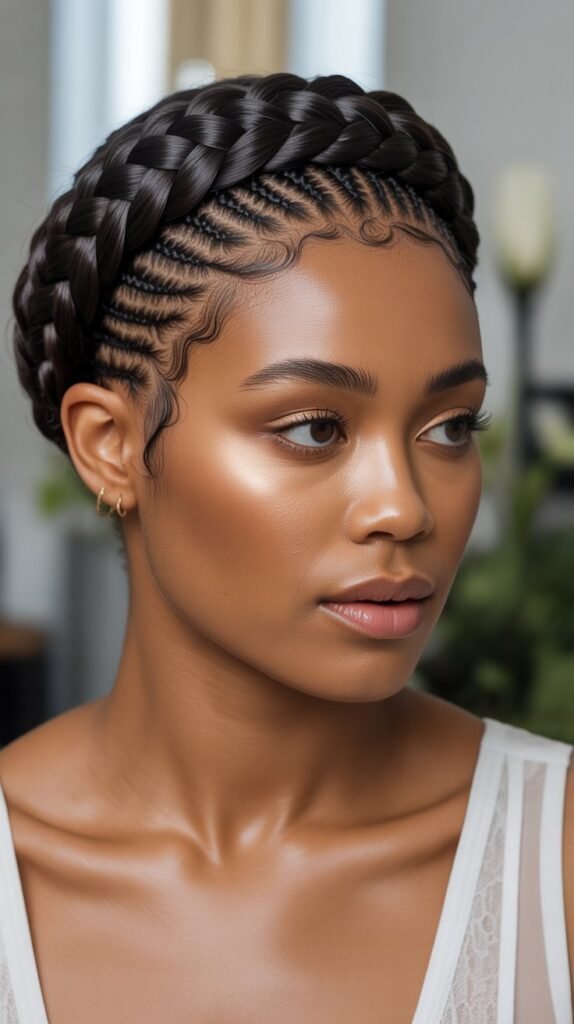
The halo braid crown creates a regal, feminine look by braiding hair around the perimeter of the head like a crown or headband.
While traditionally associated with longer hair, this style adapts beautifully to short 4C hair by using your natural length to create a textured crown effect.
The halo braid works perfectly for weddings, formal events, or anytime you want to feel like royalty.
Creating the Halo:
- Part hair in a circular pattern around the head, about 2-3 inches from the hairline, separating the crown section from the perimeter.
- Begin braiding at a point behind one ear, creating a three-strand or cornrow braid that follows the circular part.
- Pick up small sections of hair as you braid around the head, similar to the French braiding technique.
- Continue braiding all the way around the head until you return to your starting point near the ear.
- Secure the end by tucking it under the braid or pinning it invisibly with bobby pins that match your hair color.
Styling the Center Section:
- The hair in the center crown area can be styled in various ways to complement the halo braid.
- Create a defined wash and go or twist-out in the center section for textured volume and dimension.
- Install finger coils or a coil out in the crown area for uniform definition that contrasts with the sleek braid.
- Leave the center section in mini twists or braids for a fully protective style with textural variation.
- Add accessories like flowers, jeweled pins, or decorative clips along the halo braid for special occasions.
22. Faux Hawk with Flat Twists
The faux hawk with flat twists combines edgy styling with protective benefits by creating flat twists on the sides that lead to a voluminous center section.
This modern style offers the drama of a mohawk without requiring shaved sides, making it more versatile and easier to grow out.
For short 4C hair, this technique creates impressive height and dimension while keeping hair healthy.
Construction Method:
- Section hair into three main areas—two side sections and one center strip running from front to back.
- Create flat twists on both side sections, directing them backward and slightly upward toward the center strip.
- The center section is left loose or styled to maximize height and contrast with the flat twisted sides.
- Side flat twists can be uniform in size for a clean look or varied for more organic, textured appearance.
- Secure the ends of the flat twists with small elastics or allow them to transition into two-strand twists.
Styling the Center:
- Pick out the center section with an afro pick to create maximum height and volume for dramatic effect.
- Style the center strip in defined curls, a twist-out, or finger coils for textured definition that stands upward.
- Create mini twists or braids in the center section that stand upward for a fully protective faux hawk variation.
- Use edge control or strong-hold gel to slick the center section upward for a sleek, molded appearance.
- Add temporary color or glitter to the center section for festival-ready, attention-grabbing styling.
23. Passion Twists (Short Version)
Passion twists bring bohemian, carefree vibes to short 4C hair using water-wave or curly synthetic hair extensions that create a textured, slightly messy aesthetic.
Unlike traditional Senegalese twists, passion twists have a softer, more romantic appearance that moves beautifully.
When installed on short natural hair, they provide length, protection, and a distinctive style that works for 6-8 weeks.
Installation Guidelines:
- Start with clean, moisturized natural hair that’s been stretched through banding or blow-drying for easier sectioning.
- Use water-wave or passion twist hair extensions specifically designed for this style’s signature texture.
- Section hair into medium-sized parts—slightly larger than you’d use for traditional box braids or Senegalese twists.
- Attach the extension hair close to the scalp using the two-strand twist method, incorporating your natural hair.
- Continue twisting down the length, allowing the textured extension hair to create the characteristic wavy, bohemian appearance.
Styling and Maintenance:
- The shorter length makes these passion twists lighter and less stressful on your natural hair compared to longer versions.
- Style twists in a high ponytail, half-up style, or leave them loose for different looks throughout the wearing period.
- Apply a light oil or mousse to the twists periodically to maintain their sheen and reduce frizz.
- Sleep with a satin bonnet or on a satin pillowcase to preserve the style and minimize tangling.
- The textured nature of passion twists means they maintain a beautiful, slightly undone appearance even as they age.
24. Slicked Back Bun
The slicked back bun creates timeless elegance by smoothing short 4C hair backward and gathering it into a small, neat bun at the crown or nape.
While challenging with very short hair, this style becomes achievable with the right products and techniques, offering a sophisticated look perfect for professional and formal settings.
The sleekness of this style puts your facial features on full display.
Creating the Slicked Foundation:
- Apply a generous amount of edge control or strong-hold gel to damp or freshly moisturized hair.
- Use a natural bristle brush or fine-toothed comb to smooth hair backward from the hairline toward your gathering point.
- Brush in the direction of your desired bun placement—higher at the crown for a topknot, or lower at the nape for a chignon.
- Tie a silk scarf around your head while the product sets to maximize sleekness and eliminate any frizz.
- Work in sections if necessary, smoothing and securing each part before moving to the next for optimal control.
Bun Formation:
- Gather all smoothed hair at your chosen point and secure with a small elastic that matches your hair color.
- Twist the gathered hair and wrap it around the base of the elastic to form the bun shape.
- Secure the bun with bobby pins inserted from different angles to ensure it stays in place throughout the day.
- For very short hair, focus on creating a small, tight knot rather than attempting a large, full bun.
- Add decorative pins, a hair cuff at the bun base, or small flowers for special occasions and added visual interest.
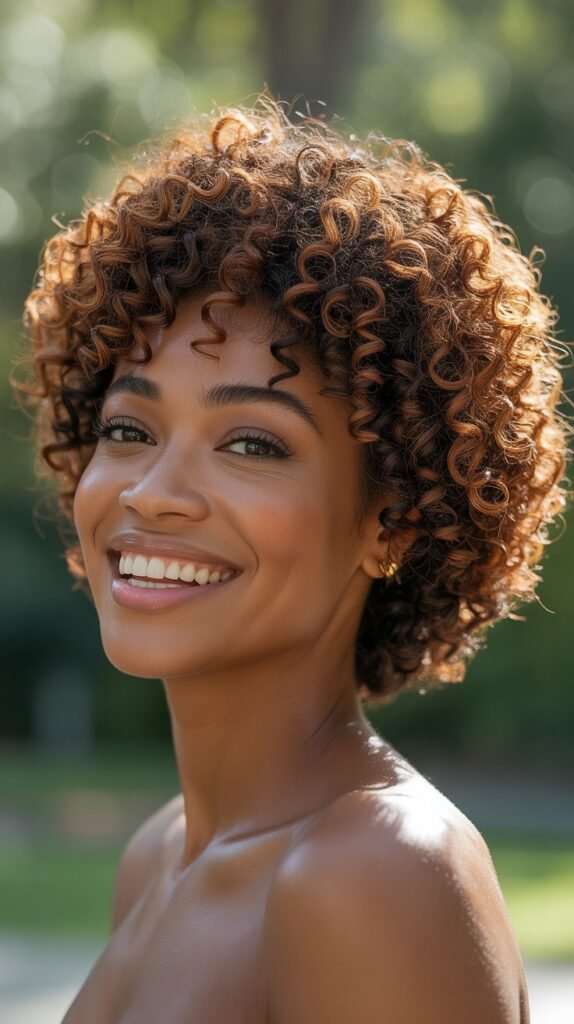
25. Curly Fro with Headband
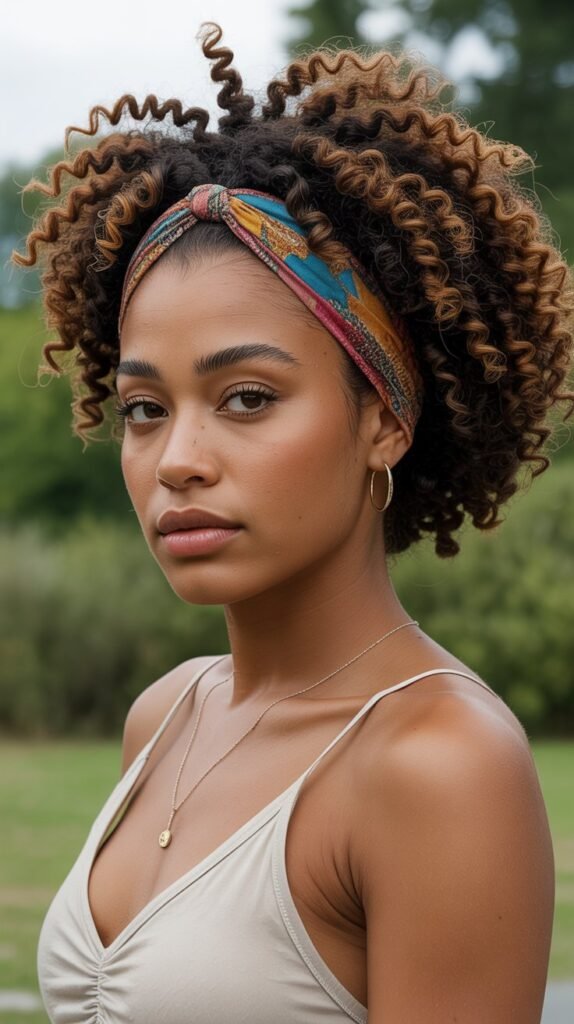
The curly fro with headband combines the natural beauty of your 4C texture with the accessorizing power of headbands to create effortless, bohemian styling.
This approach celebrates your natural coils while adding color, pattern, or texture through strategic headband placement.
For short natural hair, this styling method takes minutes while delivering maximum impact.
Achieving the Look:
- Start with a defined wash and go, twist-out, or coil out to create your preferred texture and curl definition.
- Select a headband that complements your outfit—wide fabric headbands, thin elastic bands, or braided leather options all work beautifully.
- Position the headband about 1-2 inches back from your hairline or experiment with different placements for varied looks.
- Pull the headband over your hair, allowing your natural texture to bloom above and around it.
- Adjust the volume of your fro by picking it out with an afro pick or leaving it in its natural state.
Headband Selection and Styling:
- Fabric headbands in bold prints add bohemian flair and work perfectly for casual, creative environments.
- Metallic or jeweled headbands elevate the style for evening events and formal occasions.
- Knotted turban-style headbands create a retro-inspired look that’s currently trending in natural hair communities.
- Multiple thin headbands stacked together offer an eclectic, festival-ready aesthetic with layered visual interest.
- Match your headband to your clothing or choose contrasting colors to make your hairstyle a statement piece.
26. Box Braids (Short)
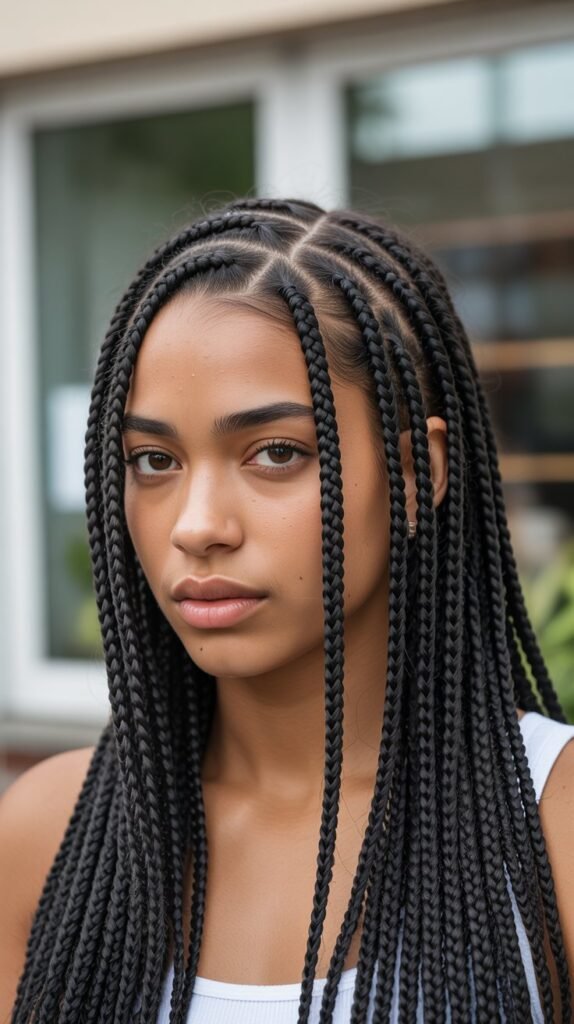
Short box braids deliver all the protective benefits and styling versatility of traditional box braids in a more manageable, lightweight package perfect for active lifestyles.
These individual plaits can be created with just your natural hair or extended slightly with synthetic hair for added fullness.
Short box braids typically fall between chin and shoulder length, offering easier maintenance than longer versions while lasting 6-8 weeks.
Installation Process:
- Section clean, moisturized 4C hair into small to medium squares using a rat-tail comb for precision and uniformity.
- Decide whether to use only your natural hair or add extension hair for thickness and slight length.
- If using extensions, fold a small amount of synthetic braiding hair over the natural hair section and begin braiding.
- Create tight three-strand braids from root to tip, maintaining consistent tension for uniform appearance.
- Seal the ends by dipping them briefly in hot water (if using synthetic hair) or using small elastics for natural hair only.
Styling Versatility:
- Wear short box braids loose for a classic, carefree look that works for virtually any occasion.
- Create a high or low ponytail by gathering braids at your desired point and securing with a hair tie.
- Pin braids into various updo configurations for formal events and professional settings.
- Add beads, cuffs, or colored thread wrapping to individual braids for personalized decorative elements.
- Part braids in different ways—center part, side part, or no visible part—to change your look throughout the wearing period.
27. Bantu Knot Out

The Bantu knot out delivers gorgeous, defined waves by creating Bantu knots throughout the hair and then carefully unraveling them once dry.
This technique produces a unique curl pattern that differs from twist-outs or braid-outs, offering striking spiral waves with impressive volume.
On short 4C hair, Bantu knot outs create beautiful fullness and definition that lasts for days.
Creating the Knot Out:
- Section stretched, moisturized hair into small to medium parts depending on your desired wave size.
- Apply a generous amount of styling cream or curl-enhancing product to each section before creating the knot.
- Twist each section from root to tip until it begins to coil on itself naturally.
- Wrap the twisted hair around its base in a circular pattern, creating a small knot that sits against your scalp.
- Allow knots to dry completely overnight or under a hooded dryer before unraveling to ensure the pattern sets properly.
Unraveling and Styling:
- Apply a light oil to your fingers before unraveling to minimize frizz and add shine to the finished style.
- Gently untwist each knot from the bottom up, being careful not to pull apart the formed waves.
- The resulting pattern features beautiful spiral waves that are tighter near the roots and looser toward the ends.
- Separate the waves gently with your fingers to create volume and fullness throughout your head.
- Use an afro pick at the roots only to add height without disrupting the wave definition.
28. Braided Crown with Loose Center

The braided crown with loose center creates a romantic, ethereal style by braiding around the perimeter of the head while leaving the center section styled in loose, textured coils or curls.
This combination offers the best of both worlds—the structure and elegance of braiding with the soft, natural beauty of defined texture.
For short 4C hair, this style works beautifully for special occasions and everyday elegance.
Construction Method:
- Part hair in a circular pattern around the head, creating a perimeter section about 2 inches wide and a center circle.
- Begin braiding the perimeter section, using cornrows or three-strand braids that follow the circular part.
- The braids can move in one continuous circle or consist of multiple smaller braids arranged around the perimeter.
- Secure braid ends by tucking them under adjacent braids or pinning them invisibly with bobby pins.
- The center section remains unbraided and ready for textured styling that contrasts with the sleek crown.
Center Section Styling:
- Create a defined wash and go in the center section for natural, voluminous texture.
- Install finger coils or perm rod curls in the center area for uniform spiral definition.
- Leave the center in a twist-out or braid-out for soft, wavy texture that complements the structured crown.
- Add fresh or artificial flowers pinned throughout the center section for bridal or special occasion styling.
- Keep the center section moisturized and defined with curl-enhancing products for a polished, cohesive look.
29. Faux Locs (Short)

Short faux locs bring the beauty and cultural significance of traditional locs to those with short 4C hair without the long-term commitment.
These protective styles use synthetic or human hair wrapped around small sections of natural hair to create the appearance of mature locs.
Short faux locs typically fall between chin and shoulder length, offering a lighter, more manageable version of this popular style that lasts 4-6 weeks.
Installation Methods:
- The crochet method involves cornrowing the natural hair and crocheting pre-looped faux loc extensions through the braids.
- The wrapping method twists natural hair with extension hair, then wraps additional hair around the twist to create the loc texture.
- Choose between distressed locs (with loose, flyaway ends) or neat locs (smooth and uniform) based on your aesthetic preference.
- Section natural hair into medium-sized squares for a natural loc size that isn’t too heavy or time-consuming to install.
- Pre-made faux locs can be purchased and installed more quickly than hand-wrapped versions.
Styling and Maintenance:
- Short faux locs can be worn loose, in a low ponytail, or in various updo configurations throughout the wearing period.
- Apply a light oil or loc refresher spray to maintain sheen and moisture without creating buildup.
- Sleep with a satin bonnet or on a satin pillowcase to protect the style and prevent frizzing.
- The shorter length makes these locs significantly lighter than long versions, reducing tension on your scalp and hairline.
- Add beads, cuffs, or colored string wrapping to individual locs for personalized decorative touches.
30. Pineapple Updo

The pineapple updo gathers short 4C hair into a high, loose ponytail at the crown that resembles a pineapple’s top leaves.
This playful style preserves curl definition, adds height, and keeps hair off the neck and shoulders while showcasing your natural texture.
Originally designed as a nighttime protective technique, the pineapple has evolved into a cute daytime style perfect for short natural hair.
Creating the Pineapple:
- Start with defined curls from a wash and go, twist-out, coil out, or any curly style you want to preserve.
- Flip your head forward and gather all hair at the very top of your head using your hands rather than a brush to maintain definition.
- Secure the gathered hair with a large, snag-free hair tie or satin scrunchie to prevent breakage and hold curls gently.
- Don’t pull the hair completely through the elastic on the final loop, creating a loose fountain of curls at the crown.
- Adjust the tightness of the elastic to ensure the style is secure but not creating tension on your scalp or hairline.
Styling Variations:
- Create two or three smaller pineapples across your head for a playful, multi-fountain effect.
- Wrap a colorful scarf or headband around the base of the pineapple for added visual interest and security.
- Allow some curls to escape around the hairline and nape for a softer, more romantic version of the style.
- Position the pineapple slightly off-center for an asymmetrical, fashion-forward look.
- Combine with slicked edges for a polished appearance that works in professional settings.
31. Protective Braids with Beads
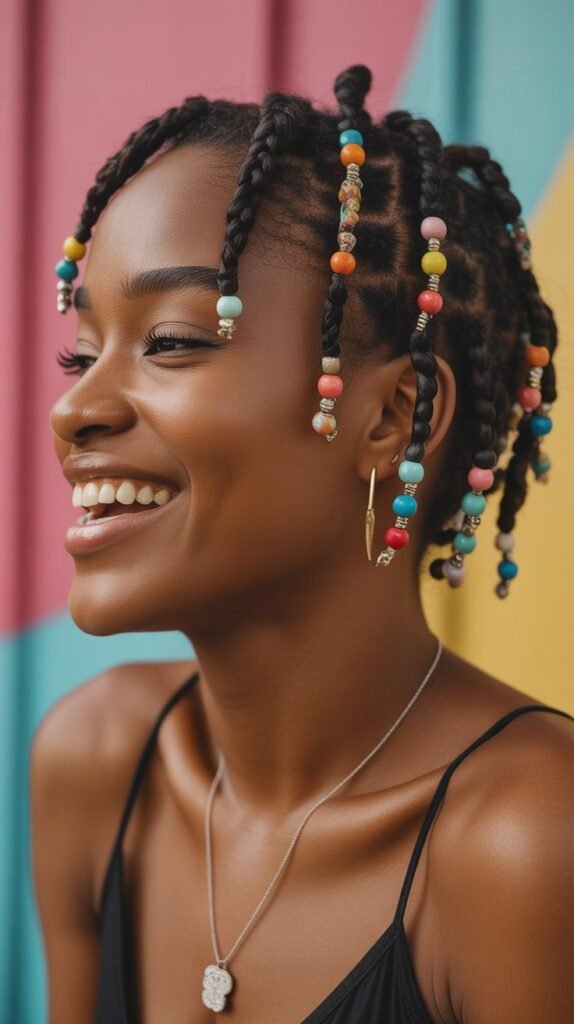
Protective braids adorned with beads combine cultural tradition with modern styling, creating a look that’s both meaningful and visually striking.
For short 4C hair, adding beads to box braids, cornrows, or individual plaits transforms a simple protective style into an artistic statement.
The beads create movement, sound, and personality while honoring the rich history of hair adornment in African cultures.
Bead Application:
- Choose beads with openings large enough to slide over your braids but small enough to stay secure.
- Wooden beads offer a natural, earthy aesthetic and are typically lightweight for comfortable wearing.
- Metal cuffs and beads add shine and modern edge to traditional braid styles.
- Colorful plastic or acrylic beads bring playful vibrancy and are often the most affordable option.
- Slide beads onto individual braids and secure them at your desired position—ends, mid-shaft, or near the roots.
Design Patterns:
- Create uniform bead placement by adding the same number and position of beads to each braid for symmetry.
- Design random, scattered bead placement for a more organic, bohemian appearance.
- Use color blocking by placing certain bead colors on specific sections of your head for visual patterns.
- Mix bead sizes and materials on single braids for eclectic, textured styling.
- Spell out words or create symbols using different colored beads across multiple braids for personalized messaging.
32. Senegalese Twists (Short)
Short Senegalese twists offer a sleeker, more refined alternative to traditional two-strand twists by using synthetic Kanekalon or Toyokalon hair for a smooth, rope-like appearance.
These elegant twists work beautifully on short 4C hair, providing protection while creating a polished look suitable for professional and formal settings.
Short Senegalese twists typically last 6-8 weeks with proper maintenance.
Installation Technique:
- Section clean, stretched 4C hair into small to medium squares for uniform twist placement.
- Fold a piece of synthetic twist hair over the natural hair section at the root.
- Begin two-strand twisting, keeping the synthetic hair smooth and flat without allowing it to bunch or create lumps.
- Maintain consistent tension throughout the twist to ensure uniform thickness from root to tip.
- Seal the ends by dipping them briefly in hot water, which sets the synthetic hair and prevents unraveling.
Styling Benefits:
- The smooth texture of Senegalese twists creates a more refined appearance compared to regular two-strand twists with natural hair.
- These twists are lighter than box braids, reducing stress on the scalp and hairline.
- Style short Senegalese twists in ponytails, buns, or leave them loose for versatile looks throughout the wearing period.
- The sleek appearance makes this protective style particularly appropriate for corporate and professional environments.
- Add minimal accessories like a few metallic cuffs for elevated styling without overwhelming the elegant simplicity.
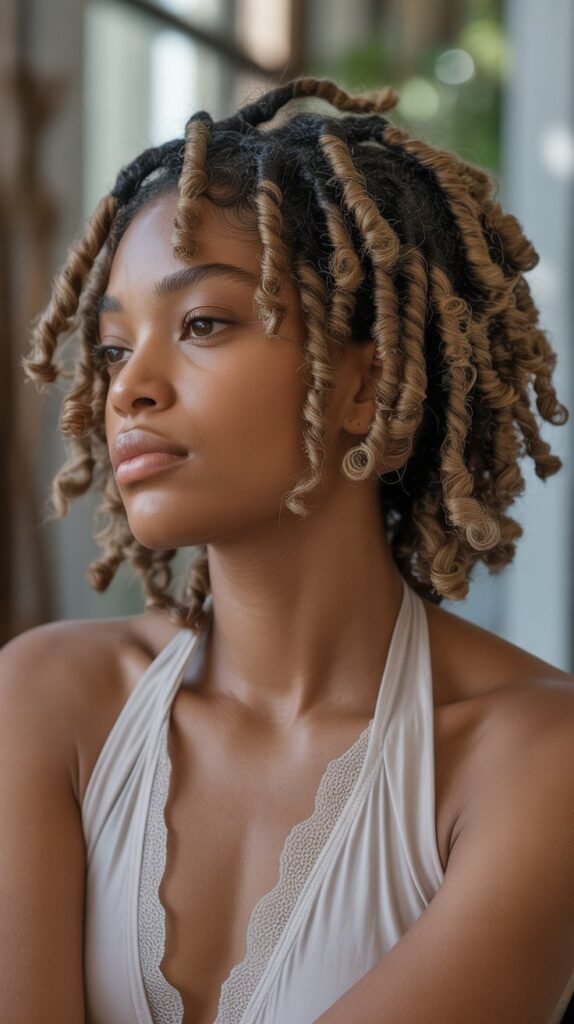
33. Twist and Curl
The twist and curl technique combines two-strand twists with perm rods or flexi rods on the ends, creating a unique style that features defined twists with curly tips.
This hybrid approach offers visual interest and dimension that pure twists or pure rod sets alone cannot achieve.
For short 4C hair, twist and curls create a youthful, playful aesthetic perfect for casual settings and creative expression.
Creating the Style:
- Install two-strand twists throughout your head as you normally would, keeping them relatively small to medium in size.
- Before completing each twist, place a perm rod or flexi rod at the end of the twist.
- Wrap the remaining hair around the rod and secure it according to the rod type you’re using.
- Apply a setting lotion or mousse to the rod-wrapped sections for better curl definition and hold.
- Allow the entire style to dry completely overnight or under a hooded dryer before removing the rods.
Finishing and Styling:
- Carefully remove each rod by unwinding or unrolling without disturbing the formed curl.
- Leave the twists intact while the curled ends add bounce and movement to the style.
- This style can last for up to two weeks, with the option to unravel the twists later for a twist-out with curly ends.
- The curled tips create a softer, more romantic appearance than blunt twist ends.
- Add coordinating accessories that complement both the structured twists and playful curls.
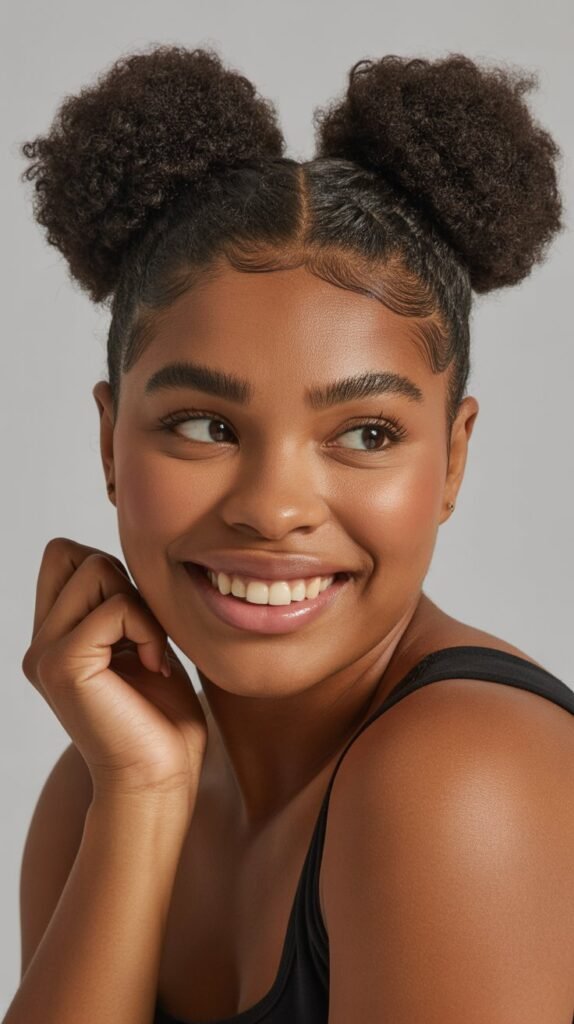
34. Space Buns
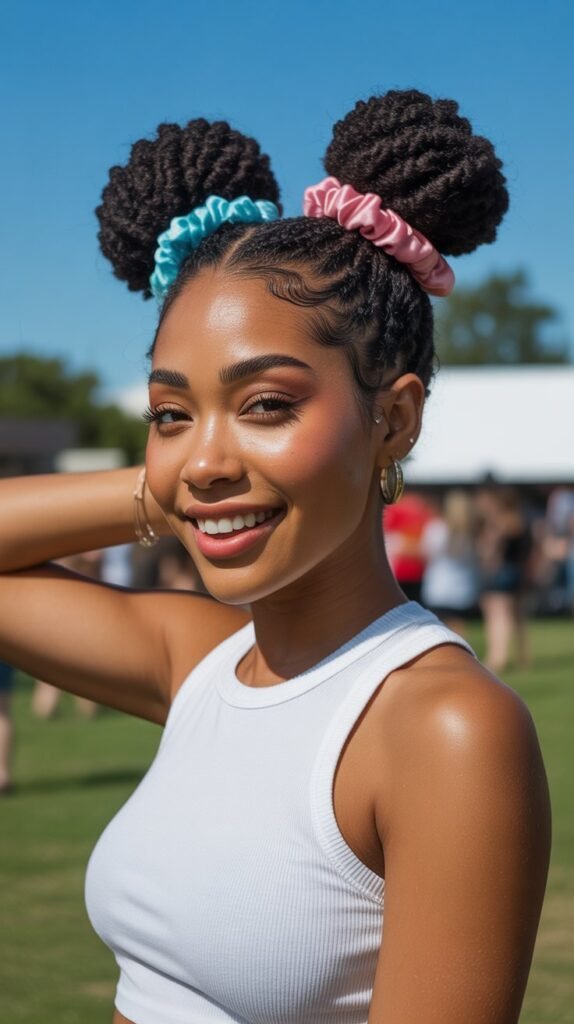
Space buns bring fun, youthful energy to short 4C hair by creating two high buns positioned symmetrically on either side of the head.
This trendy style gained popularity through festival culture and continues to be a favorite for its playful, carefree aesthetic.
While traditionally associated with longer hair, space buns adapt beautifully to short natural hair with creative styling techniques.
Creating Space Buns:
- Part hair down the center from front to back, dividing it into two equal sections.
- Gather each section into a high ponytail positioned above and slightly behind each ear.
- Secure each ponytail with a snag-free elastic or colorful scrunchie that adds to the playful vibe.
- Twist each ponytail and wrap it around its base, creating a small bun shape on each side.
- Secure buns with bobby pins inserted from multiple angles to ensure they stay in place throughout the day.
Enhancing Short Hair Space Buns:
- If your hair is very short, focus on creating smaller, tighter buns rather than attempting large, full ones.
- Use edge control to slick the sides and back sections toward the buns for a neater, more controlled appearance.
- Add decorative elements like glitter spray, temporary color, or small hair accessories to the buns themselves.
- Leave some curls or coils loose around the hairline for a softer, less structured version of the style.
- Combine space buns with braids or twists in the lower sections for added texture and protection.
35. Marley Twists (Short)
Short Marley twists use kinky Marley hair extensions to create full, natural-looking twists that blend seamlessly with 4C texture.
Unlike smooth Senegalese twists, Marley twists maintain a textured, afro-like appearance that closely mimics natural hair.
These protective twists work beautifully on short 4C hair, adding volume and length while providing 6-8 weeks of low-maintenance styling.
Installation Process:
- Start with clean, stretched 4C hair sectioned into small to medium parts throughout the entire head.
- Marley hair extensions have a kinky texture that matches 4C hair better than smooth synthetic hair.
- Attach the Marley hair to each natural hair section and begin two-strand twisting from the root downward.
- The textured nature of Marley hair creates fuller, more voluminous twists compared to sleeker alternatives.
- Seal the ends by twisting tightly and allowing them to coil around themselves—hot water isn’t necessary with textured hair.
Styling and Maintenance:
- Short Marley twists feel lighter and more comfortable than longer versions while still providing dramatic visual impact.
- The natural texture means these twists blend beautifully with your own hair if you choose to leave some sections untwisted.
- Style in various updos, ponytails, or wear loose for versatile looks throughout the protective period.
- Apply a light oil or moisturizing spray to the twists and your scalp to maintain hydration without creating buildup.
- The kinky texture means Marley twists maintain a more authentic natural hair appearance even as they age.
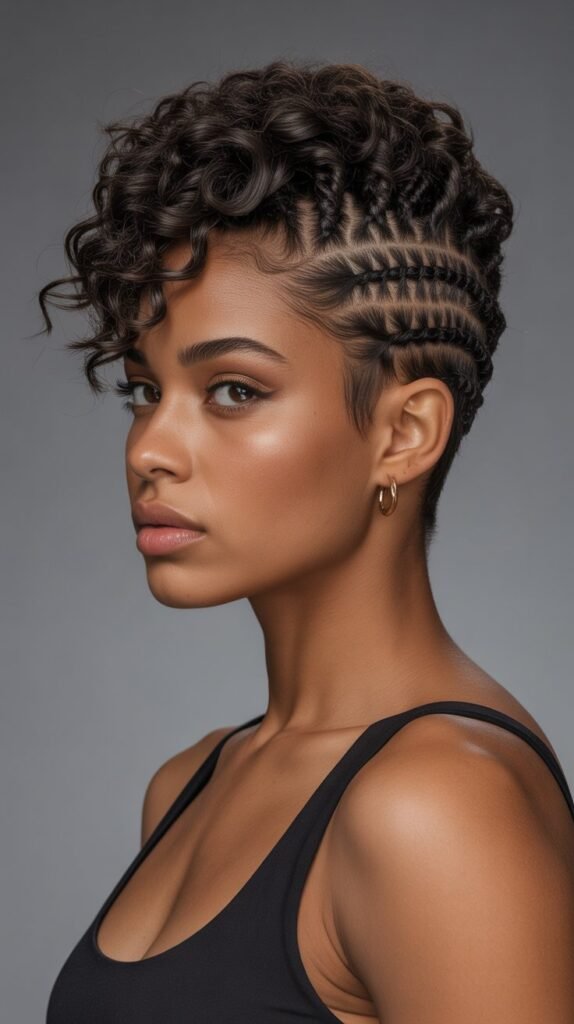
36. Curly Mohawk Updo
The curly mohawk updo creates dramatic height and elegance by pinning the sides while styling the center section upward in defined curls.
This sophisticated style works perfectly for special occasions, offering red-carpet glamour while celebrating natural 4C texture.
The combination of sleek sides and voluminous curly center creates stunning contrast and visual interest.
Construction Method:
- Create deep side parts that separate a wide center section from the narrower side sections.
- Apply edge control or strong-hold gel to the side sections and smooth them flat against the head moving backward.
- Pin the smoothed side sections securely with bobby pins, creating clean lines that define the mohawk strip.
- The center section should feature your most defined curls—use a rod set, finger coils, or curl-defining products.
- Style the center curls upward and forward, creating height and volume that contrasts with the flat sides.
Enhancing the Style:
- Use an afro pick at the roots of the center section to add extra height and drama.
- Pin decorative hair jewelry, flowers, or glittery accessories along the mohawk strip for formal events.
- The slicked sides can feature intricate pinning patterns that add detail and artistry to the overall look.
- Apply a light-hold hairspray to the center curls to maintain their definition and height throughout the event.
- This style works beautifully for weddings, proms, galas, and any occasion requiring elegant, show-stopping hair.
37. Havana Twists (Short)
Short Havana twists deliver chunky, statement-making texture using thicker sections and fuller extension hair than traditional twists.
These robust twists create bold visual impact while requiring less installation time due to their larger size.
For short 4C hair, Havana twists offer a protective style that’s both dramatic and surprisingly lightweight, lasting 4-6 weeks with proper care.
Installation Technique:
- Section natural 4C hair into larger parts compared to regular two-strand twists—think chunky, statement sections.
- Use Havana twist hair or chunky Marley hair extensions for the characteristic thick, full appearance.
- Attach extension hair at the root and begin two-strand twisting with substantial sections for bold, rope-like twists.
- Keep the number of twists relatively low—typically 15-30 total depending on head size—for the authentic Havana twist look.
- The larger size means installation is faster than smaller protective styles, often completed in 3-5 hours.
Styling Considerations:
- Short Havana twists create maximum impact with minimal length, making a bold statement without the weight of longer versions.
- The chunky nature of these twists means they work well worn loose rather than in intricate updos.
- Create a simple high or low ponytail to showcase the twist thickness while keeping hair off your face.
- Add a few hair cuffs or beads to selected twists for decorative accents without overwhelming the bold texture.
- The substantial size makes Havana twists particularly noticeable and fashion-forward, perfect for making style statements.
38. Goddess Locs (Short)
Short goddess locs combine the structure of faux locs with loose, wavy ends that create a softer, more romantic aesthetic.
This hybrid protective style features wrapped or crocheted locs with curly or wavy hair left loose at the ends, offering goddess-like beauty and versatility.
For short 4C hair, goddess locs provide protection while maintaining a feminine, flowing appearance.
Creating Goddess Locs:
- Begin by creating a cornrow base across your entire head if using the crochet installation method.
- Use pre-made goddess loc extensions that feature wrapped loc bodies with curly ends, or create them manually.
- For hand-wrapped versions, create locs using the faux loc wrapping technique but leave the last 2-4 inches unwrapped.
- Add water-wave, deep wave, or curly hair to the unwrapped ends for the signature flowing, textured tips.
- The short length means the curly ends are more proportional to the loc length, creating balanced, cohesive styling.
Styling Benefits:
- Goddess locs offer the protective benefits of traditional faux locs with added versatility from the loose ends.
- The curly tips can be styled, shaped, or even twisted into different patterns throughout the wearing period.
- This style works beautifully for 4-6 weeks, with the curly ends maintaining their texture with minimal maintenance.
- Apply a light mousse or curl refresher to the loose ends to revive the wave pattern as needed.
- The combination of structured locs and flowing curls creates romantic, goddess-like beauty that inspired the style’s name.
Maintenance Tips for Short 4C Hairstyles
Maintaining short 4C hairstyles requires consistent care routines that prioritize moisture, protection, and gentle handling. These practices ensure your styles last longer, your hair remains healthy, and your natural texture thrives. Understanding proper maintenance makes the difference between hair that flourishes and hair that struggles.
Moisture and Hydration:
- Apply a water-based leave-in conditioner daily or every other day to keep your 4C hair properly hydrated.
- Use the LOC (Liquid, Oil, Cream) or LCO (Liquid, Cream, Oil) method to seal moisture into your hair strands effectively.
- Deep condition at least once weekly with a moisturizing treatment that penetrates the hair shaft and reduces breakage.
- Mist your hair with water or a water-based refresher spray between wash days to revive moisture levels.
- 4C hair loses moisture quickly due to its structure, making consistent hydration the foundation of healthy hair maintenance.
Nighttime Protection:
- Sleep on a satin or silk pillowcase to reduce friction that causes breakage and frizz during the night.
- Wear a satin bonnet, silk scarf, or satin-lined cap to protect your hairstyle and maintain definition overnight.
- Refresh styles in the morning by lightly misting with water and applying a small amount of styling product to any frizzy areas.
- For protective styles, focus nighttime care on your edges and any exposed natural hair rather than the extensions.
- Pineappling curly styles before bed helps preserve curl definition and volume for next-day wear.
Scalp Care:
- Keep your scalp clean and healthy by washing every 1-2 weeks depending on your activity level and product buildup.
- Apply lightweight oils like jojoba or grapeseed directly to your scalp to prevent dryness and promote healthy hair growth.
- Massage your scalp regularly to stimulate blood circulation and distribute natural oils throughout your hair.
- Avoid heavy products on your scalp that can clog follicles and cause buildup, leading to irritation or dandruff.
- Pay attention to your scalp’s signals—itching, flaking, or tenderness indicates adjustments are needed in your routine.
Styling Products Essential for Short 4C Hair
Choosing the right products makes styling short 4C hair significantly easier while ensuring your hair remains healthy and properly moisturized. Understanding product categories and their specific functions helps you build an effective product arsenal tailored to your hair’s unique needs. Quality products create the foundation for successful styling and long-term hair health.
Moisturizers and Leave-Ins:
- Water-based leave-in conditioners provide the essential hydration that 4C hair requires daily to remain soft and manageable.
- Look for ingredients like aloe vera, glycerin, and botanical extracts that attract and retain moisture in your hair strands.
- Creamy leave-ins work well for thicker 4C hair while lighter sprays suit those who prefer less weight.
- Apply leave-in conditioner to damp hair immediately after washing for maximum absorption and effectiveness.
- Quality leave-in conditioners reduce tangles, improve detangling sessions, and create a moisturized base for additional styling products.
Stylers and Hold Products:
- Curl-enhancing creams define your natural coil pattern while providing light to medium hold for wash and go styles.
- Gels offer stronger hold for slicked styles, edges, and any looks requiring long-lasting definition and control.
- Edge control products specifically designed for hairlines create smooth, laid edges without flaking or leaving white residue.
- Twisting creams and butters provide the slip and moisture needed for creating two-strand twists with good definition.
- Avoid products with drying alcohols listed in the first five ingredients, as these can strip moisture from 4C hair.
Oils and Sealants:
- Natural oils like coconut, olive, jojoba, and avocado oil seal moisture into hair strands and add shine to finished styles.
- Apply oils to damp hair as the final step in your moisturizing routine to lock in water and other products.
- Light oils work better for fine 4C hair while thicker oils suit coarse, dense textures that need more sealing power.
- Avoid mineral oil and petroleum-based products that sit on hair without penetrating or providing real nourishment.
- A little oil goes a long way—start with small amounts and add more only if needed to prevent greasy buildup.
Protective Styling Benefits for Short 4C Hair
Protective styling offers numerous advantages for short 4C hair by minimizing daily manipulation and shielding strands from environmental damage. These styles tuck away fragile ends, reduce breakage, and create opportunities for consistent growth while maintaining fashionable appearances. Understanding the benefits of protective styling helps you make informed decisions about your hair care approach.
Reduced Manipulation:
- Protective styles eliminate the need for daily combing, brushing, and styling that can cause mechanical damage to fragile 4C strands.
- Less manipulation means fewer opportunities for breakage, particularly at the delicate hairline and nape areas prone to thinning.
- Your hair experiences less stress from styling tools, tight ponytails, and constant touching throughout the day.
- The reduced handling allows your hair to rest and recover from any previous damage while new growth emerges healthier.
- Protective styles are particularly beneficial during seasonal transitions when hair tends to be more fragile and prone to breakage.
Moisture Retention:
- Styles like twists, braids, and updos help hair retain moisture longer by reducing exposure to air that causes drying.
- The tucked-away ends in protective styles remain moisturized and healthy rather than becoming dry and brittle from exposure.
- You can focus moisturizing efforts on your scalp and the base of protective styles rather than daily styling of loose hair.
- Protective styles worn under wigs create an ideal environment for maintaining consistent moisture levels throughout your hair.
- Better moisture retention translates directly to reduced breakage and improved hair health over time.
Growth Retention:
- While protective styles don’t make hair grow faster, they allow you to retain the length you’re growing by preventing breakage.
- Healthy ends remain intact within protective styles rather than splitting and breaking off from daily styling stress.
- Consistent protective styling over months shows visible length retention as you’re not constantly losing growth to breakage.
- Short hair benefits particularly from protective styling during the awkward growth phases when styling loose hair becomes challenging.
- The key is maintaining proper care within protective styles—don’t neglect your hair just because it’s “protected.”
Common Mistakes to Avoid with Short 4C Hair
Understanding common pitfalls in caring for short 4C hair helps you avoid setbacks and maintain healthy, thriving natural hair. Many mistakes stem from misinformation or practices designed for other hair types that don’t translate well to 4C texture. Learning what to avoid is just as important as learning what to do for successful natural hair care.
Over-Manipulation:
- Constantly touching, picking, and restyling your short 4C hair throughout the day causes unnecessary breakage and frizz.
- Excessive combing and brushing, particularly on dry hair, leads to mechanical damage and breakage along the hair shaft.
- Tight hairstyles that create tension on the scalp and hairline can cause traction alopecia and permanent hair loss over time.
- Allow your hair to rest between styling sessions rather than creating new styles every few days that require complete manipulation.
- Find styles you can wear for several days with minimal daily maintenance to reduce the handling your hair experiences.
Product Overload:
- Using too many products or applying them too heavily weighs down short 4C hair and creates buildup that attracts dirt.
- Product buildup on the scalp blocks follicles and can lead to scalp issues, reduced growth, and dull-looking hair.
- Start with smaller amounts of product and add more only if needed—you can always apply more but can’t remove excess easily.
- Clarify your hair monthly with a clarifying shampoo to remove accumulated product residue and restore hair’s natural balance.
- Less is often more with short hair—you need less product to cover shorter lengths compared to longer hair.
Neglecting Moisture:
- Skipping daily or regular moisturizing causes 4C hair to become dry, brittle, and prone to breakage regardless of styling.
- Using products without water as a primary ingredient fails to provide true hydration that 4C hair desperately needs.
- Waiting until hair feels dry to moisturize means you’ve already allowed damage to begin—stay ahead with consistent hydration.
- Deep conditioning should be non-negotiable weekly practice, not an occasional treatment reserved for damaged hair.
- Protective styles still require moisture maintenance—don’t install a style and forget about your hair’s hydration needs.
Heat Damage:
- Excessive heat styling without heat protectant causes permanent damage to 4C hair’s structure that cannot be reversed.
- Using high heat settings or styling tools too frequently gradually changes your curl pattern and creates heat-damaged sections.
- Blow-drying on high heat without proper technique and products can cause severe dryness and breakage throughout your hair.
- If you choose to use heat, always apply heat protectant, use the lowest effective temperature, and limit frequency to prevent damage.
- Many styles for short 4C hair don’t require heat at all—explore heatless options that celebrate your natural texture.
Seasonal Care for Short 4C Hair
Short 4C hair requires adjusted care routines throughout the year as seasonal changes affect moisture levels, styling needs, and product requirements. Understanding how different weather conditions impact your natural hair helps you adapt your routine for optimal health year-round. Proactive seasonal adjustments prevent damage and keep your hair thriving regardless of climate challenges.
Winter Care:
- Cold air and indoor heating create extremely dry conditions that rapidly deplete moisture from 4C hair strands.
- Increase deep conditioning frequency to twice weekly during winter months to combat environmental moisture loss.
- Use heavier creams, butters, and oils to seal in moisture more effectively against harsh winter weather.
- Protect your hair from cold wind and dry air by wearing satin-lined hats, hoods, or scarves when outdoors.
- Static electricity becomes more problematic in winter—use anti-static products or lightly mist hair with water to reduce flyaways.
Summer Care:
- High humidity can cause frizz and reduce style longevity, requiring products with stronger hold and anti-humidity properties.
- Sun exposure can dry out hair and cause color fading if you have dyed hair—use products with UV protection.
- Swimming in chlorinated or salt water requires protective measures like pre-wetting hair and applying oil before entering water.
- Wash hair more frequently in summer if you’re more active and sweating more, which can cause scalp buildup.
- Lighter products work better in summer heat when heavy creams and butters feel uncomfortable and may melt or slide off hair.
Transitional Seasons:
- Spring and fall bring fluctuating temperatures and humidity levels that require flexible hair care routines.
- Keep both light and heavy products available to adjust based on daily weather conditions during transitional periods.
- These seasons are ideal times for trying new styles or transitioning between protective styling and wearing hair out.
- Pay attention to how your hair responds to changing conditions and adjust your routine accordingly rather than following rigid schedules.
- Maintain consistent moisture practices regardless of season—hydration remains the foundation of healthy 4C hair year-round.
Professional Styling vs. DIY for Short 4C Hair
Deciding when to visit a professional stylist versus styling your own short 4C hair depends on style complexity, your skill level, and specific hair needs. Both approaches have distinct advantages, and understanding when to choose each option helps you maintain healthy hair while achieving your desired looks. Many people find success combining professional and DIY styling based on circumstances.
When to See a Professional:
- Cutting, shaping, and maintaining tapered styles requires professional barbering skills and tools for clean, even results.
- Complex braid patterns, intricate cornrow designs, and precise parting benefit from experienced hands and professional expertise.
- Installing protective styles like faux locs, goddess locs, or intricate braided styles often works better with professional assistance.
- Dealing with significant damage, severe breakage, or hair health concerns warrants consultation with a stylist specializing in natural hair.
- Special occasions like weddings, proms, or important events may call for professional styling to ensure flawless execution.
DIY Styling Benefits:
- Simple styles like two-strand twists, Bantu knots, wash and gos, and puffs are easily achievable at home with practice.
- Learning to style your own hair builds understanding of your texture, preferences, and what works best for your specific hair.
- Home styling saves money over time, especially for styles you wear frequently that would otherwise require regular salon visits.
- You control product selection, handling gentleness, and styling timing when working on your own hair at home.
- Many online tutorials, natural hair communities, and resources make learning DIY styling more accessible than ever before.
Building Your Skills:
- Start with simpler styles and gradually work toward more complex techniques as your confidence and skill level increase.
- Watch multiple tutorials for the same style to understand different approaches and find methods that work for your hair.
- Practice new styles when you have time to experiment rather than rushing before important events or work days.
- Don’t be discouraged by imperfect early attempts—styling skills improve significantly with repetition and practice.
- Consider taking a natural hair styling class or workshop to learn techniques in person from experienced stylists.
Conclusion
Exploring the Best 37+ Short 4C Hairstyles: Chic and Easy Styles for Natural Hair reveals the incredible versatility, beauty, and creative potential of short natural hair.
From protective styles that support healthy growth to bold cuts that make powerful statements, short 4C hair offers endless possibilities for self-expression and style experimentation.
The key to success lies in understanding your unique texture, maintaining consistent moisture and care practices, and choosing styles that align with your lifestyle and personal aesthetic.
Whether you prefer the minimal maintenance of a tapered cut, the protective benefits of braids and twists, or the defined beauty of coil-outs and rod sets, there’s a perfect short 4C hairstyle waiting to showcase your natural beauty.
Embrace your coils, celebrate your texture, and remember that healthy hair practices form the foundation for any stunning style.
Your natural hair journey is uniquely yours, and these 37+ styles provide inspiration and options to keep that journey exciting, beautiful, and authentically you.