Have you ever dreamed of achieving salon-quality layers without the hefty price tag? The art of self-cutting layers might seem intimidating at first, but with the right techniques and guidance, you can transform your hair from flat and lifeless to voluminous and dynamic right in your own home.
This comprehensive guide reveals professional hairstyling secrets that will empower you to take control of your hair’s destiny.
Whether you’re looking to add subtle dimension or create dramatic cascading layers, DIY Hair Layering Secrets: The Complete Guide to Your Self-Cut will walk you through every essential step, from understanding your hair type to mastering cutting techniques that actually work.
Inside this article, you’ll discover how to properly section your hair, choose the right tools, avoid common mistakes that ruin DIY cuts, and achieve results that rival professional salons.
Get ready to unlock the confidence that comes with mastering your own hair transformation.
1. Understanding Hair Layers and Face Shapes
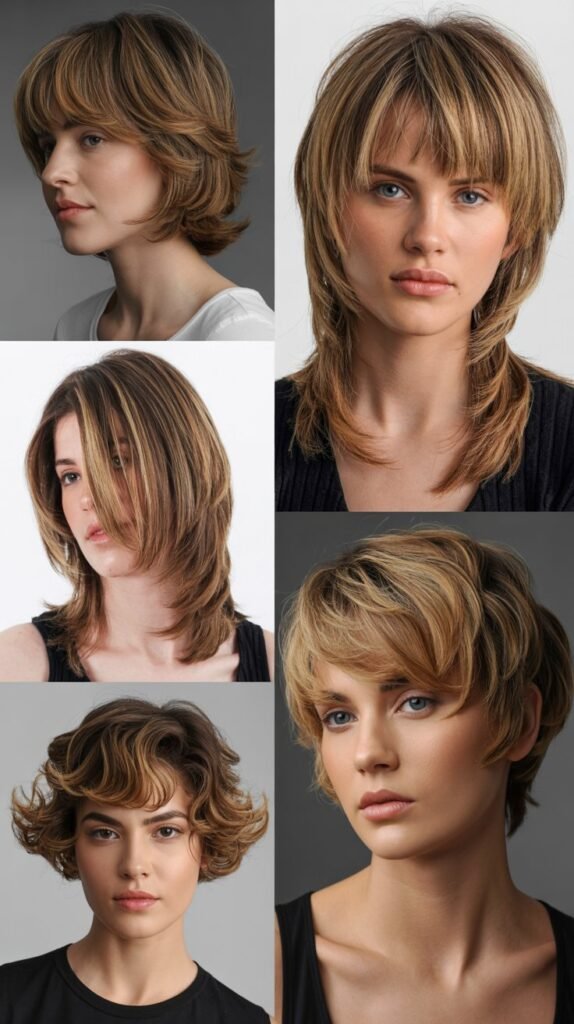
Before picking up scissors, understanding how layers interact with your unique facial structure determines whether your DIY cut will flatter or fall flat.
Layers work by creating varying lengths throughout your hair, which adds movement, removes bulk, and frames your face in strategic ways.
Different face shapes require different layering approaches—oval faces can pull off virtually any layer style, round faces benefit from longer layers that elongate, square faces soften with face-framing pieces, heart-shaped faces look best with chin-length layers, and long faces need shorter layers to add width.
Key considerations for matching layers to your features:
- Oval faces have balanced proportions and can experiment with short, medium, or long layers starting anywhere from the chin to the shoulders
- Round faces should avoid layers that end at the cheekbones as this emphasizes roundness, instead opting for layers that begin below the chin to create vertical lines
- Square faces benefit most from soft, wispy layers that start around the jawline to soften angular features
- Heart-shaped faces look stunning with layers that add volume around the chin and jaw area to balance a wider forehead
- Long or rectangular faces need horizontal layers or layers with more volume at the sides rather than cascading vertical layers
- Consider your hair texture alongside face shape since thick hair can handle more aggressive layering while fine hair needs subtle, strategic cuts
- Your lifestyle matters too—active individuals might prefer shorter layers that require less styling while professionals may want polished, longer layers
2. Essential Tools for Self-Layering Success
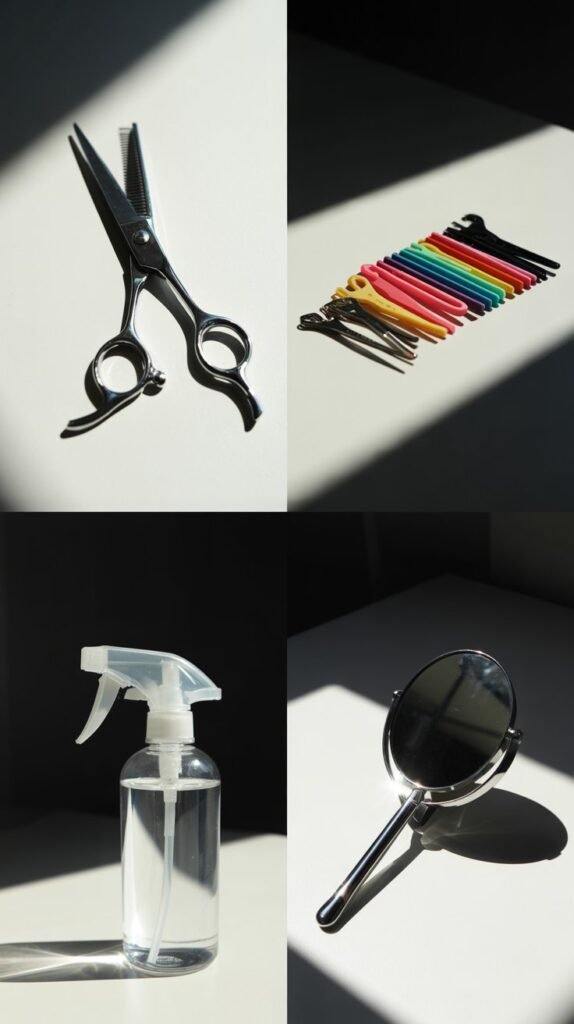
The difference between a successful DIY layer cut and a hair disaster often comes down to using professional-quality tools designed for precision cutting.
Investing in the right equipment transforms an amateur attempt into a polished result that looks intentionally styled rather than accidentally butchered.
Must-have tools for cutting your own layers:
- Professional hair cutting shears with 6-7 inch blades made from Japanese or German stainless steel provide the sharpness needed for clean cuts without damaging hair ends
- Regular household scissors create jagged, split ends because they crush rather than slice through hair strands cleanly
- A fine-toothed cutting comb helps create precise sections and maintains even tension while cutting
- Hair clips or sectioning clamps keep uncut portions secured and out of the way during the layering process
- A handheld mirror combined with a wall-mounted mirror allows you to see the back and sides of your head clearly
- A spray bottle filled with water keeps hair damp and manageable throughout the cutting process
- A cutting cape or old towel protects your clothing from falling hair clippings
- Sharp point-cutting shears or thinning scissors add texture and blend layers for a more natural finish
Where to find quality tools:
- Sally Beauty Supply offers professional-grade shears starting around $20-40 that work well for home use
- Amazon carries highly-rated brands like Equinox and Jaguar that professional stylists recommend for DIY cuts
- Investing $50-100 in quality scissors pays off through years of successful home haircuts
3. Preparing Your Hair for the Perfect Cut
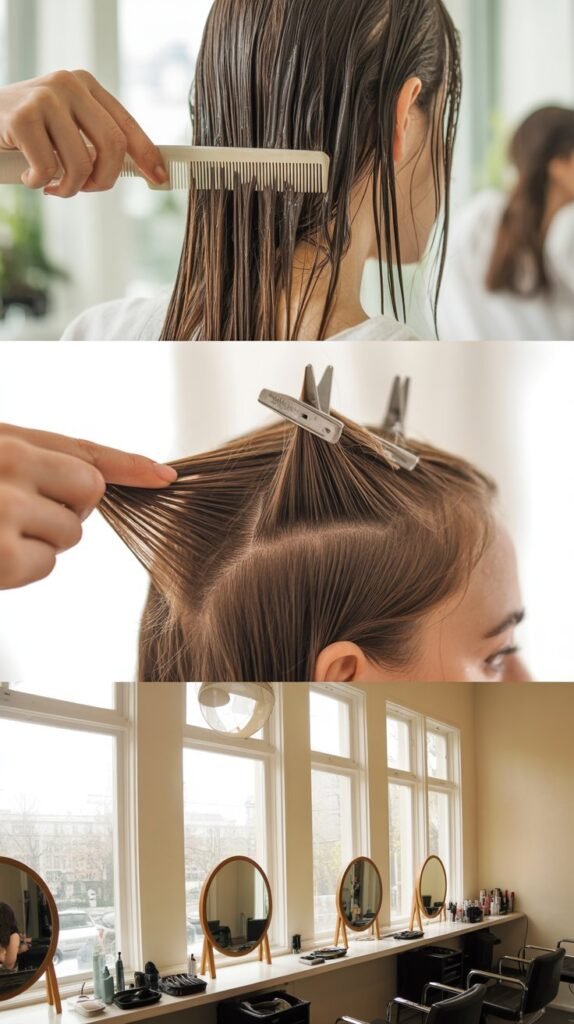
Proper preparation separates amateur hack jobs from professional-looking results when cutting your own layers.
The condition and state of your hair before you make that first cut significantly impacts how smoothly the process goes and how polished your final result appears.
Essential preparation steps before cutting:
- Wash your hair with shampoo only, skipping conditioner which can make hair too slippery and difficult to control during cutting
- Towel-dry hair until damp but not dripping wet since cutting on soaking wet hair leads to surprises when it dries and shrinks up
- Detangle thoroughly using a wide-tooth comb starting from the ends and working upward to prevent breakage
- Straighten naturally curly or wavy hair with a blow dryer if you want to see the true length while cutting, or cut dry for curly styles
- Examine your current hair condition and postpone cutting if you notice excessive damage, split ends throughout, or chemical processing that weakened the hair structure
- Choose a well-lit area with natural daylight or bright white lighting that shows your hair’s true color and texture
- Set up your workspace with all tools within easy reach and position mirrors so you can see all angles
- Start with realistic expectations knowing your first attempt might not be perfect but improves with practice
Timing considerations:
- Allow at least 45-60 minutes for your first self-layering session without rushing
- Avoid cutting hair when you’re tired, stressed, or emotionally upset as steady hands and clear judgment are essential
- Schedule your cut when you have a few days to adjust to the new style before important events
4. The Ponytail Method for Basic Layers
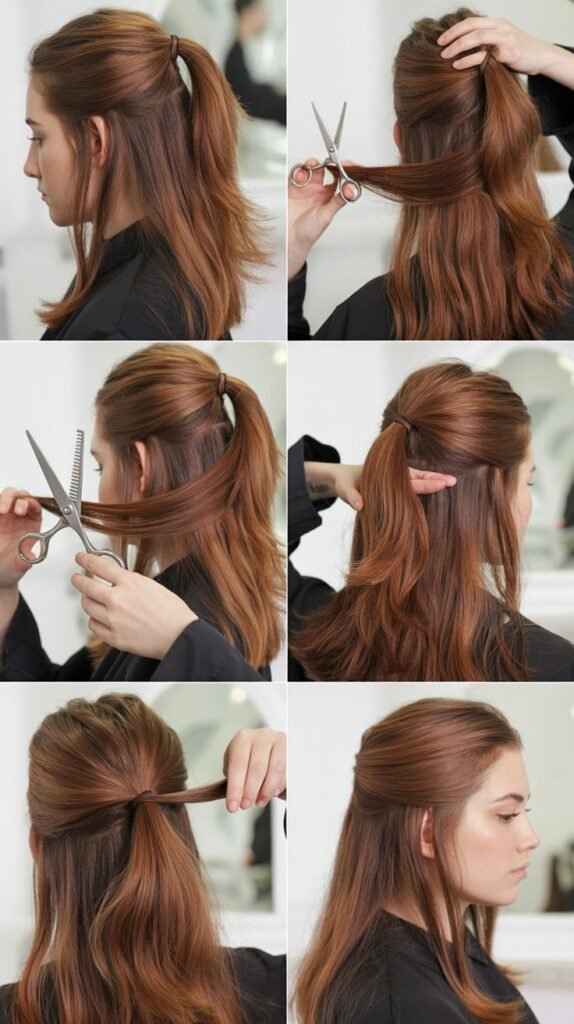
The ponytail technique stands as the most foolproof method for beginners attempting their first self-cut layers because it creates uniform layers with minimal risk of mistakes.
This approach works especially well for creating long layers throughout medium to long hair lengths.
Step-by-step ponytail cutting technique:
- Flip your head upside down and brush all hair forward toward your forehead to gather it into a high ponytail at your hairline
- Secure the ponytail tightly with a hair elastic positioned exactly at the top center of your forehead where your hairline begins
- Check that all hair is smooth in the ponytail with no bumps or sections left out that would create uneven layers
- Slide another hair elastic down the ponytail to the point where you want your shortest layer to end, typically 1-2 inches from the ends
- Hold the ponytail straight up perpendicular to your head and cut straight across just above the bottom elastic
- Remove both elastics carefully and flip your head back to see graduated layers that are shorter in the back and longer in front
- The higher you position the initial ponytail, the more dramatic your layers will be throughout your hair
- This method naturally creates face-framing layers without complicated sectioning or advanced techniques
Common ponytail method variations:
- The unicorn ponytail positions hair at the very top front of your head and creates layers that focus around the face
- The center part ponytail splits hair down the middle before gathering for more symmetrical layers on both sides
- Multiple ponytail sections allow you to layer just the top section, crown area, or sides without cutting all your hair
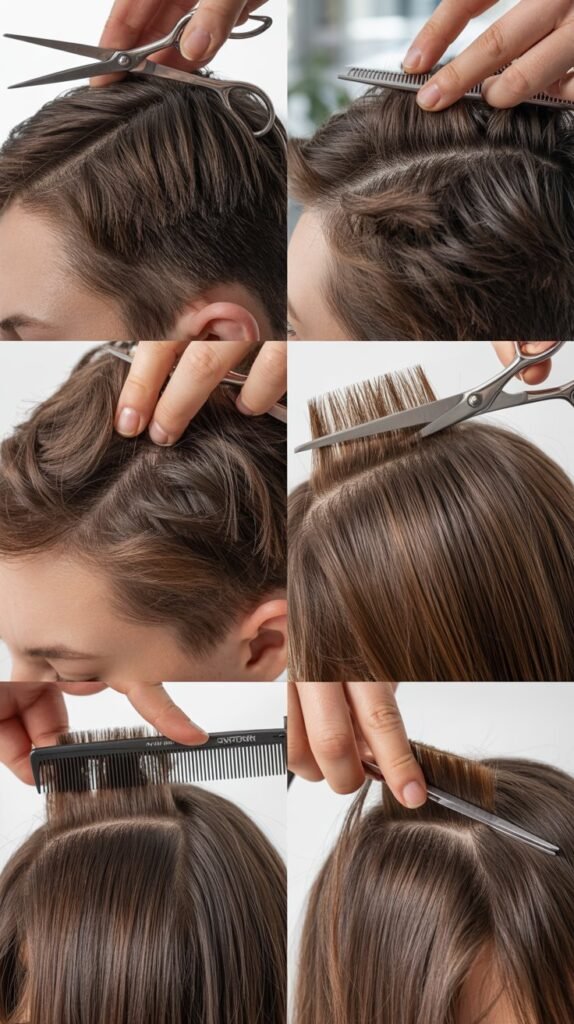
5. Advanced Sectioning Techniques for Precision Layers
Professional hairstylists achieve flawless layers through precise sectioning that divides hair into manageable portions for controlled cutting.
Mastering sectioning techniques elevates your DIY cuts from basic to sophisticated with layers that blend seamlessly throughout your entire head.
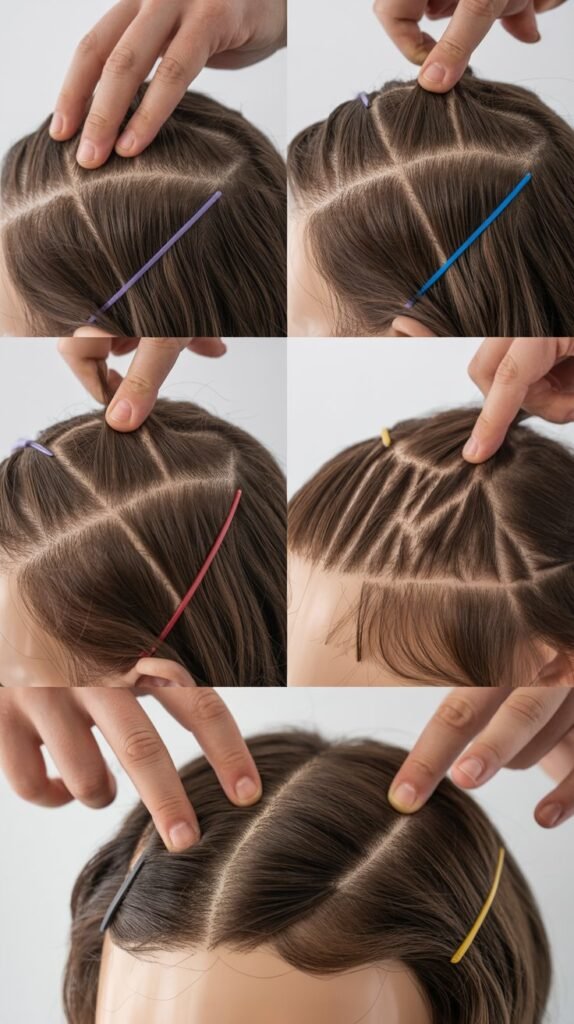
Professional sectioning patterns explained:
- The cross-section method divides hair into four quadrants by creating a part from ear to ear across the crown and another part down the center from forehead to nape
- Horizontal sections slice hair into layers parallel to the floor, with each section cut slightly longer than the one above it to create graduation
- Vertical sections cut perpendicular to the floor work best for removing bulk and creating texture without obvious layering lines
- Radial sections fan out from a central point like a sunburst pattern and create round layering that frames the face beautifully
- The seven-section technique used in professional salons divides hair into top, sides, crown, and nape sections for comprehensive control
How to execute clean sections:
- Begin with the bottom sections first and work upward, keeping uncut hair clipped securely out of your working area
- Use your cutting comb to create perfectly straight parts that divide sections evenly without zigzags or curves
- Each section should be no thicker than half an inch for the most precise cutting and blending
- Maintain consistent tension by holding each section at the same angle and pulling with equal pressure throughout the cut
- Cut small sections at a time rather than attempting to tackle large chunks which leads to uneven results
- Reference guide hairs from previously cut sections to maintain consistent length and graduation
- Document which sections you’ve completed to avoid accidentally cutting the same area twice with different techniques
6. Face-Framing Layers That Transform Your Look
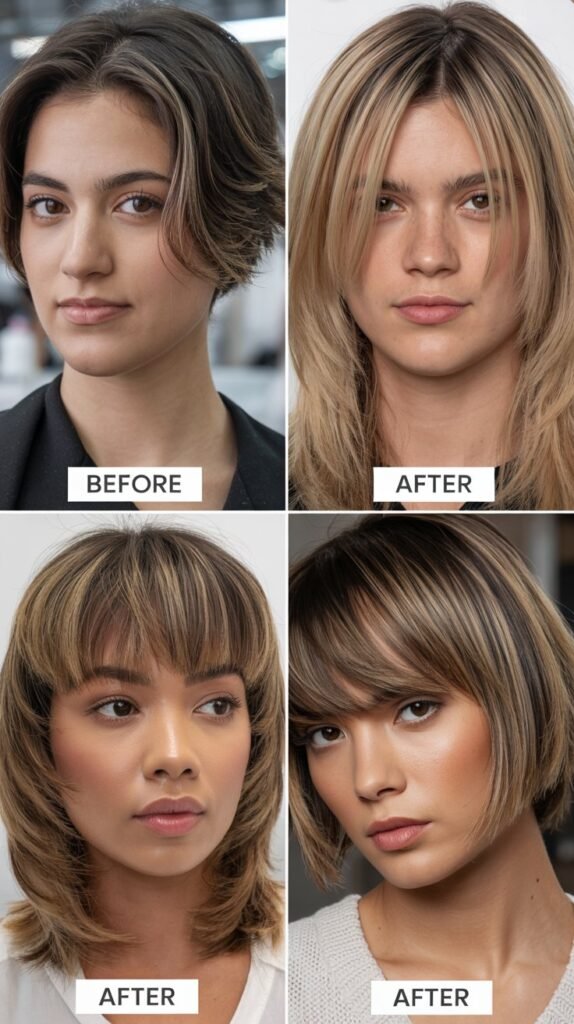
Face-framing layers create the most noticeable impact in any haircut because they draw attention directly to your features and can dramatically change your entire appearance.
These strategic front pieces soften your look, highlight your best features, and add movement exactly where it matters most.
Creating perfect face-framing layers:
- Section out a triangular piece of hair at the front on each side of your face, starting at your part and extending to just behind your ear
- Determine where you want the shortest face-framing piece to hit—typically at the cheekbone, chin, or collarbone depending on your preference
- Comb the front section forward and hold it between your index and middle fingers at the desired cutting length
- Cut at a slight diagonal angle rather than straight across to create soft, blended layers that grow gradually longer as they move back
- Point-cut into the ends by snipping vertically with your scissors rather than horizontally to soften the edge and remove bluntness
- Repeat the exact same process on the opposite side, carefully measuring to ensure both sides match in length
- Check symmetry by pulling both sides forward and comparing the lengths side by side in your mirror
- Face-framing layers should be at least 2-3 inches shorter than your longest layers to create noticeable definition
Customizing face-framing layers for your style:
- Curtain bangs flow from a center part and frame both sides of the face with shorter pieces that graze the cheekbones
- Side-swept face-framing layers start longer on one side and gradually get shorter as they sweep across the face
- Choppy face-framing creates an edgier look with more dramatic variation in length and heavier texturing
- Soft face-framing maintains subtle graduation with minimal length difference for a classic, timeless appearance
7. Creating Long Layers vs. Short Layers
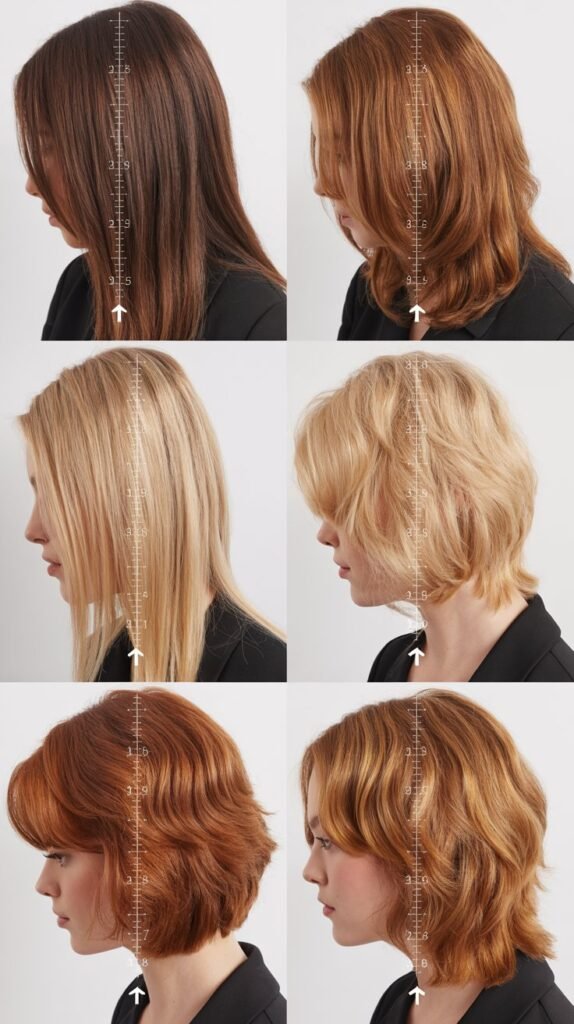
Understanding the distinction between long and short layering techniques prevents you from accidentally creating a style that doesn’t match your vision.
The spacing and positioning of your layers determines whether you achieve subtle dimension or dramatic movement throughout your hair.
Long layer characteristics and techniques:
- Long layers feature a length difference of 2-3 inches between the shortest and longest sections creating subtle, flowing movement
- The shortest layer typically begins at chin length or below, leaving substantial weight at the bottom of your hairstyle
- Long layers work beautifully for thick hair that needs some bulk removed without losing fullness
- This technique maintains length while adding shape and preventing the triangular silhouette that comes from one-length cuts
- Cut long layers by taking horizontal sections and elevating each slightly higher than the previous one with minimal elevation angle
- Long layers blend naturally and grow out gracefully without requiring frequent maintenance trims
Short layer characteristics and techniques:
- Short layers create 4-6 inches or more of length variation between sections producing voluminous, dynamic movement
- The shortest pieces might start at the crown or even higher, creating maximum lift and body throughout the style
- Short layers dramatically reduce weight and work perfectly for fine hair that needs volume or very thick hair that feels heavy
- This layering style requires more frequent trims every 6-8 weeks to maintain the shape and prevent grown-out awkwardness
- Cut short layers by elevating sections at higher angles (90 degrees or more) from the head for maximum graduation
- Short choppy layers with more texturing create edgy, contemporary styles perfect for those wanting bold transformation
8. Fixing Common DIY Layering Mistakes
Even experienced self-cutters occasionally make errors that require quick thinking and corrective techniques to salvage.
Knowing how to identify and fix mistakes prevents minor mishaps from becoming major hair catastrophes that require professional intervention.
Most frequent DIY layering errors and solutions:
- Choppy, uneven layers result from cutting with dull scissors or inconsistent tension, fixed by carefully point-cutting into the ends to blend harsh lines and create texture
- Layers that are too short happened because wet hair was cut without accounting for shrinkage when dry, corrected by embracing the shorter length and adding texturizing to create intentional choppy style
- One side longer than the other occurs from asymmetrical sectioning or cutting at different angles, remedied by carefully comparing both sides and trimming the longer side to match
- Bulky weight lines appear when too much length difference exists between layers, softened by thinning shears or additional graduation cuts between the existing layers
- Too much hair removed from the top creates a puffy, triangular shape that’s corrected by adding more face-framing layers and using styling products to smooth the crown
- Straight-across blunt layers look unnatural and harsh, improved by point-cutting and slide-cutting techniques that soften the edges dramatically
- Damaged, split ends throughout layers occur from using regular scissors instead of professional shears, requiring a dusting trim to remove only the damaged portions
When to seek professional help:
- If you’ve removed significantly more hair than intended and can’t achieve a balanced shape through minor corrections
- When chemical damage or excessive breakage makes further cutting risky without professional assessment
- If both sides are drastically different lengths and you can’t determine how to even them out safely
- When you’ve created extremely short pieces that can’t be blended into the rest of your hair
- Remember that professional stylists have seen every mistake imaginable and can usually correct DIY errors without judging
9. Styling and Maintaining Your New Layers
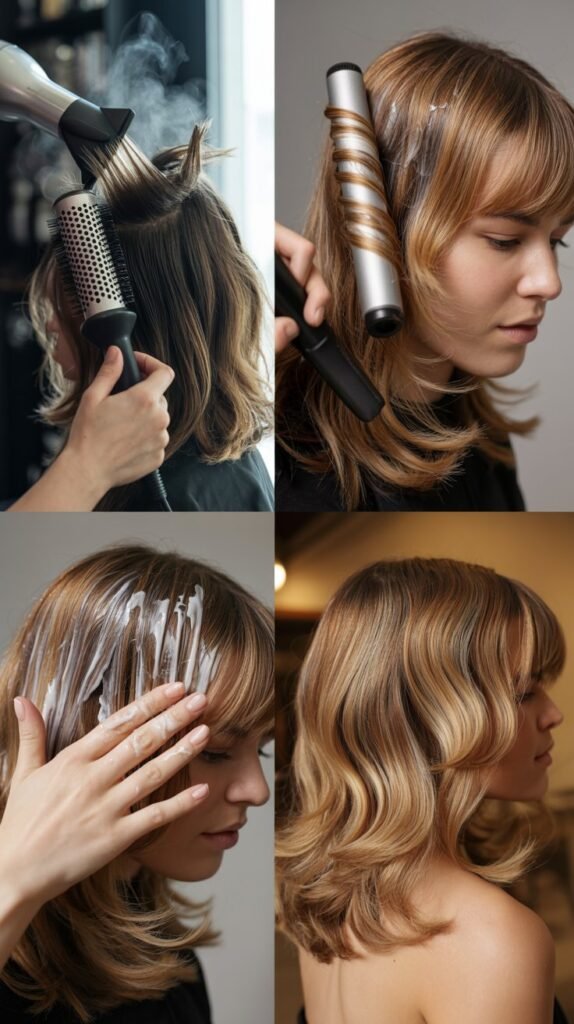
The real magic of layered hair reveals itself through proper styling techniques that enhance the dimension and movement you’ve created.
Layers require different care and styling approaches than one-length hair to maintain their shape and showcase their full potential.
Styling techniques that maximize layered hair:
- Blow-dry with a round brush by wrapping small sections around the brush and directing heat from roots to ends for smooth, voluminous layers
- The flipping method works by blow-drying hair upside down to create natural volume that emphasizes the graduation between layers
- Straightening with a flat iron piece by piece defines each layer distinctly and creates a sleek, polished finish
- Curling wand styling on layers creates dimensional waves where shorter pieces bounce higher and longer pieces flow lower
- Beach wave spray on damp layered hair and air-drying produces effortless texture that shows off the varying lengths beautifully
- Texturizing spray or dry shampoo at the roots lifts layers and prevents them from falling flat against your head
- Avoid heavy styling products on short layers near the crown as weight pulls them down and eliminates the volume you worked to create
Maintenance schedule for layered cuts:
- Dust the ends every 6-8 weeks by trimming only 1/4 inch to remove split ends without losing your shape
- Refresh face-framing layers every 4-6 weeks if they grow into your eyes or lose their dramatic effect
- Deep condition weekly to prevent dryness and damage that makes layered ends look scraggly and unhealthy
- Sleep on silk or satin pillowcases to reduce friction that tangles layered hair and creates frizz overnight
- Apply leave-in conditioner or hair oil to the ends of your layers to maintain smoothness and prevent splitting
- Schedule a professional shape-up every 3-4 months to maintain the integrity of your DIY cut and correct any unevenness
Product recommendations for layered hair:
- Volumizing mousse applied to damp roots before blow-drying creates lasting lift in short layers
- Heat protectant spray prevents damage when styling layers with hot tools frequently
- Lightweight hair oil on dry ends adds shine without weighing down your layers
- Texturizing powder at the crown gives instant volume to layers that have fallen flat by midday
10. Layer Cutting Techniques for Different Hair Textures
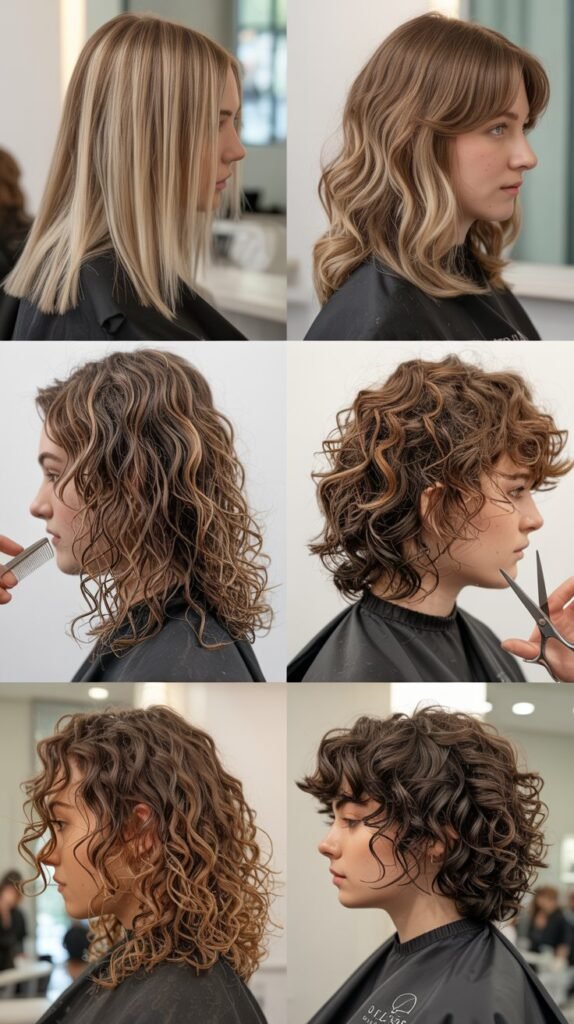
Hair texture dramatically affects how layers behave and which cutting approaches work best for achieving your desired result.
Understanding your specific texture prevents frustration and ensures your DIY layers enhance rather than fight against your hair’s natural characteristics.
Layering straight hair successfully:
- Straight hair shows every cutting mistake clearly since there’s no curl pattern to hide uneven lines or choppy sections
- Cut straight hair while completely dry to see the exact length you’re creating without surprises from shrinkage
- Use slide-cutting techniques where scissors glide down the hair shaft to create softer, less obvious layer transitions
- Point-cutting into the ends prevents the blunt, harsh lines that look especially severe on straight texture
- Straight hair benefits from longer, more gradual layers since dramatic short layers can create a boxy, dated appearance
- Thinning shears remove bulk from thick straight hair without creating noticeable layering lines
- The razor-cutting technique works beautifully on straight hair to create textured, feathered layers with movement
Layering wavy hair techniques:
- Wavy hair forgives minor mistakes better than straight hair because the wave pattern camouflages slight unevenness
- Cut wavy hair while dry or only slightly damp to account for the shrinkage that occurs as waves form when drying
- Focus layers around the face and crown where waves naturally want to expand and create fullness
- Avoid over-layering wavy hair in the back which can create a triangular shape as waves push outward
- Leave more weight at the bottom of wavy hair to prevent excessive volume and frizz that makes the style look unpolished
- The twist-and-cut method works well for wavy hair by twisting small sections and cutting at an angle to create natural-looking layers
Layering curly and coily hair properly:
- Curly hair must be cut dry so you can see exactly how each curl spiral sits and bounces after cutting
- Cut curly hair curl by curl, snipping individual ringlets to their desired length rather than sectioning in traditional ways
- Never use thinning shears on curly or coily hair as this creates frizz and destroys the curl pattern permanently
- Curly hair needs layers throughout to prevent the pyramid shape that occurs when all curls are the same length
- Remove bulk from curly hair by cutting into the interior of sections rather than just cutting the length
- The DevaCut technique specifically designed for curls angles layers to enhance the natural curl pattern’s shape
- Coily textures benefit from carefully placed layers that reduce shrinkage areas while maintaining healthy, strong ends
11. Safety Tips and Best Practices
Cutting your own hair involves sharp tools near your face and body, making safety awareness crucial for preventing accidents and achieving successful results.
Following established best practices transforms a potentially risky activity into a safe, controlled process.
Essential safety guidelines for home hair cutting:
- Always cut hair in a well-lit area where you can clearly see what you’re doing without shadows obscuring your work
- Never rush through a DIY haircut regardless of time constraints as hurrying leads to mistakes and potential injuries
- Keep scissors pointed away from your eyes, face, and body at all times, maintaining awareness of blade position
- Store professional shears in a protective case immediately after use to prevent accidental cuts when reaching into drawers
- Never cut hair while under the influence of alcohol or medications that affect coordination and judgment
- Supervise children and pets by keeping them out of your cutting area to prevent distractions or accidents
- Position yourself comfortably while cutting to avoid straining your back, neck, or arms which leads to shaky, imprecise cuts
- Clean up cut hair immediately as loose hair on the floor creates a slipping hazard and tracks throughout your home
Scissor handling techniques:
- Hold shears with your thumb in one handle and ring finger in the other, using your pinky finger on the tang for stability and control
- Keep your elbow down and close to your body rather than extended outward which causes fatigue and reduces cutting precision
- Open and close scissors with smooth, controlled motions instead of rapid snipping that can catch and tear hair
- Never walk around or move between areas while holding open scissors that could catch on objects or injure someone
- Sanitize your cutting tools with rubbing alcohol before and after each use to prevent bacterial buildup and skin infections
Knowing your limits:
- Attempt only simple layer cuts for your first few DIY experiences, saving complex techniques for after you’ve built confidence
- Stop immediately if you feel frustrated, tired, or notice your hands shaking from holding awkward positions too long
- Take breaks every 15-20 minutes to rest your arms, check your progress in different lighting, and ensure you’re still happy with the direction
- Don’t attempt to fix major professional cut mistakes at home as this often makes problems worse rather than better
- Keep realistic expectations knowing your first self-cut won’t rival 15 years of professional training but improves with each attempt
12. Cost Savings and Long-Term Benefits
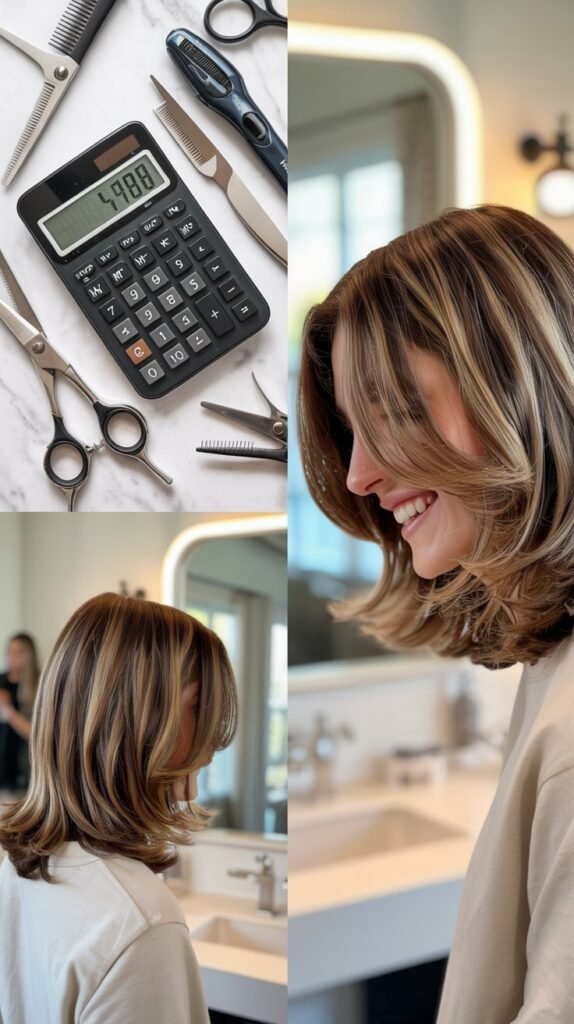
Understanding the financial advantages of mastering DIY hair layering motivates you to develop this valuable skill while revealing how small investments in quality tools pay dividends over time.
The empowerment that comes from controlling your own appearance extends far beyond mere dollars saved.
Financial breakdown of DIY vs. salon cuts:
- Professional salon layer cuts cost $50-150 per visit depending on your location and salon prestige
- Maintaining layered hair requires cuts every 8-10 weeks, totaling 5-6 salon visits annually
- Annual salon layer cutting costs range from $250-900 for regular maintenance throughout the year
- Quality hair cutting shears cost $30-100 as a one-time investment that lasts 5-10 years with proper care
- DIY cutting saves approximately $200-800 annually after the initial tool investment is recouped
- Over ten years of DIY cutting, savings accumulate to $2,000-8,000 compared to regular salon visits
- Additional savings come from eliminating salon tipping, transportation costs, and time away from other activities
Non-financial benefits of cutting your own layers:
- Complete control over your hairstyle means you can experiment with different layer lengths and placements without expensive consequences
- Convenience of cutting layers on your own schedule eliminates waiting for appointments or working around salon hours
- Building a valuable skill that serves you throughout your entire life and can even be shared with family members
- Confidence that comes from mastering a technical skill most people believe requires professional training
- Understanding your hair’s behavior and characteristics at a deeper level than clients who never cut their own hair
- Freedom to make small adjustments whenever needed rather than living with slightly grown-out layers between appointments
- No more awkward salon small talk if you’re introverted or prefer quiet personal time during grooming activities
Investing savings wisely:
- Redirect money saved from salon visits toward high-quality hair care products that enhance your DIY cuts
- Use savings for other beauty services you can’t do yourself like professional color treatments or keratin smoothing
- Build an emergency fund or invest in experiences that create lasting memories rather than routine maintenance
Conclusion
Mastering DIY Hair Layering Secrets: The Complete Guide to Your Self-Cut opens up a world of possibilities for transforming your appearance while saving significant money over time.
Throughout this comprehensive guide, you’ve discovered essential techniques from understanding how face shapes interact with different layer styles to executing professional sectioning methods that create seamless, beautiful results.
The journey from hesitant beginner to confident self-stylist happens through practice, patience, and applying the proper techniques detailed in each section of this article.
Remember that every professional hairstylist started with their first uncertain cut, and your skills will naturally improve with each attempt as you develop muscle memory and a better understanding of your unique hair.
By investing in quality tools, following safety guidelines, and respecting your hair’s natural texture, you’ve gained the knowledge to create stunning layered looks whenever inspiration strikes.
The empowerment of controlling your own style, combined with hundreds or thousands of dollars saved annually, makes learning to cut your own layers one of the most valuable skills you can develop.
Take what you’ve learned here, start with simple techniques, and gradually build toward more advanced layer cutting as your confidence grows—your hair transformation journey begins right now.