Dreaming of achieving that effortlessly cool, layered shag haircut without spending a fortune at the salon? You’re in the right place.
Learning How to Cut a Shag Haircut at Home might seem intimidating at first, but with the right technique, tools, and a bit of confidence, you can create this trendy, textured style in your own bathroom.
This comprehensive guide walks you through every essential step, from understanding what makes a shag unique to mastering the cutting angles that create those signature choppy layers.
Whether you’re working with long, medium, or short hair, you’ll discover practical techniques for sectioning, cutting, and styling that deliver professional-looking results.
We’ll cover the must-have tools you need, common mistakes to avoid, and expert tips for customizing your shag to complement your face shape and hair texture.
By the end of this article, you’ll have the knowledge and confidence to transform your hair with this iconic, rock-and-roll inspired cut that’s been beloved for decades and continues to dominate modern hair trends.
1. Understanding the Shag Haircut Style

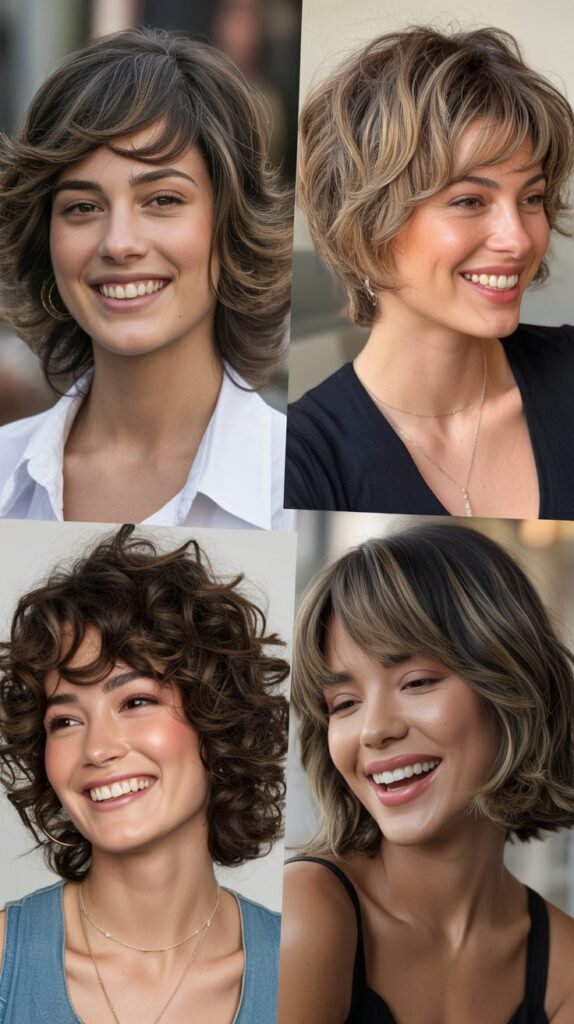
The shag haircut is a layered, textured style that creates volume, movement, and an edgy, lived-in appearance that works beautifully on various hair types and lengths.
Before picking up your scissors, it’s essential to understand the defining characteristics that make a shag distinctly different from other layered cuts.
- The shag features choppy, disconnected layers throughout the hair rather than blended, uniform layers.
- This cut typically includes shorter layers around the crown and face, gradually lengthening toward the ends.
- Texture and movement are the hallmarks of a shag, creating a deliberately messy, carefree aesthetic.
- The style originated in the 1970s and has been reinvented multiple times, with modern versions offering more versatility.
- Shags work exceptionally well on straight, wavy, and curly hair textures, though the final look varies based on your natural texture.
- Face-framing layers are a signature element, typically starting around the cheekbones or chin.
- The cut creates natural volume at the crown without requiring excessive styling products or heat tools.
- Unlike precision cuts, shags embrace imperfection and actually look better with slight irregularities.
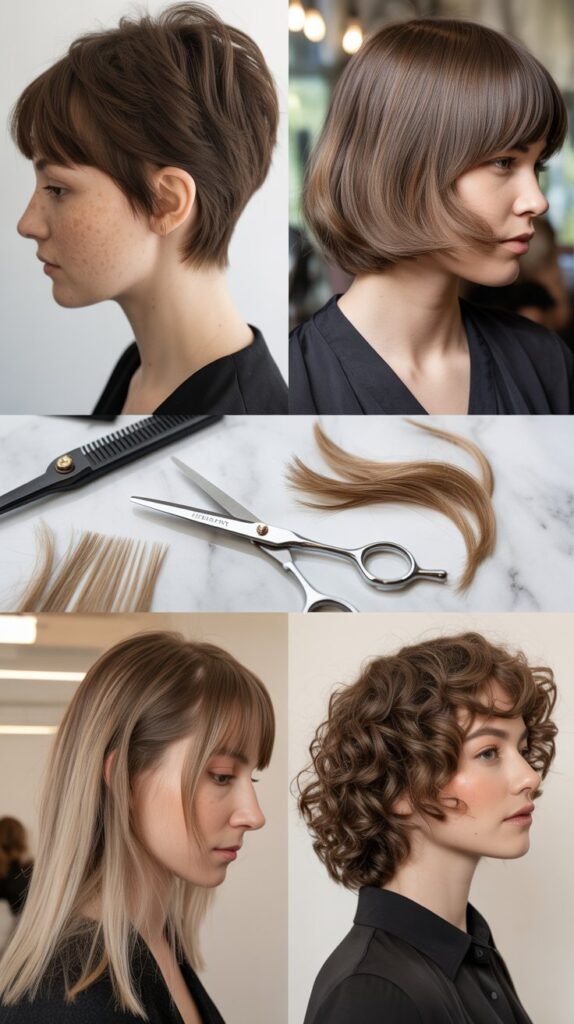
2. Essential Tools and Materials You’ll Need

Gathering the proper professional-grade tools before you begin ensures cleaner cuts, better control, and results that closely mirror what you’d achieve in a salon.
Investing in quality scissors specifically designed for hair cutting makes a significant difference in your final outcome.
- Professional hair cutting shears (6-7 inches) with sharp, precision blades designed specifically for cutting hair, not regular household scissors.
- Thinning shears or texturizing scissors to create the signature choppy, textured finish.
- A fine-toothed comb for creating clean sections and precise partings throughout your hair.
- Hair clips or sectioning clamps (at least 4-6) to keep hair organized and out of the way while working.
- A spray bottle filled with clean water to keep hair damp throughout the cutting process.
- A handheld mirror to check the back and sides of your head as you work.
- A large mirror positioned so you can see multiple angles simultaneously.
- A cape or old towel to protect your clothing from hair clippings.
- A chair positioned in a well-lit area with access to both your mirrors.
- Optional: A razor comb for additional texturizing if you want a softer, more feathered effect.
3. Preparing Your Hair for Cutting

Proper preparation creates the foundation for an even, controlled cut and helps you avoid common mistakes that can lead to uneven results or having to cut more than intended.
Taking time to properly wash, detangle, and section your hair sets you up for success.
- Start with freshly washed hair using your regular shampoo and conditioner to remove all products, oils, and buildup.
- Gently towel-dry your hair until it’s damp but not dripping wet, as overly wet hair can appear longer and lead to cutting too much.
- Thoroughly detangle your hair using a wide-tooth comb, starting from the ends and working up to the roots to prevent breakage.
- Avoid applying any styling products, leave-in conditioners, or oils before cutting, as these can affect how the scissors glide through your hair.
- Comb your hair straight down in its natural fall pattern without forcing it into any particular style.
- Check for any existing unevenness or problem areas you want to address during the cut.
- Ensure your hair remains consistently damp throughout the cutting process by misting with your spray bottle as needed.
- Position yourself in front of your mirrors in a comfortable chair with good lighting from multiple angles.
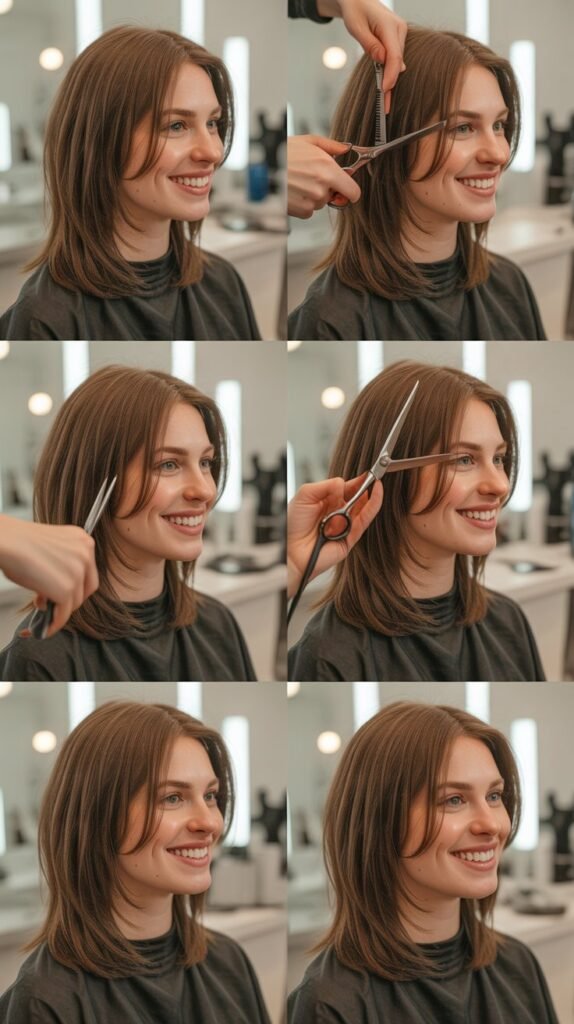
4. Creating the Initial Sectioning

Strategic sectioning is the secret to achieving balanced, even layers throughout your shag and prevents you from becoming overwhelmed by trying to cut too much hair at once.
This organizational step ensures you can work systematically through each area of your head.
- Begin by creating a center part from your forehead straight back to the nape of your neck using your fine-toothed comb.
- Divide your hair into five main sections: top/crown, two sides, and two back sections.
- The top section should extend from your hairline back to approximately the crown of your head, forming a rectangular shape.
- Use your first clip to secure the top section out of the way, twisting it slightly to keep it contained.
- Part the hair horizontally from ear to ear across the back of your head, creating upper and lower back sections.
- The side sections should include the hair in front of your ears and along the sides of your head down to where it meets the back sections.
- Secure each section with a separate clip, ensuring no hair escapes into other sections.
- Double-check that your sections are even on both sides by comparing them in your mirrors.
5. Cutting the Top Layers (Crown Section)
The crown section establishes the shortest layers of your shag and creates the volume that defines this iconic cut, so approaching this section with precision and confidence is crucial.
This is where the signature shag shape truly begins to take form.
- Release the top section and comb it straight up from the scalp, perpendicular to the head.
- Gather all the hair from this section into one ponytail at the very top center of your head.
- Hold the ponytail straight up at a 90-degree angle from your scalp, maintaining even tension.
- Decide on your desired shortest layer length, typically between 3-5 inches from the scalp depending on your preference.
- Use your scissors to cut straight across the ponytail, creating your guide length for the top layers.
- Release the hair and comb it down to see how the layers fall naturally around your crown.
- The hair will naturally create shorter layers near the top that gradually lengthen as they fall.
- Make small adjustments by taking thin vertical sections and point-cutting into the ends if you want additional texture.
- Check for symmetry by combing the hair to each side and ensuring the layers appear balanced.
6. Cutting the Side Sections (Face-Framing Layers)
Face-framing layers define your shag’s personality and can be customized to flatter your specific face shape, making this section particularly important for achieving a polished, personalized result.
These layers create the soft, flattering frame that draws attention to your features.
- Release one side section and comb the hair straight down in its natural direction.
- Determine where you want your shortest face-framing layer to begin, typically around the cheekbone or chin.
- Take a thin vertical section of hair closest to your face, about one inch wide.
- Hold this section between your fingers at your desired length, keeping your fingers parallel to the hair’s natural fall.
- Point-cut into the hair at an angle rather than cutting straight across to create soft, textured ends.
- Work your way back from the face, taking subsequent sections and cutting each one slightly longer than the previous section.
- This creates a gradual increase in length as you move from front to back, establishing the layered effect.
- The difference between each section should be subtle, approximately half an inch to one inch.
- Repeat the exact same process on the opposite side, using the first side as your guide for symmetry.
- Continuously check both sides by combing the hair forward to ensure the layers match in length and angle.
7. Cutting the Back Sections

The back sections require careful attention since you can’t see them directly, but mastering this area ensures your shag looks polished and balanced from every angle.
Working methodically and checking your progress frequently with your handheld mirror prevents uneven results.
- Release the lower back section first and comb the hair straight down.
- This section will be your longest length, maintaining the overall shape and fullness of your cut.
- Take horizontal sections about one inch thick, starting from the bottom.
- Pull each section straight out from the head at a 45-degree angle and cut to your desired length.
- Use the previously cut section as a guide, ensuring each new section blends smoothly with the one below it.
- Release the upper back section and repeat the process, connecting these layers to both the crown and lower back sections.
- The upper back should gradually transition from the shorter crown layers to the longer lower layers.
- Use your handheld mirror positioned behind you to check for evenness and balance throughout the back.
- Take small vertical sections and point-cut into any areas that appear too heavy or blunt.
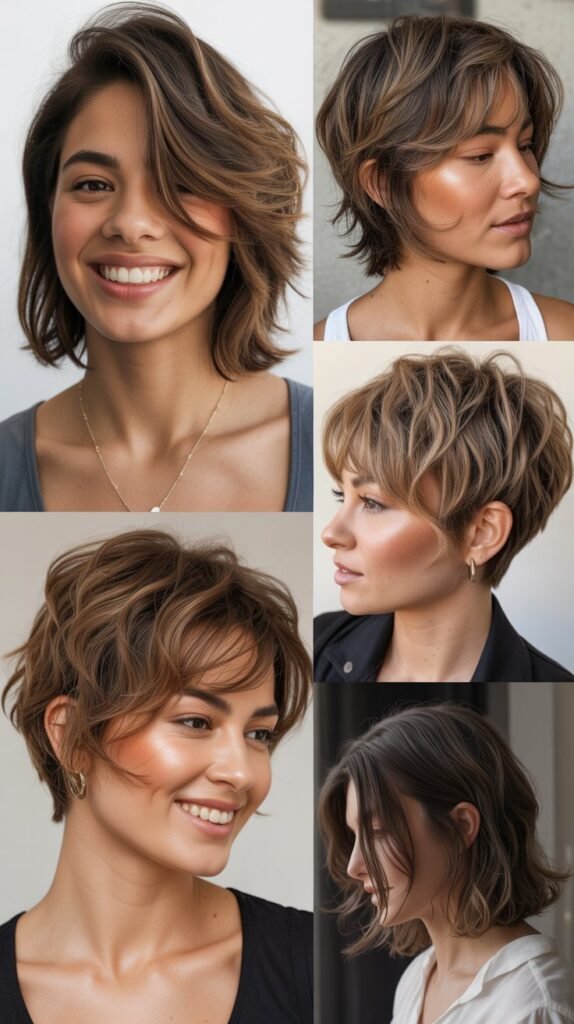
8. Adding Texture with Point Cutting

Point cutting transforms a basic layered cut into a true shag by creating the signature choppy, piece-y texture that gives this style its edge and movement.
This technique softens harsh lines and adds dimension that makes your hair look effortlessly cool.
- Point cutting involves holding your scissors vertically and cutting into the hair at an angle rather than straight across.
- Work with small sections of hair, about one inch wide, combing each section smooth before texturizing.
- Hold the section between your fingers at the length where you want to add texture.
- Point the tips of your scissors toward the scalp and make small snips into the hair, removing tiny triangular pieces.
- Cut approximately one-half to one inch up into the ends, varying the depth for a natural, irregular effect.
- Focus especially on the ends of your layers and around the face-framing sections for maximum impact.
- Avoid point cutting too aggressively near the roots, as this can create unwanted volume or frizz.
- Move systematically around your entire head, ensuring every section receives texturizing attention.
- Step back periodically to assess the overall texture and identify areas that need additional work.
9. Using Thinning Shears for Softness
Thinning shears remove bulk and weight from your hair without changing the length, creating a softer, more lived-in appearance that prevents your shag from looking too structured or heavy.
This step is particularly beneficial for those with thick or dense hair textures.
- Thinning shears have one regular blade and one blade with teeth that remove only some of the hair with each cut.
- Use these shears on dry or nearly dry hair for the most accurate results, as wet hair can appear thinner than it actually is.
- Take small sections of hair and close the thinning shears about halfway down the length, avoiding cuts too close to the scalp.
- Make one to three snips per section depending on how much thinning you desire.
- Focus on areas that feel particularly heavy, such as around the ears, nape, and the underneath sections.
- Avoid using thinning shears on the very top surface layers, as this can create frizz or an unfinished appearance.
- The goal is to reduce internal bulk while maintaining the shape and structure of your cut.
- Comb through each section after thinning to distribute the removed hair and assess whether additional thinning is needed.
10. Checking and Adjusting for Balance

Stepping back to evaluate your work from multiple angles allows you to identify any unevenness or areas that need refinement before you consider your cut complete.
This critical assessment phase separates amateur cuts from professional-looking results.
- Use both your wall mirror and handheld mirror to view your hair from the front, sides, and back simultaneously.
- Comb all your hair down naturally without forcing it into any style to see how it falls.
- Check that the face-framing layers are symmetrical by pulling sections from each side forward simultaneously.
- Look for any obvious gaps, chunks, or areas where layers don’t blend smoothly into each other.
- Identify any sections that appear too bulky, too long, or disconnected from the surrounding layers.
- Make small, conservative adjustments by taking thin sections and point-cutting to remove length or add texture.
- It’s better to cut less and reassess than to remove too much hair and create an imbalance.
- Have someone else look at your hair from behind if possible, as an outside perspective can spot issues you might miss.
- Take a break and return to your mirrors with fresh eyes if you’re feeling uncertain about any adjustments.
11. Styling Your New Shag Haircut
Proper styling brings your shag to life and showcases the texture, movement, and dimension you’ve created through your cutting technique. The beauty of a shag is that it looks best with minimal effort and embraces natural texture.
- Allow your hair to air-dry naturally for the most effortless, authentic shag appearance.
- If you prefer using heat tools, blow-dry your hair upside down to maximize volume at the roots.
- Scrunch a small amount of texturizing spray or sea salt spray into damp hair to enhance natural texture.
- Use a diffuser attachment if you have wavy or curly hair to encourage your natural pattern while preventing frizz.
- For straight hair, wrap random sections around a curling iron or wand in alternating directions for piece-y, undone waves.
- Avoid over-brushing your dried hair, as this can eliminate the textured, separated layers you worked to create.
- A light-hold hairspray or texture powder at the roots can add extra lift and grip without looking stiff.
- Run your fingers through your hair rather than using a brush to maintain the lived-in, tousled aesthetic.
- The shag is meant to look slightly imperfect and bedhead-inspired, so embrace the messiness.
12. Common Mistakes to Avoid

Understanding the most frequent pitfalls when cutting a shag at home helps you sidestep these issues before they compromise your results. Learning from others’ mistakes is far less painful than learning from your own.
- Cutting your hair when it’s too wet causes it to appear longer, leading to cutting too much and ending up with a shorter result than intended.
- Using dull or household scissors creates ragged, split ends rather than clean cuts, making your hair look damaged.
- Cutting too much hair at once without proper sectioning leads to uneven layers and an unbalanced overall shape.
- Holding sections at inconsistent angles produces irregular layers that don’t blend smoothly into each other.
- Over-texturizing with thinning shears or point cutting too aggressively creates a stringy, overly thin appearance.
- Failing to cut small, conservative amounts and assess before continuing results in removing more hair than you wanted.
- Not checking your work from multiple angles causes you to miss obvious unevenness until after you’ve finished.
- Attempting to cut your hair when you’re tired, rushed, or emotional increases the likelihood of poor decisions and mistakes.
- Forgetting to maintain consistent dampness throughout the cutting process creates uneven sections.
13. Maintaining Your Shag Between Cuts
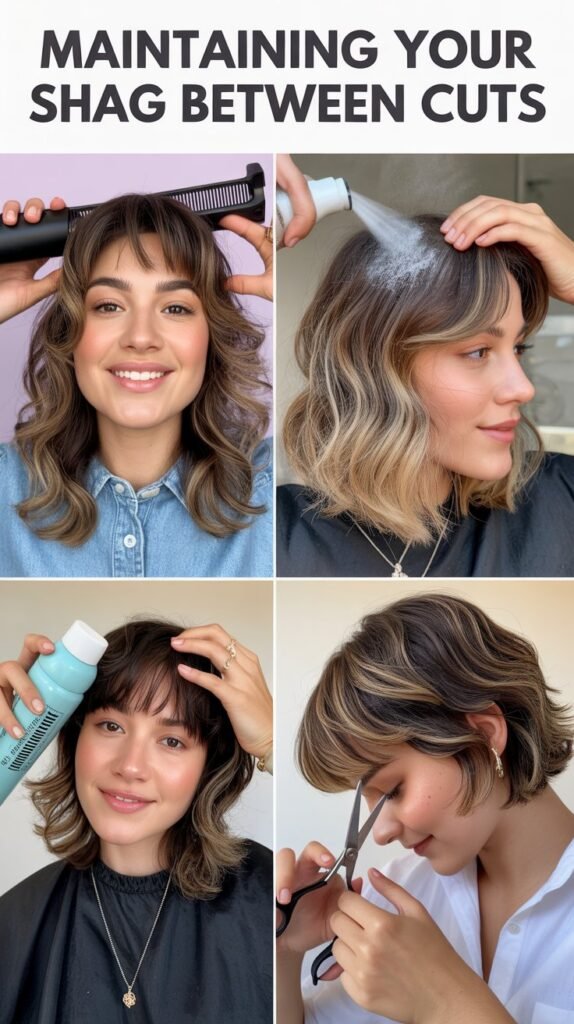
Regular maintenance keeps your shag looking fresh, textured, and intentionally messy rather than genuinely overgrown and shapeless. Learning simple touch-up techniques extends the time between full cuts.
- Trim your face-framing layers every 4-6 weeks to maintain their shape and keep them from falling into your eyes.
- Use your point-cutting technique to remove any split ends or pieces that appear too long without losing overall length.
- Focus maintenance cuts on areas that grow fastest, typically around the face and on the top layers.
- Apply a deep conditioning treatment weekly to keep your textured ends healthy and prevent excessive splitting.
- Use a heat protectant spray before any heat styling to minimize damage that shows more obviously on layered hair.
- Sleep on a silk or satin pillowcase to reduce friction that can create frizz and tangles in your textured layers.
- Refresh your texture between washes using dry shampoo at the roots and texturizing spray on the lengths.
- Schedule a complete reshaping every 8-12 weeks depending on how quickly your hair grows and how precise you want your shape.
14. Customizing Your Shag for Different Hair Types
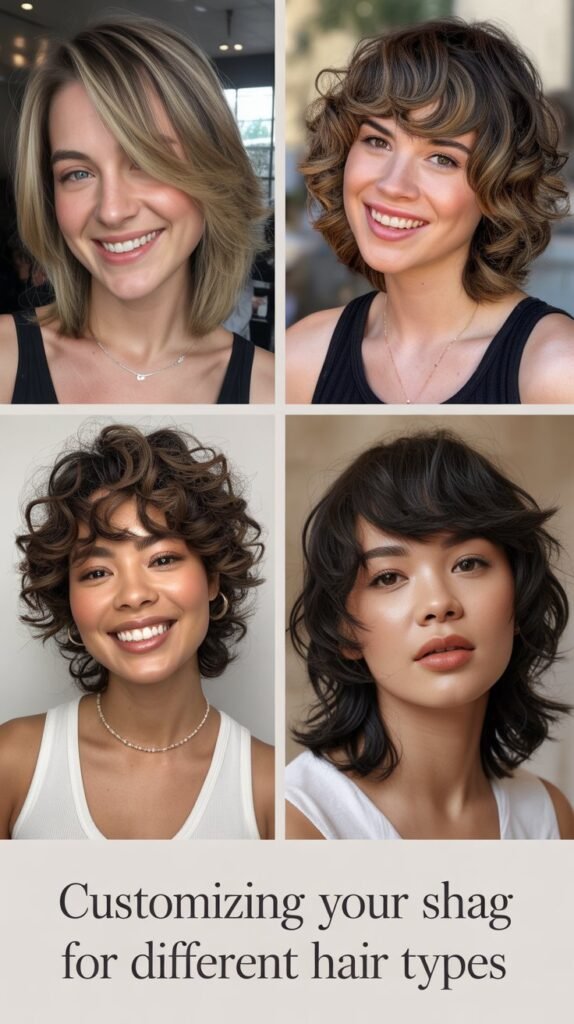
Adapting the basic shag technique to work with your specific hair texture ensures your cut looks natural, flattering, and enhances rather than fights against your hair’s inherent characteristics.
One size definitely does not fit all when it comes to this versatile cut.
For Straight Hair:
- Cut slightly shorter layers to create more dramatic movement since straight hair doesn’t naturally add volume.
- Focus heavily on point cutting and texturizing to prevent a blunt, heavy appearance.
- Consider adding more layers around the crown for lift that straight hair lacks naturally.
For Wavy Hair:
- Wavy hair naturally enhances the shag’s texture, so you may need less aggressive texturizing.
- Cut layers following the natural wave pattern rather than fighting against it.
- Dry-cut any final adjustments after your hair has dried to see how the waves truly fall.
For Curly Hair:
- Cut curly hair when it’s dry so you can see the true length and how each curl spring up.
- Create longer layers than you would on straight hair to account for shrinkage when curls dry.
- Avoid over-thinning, as this can create a pyramid shape and increase frizz in curly textures.
For Thick Hair:
- Use thinning shears more liberally throughout to remove internal bulk without sacrificing shape.
- Create more layers and graduation to prevent a heavy, triangular silhouette.
For Fine Hair:
- Be conservative with thinning shears to maintain density and fullness.
- Focus layers around the face and crown while keeping more length and weight in the underneath sections.
15. When to Consider Professional Help

Knowing your limitations and recognizing when a professional stylist is the better choice saves you from potentially disastrous results that take months to grow out.
Honest self-assessment is a skill that protects your hair and your confidence.
- If you’ve never cut anyone’s hair before, including your own, consider starting with a professional cut you can maintain rather than creating the initial shape yourself.
- Very short shags require more precision and are harder to correct if mistakes happen, making them better suited to professional execution.
- If you have extremely thick, coarse, or difficult-to-manage hair, a stylist’s experience with your texture type ensures better results.
- When you want dramatic changes like going from very long to very short, professional guidance helps you achieve the shape correctly.
- If you’ve made mistakes during your home cut and feel overwhelmed, a stylist can correct and reshape rather than letting you continue cutting.
- Complex color combinations, especially with highlights or balayage, look best when the cut is professionally tailored to complement the color placement.
- Those with very curly or textured hair may benefit from a stylist trained in cutting these specific textures.
- If you experience significant anxiety or lack confidence in your ability, the investment in professional service is worth your peace of mind.
- Use professional cuts as learning opportunities by asking questions and watching techniques you can incorporate into home maintenance.
Conclusion
Mastering How to Cut a Shag Haircut at Home empowers you with the skills, confidence, and creative control to achieve this effortlessly cool style whenever you desire a fresh look.
Throughout this guide, you’ve learned the fundamental techniques that professional stylists use, from strategic sectioning and precise angle cutting to texturizing methods that create that signature choppy, lived-in aesthetic.
While the process requires patience, attention to detail, and quality tools, the reward is a flattering, low-maintenance haircut that saves you money and gives you complete control over your personal style.
Remember that practice improves your technique with each cut, and even small imperfections contribute to the deliberately imperfect nature of the shag.
Whether you’re maintaining a professional cut or creating your entire shag from scratch, the knowledge you’ve gained here provides a solid foundation for hair cutting success. Don’t be afraid to start conservatively, cutting less than you think you need and gradually refining your shape.
With these techniques in your styling arsenal, you’ll never look at your hair the same way again, and you’ll have the freedom to experiment, adjust, and refresh your look on your own schedule, in the comfort of your home.