Have you ever walked out of a salon with perfectly layered hair and wished you could recreate that magic at home? The truth is, achieving salon-quality layers without professional help isn’t just a dream—it’s entirely possible with the right technique and a bit of confidence.
Cutting your own hair might seem intimidating at first, but thousands of people have successfully mastered the art of self-layering and transformed their look from the comfort of their own bathroom.
Whether you’re looking to save money, gain independence from salon appointments, or simply enjoy the creative control over your hairstyle, learning how to get perfect layers through a step-by-step self-cut method can be one of the most empowering beauty skills you’ll ever acquire.
This comprehensive guide will walk you through every single step of the process, from gathering the essential tools to executing precise cutting techniques that deliver professional results.
You’ll discover how to assess your hair type, choose the right layering style for your face shape, section your hair like a pro, and execute cuts with confidence and precision.
By the end of this article on How to Get Perfect Layers: The Step-by-Step Self-Cut Method, you’ll have all the knowledge and practical tips needed to transform your hair into a beautifully layered masterpiece that rivals any salon creation.
1. Understanding Hair Layers and Why They Matter
Before diving into the cutting process, it’s essential to understand what hair layers actually are and why they’ve remained a timeless hairstyle choice for decades.
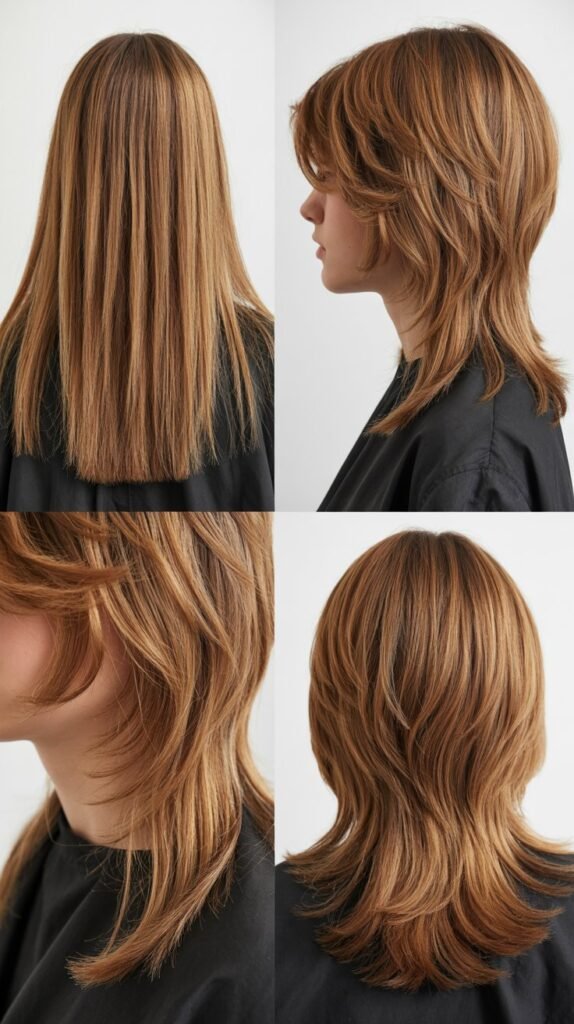
Layers are graduated sections of hair cut at different lengths to create dimension, movement, and shape throughout your hairstyle.
- Layers work by removing weight from specific sections of your hair while maintaining length in others, creating a cascading effect that adds volume and texture.
- The strategic placement of layers can completely transform flat, lifeless hair into a dynamic style with body and bounce.
- Shorter layers near the crown add lift and volume at the roots, while longer layers toward the ends create flowing movement.
- Layers help distribute the weight of thick hair more evenly, preventing that heavy, triangular shape that can weigh down your overall look.
- For fine hair, layers create the illusion of fullness by allowing different sections to fall at varying heights and catch light differently.
- Face-framing layers can soften angular features, highlight your best facial attributes, and create a more flattering silhouette.
- Layers reduce bulk without sacrificing overall length, making them ideal for people who want to keep long hair but need more manageability.
- The versatility of layered hair means you can style it straight for a sleek look or curled for added drama and dimension.
- Understanding the difference between short layers, medium layers, and long layers helps you choose the right approach for your desired outcome.
- Properly executed layers should blend seamlessly from one section to the next, creating a cohesive look rather than choppy, disconnected pieces.
2. Essential Tools You’ll Need for Self-Cutting
Having the right tools is absolutely critical to achieving professional-looking layers at home.
Using household scissors or inadequate equipment will lead to frustration and disappointing results.
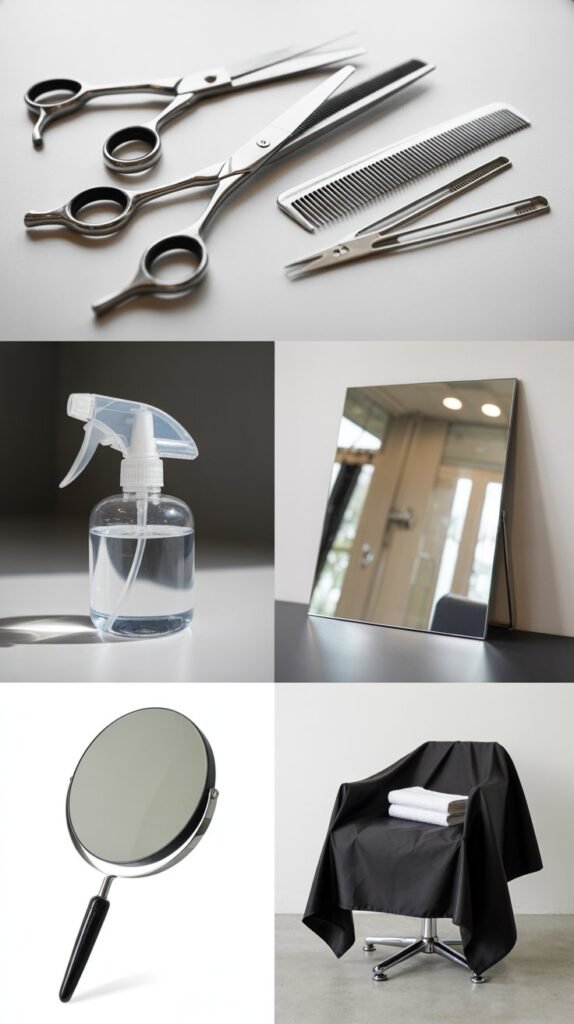
- Professional haircutting shears are the single most important investment you’ll make, as regular scissors create uneven, damaged edges that fray and split.
- Look for scissors between 5.5 to 6.5 inches in length with sharp, beveled edges specifically designed for cutting hair rather than paper or fabric.
- A fine-tooth comb helps create clean sections and allows you to comb through hair smoothly before each cut for precision.
- Multiple sectioning clips or hair clamps keep separated portions of hair secure while you work on specific areas.
- A spray bottle filled with clean water keeps hair damp throughout the cutting process, which is essential for accuracy and control.
- Two mirrors—one large wall-mounted mirror and one handheld mirror—allow you to see the back and sides of your head clearly.
- A hair cutting cape or large towel draped around your shoulders protects your clothing and makes cleanup significantly easier.
- Good lighting is essential, so position yourself near a window or under bright overhead lights to see every strand clearly.
- A rattail comb with a pointed end helps create precise parts and sections, especially when dividing hair into quadrants.
- Hair elastics or scrunchies temporarily secure sections you’re not currently working on, preventing them from interfering with your cuts.
- A neck brush or small cleaning brush helps remove cut hair from your neck and shoulders throughout the process.
- Consider having a hair cutting guide or reference image nearby to remind you of your target style during the cutting process.
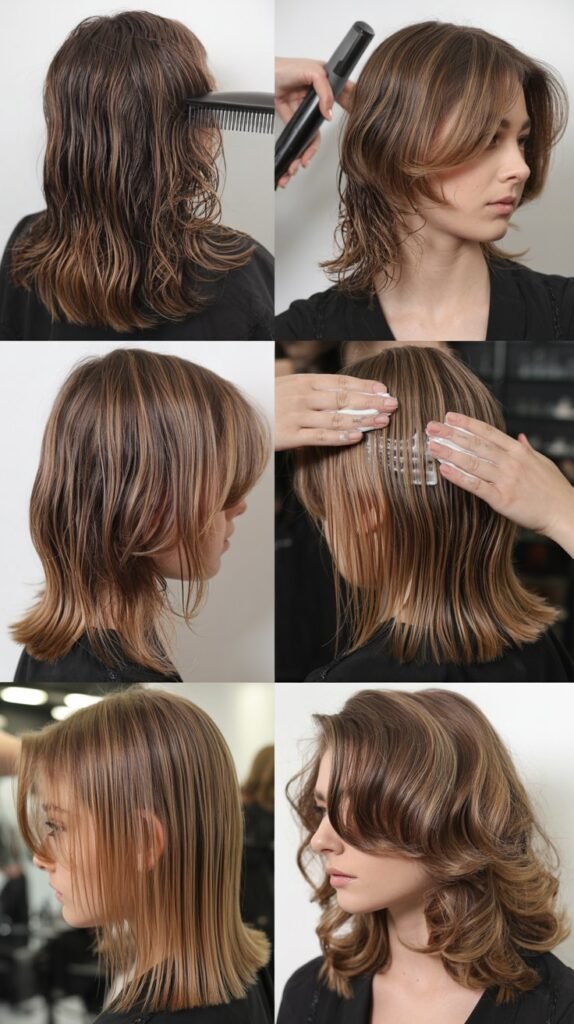
3. Preparing Your Hair Before Cutting
Proper preparation sets the foundation for a successful self-cut and ensures your layers turn out exactly as intended.
Skipping preparation steps often leads to uneven results and regrettable mistakes.
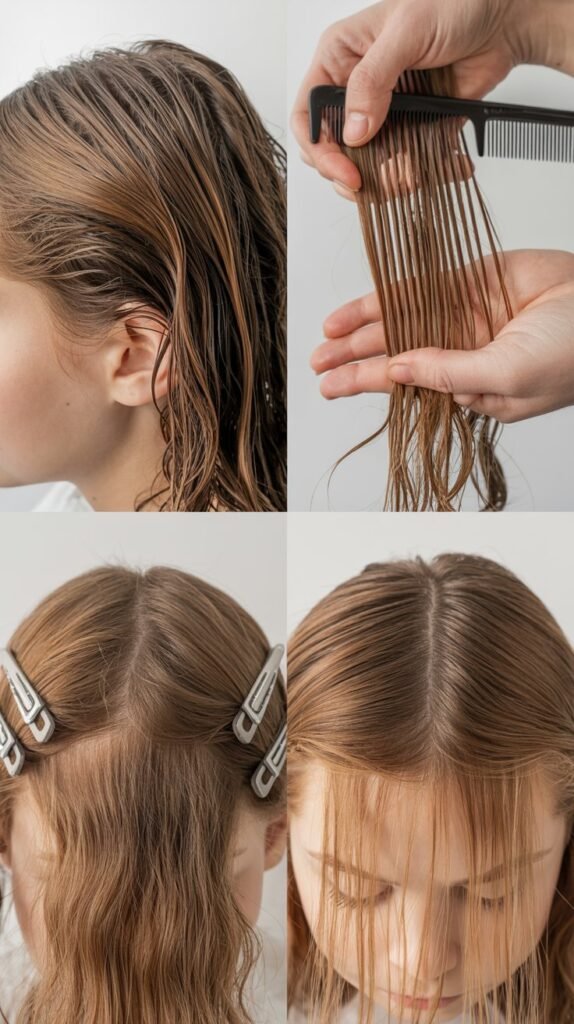
- Start with freshly washed and conditioned hair that’s free from product buildup, oil, and tangles that could interfere with cutting accuracy.
- Use a moisturizing conditioner to ensure your hair is smooth and manageable, making it easier to section and cut evenly.
- Towel-dry your hair until it’s damp but not dripping wet, as overly saturated hair is difficult to control and can lead to cutting more than intended.
- Detangle thoroughly using a wide-tooth comb, starting from the ends and working your way up to the roots to prevent breakage.
- Check for any existing damage, split ends, or uneven areas that need extra attention during your layering process.
- If your hair tends to shrink significantly when dry, account for this by cutting slightly longer than your target length.
- Straighten curly or wavy hair before cutting if you want to see the true length and create more predictable layers.
- Part your hair the way you typically wear it so layers fall naturally around your face and complement your usual styling routine.
- Remove any hair accessories, jewelry, or clothing that might interfere with your cutting movements or get in the way.
- Set up your cutting station in a well-lit bathroom or area where you have easy access to mirrors, water, and all your tools.
- Do a final check in the mirror to ensure you’re comfortable with your starting point before making any cuts.
4. Face Shape Analysis for Optimal Layer Placement
Understanding your face shape is crucial for determining where to place layers for the most flattering results.
Different face shapes benefit from strategically positioned layers that balance proportions and highlight your best features.
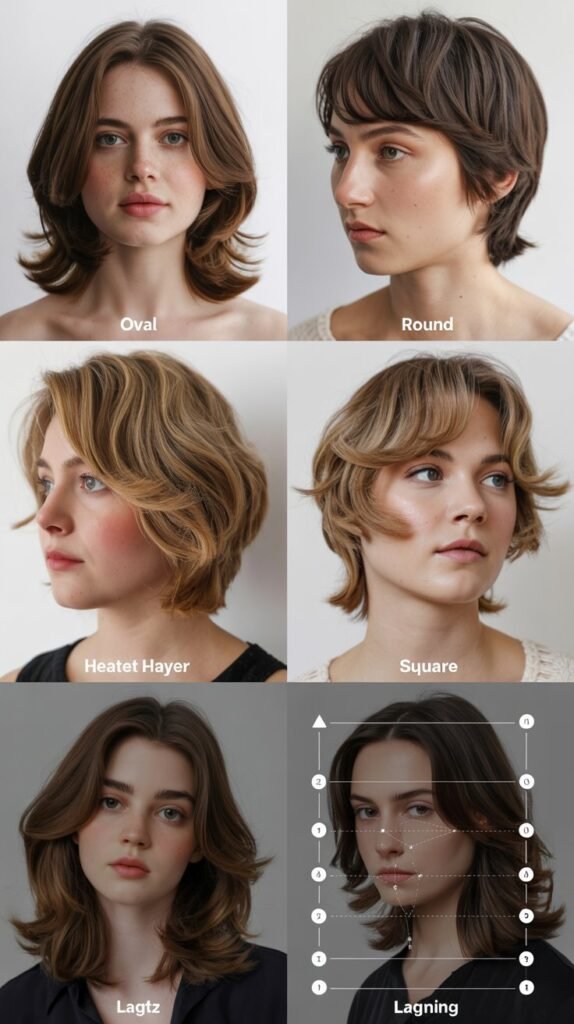
- Oval faces are considered the most versatile shape and can pull off virtually any layering style from short to long.
- Round faces benefit most from layers that start below the chin line, as this creates the illusion of length and elongates the face.
- Square faces need softening around the angular jawline, which can be achieved with wispy, textured layers that create movement.
- Heart-shaped faces look best with layers that add volume around the chin area to balance a wider forehead and create proportion.
- Long or rectangular faces need horizontal layers around the cheekbones and chin to add width and break up the vertical length.
- Diamond-shaped faces should focus layers around the cheekbones to emphasize this striking feature while softening the narrow forehead.
- Consider your hair texture alongside your face shape, as thick hair may need more substantial layers while fine hair needs lighter, more strategic cutting.
- Take measurements of your face by comparing the width of your forehead, cheekbones, and jawline to accurately determine your shape.
- Face-framing layers that curve around your features are universally flattering and work well regardless of specific face shape.
- Your natural hair part also influences how layers should be cut, as a center part distributes layers differently than a deep side part.
5. The Classic Ponytail Method for Basic Layers
The ponytail method is one of the simplest and most popular techniques for creating layers at home, particularly for those attempting self-cutting for the first time.
This approach creates uniform layers throughout the hair with minimal complexity.
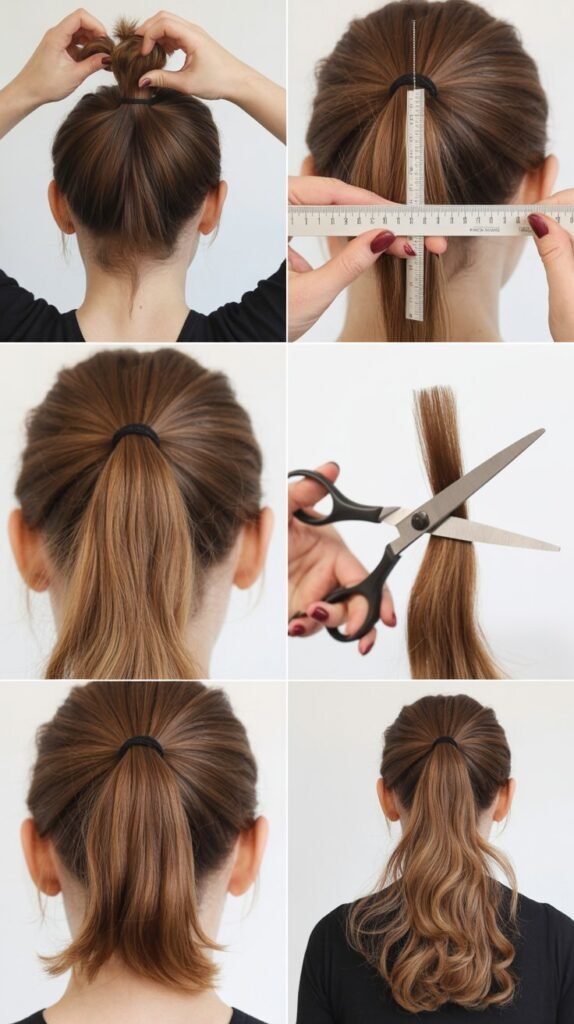
- Flip your head upside down and brush all your hair forward toward your forehead, gathering every strand into one high ponytail at the top of your head.
- Position the ponytail directly at the center of your crown, ensuring it’s perfectly aligned and secure with a hair elastic.
- Slide the elastic down the length of the ponytail to the point where you want your shortest layer to end.
- Hold the ponytail straight up perpendicular to your head, keeping tension consistent throughout the entire length.
- Use your fingers to slide down the ponytail and position them just below the elastic at your desired cutting point.
- Cut straight across the ponytail with sharp shears, making clean, decisive cuts rather than sawing back and forth.
- For a softer, more blended effect, angle your scissors slightly upward as you cut rather than cutting perfectly horizontal.
- Remove the elastic carefully and shake your head to allow the hair to fall naturally and reveal your new layers.
- The higher the ponytail placement, the more dramatic the layers will be, while a lower ponytail creates subtler, more gradual layers.
- This method works best for those wanting relatively uniform layers throughout rather than customized layers in specific areas.
- If you have very long hair, you may want to make several smaller cuts rather than one large cut to maintain control and precision.
- For added texture, you can point-cut into the ends after releasing the ponytail, creating softer, less blunt edges.
6. The Unicorn Cut for Face-Framing Layers
The unicorn cut method creates stunning face-framing layers with minimal effort and has become increasingly popular on social media for its dramatic yet manageable results.
This technique focuses layers around the front of your face while maintaining length in the back.
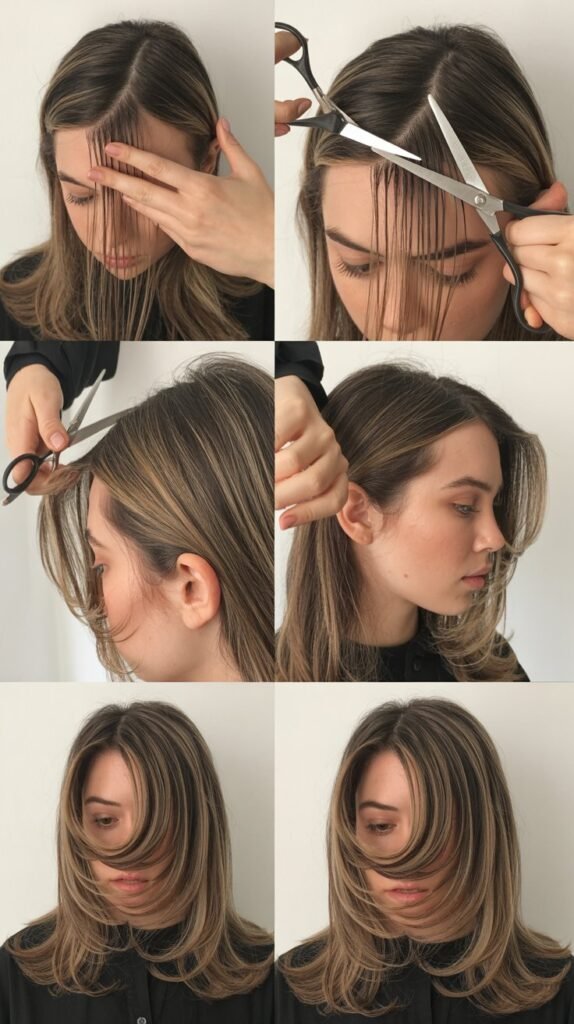
- Flip your head upside down and gather all of your hair into a ponytail positioned directly in front of your face, centered at your forehead.
- The ponytail should be positioned above your nose or between your eyebrows, depending on how dramatic you want the layers.
- Secure the hair tightly with an elastic, making sure every section is incorporated smoothly without bumps or uneven tension.
- Bring your head back to an upright position while holding the ponytail stretched out in front of your face.
- Determine the length of your shortest layer by measuring where you want the front pieces to fall around your face.
- Cut straight across the ponytail at your chosen length, keeping the scissors perpendicular to the hair for an even cut.
- For a more blended look, you can angle the scissors slightly or use point-cutting technique to soften the edges.
- Release the ponytail and shake your head to see how the layers fall naturally around your face and through the crown.
- This method automatically creates shorter layers at the front and gradually longer layers toward the back of your head.
- The unicorn cut works exceptionally well for those wanting curtain bangs or soft framing pieces without drastically changing overall length.
- You can adjust the intensity of the layers by changing the position of the ponytail—higher placement creates more dramatic layers.
- After the initial cut, you can refine individual sections by taking small pieces and point-cutting for additional texture.
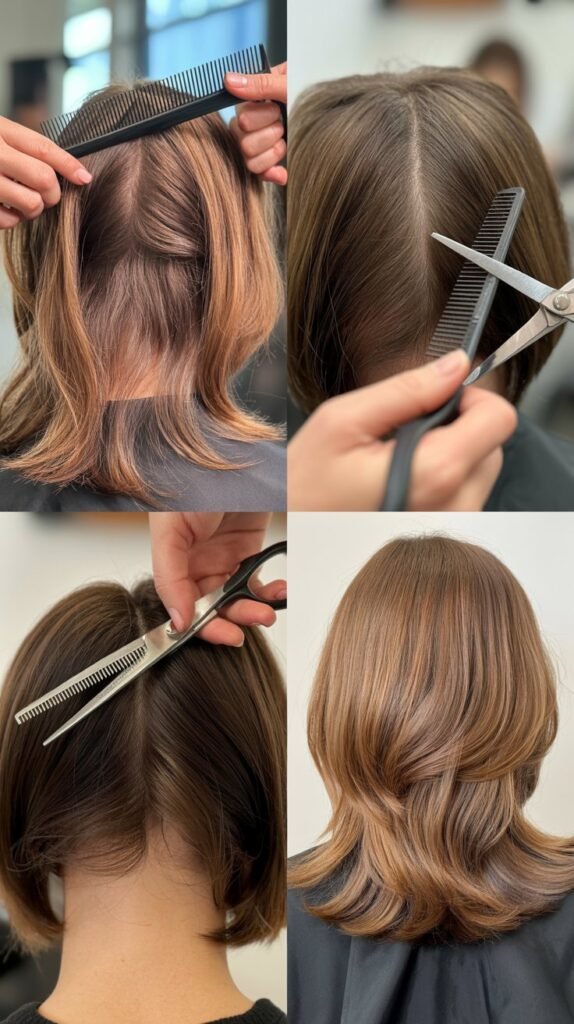
7. Sectioning Techniques for Advanced Layering
For more controlled and customized layers, proper sectioning allows you to work methodically through different areas of your head.
Advanced sectioning gives you professional-level precision and the ability to create exactly the layer pattern you envision.
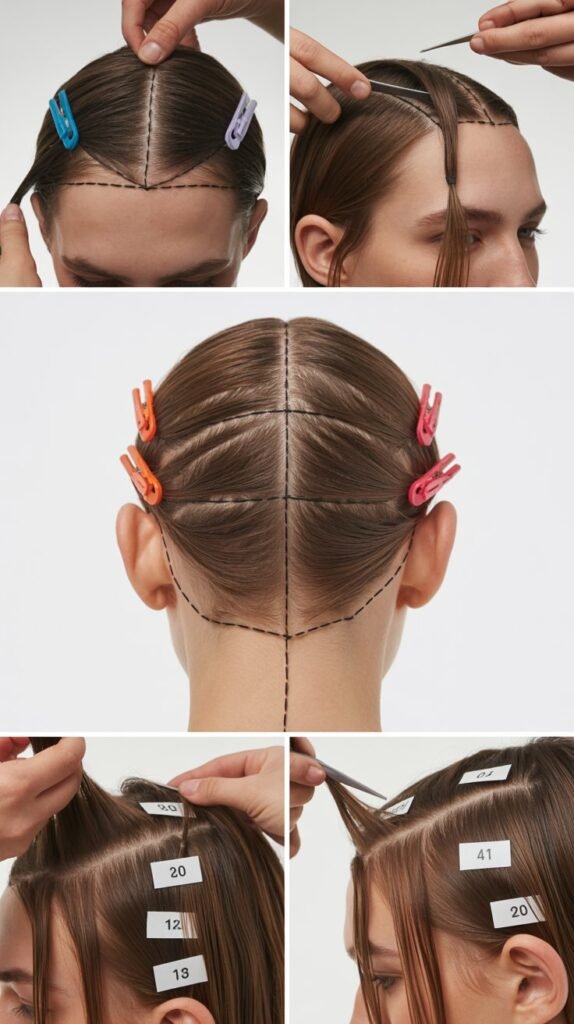
- Begin by creating a center part from your forehead all the way back to the nape of your neck, dividing hair into left and right halves.
- Create a horizontal section from ear to ear across the top of your head, separating the crown area from the lower sections.
- You should now have four main quadrants: top left, top right, bottom left, and bottom right sections.
- Secure each quadrant with a large clip, ensuring the hair is smooth and the sections are clearly defined with clean parts.
- When ready to cut, release one section at a time while keeping the others clipped securely out of the way.
- Within each quadrant, take horizontal subsections about half an inch to one inch thick, working from bottom to top.
- The thickness of your subsections matters—thinner sections provide more precision, while thicker sections work faster but with less control.
- For face-framing layers, create diagonal sections that angle from the ear forward toward the chin on both sides.
- Always comb each subsection smooth before cutting to ensure there are no tangles or uneven areas that could affect accuracy.
- Work systematically through each section in the same order every time to maintain consistency and avoid missing areas.
- As you complete each subsection, clip it back or secure it to keep it separate from uncut hair below.
- Take before photos of your sectioning pattern so you can replicate the same technique in future self-cuts for consistent results.
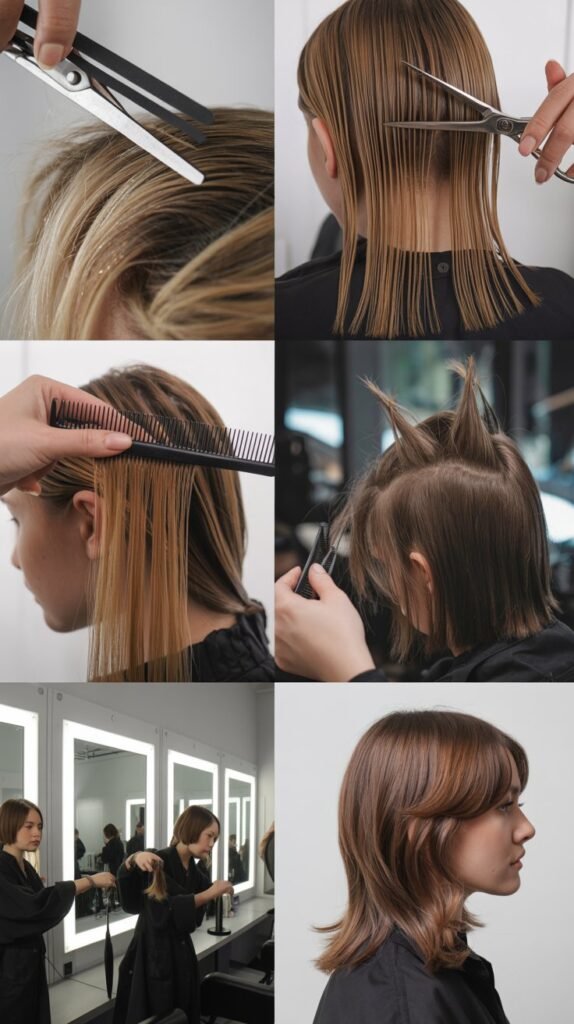
8. The Slide-Cutting Technique for Seamless Blending
Slide-cutting, also called slithering, creates beautifully blended layers without harsh lines or obvious demarcation between different lengths.
This professional technique requires practice but delivers superior results compared to blunt cutting.
- Hold a small section of hair between your fingers at the desired cutting length, keeping steady tension throughout the strand.
- Position your scissors at approximately a 45-degree angle along the hair shaft rather than perpendicular to it.
- Open the scissors partially and gently slide them down the length of the hair while making small cutting motions.
- The sliding motion should be smooth and continuous, removing small amounts of hair as the scissors travel down the shaft.
- This technique removes bulk and creates texture while maintaining length, resulting in softer, more natural-looking layers.
- Slide-cutting works best on damp but not soaking wet hair, as the scissors need to glide smoothly without snagging.
- Apply minimal pressure as you slide—the scissors should move effortlessly through the hair without forcing or pulling.
- Work in thin sections no thicker than a pencil for the most control and the best blending results.
- This method is particularly effective for thick hair that needs thinning without losing overall shape or style.
- You can use slide-cutting throughout the hair or just on the ends to soften blunt lines from previous cuts.
- Be conservative with slide-cutting at first, as it’s easier to do more than to undo excessive thinning.
- Slide-cutting is ideal for creating that “lived-in” look where layers appear naturally grown out rather than freshly cut.
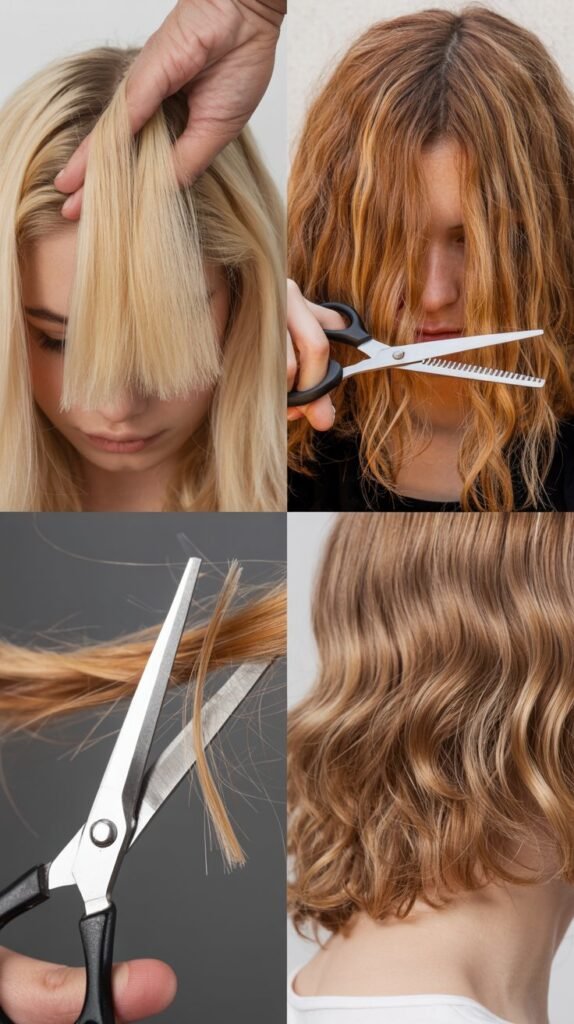
9. Point-Cutting for Textured, Natural-Looking Ends
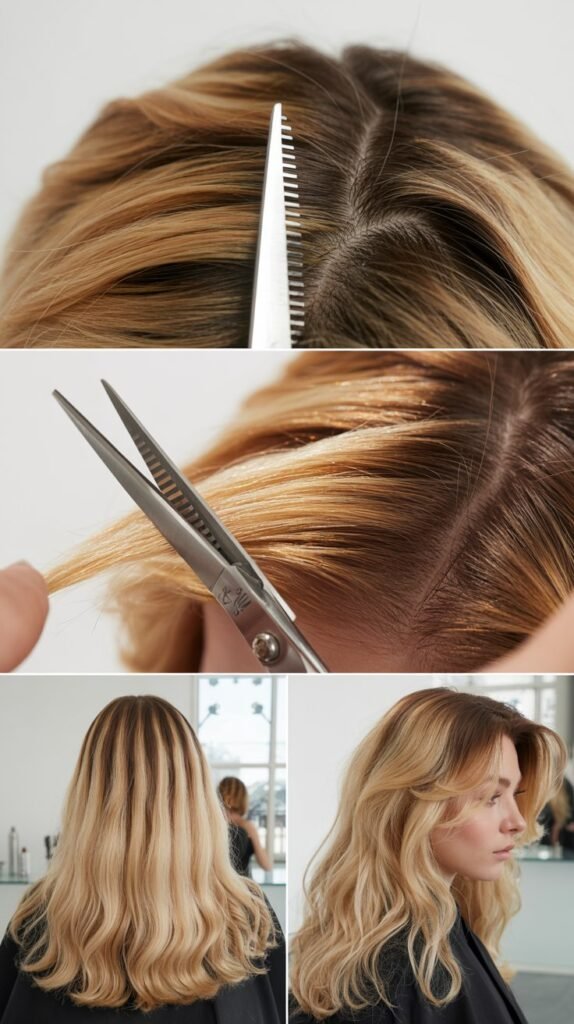
Point-cutting is an essential finishing technique that creates soft, textured ends instead of blunt, harsh lines.
This method gives layers a more natural, professionally styled appearance that moves beautifully.
- Point-cutting involves holding your scissors vertically and cutting into the ends of the hair rather than straight across.
- Hold a small section of hair taut between your fingers, positioning your fingers where you want the final length to be.
- Point the tips of your scissors directly into the ends of the hair at varying depths, creating a zigzag pattern along the edge.
- Make quick, confident snips rather than hesitant tiny cuts, moving across the entire section systematically.
- The depth of your point cuts determines how much texture you create—deeper cuts produce more dramatic texture, while shallow cuts create subtlety.
- Point-cutting removes weight from the ends without significantly changing length, making hair appear lighter and move more freely.
- This technique is perfect for softening layers after making your initial length cuts with a different method.
- Point-cutting works exceptionally well on fine to medium hair, though it should be used more sparingly on already thin or fragile hair.
- The randomness of point-cutting creates natural variation that mimics how hair naturally breaks and tapers at the ends.
- You can use point-cutting on every layer or just on the outermost visible layers for a more polished, finished appearance.
- Always point-cut on dry or nearly dry hair for the most accurate results, as wet hair behaves differently when cut.
- Work through each section methodically, maintaining consistency in your cutting depth to avoid some areas looking choppy while others remain blunt.
10. Creating Long Layers for Subtle Dimension
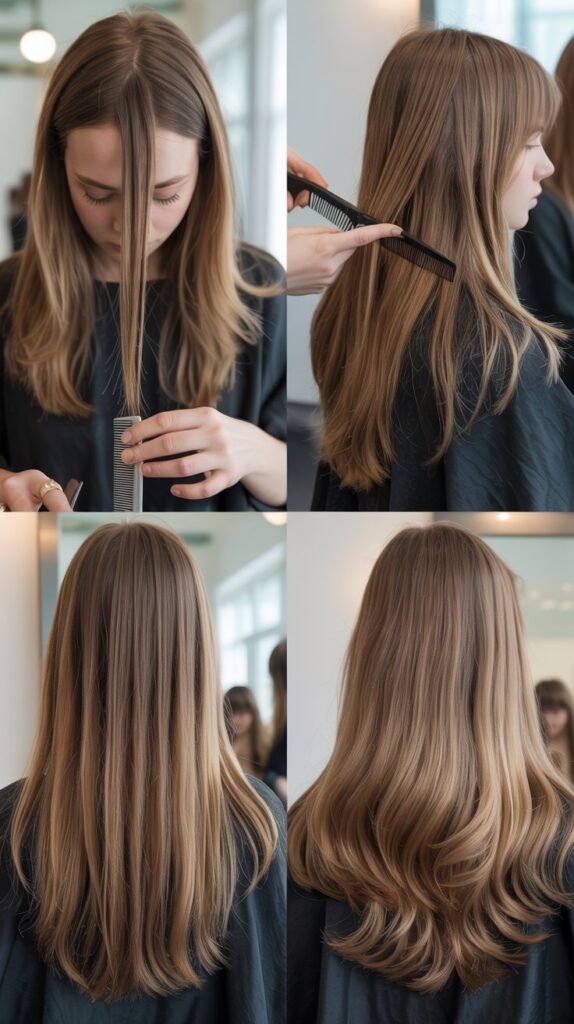
Long layers provide movement and dimension without dramatically altering the overall length of your hair.
This conservative approach is ideal for those new to self-cutting or anyone wanting to maintain length while adding interest.
- Long layers typically begin about three to four inches from the ends of your hair, creating very subtle graduation.
- This style is perfect for thick, heavy hair that needs some weight removed without sacrificing the impression of full, long hair.
- Section your hair into your preferred quadrants and work with the bottom sections first before moving to upper sections.
- Take a horizontal section about one inch thick and comb it completely smooth with no tangles or bumps.
- Hold the section out from your head at a 90-degree angle and determine where you want the shortest point of that layer.
- Cut the section at a slight angle so the hair gradually gets longer as you move from the interior to the exterior of the section.
- Use your previous section as a guide, pulling down a small portion of the already-cut hair along with the new section to ensure consistency.
- The angle of graduation should be very subtle with long layers—a difference of only one to two inches between the shortest and longest points.
- Long layers are forgiving because they don’t create dramatic changes, making them ideal for building confidence in self-cutting skills.
- This technique maintains a relatively uniform silhouette while adding movement that becomes visible when hair is in motion or styled in waves.
- Long layers work beautifully on straight, wavy, and loose curly hair textures, though very tight curls may not show the layering as clearly.
- After completing all sections, check your work by running your fingers through your hair and feeling for any uneven areas that need refinement.
11. Medium Layers for Balanced Volume and Movement
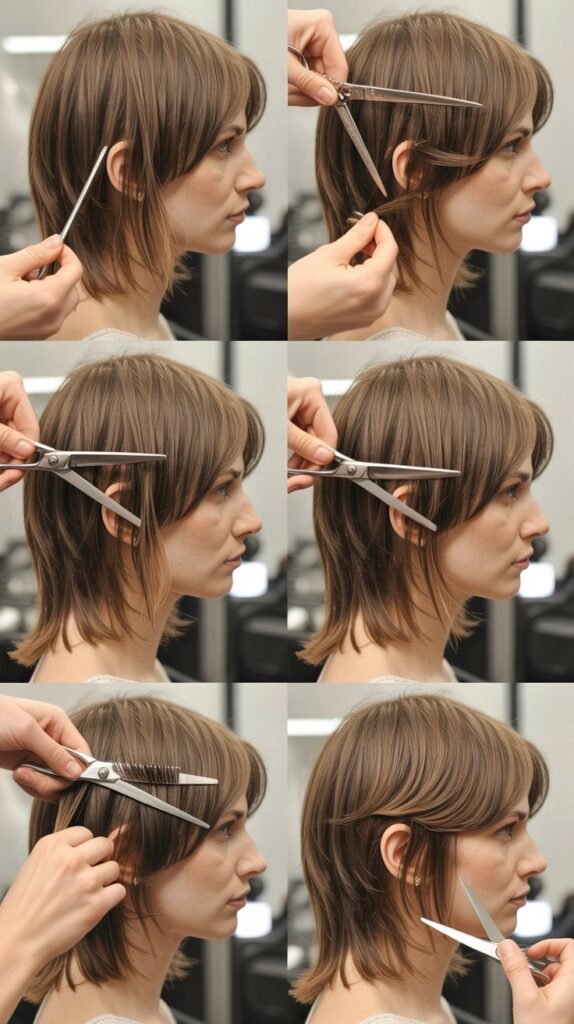
Medium layers strike the perfect balance between subtle long layers and dramatic short layers, providing significant movement while maintaining substantial length.
This versatile style works across virtually all hair types and face shapes.
- Medium layers typically begin somewhere between the chin and collarbone, creating visible dimension without extreme graduation.
- This layering style adds substantial volume to flat hair and removes enough weight from thick hair to make it more manageable.
- Start by sectioning your hair into quadrants and focusing on one section at a time for the most organized approach.
- Within each section, take horizontal subsections and use your previous layer as a guide for consistency.
- Pull each subsection out at a 90-degree angle from your head and cut at a slight elevation to create the graduated effect.
- The layers should gradually increase in length as you work from the top of your head down to the bottom sections.
- Medium layers create the ideal canvas for various styling options, from sleek and straight to voluminous curls and waves.
- Pay special attention to the front sections, as these face-framing pieces are the most visible and have the biggest impact on your overall appearance.
- Check your work frequently by releasing all sections and seeing how the layers blend together in their natural fall.
- Medium layers should create a visible cascading effect where you can clearly distinguish between different length sections.
- This style reduces the weight of heavy hair while distributing volume more evenly from roots to ends.
- If you’re transitioning from one length or from long layers, medium layers provide a noticeable change without shocking transformation.
12. Short Layers for Maximum Volume and Texture
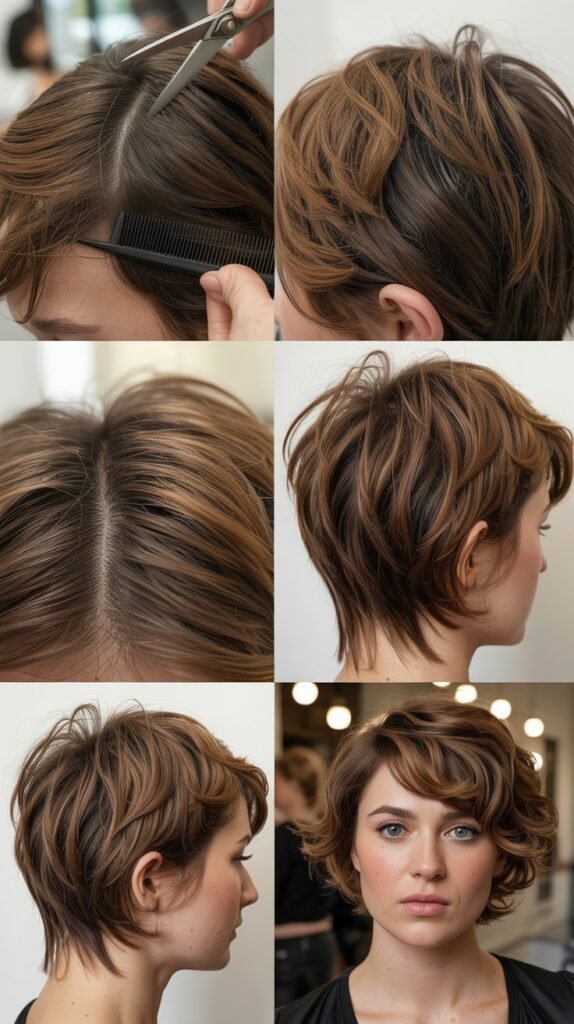
Short layers create the most dramatic effect, with significant graduation between the shortest and longest sections.
This bold choice delivers maximum volume, movement, and styling versatility but requires more maintenance and precision.
- Short layers begin anywhere from the crown to the ears, creating substantial differences in length throughout your hair.
- This style is particularly effective for adding volume to fine or thin hair that appears flat and lifeless with single-length cuts.
- Precise sectioning becomes even more critical with short layers, as mistakes are more visible with dramatic graduation.
- Begin with the bottom sections and establish your longest length before moving to upper sections where layers get progressively shorter.
- Pull sections out at varying elevations from your head—higher elevations create shorter layers with more lift at the roots.
- Use your shears to cut at a slight upward angle rather than straight across to avoid creating a stacked or choppy appearance.
- Short layers require more frequent trims to maintain the shape, typically every six to eight weeks compared to longer styles.
- The dramatic nature of short layers means they’re more visible and have a bigger impact on your overall silhouette and style.
- Face-framing short layers around the face should be customized to your features, typically starting at the cheekbones or just below.
- Short layers work exceptionally well with textured styling techniques like curling, scrunching, or using volumizing products.
- Be conservative when first attempting short layers—you can always cut more hair, but you cannot put it back once it’s gone.
- This style requires confidence and commitment, as growing out short layers can take considerable time if you decide you prefer longer hair.
13. Correcting Mistakes and Fixing Uneven Layers
Even experienced stylists occasionally make cutting errors, so knowing how to correct mistakes is an essential skill for anyone cutting their own hair.
Most minor issues can be fixed without professional intervention.
- The most common mistake is cutting one section shorter than intended, which creates an obvious unevenness when hair is styled.
- To fix uneven layers, identify the shortest unwanted section and use it as your new guide, carefully adjusting surrounding sections to match.
- Never try to fix mistakes by drastically cutting more hair—instead, work incrementally and check your progress frequently.
- Point-cutting into the ends of uneven areas can help blend mistakes and make them less noticeable until hair grows out.
- If one side is shorter than the other, resist the urge to match them by cutting the longer side—instead, use styling techniques to camouflage differences.
- Slide-cutting through uneven sections can remove small amounts of length while adding texture that disguises the mistake.
- When layers are too choppy or disconnected, take small vertical sections and slightly trim to create better blending between lengths.
- If you’ve cut too much length overall, embrace the shorter style and focus on styling it well while waiting for regrowth.
- Deep conditioning treatments and styling products can improve the appearance of damaged or poorly cut ends while you correct issues.
- Sometimes the best solution is strategic styling—curls, waves, and textured styling hide minor cutting imperfections better than straight styles.
- Learn from each mistake by identifying what went wrong in your technique, whether it was poor sectioning, inconsistent elevation, or cutting too much at once.
- If mistakes are severe or you’re unable to correct them yourself, consult a professional stylist who can salvage your cut while teaching you where you went wrong.
14. Styling and Maintaining Your New Layers
Creating beautiful layers is only half the process—styling and maintaining them properly ensures they continue looking salon-fresh between cuts.
Different styling approaches can dramatically change how your layers appear and perform.
- Blow-drying layers with a round brush adds volume and shapes the layers to create the most polished, styled appearance.
- Start with a heat protectant spray applied throughout damp hair to prevent damage from heat styling tools.
- Section hair while blow-drying, working from bottom layers to top layers for the most efficient and effective drying process.
- Direct the nozzle of your blow dryer downward along the hair shaft to smooth the cuticle and create shine.
- Use a medium-sized round brush to curl the ends of each layer under or flip them out, depending on your desired style.
- Curling or waving layered hair enhances the dimension and makes the different lengths more visible and dynamic.
- Apply styling products strategically—lighter products on fine hair to avoid weighing down layers, and heavier products on thick hair for control.
- Texturizing sprays or dry shampoos add grip and definition to layers, making them appear more piece-y and deliberately styled.
- Regular trims every eight to twelve weeks maintain the shape of your layers and prevent them from growing out unevenly.
- Sleep on silk or satin pillowcases to reduce friction that can cause tangling and disrupt the layer pattern overnight.
- Use hair masks and deep conditioning treatments regularly to keep layer ends healthy, as they’re more prone to damage and splitting.
- Experiment with different styling tools and techniques to discover which methods make your specific layer pattern look its absolute best.
15. Common Mistakes to Avoid When Self-Cutting Layers
Understanding potential pitfalls before you begin cutting helps you avoid frustrating results and disappointing outcomes.
Learning from others’ mistakes is always preferable to learning from your own.
- Cutting too much hair at once is the most common and most regrettable mistake—always err on the side of cutting less than you think you need.
- Using dull or inappropriate scissors creates raggedy, damaged ends that won’t style well and will require corrective cutting.
- Attempting to cut layers on completely dry hair makes it difficult to see the true cutting line and often results in uneven lengths.
- Conversely, cutting soaking wet hair can be misleading since hair shrinks as it dries, especially curly and wavy textures.
- Rushing through the process without taking time for proper preparation, sectioning, and careful cutting leads to sloppy results.
- Cutting while distracted, tired, or in poor lighting almost always results in mistakes you’ll notice and regret later.
- Failing to use a guide or reference point from section to section creates disconnected layers that don’t blend smoothly.
- Cutting at inconsistent elevations throughout your head produces an unbalanced look with some areas too layered and others too heavy.
- Ignoring your hair’s natural texture and growth patterns when deciding on layer placement results in styles that fight against your hair’s nature.
- Comparing your home results to professional salon work and expecting perfection on your first attempt sets you up for disappointment.
- Attempting advanced techniques before mastering basic methods increases the likelihood of significant mistakes that are difficult to correct.
- Not investing in proper tools to save money ultimately costs more when you need professional correction of self-cutting disasters.
16. Advanced Tips for Professional-Looking Results
Once you’ve mastered basic layering techniques, these advanced tips will elevate your self-cutting skills to create truly professional-quality results.
Small refinements make significant differences in the final appearance.
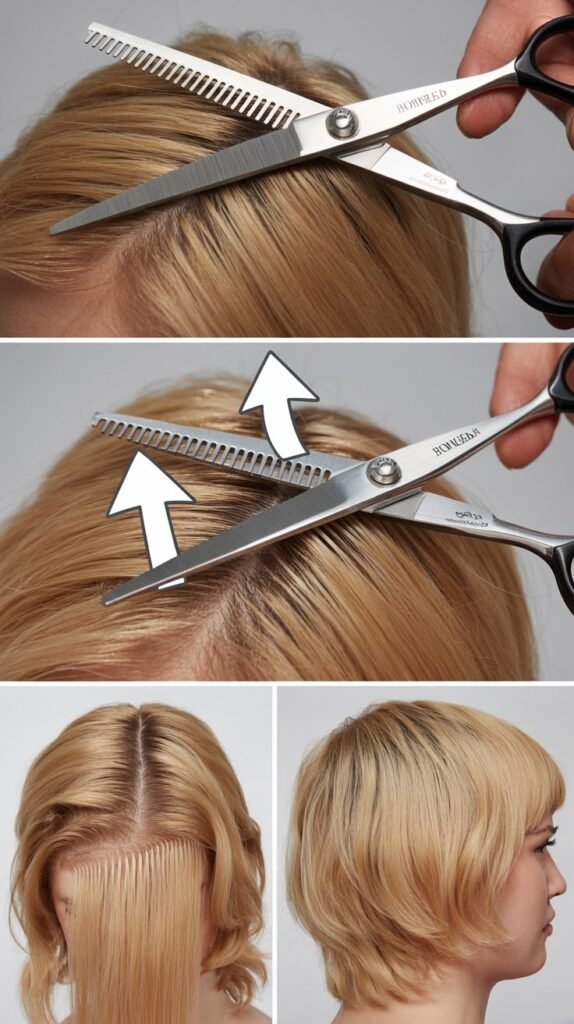
- Invest in thinning shears for removing bulk from thick hair without creating obvious shorter layers or losing overall length.
- Use thinning shears only on the bottom third of each section and never too close to the roots where the effect would be obvious.
- Create a cutting plan before you begin, mapping out where each layer will start and end based on your face shape and hair texture.
- Take progress photos throughout the cutting process so you can refer back to successful techniques for future self-cuts.
- Cut slightly longer than your target length to account for hair springing up when it dries, especially with wavy and curly textures.
- Work in natural daylight whenever possible, as artificial lighting can create shadows that hide uneven sections or cutting errors.
- Use the “twist and snip” method on face-framing layers—twist small sections and cut at an angle for soft, blended front pieces.
- Check symmetry constantly by bringing sections from both sides of your head together at the center to ensure they match in length.
- Develop a systematic approach and follow the same order of operations each time you cut for consistency in results.
- Allow hair to air-dry partially between major cutting stages so you can see how it’s actually falling and adjust your approach accordingly.
- Use a razor tool sparingly and only on the very ends of layers to create additional texture and soften blunt lines.
- Learn to read your hair’s natural growth patterns and work with them rather than against them when planning layer placement.
17. When to Seek Professional Help
Despite your best efforts and growing skills, certain situations warrant consulting a professional hairstylist rather than attempting corrections or advanced techniques at home.
Knowing your limitations protects your hair and prevents costly mistakes.
- If you’ve made a significant cutting mistake that you’re unable to correct through blending or styling techniques, a professional can salvage your look.
- Extremely damaged hair with excessive breakage, chemical damage, or severe split ends requires professional assessment and potentially a corrective cut.
- Very curly, coily, or textured hair often benefits from professional cutting by someone experienced in cutting curls when dry and in their natural state.
- Dramatic style changes from long to short or from single-length to heavily layered are better executed by professionals who can visualize the final result.
- If you’re experiencing significant hair loss or thinning, a professional can recommend cutting strategies that maximize the appearance of fullness.
- Complex techniques like face-framing bangs combined with layers require precision that’s difficult to achieve when you cannot see the front of your own head clearly.
- When preparing for an important event like a wedding or professional photos, professional cutting ensures you’ll feel confident about your appearance.
- If multiple self-cutting attempts haven’t achieved your desired look, professional guidance can identify what’s going wrong in your technique.
- Very thick or very fine hair presents unique challenges that professionals have specialized training to manage effectively.
- Transitioning from color-treated to natural hair often requires strategic layering that considers where color and natural growth meet.
- Use professional appointments as learning opportunities—watch what your stylist does and ask questions about techniques you can replicate at home.
- Building a relationship with a trusted stylist means you have someone to consult when you’re unsure about self-cutting decisions or need corrective work.
Conclusion
Mastering How to Get Perfect Layers: The Step-by-Step Self-Cut Method empowers you with the skills, knowledge, and confidence to take control of your hair styling journey.
Throughout this comprehensive guide, you’ve discovered the fundamental principles of understanding hair layers and why they transform your look, learned which essential tools make the difference between amateur and professional results, and explored multiple cutting techniques from simple ponytail methods to advanced sectioning and texturizing approaches.
You’ve gained insights into customizing layers for your unique face shape, discovered how to correct mistakes without panic, and learned the styling techniques that keep your layers looking fresh and dimensional between cuts.
The journey to perfect self-cut layers requires patience, practice, and a willingness to learn from each experience, but the rewards extend far beyond saving money on salon visits.
You’ve gained independence, creative control, and a deep understanding of how your hair works and what makes it look its best.
Remember that even professional stylists spent years perfecting their craft, so approach your self-cutting journey with realistic expectations and celebrate your progress along the way.
Whether you choose to handle all your hair cutting needs yourself or use these skills to maintain your style between professional appointments, the confidence and capability you’ve developed will serve you for a lifetime.