Have you ever walked out of a salon with perfectly layered hair and wished you could recreate that magic at home? Learning to cut your own layers isn’t just about saving money—
it’s about gaining the confidence and freedom to maintain your hairstyle whenever inspiration strikes.
Whether you’re a busy professional who can’t always make salon appointments, a creative spirit who loves experimenting with new looks, or simply someone looking to master a valuable skill, cutting your own layers at home is entirely achievable with the right guidance.
This comprehensive guide will walk you through everything you need to know, from selecting the proper tools and preparing your hair to mastering various layering techniques for different hair types and lengths.
You’ll discover professional secrets that stylists use, learn how to avoid common mistakes that could compromise your results, and gain the knowledge to maintain your layers between cuts.
By the end of The Ultimate Guide to Cutting Your Own Layers at Home, you’ll have the skills and confidence to transform your hair from flat and lifeless to dimensional and beautifully textured, all from the comfort of your own bathroom.
1. Understanding Hair Layers and Why They Matter
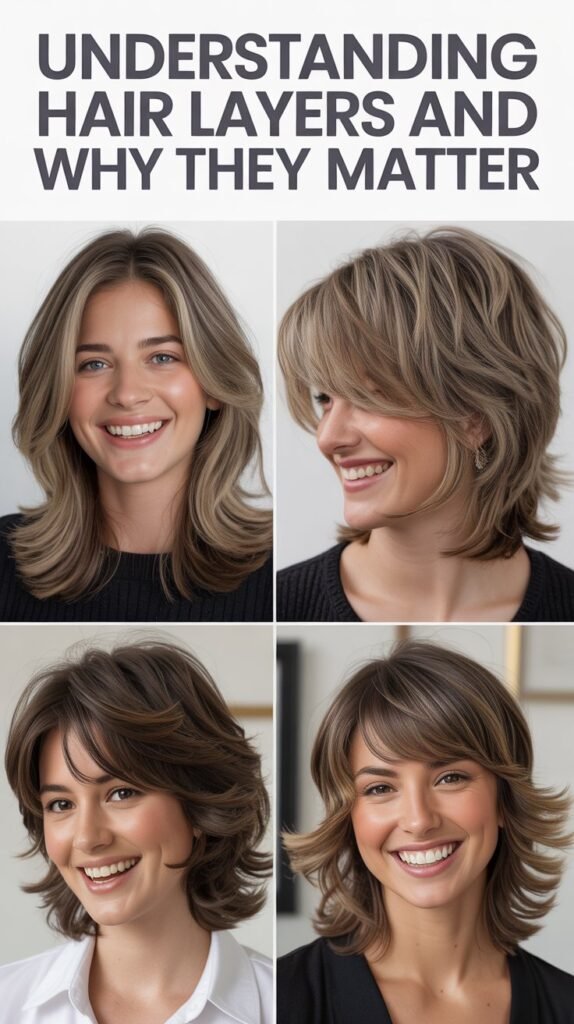
Before picking up those scissors, it’s essential to understand what layers actually are and how they can transform your overall appearance.
Layers are sections of hair cut at different lengths to create dimension, movement, and shape throughout your hairstyle.
Why Layers Work
- Layers remove weight from thick hair, making it more manageable and preventing that heavy, triangular shape that can occur with blunt cuts.
- They add volume and movement to fine or thin hair by creating the illusion of fullness and preventing hair from lying flat against the scalp.
- Layers frame the face beautifully, drawing attention to your best features while softening harsh angles or balancing proportions.
- They allow for versatile styling options, from sleek and straight to voluminous curls, giving you multiple looks with one haircut.
- Layers can help control naturally curly or wavy hair by removing bulk in specific areas while maintaining length where desired.
Different Types of Layers
- Long layers maintain most of your hair’s length while adding subtle movement, perfect for those who want dimension without dramatic change.
- Medium layers create noticeable texture and volume throughout the mid-lengths and ends, ideal for most hair types and face shapes.
- Short layers deliver maximum volume and dramatic texture, often concentrated around the crown and face-framing areas.
- Face-framing layers specifically target the hair around your face, creating a flattering contour regardless of the rest of your hair length.
- Feathered layers involve cutting at angles to create soft, wispy ends that blend seamlessly together for a natural, flowing appearance.
2. Essential Tools You Need for Cutting Layers
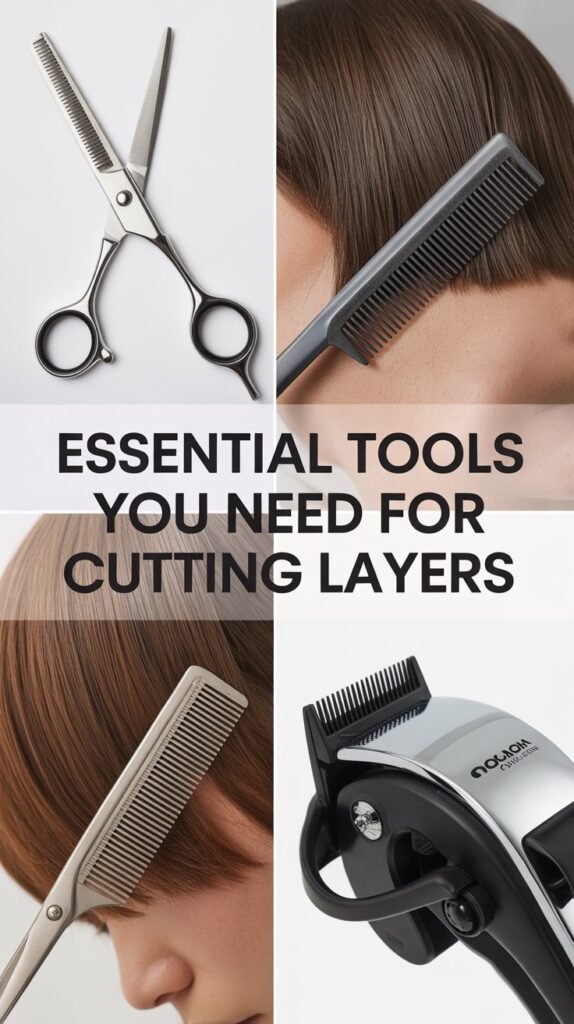
Professional results require professional-quality tools, and investing in the right equipment will make your layering journey significantly easier and more successful.
Using household scissors or dull blades can damage your hair and create uneven, unprofessional results.
Must-Have Cutting Tools
- Professional hair cutting scissors (6-7 inches) made from high-quality stainless steel provide the sharpness and precision necessary for clean cuts without damaging hair ends.
- Thinning shears or texturizing scissors help blend layers seamlessly and remove bulk without creating harsh lines between sections.
- Hair sectioning clips (at least 4-6 large clips) keep hair organized and out of the way while you work on specific sections.
- Fine-tooth comb allows for precise parting and smooth sectioning, ensuring even distribution of hair in each section you cut.
- Spray bottle filled with water keeps hair damp and manageable throughout the cutting process, preventing flyaways and ensuring accuracy.
- Handheld mirror enables you to see the back and sides of your head when used in conjunction with your bathroom mirror.
- Cape or old towel protects your clothing from hair clippings and makes cleanup much easier after you finish cutting.
Tool Maintenance and Care
- Scissors should be sharpened professionally every 6-12 months depending on usage frequency to maintain their cutting precision.
- Clean your scissors after each use by wiping them with rubbing alcohol to remove hair product buildup and natural oils.
- Store scissors in a protective case or pouch to prevent the blades from dulling when they come into contact with other objects.
- Never use your hair cutting scissors for paper, fabric, or other materials as this will dull the blades quickly.
- Check that sectioning clips open and close smoothly, replacing any that have weakened springs or broken hinges.
3. Preparing Your Hair Before Cutting
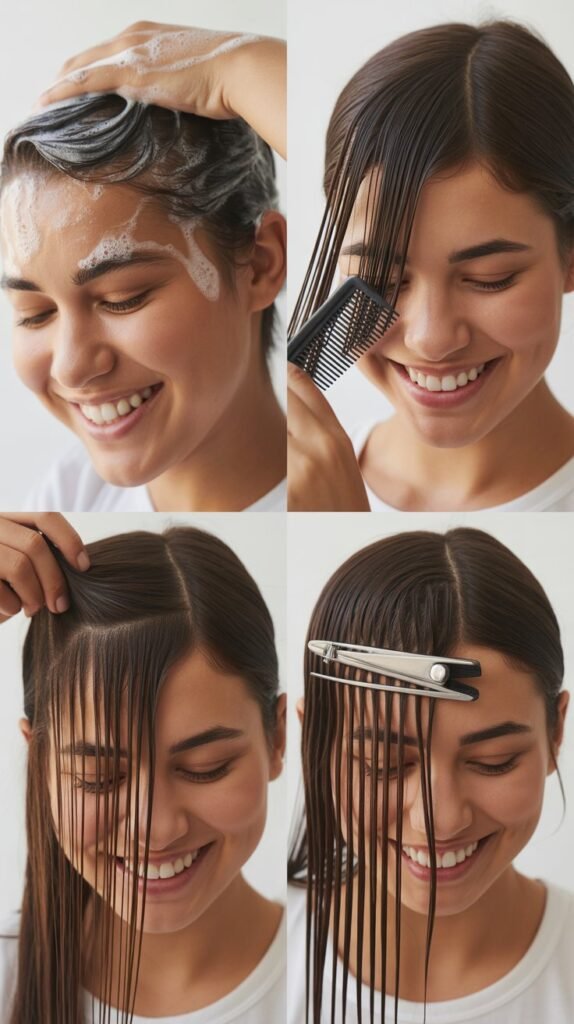
Proper preparation is the foundation of a successful at-home layering session, and skipping these crucial steps can lead to disappointing results.
The condition and state of your hair when you begin cutting will significantly impact the final outcome.
Pre-Cutting Hair Care
- Wash your hair with shampoo to remove all styling products, oils, and buildup that could interfere with achieving clean, precise cuts.
- Apply a lightweight conditioner focusing on the mid-lengths and ends to ensure hair is detangled but not overly slippery.
- Gently detangle hair using a wide-tooth comb, starting from the ends and working your way up to the roots to prevent breakage.
- Towel-dry hair until it’s damp but not dripping wet, as cutting soaking wet hair can lead to cutting too much length since wet hair stretches.
- Avoid applying any styling products like mousse, gel, or oil before cutting as these can make hair clump together unnaturally.
Sectioning Your Hair Properly
- Part your hair down the center from forehead to nape, creating two equal halves for balanced cutting results.
- Divide each side horizontally at ear level, creating four quadrants total that allow you to work methodically through each section.
- Secure each quadrant with a large clip, ensuring hair is twisted smoothly without bumps or irregularities.
- Pull sections taut but not stretched when cutting to ensure accuracy and prevent cutting hair shorter than intended.
- Keep a spray bottle handy to re-dampen sections as you work since hair dries quickly in some environments.
4. The Ponytail Method for Basic Layers
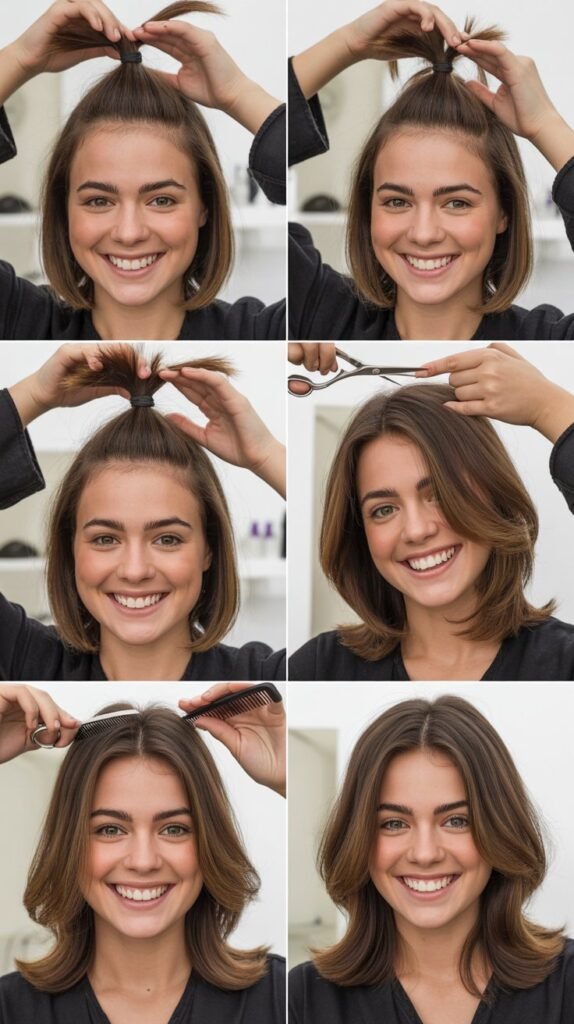
The ponytail method is one of the most popular and beginner-friendly techniques for cutting layers at home, offering a foolproof approach that delivers consistent results.
This method works exceptionally well for creating uniform layers throughout your hair with minimal technical skill required.
Step-by-Step Ponytail Technique
- Flip your head upside down and brush all hair forward, gathering it at the very top center of your head (the highest point of your crown).
- Secure hair tightly with a hair elastic, making sure the ponytail is positioned exactly at the center to ensure even layers on both sides.
- Slide the elastic down to where you want your shortest layer to end, remembering that dry hair will be shorter than damp hair.
- Hold the ponytail straight up perpendicular to your head and cut straight across using sharp scissors in one clean motion.
- For a softer, more blended look, you can point-cut into the ends by holding scissors vertically and making small snips.
- Release the ponytail and gently shake out your hair to see the layers fall naturally into place.
- Make any necessary adjustments to individual pieces that seem longer or uneven compared to the rest.
Variations of the Ponytail Method
- High ponytail placement (at the crown) creates dramatic, shorter layers with maximum volume around the face.
- Middle ponytail placement (at the back of the head at ear level) produces medium layers with balanced volume throughout.
- Low ponytail placement (at the nape) generates subtle, long layers that maintain most of your length while adding gentle movement.
- Multiple ponytail method involves creating several small ponytails throughout the head and trimming each to different lengths for customized layering.
5. The Twist and Slide Technique for Face-Framing Layers
Face-framing layers can dramatically enhance your features and add dimension around your face, and the twist and slide technique makes creating these flattering layers remarkably simple.
This method gives you precise control over the length and angle of layers that frame your face.
Creating Perfect Face-Framing Layers
- Section out the front portions of your hair on both sides, typically from the front of your ears forward, creating triangle sections.
- Determine where you want your shortest face-framing layer to begin—at the cheekbone, jawline, or chin level.
- Take one front section and twist it smoothly away from your face, keeping the twist firm but not overly tight.
- Slide your fingers down the twisted section to where you want the layer to end, with your fingers acting as a cutting guide.
- Cut the hair just below your fingers at a slight angle, with the angle pointing downward and backward toward your ear.
- Untwist the section and check the length, making small adjustments if needed before moving to the other side.
- Repeat the exact process on the opposite side, ensuring both sides are symmetrical by comparing them frequently.
Blending Face-Framing Layers
- Use thinning shears on the ends of face-framing layers to soften any harsh lines and create a more natural, feathered appearance.
- Take vertical sections of the face-framing hair and point-cut into the ends to add texture and prevent a blocky look.
- Blend the face-framing layers into the rest of your hair by taking small sections where they meet and using diagonal cuts.
- Check your face-framing layers from multiple angles using a handheld mirror to ensure they fall correctly from all views.
- Style your layers with a round brush or flat iron to see how they frame your face when dry and finished.
6. The Vertical Sectioning Method for Long Hair
The vertical sectioning method is ideal for those with long hair who want to add dimension and movement without sacrificing significant length.
This professional technique creates beautifully blended layers that cascade naturally down your back.
Mastering Vertical Sections
- Part your hair down the center and create vertical sections running from the crown of your head down to the nape of your neck.
- Each vertical section should be about 1-2 inches wide, secured with clips while you work on one section at a time.
- Take the first vertical section at the very back center of your head as your guide section for all subsequent cuts.
- Hold this guide section straight out from the head at a 90-degree angle and cut straight across at your desired shortest layer length.
- Work your way forward through each vertical section, matching each new section’s length to the guide section you created.
- Comb each section smoothly before cutting and check that you’re holding it at the same angle as your guide section.
- This method creates what’s called “uniform layering” where all the internal layers are the same length but appear graduated when hair falls naturally.
Advanced Vertical Sectioning Tips
- For more dramatic layers, increase the elevation angle beyond 90 degrees, holding sections up and slightly forward.
- To create subtle, blended layers, use a slightly lower elevation angle between 45-90 degrees depending on desired effect.
- Always cut vertically straight across each section rather than at angles to maintain clean, even layers throughout.
- Check your work by combing hair naturally and looking for any pieces that stick out or appear uneven compared to surrounding hair.
- This technique works best on straight to wavy hair; very curly hair may require modifications to account for shrinkage when dry.
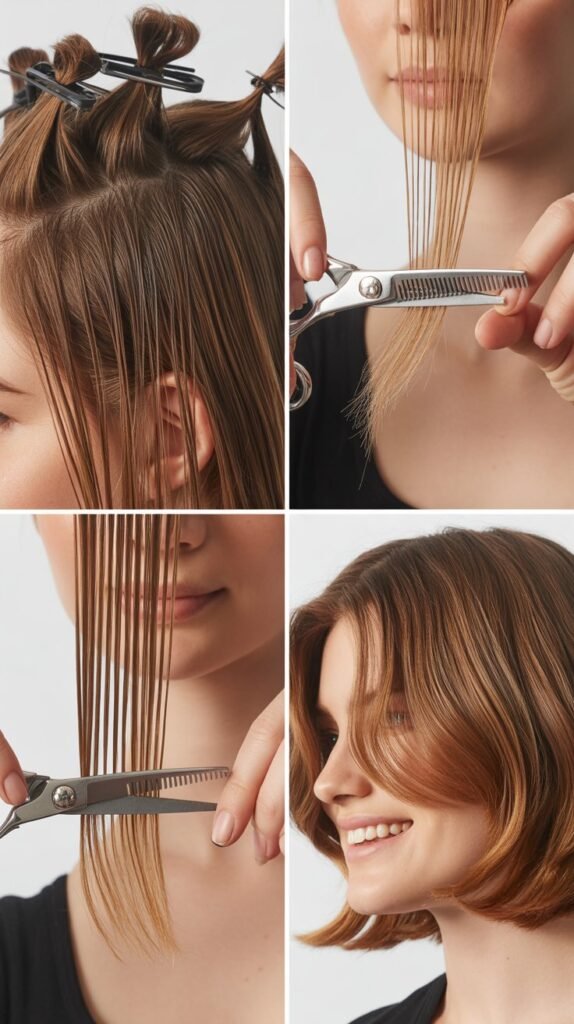
7. The Slide Cutting Technique for Soft, Blended Layers
Slide cutting is a professional technique that creates seamlessly blended layers with soft, feathered ends that look incredibly natural.
This method requires practice but delivers salon-quality results that are worth mastering.
How to Perform Slide Cutting
- Work with slightly damp hair and take a small vertical or diagonal section about 1 inch wide for maximum control.
- Hold the section taut between your fingers at a slight angle away from the head, positioning your fingers where you want the layer to end.
- Open your scissors partially (about 45 degrees) and position them a few inches above where you want to cut.
- Gently slide the partially opened scissors down the hair shaft toward the ends while maintaining light, consistent pressure.
- The scissors will gradually remove small amounts of hair as they slide, creating a soft, tapered effect rather than a blunt line.
- Use smooth, continuous motions rather than choppy movements to ensure even removal of hair throughout the section.
- Repeat this process on all sections where you want soft, blended layers, always working with small sections for precision.
Safety and Technique Considerations
- Keep your scissors extremely sharp for slide cutting as dull blades will pull and damage hair rather than cut cleanly.
- Apply very light pressure while sliding—the weight of the scissors should do most of the work without forcing.
- Practice the sliding motion without cutting first to get comfortable with the hand movement and scissor control required.
- Never slide cut toward your face or body; always direct scissors away from yourself for safety.
- This technique works best for blending and softening layers rather than creating initial length, so establish your basic layer structure first.
8. Layering Techniques for Different Hair Types

Different hair textures and types require modified approaches to layering, and understanding these variations will help you achieve the best results for your specific hair.
What works beautifully on straight hair might not translate well to curly hair and vice versa.
Layering Straight Hair
- Straight hair shows every imperfection in cutting technique, so precision and symmetry are absolutely critical for professional-looking results.
- Use the ponytail or vertical sectioning method for clean, geometric layers that will lie smoothly and show off shine.
- Point-cutting the ends creates texture and prevents layers from looking too harsh or blocky against straight hair.
- Straight hair tends to show cutting lines more obviously, so invest extra time in blending sections where different layer lengths meet.
- Consider adding face-framing layers to create interest and prevent straight hair from appearing too flat or one-dimensional.
Layering Wavy Hair
- Wavy hair is the most forgiving hair type for home layering since the natural texture helps hide minor imperfections.
- Cut wavy hair when it’s damp and forming its natural wave pattern so you can see how layers will fall when dry.
- Focus on removing weight from the bottom to allow waves to spring up and create more volume throughout.
- Use the twist and slide method for face-framing layers that will enhance natural wave patterns around the face.
- Avoid over-layering wavy hair as too many short layers can create a triangular or pyramid shape when hair dries.
Layering Curly Hair
- Always cut curly hair when it’s dry and styled in its natural curl pattern to avoid cutting too much length due to shrinkage.
- Focus on creating layers that enhance curl formation and remove weight rather than adding layers solely for movement.
- Cut curl by curl if possible, working with individual curl formations to maintain the integrity of each spiral.
- Use a “twist and snip” method where you gently twist a curl and trim the ends to maintain the curl’s natural shape.
- Curly hair often looks best with longer layers that remove bulk without creating frizz or disrupting curl patterns.
Layering Thick or Coarse Hair
- Thick hair benefits most from layering as it removes excess weight and prevents that heavy, triangular silhouette.
- Use more dramatic layering techniques with greater length variation between layers to create noticeable dimension.
- Incorporate thinning shears throughout layers to remove bulk and create softer, more manageable sections.
- Focus internal layers more than external ones to remove weight without sacrificing the perimeter shape of your haircut.
- Consider the twist and slide or slide cutting techniques to create soft, blended layers that don’t feel bulky or heavy.
9. Common Mistakes to Avoid When Cutting Layers
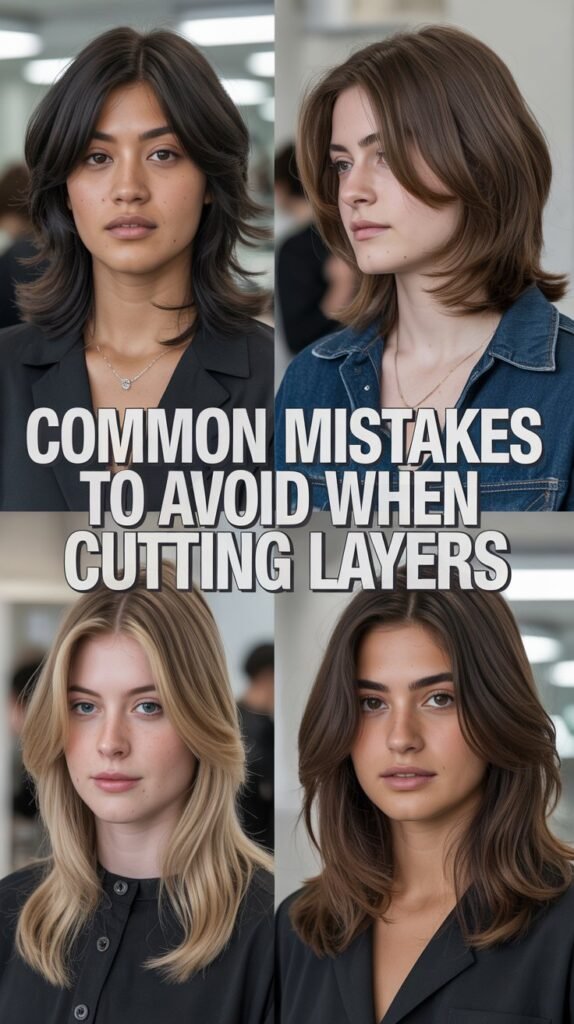
Even experienced home hair cutters can fall into common traps that compromise their results, and being aware of these pitfalls will help you achieve professional-looking layers.
Learning what not to do is just as important as learning proper techniques.
Technical Cutting Errors
- Cutting hair that’s too dry causes scissors to pull and tear hair rather than cutting cleanly, resulting in split ends and damage.
- Cutting hair that’s soaking wet leads to cutting off more length than intended since wet hair stretches and appears longer.
- Using dull household scissors or craft scissors creates ragged, damaged ends that split quickly and look unprofessional.
- Cutting too much hair at once in thick sections makes it impossible to achieve even, consistent results throughout.
- Failing to maintain consistent tension on hair sections while cutting causes uneven lengths and layers that don’t match.
- Cutting hair at different angles or elevations between sections creates disconnected layers that don’t blend properly.
- Rushing through the cutting process without checking your work from multiple angles leads to asymmetrical, unbalanced results.
Planning and Preparation Errors
- Starting without a clear plan for what type of layers you want and where they should fall throughout your hair.
- Failing to section hair properly before cutting makes it nearly impossible to create even, symmetrical layers on both sides.
- Not establishing a guide section first means you have no reference point for keeping subsequent sections consistent.
- Cutting too much length initially—it’s always better to cut conservatively and remove more later if needed.
- Working in poor lighting conditions where you can’t clearly see what you’re cutting or how sections compare.
- Not using a handheld mirror to check the back and sides of your head from multiple viewing angles.
- Attempting advanced techniques without practicing the hand movements and building necessary muscle memory first.
Strategic Mistakes
- Adding too many short layers throughout creates a bottom-heavy or pyramid-shaped silhouette, especially on thick or curly hair.
- Cutting face-framing layers too short for your face shape or without considering how they’ll style when dry.
- Not accounting for your natural hair texture and how it behaves when dry—straight hair hangs differently than curly hair.
- Trying to replicate a salon cut that was customized for someone else’s hair type, face shape, and features.
- Cutting when you’re tired, rushed, or emotional, as this increases the likelihood of making mistakes you’ll regret.
10. Fixing Mistakes and Problem Areas

Even with the best techniques and careful attention, mistakes can happen, but most layering errors can be corrected or minimized with strategic adjustments.
Knowing how to troubleshoot problems will save your haircut and prevent panic.
Addressing Uneven Layers
- If one side is longer than the other, identify the shorter side and carefully match the longer side to it rather than continuing to cut both sides.
- Use the twist method on both sides simultaneously, bringing them forward over your shoulders to compare lengths directly side by side.
- Make tiny adjustments of only 1/8 to 1/4 inch at a time when evening out uneven layers to avoid over-correcting.
- Wet the hair completely and comb it smooth before attempting corrections to ensure you’re seeing the true length difference.
- Take vertical sections from both sides and hold them together in front of your face to check that they match exactly.
Fixing Choppy or Disconnected Layers
- Use thinning shears or texturizing scissors on the harsh lines where layers disconnect to create softer transitions.
- Point-cut vertically into the ends of choppy sections to create texture that helps different layer lengths blend together.
- Take diagonal sections that span across the disconnected areas and use slide cutting to create gradual transitions.
- Sometimes adding additional layers between two disconnected lengths can create the bridge needed for better blending.
- Consider using styling techniques like blow-drying with a round brush to help camouflage areas where layers don’t connect smoothly.
Managing Layers That Are Too Short
- Unfortunately, hair that’s been cut too short can only be fixed by waiting for growth, but strategic styling can help during the grow-out phase.
- Use headbands, clips, or other accessories to manage pieces that are awkwardly short and don’t blend with the rest of your hair.
- Apply texturizing products to help short layers blend with longer sections and create a more intentionally tousled appearance.
- Consider adding extensions or clip-in pieces that match your hair color to fill in areas where layers were cut too short.
- Talk to a professional stylist who may be able to adjust the rest of your hair to better incorporate the short layers into the overall style.
When to Seek Professional Help
- If you’ve created significant asymmetry that you can’t correct after several careful attempts, a professional can assess and fix the issue.
- When layers are so choppy or disconnected that blending techniques aren’t creating smooth transitions between lengths.
- If you’ve damaged your hair ends by using dull scissors or improper cutting techniques and need a professional to restore hair health.
- When you’ve cut layers too short and need a stylist to create a new overall shape that incorporates the mistake.
- If you’re feeling overwhelmed, stressed, or upset about your hair, sometimes the peace of mind from a professional correction is worth the cost.
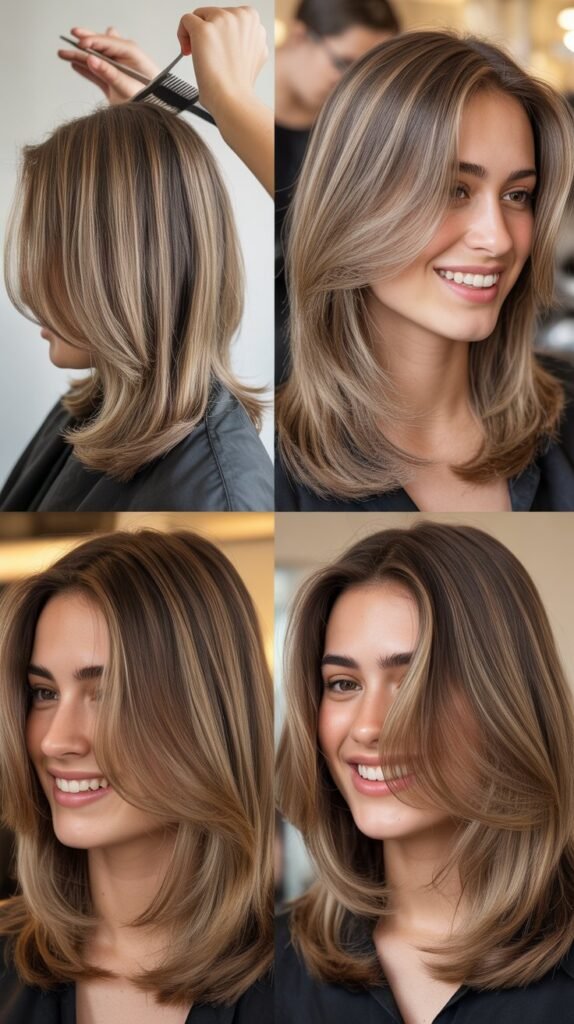
11. Styling and Maintaining Your New Layers
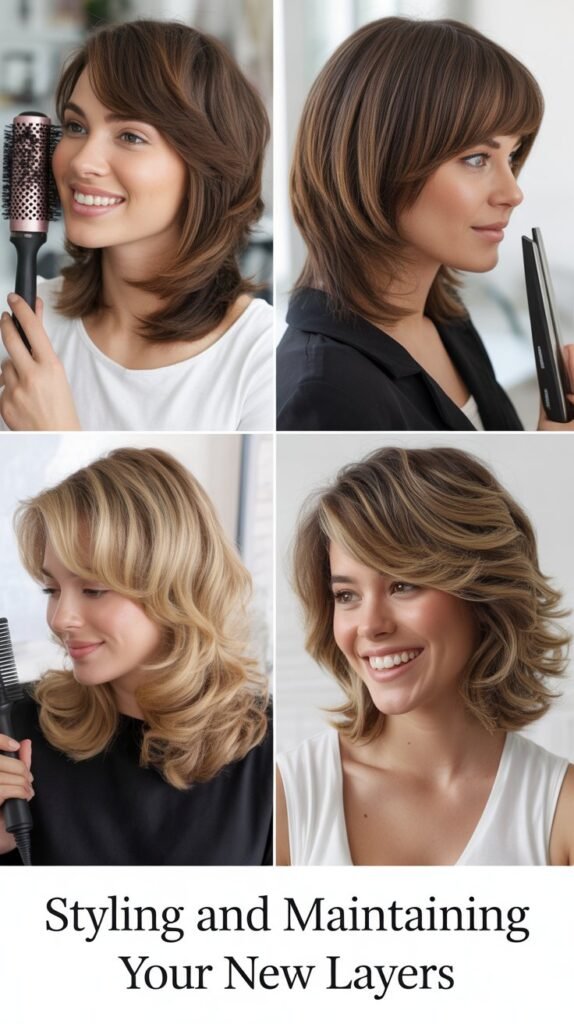
Creating beautiful layers is only half the battle—knowing how to style and maintain them will keep your hair looking salon-fresh between cuts. Proper styling techniques enhance the dimension and movement that layers provide.
Blow-Drying Techniques for Layers
- Apply a heat protectant spray throughout damp hair before using any hot tools to prevent damage and maintain hair health.
- Use a round brush to blow-dry layers, wrapping small sections around the brush and directing heat from roots to ends.
- Focus on lifting hair at the roots when blow-drying to maximize the volume that layers provide, especially around the crown.
- Direct the dryer nozzle downward along the hair shaft to smooth the cuticle and enhance shine in your layers.
- For face-framing layers, wrap them around a round brush and direct them slightly forward to frame your face attractively.
- Finish with a cool shot from your dryer to set the style and help your layers hold their shape throughout the day.
Styling Products for Layered Hair
- Volumizing mousse applied to damp roots before blow-drying helps maximize the lift and fullness that layers create.
- Texturizing spray or sea salt spray enhances the piece-y, dimensional look of layers and adds grip for styling.
- Lightweight oil or serum smoothed over ends prevents frizz and adds shine without weighing down shorter layers.
- Dry shampoo adds texture and volume to roots on non-wash days, helping layers maintain their shape between washes.
- Flexible hold hairspray keeps layers in place without making them stiff or crunchy, maintaining natural movement.
Maintaining Layers Between Cuts
- Trim your layers every 6-8 weeks to maintain their shape and prevent the ends from becoming damaged or split.
- Use the same techniques you learned for the initial cut to refresh your layers at home between professional appointments.
- Focus on maintaining the face-framing layers more frequently as they grow out most noticeably and affect your overall look significantly.
- Deep condition regularly to keep ends healthy and prevent the dry, ragged appearance that can occur with layered hair.
- Be consistent with heat protectant use since layered hair often requires more heat styling to enhance its shape and movement.
12. Tools and Resources for Continued Learning

Mastering the art of cutting your own layers is an ongoing journey, and having access to quality resources will help you continuously improve your skills.
The more you learn and practice, the more confident and capable you’ll become.
Educational Resources
- Search for reputable hair cutting tutorials on video platforms that demonstrate techniques with clear angles and step-by-step instructions.
- Follow professional hairstylists on social media who share tips, techniques, and troubleshooting advice for home hair cutting.
- Visit websites like Cosmopolitan’s beauty section for articles on hair cutting techniques and trending styles.
- Explore resources from beauty education sites like Naturally Curly for specific guidance on cutting textured hair types.
- Join online communities or forums where people share their home hair cutting experiences, tips, and advice for improvement.
- Consider taking an online hair cutting course designed for beginners who want to learn professional techniques at home.
Building Your Skills Over Time
- Start with simple techniques like the ponytail method before progressing to more advanced approaches like slide cutting.
- Practice cutting motions without actually cutting hair to build muscle memory and hand-eye coordination.
- Keep a hair journal documenting what techniques you tried, what worked well, and what you’d do differently next time.
- Take photos of your hair from multiple angles after each cutting session to track your progress and identify areas for improvement.
- Be patient with yourself and understand that developing cutting skills takes time, practice, and learning from mistakes.
- Consider practicing on a mannequin head if you want to build confidence before working on your own hair.
Investing in Quality Tools
- Invest in the best scissors you can afford as they make the biggest difference in achieving clean, professional cuts.
- Quality tools last longer and perform better, ultimately saving money compared to repeatedly replacing cheap alternatives.
- Purchase tools from reputable beauty supply stores or professional hair cutting equipment retailers for authentic products.
- Read reviews from other home hair cutters before investing in tools to ensure you’re choosing reliable, well-made products.
- Consider starting with mid-range options that offer good quality without the professional price tag while you’re developing your skills.
Conclusion
Mastering the art of cutting your own layers at home is an empowering skill that gives you control over your appearance, saves significant money over time, and allows you to experiment with your look whenever inspiration strikes.
Throughout The Ultimate Guide to Cutting Your Own Layers at Home, you’ve learned everything from understanding different layer types and gathering the essential tools to executing various cutting techniques and fixing common mistakes.
You now have the knowledge to assess your hair type, choose appropriate layering methods, and create dimension and movement that flatters your face shape and enhances your natural texture.
Remember that developing proficiency with home hair cutting takes practice, patience, and a willingness to learn from both successes and mistakes.
Start with conservative cuts and simple techniques like the ponytail method, gradually building your confidence before attempting more advanced approaches. Document your progress, celebrate your improvements, and don’t be discouraged by occasional setbacks—
even professional stylists had to start somewhere. With the techniques, tips, and resources provided in this guide, you’re well-equipped to transform your hair from flat and lifeless to beautifully layered and dimensional.
Whether you’re maintaining your current style between salon visits or completely taking charge of your hair care routine, the skills you’ve learned will serve you for years to come, giving you the freedom and flexibility to always look and feel your best.