If you’ve been struggling with flat, lifeless locks and wondering if there’s any hope, you’re in the right place. Thin Hair? 37 Dirty Styles
That Add Instant Volume is your ultimate guide to transforming what you’ve got into something full, fabulous, and effortlessly chic.
Whether your hair falls flat by noon or you’ve been fighting fine strands your whole life, this article is packed with practical, proven styles that genuinely work.
From second-day texture tricks to deliberate “undone” looks that fool the eye into seeing thickness, every style here is designed with you in mind.
By the time you finish reading, you’ll have a fresh arsenal of ideas, tips, and techniques that will completely change the way you think about your thin hair — and the best part is, many of these styles work even better when your hair isn’t freshly washed.
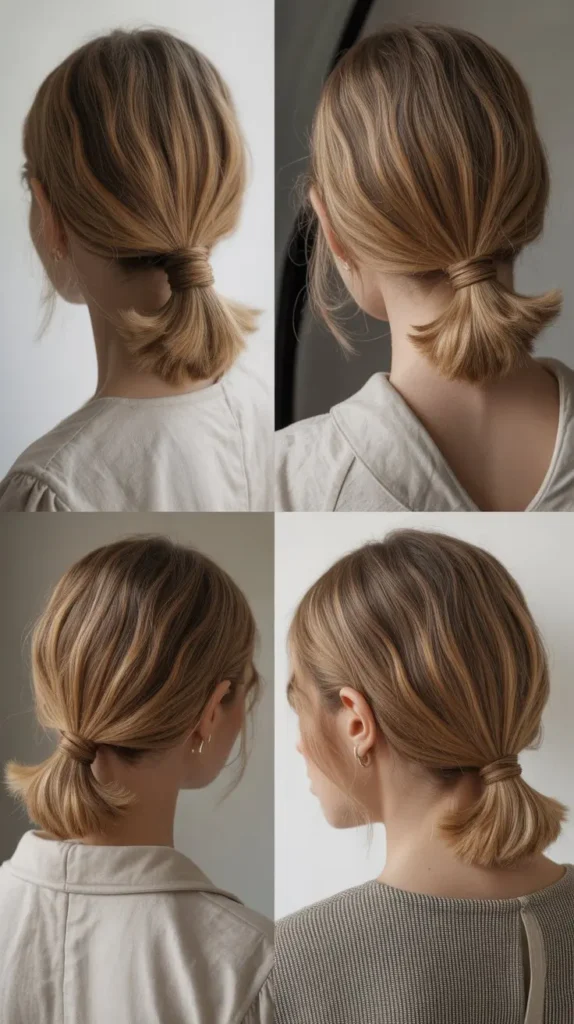
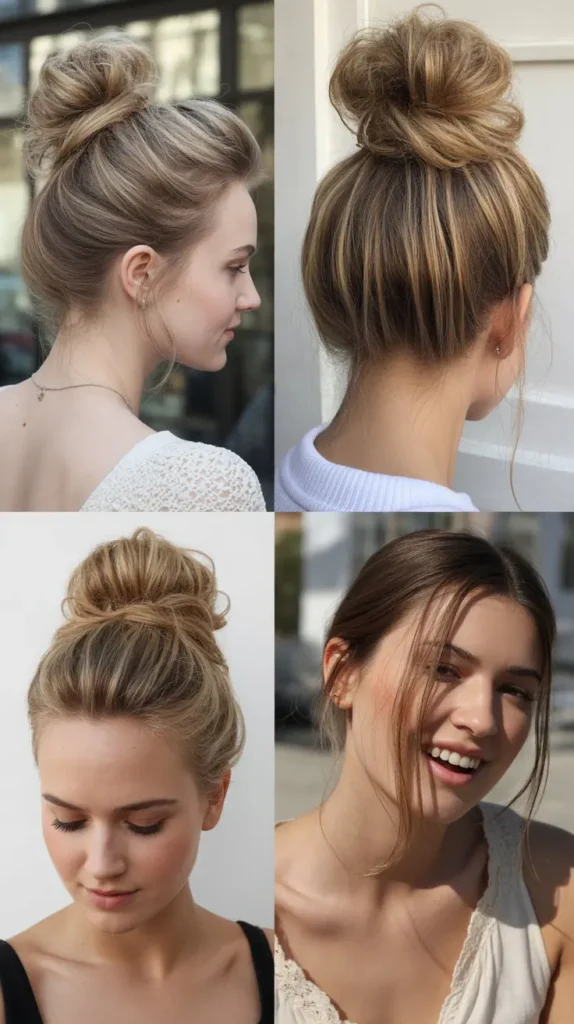
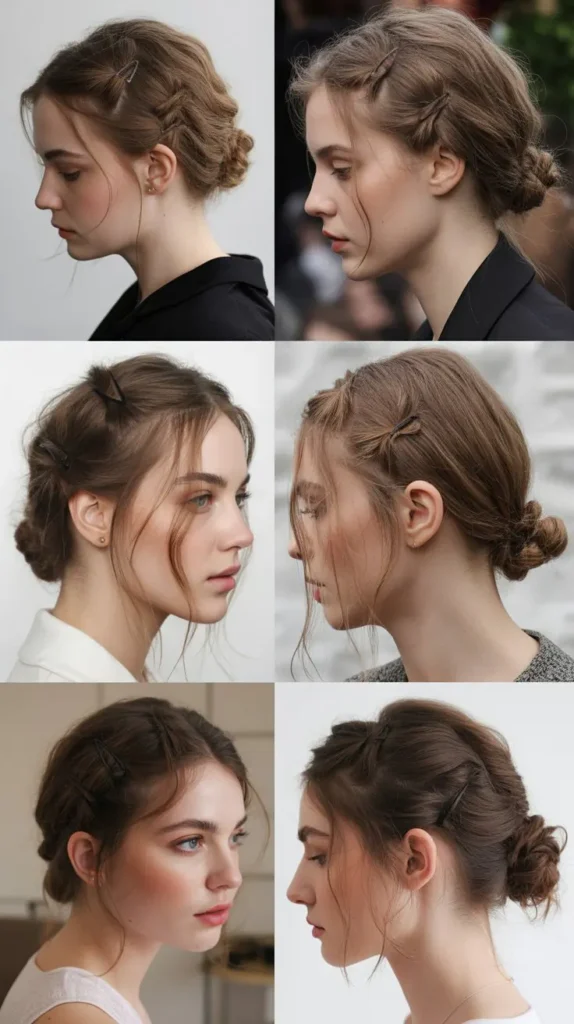
1. The Classic Messy Bun
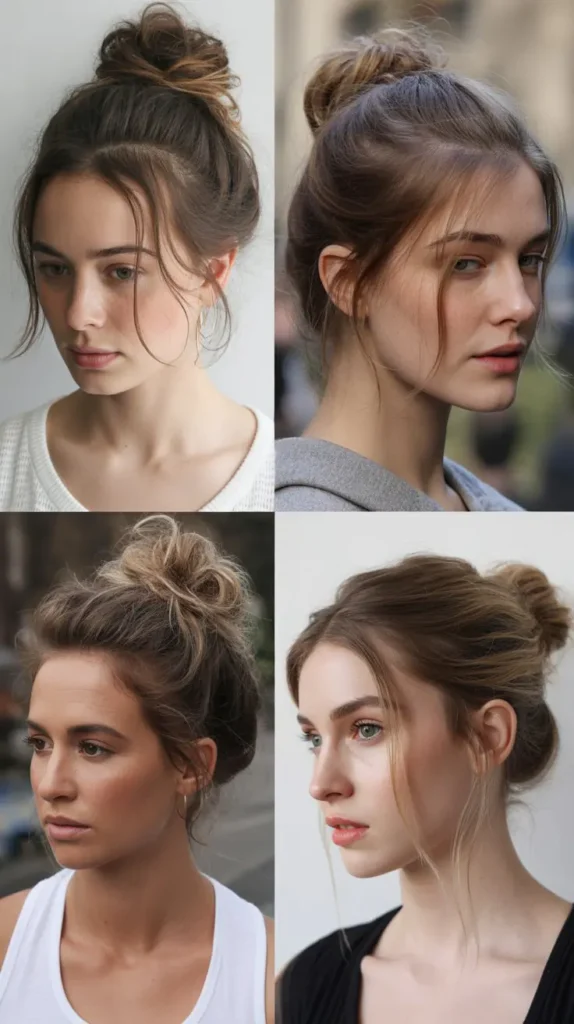
The messy bun is one of the most beloved “dirty hair” styles for a reason — it thrives on texture, grip, and natural oils that make it hold all day long.
When hair is slightly unwashed, it has the perfect amount of grit to stay in place without pins or products. This style suits nearly every face shape and hair length from the chin down.
- Gather your hair loosely at the crown or nape of the neck, leaving a few face-framing strands out.
- Twist the ponytail loosely and wrap it around its own base in a relaxed, uneven loop.
- Secure with a hair tie and pull at sections to create that intentionally undone, voluminous look.
- Let some pieces fall out naturally — these imperfections actually make thin hair look fuller and more abundant.
- Skip the brush before styling; finger-combing creates better texture and avoids flattening fine strands.
- Use a texturizing spray at the roots if your hair is too freshly washed to hold the shape naturally.
- Natural oils from day-two or day-three hair act like a built-in styling product, giving you grip that pomades and sprays often fail to match.
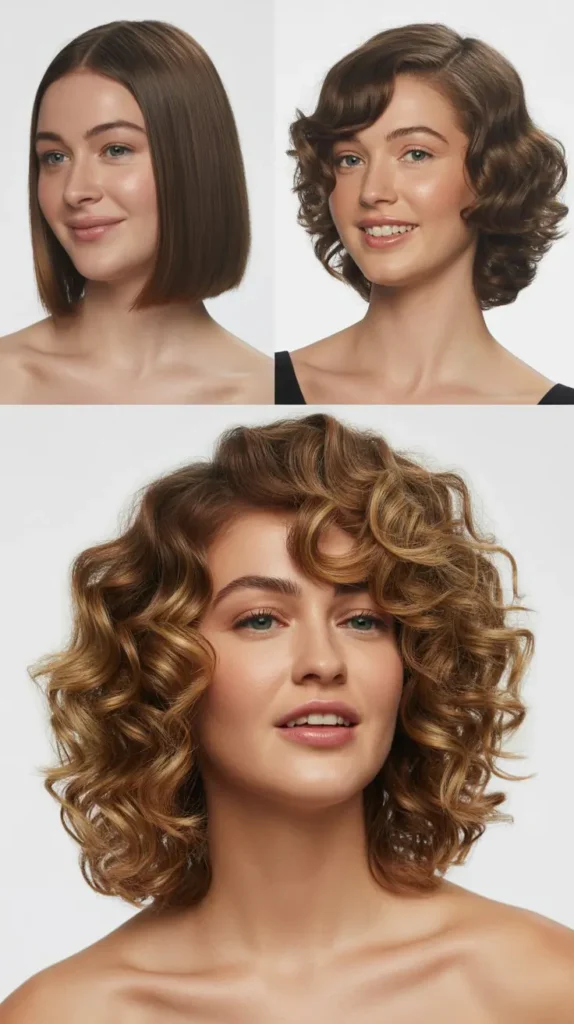
2. Tousled Textured Waves
Tousled waves are the ultimate optical illusion for thin hair — the bends and curves in each strand create the visual impression of body and fullness.
Dirty hair holds waves far longer than freshly washed hair, making it the ideal canvas. This style works beautifully on straight, wavy, or slightly curly fine hair types.
- Start with day-two or day-three hair that already has natural texture built up from oils.
- Apply a sea salt spray from mid-lengths to ends, scrunching upward to activate wave patterns.
- Use a 1-inch curling wand to wrap random sections — not all of them — leaving some straighter for a natural effect.
- Alternate the direction of each curl (some toward the face, some away) so they don’t clump together flat.
- Break up the waves with your fingers once they cool completely, never with a brush.
- Flip your head upside down and scrunch at the roots to push volume up from the base.
- According to Byrdie, diffusing or air-drying with a wave spray adds significant visible texture to fine hair without weighing it down.
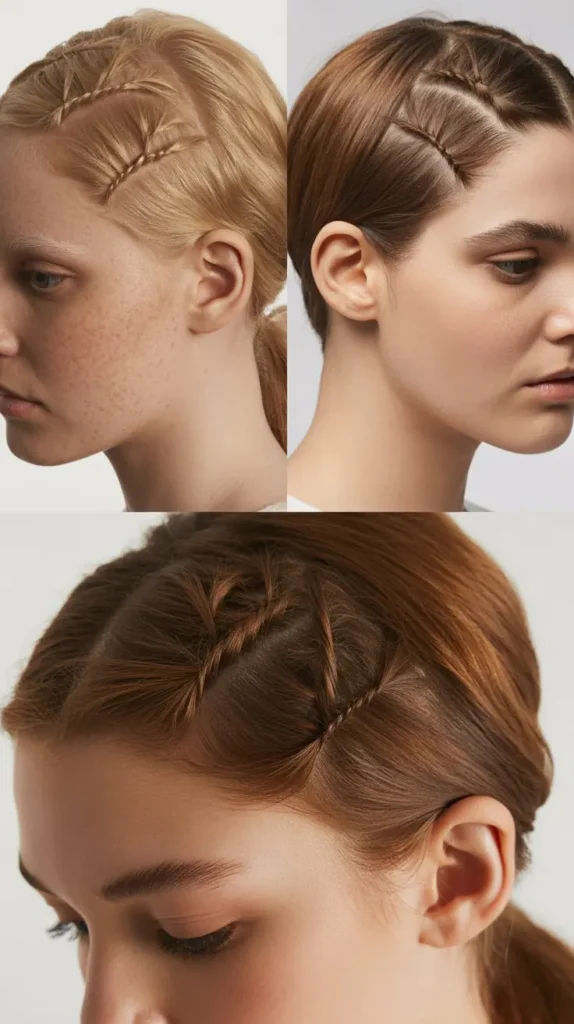
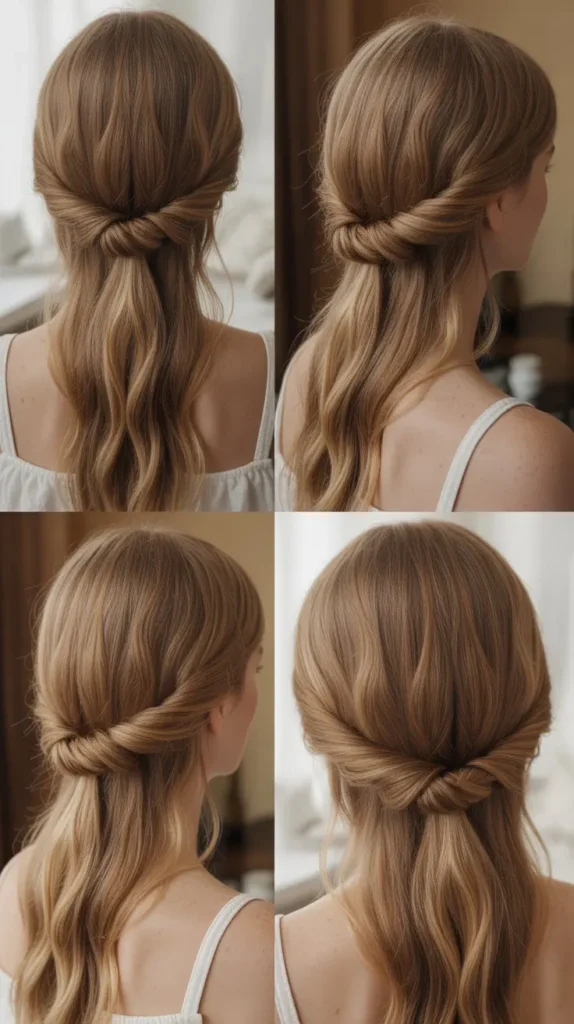
3. Half-Up Twisted Crown
The half-up twisted crown is a romantic, effortlessly styled look that pulls hair away from the face while using the “dirty” texture at the roots to create invisible fullness.
It works especially well because the twist itself creates volume at the crown where thin hair needs it most. This style looks polished yet relaxed — perfect for both casual and semi-formal occasions.
- Section the top half of your hair from ear to ear across the crown of your head.
- Divide this section into two parts and twist each piece toward the back of your head.
- Cross the two twists over each other and secure with a small clear elastic or bobby pins.
- Gently pull at the twist to loosen and widen it — this creates the illusion of more hair volume.
- Allow wispy tendrils to fall freely around the face for a soft, full-looking framing effect.
- Backcomb the crown section lightly before twisting if your hair is too fine to hold the shape.
- The natural texture of unwashed hair keeps the twist from slipping down flat throughout the day.
4. Effortless Space Buns
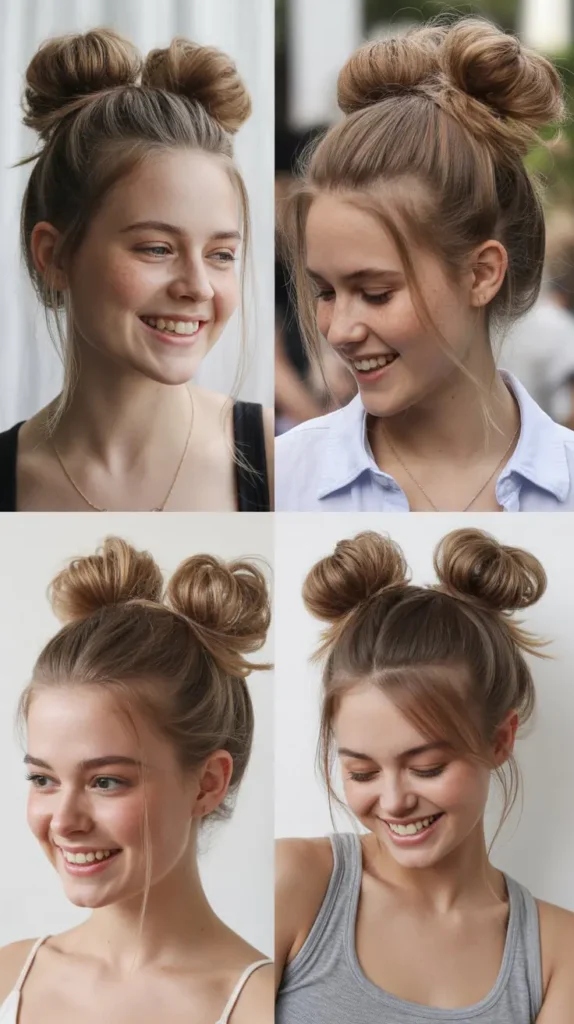
Space buns have had a major style revival and they’re surprisingly flattering for thin hair because the divided sections make each bun look fuller than a single ponytail ever could.
The divided style distributes your hair strategically to maximize visual impact on both sides of the head. Slightly oily or textured hair holds space buns perfectly without sliding out.
- Divide your hair down the middle with a clean center part from forehead to nape.
- Pull each half into a high ponytail secured with an elastic on each side of the head.
- Tease or backcomb each ponytail at the base before wrapping to dramatically increase bun size.
- Wrap each ponytail around its own elastic in a loose coil and secure with pins.
- Pull small sections outward from each bun to fluff them up and make them appear thicker.
- Leave baby hairs or wispy ends out deliberately for a playful, full-looking finish.
- Skip washing for a day before styling — the added grip is essential for keeping both buns lifted and round.
5. The Low Textured Ponytail
The low ponytail often gets written off as boring, but a textured version on dirty hair is anything but.
Strategic teasing, strategic pulling, and the right placement can make a low pony look full, intentional, and editorial. This is one of the most wearable everyday styles for thin hair that actually holds its shape.
- Gather hair at the nape of the neck into a low ponytail but don’t pull it fully tight.
- Use a bristle brush only at the sides to smooth any frizz while keeping the top section untouched for natural volume.
- Backcomb the crown section before pulling it back so the top appears lifted and padded.
- Wrap a small strand of hair around the elastic to hide it and make the style look more intentional.
- Gently tug at the hair on top of the head after securing — this lifts the scalp area and creates immediate volume.
- Leave face-framing pieces out at the temples for a softer, fuller visual frame.
- Dirty hair provides the grip needed to keep a backcombed crown in place without any additional product.
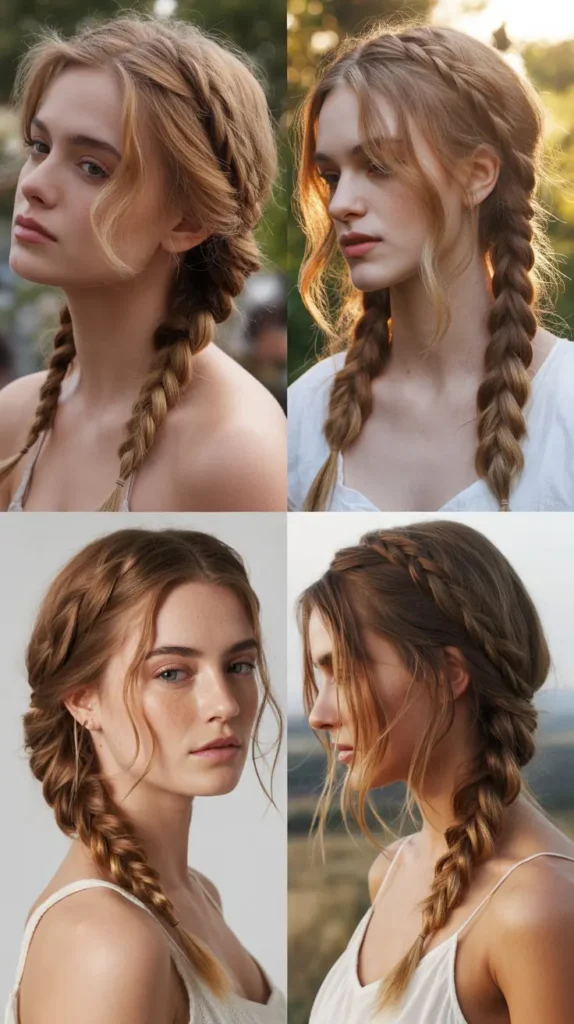
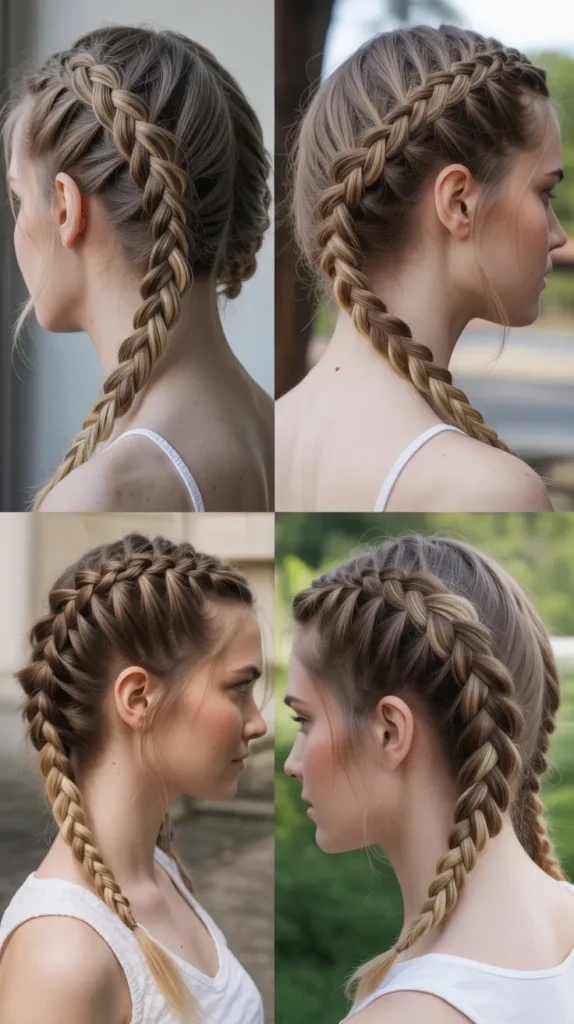
6. The Undone French Braid
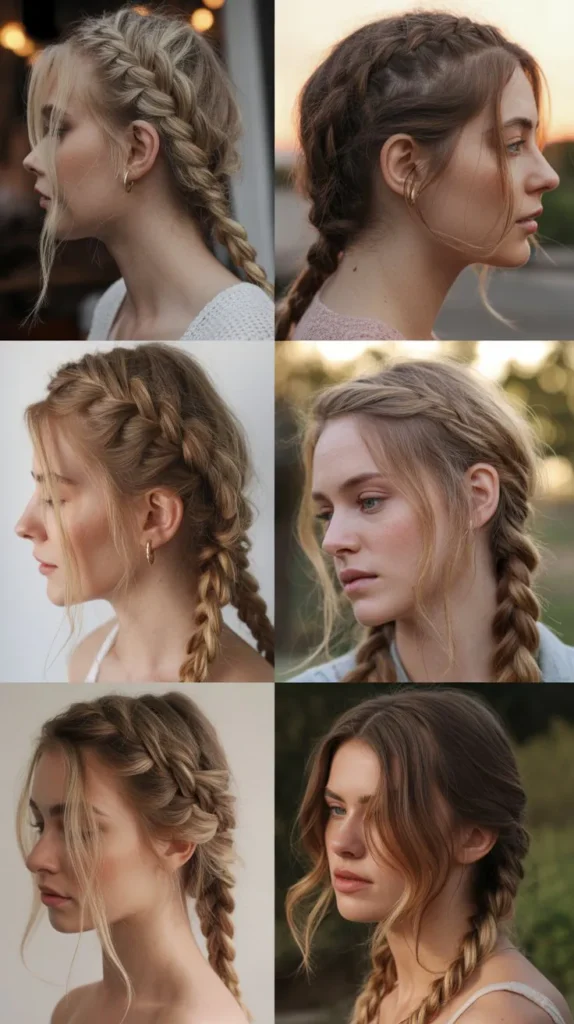
A French braid on dirty hair creates beautiful texture and dimension that freshly washed hair simply cannot replicate.
The natural oils and grip from second-day hair make each stitch of the braid hold without slipping. When you loosen the braid panels after plaiting, the result looks incredibly voluminous and full.
- Start braiding from the crown with loose sections — the looser each pick-up, the fuller the braid appears.
- Cross each section over the center loosely rather than pulling tightly; this keeps the braid puffed up.
- Once the braid is complete, use your fingers to gently pancake — press and pull each panel outward.
- Loosen the braid from root to tip working upward, pinching and widening every section.
- Secure the end loosely so the braid tail also looks full and casual, not tight and flat.
- Pull out soft strands at the temples and hairline to frame the face.
- The finished braid should look effortlessly undone, which paradoxically makes fine hair look much thicker than a neat tight braid.
7. Curtain Bangs with Body
Curtain bangs are a transformative cut that creates an instant illusion of fullness at the front, and they look especially beautiful on dirty hair because natural oils give them exactly the right amount of definition and separation.
The parted, slightly wispy curtain effect draws the eye to face-framing fullness rather than flat lengths. This works on all thin hair lengths.
- Part bangs down the center of the forehead and sweep each side outward and down toward the temples.
- Use a round brush (or your fingers) to curl the ends very slightly outward as they dry or settle.
- Let the bangs have natural movement rather than forcing them to lie flat — movement reads as thickness.
- Apply a tiny amount of a light styling cream only to the bang sections if needed for shape definition.
- Allow slight separation between bang strands — perfectly combed-together bangs look thinner than naturally separated ones.
- Blend bangs into the rest of your hair by curling or waving side sections so everything flows together seamlessly.
- Pair curtain bangs with layers throughout the rest of the hair for a full-face-framing effect that works all day.
Thin Hair Volume Quick-Reference Table
| Style | Best Hair Length | Difficulty | Days Since Wash |
|---|---|---|---|
| Messy Bun | Medium–Long | Easy | Day 2–3 |
| Tousled Waves | Short–Long | Moderate | Day 2 |
| Half-Up Twisted Crown | Medium–Long | Easy | Day 2–3 |
| Space Buns | Short–Long | Easy | Day 2–3 |
| Low Textured Ponytail | Medium–Long | Easy | Day 2 |
| Undone French Braid | Medium–Long | Moderate | Day 2–3 |
| Curtain Bangs with Body | All Lengths | Easy | Day 2 |
| Bouffant Blowout | Medium–Long | Moderate | Day 1–2 |
| Braided Headband | Medium–Long | Easy | Day 2–3 |
| Faux Bob Tuck | Long | Easy | Day 2–3 |
8. The Bouffant Blowout
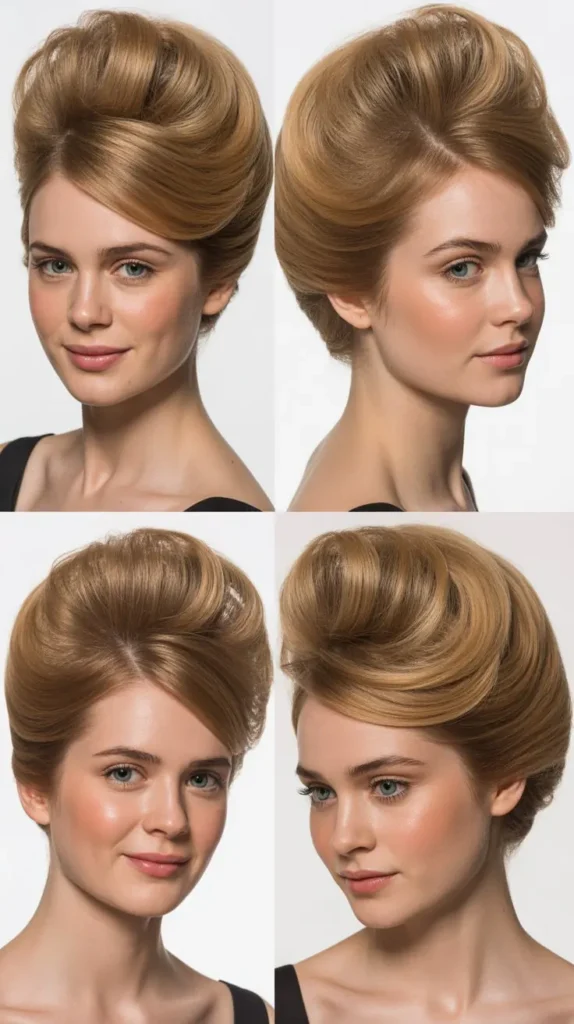
The bouffant blowout is rooted in vintage glamour but remains one of the most effective volume techniques for thin hair today.
It relies on strategic backcombing at the crown that dirty hair holds far more effectively than clean hair. The result is a lifted, rounded silhouette that makes fine hair look dramatically fuller.
- Section off the crown area (roughly from ear to ear) and clip the rest out of the way.
- Backcomb each section at the crown by holding hair straight up and brushing downward toward the root with a fine-tooth comb or teasing brush.
- Spray each teased section lightly with a flexible-hold hairspray as you go to lock in the volume.
- Smooth the very top layer gently with a boar bristle brush, leaving the teased section beneath intact.
- Release the rest of your hair and style it into whatever shape you prefer — down, half-up, or pinned back.
- Secure any lifted sections with a single bobby pin from each side if needed for longevity.
- Dirty hair naturally holds backcombing for hours longer than freshly washed hair, making this style a true “day-two special.”
9. The Braided Headband
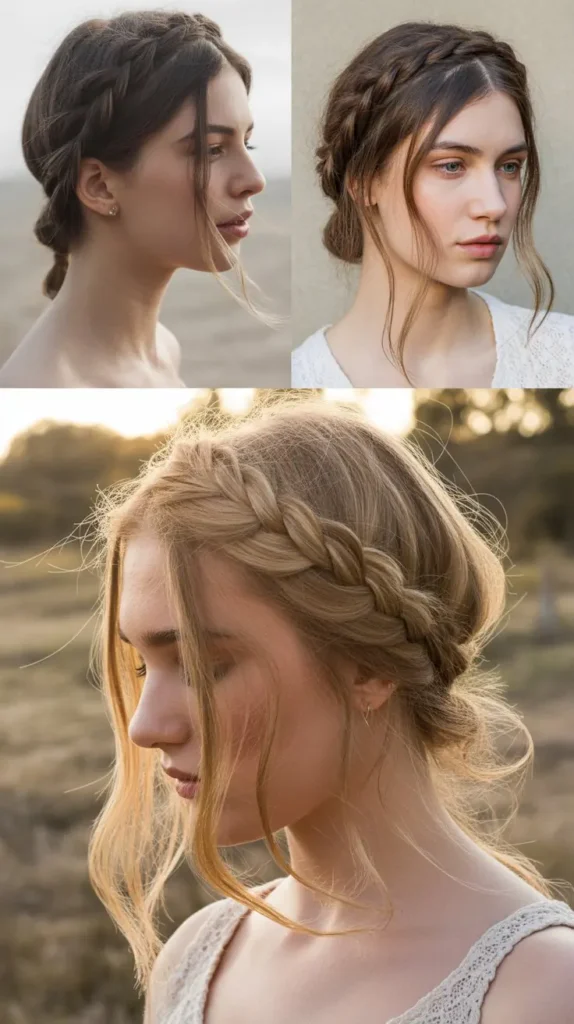
The braided headband style takes a slim braid from one side of the head and pins it across the top like a headband — instantly pulling hair back while adding textural interest and the illusion of a fuller hairline.
Dirty hair braids with better grip and the braid stays flat against the head without slipping. This is a practical, beautiful style for thin hair.
- Take a small section of hair from just behind one ear, roughly an inch wide.
- Braid this section in a simple three-strand braid all the way to the ends and secure with a tiny elastic.
- Drape the braid across the top of your head like a headband, pulling it gently over the crown.
- Pin the braid into place with bobby pins that match your hair color, hiding them beneath the braid for a seamless finish.
- Tuck the end of the braid under the hair at the opposite ear and pin it out of sight.
- Loosen the rest of your hair slightly or style it in waves beneath the braided band for contrast.
- The braided section frames the face and draws attention to the crown, making the whole head look fuller.
10. The Faux Bob Tuck
The faux bob is one of the cleverest dirty-hair styles for thin hair because tucking the length under creates the illusion of a blunt, voluminous bob without cutting a single strand.
Long thin hair often looks very flat when worn down, but tucked up it reads as thick and full. This style is also surprisingly quick and easy to achieve.
- Flip your hair forward and gather all of it into a low ponytail at the nape, but don’t tighten it fully.
- Fold the ponytail upward toward the back of the head, tucking it under the hair at the nape.
- Secure the tucked section with bobby pins inserted upward through the fold so they’re hidden from view.
- Pull the outer layer of hair down over the pins to completely cover them for a seamless finish.
- Adjust the length of the “bob” by pushing the fold higher or lower until you hit the chin or jaw length you want.
- Style the visible top section with a slight wave or texture spray for a polished lived-in finish.
- The blunt edge of the faux bob creates the optical illusion of much thicker, denser hair than a long style would.
11. The Piecey Pixie Texture
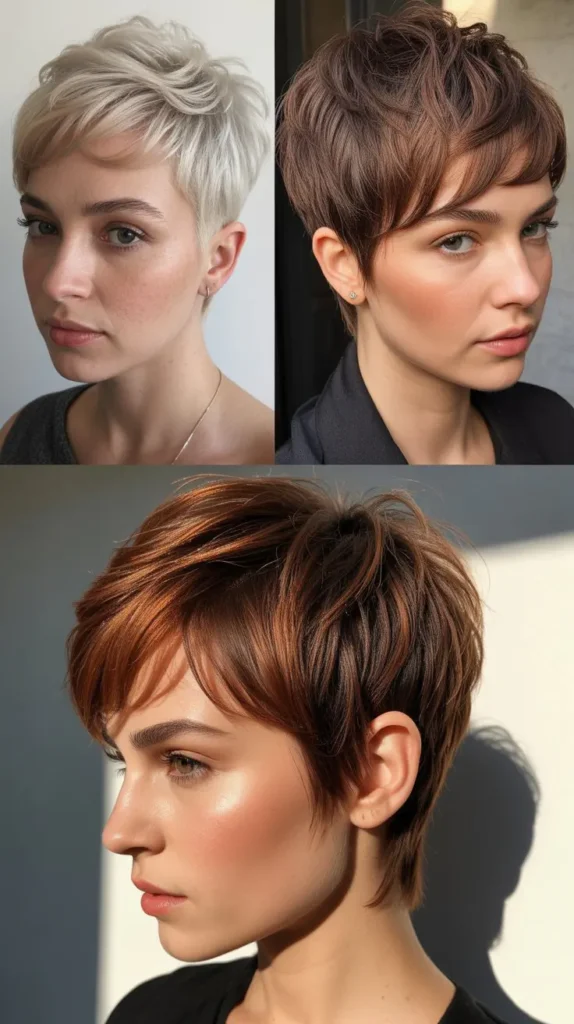
If you have a pixie cut, dirty hair is genuinely your best friend because the natural oils give each piece definition, separation, and a lived-in edginess that looks intentional and full.
A textured pixie on day-two hair has far more visual interest than one that’s freshly washed and flat. This style suits bold, confident personalities.
- Work a tiny amount of pomade or paste through dry fingertips and then through the hair in random directions.
- Point sections upward at the crown and temple to add height, which visually widens the look of the hair overall.
- Separate pieces at the fringe so they fan out slightly rather than clumping together in a flat strip.
- Twist small sections and press them into different directions for a deliberately deconstructed, artistic finish.
- Leave the nape and sides sleeker while keeping the top section deliberately tousled for contrast.
- Finish with a light-hold flexible spray to keep everything in place without flattening the texture.
- The dirtier the pixie, the more interesting and intentional it looks — unwashed hair is the secret ingredient here.
12. The Waterfall Braid
The waterfall braid is a visually stunning style that appears far more complex than it actually is, and it’s tailor-made for thin hair because the “waterfall” sections cascade down and create layers of visual depth.
On dirty hair, the braid holds its position without pins sliding and the cascading sections have beautiful natural wave from previous styling. This is a perfect weekend or event hairstyle.
- Start a regular French braid from one side of the head at the temple, moving horizontally across the back of the head.
- When it’s time to add a new section, instead of incorporating the dropped strand into the braid, let it fall freely downward.
- Pick up a new strand from the hairline above to replace the dropped one and continue braiding across.
- Continue this pattern all the way to the opposite side of the head, dropping sections and picking up new ones.
- Secure the end with a small elastic or bobby pin hidden behind the ear.
- Gently loosen each braided stitch by pulling the panels slightly to make the braid look bigger and fuller.
- The waterfall effect creates layers of flowing hair that make even very fine hair look beautifully abundant.
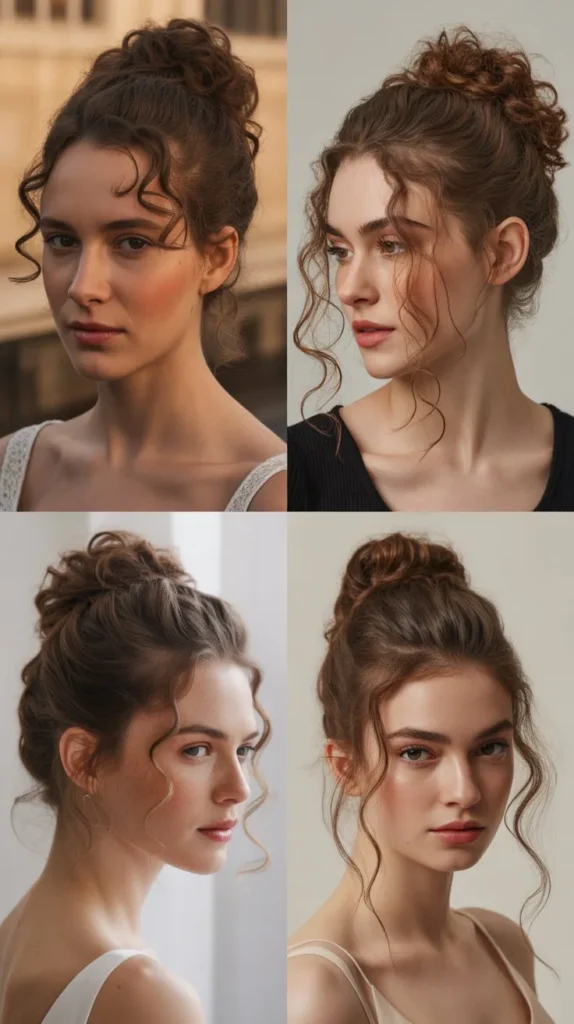
13. The Pineapple Updo
The pineapple updo is named for the topknot shape that resembles a pineapple crown, and it’s one of the most flattering styles for thin hair because all the volume is concentrated at the very top of the head.
This updo creates impressive height and fullness using the same hair that falls flat when worn down. Day-two or three hair is ideal.
- Tip your head forward and gather all of your hair up toward the very top of your head.
- Secure it with a loose, soft hair tie right at the crown — don’t pull it tight or the volume will collapse.
- Fan the gathered hair outward in all directions at the crown so it spreads wide like a pineapple top.
- Tease the gathered section lightly with your fingers or a wide-tooth comb to maximise the spread.
- Pull a few strands down around the temples and nape to soften the look and add romantic detailing.
- Leave the ponytail/topknot loose rather than coiling it — the spreading loose hair reads as full and abundant.
- The height of the pineapple placement adds visual length to the head and draws attention away from fine strands.
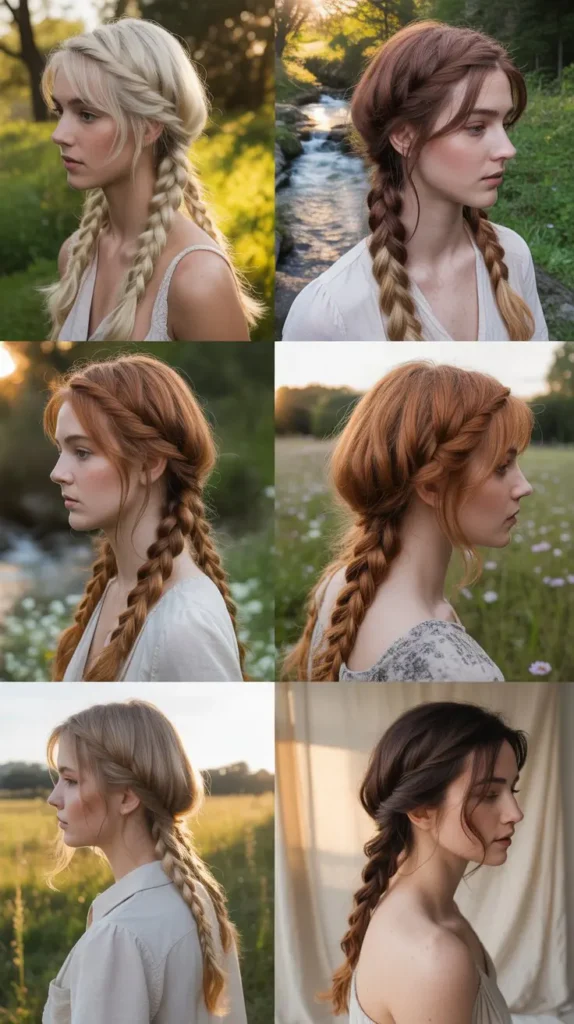
14. The Undone Side Braid
A side braid is one of the most flattering styles for thin hair because draping it over one shoulder makes the braid appear much thicker than a back-centered braid would.
When pancaked and loosened on dirty hair, a side braid looks full, romantic, and effortlessly styled. This is the definition of “beautiful without trying.”
- Gather all of your hair to one side of your head and hold it loosely in front of your shoulder.
- Begin a loose three-strand braid starting as high up near the ear as possible to maximize length.
- Keep each cross deliberately loose rather than tight — a loose braid looks thicker by default.
- Once finished, use both hands to gently pancake the braid by pressing the sides of each section outward.
- Work from the bottom of the braid upward, loosening each stitch as you go until the braid looks doubled in width.
- Secure the end with a small elastic and pull a few loops at the bottom loose for a relaxed tail finish.
- The side placement drapes the braid across the collarbone, making it look abundant and show-stopping.
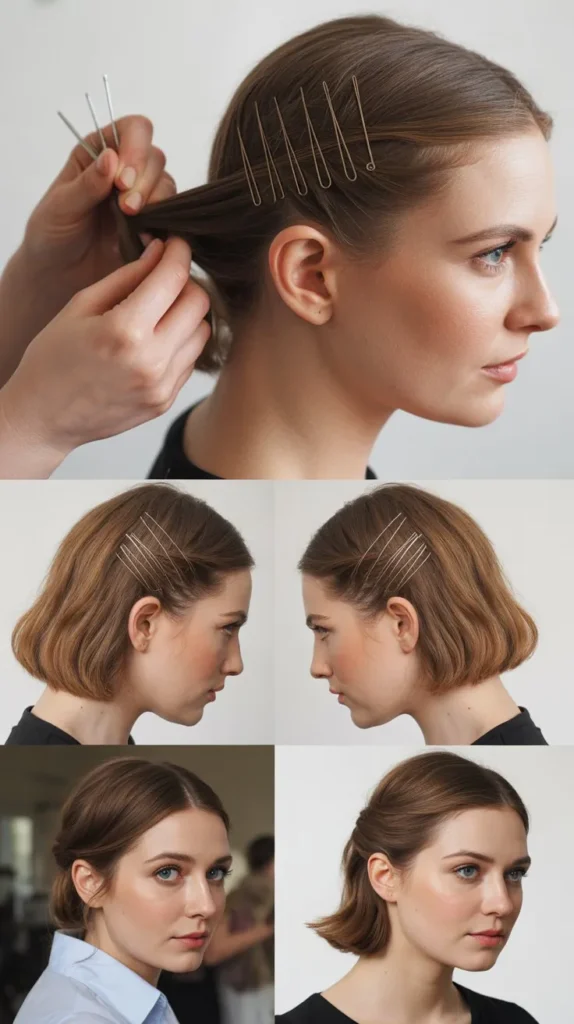
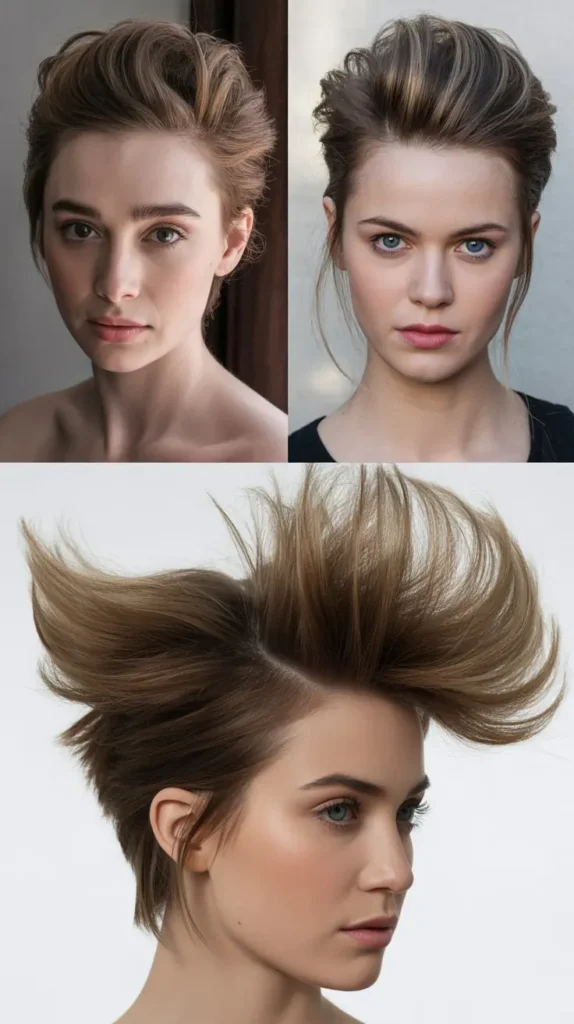
15. The Root-Lifted Blow Dry
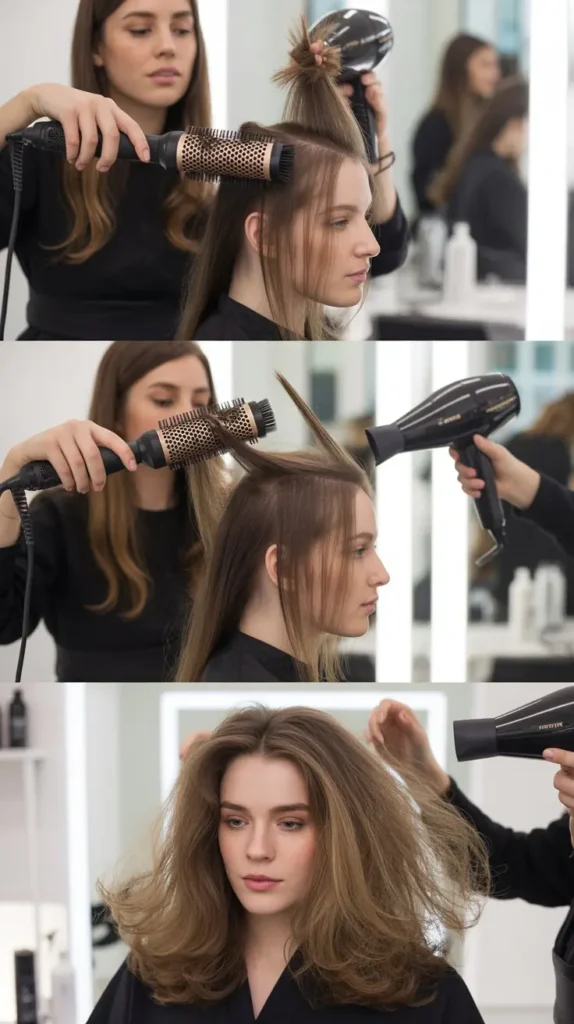
While not strictly a “dirty hair” style, knowing how to blow dry fine hair for maximum root lift is a foundational skill that gives every subsequent style more life.
Root lift makes thin hair look dramatically different — the silhouette becomes rounded, the hair appears denser, and styles last much longer. This technique works even better on day-one or day-two hair.
- Flip your head upside down immediately after applying a volumizing mousse to damp hair.
- Rough-dry the roots first while still upside down, using your fingers to lift and separate at the scalp.
- Once about 80% dry, flip back up and use a round brush to roll sections under or over for shape.
- Direct the nozzle of the dryer downward along the hair shaft to smooth the cuticle and reduce frizz.
- Focus on the roots of each section first before drying the mid-lengths and ends.
- Finish each section with a blast of cool air while the brush is still in place — this sets the volume in position.
- For more guidance on the best tools for fine hair blowouts, visit Allure’s fine hair guide.
16. The Pinned-Back Wave
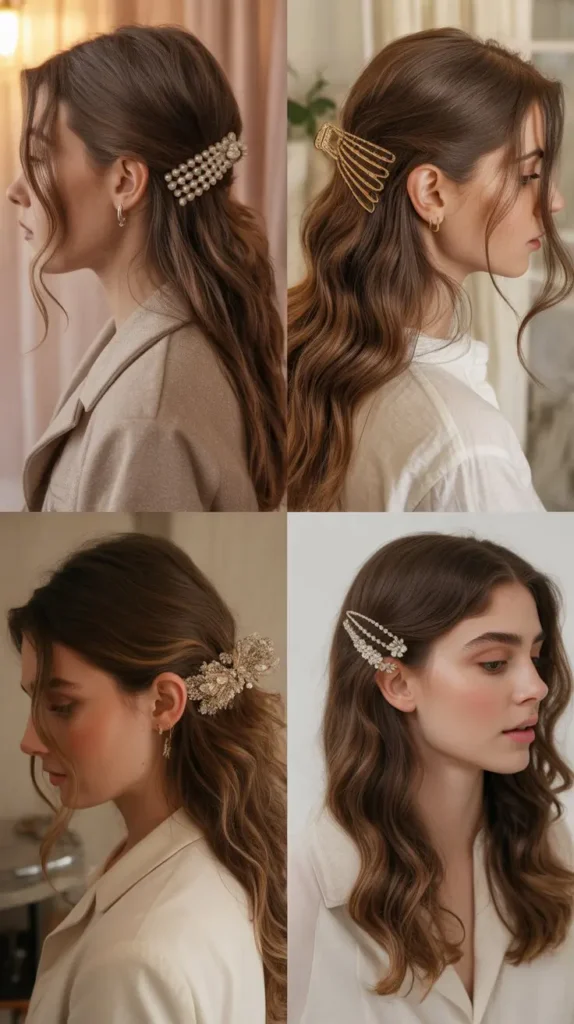
Pinning back one side of the hair with an embellished clip or sleek pin creates a half-up effect that gathers volume at the crown while the remaining hair hangs in a wave or curl pattern.
On dirty hair, the wave or curl that was created the previous day has the perfect relaxed quality for this style. It’s quick, chic, and works on any thin hair length.
- Style the night before with a loose curl or wave so that by morning you have beautiful relaxed texture.
- Part your hair on the side rather than the center to immediately add visual volume at the crown.
- Take a section from the heavier side of the part and clip it back behind the ear with a decorative barrette.
- Tease the root of the clipped section slightly before pinning so the hair doesn’t fall flat against the head.
- Adjust the clip so it sits slightly up from the ear, adding lift to the overall silhouette.
- Tousle the loose side of the hair so it falls in soft waves, contrasting the sleek pinned side.
- The contrast between the pinned and loose sides creates asymmetry that tricks the eye into seeing more hair overall.
17. The Reverse French Braid
Also called a Dutch braid, the reverse French braid sits on top of the hair rather than underneath it, creating a raised ridge that looks visually impressive and full.
For thin hair, this raised effect adds a sculptural quality that a flat style never could.
This braid style is eye-catching and surprisingly long-lasting on day-two or day-three hair.
- Start at the crown by dividing a small top section into three equal strands.
- Cross each outer strand under the center rather than over — this is what creates the raised effect.
- Pick up new hair with each cross from the sides of the head and incorporate it under the center strand.
- Keep tension moderate — not too loose (it will fall apart) and not too tight (it will flatten the braid).
- Continue to the nape of the neck and finish with a regular three-strand braid down the remaining length.
- Pancake the braid carefully by pulling each raised loop outward and upward to widen and thicken it.
- The raised, three-dimensional quality of the Dutch braid makes it one of the most volumizing braided styles available for thin hair.
18. The Claw Clip Updo
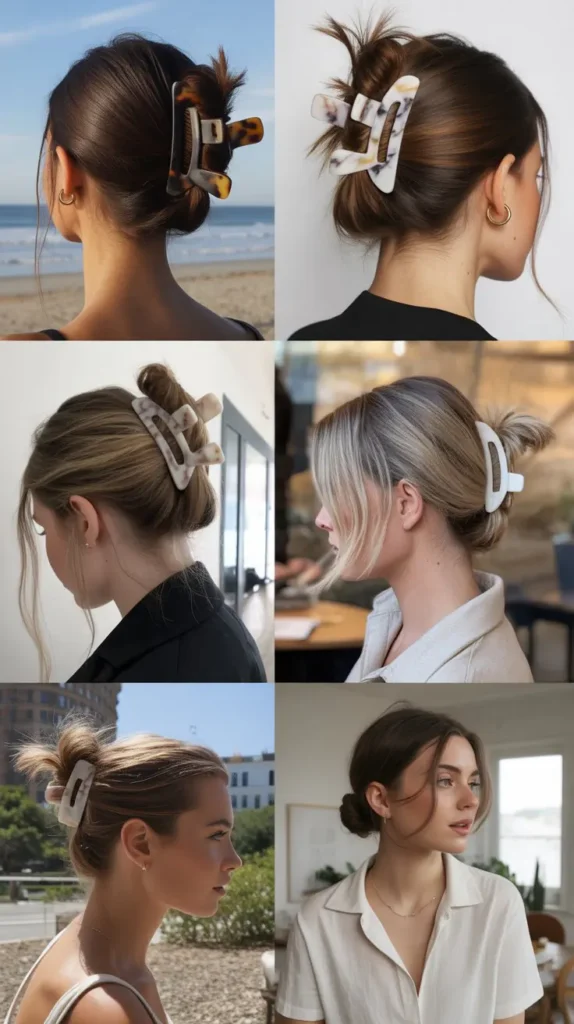
The claw clip updo has had an enormous resurgence and it’s beloved by thin-haired people everywhere because it creates an effortlessly full-looking updo using almost no effort.
The secret is in how you gather and fold the hair before clipping — a little chaos is your friend. Dirty hair works best because it holds the folds and tucks without slipping.
- Gather hair loosely in one hand at the back of the head, at nape level or mid-level depending on preference.
- Twist the gathered hair loosely two or three times upward.
- Fold the twist upward toward the crown of the head rather than coiling it tightly against the head.
- Clamp the claw clip over the folded hair, positioned toward the upper part of the fold so it lifts the style.
- Fan out the ends that stick out from the top of the clip so they spread upward and outward.
- Pull out several face-framing pieces at the temples and let them fall naturally.
- The loose, fanned-out top of the claw clip updo creates significant visual volume for even the finest hair.
19. The Teased High Ponytail
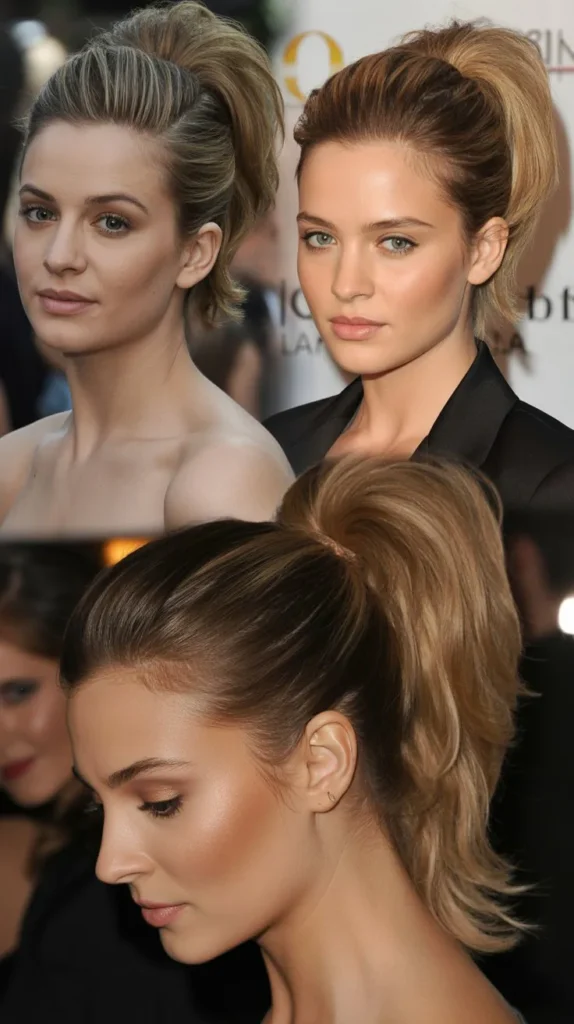
A teased high ponytail is the style that photographers and stylists reach for when they need maximum impact for thin hair.
The combination of height, teasing, and wrapping creates a ponytail that looks much fuller than it actually is. This is a signature style for events, nights out, and occasions where you want your hair to make a statement.
- Tilt your head back while gathering your hair so the ponytail sits at its highest natural point on the crown.
- Secure with a strong elastic and immediately backcomb the length of the ponytail aggressively.
- Work in sections, holding the ponytail straight up and backcombing from the ends toward the base.
- Spray each section with a medium-hold hairspray before backcombing the next section.
- Once fully teased, smooth just the very outermost layer with a soft brush for a polished surface over a voluminous base.
- Wrap a thin strand from the ponytail around the elastic and pin it for a finished look.
- The teased interior of the ponytail creates a thick, padded body that makes the entire style look dramatically fuller.
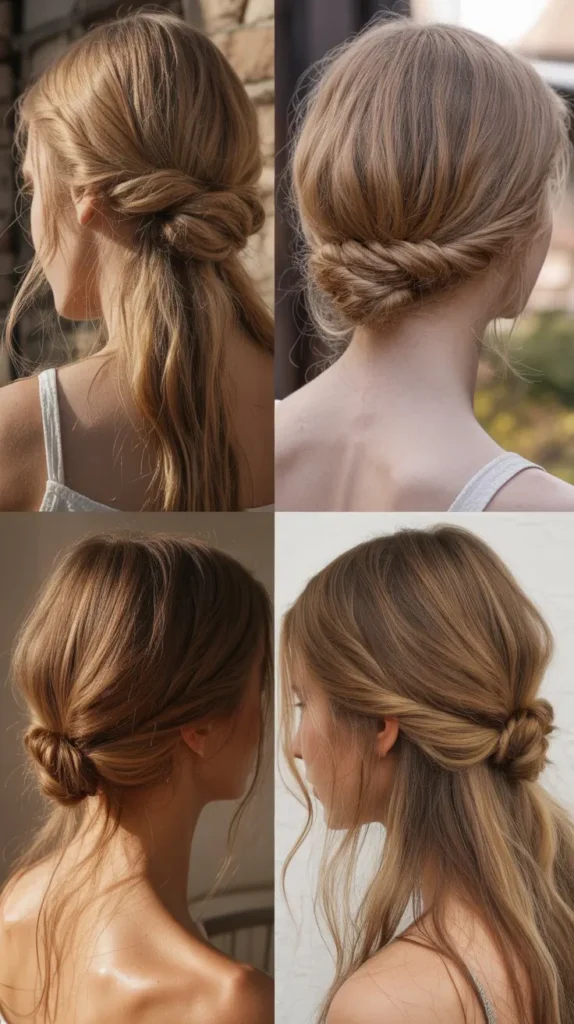
20. The Loose Chignon
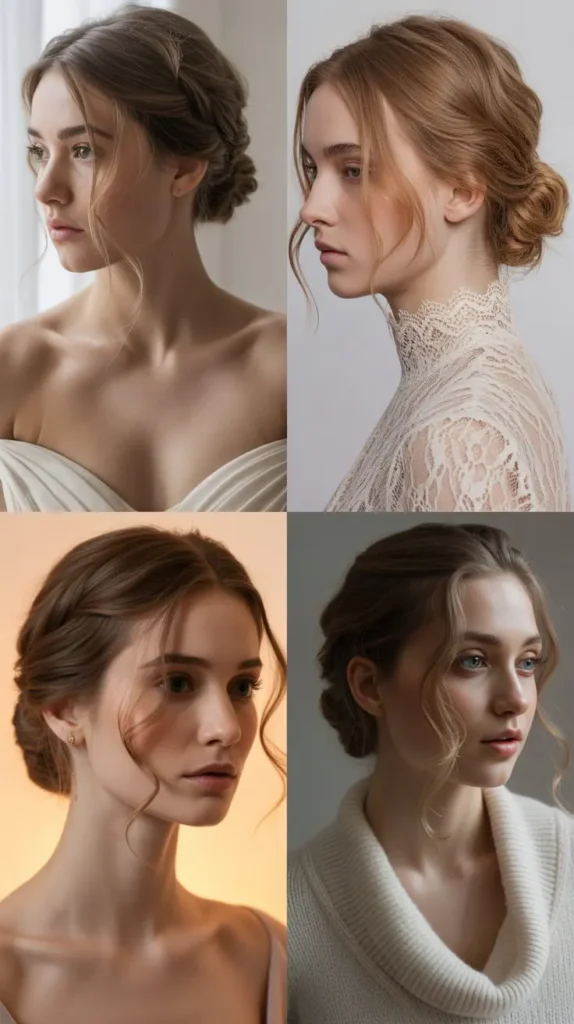
The loose chignon is a timeless, elegant style that translates beautifully to thin hair because the gathered, pinned loops create a multi-dimensional cluster that reads as thick and full from every angle.
Unlike a tight bun, the loose chignon has deliberate imperfection built in. Dirty hair gives it the best texture and hold.
- Gather hair into a low ponytail at the nape and secure loosely with an elastic.
- Divide the ponytail into two or three sections and twist each section loosely.
- Coil each twisted section around the base of the ponytail in different directions, overlapping them.
- Pin each coil with bobby pins pushed in at angles so they grip and stay hidden inside the style.
- Pull the edges of each coil outward slightly to puff them up and create a fuller, rounder chignon shape.
- Loosen the top section by tugging gently at the hair between the ponytail and the crown.
- Pull delicate strands free around the hairline and nape for a soft, romantic, full-looking finish.
21. The Diagonal Twist
The diagonal twist is a sophisticated style where you gather hair in a diagonal sweep from one ear toward the opposite nape, creating a beautiful cross-head effect that adds visual complexity and fullness.
The angle of the gather creates natural volume lift on one side of the head. This style looks much more intricate than it actually is.
- Part your hair on the side and sweep the heavier section toward the back diagonally.
- As you gather, pick up sections from the hairline and incorporate them to create a loose diagonal French twist movement.
- Secure the gathered hair at the opposite nape with pins, leaving the ends loose or tucking them under.
- Loosen the gathered sections by pulling gently at the hair to create soft puffing along the diagonal line.
- Leave the lighter side of the part loose in waves or curls to contrast the gathered diagonal side.
- Secure any loose sections with discreet pins and soften the finish with a light-hold spray.
- The diagonal direction of the gather creates an architectural lift that adds instant volume to the crown and sides.
22. The Teased Voluminous Blowout
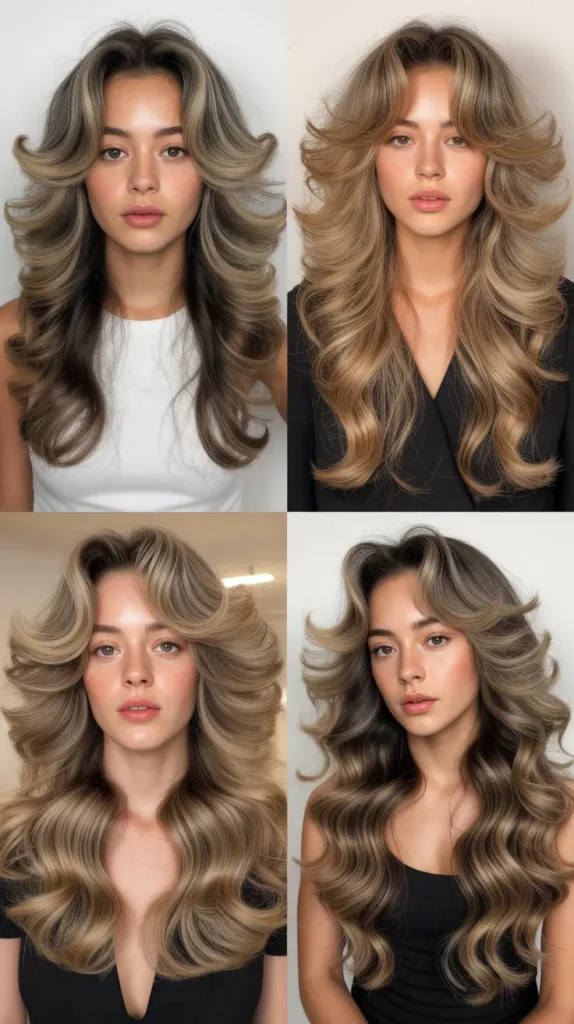
A voluminous blowout is the gold standard volume technique and when combined with strategic teasing and the right products, thin hair can achieve a full-bodied look that lasts all day.
Knowing the correct technique makes all the difference. This style works particularly well on day-one to day-two hair.
- Start with a volumizing mousse worked through damp hair from root to mid-length (avoiding ends).
- Blow dry sections using a round brush, rolling each section under toward the face at the ends.
- Focus heat at the roots of each section to lift them off the scalp before styling the lengths.
- Once dry, take the top crown section and backcomb it thoroughly with a teasing brush.
- Mist each teased section with a flexible hairspray before moving to the next.
- Smooth the top layer only of the crown with soft strokes of a boar bristle brush.
- Finish with a lightweight shine spray from mid-lengths to ends to add healthy luminosity without weight.
23. The Bubble Ponytail
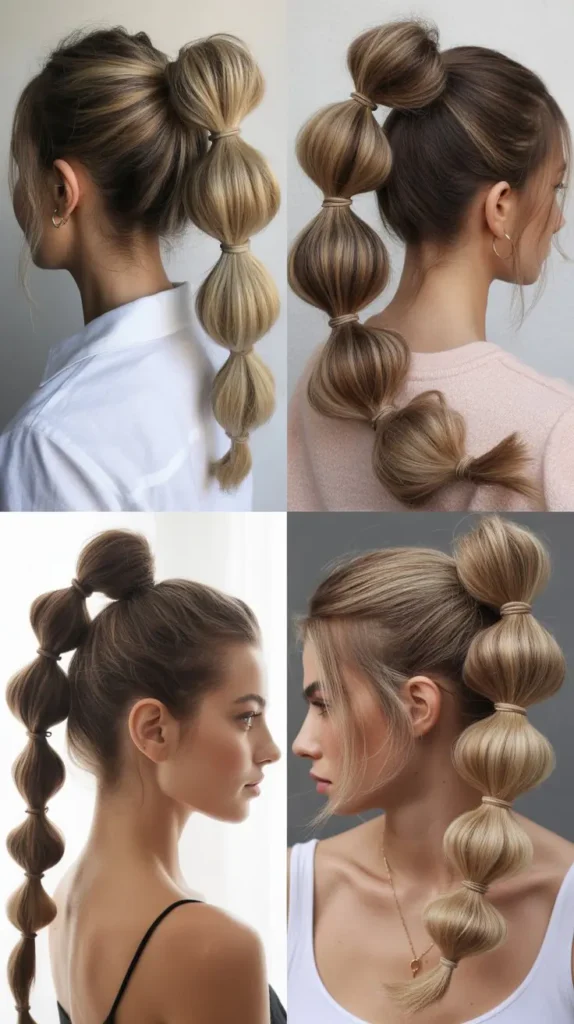
The bubble ponytail is a trend that’s incredibly flattering for thin hair because the technique of adding multiple elastics and puffing each section between them creates the illusion of a dramatically thick, full ponytail.
The bubbled sections read as mass and volume even when there isn’t much hair to work with. This is a fun, youthful style that works on any length.
- Start with a standard high or mid ponytail secured at your preferred height.
- Add a second elastic about 1.5 to 2 inches below the first and puff the section between them outward.
- Continue adding elastics every 1.5 to 2 inches all the way down the ponytail length.
- After each elastic is added, grip the hair on either side of the section above and gently pull it outward.
- Each section should look round and bubble-like — the more you puff, the thicker the ponytail appears.
- Leave the very end in a small loop or leave ends loose for a casual finish.
- Dirty hair’s natural texture and grip keeps each bubble puffed outward rather than falling flat between elastics.
24. The Faux Hawk Updo
The faux hawk is a creative, edgy updo that takes thin hair in a bold direction, using strategic pinning to create a lifted center ridge that mimics a mohawk silhouette.
The divided and pinned sections create fullness through structure and architecture. Dirty hair’s grip is essential for keeping the pinned sections in place.
- Part your hair into three sections — a wide center section and two side sections.
- Take each side section and gather it upward toward the center, pinning it along the center part with bobby pins.
- Overlap the pinned sections slightly and ruffle them upward so they create a raised ridge of hair down the center.
- Backcomb the center ridge lightly to give it additional height and texture.
- Tuck or pin the ends at the nape into a small tucked finish or leave them loose depending on preference.
- Spray the finished ridge with a medium-hold spray to keep it lifted throughout the day or night.
- The architectural ridge of the faux hawk creates dramatic visual volume without needing a thick mane of hair.
25. The Twisted Half-Up with Volume
This style combines a half-up element with strategic twisting and teasing at the crown to create a relaxed but voluminous look that works perfectly on dirty hair.
It’s one of those styles that genuinely looks better on day-two hair than it ever could on freshly washed locks. The twist lifts the crown naturally.
- Take a generous section from the crown — larger than you think you need.
- Backcomb this crown section thoroughly before twisting it for maximum base volume.
- Twist the section loosely backward toward the center back of the head and pin it with crossed bobby pins.
- Fan the twisted section outward once pinned so it covers the pins and looks wide and full.
- Pull the pinned section gently upward before fully securing to create crown lift.
- Leave the lower half of the hair loose in waves or relaxed straight for contrast.
- Finish the half-up area by pulling soft face-framing sections free at each temple.
26. The Ribbon Braid
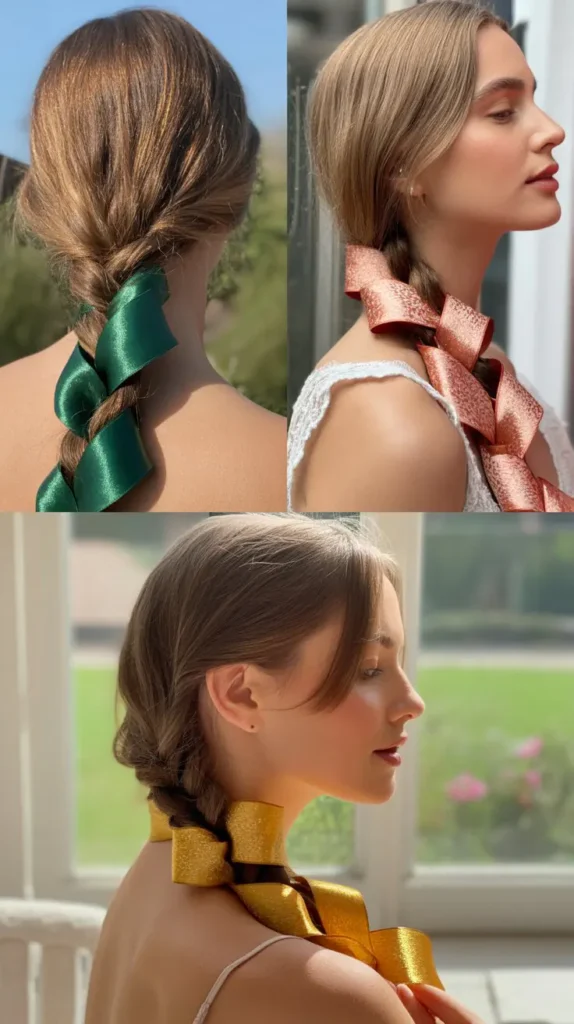
Incorporating ribbon or fabric strips into a braid adds color and visual bulk to thin braids instantly, making even the slimmest braid look full and intentional.
The ribbon weaves through the sections to add texture and apparent thickness. This is a creative, customizable style that suits many occasions from casual to festive.
- Choose a ribbon in a color that complements your hair — satin, velvet, or grosgrain all work beautifully.
- Cut the ribbon to roughly twice the length of your hair so you have enough to weave throughout.
- Begin braiding your hair with the ribbon incorporated as a fourth “strand” running alongside one of the three hair sections.
- Weave the ribbon by crossing it over and under the hair sections as you braid, letting it naturally twist through.
- Adjust the ribbon’s visibility — more crossing means more ribbon visible, creating more the appearance of thickness.
- Secure the end with an elastic and tie the ribbon ends in a small bow or tuck them under.
- The added visual mass of the ribbon makes the finished braid appear significantly thicker than a hair-only braid.
27. The Slick-Back with Texture at Ends
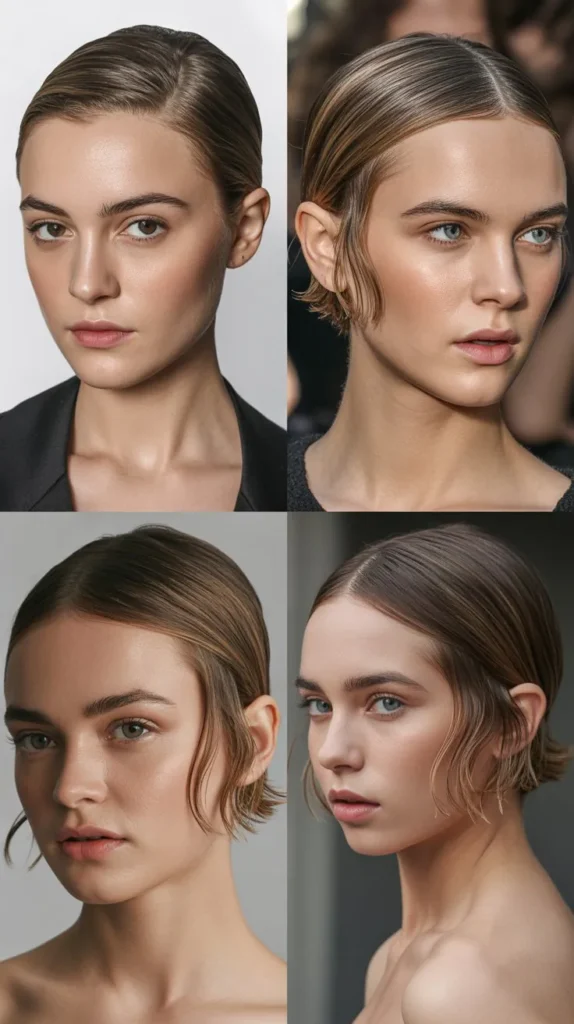
This sophisticated style takes thin hair and channels a sleek, controlled look at the top while leaving the ends deliberately tousled for contrast.
The slick-back actually creates the illusion of more hair because the flat roots draw attention to the volume at the ends. This is a polished yet modern style.
- Apply a light gel or pomade to the crown area only, using a fine-tooth comb to slick hair smoothly back from the face.
- Comb all sections back tightly from the hairline toward the crown and nape for a sleek, controlled surface.
- Secure with a small clip at the nape if hair is too short to tuck, or allow the slicked sections to transition into a natural fall.
- Leave the ends completely unstyled or add texture spray to them for a deliberately contrasted, tousled finish.
- Spray the slicked top section with a light flexible hold spray to lock in the smoothness.
- Allow flyaways at the hairline on days two and three — these add softness and stop the look from being too severe.
- The contrast between controlled top and textured ends gives the overall style a sense of depth and layering.
28. The Rolled Updo
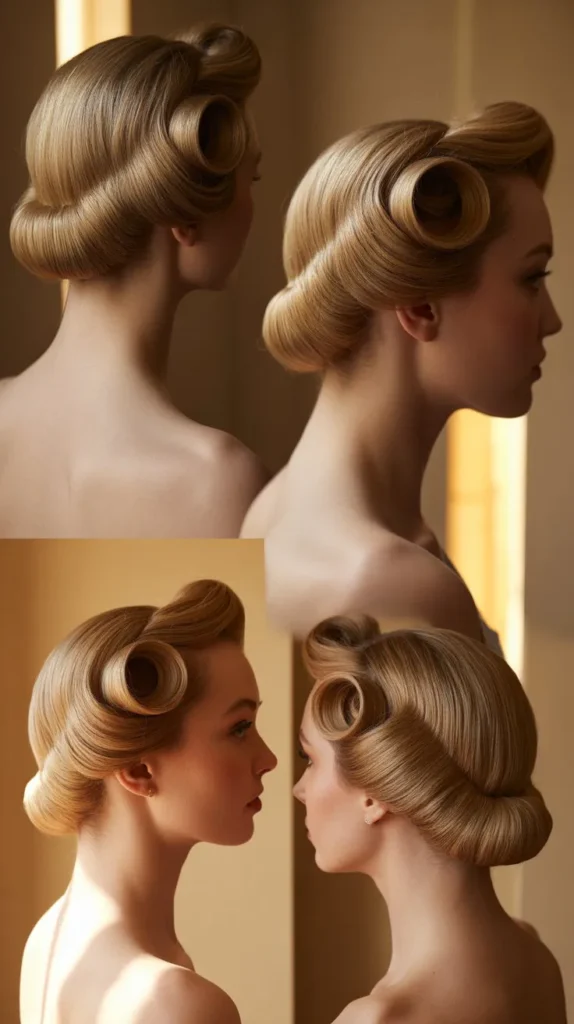
The rolled updo is a classic Hollywood technique where sections of hair are rolled under or over and pinned to create a structured, voluminous shape.
It creates the appearance of significantly more hair because the rolls add three-dimensional depth. Dirty hair holds rolls without bobby pins slipping throughout the day.
- Divide your hair into two sections — top and bottom — clipping the top out of the way.
- Take the lower section and roll it under toward the back of the head in a smooth cylinder, pinning it in place.
- Take sections from the top and roll them either over or under in the same direction and pin them overlapping the first roll.
- Adjust each roll’s width by gently pulling at the sides — wider rolls look thicker and more voluminous.
- Leave the very front sections loose to frame the face, then tuck them back into the sides of the roll with pins.
- Smooth the surface with a light brush stroke and set with a medium-hold spray.
- The cylindrical rolls create a structured, dimensional updo that reads as full and thick from every angle.
29. The Headscarf Wrap
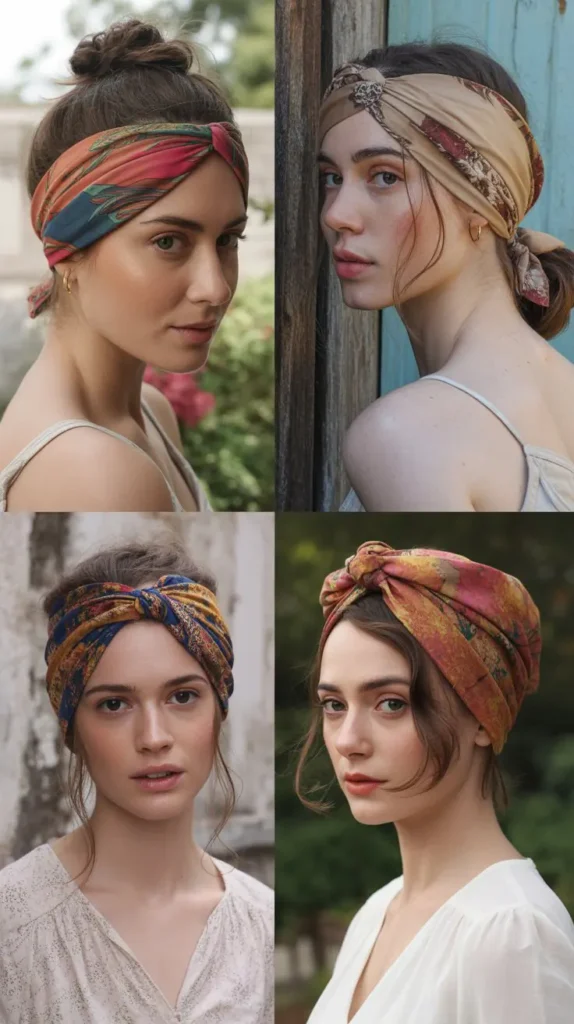
A headscarf is one of the most transformative tools for thin hair — it adds immediate visual volume, covers root areas, and elevates even the simplest hairstyle into something that looks deliberate and full.
The gathered fabric bulk at the top of the head creates impressive height and perceived thickness. This style has strong vintage and bohemian roots.
- Choose a silk or satin scarf roughly 20–30 inches square for the best wrapping results.
- Fold the scarf diagonally into a long strip, about 2–3 inches wide.
- Place the center of the scarf at the nape of the neck and bring both ends up and over the top of the head.
- Cross the ends over each other at the forehead and bring them back toward the nape, tying in a secure knot.
- Tuck the knot under the nape section and adjust the scarf so it sits evenly on the head.
- Allow some hair to peek out at the front and back for a more relaxed, full-looking finish.
- Vary the knotting position — a knot at the top of the head creates the most volume and height.
30. The Top Knot with Tendrils
The top knot is already a favorite for thin hair, but adding deliberately placed tendrils elevates it from a simple hairstyle into a full, romantically styled look.
The tendrils framing the face add the illusion of a fuller hairline and more hair overall. Dirty hair gives the top knot the grip it needs to stay tall and rounded.
- Pull hair up into a high ponytail at the very crown of the head and secure firmly.
- Before securing, pull out 2–3 face-framing tendrils from each temple and a few from the nape.
- Tease the ponytail before twisting to add internal volume to the knot.
- Twist the ponytail and wrap it in a loose coil around its own base, pinning as you go.
- Pull sections of the knot outward so it looks wide and full rather than tight and compact.
- Curl each tendril with a small curling iron or wrap around a pencil for a corkscrew finish.
- Apply a light shine serum to the tendrils so they look defined and intentional rather than like random stray hairs.
31. The Zigzag Part
Simply changing the direction of your part can add surprising volume to thin hair.
A zigzag part breaks up the flat line of a traditional center or side part, creating textural interest at the scalp that reads as fuller and more interesting. It’s one of the simplest, quickest tricks in the thin hair playbook.
- Use the pointed end of a rat-tail comb to create the zigzag — work slowly and carefully from front to back.
- Alternate the direction of each section of the zigzag by about an inch with each change in direction.
- Style the hair on either side of the zigzag in soft waves or loose curls for maximum impact.
- Spray the zigzag area lightly with a volumizing spray to lift the separated sections slightly off the scalp.
- Backcomb very gently right along the line of the zigzag to add slight lift at the part.
- Leave the part as the focal point by pulling hair loosely back on each side, letting the zigzag be visible.
- The irregular line of the part creates visual texture and makes hair appear thicker and less flat at the scalp.
32. The Fishtail Braid
A fishtail braid creates an intricate, woven texture that appears thick and complex even when made with fine hair.
The many overlapping strands and the herringbone pattern add visual density to thin hair that a simple three-strand braid can never match.
Fishtail braids on day-two or day-three hair hold their shape beautifully without slipping.
- Divide hair into two sections at the nape — equal halves from a center point.
- Take a very thin strand from the outer edge of the right section and cross it over to the left section, adding it to the inside.
- Repeat on the other side — take a thin strand from the outer left and cross it to the right.
- Continue this alternating pattern all the way down the length of the hair.
- Keep each picked strand thin — the thinner each strand, the more intricate and fuller the braid appears.
- Pancake the finished braid by pulling each row outward to widen and thicken the overall braid dramatically.
- Secure loosely at the end and pull a few pieces free around the face for a romantic, full finish.
33. The Barrel Curl Blowout
Barrel curls created with a round brush during blow-drying give thin hair a theatrical, full-bodied look that is difficult to achieve any other way.
Each barrel-curled section of hair gains body and bounce that persists through day two and day three as a beautiful wave. This is a time investment that pays off for several days.
- Section hair into four or more sections, clipping all but the bottom one out of the way.
- Take a 1–2 inch subsection and place a round brush underneath it at the mid-length.
- Roll the brush under the hair toward the roots while directing the hairdryer nozzle along the brush.
- Hold at the roots for several seconds on high heat to set the volume at the base of the section.
- Roll slowly down toward the ends, creating a barrel-shaped curl around the brush.
- Hold with cool air for 5–10 seconds before releasing — this sets the curl for significantly longer wear.
- Work through all sections systematically, always directing the brush upward at the roots for maximum lift.
34. The Pinned Curl Updo
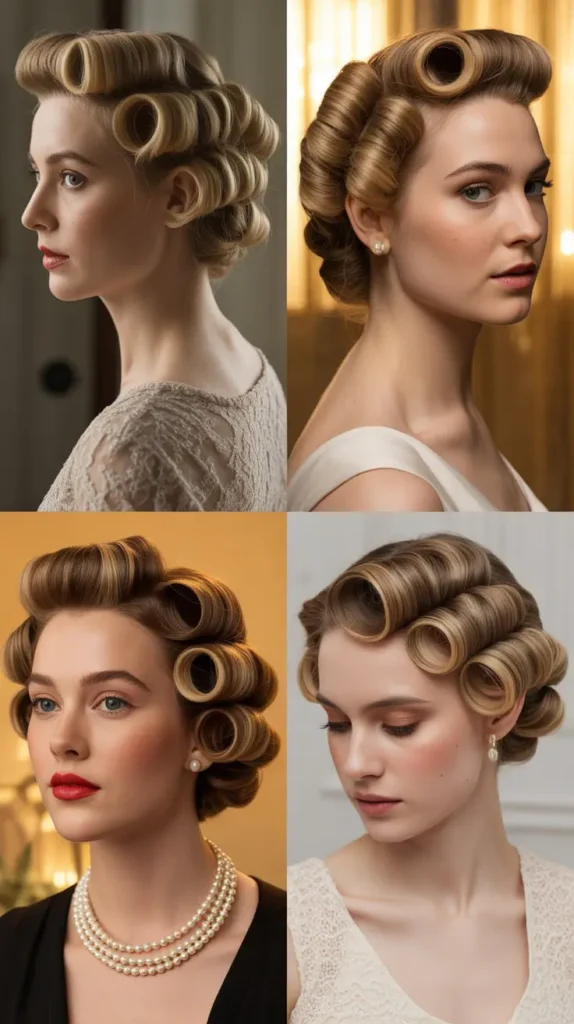
Pinned curls create a vintage-inspired updo that suits thin hair beautifully because each individually pinned curl adds a separate, rounded shape to the overall silhouette — and many small rounded shapes read as more volume than one flat gathered style would.
This style is ideal for events, weddings, and formal occasions.
- Curl all of your hair with a medium-barrel curling iron and allow curls to cool completely before styling.
- Starting at the nape, take one curl, coil it back toward the scalp, and pin it flat with bobby pins in an X pattern.
- Work your way up toward the crown, pinning each curl individually in the same direction.
- Vary the position of each pinned curl slightly so they overlap and create a layered, dimensional cluster.
- Leave a few curls unpinned at the front for face-framing softness and to add the illusion of more hair.
- Set the finished style with a light-hold finishing spray to keep the pins secure and the curls defined.
- The cluster of pinned curls creates a sculptural, full-looking updo that works beautifully on even the finest hair.
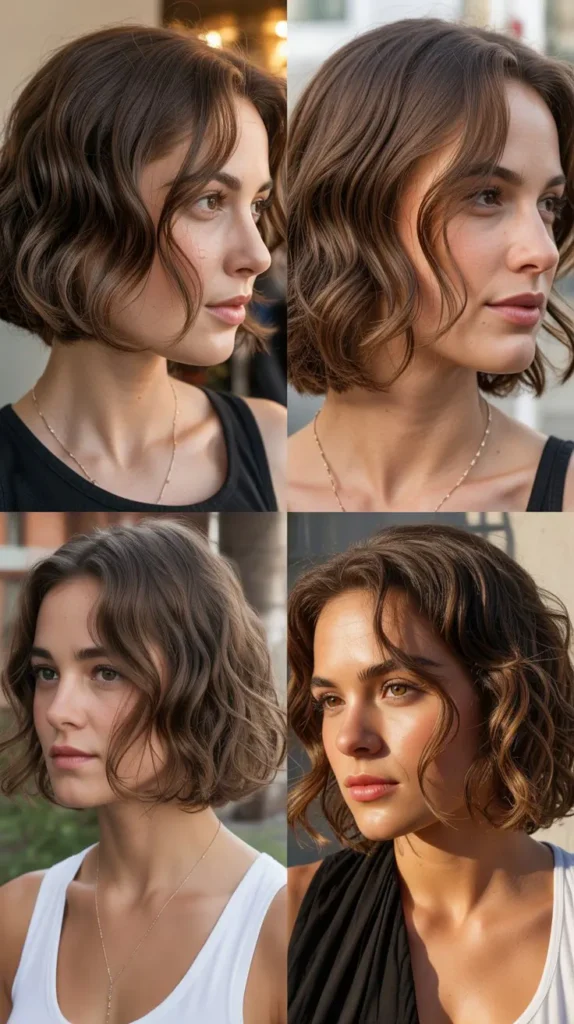
35. The Beach Wave Bob
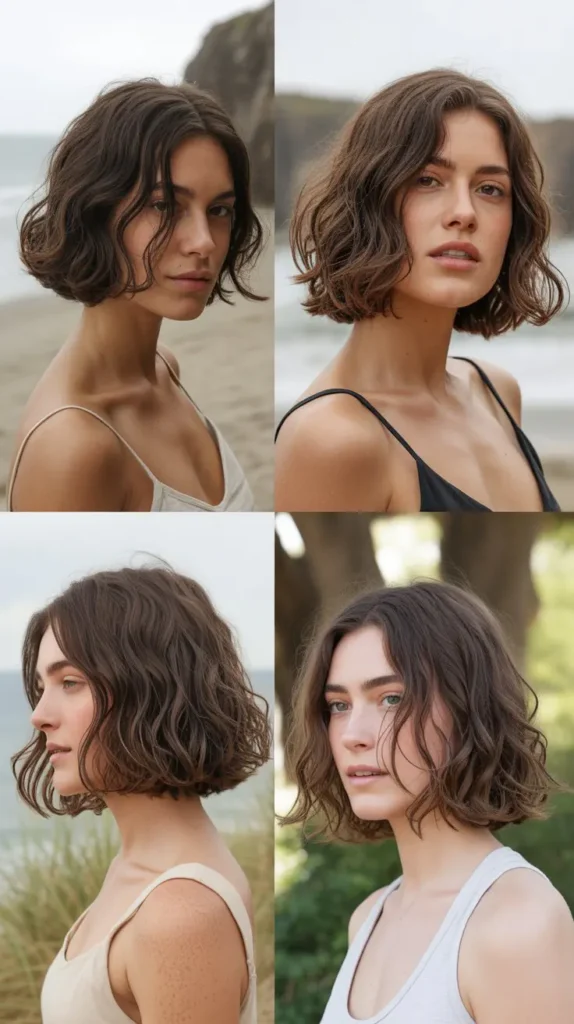
If you have a shorter bob cut, the beach wave finish is one of the most volumizing styles you can achieve because waves in short hair create width and the appearance of thickness without needing length to support it.
A bob with beach waves on dirty hair looks incredibly full and intentional. This is a powerhouse style for fine-haired bob wearers.
- Apply a sea salt spray to dry day-two hair, scrunch through from roots to ends.
- Take horizontal sections of the bob and wrap each one around a small curling iron in alternating directions.
- Keep the iron horizontal rather than vertical to create waves rather than ringlets.
- Release each curl immediately and scrunch it upward while it’s still warm to set the texture.
- Once all sections are done, flip the hair forward and shake the roots vigorously with fingertips.
- Flip back up and scrunch one more time with a texturizing spray for extra grit and hold.
- Avoid combing or brushing — use only fingers to maintain the wave’s width and volume.
36. The Micro Braid Crown
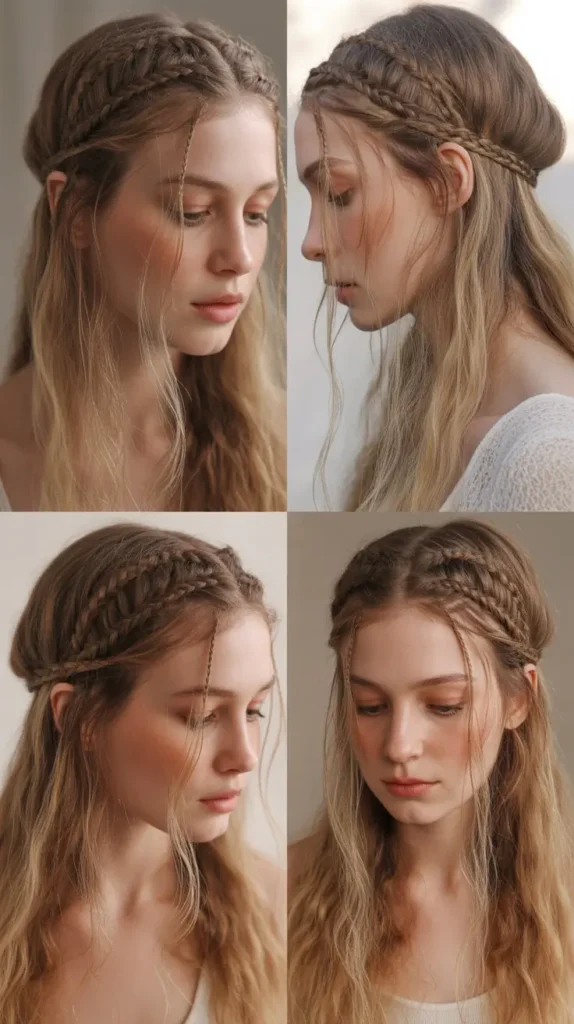
Micro braids around the hairline create a boho crown effect that draws attention to the frame of the face and adds textural interest that makes the overall hairstyle look more complex and full.
Even with very fine hair, a few small braids placed strategically around the head create significant visual impact. This style pairs beautifully with loose waves or curls in the rest of the hair.
- Take a very small section from just behind the hairline at one temple — roughly a quarter inch wide.
- Braid it into a thin three-strand braid all the way to the end, securing with a tiny elastic.
- Repeat 2–3 more micro braids along the same temple area, or move around to different sections of the hairline.
- Drape or pin the micro braids back into the rest of your hair, overlapping them slightly for a woven crown effect.
- Secure at the back with a pin hidden beneath the rest of the hair.
- Style the remaining hair in loose waves or curls that complement the textural interest of the braids.
- The micro braids create points of visual complexity that make the whole hairstyle look fuller and more layered.
37. The Deconstructed Updo
The deconstructed updo is perhaps the most liberating style for thin hair — it celebrates imperfection, embraces texture, and deliberately leaves pieces out in an artful, intentional way.
The “undone” quality makes thin hair look deliberately styled rather than accidentally flat. This is the ultimate dirty-hair, carefree-chic style.
- Gather your hair loosely at the back of your head in whatever direction feels natural.
- Twist sections randomly and pin them in overlapping clusters using bobby pins in several directions.
- Pull generous pieces free from the cluster — around the hairline, at the nape, from the sides.
- Add texture spray to the loose pieces and scrunch them gently for a tousled, separated finish.
- Backcomb the pinned cluster slightly from underneath to push it upward and make it appear larger.
- Accessorize with a decorative pin or clip placed deliberately in the cluster for a finished, intentional touch.
- Resist the urge to perfect it — the more organic and imperfect the updo looks, the fuller and more beautiful fine hair appears.
Conclusion
Fine hair doesn’t have to mean flat hair — not when you have the right styles in your toolkit. From quick messy buns to intricate waterfall braids, every single idea in Thin Hair?
37 Dirty Styles That Add Instant Volume proves that working with your hair’s natural texture — especially on non-wash days — is the secret to looking fuller, more polished, and effortlessly put together.
The key takeaway is simple: embrace the texture, skip the unnecessary wash, and let your hair’s natural oils work in your favor. With these 37 styles at your fingertips, every day is a great hair day.